VC MFC编程实例
- 格式:ppt
- 大小:203.00 KB
- 文档页数:13
VS2008下计算器的MFC编程实现简单的计算器编程,完全在VS2008下实现,主要用于熟悉VS2008的功能。
谨以此分享给和我一样初学MFC的朋友们。
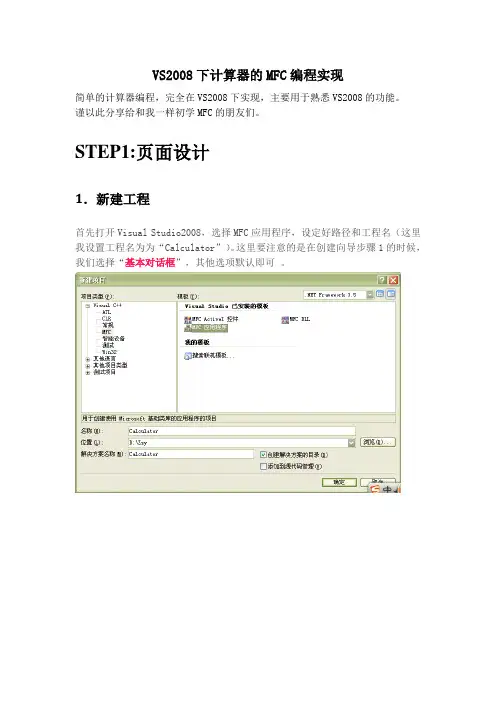
STEP1:页面设计1.新建工程首先打开Visual Studio2008,选择MFC应用程序,设定好路径和工程名(这里我设置工程名为为“Calculator”)。
这里要注意的是在创建向导步骤1的时候,我们选择“基本对话框”,其他选项默认即可。
之后我们可以点击完成便看到以下界面:此时我们把当前页面上原配的控件按Delete全部清除(如下图)2.添加控件接着我们按照MFC自带的控件选项进行我们本次计算器的控件添加。
点击右侧的工具栏按钮(以下是控件)我们在原先清空的界面中依次用上图控件画出一个基本的计算器页面(如下图)。
影响用户的心情。
3.修改空间ID和Caption上图各控件类型如下:Edit ControlButtonGroup Box:选择其中一个GroupBox,右键单击,选择[属性]。
在右边显示属性对话框。
每个控件“属性”都有属于它自己的ID,默认的Group Box的ID为IDC_STATIC,而且Cap当然我们为了“顾名思义”,对控件ID进行修改成我们容易辨认的(也可以不改),添加完控件并修改ID。
4个Group Box的ID分别修改为IDC_STATIC_FRAME ,IDC_STATIC_IN, IDC_STATIC_RESULT, IDC_STATIC_BUTTON 控件Edit Control和Button也按相同的办法处理。
ID设置完成可以在“Resourse.h”中查看。
完成修改ID后,就需给控件添加消息响应了。
在属性对话框的上方点击闪电“”图标,添加控件事件。
如对于按钮“”,点击“”点击下拉键头,添加控件事件,页面自动切换到代码的编辑页面,如“添加OnBnClickedButton5”MFC默认下了的响应信息都为On_开头。
int Str2Hex(CString str, UINT32* data)实现的功能是将str(16进制)->数字。
比如11转换成17。
21转换成33。
Visual C++通用范例开发金典\Visual C++通用范例开发金典ch011. IDC_STATIC1:void CCStatic2Dlg::OnStatic1(){// TODO: Add your control notification handler code hereCString str;GetDlgItem(IDC_STATIC1)->GetWindowText(str);if("Hello,World!"==str){GetDlgItem(IDC_STATIC1)->SetWindowText("Visual C++!");}if("Visual C++!"==str){GetDlgItem(IDC_STATIC1)->SetWindowText("I like C++");}if("I like C++"==str){GetDlgItem(IDC_STATIC1)->SetWindowText("Hello,World!");}}2.BOOL CRadio_Button1Dlg::OnInitDialog()中的代码:CheckRadioButton(IDC_RADIO1,IDC_RADIO3,IDC_RADIO1);3.BOOL CButton3Dlg::OnInitDialog()中的代码:CheckRadioButton(IDC_RADIO1,IDC_RADIO3,IDC_RADIO3);CButton *ptn=(CButton *)GetDlgItem(IDC_CHECK1);ptn->SetCheck(1);在void CButton3Dlg::OnOK(){// TODO: Add extra validation hereCString str,strCtrl;int i;str="您的年级:";UINT nID1=GetCheckedRadioButton(IDC_RADIO1,IDC_RADIO3);GetDlgItemText(nID1,strCtrl);str=str+strCtrl;str=str+"\n你最喜欢的课程:";UINT nID2[4]={IDC_CHECK1,IDC_CHECK2,IDC_CHECK3,IDC_CHECK4};CButton *ptn;for(i=0;i<4;i++){ptn=(CButton *)GetDlgItem(nID2[i]);if(1==ptn->GetCheck()){ptn->GetWindowText(strCtrl);str=str+strCtrl;str=str+" ";}}MessageBox(str);// CDialog::OnOK();}4.void CCstatic1Dlg::OnOK(){if (static1.m_hWnd){static1.DestroyWindow();}else{static1.Create("生成的新的静态文本框",WS_CHILD|WS_VISIBLE,CRect(0,0,200,30),this,11);}// CDialog::OnOK();}5.void CCShrinkView::OnShrink(){// TODO: Add your command handler code hereCShrink_Dlg* pt1=new CShrink_Dlg;pt1->DoModal();}void CShrink_Dlg::OnButton1(){// TODO: Add your control notification handler code hereCString str;GetDlgItemText(IDC_BUTTON1,str);if("收缩<<"==str)SetDlgItemText(IDC_BUTTON1,"扩展>>");elseSetDlgItemText(IDC_BUTTON1,"收缩<<");static CRect rectLarge;static CRect rectSmall;if(rectLarge.IsRectNull()){CRect temp;GetWindowRect(&rectLarge);GetDlgItem(IDC_SHRINK)->GetWindowRect(&temp);rectSmall.left=rectLarge.left;rectSmall.top=rectLarge.top;rectSmall.right=rectLarge.right;rectSmall.bottom=temp.top;}if(str=="收缩<<"){SetWindowPos(NULL,0,0,rectSmall.Width(),rectSmall.Height(),SWP_NOMOVE|SWP_NO ZORDER);}else{SetWindowPos(NULL,0,0,rectLarge.Width(),rectLarge.Height(),SWP_NOMOVE|SWP_NO ZORDER);}}6.BOOL CCEdit_6Dlg::OnInitDialog()中的:CTime time;time=CTime::GetCurrentTime();m_time=time.Format("%x--%X");UpdateData(FALSE);void CCEdit_6Dlg::OnTimer(UINT nIDEvent){CTime time;time=CTime::GetCurrentTime();m_time=time.Format("%Y-%m-%d %H:%M:%S");UpdateData(FALSE);CDialog::OnTimer(nIDEvent);}7.只有一个例子,其它的仿照void CCEdit4Dlg::OnGreenRadio3(){colour = RGB(0,255,0);m_edit.SetFocus();}8.class CColorEdit : public CEdit自己新创了一个类HBRUSH CColorEdit::CtlColor(CDC* pDC, UINT nCtlColor){// TODO: Change any attributes of the DC hereCDC* dc = GetDC(); //获取画布对象CRect rect;GetClientRect(rect); //获取客户区域rect.InflateRect(3,3,3,3);//将客户区域增大3个像素CBrush brush (m_color);//创建画刷dc->FrameRect(rect,&brush);//绘制边框// TODO: Return a non-NULL brush if the parent's handler should not be called return NULL;}void CColorEdit::SetColorEdit(COLORREF color){m_color=color;}//m_color是CColorEdit的一个成员函数BOOL CCEdit_5Dlg::OnInitDialog()中的m_edit1.SetColorEdit(RGB(255,0,0));m_edit2.SetColorEdit(RGB(0,0,255));9.void CCEdit_1Dlg::OnButton1(){// TODO: Add your control notification handler code hereCString str;UpdateData(TRUE);if((strcmp(m_name,"张三")==0)&&(strcmp(m_password,"1113")==0)) str="密码正确,登陆成功!";else if((strcmp(m_name,"")==0)||(strcmp(m_password,"")==0)) str="请输入用户名或密码:";elsestr="用户名或密码错误:";MessageBox(str);}10.void CCEdit_2Dlg::OnChangeEdit1(){UpdateData(TRUE);// m_write="d\nyyy";m_read=m_write;UpdateData(FALSE);}11.CSpinButtonCtrl m_spinage;BOOL CSpinButtonDlg::OnInitDialog()中的:m_spinage.SetRange(1,100);m_spinage.SetBase( 0 );void CSpinButtonDlg::OnDeltaposSpin1(NMHDR* pNMHDR, LRESULT* pResult) {NM_UPDOWN* pNMUpDown = (NM_UPDOWN*)pNMHDR;// TODO: Add your control notification handler code hereUpdateData(TRUE);m_age=m_age+(float)pNMUpDown->iDelta;if(m_age<0) m_age=0;if(m_age>10) m_age=10;UpdateData(FALSE);*pResult = 0;}void CSpinButtonDlg::OnOK(){// TODO: Add extra validation hereUpdateData(TRUE);CString str;char *temp=new char;itoa(m_age,temp,10);str="结果显示:\n姓名:";str+=m_name;str+="\n年龄:";str+=temp;str+="\n年级:";str+=m_class;str+="\n电话:";str+=m_phone;MessageBox(str);//CDialog::OnOK(); }。


VC(MFC)开发OPENGL程序作者:李英江日期: 2006-08-10 19:07:00网站:转载请保留作者内容!利用使用VC开发OPENGL程序,运用MFC库,做一个简单例子我简单介绍一下图形接口,现在流行的两大图形接口Direct3D 和OpenGL,Direct3D主要是针对游戏,像starcaft星际争霸,它支持DX5.0以上的版本,但是不少游戏同时支持两种图形加速,如CS,魔兽争霸。
OpenGL主要是针对专业的图形应用,在军事,医学,GIS地理信息系统,动画(3dsmax,maya...),电影,等应用广泛,并且可以在不同的平台上应用,DX相对来说就只能限于Windows操作系统了。
1.运用MFC向导,生成一个单文档应用程序,不做任何事的MFC 框架程序。
2.视图类中添加窗口样式。
/************************************************************** *******/BOOL CMfc_basicView::PreCreateWindow(CREATESTRUCT& cs){// Add Window styles required for OpenGL before window iscreatedcs.style |= (WS_CLIPCHILDREN | WS_CLIPSIBLINGS | CS_OWNDC);return CView::PreCreateWindow(cs);}/************************************************************** *******/3.在afxcmn.h中包含OPENGL头文件。
/************************************************************** *******/#include <afxcmn.h>// MFC support for Windows Common Controls// Inserted these files for openGL#include <gl.h>#include <glut.h>#include <glu.h>#include <glaux.h>#endif // _AFX_NO_AFXCMN_SUPPORT/************************************************************** *******/4.视图类中 .h文件中加入四个public 成员变量/************************************************************** *******/HGLRC m_hRC; // Permanent Rendering ContextHDC m_myhDC; // Private GDI Device Contextint m_height; // Stores the height of the Viewint m_width; // Stores the width of the view/************************************************************** *******/5.视图类中右键添加一个BOOL成员函数SetupPixelFormat/************************************************************** *******/BOOL COglm_demoView::SetupPixelFormat(){GLuint PixelFormat;static PIXELFORMATDESCRIPTOR pfd= {sizeof(PIXELFORMATDESCRIPTOR),// Size Of This Pixel Format Descriptor1,// Version Number (?)PFD_DRAW_TO_WINDOW | // Format Must Support WindowPFD_SUPPORT_OPENGL | // Format Must Support OpenGL PFD_DOUBLEBUFFER, // Must Support Double Buffering PFD_TYPE_RGBA, // Request An RGBA Format24, // Select A 24Bit Color Depth0, 0, 0, 0, 0, 0, // Color Bits Ignored (?)0, // No Alpha Buffer0, // Shift Bit Ignored (?)0, // No Accumulation Buffer0, 0, 0, 0, // Accumulation Bits Ignored (?)16, // 16Bit Z-Buffer (Depth Buffer)0, // No Stencil Buffer0, // No Auxiliary Buffer (?)PFD_MAIN_PLANE, // Main Drawing Layer0, // Reserved (?)0, 0, 0 // Layer Masks Ignored (?)};m_myhDC = ::GetDC(m_hWnd); // Gets A Device Context For The WindowPixelFormat = ChoosePixelFormat(m_myhDC, &pfd); // Finds The Closest Match To The Pixel Format We Set Aboveif (!PixelFormat){::MessageBox(0,"Can't Find A Suitable PixelFormat.","Error",MB_OK|MB_ICONERROR);PostQuitMessage(0);// This Sends A 'Message' Telling The Program To Quitreturn false ; // Prevents The Rest Of The Code From Running}if(!SetPixelFormat(m_myhDC,PixelFormat,&pfd)){::MessageBox(0,"Can't Set The PixelFormat.","Error",MB_OK|MB_ICONERROR);PostQuitMessage(0);return false;}m_hRC = wglCreateContext(m_myhDC);if(!m_hRC){::MessageBox(0,"Can't Create A GL Rendering Context.","Error",MB_OK|MB_ICONERROR);PostQuitMessage(0);return false;}if(!wglMakeCurrent(m_myhDC, m_hRC)){::MessageBox(0,"Can't activate GLRC.","Error",MB_OK|MB_ICONERROR);PostQuitMessage(0);return false;}// Now that the screen is setup we can// initialize OpenGL();InitGL();return true;}/************************************************************** *******/6.关闭WM_ERASEBACKGROUND消息,不关闭的话,画图时会闪动.在视图类中选择“Add Windows Message Handler”加入消息处理函数./************************************************************** *******/BOOL CMfc_basicView::OnEraseBkgnd(CDC* pDC){return FALSE;}/************************************************************** *******/7.初始化OPENGL 添加InitGL()函数./************************************************************** *******/void CMfc_basicView::InitGL(){// Enables Depth TestingglEnable(GL_DEPTH_TEST);// Enable the point size for selected pointsglPointSize(5.0f);// This Will Clear The Background Color To BlackglClearColor(.4, 0.2, 0.0, 0.0f);// Reset the current projection matrixSetProjection();glMatrixMode(GL_MODELVIEW);glLoadIdentity();//Enable back face culling, defaults to Clock wise vertices.glEnable(GL_CULL_FACE);glEnable(GL_COLOR_MATERIAL);glColorMaterial(GL_FRONT, GL_AMBIENT_AND_DIFFUSE);glShadeModel(GL_SMOOTH);glPolygonMode(GL_FRONT, GL_FILL);}/************************************************************** *******/8. 在视图类中添加调窗口大小的处理函数OnSize() 消息句柄/************************************************************** *******/void CMfc_basicView::OnSize(UINT nType, int cx, int cy){CView::OnSize(nType, cx, cy);glMatrixMode(GL_MODELVIEW);glLoadIdentity();// Make the rendering context currentwglMakeCurrent(m_myhDC,m_hRC);// Reset The Current Viewport And Perspective TransformationglViewport(0, 0, cx, cy);m_height= cy;m_width = cx;// Calculate The Aspect Ratio Of The WindowgluPerspective(60.0f,(GLfloat)cx/(GLfloat)cy,0.1f,1000.0f);}9.添加SetPorjection()函数void CMfc_basicView::SetProjection(){glViewport(0, 0, m_width, m_height);// Reset The Projection MatrixglMatrixMode(GL_PROJECTION);glLoadIdentity();// It's a perspective projection// Calculate The Aspect Ratio Of The WindowgluPerspective(60.0f,(GLfloat)m_width/(GLfloat)m_height, 0.1f,3000.0f);}/************************************************************** *******/10.在Project 菜单选择Settings. 单击Link 选项页Object/library Module添加库文件.opengl32.lib glu32.lib glut.lib glaux.lib11.在视图类中加入OnCreate消息句柄/*********************************************************************/int CMfc_basicView::OnCreate(LPCREATESTRUCT lpCreateStruct){if (CView::OnCreate(lpCreateStruct) == -1)return -1;SetupPixelFormat();wglMakeCurrent(NULL,NULL);return 0;}/************************************************************** *******///现在编译程序的话,会看到一个无法刷新的应用程序了。

一、实验目的(1) 熟悉开发环境;(2) 掌握应用MFC类库编写鼠标绘图程序的方法;(3) 掌握MFC环境中绘图函数的使用方法。
二、实验内容创建一个单文档应用程序,实现鼠标的绘图功能。
要求:(1) 创建一个工具栏,有线段、矩形、椭圆三个按钮;(2) 绘图前,选择工具栏上的按钮,确定图形的形状。
按下鼠标左键,开始绘图,结合鼠标的光标坐标值,来确定图形的形状和大小,并随着鼠标的移动在屏幕上实时绘制图形,放开鼠标左键,确定最后的图形,绘制在屏幕上。
三、实验处理列表实现绘图功能的代码清单:1、代码如下#if !defined(AFX_PIC_H__00F5F2B9_A2A6_4ED6_907E_EC07AA16 8545__INCLUDED_)#defineAFX_PIC_H__00F5F2B9_A2A6_4ED6_907E_EC07AA168545__INCL UDED_#if _MSC_VER > 1000#pragma once#endif // _MSC_VER > 1000class CPic{public:CPic();virtual ~CPic();void Draw(CDC *PDC);public:UINT m_nDrawType;int m_nX0;int m_nY0;int m_nX1;int m_nY1;};#endif// !defined(AFX_PIC_H__00F5F2B9_A2A6_4ED6_907E_EC07AA1685 45__INCLUDED_)2、代码如下:// Pic.cpp: implementation of the CPic class.////////////////////////////////////////////////////////////////////////#include ""#include "Shiyan8.h"#include ""#ifdef _DEBUG#undef THIS_FILEstatic char THIS_FILE[]=__FILE__;#define new DEBUG_NEW#endif//////////////////////////////////////////////////////////////////////// Construction/Destruction//////////////////////////////////////////////////////////////////////CPic::CPic(){}CPic::~CPic(){}void CPic::Draw(CDC *pDC){CPen PenLN,*pOldPen;(PS_SOLID,3,RGB(255,0,0));pOldPen = pDC->SelectObject(&PenLN);switch(m_nDrawType){case 0:pDC->MoveTo(m_nX0,m_nY0);pDC->LineTo(m_nX1,m_nY1);break;case 1:pDC->Ellipse(m_nX0,m_nY0,m_nX1,m_nY1);break;case 2:pDC->Rectangle(m_nX0,m_nY0,m_nX1,m_nY1);break;}pDC->SelectObject(pOldPen);}3、程序如下:// Shiyan8View.cpp : implementation of the CShiyan8View class//#include ""#include "Shiyan8.h"#include "Shiyan8Doc.h"#include "Shiyan8View.h"#ifdef _DEBUG#define new DEBUG_NEW#undef THIS_FILEstatic char THIS_FILE[] = __FILE__;#endif/////////////////////////////////////////////////////////////////////////////// CShiyan8ViewIMPLEMENT_DYNCREATE(CShiyan8View, CView)BEGIN_MESSAGE_MAP(CShiyan8View, CView)//{{AFX_MSG_MAP(CShiyan8View)ON_COMMAND(ID_DRAW_FILEOPEN, OnDrawFileopen)ON_UPDATE_COMMAND_UI(ID_DRAW_FILEOPEN, OnUpdateDrawFileopen)ON_COMMAND(ID_DRAW_FILESA VE, OnDrawFilesave)ON_UPDATE_COMMAND_UI(ID_DRAW_FILESA VE, OnUpdateDrawFilesave)ON_WM_LBUTTONDOWN()ON_WM_MOUSEMOVE()ON_WM_LBUTTONUP()//}}AFX_MSG_MAPON_COMMAND_RANGE(ID_DRAWTYPE_LINE,ID_DRAWTYPE_RECT,OnDrawType)ON_UPDATE_COMMAND_UI_RANGE(ID_DRAWTYPE_LIN E, ID_DRAWTYPE_RECT,OnUpdateDrawType)// Standard printing commandsON_COMMAND(ID_FILE_PRINT, CView::OnFilePrint)ON_COMMAND(ID_FILE_PRINT_DIRECT,CView::OnFilePrint)ON_COMMAND(ID_FILE_PRINT_PREVIEW, CView::OnFilePrintPreview)END_MESSAGE_MAP()/////////////////////////////////////////////////////////////////////////////// CShiyan8View construction/destructionCShiyan8View::CShiyan8View(){// TODO: add construction code herem_nDrawType = 0;m_nX0 = 0;m_nY0 = 0;m_nX1 = 0;m_nY1 = 0;m_nPicNum = 0;}CShiyan8View::~CShiyan8View(){}BOOL CShiyan8View::PreCreateWindow(CREATESTRUCT& cs) {// TODO: Modify the Window class or styles here by modifying // the CREATESTRUCT csreturn CView::PreCreateWindow(cs);}/////////////////////////////////////////////////////////////////////////////// CShiyan8View drawingvoid CShiyan8View::OnDraw(CDC* pDC){CShiyan8Doc* pDoc = GetDocument();ASSERT_V ALID(pDoc);// TODO: add draw code for native data herefor(int i=0;i<m_nPicNum;i++){m_Pic[i].Draw(pDC);}}/////////////////////////////////////////////////////////////////////////////// CShiyan8View printingBOOL CShiyan8View::OnPreparePrinting(CPrintInfo* pInfo){// default preparationreturn DoPreparePrinting(pInfo);}void CShiyan8View::OnBeginPrinting(CDC* /*pDC*/, CPrintInfo* /*pInfo*/){// TODO: add extra initialization before printing}void CShiyan8View::OnEndPrinting(CDC* /*pDC*/, CPrintInfo* /*pInfo*/){// TODO: add cleanup after printing}/////////////////////////////////////////////////////////////////////////////// CShiyan8View diagnostics#ifdef _DEBUGvoid CShiyan8View::AssertValid() constCView::AssertValid();}void CShiyan8View::Dump(CDumpContext& dc) const{CView::Dump(dc);}CShiyan8Doc* CShiyan8View::GetDocument() // non-debug version is inline{ASSERT(m_pDocument->IsKindOf(RUNTIME_CLASS(CShiyan8Doc)));return (CShiyan8Doc*)m_pDocument;}#endif //_DEBUG/////////////////////////////////////////////////////////////////////////////// CShiyan8View message handlersvoid CShiyan8View::OnDrawFileopen(){// TODO: Add your command handler code here}void CShiyan8View::OnUpdateDrawFileopen(CCmdUI* pCmdUI){// TODO: Add your command update UI handler code herepCmdUI->Enable(FALSE);}void CShiyan8View::OnDrawFilesave(){// TODO: Add your command handler code herevoid CShiyan8View::OnUpdateDrawFilesave(CCmdUI* pCmdUI){// TODO: Add your command update UI handler code herepCmdUI->Enable(FALSE);}void CShiyan8View::OnDrawType(WORD nID){m_nDrawType = nID-ID_DRAWTYPE_LINE;}void CShiyan8View::OnUpdateDrawType(CCmdUI* pCmdUI){pCmdUI->SetRadio(m_nDrawType == pCmdUI->m_nID-ID_DRAWTYPE_LINE);}void CShiyan8View::OnLButtonDown(UINT nFlags, CPoint point){// TODO: Add your message handler code here and/or call defaultm_nX0 = m_nX1 = ;m_nY0 = m_nY1 = ;CView::OnLButtonDown(nFlags, point);}void CShiyan8View::OnMouseMove(UINT nFlags, CPoint point){// TODO: Add your message handler code here and/or call defaultCClientDC dc(this);CPen PenBK,PenLN,*pOldPen;if(nFlags & MK_LBUTTON)(PS_SOLID,1,RGB(255,255,255)); (PS_DASH, 1,RGB(255,0,0)); pOldPen = (&PenBK);switch(m_nDrawType){case 0:(m_nX0,m_nY0);(m_nX1,m_nY1);break;case 1:(m_nX0,m_nY0,m_nX1,m_nY1);break;case 2:(m_nX0,m_nY0,m_nX1,m_nY1);break;}(&PenLN);m_nX1 = ;m_nY1 = ;switch(m_nDrawType){case 0:(m_nX0,m_nY0);(m_nX1,m_nY1);break;case 1:(m_nX0,m_nY0,m_nX1,m_nY1);break;case 2:(m_nX0,m_nY0,m_nX1,m_nY1);break;}(pOldPen);CView::OnMouseMove(nFlags, point);}void CShiyan8View::OnLButtonUp(UINT nFlags, CPoint point){// TODO: Add your message handler code here and/or call default CClientDC dc(this);CPen PenBK,PenLN,*pOldPen;(PS_SOLID,1,RGB(255,255,255));(PS_SOLID,3,RGB(255,0,0));pOldPen = (&PenBK);switch(m_nDrawType){case 0:(m_nX0,m_nY0);(m_nX1,m_nY1);break;case 1:(m_nX0,m_nY0,m_nX1,m_nY1);break;case 2:(m_nX0,m_nY0,m_nX1,m_nY1);break;}(&PenLN);m_nX1 = ;m_nY1 = ;switch(m_nDrawType){case 0:(m_nX0,m_nY0);(m_nX1,m_nY1);break;case 1:(m_nX0,m_nY0,m_nX1,m_nY1);break;case 2:(m_nX0,m_nY0,m_nX1,m_nY1);break;}m_Pic[m_nPicNum].m_nDrawType = m_nDrawType;m_Pic[m_nPicNum].m_nX0 = m_nX0;m_Pic[m_nPicNum].m_nY0 = m_nY0;m_Pic[m_nPicNum].m_nX1 = m_nX1;m_Pic[m_nPicNum].m_nY1 = m_nY1;m_nPicNum++;(pOldPen);CView::OnLButtonUp(nFlags, point);}其他的程序略四、实验总结:1.在Resource View中展开menu资源菜单中,设计如下:2、在Resource View中展开Toorlbar资源菜单中,设计如下:3、本实验的一部分代码可以从实验六中复制过来,但应注意变量名称。
实验四 MFC图形绘制编程实验一、实验目的(1) 熟悉Visual C++ 6.0开发环境;(2) 掌握MFC消息映射的操作步骤;(2) 掌握MFC图形输出的方法;(3) 理解设备环境、画笔、画刷的概念,掌握常用的绘图函数。
二、实验内容请编写程序,要求如下:(1) 定义一支黄色画笔,绘制一条线段;(1) 定义一支紫色画笔,绘制一条多段线;(3) 定义一支红色画笔,绘制一个正方形,并用适当的画刷填充图形内部;(4) 定义一支绿色画笔,绘制一个圆,并用适当的画刷填充图形内部;(5) 定义一支蓝色画笔,绘制一个正六边形,并用适当的画刷填充图形内部。
三、实验报告1.列出图形绘制程序代码清单:(1)在头文件Demo.h中:#include "afxwin.h"class CDemoWnd:public CFrameWnd{public:CDemoWnd();~CDemoWnd();public:LRESULT OnPaint(WPARAM wParam,LPARAM lParam);DECLARE_MESSAGE_MAP()public:int m_nX0;int m_nY0;int m_nX1;int m_nY1;};class CDemoApp:public CWinApp{public:BOOL InitInstance();};CDemoApp ThisApp;(2)在源文件Demo.cpp中:#include "Demo.h"CDemoWnd::CDemoWnd(){m_nX0 = 0;m_nY0 = 0;m_nX1 = 0;m_nY1 = 0;}CDemoWnd::~CDemoWnd(){}BEGIN_MESSAGE_MAP(CDemoWnd,CFrameWnd)ON_MESSAGE(WM_PAINT,OnPaint)END_MESSAGE_MAP()LRESULT CDemoWnd::OnPaint(WPARAM wParam,LPARAM lParam) {CPaintDC dc(this);CPen Pen1,*pOldPen1;Pen1.CreatePen(PS_SOLID,10,RGB(255,255,0));pOldPen1=dc.SelectObject(&Pen1);dc.SelectObject(&Pen1);dc.MoveTo(10,10);dc.LineTo(100,100);CPen Pen2,*pOldPen2;Pen2.CreatePen(PS_SOLID,4,RGB(255,0,255));pOldPen2=dc.SelectObject(&Pen2);dc.SelectObject(&Pen2);POINT pt1[]={{100,10},{10,180},{200,150}};dc.Polyline(pt1,3);CPen Pen3,*pOldPen3;dc.SelectStockObject(BLACK_BRUSH);Pen3.CreatePen(PS_SOLID,4,RGB(255,0,0));pOldPen3=dc.SelectObject(&Pen3);dc.SelectObject(&Pen3);dc.Rectangle(300,50,400,150);CPen Pen4,*pOldPen4;dc.SelectStockObject(GRAY_BRUSH);Pen4.CreatePen(PS_SOLID,4,RGB(0,255,0));pOldPen4=dc.SelectObject(&Pen4);dc.SelectObject(&Pen4);dc.Ellipse(500,200,700,400);CPen Pen5,*pOldPen5;Pen5.CreatePen(PS_SOLID,4,RGB(0,0,255));pOldPen5=dc.SelectObject(&Pen5);dc.SelectStockObject(DKGRAY_BRUSH);dc.SelectObject(&Pen5);POINT pt2[]={{250,250},{400,250},{475,379},{400,509},{250,509},{175,379}};dc.Polygon(pt2,6);return 0;}BOOL CDemoApp::InitInstance(){CDemoWnd *pMainWnd = new CDemoWnd();pMainWnd->Create(NULL,"Demo Mini-MFC");pMainWnd->ShowWindow(m_nCmdShow);pMainWnd->UpdateWindow();m_pMainWnd = pMainWnd;return TRUE;}2、程序运行结果:3、总结在MFC 程序中绘制图形的基本操作步骤:(1)获取图形设备接口。

#include <windows.h>#include <time.h>#include <stdlib.h>#include <stdio.h>#define tDown 1 //方块下落定时器的标识(编号)#define tPaint 2 //重绘定时器的标识(编号)#define tDownTime 500 //方块下落一行位置的时间间隔#define tPaintTime 50 //窗口重绘的时间间隔#define ROW 24 //地图的行数目(第23行不用)#define COL 14 //地图的列数目(第0列和第13列不用)#define MAX_CLASS 7 //方块形状数目#define LEN 20 //每个方格大小为20×20像素#define StartY -1 * LEN + 5 //-15,绘制俄罗斯方块地图时的边界起始位置#define StartX -1 * LEN + 5 //-15int iDeleteRows = 0; //总共清除的行int iTotalNum = 0; //总得分char WindowTxt[100] = "俄罗斯方块游戏自动求解已关闭"; //窗口标题char s1[] = "关闭", s2[] = "启动"; //用于启动/关闭自动求解功能时显示不同的标题bool bAuto; //是否自动求解的标志bool Pause; //是否暂停的标志int Map[ROW][COL]; //俄罗斯方块的地图(被占据的方格为1,否则为0) int CurrentBox[4][4]; //当前落下的方块int CurrentY, CurrentX; //当前落下方块的当前位置(指左上角位置)int NextBox[4][4]; //下一个将落下的方块int Box[MAX_CLASS][4][4] = //7种方块形状{{{0,0,0,0},{1,1,1,1},{0,0,0,0},{0,0,0,0}},{{0,0,0,0},{0,1,0,0},{1,1,1,0},{0,0,0,0}},{{0,0,0,0},{1,1,0,0},{0,1,1,0},{0,0,0,0}},{{0,0,0,0},{0,1,1,0},{1,1,0,0},{0,0,0,0}},{{0,1,1,0},{0,0,1,0},{0,0,1,0},{0,0,0,0}},{{0,1,1,0},{0,1,0,0},{0,1,0,0},{0,0,0,0}{{0,0,0,0},{0,1,1,0},{0,1,1,0},{0,0,0,0}}};void InitMap( ); //初始化地图int NewFall( ); //新的方块落下void BuildNextBox( ); //产生下一个随机的方块int Test( int y, int x, int box[4][4] ); //测试在(y,x)位置是否能放置方块box,能放置返回1,否则返回0int Drop( ); //定时时间到,当前方块下降一行位置void PutBox( ); //放置当前方块int Move( int Right ); //(通过方向键)移动方块,参数right为1表示向右移动,为0表示向左移动void Clear( ); //清除满足条件的行int Rotate( ); //测试旋转是否可行,如果可行则旋转当前方块int RotateTest( int Box1[4][4], int Box2[4][4] ); //旋转当前方块int count1( int y, int x, int box[4][4] ); //新增函数int BestStartX( ); //新增函数LRESULT CALLBACK WndProc( HWND, UINT, WPARAM, LPARAM ); //窗口处理函数声明int WINAPI WinMain( HINSTANCE hInstance, HINSTANCE hPrevInstance,PSTR szCmdLine, int iCmdShow ) //入口函数{static TCHAR szAppName[ ] = TEXT ("Russion");HWND hwnd;MSG msg;WNDCLASS wndclass;wndclass.style = CS_HREDRAW | CS_VREDRAW;wndclass.lpfnWndProc = WndProc;wndclass.cbClsExtra = 0;wndclass.cbWndExtra = 0;wndclass.hInstance = hInstance;wndclass.hIcon = LoadIcon( NULL, IDI_APPLICATION );wndclass.hCursor = LoadCursor( NULL, IDC_ARROW );wndclass.hbrBackground = (HBRUSH)GetStockObject( WHITE_BRUSH );wndclass.lpszMenuName = NULL;wndclass.lpszClassName = szAppName;if( !RegisterClass( &wndclass ) ){MessageBox( NULL, TEXT ("Program requires Windows NT!" ),szAppName, MB_ICONERROR );return 0;}hwnd = CreateWindow( szAppName, WindowTxt,WS_OVERLAPPED | WS_SYSMENU | WS_BORDER,CW_USEDEFAULT, CW_USEDEFAULT,(COL + 4) * LEN, //窗口宽度:(14+4)×20=360像素ROW * LEN, //窗口高度:24×20=480像素(包括标题栏部分)NULL, NULL, hInstance, NULL );ShowWindow( hwnd, iCmdShow );UpdateWindow( hwnd );while( GetMessage( &msg, NULL, 0, 0 ) ){TranslateMessage( &msg );DispatchMessage( &msg );}return msg.wParam;}//初始化地图(将第0列和第13列、第23行设置为1(被占据),其他位置设置为0) void InitMap( ){int y, x;for( y = 0; y < ROW; y++ ){for( x = 0; x < COL; x++ ){//第0列、第13列、第23行设置为1(被占据)if( x < 1 || x > COL - 2 || y > ROW - 2 )Map[y][x] = 1;else Map[y][x] = 0;}}}//计算在(y,x)位置(左上角位置)上放置方块box后空出的方格数int count1( int y, int x, int box[4][4] ){if( !Test(y,x,box) ) return 100; //不能在(y,x)位置放置box,返回∞if( Test(y+1,x,box) ) return 100; //如果box还能下降,也返回∞int tmpy, tmpx;int c = 0; //空出的方格数for( tmpx = 0; tmpx < 4; tmpx++ ) //考虑第0~3列{for( tmpy = 3; tmpy >= 0; tmpy-- ){if( box[tmpy][tmpx] ) break;}tmpy++;if( tmpy>0 ){for( ; tmpy<4; tmpy++ ){if( tmpy+y<0 || tmpy+y>=ROW || tmpx+x<0 || tmpx+x>=COL ) continue;if(!Map[tmpy+y][tmpx+x]) c++; //空出的方格}}}return c;}//当启动自动求解功能时,求下一个方块的最佳下降位置//策略1为:放置后,空出的方格数最少,为MinC1,此时能达到最高位置为MaxY1,该位置为BestX1;//策略2为:放置后,能下降的位置最高,为MaxY2,此时空出的方格数为MinC2,该位置为BestX2;//必有MaxY1<=MaxY2, MinC1>=MinC2//取二者的折衷,策略为:优先采取策略1,但如果MinC2==MinC1或MaxY2>=MaxY1+2,则取策略2int BestStartX( ){int X, Y, tmpx, tmpy; //循环变量int BestX = 0, MaxY = 0, MinC = 100;//最终所求的最佳下降位置int BestX1, MaxY1, MinC1; //策略1:MinC:最佳位置处放置方块时,空出的空格最少,BestX:最佳下降位置,MaxY:能下降到的位置int BestX2, MaxY2, MinC2; //策略2:最佳位置为能下降的位置最高int c; //以上策略求最值时用到的辅助变量int tBox1[4][4], tBox2[4][4]; //tBox2为实现旋转时用到的临时变量int Rotates = 0, Rotates1 = 0, Rotates2 = 0;//找到最佳位置后,当前方块需要旋转的次数int Last1, Last2; //Last1为下一个方块未旋转时最下一个方格所在的行,Last2为旋转后最下一个方格所在的行memcpy(tBox1, NextBox, sizeof(tBox1)); memcpy(tBox2, NextBox, sizeof(tBox1)); for( tmpy=3; tmpy>=0; tmpy-- ) //统计tBox1中最下一个方格所在的行{for( tmpx=0; tmpx<4; tmpx++ ) if(tBox1[tmpy][tmpx]) break;if(tmpx<4) break;}Last1 = tmpy;BestX1 = 0, MaxY1 = 0, MinC1 = 100; BestX2 = 0, MaxY2 = 0, MinC2 = 100;//枚举从第0~COL-4列下落for( X=0; X<=COL-4; X++ ){for( Y=0; Y<=ROW-1; Y++ )if( !Test( Y, X, tBox1 ) ) break;Y--;c = count1(Y,X,tBox1);if( c<MinC1 || c==MinC1 && Y+Last1>MaxY1 )MinC1 = c, BestX1 = X, MaxY1 = Y+Last1;if( Y+Last1>MaxY2 || Y+Last1==MaxY2 && c<MinC2 )MinC2 = c, BestX2 = X, MaxY2 = Y+Last1;}//第1次旋转,旋转后为tBox1Last2 = RotateTest(tBox1, tBox2); memcpy(tBox1, tBox2, sizeof(tBox1));for( X=0; X<=COL-4; X++ ){for( Y=0; Y<=ROW-1; Y++ )if( !Test( Y, X, tBox1 ) ) break;Y--;c = count1(Y,X,tBox1);if( c<MinC1 || c==MinC1 && Y+Last2>MaxY1 )MinC1 = c, BestX1 = X, MaxY1 = Y+Last2, Rotates1 = 1;if( Y+Last2>MaxY2 || Y+Last2==MaxY2 && c<MinC2 )MinC2 = c, BestX2 = X, MaxY2 = Y+Last2, Rotates2 = 1;}//第2次旋转,旋转后为tBox1Last2 = RotateTest(tBox1, tBox2); memcpy(tBox1, tBox2, sizeof(tBox1));for( X=0; X<=COL-4; X++ ){for( Y=0; Y<=ROW-1; Y++ )if( !Test( Y, X, tBox1 ) ) break;Y--;c = count1(Y,X,tBox1);if( c<MinC1 || c==MinC1 && Y+Last2>MaxY1 )MinC1 = c, BestX1 = X, MaxY1 = Y+Last2, Rotates1 = 2;if( Y+Last2>MaxY2 || Y+Last2==MaxY2 && c<MinC2 )MinC2 = c, BestX2 = X, MaxY2 = Y+Last2, Rotates2 = 2;}//第3次旋转,旋转后为tBox1Last2 = RotateTest(tBox1, tBox2); memcpy(tBox1, tBox2, sizeof(tBox1));for( X=0; X<=COL-4; X++ ){for( Y=0; Y<=ROW-1; Y++ )if( !Test( Y, X, tBox1 ) ) break;Y--;c = count1(Y,X,tBox1);if( c<MinC1 || c==MinC1 && Y+Last2>MaxY1 )MinC1 = c, BestX1 = X, MaxY1 = Y+Last2, Rotates1 = 3;if( Y+Last2>MaxY2 || Y+Last2==MaxY2 && c<MinC2 )MinC2 = c, BestX2 = X, MaxY2 = Y+Last2, Rotates2 = 3;}MinC = MinC1, BestX = BestX1, MaxY = MaxY1, Rotates = Rotates1;if( MinC2==MinC1 || MaxY2>=MaxY1+2 )MinC = MinC2, BestX = BestX2, MaxY = MaxY2, Rotates = Rotates2;if( Rotates>0 ){for( int i=0; i<Rotates; i++ ){RotateTest(NextBox, tBox1);memcpy(NextBox, tBox1, sizeof(tBox1));}}return BestX;}int NewFall( ) //新的方块落下(如果能落下返回1,否则不能落下返回0(程序就该结束了)) {int y, x;CurrentY = 0; //当前方块的当前位置是指该方块(4×4大小)的左上角所在位置if(bAuto) CurrentX = BestStartX( );else CurrentX = COL / 2 - 2; //初始为(0,5)for( y = 0; y < 4; y++ ){for( x = 0; x < 4; x++ )CurrentBox[y][x] = NextBox[y][x];}BuildNextBox( ); //产生下一个随机的方块return Test( CurrentY, CurrentX, CurrentBox );}int no[400] = {3,3,5,1};void BuildNextBox( ) //产生下一个随机的方块{static int j=0;int i, y, x;i = rand()%MAX_CLASS; //随机生成0~6的整数for( y = 0; y < 4; y++ ){for( x = 0; x < 4; x++ )NextBox[y][x] = Box[i][y][x];}}//测试在(y,x)位置(左上角位置)是否能放置方块box,能放置返回1,否则返回0int Test( int y, int x, int box[4][4] ){int tmpy, tmpx;for( tmpy = 0; tmpy < 4; tmpy++ ){for( tmpx = 0; tmpx < 4; tmpx++ ){if( Map[tmpy + y][tmpx + x] && box[tmpy][tmpx] )return 0;}}return 1;}int Drop( ) //定时时间到,当前方块下降一行位置(如果能下降返回1,否则返回0){int NewY;NewY = CurrentY + 1;if( Test( NewY, CurrentX, CurrentBox ) ){CurrentY = NewY;return 1;}return 0;}void PutBox( ) //在当前位置(CurrentY,CurrentX)放置当前方块(此时当前方块已经不能下降了){int y, x;for( y = 0; y < 4; y++ ){for( x = 0; x < 4; x++ ){if( CurrentBox[y][x] )Map[CurrentY + y][CurrentX + x] = CurrentBox[y][x];}}}int Move( int Right ) //(通过方向键)移动方块,参数right为1表示向右移动,为0表示向左移动{int x;if( Right ) x = CurrentX + 1; //向右移动一列位置else x = CurrentX - 1; //向左移动一列位置if( Test( CurrentY, x, CurrentBox ) ){CurrentX = x;return 1;}return 0;}void Clear( ) //清除满足条件的行{int y, x; //循环变量int DelY, DelX; //循环变量int Full; //一行是否满的标志for( y = 0; y < ROW - 1; y++ ) //检查第0~22行{Full = 1;for( x = 1; x < COL - 1; x++ ) //检查每行的第1~12列{if( !Map[y][x] ){Full = 0; break;}}if( Full ) //第y行满了,删除该行,该行以上的其他行下移一行{iDeleteRows++; iTotalNum = iDeleteRows*100; //更新得分for( DelY = y; DelY > 0; DelY-- ){for( DelX = 1; DelX < COL - 1; DelX++ )Map[DelY][DelX] = Map[DelY-1][DelX];}for( DelX = 1; DelX < COL - 1; DelX++ ) //第0行置为0Map[0][DelX] = 0;}}}int Rotate( ) //测试旋转是否可行,如果可行则旋转当前方块{int y, x;int TmpBox[4][4];RotateTest( CurrentBox, TmpBox );if( Test( CurrentY, CurrentX, TmpBox ) ){for( y = 0; y < 4; y++ ){for( x = 0; x < 4; x++ )CurrentBox[y][x] = TmpBox[y][x];}return 1;}else return 0;}/*0000 0000 0000 //旋转规律是:Box3[y][x] = Box1[y][3-x] -> 方块绕竖直方向对称变换0100-> 0010-> 0010 //Box2[x][y] = Box3[y][x] -> 沿着主对角线对称变换(相当于矩阵转置)1110 0111 01100000 0000 0010 */int RotateTest( int Box1[4][4], int Box2[4][4] ) //旋转当前方块{ //新增返回值为:旋转后的Box2中最下一个方格所在的行int y, x;for( y = 0; y < 4; y++ ){for( x = 3; x >=0; x-- )Box2[x][y] = Box1[y][3 - x];}for( y=3; y>=0; y-- ) //统计Box2中最下一个方格所在的行{for( x=0; x<4; x++ ){if(Box2[y][x]) break;}if(x<4) break;}return y;}LRESULT CALLBACK WndProc( HWND hwnd, UINT message, //窗口处理函数WPARAM wParam, LPARAM lParam ){HDC hdc, hdcMem;int y, x;PAINTSTRUCT ps;HBITMAP hBitMap;HPEN hPen;HBRUSH hBrush;static int cxClient, cyClient; //窗口客户区宽度和高度char str[20]; //用于显示得分的变量switch( message ){case WM_CREATE:SetTimer( hwnd, tDown, tDownTime, NULL ); //开启两个定时器SetTimer( hwnd, tPaint, tPaintTime, NULL );srand( (unsigned)time( NULL ) );bAuto = false;Pause = false;InitMap( );BuildNextBox( ); //先随机产生一个方块NewFall( ); //方块落下并随机产生下一个方块sprintf( str, " 得分:%d", iTotalNum ); strcat( WindowTxt, str );SetWindowText(hwnd,WindowTxt);return 0;case WM_SIZE:cxClient = LOWORD( lParam ); //取得窗口客户区宽度和高度cyClient = HIWORD( lParam );return 0;case WM_TIMER:switch( wParam ){case tDown: //下降定时器if( !Drop( ) ) //如果不能下降则放置当前方块{PutBox( );MessageBeep( -1 );Clear( ); //清除//刷新得分sprintf( str, "%d", iTotalNum ); WindowTxt[36] = 0;strcat( WindowTxt, str ); SetWindowText(hwnd,WindowTxt);if( !NewFall( ) ) //如果新的方块不能落下,则程序结束{KillTimer(hwnd, tDown );KillTimer(hwnd, tPaint );//PostMessage( hwnd, WM_CLOSE, NULL, NULL );}}break;case tPaint: //重绘定时器InvalidateRect(hwnd, NULL, FALSE); //强制重绘窗口工作区break;}case WM_KEYDOWN:switch( wParam ){case VK_LEFT: //"向左"方向键if(bAuto) break;Move(0); break;case VK_RIGHT: //"向右"方向键if(bAuto) break;Move(1); break;case VK_UP: //"向上"方向键:旋转if(bAuto) break;Rotate( ); break;case VK_DOWN: //"向下"方向键:当前方块下移一行位置if(bAuto) break;MessageBeep( -1 ); Drop( ); break;case VK_RETURN: //回车键:暂停Pause = !Pause;if( Pause ) //暂停、自动求解时也可以暂停KillTimer( hwnd, tDown );else //启动{if(bAuto) SetTimer( hwnd, tDown, tDownTime/5, NULL );else SetTimer( hwnd, tDown, tDownTime, NULL );}break;case VK_SPACE:if(bAuto) break;while( 1 ) //使用永真循环,使得当前方块一直下降到不能下降为止{if( !Drop( ) ){PutBox( ); Clear( );sprintf( str, "%d", iTotalNum ); WindowTxt[36] = 0;strcat( WindowTxt, str ); SetWindowText(hwnd,WindowTxt);if( !NewFall( ) ) //如果新的方块不能落下,则程序结束{KillTimer(hwnd, tDown );KillTimer(hwnd, tPaint );//PostMessage( hwnd, WM_CLOSE, NULL, NULL );}break;}}break;case VK_F1:bAuto = !bAuto;if(bAuto) //自动求解{KillTimer(hwnd, tDown );SetTimer( hwnd, tDown, tDownTime/5, NULL );memcpy( WindowTxt+25, s2, strlen(s2) ); //修改标题}else{KillTimer(hwnd, tDown );SetTimer( hwnd, tDown, tDownTime, NULL );memcpy( WindowTxt+25, s1, strlen(s1) ); //修改标题}SetWindowText(hwnd,WindowTxt);break;}case WM_PAINT: //重绘窗口工作区hdc = BeginPaint( hwnd, &ps );hdcMem = CreateCompatibleDC( hdc );hBitMap = CreateCompatibleBitmap( hdc, cxClient, cyClient );SelectObject( hdcMem, hBitMap );//画地图最外面的矩形(4, 4, 246, 446)Rectangle( hdcMem, StartX + LEN * 1 - 1,StartY + LEN * 1 - 1,StartX + LEN * (COL - 1) + 1, StartY + LEN * (ROW - 1) + 1 );hPen = CreatePen( PS_SOLID, 1, RGB(180, 180, 180) );SelectObject( hdcMem, hPen );hBrush = CreateSolidBrush( RGB(250, 250, 250) );SelectObject( hdcMem, hBrush );for( y = 1; y < ROW - 1; y++ ) //画地图中的每一格{for( x = 1; x < COL - 1; x++ ){Rectangle( hdcMem, StartX + LEN * x, StartY + LEN * y,StartX + LEN * (x + 1), StartY + LEN * (y + 1) );}}DeleteObject( hPen );DeleteObject( hBrush );hPen = CreatePen( PS_SOLID, 1, RGB(180, 180, 180) ); SelectObject( hdcMem, hPen );hBrush = CreateSolidBrush( RGB(255, 100, 100) );SelectObject(hdcMem, hBrush);for( y = 1; y < ROW - 1; y++ ) //画出地图中每个被占据的方格{for( x = 1; x < COL - 1; x++ ){if( Map[y][x] ){Rectangle( hdcMem, StartX + LEN * x, StartY + LEN * y,StartX +LEN * (x + 1), StartY + LEN * (y + 1) );}}}for( y = 0; y < 4; y++ ) //画当前方块{for( x = 0; x < 4; x++ ){if( CurrentBox[y][x] ){if( y + CurrentY > 0 ){Rectangle( hdcMem, (x + CurrentX) * LEN + StartX,(y + CurrentY) * LEN +StartY,(x + CurrentX + 1) * LEN + StartX,(y + CurrentY + 1) * LEN + StartY );}}}}for( y = 0; y < 4; y++ )//在窗口右边区域画下一个方块{for( x = 0; x < 4; x++ ){if( NextBox[y][x] ){Rectangle( hdcMem, (x + COL) * LEN + StartX,(y + 2) * LEN + StartY,(x+ COL + 1) * LEN + StartX, (y + 3) * LEN + StartY );}}}DeleteObject( hPen );DeleteObject( hBrush );DeleteObject( hBitMap );BitBlt( hdc, 0, 0, cxClient, cyClient, hdcMem, 0, 0, SRCCOPY );DeleteDC( hdcMem );EndPaint( hwnd, &ps );return 0;case WM_DESTROY:KillTimer(hwnd, tDown );KillTimer(hwnd, tPaint );PostQuitMessage( 0 );return 0;}//end of switch( message )return DefWindowProc( hwnd, message, wParam, lParam );}。
visual c++ mfc扩展编程实例MFC(Microsoft Foundation Class)是Microsoft提供的一个C++类库,它封装了Windows API,使得开发者可以更方便地使用Windows平台的各种功能。
下面是一个简单的Visual C++ MFC扩展编程实例,演示如何创建一个简单的窗口并显示文本。
1. 打开Visual Studio,创建一个新的MFC应用程序项目。
2. 在项目属性中,将“应用程序类型”设置为“MFC应用程序”。
3. 在“源文件”文件夹中,打开“CMyApp”类。
4. 在“CMyApp”类的“OnInitDialog”函数中,添加以下代码:```cppBOOL CMyApp::OnInitDialog(){CMainDialog::OnInitDialog();// 设置窗口标题SetWindowText(_T("MFC扩展编程实例"));// 创建文本控件CWnd* pWnd = GetDlgItem(IDC_STATIC_TEXT);ASSERT(pWnd);CRect rect;pWnd->GetWindowRect(&rect);CString strText;strText.Format(_T("Hello, MFC!"));pWnd->SetWindowText(strText);return TRUE; // 返回TRUE 除非你对WM_COMMAND 设置了一个处理函数}```5. 在“头文件”文件夹中,打开“CMyApp”类的头文件“CMyApp.h”。
6. 在“CMyApp”类中添加一个成员变量:```cppCStatic m_StaticT ext; // 文本控件成员变量```7. 在“CMyApp”类的构造函数中,初始化该成员变量:```cppCMyApp::CMyApp() : CMainDialog(CMyApp::IDD){// 初始化成员变量m_StaticText.SubclassDlgItem(IDC_STATIC_TEXT, this); // 绑定控件ID 和窗口句柄}```。
VCMFC编程实例1本文由sdhexu贡献pdf文档可能在WAP端浏览体验不佳。
建议您优先选择TXT,或下载源文件到本机查看。
下载第一部分基础知识用 V i s u a l C++ 和 M F C 创建的应用程序大多会自动生成窗口 , 并且可以处理消息 , 进行绘图. M i c r o s o f t 在这方面做了大量的工作 , 隐藏了内部工作 , 使我们能够更轻松地创建一个一般的应用程序.然而,当用户不能实现他们想要实现的功能时,适当地了解内部工作机制,对于消除编程上的困惑会有好处.更重要的是,知道怎样执行任务(诸如把窗口放置到什么地方,从什么地方获得一个消息和在任意地方绘图) ,有助于分清用户的应用程序和由Visual C++ 和 M F C 自动提供的限于窗口 , 消息和绘图的应用程序. Visual C++ 应用程序有四项主要基本知识:创建一个窗口,了解其他的M F C类,把消息发送到一个窗口和在一个窗口内绘图.当然还有其他一些基本知识,我们也将在涉及时适当地进行讨论.不过本部分将讨论以下四项基本知识.窗口在第1章中,我们首先讨论在使用和不使用MFC的情况下创建一个窗口,以便清楚地了解 M F C是如何工作的. M F C窗口既可以由属于 M F C的C + +类创建,也可以由一个早于并存在于 M F C之外的非C + +窗口类创建.我们将进一步观看窗口类并讨论那些由 Wi n d o w s操作系统提供的窗口类.最后,再看看 MFC应用程序中都有什么.类在第2章中,我们将全面地讨论M F C提供的强大的功能.大多数M F C类是从三个 M F C基类( C O b j e c t,C W n d和C C m d Ta rg e t )派生来的.并讨论构成一个应用程序的 M F C类,支持窗口界面的M F C 类,用来绘图的类,访问文件的类,维护数据和数据库的类和访问因特网 (Internet)的MFC类.消息处理在第3章中, 我们将讨论一个MFC应用程序是怎样通过消息与外界及应用程序进行通信的. 还将讨论四种消息类型,并跟踪一个消息通过接收消息的类.最后将探讨该路径上的重定向消息.绘图在第4章中,我们将讨论在窗口中绘图的方法,包括绘图工具,绘图用的颜色,在屏幕或打印机上绘图,绘制位图和图标,绘制矩形和圆,绘制动画.下载第1章窗口在本章中,我们将讨论M F C用户界面的基本要素:窗口.在此基础上比较 A P I 窗口和 M F C窗口的异同,描述如何创建一个窗口,销毁一个窗口和控制 Wi n d o w s操作系统与窗口的通信问题.1.1 窗口和API环境窗口是屏幕上的一个矩形区域,应用程序在该区域中显示数据并等待鼠标点击. Wi n d o w s应用系统的用户界面可以包含许多窗口,每个窗口都有不同的特点,但都是互相联系的,如图 1-1所示.窗口应用程序的主窗口窗口窗口窗口图1-1 Windows应用程序用户界面包括的窗口1.1.1 三种类型窗口在这么多窗口中,基本类型只有三种:重叠(Overlapped)窗口,弹出 (Popup)窗口和子窗口 ( C h i l d ).在它们之间并没有太多内在的差异,但是使用不同的窗口风格,它们的外观是不同的(见图1-2). 重叠窗口窗口. 弹出窗口通常以对话框和消息框的形式与用户对话. 子窗口通常用在视图(View)中,如在文本编辑器中的文本显示,也用在控件中,如在对话框中的OK按钮.而对那些看起来像按钮或控件的子窗口,也称为"控件"窗口. 重叠窗口和弹出窗口的主要区别是弹出窗口出现时可以没有标题 (也称为标题栏 ).子窗口与重叠窗口或弹出窗口的主要区别是子窗口只能出现在另一个窗口中,并且子窗口的任何多余部分都被该窗口移去或剪切掉.另外,子窗口是唯一不能有菜单条的窗口. 参见图1-3中的Windows 应用程序,其中包括重叠窗口,弹出窗口和子窗口. 通常用于建立应用程序主窗口.事实上,有时也叫做"主"窗口或者"框架"下载重叠窗口最基本的窗体第1章窗口3弹出窗口注意:在它的最基本的窗体中,系统不进行任何绘制. 窗口都是客户区子窗口注意:在它的最基本的窗体中,系统不进行任何绘制. 窗口都是客户区典型的外观注意:这都是客户区.子窗口通常自己进行绘制共同的设置注意:子窗口不能有子菜单图1-2 窗口风格可以用来区分三种不同类型的窗口不是一个窗口—显示在子窗口中, 并由子窗口绘制属于桌面的重叠窗口,也称为主窗口属于主窗口的弹出窗口属于主窗口的子窗口属于弹出窗口的子窗口,它位于弹出窗口之中图1-3 由重叠窗口,弹出窗口和子窗口组成的窗口应用程序1.1.2 客户区和非客户区每个窗口都有由系统绘制的"非客户区"和由应用程序绘制的"客户区" .系统可以绘制图1-4显示的其中一个或者全部特征,当然也可以把所有的特征留给你去绘制.任务栏应用程序图标最小化按钮最大化按钮菜单条关闭按钮垂直滚动条水平滚动条系统菜单(单击应用程序图标时,显示虚线框)客户区图1-4 窗口的非客户区可以由系统选择绘制每个窗口代表内存中的一个窗口对象,并由该窗口对象告诉 Wi n d o w s操作系统将窗口绘制在何处,以及在对鼠标单击,键盘按下(假设该窗口拥有输入焦点 )和时钟终止等事件作出响4图1-5).第一部分基础知识下载应时应调用什么应用程序.窗口对象自身是窗口类的一个实例,它不是Visual C++的类,而是存在于Visual C++之外,并早于Visual C++的Microsoft Windows所属的类.然而,就像C++的类一样,窗口类为每个基于它创建的窗口定义了若干特征,如背景色和往何处发送消息等(见窗口对象窗口类窗口①使用RegisterClass( ) 函数创建窗口类②窗口对象由CreateWindow( ) ③窗口管理器保持一个窗口对函数创建,作为它的变量传象列表,并告诉每个对象在输窗口类屏幕上绘制自己图1-5 Microsoft Windows所属的窗口类创建的窗口对象Wi n d o w s操作系统提供了一个扩展的应用程序接口 ( A P I ),可以用来创建和维护这些窗口对象.调用 C r e a t e Window( )函数可以创建一个窗口对象;调用 S e t WindowLong( )函数可以改变由窗口类定义的特征;调用MoveWindow( )函数可以移动窗口;调用DestroyWindow( )可以退出窗口.如此说来, MFC又能做些什么呢?1.2 窗口和MFC环境M F C窗口是 C + +和Windows API 调用的综合.事实上, M F C 窗口提供了许多 (但不是全部) Windows API的C + +封装,从而减轻了编写 Wi n d o w s应用程序时一些乏味的工作,并提供了一些新的服务. M F C窗口不对窗口对象进行直接控制,而在 A P I环境中却是可以的.如果不能在 A P I环境中实现某项功能,那么肯定也不能在 M F C环境中实现.举例来说, M F C库的C W n d可以创建一个窗口,但它只是过去在API环境中使用的API调用的封装. 微软已经把在 M F C库中创建和维护一个窗口的逻辑作为真正的 C + +封装和控制.然而, 这种方法虽使得MFC库万能,但却是不方便的,并导致了严重的冗余和更多的错误. 创建M F C窗口是复杂的,首先,创建类 C W n d的一个实例,然后调用类 C W n d的一个成员函数,该成员函数调用API中的CreatWindow( )函数.返回的窗口句柄 (这只是指向窗口对象的非直接指针 )保存在类CWnd的成员变量 m_hWnd中. 注意因为窗口在内存中创建,而内存经常发生变化,窗口地址可能是经常变化的.因此,窗口句柄并非直接指向窗口对象,而是指向跟踪窗口对象地址的另一个指针. 销毁窗口同样也是复杂的,必须确保销毁了该窗口对象,以及封装该窗口对象的 CWnd实例.虽然CWnd对象知道窗口对象,但是窗口对象并不知道 CWnd对象(见图1-6).下载窗口对象窗口类 CWnd类对象第1章窗口5窗口①首先,用 AfxRegister Class( ) 函数创建一个窗口类②然后,在堆栈上或堆中创建一个 CWnd类对象③调用 CWnd的成员函数 Create(),该函数自身调用图 1 - 4中看到的 ::Create Window()函数④ ::Create Window ⑤窗口管理器告知再次创建窗口; 每个窗口对象在窗口句柄保存到屏幕上绘制自己 CWnd中图1-6 应用两个对象创建MFC窗口尽管窗口应用程序的用户界面可以由几十个,甚至几百个窗口构成,但是大多数窗口还是由不到十个的窗口类创建的.即使在应用程序中有一千个窗口,每个窗口也只能是三种基本类型之一:重叠窗口,弹出窗口或子窗口.1.3 怎样应用MFC创建一个窗口可以用MFC的CWnd类创建一个窗口:CWnd wnd; BOOL b=wnd.CreateEx (ExStyle, ClassName, WindowName, Style, x, y, Width, Height, Parent, Menu, Param);第一行代码创建了一个CWnd类的对象,第二行通过调用Windows API函数CreateWindowEx( ) 创建了真正的窗口.HWND hwnd=::CreateWindowEx (ExStyle, ClassName, WindowName, Style, x, y, Width, Height, Parent, Menu, Instance, Param);因为C W n d类只是封装了用于创建窗口的 Windows API函数( C r e a t e WindowEx( )),因此, 从本质上讲,创建窗口所必须的参数在API环境和MFC环境中是相同的:■ ■ ■ ■ ■ ■参数Style和ExStyle决定窗口的"外观"和类型 (重叠,弹出,子窗口 ). 参数ClassName决定在创建窗口时使用的窗口类. 参数WindowName决定窗口标题内容(如果窗口标题有内容). 参数x, y, Width和Height决定窗口的位置和大小. 参数Parent指向拥有该窗口的窗口指针 (如果有这样的窗口 ). 参数M e n u指向内存中的一个对象,作为它的菜单使用—除非创建一个子窗口,如果是这样的话,那么该参数是帮助父窗口识别子窗口的IDnumber. 参数Instance识别该窗口属于哪个应用程序,以便发送到该窗口的消息能被发送到正确的应用程序的消息队列中. CWnd类填入Instance参数. 参数Param是在创建窗口时由窗口类使用的指针,该指针是指向附加信息的非强制性结构的指针.■■返回的hwnd参数是指向创建的窗口对象的指针,但在未创建任何窗口时,该参数返回值为NULL.窗口句柄自动地保存在CWnd类的m_hWnd成员变量中,这在前面的图 1-6中可以看到.6规则. 规则第一部分基础知识下载现在既然已了解了有关创建窗口的基本知识,那么让我们进一步来看看填写这些参数的1. 窗口名称参数该参数是一个零结尾的文本串,用该串指明在窗口标题栏中显示的内容.如果窗口没有标题栏,该参数可以为零(0). 然而,某些通用控件也使用该参数.例如,按钮控件把该参数的内容放在按钮的表面. 在创建窗口标题栏后,可以用类CWnd的成员函数SetWindowText()来改变窗口标题栏的名称.2. 风格和扩展风格参数这两个是3 2位的参数,用来指定创建什么类型的窗口.可以选择多种类型,如下面的例子所示:,WS_CHILD|WS_VISIBLE,窗口风格参数的作用包括:■用于创建三种基本窗口类型的风格,用 W M _ C H I L D创建一个子窗口;用 W M _ P O P U P 创建一个弹出窗口. W M _ O V E R L A P P E D创建一个重叠窗口.如果不为窗口指定任何一种风格,那么窗口风格默认为WM_OVERLAPPED. 用以增添窗口的非客户区特色的风格.例如,可以用 W S _ V S C R O L L为窗口添加一个垂直滚动条,如图 1-7所示其他非客户区窗口风格.■■若在CreateWindow( ) 中定义了菜单条,则菜单条出现, 它不是一个子窗口 (使窗口可视) (禁止窗口输入)如果选取了最小化或最大化按钮则关闭按钮出现图1-7 非客户窗口风格用来增添窗口的特色■由每个通用控件定义的风格.例如, B S _ F L AT按钮风格告诉按钮控件绘制一个二维按钮. 用来使窗口可视,可操作和 /或初始最大化的风格. 用来标识控件组起始控件的风格,或者当用户敲击 Tab键控制焦点在窗口中变化时,用来指示哪个控件有资格获得输入焦点的风格. 想了解更多的有关窗口风格的例子,请参阅附录 A.■ ■■在创建窗口以后,可以用C W n d的成员函数ModifyStyle( )和ModifyStyleEx( )改变窗口风格.某些风格可能要求重画窗口,这时,可以给 ModifyStyle( )函数添加第三个参数,自动激发类CWnd的成员函数SetWindowPos( )做重画窗口工作.下载CWnd wnd; wnd.ModifyStyle (0,WS_BORDER,SWP_NOZORDER);第1章窗口7事实上,给 M o d i f y S t y l e ( )或M o d i f y S t y l e E x ( )添加任何第三个参数,都需要添加下面的 S e t WindowPos( ) 选项: S W P _ N O Z O R D E R,S W P _ N O M O V E ,S W P _ N O A C T I VAT E和 SWP_SHOW. 注意有时候,甚至一个重画的窗口可能与新风格不相容,尤其对通用控件窗口来说更是这样.因为单个窗口决定重画窗口时使用什么风格.在这种情况下,唯一的办法是: 在事先存储已有窗口的风格和其他参数后,销毁和重建该窗口. 3. X 和Y位置参数这是两个 3 2位的参数,用于以像素为单位指定窗口的位置.创建重叠窗口和弹出窗口时,X和Y是相对于桌面窗口左上角的位置.而创建子窗口时, X和Y是相对于父窗口客户区的左上角位置.如果把 X和Y参数都设置为 C W _ U S E D E FA U LT,那么系统将自动为窗口选定一个位置.系统层叠排列这些新窗口 (见图1-8).第一窗口下一个窗口第三个窗口图1-8 CW_USEDEFAULT允许系统自动设定窗口位置然而,如果 X和Y参数都设置为 C W _ U S E D E FA U LT,那么子窗口在创建的时候,总被创建在(0, 0)的位置. 创建窗口以后,可以用类CWnd的成员函数MoveWindow( )移动窗口. 4. 宽度和高度参数这是两个 3 2位的参数,用于以像素为单位指定窗口的大小.如果将参数 Wi d t h和H e i g h t都设置为CW_USEDEFAULT,则系统将根据桌面窗口的大小,自动选定窗口的大小.然而,对于一个子窗口来说,系统将创建一个长和宽均为 0的窗口.如果窗口的风格是 W S _ M I N I M I Z E 或WS_MAXIMIZE,那么系统将忽视用户为 Width和Height设置的任何值. 创建窗口以后,可以用类CWnd的成员函数MoveWindow( )重新设置窗口的大小. 5. Z-Order 当几个窗口占据屏幕上同一区域时, Z - O r d e r决定哪个窗口显示在哪个窗口之上. Z O r d e r ( Z顺序)中的Z来源于坐标X-Y-Z轴的Z轴,其中Z轴垂直屏幕,并由屏幕指向外面.当窗口最初被创建或选中时,则窗口将出现在 Z - O r d e r的顶层.然而,该窗口永远不可能出现在一个最顶层窗口的上面,除非该窗口也是最顶层的窗口. "最顶层"窗口用 W S _ E X _ TO P M O S T 窗口风格创建,并显示在所有非最顶层窗口的上面,而与该窗口是不是当前选中的窗口无关. 创建窗口后,可以用 CWnd的成员函数 SetWindowPos()改变窗口的Z顺序. 6. 父窗口或物主窗口参数该参数是指向类 CW n d对象的指针,根据创建的窗口类型标识是父窗口还是物主窗口8■第一部分基础知识下载(Owner): 如果创建的是一个子窗口,那么用该参数来标识它的父窗口 (该子窗口所放置的并为之所截断的窗口 ).该值不能为 N U L L.子窗口只能出现在它的父窗口里面,当父窗口被销毁时它们也被销毁,并且当父窗口被隐藏或最小化时它们也被隐藏.■如果创建的是重叠窗口或弹出窗口,用该参数来标识物主窗口.如果该值为N U L L,则桌面窗口成为物主窗口.从属窗口总是显示在它们的主窗口上面,并且随着物主窗口的销毁而被销毁;物主窗口最小化时,则从属窗口被隐藏;但当物主窗口被隐藏时, 从属窗口并不被隐藏. 一个子窗口可能是另一个子窗口的父窗口,但绝不可能是一个物主窗口.如果试图使一个子窗口成为一个物主窗口,那么系统只能使那个子窗口的最顶层窗口作为物主窗口.图 1 - 9 是这些关系的概述.②子窗口对象被创建, 并显示在父窗口中①重叠或弹出窗口对象被创建,并显示在屏幕上③ 弹出或重叠窗口对象被创建,并显示在父窗口中图1-9 物主,父,子窗口的层次关系可以用 C W n d的成员函数 SetOwner( ) 改变已有窗口的物主窗口,用 C W n d的成员函数 SetParent( )改变父窗口. 7. 菜单或控件 ID 参数该参数用来标识菜单 ( M e n u )句柄或控件 (Control )ID,这要依赖于创建的窗口是子窗口, 重叠窗口,还是弹出窗口.■如果创建的是一个子窗口,用该参数标识控件 I D,控件I D通常用来帮助父窗口识别子窗口.因为该参数寻求一个 H M E N U变量,因此,需要用 H M E N U类型重载变量定义控件ID.例如,如果子窗口的控件 ID 是102,应该用如下方法定义它:…, (HMENU) 102,… ■如果创建的是一个重叠窗口或弹出窗口,用该参数定义窗口的菜单.若该值为 N U L L, 则菜单默认为在该窗口的窗口类中定义的任何菜单;如果窗口类也没有指定的菜单, 则该窗口在创建时没有菜单.可以用下面的方法为该参数加载一个菜单:HMENU hMenu=::LoadMenu (AfxGetInstanceHandle( ), MAKEINTRESOURCE (xx));下载这里的xx是应用程序资源里面的菜单 ID(Menu ID).第1章窗口9可以用CWnd的SetDlgCtrlID( )改变已有子窗口的 ID.用类CWnd 的成员函数 SetMenu( )改变一个重叠窗口或弹出窗口的菜单. 8. 实例前面已提到,CWnd类将填入该参数. CWnd通过调用AfxGetInstanceHandle( )获得该实例 (Instance).一个应用程序的实例从本质上标识了哪个程序在内存里. AfxGetInstanceHandle( ) 是由MFC库提供的静态函数. 9. 参数该3 2位参数 ( P a r a m e t e r )是可选的.它通常是指向一个结构或者类对象的指针,而该结构或者类对象是创建某种类型的窗口时需要提供的.例如,当用MDICLIENT窗口类创建窗口时, 需要该参数提供一个CLIENTCREATESTRUCT结构的指针.10. 类名参数类名(Class Name)参数是一个零结尾字符串,当创建一个窗口时,用来标识使用那个窗口类.关于窗口类和窗口处理,将在本章后面的内容中详细讨论.该参数不能为NULL,在创建一个非常一般的MFC窗口时,使用AfxRegisterWndClass (0)填入该参数.1.4 怎样使用MFC销毁一个窗口如前面所提到的一样,删除一个 M F C窗口可能有些烦琐,必须按下面的顺序删除两个对象:pWnd->DestroyWindow( ); //destroys Window Object delete pWnd; //destroys Cwnd Object也可以只删除 C W n d对象,因为 D e s t r o y Window( )是从CW n d的析构函数中调用的,但不提倡使用这种方法.销毁一个窗口而不先调用DestroyWindow( )函数,将使某些析构消息不能被任何从CWnd派生的类处理.你几乎不需自己销毁一个窗口,用户或系统通常会做这项工作. 如果需要在销毁窗口的同时销毁 C W n d对象,则应该在C W n d的派生类中添加下面的重载函数:CYourWnd::PostNcDestroy( ) { delete this; }PostNcDestroy( )是销毁窗口前调用的最后一个成员函数.但是,几乎不需对该函数进行重载,因为CWnd和派生类一般是嵌在另一个类中或建立在堆栈中的. 1.4.1 捆绑到一个已有的窗口如果一个窗口是用Windows API在应用程序建立之前或外面创建的,并且需要把它封装到CWnd类中,可以用下面的语句实现:CWnd wnd; wnd.Attach (hwnd);这里的hwnd是已有窗口的句柄. Attach( )只是把CWnd的成员变量 m_hWnd赋给hwnd. 也可以使用CWnd::FromHandle (hwnd),它查看是否有 C W n d对象已经封装了该窗口句柄并返回该 C W n d 对象的指针.如果不存在这样的 C W n d对象,将创建一个临时对象.如果是临10第一部分基础知识下载时对象,则不要使用该指针,因为在应用程序空闲的时候,该指针指向的对象将被删除. 1.4.2 窗口类前面已提及,一个窗口类不是一个 C + +类,而是早于并存在于 C + +之外的窗口专有的类. 窗口类的作用就像一个模板,可以由此创建其他窗口,并可共享某些特征,包括下面所示的特征: 类风格包括能给予窗口的一些微小的特征. 类图标类菜单如果窗口有图标,用它来指定在窗口的左上角处所画的图标. 如果窗口有菜单,用它来指定窗口中显示的菜单.类光标当光标通过窗口的客户区时,用它来指定显示哪种鼠标形状. 背景色定义用什么颜色来擦除窗口的背景色.窗口的客户区将显示该颜色. 窗口进程定义处理任何发送到该窗口的消息时应该调用的函数.定义窗口进程可能是窗口类唯一最重要的前提. 1.4.3 窗口进程窗口与环境的交互是通过发送和接收消息来实现的.如果系统要求窗口自己进行绘制, 系统给它发送一个 W M _ PA I N T 消息; 如果系统要求窗口销毁自己 , 则发送一个 W M _ D E S T R O Y消息.这些消息都由窗口的窗口进程处理,该窗口进程的地址在窗口类中定义.对于发送到由相同的窗口类创建的窗口的消息,系统采用完全相同的窗口进程进行处理. 相同的窗口进程是怎样跟踪所有的窗口的呢?它是怎么知道窗口A 画在( 1 0 , 3 4 ),而窗口 B画在 (56,21)呢?所有这些工作的完成只需使用窗口的窗口对象. 例如,所有用按钮窗口类创建的窗口,都使用相同的按钮窗口进程.如果一个WM_PAINT消息发送到其中任何一个窗口,则按钮窗口进程根据每个窗口的窗口对象指定的大小,位置和风格画出确切的按钮 (见图1-10).窗口对象③" BUTTON"的窗口进程搜索窗口对象,以查明绘制什么类型的按钮,如果风格是 "Check Box" ,则绘制一个复选框父窗口①用"BUTTON"窗口类创建的窗口②通过发送一个WM_PAINT 消息到窗口进程,窗口管理器告诉每个窗口绘制自己④如果风格是" Push Button",则窗口进程绘制一个按钮⑤ 窗口进程也搜索窗口对象以查明在哪里绘制这些控件窗口图1-10 按钮窗口进程使用窗口对象指定对哪个窗口进行操纵下载1.5 怎样使用MFC创建一个窗口类第1章窗口11当用户创建一个窗口类时,实际上只是在三个操作系统列表之一中注册一个 W N D C L A S S 结构.系统为每个窗口类类型维护一个列表: 系统全局类(System Global Class) 有效. 应用程序全局类(Application Global Class) 的线程有效. 应用程序局部类(Application Local Class) 由应用程序注册,并只对注册它们的应用程序或DLL有效. 当系统搜索一个窗口类时,从应用程序局部类开始,然后搜索应用程序全局类,最后搜索系统全局类. 要创建一个窗口类,可以先创建WNDCLASS结构的实例,然后用 MFC类库的AfxRegister Class( ) 注册它.也可以用 M F C类库的AfxRegisterWndClass( ) 来创建一个基于调用参数的WNDCLASS对象. 1.5.1 使用AfxRegisterWndClass( )函数注册一个窗口类 AfxRegisterWndClass( )函数在使用上是非常自动化的,一些通常需要你提供的参数都能自己填入,甚至连新的窗口类的名字也能自动产生.LPCTSTR lpszClassName=AfxRegisterWndClass(UINT nClassStyle, HCURSOR hCursor=0,HBRUSH hbrBackground=0, HICON hIcon=0);在系统启动时注册,且必须注册,对所有应用程序都由应用程序注册,只对应用程序及应用程序这些参数的使用规则如下: 1. 类名根据传给该函数的参数,为新的窗口类产生名字.如果传输的参数完全相同,那么创建的窗口类也将完全相同.如果需要创建新的窗口类,可以用 AfxRegisterClass( ). 2. 风格窗口类风格由下面选项列表中一系列标记的或 (OR)运算提供: 类风格CS_OWNDC CS_PARENTDC CS_CLASSDC CS_SAVEBITS CS_BYTEALIGNCLIENT CS_BYTEALIGNWINDOW CS_GLOBALCLASS CS_VREDRAW CS_HREDRAW CS_NOCLOSE CS_DBLCLKS 描述为为该窗口类创建的每个窗口分配唯一的设备环境.有关设备环境的更详尽资料见第4章为从系统高速缓存中检索设备环境,然后设置该设备环境的剪裁区,以组合到父窗口中,以便子窗口能画在父窗口上为分配一个设备环境给所有由该窗口类创建的窗口使用为由该类创建的任何窗口的视频存储区将被保存,以便窗口移动或关闭时,不需要重画基础窗口—这对快速机器来说作用不大为当计算机的显示卡和 C P U速度较慢时,这两种风格有用.添加这些风格后,当窗口在字节边缘时,显示卡更容易移动窗口为如果设置该风格,则该类是应用程序的全局类,否则它是一个应用程序局部类为如果设置了垂直风格,并且窗口的垂直大小发生了变化,则整个窗口被重画. 水平风格也这样为禁用系统菜单中的关闭命令为如果未设置该参数,并且双击由该窗口类创建的窗口,则传送给应用程序的将不是双击事件,而是两个相继完成的单击事件12第一部分基础知识下载3. 图标(Icon) 该参数是显示在窗口左上角的图标的句柄,但只适用于使用 W S _ S Y S M E N U的窗口风格. 应用程序主窗口的图标也显示在任务栏上.如果将该参数设置为理过,用CWnd的SetIcon()可改变已有的图标.4. 光标(Cursor) 该参数是鼠标移经应用程序窗口的客户区时,将要显示的鼠标光标句柄.如果将该参数设置为NULL,则显示的是箭头光标.可以用下面的语句装载一个光标:HICON hIcon=AfxGetApp( )->LoadCursor (xx);N U L L ,并且设置了W S _ S Y S M E N U风格,则系统将提供一个默认的图标.在 M F C环境中,绝大部分图标已被处这里的xx是应用程序资源中光标的名字或ID. 这里指定的光标意味着是该窗口的默认光标.如果想动态地改变光标形状,则应该处理该窗口的WM_SETCURSOR消息,并用 SetCursor( )来改变光标形状 (见第8章例33). 5. 背景色当系统创建窗口时,先在显示窗口的地方画一个矩形区域,以擦除该区域的背景色.该参数指定填充该矩形域时所用画刷的句柄 (参见第 4章有关画刷的详细内容 ).为窗口类创建的画刷对象在该类退出注册时被自动释放. 在指定背景色时,也可以不创建画刷对象,而指定下面所列系统颜色之一:COLOR_ACTIVEBORDER COLOR_ACTIVECAPTION COLOR_APPWORKSPACE COLOR_BACKGROUND COLOR_BTNFACE COLOR_BTNSHADOW COLOR_BTNTEXT COLOR_CAPTIONTEXT COLOR_GRAYTEXT COLOR_HIGHLIGHT。
使⽤C++MFC编写⼀个简单的五⼦棋游戏程序MFC简介: MFC(MicrosoftFoundationClasses)是微软基础类库的简称,是微软公司实现的⼀个c++类库,主要封装了⼤部分的windows API函数。
MFC除了是⼀个类库以外,还是⼀个框架,在vc++⾥新建⼀个MFC的⼯程,开发环境会⾃动帮你产⽣许多⽂件,同时它使⽤了mfcxx.dll。
xx是版本,它封装了mfc内核,所以你在你的代码看不到原本的SDK编程中的消息循环等等东西,因为MFC框架帮你封装好了,这样你就可以专⼼的考虑你程序的逻辑,⽽不是这些每次编程都要重复的东西,但是由于是通⽤框架,没有最好的针对性,当然也就丧失了⼀些灵活性和效率。
但是MFC的封装很浅,所以效率上损失不⼤。
开始正⽂简述在学习了C++ MFC编程后,就萌⽣了编写⼀个五⼦棋程序的想法。
诚然,⽤C#来编写的话可能界⾯会好很多,但是我的主要⽬标不在界⾯⽽是算法,所以利⽤了VS的MFC来编写程序。
程序特点⿏标移动过程中有选中框跟随,下棋位置实时⾃动反馈选中框位置只会在合法的下棋位置出现(即棋线的交叉处并且没有下过的位⼦),所以即使你的⿏标不在棋线交叉处,程序也会实时⾃动反馈⿏标在当前位置将要下棋的位置,这避免了下棋过程中的错下。
提供悔棋功能为了进⼀步避免错下,提⾼程序的可⽤性,本程序还设计了⼀个悔棋按钮(程序设置最⼤悔棋次数为1次)提供多种棋盘⼤⼩标准的五⼦棋棋盘为15x15,为了提供更多样的棋盘⼤⼩,本程序还设有17x17和19x19两种⾮常规棋盘。
提供复盘功能在棋局结束后,程序会给出棋局的复盘结果,可以从中分析出棋局胜败的原因。
解决了MFC绘图窗⼝移出屏幕图像消失的问题你可以在完整代码中看到解决刷新问题的解决⽅案代码较为基础,只需要掌握基础的MFC编程知识就可以⾃⼰实现因为本⼈也是编程⼩⽩,算法设计⽐较基础和简单,只掌握基础的C++编程知识就可以看懂代码程序实现step1:在VS中创建⼀个MFC对话框程序⼯程。
VC++实验八MFC菜单编程实验实验八MFC 菜单编程实验一、实验目的(1) 熟悉Visual Studio 开发环境;(2) 掌握MFC 程序中菜单资源的设计方法;(3) 进一步熟悉MFC 的消息映射机制;(4) 进一步熟悉MFC 环境中GDI 编程技术。
二、实验内容如上图所示,创建一个单文档应用程序,实现鼠标的绘图功能。
要求:(1) 创建菜单和工具栏,实现线段、矩形、椭圆三个菜单项和工具栏按钮;(2) 绘图前,选择菜单项或工具栏按钮,确定图形的形状。
按下鼠标左键,拖动鼠标开始绘图,结合鼠标的光标坐标值,来确定图形的形状和大小,并随着鼠标的移动在屏幕上实时绘制图形,放开鼠标左键,确定最后的图形,绘制在屏幕上。
三、编程实验部分程序及运行结果(1) 列表实现绘图功能的代码清单1、ON_COMMAND消息中ID_DRAW_LINE、ID_DRAW_RECT及ID_DRAW_ELLIPSE消息的处理void CDemoView::OnDrawLine(){// TODO: 在此添加命令处理程序代码//m_nDrawType = 0时绘制直线m_nDrawType = 0;}void CDemoView::OnDrawRect(){// TODO: 在此添加命令处理程序代码//m_nDrawType = 1绘制矩形m_nDrawType = 1;}void CDemoView::OnDrawEllipse(){// TODO: 在此添加命令处理程序代码//m_nDrawType = 2时绘制椭圆m_nDrawType = 2;}2、设置菜单项的check状态,显示标志为“.”void CDemoView::OnUpdateDrawLine(CCmdUI *pCmdUI) { // 若m_nDrawType=0时,表明选中此菜单项if (m_nDrawType == 0){pCmdUI->SetRadio(TRUE);}else{pCmdUI->SetRadio(FALSE);}}void CDemoView::OnUpdateDrawRect(CCmdUI *pCmdUI) { //若m_nDrawType=1时,表明选中此菜单项if (m_nDrawType == 1){pCmdUI->SetRadio(TRUE);}else{pCmdUI->SetRadio(FALSE);}}void CDemoView::OnUpdateDrawEllipse(CCmdUI *pCmdUI) {// 若m_nDrawType=2时,表明选中此菜单项if (m_nDrawType == 2){pCmdUI->SetRadio(TRUE);}else{pCmdUI->SetRadio(FALSE);}}3、WM_LBUTTONDOWN消息的处理void CDemoView::OnLButtonDown(UINT nFlags, CPoint point) {// TODO: 在此添加消息处理程序代码和/或调用默认值CDemoDoc* pDoc = GetDocument();ASSERT_VALID(pDoc);if (!pDoc)return;pDoc->m_nX0 = point.x;pDoc->m_nY0 = point.y;CView::OnLButtonDown(nFlags, point);}4、WM_MOUSEMOVE消息的处理void CDemoView::OnMouseMove(UINT nFlags, CPoint point) {// TODO: 在此添加消息处理程序代码和/或调用默认值CClientDC dc(this);CDemoDoc* pDoc = GetDocument();ASSERT_VALID(pDoc);if (!pDoc)return;//1.用与背景颜色相同的画笔擦除原有的图形dc.SelectStockObject(WHITE_PEN);//m_nDrawType用于判断所要绘制图形的形状//0:直线 1:矩形 2:椭圆if (nFlags & MK_LBUTTON){switch (m_nDrawType){case 0:dc.MoveTo(pDoc->m_nX0, pDoc->m_nY0);dc.LineTo(pDoc->m_nX1, pDoc->m_nY1);break;case 1:dc.Rectangle(pDoc->m_nX0, pDoc->m_nY0, pDoc->m_nX1, pDoc->m_nY1);break;case 2:dc.Ellipse(pDoc->m_nX0, pDoc->m_nY0, pDoc->m_nX1, pDoc->m_nY1);break;}}// 2.绘制新的图形//获取鼠标移动的位置,用于绘制图形pDoc->m_nX1 = point.x;pDoc->m_nY1 = point.y;dc.SelectStockObject(BLACK_PEN);//判断是否为鼠标左键按下,绘制图形if (nFlags & MK_LBUTTON){switch (m_nDrawType){case 0:dc.MoveTo(pDoc->m_nX0, pDoc->m_nY0);dc.LineTo(pDoc->m_nX1, pDoc->m_nY1);break;case 1:dc.Rectangle(pDoc->m_nX0, pDoc->m_nY0, pDoc->m_nX1, pDoc->m_nY1);break;case 2:dc.Ellipse(pDoc->m_nX0, pDoc->m_nY0, pDoc->m_nX1, pDoc->m_nY1);break;}}CView::OnMouseMove(nFlags, point);}5、实验结果四、实验总结通过本次的编程实验,我对MFC的消息映射机制有了更进一步的认识和了解,熟练掌握了MFC消息映射的处理,对类向导的使用也有了更加熟练的掌握;进一步熟悉MFC 环境中GDI编程技术,对一些绘图函数以及自定义画笔和画刷的使用有了更深的理解,也熟练掌握了各种绘图函数的使用方法和步骤。