DD神牛2013最新的背包九讲
- 格式:pdf
- 大小:274.63 KB
- 文档页数:17

背包问题九讲 v1.0目录第一讲 01背包问题第二讲完全背包问题第三讲多重背包问题第四讲混合三种背包问题第五讲二维费用的背包问题第六讲分组的背包问题第七讲有依赖的背包问题第八讲泛化物品第九讲背包问题问法的变化附:USACO中的背包问题前言本篇文章是我(dd_engi)正在进行中的一个雄心勃勃的写作计划的一部分,这个计划的内容是写作一份较为完善的NOIP难度的动态规划总结,名为《解动态规划题的基本思考方式》。
现在你看到的是这个写作计划最先发布的一部分。
背包问题是一个经典的动态规划模型。
它既简单形象容易理解,又在某种程度上能够揭示动态规划的本质,故不少教材都把它作为动态规划部分的第一道例题,我也将它放在我的写作计划的第一部分。
读本文最重要的是思考。
因为我的语言和写作方式向来不以易于理解为长,思路也偶有跳跃的地方,后面更有需要大量思考才能理解的比较抽象的内容。
更重要的是:不大量思考,绝对不可能学好动态规划这一信息学奥赛中最精致的部分。
你现在看到的是本文的1.0正式版。
我会长期维护这份文本,把大家的意见和建议融入其中,也会不断加入我在OI学习以及将来可能的ACM-ICPC的征程中得到的新的心得。
但目前本文还没有一个固定的发布页面,想了解本文是否有更新版本发布,可以在OIBH论坛中以“背包问题九讲”为关键字搜索贴子,每次比较重大的版本更新都会在这里发贴公布。
目录第一讲 01背包问题这是最基本的背包问题,每个物品最多只能放一次。
第二讲完全背包问题第二个基本的背包问题模型,每种物品可以放无限多次。
第三讲多重背包问题每种物品有一个固定的次数上限。
第四讲混合三种背包问题将前面三种简单的问题叠加成较复杂的问题。
第五讲二维费用的背包问题一个简单的常见扩展。
第六讲分组的背包问题一种题目类型,也是一个有用的模型。
后两节的基础。
第七讲有依赖的背包问题另一种给物品的选取加上限制的方法。
第八讲泛化物品我自己关于背包问题的思考成果,有一点抽象。

SOUNDBAR 850重要安全说明请阅读并保留所有安全、安全性和使用说明。
重要安全说明请阅读这些说明。
请仅用干布进行清洁。
请勿堵塞任何通风口。
请按照制造商的说明安装。
请勿安装在任何热源旁,例如暖气片、热调节装置、火炉或可产生热量的其他设备(包括扩音器)。
只能使用制造商指定的附件/配件。
任何维修事宜均请向合格的人员咨询。
如果设备有任何损坏,均需进行维修,例如电源线或插头受损、液体溅入或物体落入设备内、设备受雨淋或受潮、不能正常工作或跌落。
警告/小心此符号表示产品外壳内存在未绝缘的危险电压,可能会造成触电危险。
此符号表示产品指南中提供了重要的操作和维护说明。
包含小部件,可能会导致窒息。
不适合 3 岁以下的儿童使用。
本产品含有磁性材料。
关于是否会影响可植入医疗设备的情况,请咨询医生。
本产品含有钢化玻璃表面。
请小心使用以避免撞击。
如果破损,请小心处理破碎的玻璃。
• 为降低火灾或触电危险,切勿将本产品暴露在雨中、液体中或湿气中。
• 本产品不得受液体淋溅或喷洒,不得将装有液体的物体(如花瓶等)置于本产品上或本产品附近。
• 请将本产品放置到远离火源和热源的地方。
请勿将明火火源(如点燃的蜡烛)置于本产品上或靠近本产品。
• 未经授权切勿改装本产品。
• 请勿将本产品与逆变器配合使用。
• 请勿在汽车或船舶上使用本产品。
• 如果将电源插头或设备耦合器作为断路设备,那么此类断路设备应当保持可随时恢复工作的状态。
• 只能使用以下硬件安装本产品:Bose 条形音箱壁挂架。
• 放置产品时,请确保它没有阻塞电视或显示器上的任何通风孔。
请参阅电视或显示器随附的用户指南,并按照制造商的说明进行安装。
• 由于有通风需求,Bose 不推荐将本产品放置在有限的空间中,比如墙洞或封闭式橱柜。
• 请勿让儿童接触电池。
• 如果处理不当,电池可能导致着火或化学灼伤。
请勿对其进行充电、拆解、加热或焚化。
中国危险物质限用表生产日期:序列号中第八位数字表示生产年份;“1”表示 2011 年或 2021 年。

English - 3C ontentsPlease complete and retain for your records:The serial and model number can be found on the original shipping carton and on the warranty card.Serial number ________________________________________________________________________Model number _______________________________________________________________________Purchase date _______________________________________________________________________We suggest you keep your receipt with this owner’s guide.About your Bose ® SoundTrue ® Ultra in-ear headphones ............................................... 4Unpacking .............................................................................................................................. 5Connecting to your device ................................................................................................. 6Using the headphones with your device .. (6)Headphone controls .................................................................................................... 6Basic functions ............................................................................................................. 7Media playback functions ........................................................................................... 7Importance of proper fit (8)Fitting the headphones to your ear .......................................................................... 8Changing the ear tips .................................................................................................. 9Removing the headphones ........................................................................................ 9Adjusting for comfort and stability .. (10)Using the adjustment slider ...................................................................................... 10Using the clothing clip ................................................................................................ 10Using a single earpiece ................................................................................................ 10Troubleshooting ................................................................................................................... 11Cleaning .................................................................................................................................. 12Limited warranty (12)Samsung Galaxy is a trademark of Samsung Electronics Co., Ltd.Android is a trademark of Google Inc.Using the headphones4 - EnglishAbout your Bose ® SoundTrue ® Ultra in-ear headphonesThe Bose ® SoundTrue ® Ultra in-ear headphones offer a combination of lifelike audio performance and comfortable fit not available from most conventional headphones.Features• Enjoy your music with deep, clear sound and full immersion.• Exclusive TriPort ® technology delivers natural-sounding lows, even at higher volumes.• Inline microphone and remote for easy switching between calls and music with Samsung Galaxy devices and select Android devices.• StayHear ® tips keep your headphones comfortably in place.• Engineered and tested for lasting quality and durability.• Carrying case stores and protects headphones.• Available in different colors to fit your style.Using the headphonesEnglish - 7Basic functionsIncrease volume Press and release the + button.Decrease volume Press and release the – button.Answer a callWhen you receive an incoming call, press and release the Answer/End button to answer.End a callPress and release the Answer/End button.Decline an incoming callPress and hold the Answer/End button for about two seconds, then release.Switch to an incoming or on-hold call and put the current call on-hold While on a call, press and release the A nswer/End button once. Press andr elease again to switch back to the first call.Switch to an incoming or on-hold call and end the current call While on a call, press and hold the Answer/End button for about two seconds, then release.Use voice controlPress and hold the Answer/End button. For more information on voice control, refer to your device user’s guide.Media playback functionsPlay or pause a song or video Press and release the Answer/End button.Skip forward Press and release the Answer/End button twice quickly.Skip backwardPress and release the Answer/End button three times quickly.。
Snagit9的介绍和使⽤Snagit 9的介绍和使⽤⼀、前⾔:⼀个⾮常著名的优秀屏幕、⽂本和视频捕获、编辑与转换软件。
可以捕获Windows 屏幕、DOS屏幕;RM电影、游戏画⾯;菜单、窗⼝、客户区窗⼝、最后⼀个激活的窗⼝或⽤⿏标定义的区域。
图象可保存为BMP、PCX、TIF、GIF或JPEG格式,也可以存为视频动画。
使⽤JPEG可以指定所需的压缩级(从1%到99%)。
可以选择是否包括光标,添加⽔印。
另外还具有⾃动缩放,颜⾊减少,单⾊转换,抖动,以及转换为灰度级。
⼀会将会介绍到各个功能。
⼆、SnagIt的⼀些特点:Snagit是⼀个极其优秀的捕捉图形的软件,和其他捕捉屏幕软件相⽐,它有以下⼏个特点:1、捕捉的种类多:不仅可以捕捉静⽌的图像,⽽且可以获得动态的图像和声⾳,另外还可以在选中的范围内只获取⽂本。
2、捕捉范围极其灵活:可以选择整个屏幕,某个静⽌或活动窗⼝,也可以⾃⼰随意选择捕捉内容。
3、输出的类型多:可以以⽂件的形式输出,也可以把捕捉的内容直接发e-mail给朋友,另外可以编辑成册。
4、具备简单的图形处理功能:利⽤它的过滤功能可以将图形的颜⾊进⾏简单处理,也可对图形进⾏放⼤或缩⼩。
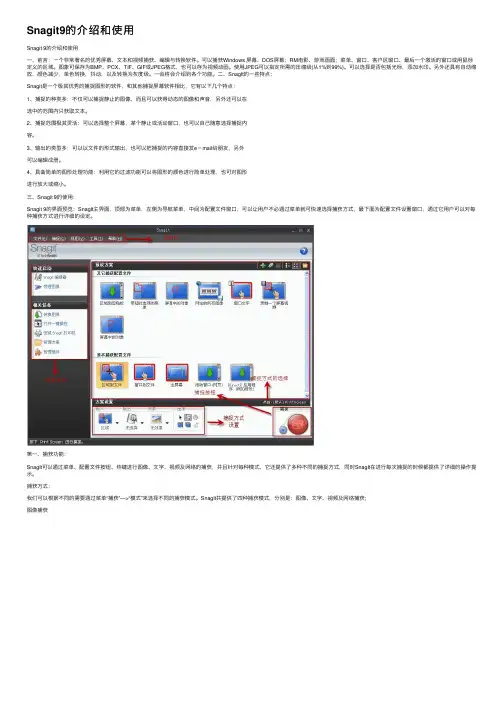
三、Snagit 9的使⽤:Snagit 9的界⾯预览:SnagIt主界⾯,顶部为菜单,左侧为导航菜单,中间为配置⽂件窗⼝,可以让⽤户不必通过菜单就可快速选择捕获⽅式,最下⾯为配置⽂件设置窗⼝,通过它⽤户可以对每种捕获⽅式进⾏详细的设定。
第⼀、捕获功能:SnagIt可以通过菜单、配置⽂件按钮、热键进⾏图像、⽂字、视频及⽹络的捕获,并且针对每种模式,它还提供了多种不同的捕捉⽅式,同时SnagIt在进⾏每次捕捉的时候都提供了详细的操作提⽰。
捕获⽅式:我们可以根据不同的需要通过菜单“捕获”—>“模式”来选择不同的捕获模式。
SnagIt共提供了四种捕获模式,分别是:图像、⽂字、视频及⽹络捕获;图像捕获通过菜单的“捕捉”“输⼊”可以选择不同的捕捉⽅式:如:屏幕,窗⼝,活动窗⼝,等等。

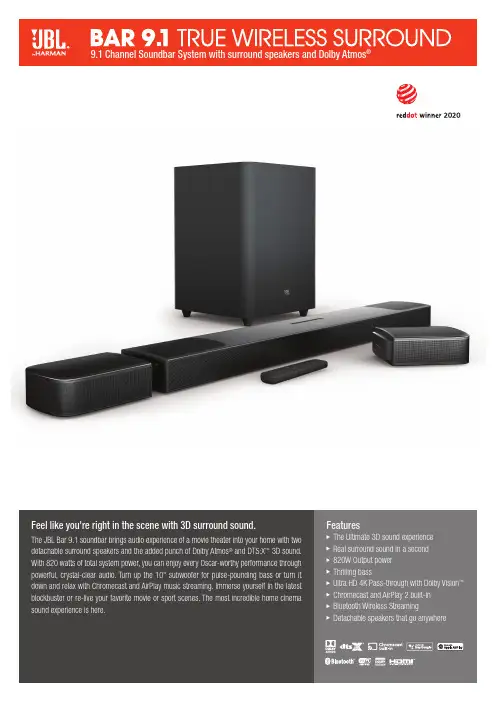
Feel like you're right in the scene with 3D surround sound.The JBL Bar 9.1 soundbar brings audio experience of a movie theater into your home with two detachable surround speakers and the added punch of Dolby Atmos® and DTS:X™ 3D sound. With 820 watts of total system power, you can enjoy every Oscar-worthy performance through powerful, crystal-clear audio. Turn up the 10" subwoofer for pulse-pounding bass or turn it down and relax with Chromecast and AirPlay music streaming. Immerse yourself in the latest blockbuster or re-live your favorite movie or sport scenes. The most incredible home cinema sound experience is here. FeaturesThe Ultimate 3D sound experienceReal surround sound in a second820W Output powerThrilling bassUltra HD 4K Pass-through with Dolby Vision™Chromecast and AirPlay 2 built-in Bluetooth Wireless Streaming Detachable speakers that go anywhereTechnical Specifications:S ound system: 5.1.4 channel P ower supply: 100 – 240VAC, ~ 50/60Hz B attery charge time: 3 hours T otal speaker power output (Max. @THD 1%): 820 W M ain Soundbar output power (Max. @THD 1%): 400 W S urround speakers output power (Max. @THD 1%): 2 x 60W S ubwoofer output power (Max. @THD 1%): 300 WS oundbar transducer: 4 x racetrack drivers +2 x up-firing full-range drivers +3 x 0.75" (20mm) tweeter S urround transducer (per piece): up-fring full-range driver + 0.75" (20mm) tweeter S ubwoofer transducer: 10" O perating temperature: 0°C – 45°C Video H DMI In: 1 H DMI eARC: 1 H DMI HDCP version: 2.3Audio M ax SPL: 103dB F requency response: 34Hz~20kHz A udio inputs: 1 Optical, Bluetooth, Chromecast, AirPlay 2, USB USB U SB port: Type A U SB rating: 5 V/500 mA S upported file format: MP3 M P3 codec: MPEG 1 Layer 2/3, MPEG 2 Layer 3, MPEG 2.5 Layer 3 M P3 sampling rate: 16kHz – 48kHz M P3 bitrate: 80kbps – 320kbps U SB Port: (USB playback is available in US version. For other versions, USB is for Service only.)Wireless B luetooth version: 4.2 B luetooth profile: A2DP V1.2/ AVRCP V1.5 B luetooth frequency range: 2402MHz – 2480MHz B luetooth Max. transmitting power: 13dbm (EIRP) M odulation type: GFSK, π/4 DQPSK, 8DPSK W i-Fi network: IEEE 802.11 a/b/g/n/ac (2.4GHz/5GHz) 2.4G Wi-Fi frequency range: 2412 – 2472MHz (2.4GHz ISM Band, USA 11 Channels, Europe and others 13 Channels) 2.4G Wi-Fi Max. transmitting power: 20dBm (EIRP) M odulation type: DBPSK, DQPSK, CCK, QPSK, BPSK, 16QAM, 64QAM 5G Wi-Fi frequency range: 5.15 – 5.35GHz, 5.470 – 5.725GHz, 5.725 – 5.825GHz 5G Wi-Fi Max. transmitting power: 22dBm (EIRP) M odulation type: QPSK, BPSK, 16QAM, 64QAM, 256QAM 5G Wireless frequency range: 5180.0 – 5240.0MHz (Except Europe), 5725.0 – 5825.0MHz 5G Max. transmitting power: 13dBm (EIRP) M odulation type: QPSK Dimensions (W x H x D) 884 x 62 x 120mm / 34.8 x 2.4 x 4.7 inches (soundbar); 173 x 60 x 120mm / 6.8 x 2.4 x 4.7 inches (detachable surround speaker, per piece);305 x 440 x 305mm / 12.0 x 17.3 x 12.0 inches (subwoofer) Weight 3.70kg /8.1 lb (soundbar);0.75kg x 2/1.6 lb x 2 (detachable surround speaker); 11.14kg/24.6 lb (subwoofer)Dimension (Packaging) D imensions: 1032 x 382 x 488mm G ross Weight:20.00kg Power consumption O ff mode: N/A S tandby for Soundbar (when all wireless connections are deactivated): < 0.5 W N etwork standby (Soundbar): < 6.0 W N etwork standby (Subwoofer): < 2.0 W T ime to standby: <10 minutesHARMAN International Industries, Incorporated8500 Balboa Boulevard, Northridge, CA 91329 USA Features and BenefitsThe Ultimate 3D sound experienceUpgrade your viewing or gaming experience from ordinary to extraordinary. Built-in Dolby Atmos ®, DTS:X ™ and four up-firing speakers bounce sound up to the ceiling back down to you for an awesome, true 3D sound experience.Real surround sound in a secondInstantly enjoy a true, cinematic 9.1 surround experience. Simply place the two detachable surround speakers behind you. No extra wires, no extra power connections so no extra hassle.820W Output powerWith 820 Watts of system output power, you'll hear your movies, games and music like never before. Let the immersive, powerful sound take your viewing or gaming experience to the next level.Thrilling bassPunchy, precise bass from a mighty 10" wireless subwoofer brings the action to your action movies and the emotion to your music.Ultra HD 4K Pass-through with Dolby Vision ™Incredible 4K video resolution deserves incredible sound. The JBL Bar 9.1 soundbar makes the ultimate dynamic duo when paired with your TV.Chromecast and AirPlay 2 built-inBuilt-in Wi-Fi and compatibility with Chromecast and Airplay 2 means you can stream all your favorite online music in high clarity with a simple finger tap.Bluetooth Wireless StreamingNot in the mood for a film or game? No problem. With the JBL Bar 9.1 soundbar you can also enjoy wireless music streaming via Bluetooth from your mobile or tablet.Detachable speakers that go anywhereBuilt-in batteries mean audio freedom. Place the two detachable surround speakersanywhere in your room to enjoy an incredible audio experience. After 10 hours of playback, simply dock them to the soundbar to recharge.© 2020 HARMAN International Industries, Inc orporated. All rights reserved. JBL is a trademark of HARMAN International Industries, Inc orporated, registered in the United States and/or other c ountries. The Bluetooth ® word mark and logos are registered trademarks owned by Bluetooth SIG, Inc. and any use of suc h marks by HARMAN International Industries, Incorporated is under license. Other trademarks and trade names are those of their respective owners. The terms HDMI, the HDMI logo, and High-Definition Multimedia Interface are trademarks or registered trademarks of HDMI Licensing LLC in the United States and other countries. Dolby, Dolby Audio and the double-D symbol are trademarks of Dolby Laboratories. Features, specifications and appearance are subject to change without notice.What’s in the box:1x Main Soundbar2x Detachable wireless surround speakers 1x Wireless subwooferRemote control with 2 x batteriesPower cords (up to 8pcs depending on region SKUs)HDMI cable x12 x L-shape Wall-mount bracket (Main Bar) + 2 x U-shape Wall-mount bracket (for Surround Speakers) kit with screws Quick start guide Warranty card Safety sheetSide caps (x4, For some regions only)。
The information in this document is subject to change without notice and does not represent a commitment on the part of Native Instruments GmbH. The software described by this docu-ment is subject to a License Agreement and may not be copied to other media. No part of this publication may be copied, reproduced or otherwise transmitted or recorded, for any purpose, without prior written permission by Native Instruments GmbH, hereinafter referred to as Native Instruments.“Native Instruments”, “NI” and associated logos are (registered) trademarks of Native Instru-ments GmbH.ASIO, VST, HALion and Cubase are registered trademarks of Steinberg Media Technologies GmbH.All other product and company names are trademarks™ or registered® trademarks of their re-spective holders. Use of them does not imply any affiliation with or endorsement by them.Document authored by: David Gover and Nico Sidi.Software version: 2.6.11 (11/2017)Hardware version: MASCHINE MK3Special thanks to the Beta Test Team, who were invaluable not just in tracking down bugs, but in making this a better product.NATIVE INSTRUMENTS GmbH Schlesische Str. 29-30D-10997 Berlin Germanywww.native-instruments.de NATIVE INSTRUMENTS North America, Inc. 6725 Sunset Boulevard5th FloorLos Angeles, CA 90028USANATIVE INSTRUMENTS K.K.YO Building 3FJingumae 6-7-15, Shibuya-ku, Tokyo 150-0001Japanwww.native-instruments.co.jp NATIVE INSTRUMENTS UK Limited 18 Phipp StreetLondon EC2A 4NUUKNATIVE INSTRUMENTS FRANCE SARL 113 Rue Saint-Maur75011 ParisFrance SHENZHEN NATIVE INSTRUMENTS COMPANY Limited 203B & 201B, Nanshan E-Commerce Base Of Innovative ServicesShi Yun Road, Shekou, Nanshan, Shenzhen China© NATIVE INSTRUMENTS GmbH, 2017. All rights reserved.Table of Contents1Welcome to MASCHINE (23)1.1MASCHINE Documentation (24)1.2Document Conventions (25)1.3New Features in MASCHINE 2.6.11 (27)2Basic Concepts (29)2.1Important Names and Concepts (29)2.2Adjusting the MASCHINE User Interface (32)2.2.1Adjusting the Size of the Interface (32)2.2.2Switching between Ideas View and Arranger View (33)2.2.3Showing/Hiding the Browser (34)2.2.4Minimizing the Mixer (34)2.2.5Showing/Hiding the Control Lane (35)2.3Common Operations (36)2.3.1Using the 4-Directional Push Encoder (36)2.3.2Pinning a Mode on the Controller (37)2.3.3Pinning a Mode on the Controller (38)2.3.4Undo/Redo (39)2.3.5List Overlay for Selectors (41)2.3.6Zoom and Scroll Overlays (42)2.3.7Focusing on a Group or a Sound (42)2.3.8Switching Between the Master, Group, and Sound Level (47)2.3.9Navigating Channel Properties, Plug-ins, and Parameter Pages in the Control Area.482.3.9.1Extended Navigate Mode on Your Controller (53)2.3.10Using Two or More Hardware Controllers (56)2.3.11Touch Auto-Write Option (58)2.4Native Kontrol Standard (60)2.5Stand-Alone and Plug-in Mode (62)2.5.1Differences between Stand-Alone and Plug-in Mode (62)2.5.2Switching Instances (63)2.5.3Controlling Various Instances with Different Controllers (64)2.6Preferences (65)2.6.1Preferences – General Page (66)2.6.2Preferences – Audio Page (70)2.6.3Preferences – MIDI Page (74)2.6.4Preferences – Default Page (77)2.6.5Preferences – Library Page (81)2.6.6Preferences – Plug-ins Page (89)2.6.7Preferences – Hardware Page (94)2.6.8Preferences – Colors Page (98)2.7Integrating MASCHINE into a MIDI Setup (100)2.7.1Connecting External MIDI Equipment (100)2.7.2Sync to External MIDI Clock (101)2.7.3Send MIDI Clock (102)2.8Syncing MASCHINE using Ableton Link (103)2.8.1Connecting to a Network (103)2.8.2Joining and Leaving a Link Session (103)2.9Using a Pedal with the MASCHINE Controller (105)2.10File Management on the MASCHINE Controller (105)3Browser (107)3.1Browser Basics (107)3.1.1The MASCHINE Library (107)3.1.2Browsing the Library vs. Browsing Your Hard Disks (108)3.2Searching and Loading Files from the Library (109)3.2.1Overview of the LIBRARY Pane (109)3.2.2Selecting or Loading a Product and Selecting a Bank from the Browser (114)3.2.2.1Browsing by Product Category Using MASCHINE MK3 (118)3.2.2.2Browsing by Product Vendor Using MASCHINE MK3 (119)3.2.3Selecting a Product Category, a Product, a Bank, and a Sub-Bank (119)3.2.3.1Selecting a Product Category, a Product, a Bank, and a Sub-Bank on theController (124)3.2.4Selecting a File Type (125)3.2.5Choosing Between Factory and User Content (126)3.2.6Selecting Type and Mode Tags (127)3.2.7List and Tag Overlays in the Browser (133)3.2.8Performing a Text Search (135)3.2.9Loading a File from the Result List (135)3.3Additional Browsing Tools (140)3.3.1Loading the Selected Files Automatically (140)3.3.2Auditioning Instrument Presets (142)3.3.3Auditioning Samples (143)3.3.4Loading Groups with Patterns (144)3.3.5Loading Groups with Routing (145)3.3.6Displaying File Information (145)3.4Using Favorites in the Browser (146)3.5Editing the Files’ Tags and Properties (152)3.5.1Attribute Editor Basics (152)3.5.2The BANK Page (154)3.5.3The TYPES and MODES Pages (155)3.5.4The PROPERTIES Page (157)3.6Loading and Importing Files from Your File System (158)3.6.1Overview of the FILES Pane (158)3.6.2Using Favorites (160)3.6.3Using the Location Bar (161)3.6.4Navigating to Recent Locations (162)3.6.5Using the Result List (163)3.6.6Importing Files to the MASCHINE Library (166)3.7Locating Missing Samples (168)3.8Using Quick Browse (170)4Managing Sounds, Groups, and Your Project (175)4.1Overview of the Sounds, Groups, and Master (175)4.1.1The Sound, Group, and Master Channels (176)4.1.2Similarities and Differences in Handling Sounds and Groups (177)4.1.3Selecting Multiple Sounds or Groups (178)4.2Managing Sounds (183)4.2.1Loading Sounds (185)4.2.2Pre-listening to Sounds (186)4.2.3Renaming Sound Slots (187)4.2.4Changing the Sound’s Color (187)4.2.5Saving Sounds (189)4.2.6Copying and Pasting Sounds (191)4.2.7Moving Sounds (194)4.2.8Resetting Sound Slots (196)4.3Managing Groups (197)4.3.1Creating Groups (198)4.3.2Loading Groups (200)4.3.3Renaming Groups (201)4.3.4Changing the Group’s Color (201)4.3.5Saving Groups (203)4.3.6Copying and Pasting Groups (205)4.3.7Reordering Groups (208)4.3.8Deleting Groups (209)4.4Exporting MASCHINE Objects and Audio (210)4.4.1Saving a Group with its Samples (211)4.4.2Saving a Project with its Samples (212)4.4.3Exporting Audio (214)4.5Importing Third-Party File Formats (221)4.5.1Loading REX Files into Sound Slots (221)4.5.2Importing MPC Programs to Groups (222)5Playing on the Controller (226)5.1Adjusting the Pads (226)5.1.1The Pad View in the Software (226)5.1.2Choosing a Pad Input Mode (228)5.1.3Adjusting the Base Key (231)5.1.4Using Choke Groups (233)5.1.5Using Link Groups (235)5.2Adjusting the Key, Choke, and Link Parameters for Multiple Sounds (238)5.3Adjusting the Base Key (239)5.4Playing Tools (240)5.4.1Mute and Solo (241)5.4.2Choke All Notes (245)5.4.3Groove (246)5.4.4Level, Tempo, Tune, and Groove Shortcuts on Your Controller (248)5.4.5Tap Tempo (252)5.5Performance Features (253)5.5.1Overview of the Perform Features (253)5.5.2Selecting a Scale and Creating Chords (256)5.5.3Scale and Chord Parameters (256)5.5.4Creating Arpeggios and Repeated Notes (262)5.5.5Swing on Note Repeat / Arp Output (267)5.6Using Lock Snapshots (268)5.6.1Creating a Lock Snapshot (268)5.6.2Using Extended Lock (269)5.6.3Updating a Lock Snapshot (269)5.6.4Recalling a Lock Snapshot (270)5.6.5Morphing Between Lock Snapshots (270)5.6.6Deleting a Lock Snapshot (271)5.6.7Triggering Lock Snapshots via MIDI (272)5.7Using the Smart Strip (274)5.7.1Pitch Mode (274)5.7.2Modulation Mode (275)5.7.3Perform Mode (275)5.7.4Notes Mode (276)6Working with Plug-ins (277)6.1Plug-in Overview (277)6.1.1Plug-in Basics (277)6.1.2First Plug-in Slot of Sounds: Choosing the Sound’s Role (281)6.1.3Loading, Removing, and Replacing a Plug-in (281)6.1.3.1Browser Plug-in Slot Selection (287)6.1.4Adjusting the Plug-in Parameters (290)6.1.5Bypassing Plug-in Slots (290)6.1.6Using Side-Chain (292)6.1.7Moving Plug-ins (292)6.1.8Alternative: the Plug-in Strip (294)6.1.9Saving and Recalling Plug-in Presets (294)6.1.9.1Saving Plug-in Presets (295)6.1.9.2Recalling Plug-in Presets (296)6.1.9.3Removing a Default Plug-in Preset (297)6.2The Sampler Plug-in (298)6.2.1Page 1: Voice Settings / Engine (300)6.2.2Page 2: Pitch / Envelope (302)6.2.3Page 3: FX / Filter (305)6.2.4Page 4: Modulation (307)6.2.5Page 5: LFO (309)6.2.6Page 6: Velocity / Modwheel (311)6.3Using Native Instruments and External Plug-ins (313)6.3.1Opening/Closing Plug-in Windows (313)6.3.2Using the VST/AU Plug-in Parameters (316)6.3.3Setting Up Your Own Parameter Pages (317)6.3.4Using VST/AU Plug-in Presets (322)6.3.5Multiple-Output Plug-ins and Multitimbral Plug-ins (325)7Working with Patterns (326)7.1Pattern Basics (326)7.1.1Pattern Editor Overview (327)7.1.2Navigating the Event Area (333)7.1.3Following the Playback Position in the Pattern (335)7.1.4Jumping to Another Playback Position in the Pattern (337)7.1.5Group View and Keyboard View (338)7.1.6Adjusting the Arrange Grid and the Pattern Length (341)7.1.7Adjusting the Step Grid and the Nudge Grid (344)7.2Recording Patterns in Real Time (349)7.2.1Recording Your Patterns Live (349)7.2.2The Record Prepare Mode (352)7.2.3Using the Metronome (353)7.2.4Recording with Count-in (354)7.2.5Quantizing while Recording (356)7.3Recording Patterns with the Step Sequencer (356)7.3.1Step Mode Basics (356)7.3.2Editing Events in Step Mode (359)7.3.3Recording Modulation in Step Mode (361)7.4Editing Events (361)7.4.1Editing Events with the Mouse: an Overview (362)7.4.2Creating Events/Notes (365)7.4.3Selecting Events/Notes (366)7.4.4Editing Selected Events/Notes (372)7.4.5Deleting Events/Notes (378)7.4.6Cut, Copy, and Paste Events/Notes (381)7.4.7Quantizing Events/Notes (383)7.4.8Quantization While Playing (385)7.4.9Doubling a Pattern (386)7.4.10Adding Variation to Patterns (387)7.5Recording and Editing Modulation (391)7.5.1Which Parameters Are Modulatable? (392)7.5.2Recording Modulation (393)7.5.3Creating and Editing Modulation in the Control Lane (395)7.6Creating MIDI Tracks from Scratch in MASCHINE (401)7.7Managing Patterns (403)7.7.1The Pattern Manager and Pattern Mode (403)7.7.2Selecting Patterns and Pattern Banks (406)7.7.3Creating Patterns (408)7.7.4Deleting Patterns (410)7.7.5Creating and Deleting Pattern Banks (411)7.7.6Naming Patterns (413)7.7.7Changing the Pattern’s Color (415)7.7.8Duplicating, Copying, and Pasting Patterns (416)7.7.9Moving Patterns (419)7.7.10Adjusting Pattern Length in Fine Increments (420)7.8Importing/Exporting Audio and MIDI to/from Patterns (421)7.8.1Exporting Audio from Patterns (421)7.8.2Exporting MIDI from Patterns (422)7.8.3Importing MIDI to Patterns (425)8Audio Routing, Remote Control, and Macro Controls (434)8.1Audio Routing in MASCHINE (435)8.1.1Sending External Audio to Sounds (436)8.1.2Configuring the Main Output of Sounds and Groups (441)8.1.3Setting Up Auxiliary Outputs for Sounds and Groups (446)8.1.4Configuring the Master and Cue Outputs of MASCHINE (450)8.1.5Mono Audio Inputs (456)8.1.5.1Configuring External Inputs for Sounds in Mix View (457)8.2Using MIDI Control and Host Automation (461)8.2.1Triggering Sounds via MIDI Notes (462)8.2.2Triggering Scenes via MIDI (469)8.2.3Controlling Parameters via MIDI and Host Automation (471)8.2.4Selecting VST/AU Plug-in Presets via MIDI Program Change (479)8.2.5Sending MIDI from Sounds (480)8.3Creating Custom Sets of Parameters with the Macro Controls (484)8.3.1Macro Control Overview (485)8.3.2Assigning Macro Controls Using the Software (486)8.3.3Assigning Macro Controls Using the Controller (492)9Controlling Your Mix (494)9.1Mix View Basics (494)9.1.1Switching between Arrange View and Mix View (494)9.1.2Mix View Elements (495)9.2The Mixer (497)9.2.1Displaying Groups vs. Displaying Sounds (498)9.2.2Adjusting the Mixer Layout (500)9.2.3Selecting Channel Strips (501)9.2.4Managing Your Channels in the Mixer (502)9.2.5Adjusting Settings in the Channel Strips (504)9.2.6Using the Cue Bus (508)9.3The Plug-in Chain (510)9.4The Plug-in Strip (511)9.4.1The Plug-in Header (513)9.4.2Panels for Drumsynths and Internal Effects (515)9.4.3Panel for the Sampler (516)9.4.4Custom Panels for Native Instruments Plug-ins (519)9.4.5Undocking a Plug-in Panel (Native Instruments and External Plug-ins Only) (523)9.5Controlling Your Mix from the Controller (525)9.5.1Navigating Your Channels in Mix Mode (526)9.5.2Adjusting the Level and Pan in Mix Mode (527)9.5.3Mute and Solo in Mix Mode (528)9.5.4Plug-in Icons in Mix Mode (528)10Using the Drumsynths (529)10.1Drumsynths – General Handling (530)10.1.1Engines: Many Different Drums per Drumsynth (530)10.1.2Common Parameter Organization (530)10.1.3Shared Parameters (533)10.1.4Various Velocity Responses (533)10.1.5Pitch Range, Tuning, and MIDI Notes (533)10.2The Kicks (534)10.2.1Kick – Sub (536)10.2.2Kick – Tronic (538)10.2.3Kick – Dusty (541)10.2.4Kick – Grit (542)10.2.5Kick – Rasper (545)10.2.6Kick – Snappy (546)10.2.7Kick – Bold (548)10.2.8Kick – Maple (550)10.2.9Kick – Push (551)10.3The Snares (553)10.3.1Snare – Volt (555)10.3.2Snare – Bit (557)10.3.3Snare – Pow (559)10.3.4Snare – Sharp (560)10.3.5Snare – Airy (562)10.3.6Snare – Vintage (564)10.3.7Snare – Chrome (566)10.3.8Snare – Iron (568)10.3.9Snare – Clap (570)10.3.10Snare – Breaker (572)10.4The Hi-hats (574)10.4.1Hi-hat – Silver (575)10.4.2Hi-hat – Circuit (577)10.4.3Hi-hat – Memory (579)10.4.4Hi-hat – Hybrid (581)10.4.5Creating a Pattern with Closed and Open Hi-hats (583)10.5The Toms (584)10.5.1Tom – Tronic (586)10.5.2Tom – Fractal (588)10.5.3Tom – Floor (592)10.5.4Tom – High (594)10.6The Percussions (595)10.6.1Percussion – Fractal (597)10.6.2Percussion – Kettle (600)10.6.3Percussion – Shaker (602)10.7The Cymbals (606)10.7.1Cymbal – Crash (608)10.7.2Cymbal – Ride (610)11Using the Bass Synth (613)11.1Bass Synth – General Handling (614)11.1.1Parameter Organization (614)11.1.2Bass Synth Parameters (616)12Using Effects (618)12.1Applying Effects to a Sound, a Group or the Master (618)12.1.1Adding an Effect (618)12.1.2Other Operations on Effects (627)12.1.3Using the Side-Chain Input (629)12.2Applying Effects to External Audio (632)12.2.1Step 1: Configure MASCHINE Audio Inputs (632)12.2.2Step 2: Set up a Sound to Receive the External Input (635)12.2.3Step 3: Load an Effect to Process an Input (637)12.3Creating a Send Effect (639)12.3.1Step 1: Set Up a Sound or Group as Send Effect (639)12.3.2Step 2: Route Audio to the Send Effect (644)12.3.3 A Few Notes on Send Effects (646)12.4Creating Multi-Effects (647)13Effect Reference (650)13.1Dynamics (651)13.1.1Compressor (651)13.1.2Gate (655)13.1.3Transient Master (659)13.1.4Limiter (661)13.1.5Maximizer (665)13.2Filtering Effects (668)13.2.1EQ (668)13.2.2Filter (671)13.2.3Cabinet (675)13.3Modulation Effects (676)13.3.1Chorus (676)13.3.2Flanger (678)13.3.3FM (680)13.3.4Freq Shifter (681)13.3.5Phaser (683)13.4Spatial and Reverb Effects (685)13.4.1Ice (685)13.4.2Metaverb (687)13.4.3Reflex (688)13.4.4Reverb (Legacy) (690)13.4.5Reverb (692)13.4.5.1Reverb Room (692)13.4.5.2Reverb Hall (695)13.4.5.3Plate Reverb (698)13.5Delays (700)13.5.1Beat Delay (700)13.5.2Grain Delay (703)13.5.3Grain Stretch (705)13.5.4Resochord (707)13.6Distortion Effects (709)13.6.1Distortion (709)13.6.2Lofi (711)13.6.3Saturator (713)13.6.4Analog Distortion (716)13.7Perform FX (718)13.7.1Filter (719)13.7.2Flanger (721)13.7.3Burst Echo (724)13.7.4Reso Echo (726)13.7.5Ring (729)13.7.6Stutter (731)13.7.7Tremolo (734)13.7.8Scratcher (737)14Working with the Arranger (740)14.1Arranger Basics (740)14.1.1Navigating the Arranger (743)14.1.2Following the Playback Position in Your Project (745)14.1.3Jumping to Other Sections (746)14.2Using Ideas View (748)14.2.1Scene Overview (748)14.2.2Creating Scenes (750)14.2.3Assigning and Removing Patterns (751)14.2.4Selecting Scenes (755)14.2.5Deleting Scenes (757)14.2.6Creating and Deleting Scene Banks (758)14.2.7Clearing Scenes (759)14.2.8Duplicating Scenes (759)14.2.9Reordering Scenes (761)14.2.10Making Scenes Unique (762)14.2.11Appending Scenes to Arrangement (763)14.2.12Naming Scenes (764)14.2.13Changing the Color of a Scene (765)14.3Using Arranger View (767)14.3.1Section Management Overview (767)14.3.2Creating Sections (772)14.3.3Assigning a Scene to a Section (773)14.3.4Selecting Sections and Section Banks (774)14.3.5Reorganizing Sections (778)14.3.6Adjusting the Length of a Section (779)14.3.6.1Adjusting the Length of a Section Using the Software (781)14.3.6.2Adjusting the Length of a Section Using the Controller (782)14.3.7Assigning and Removing Patterns (783)14.3.8Duplicating Sections (785)14.3.8.1Making Sections Unique (786)14.3.9Removing Sections (787)14.3.10Renaming Scenes (789)14.3.11Clearing Sections (790)14.3.12Creating and Deleting Section Banks (791)14.3.13Enabling Auto Length (792)14.3.14Looping (793)14.3.14.1Setting the Loop Range in the Software (793)14.4Playing with Sections (794)14.4.1Jumping to another Playback Position in Your Project (795)14.5Triggering Sections or Scenes via MIDI (796)14.6The Arrange Grid (798)14.7Quick Grid (800)15Sampling and Sample Mapping (801)15.1Opening the Sample Editor (801)15.2Recording a Sample (802)15.2.1Opening the Record Page (802)15.2.2Selecting the Source and the Recording Mode (803)15.2.3Arming, Starting, and Stopping the Recording (806)15.2.5Checking Your Recordings (810)15.2.6Location and Name of Your Recorded Samples (813)15.3Editing a Sample (814)15.3.1Using the Edit Page (814)15.3.2Audio Editing Functions (820)15.4Slicing a Sample (828)15.4.1Opening the Slice Page (829)15.4.2Adjusting the Slicing Settings (830)15.4.3Live Slicing (836)15.4.3.1Live Slicing Using the Controller (836)15.4.3.2Delete All Slices (837)15.4.4Manually Adjusting Your Slices (837)15.4.5Applying the Slicing (844)15.5Mapping Samples to Zones (850)15.5.1Opening the Zone Page (850)15.5.2Zone Page Overview (851)15.5.3Selecting and Managing Zones in the Zone List (853)15.5.4Selecting and Editing Zones in the Map View (858)15.5.5Editing Zones in the Sample View (862)15.5.6Adjusting the Zone Settings (865)15.5.7Adding Samples to the Sample Map (872)16Appendix: Tips for Playing Live (875)16.1Preparations (875)16.1.1Focus on the Hardware (875)16.1.2Customize the Pads of the Hardware (875)16.1.3Check Your CPU Power Before Playing (875)16.1.4Name and Color Your Groups, Patterns, Sounds and Scenes (876)16.1.5Consider Using a Limiter on Your Master (876)16.1.6Hook Up Your Other Gear and Sync It with MIDI Clock (876)16.1.7Improvise (876)16.2Basic Techniques (876)16.2.1Use Mute and Solo (876)16.2.2Use Scene Mode and Tweak the Loop Range (877)16.2.3Create Variations of Your Drum Patterns in the Step Sequencer (877)16.2.4Use Note Repeat (877)16.2.5Set Up Your Own Multi-effect Groups and Automate Them (877)16.3Special Tricks (878)16.3.1Changing Pattern Length for Variation (878)16.3.2Using Loops to Cycle Through Samples (878)16.3.3Using Loops to Cycle Through Samples (878)16.3.4Load Long Audio Files and Play with the Start Point (878)17Troubleshooting (879)17.1Knowledge Base (879)17.2Technical Support (879)17.3Registration Support (880)17.4User Forum (880)18Glossary (881)Index (889)1Welcome to MASCHINEThank you for buying MASCHINE!MASCHINE is a groove production studio that implements the familiar working style of classi-cal groove boxes along with the advantages of a computer based system. MASCHINE is ideal for making music live, as well as in the studio. It’s the hands-on aspect of a dedicated instru-ment, the MASCHINE hardware controller, united with the advanced editing features of the MASCHINE software.Creating beats is often not very intuitive with a computer, but using the MASCHINE hardware controller to do it makes it easy and fun. You can tap in freely with the pads or use Note Re-peat to jam along. Alternatively, build your beats using the step sequencer just as in classic drum machines.Patterns can be intuitively combined and rearranged on the fly to form larger ideas. You can try out several different versions of a song without ever having to stop the music.Since you can integrate it into any sequencer that supports VST, AU, or AAX plug-ins, you can reap the benefits in almost any software setup, or use it as a stand-alone application. You can sample your own material, slice loops and rearrange them easily.However, MASCHINE is a lot more than an ordinary groovebox or sampler: it comes with an inspiring 7-gigabyte library, and a sophisticated, yet easy to use tag-based Browser to give you instant access to the sounds you are looking for.What’s more, MASCHINE provides lots of options for manipulating your sounds via internal ef-fects and other sound-shaping possibilities. You can also control external MIDI hardware and 3rd-party software with the MASCHINE hardware controller, while customizing the functions of the pads, knobs and buttons according to your needs utilizing the included Controller Editor application. We hope you enjoy this fantastic instrument as much as we do. Now let’s get go-ing!—The MASCHINE team at Native Instruments.MASCHINE Documentation1.1MASCHINE DocumentationNative Instruments provide many information sources regarding MASCHINE. The main docu-ments should be read in the following sequence:1.MASCHINE Getting Started: This document provides a practical approach to MASCHINE viaa set of tutorials covering easy and more advanced tasks in order to help you familiarizeyourself with MASCHINE.2.MASCHINE Manual (this document): The MASCHINE Manual provides you with a compre-hensive description of all MASCHINE software and hardware features.Additional documentation sources provide you with details on more specific topics:▪Controller Editor Manual: Besides using your MASCHINE hardware controller together withits dedicated MASCHINE software, you can also use it as a powerful and highly versatileMIDI controller to pilot any other MIDI-capable application or device. This is made possibleby the Controller Editor software, an application that allows you to precisely define all MIDIassignments for your MASCHINE controller. The Controller Editor was installed during theMASCHINE installation procedure. For more information on this, please refer to the Con-troller Editor Manual available as a PDF file via the Help menu of Controller Editor.▪Online Support Videos: You can find a number of support videos on The Official Native In-struments Support Channel under the following URL: https:///NIsupport-EN We recommend that you follow along with these instructions while the respective appli-cation is running on your computer.Other Online Resources:If you are experiencing problems related to your Native Instruments product that the supplied documentation does not cover, there are several ways of getting help:▪Knowledge Base▪User Forum▪Technical Support▪Registration SupportYou will find more information on these subjects in the chapter Troubleshooting.1.2Document ConventionsThis section introduces you to the signage and text highlighting used in this manual. This man-ual uses particular formatting to point out special facts and to warn you of potential issues. The icons introducing these notes let you see what kind of information is to be expected:This document uses particular formatting to point out special facts and to warn you of poten-tial issues. The icons introducing the following notes let you see what kind of information can be expected:Furthermore, the following formatting is used:▪Text appearing in (drop-down) menus (such as Open…, Save as… etc.) in the software and paths to locations on your hard disk or other storage devices is printed in italics.▪Text appearing elsewhere (labels of buttons, controls, text next to checkboxes etc.) in the software is printed in blue. Whenever you see this formatting applied, you will find the same text appearing somewhere on the screen.▪Text appearing on the displays of the controller is printed in light grey. Whenever you see this formatting applied, you will find the same text on a controller display.▪Text appearing on labels of the hardware controller is printed in orange. Whenever you see this formatting applied, you will find the same text on the controller.▪Important names and concepts are printed in bold.▪References to keys on your computer’s keyboard you’ll find put in square brackets (e.g.,“Press [Shift] + [Enter]”).►Single instructions are introduced by this play button type arrow.→Results of actions are introduced by this smaller arrow.Naming ConventionThroughout the documentation we will refer to MASCHINE controller (or just controller) as the hardware controller and MASCHINE software as the software installed on your computer.The term “effect” will sometimes be abbreviated as “FX” when referring to elements in the MA-SCHINE software and hardware. These terms have the same meaning.Button Combinations and Shortcuts on Your ControllerMost instructions will use the “+” sign to indicate buttons (or buttons and pads) that must be pressed simultaneously, starting with the button indicated first. E.g., an instruction such as:“Press SHIFT + PLAY”means:1.Press and hold SHIFT.2.While holding SHIFT, press PLAY and release it.3.Release SHIFT.Unlabeled Buttons on the ControllerThe buttons and knobs above and below the displays on your MASCHINE controller do not have labels.1234567812345678The unlabeled buttons and knobs on the MASCHINE controller.For better reference, we applied a special formatting here: throughout the document, the ele-ments are capitalized and numbered, so the buttons above the displays are written Button 1 to Button 8, while the knobs under the displays are written Knob 1 to Knob 8. E.g., whenever you see an instruction such as “Press Button 2 to open the EDIT page,” you’ll know it’s the second button from the left above the displays.1.3New Features in MASCHINE2.6.11The following two new features have been added to MASCHINE 2.6.11 and are only aimed at MASCHINE MK3 users:▪Introduction of the General, Audio, MIDI and Hardware Preferences direct from the MA-SCHINE MK3 controller using the SETTINGS button. For more information on using the Preferences from the hardware, refer to each section of the following chapter: ↑2.6, Prefer-ences.。
Jeep WranglerX109-WRA 9” Restyle In-Dash System Installation ManualModel: Wrangler Model Y ear: 2011-UPDesign and specifications are subject to change without notice for improvement.The installation of this product requires specialized skills and experience. We recommend that you have theproduct installed by an Alpine authorized dealer. Before you use this product, be sure to carefully read this installation manual and the separate user's manualso that you can use the product correctly. Alpine Electronics bears no responsibility for problems that arise as a result of failure to follow the instructions in the manuals. This manual includes a number of symbols that are intended to help you use the product safely, to preventharm to you and others, and to protect against damage to property. These symbols and their meanings are listed below. Make sure you fully understand these symbols before you begin reading the main text.Explanations of Injury and Damage That May Result from Incorrect UseJeepModel Year Wrangler2011 - UP* The specified vehicles have been tested and have met compatibility specs at the time of testing. Compatibility is not guaranteed if the manufacturer has made production changes to the listed vehicles above.Warning: Before you begin wiring, remove the ground wire from the negativeterminal of the battery. Failing to do so can lead to electric shock, injury or damage to equipment.Types of PrecautionsStore screws and other small objects where small children cannot reach them. If one of these small objects is swallowed, consult with a doctor immediately.When replacing fuses, be sure to use fuses with the specified current rating. Failing to do so couldlead to an accident or fire.ForbiddenMandatory Before you begin wiring, remove the ground wire from the negative terminal of the battery. Failing to do so could lead to electric shock or injury.When making a hole in the vehicle body, be careful to avoid damaging pipes, the fuel tank, electrical wiring, and the like. This kind of damage could lead to an accident or fire.Bundle cords so that they don’t interfere with driving. Wrapping cords around the steering wheel, gearshift, brake pedal, or the like, could lead to an accident or damage equipment.Do not sandwich cords between the seat railing or allow them to touch protrusions. Resulting breaks or shorts could lead to electric shock or fire.Do not block vents or heat sinks. Doing so could lead to fire or damage equipment.The installation and wiring of this product requires specialized skills and experience. Have the product installed by an Alpine authorized dealer.Tools RequiredAccessory ListInstallation Kit Parts (G-KTX-X109D-WRA)Accessory ListHead Unit Box Parts (X109D)iDatalink Maestro Box Parts (ALP-MRR2/ALP-HRN-WRA2)Component LocationsIMPORTANT: Follow the recommended component location shown below. Failure to do so, will result in poor GPS performance.GPS Antenna InstallationIMPORTANT: Follow the GPS antenna installation procedure shown below. Failure to do so will result in poor GPS performance.Factory Unit Disassembly Process1Remove the rubber cover from the top centerstorage area and extract (1) 7mm screw.3Remove the window switch pod using a panelremoving tool and extract (1) 7mm screw.radio.2Remove the knee cover panel and extract (2) 7mm screws located to the right and left sides of thesteering wheel column.steering wheelcolumn.Left side of steering wheelcolumn.4Remove the dash panel.6Extract (2) 7 mm screws from the factory radio bracket and remove it.Programming the iDatalink Maestro Module1INSTALL THE WEBLINK PLUG-INGo to:/plugin and follow the installation steps.Review the System Requirements before installing.If the plugin is already installed, the caution, “The plugin is alreadyinstalled” appears. Please skip to step 2.3 CONNECT YOUR MAESTRO MODULEUse the included USB cable to connect your Maestro module to yourPC.5 PROGRAM YOUR MODULEFollow the programming steps for your vehicle.2REGISTER A WEBLINK ACCOUNTGo to:/register and complete the registration process.A confirmation email will be sent to you requiring validation.For existing customers, click log in.4 LOG INTO WEBLINKGo to:/login.Enter your username and password, then click OK.6 Once Programing is complete “FLASHINGCOMPLETED!” will be displayed.Proceed to the next page to complete installation.Installation Instructions2Remove the vents from the radio section on the OEM dash panel by pressing down on the lock tab and turning right. Mount vents on to the X109-WRA bezel.4Mount the microphone as illustrated and run the cable to the radio cavity.6Attach the Maestro to the main harness.1The factory dash panel needs to be trimmed to allow the new X109-WRA bezel to fit into place. Remove the highlighted area by cutting along the dashed line.3Use a cutting tool to trim the highlighted areashown below.below the driver side dash and run the extension to the radio cavity.Mounting BracketsIMPORTANT: During the research and development of this product it was discovered that mounting tolerance may vary from the vehicle’s trim level to year built. We have added a 1mm tolerance to the mounting brackets to compensate for such variance in mounting tolerance. Use the guides below as reference if there are any required adjustments.Adjust the rear bracket as needed when the top or bottom is protruding or not flushed.Adjust the side brackets as needed when either side is protruding or not flushed.Installation Instructions2Position X109D source unit on top of X109 DVD/Display unit as shown, and attach the mounting brackets using the provided (8) 8mm screws andrear support rubber cap screw.4Route the USB extension cable to the glove box, connect the main harness and other adapters to thefactory harness and secure them.Connect the radio bezel and snap it into place.1Attach the modified panel using the factory screws.3Attach the rear support bracket using (2) 7mm factory screws.5Route the key harness through the top-left side of the X109D source unit. Mount the X109D source unit using (4) 7mm factory screws.Exploded-View DiagramX109-WRARadio DashBezelBracketsFactory Vents and WindowSwitch Pod (not included)Bezel Wiring Diagram20 Pin Harness(Connect to X109D)8 Pin Harness8 Pin HarnessX109-WRA Wiring DiagramX109-WRA With Optional HDMI Interface Wiring DiagramSet Up Guide1Turn the vehicle’s Ignition switch to ACC.2Turn ON the X109-WRA by pressing any key.3Select the user language and press OK.4Press and release the parking brake twice.5If a camera is present, turn it ON in the system menu. (MENU/SETUP/SYSTEM/CAMERA/CAMERA SELECT) 6AUDIO MUTE ON REVERSE- By default, when the vehicle is shifted into reverse the AUDIO will MUTE. If this feature is not desired turn it off in the AUDIO MENU (MENU/SETUP/SOUND/MUTE WHILE BACKING UP)7Set the DVD player. (MENU/SETUP/SOURCE/HDMI).8When the KCX-630HD (HDMI SELECTOR) is present be sure to turn it ON in the SETUP MENU. (MENU/ SYSTEM/EXTERNAL ACCESSORIES/HDMI SELECTOR)9When the KAC-001 (External Accessory Control Module) is present be sure to turn it ON in the SETUP MENU.(MENU/SYSTEM/EXTERNAL ACCESSORIES/EXTERNAL ACCESSORY CTLR)10 Vehicle information- Set the desired gauge information. (MENU/VEHICLE INFO/GAUGES/CAR SETTINGS) Troubleshooting GuideSymptom Possible Cause Remedy1iDatalink website saysserial number is invalid.Serial number may not be iniDatalink database.Call ADS at 1-866-427-2999 andverify.2Headunit will not turn on.Incorrect serial number was usedwhen flashing maestro.Flash Maestro with correct serialnumber.4 pin Maestro data cable isdisconnected or damaged.Check for proper connection ordisconnected pins.Monitor, key-harness or mainharness are not connected.Check for proper connection ordisconnected pins.3Cannot enter SETTINGSMENU.Vehicle is in motion or parkingbrake is not engaged.With vehicle on (P)PARK, engagethe parking brake, release theparking brake and engage theparking brake a second time.4Cannot control the DVDPlayer properly.DVD has not been set on theSETUP menu.Ensure DVD is ON in HDMI SETUPmenu.HDMI box has not been set on theSETUP menu.Ensure DVD is ON in HDMI SETUPmenu and remote loop was cut onthe wire harness.5Sound mutes whenvehicle is shift to reverse.Mute on reverse is turned on in theSOUND menu.Select Mute on reverse off.6On Nav screen thevehicle is out of place.Poor GPS signal.Ensure the recommended GPSantenna route was used. See page6.。
背包问题九讲2.0beta1.2崔添翼(Tianyi Cui)*2012-05-08†本文题为《背包问题九讲》,从属于《动态规划的思考艺术》系列。
这系列文章的第一版于2007年下半年使用EmacsMuse制作,以HTML格式发布到网上,转载众多,有一定影响力。
2011年9月,本系列文章由原作者用L A T E X重新制作并全面修订,您现在看到的是2.0beta版本,修订历史及最新版本请访问https:///tianyicui/pack查阅。
本文版权归原作者所有,采用CC BY-NC-SA协议发布。
Contents101背包问题31.1题目 (3)1.2基本思路 (3)1.3优化空间复杂度 (3)1.4初始化的细节问题 (4)1.5一个常数优化 (4)1.6小结 (5)2完全背包问题52.1题目 (5)2.2基本思路 (5)2.3一个简单有效的优化 (5)2.4转化为01背包问题求解 (6)2.5O(V N)的算法 (6)2.6小结 (7)3多重背包问题73.1题目 (7)3.2基本算法 (7)3.3转化为01背包问题 (7)3.4可行性问题O(V N)的算法 (8)*a.k.a.dd_engi†Build2012050812090013.5小结 (9)4混合三种背包问题94.1问题 (9)4.201背包与完全背包的混合 (9)4.3再加上多重背包 (9)4.4小结 (10)5二维费用的背包问题105.1问题 (10)5.2算法 (10)5.3物品总个数的限制 (10)5.4复整数域上的背包问题 (11)5.5小结 (11)6分组的背包问题116.1问题 (11)6.2算法 (11)6.3小结 (11)7有依赖的背包问题127.1简化的问题 (12)7.2算法 (12)7.3较一般的问题 (12)7.4小结 (13)8泛化物品138.1定义 (13)8.2泛化物品的和 (13)8.3背包问题的泛化物品 (14)8.4小结 (14)9背包问题问法的变化149.1输出方案 (14)9.2输出字典序最小的最优方案 (15)9.3求方案总数 (15)9.4最优方案的总数 (16)9.5求次优解、第K优解 (16)9.6小结 (17)2101背包问题1.1题目有N件物品和一个容量为V的背包。
放入第i件物品耗费的费用是C i1,得到的价值是W i。
求解将哪些物品装入背包可使价值总和最大。
1.2基本思路这是最基础的背包问题,特点是:每种物品仅有一件,可以选择放或不放。
用子问题定义状态:即F[i,v]表示前i件物品恰放入一个容量为v的背包可以获得的最大价值。
则其状态转移方程便是:F[i,v]=max{F[i−1,v],F[i−1,v−C i]+W i}这个方程非常重要,基本上所有跟背包相关的问题的方程都是由它衍生出来的。
所以有必要将它详细解释一下:“将前i件物品放入容量为v的背包中”这个子问题,若只考虑第i件物品的策略(放或不放),那么就可以转化为一个只和前i−1件物品相关的问题。
如果不放第i件物品,那么问题就转化为“前i−1件物品放入容量为v的背包中”,价值为F[i−1,v];如果放第i件物品,那么问题就转化为“前i−1件物品放入剩下的容量为v−C i的背包中”,此时能获得的最大价值就是F[i−1,v−C i]再加上通过放入第i件物品获得的价值W i。
伪代码如下:F[0,0..V]←0for i←1to Nfor v←C i to VF[i,v]←max{F[i−1,v],F[i−1,v−C i]+W i}1.3优化空间复杂度以上方法的时间和空间复杂度均为O(V N),其中时间复杂度应该已经不能再优化了,但空间复杂度却可以优化到O(V)。
先考虑上面讲的基本思路如何实现,肯定是有一个主循环i←1...N,每次算出来二维数组F[i,0...V]的所有值。
那么,如果只用一个数组F[0...V],能不能保证第i 次循环结束后F[v]中表示的就是我们定义的状态F[i,v]呢?F[i,v]是由F[i−1,v]和F[i−1,v−C i]两个子问题递推而来,能否保证在推F[i,v]时(也即在第i次主循环中推F[v]时)能够取用F[i−1,v]和F[i−1,v−C i]的值呢?事实上,这要求在每次主循环中我们以v←V...0的递减顺序计算F[v],这样才能保证计算F[v]时F[v−C i]保存的是状态F[i−1,v−C i]的值。
伪代码如下:F[0..V]←0for i←1to Nfor v←V to C iF[v]←max{F[v],F[v−C i]+W i}1也即占用背包的空间容量,后文统一称之为“费用(cost)”3其中的F[v]←max{F[v],F[v−C i]+W i}一句,恰就对应于我们原来的转移方程,因为现在的F[v−C i]就相当于原来的F[i−1,v−C i]。
如果将v的循环顺序从上面的逆序改成顺序的话,那么则成了F[i,v]由F[i,v−C i]推导得到,与本题意不符。
事实上,使用一维数组解01背包的程序在后面会被多次用到,所以这里抽象出一个处理一件01背包中的物品过程,以后的代码中直接调用不加说明。
def ZeroOnePack(F,C,W)for v←V to CF[v]←max(F[v],F[v−C]+W)有了这个过程以后,01背包问题的伪代码就可以这样写:F[0..V]←0for i←1to NZeroOnePack(F,C i,W i)1.4初始化的细节问题我们看到的求最优解的背包问题题目中,事实上有两种不太相同的问法。
有的题目要求“恰好装满背包”时的最优解,有的题目则并没有要求必须把背包装满。
一种区别这两种问法的实现方法是在初始化的时候有所不同。
如果是第一种问法,要求恰好装满背包,那么在初始化时除了F[0]为0,其它F[1..V]均设为−∞,这样就可以保证最终得到的F[V]是一种恰好装满背包的最优解。
如果并没有要求必须把背包装满,而是只希望价格尽量大,初始化时应该将F[0..V]全部设为0。
这是为什么呢?可以这样理解:初始化的F数组事实上就是在没有任何物品可以放入背包时的合法状态。
如果要求背包恰好装满,那么此时只有容量为0的背包可以在什么也不装且价值为0的情况下被“恰好装满”,其它容量的背包均没有合法的解,属于未定义的状态,应该被赋值为-∞了。
如果背包并非必须被装满,那么任何容量的背包都有一个合法解“什么都不装”,这个解的价值为0,所以初始时状态的值也就全部为0了。
这个小技巧完全可以推广到其它类型的背包问题,后面不再对进行状态转移之前的初始化进行讲解。
1.5一个常数优化上面伪代码中的for i←1to Nfor v←V to C i中第二重循环的下限可以改进。
它可以被优化为for i←1to Nfor v←V to max(V−ΣN i W i,C i)这个优化之所以成立的原因请读者自己思考。
(提示:使用二维的转移方程思考较易。
)41.6小结01背包问题是最基本的背包问题,它包含了背包问题中设计状态、方程的最基本思想。
另外,别的类型的背包问题往往也可以转换成01背包问题求解。
故一定要仔细体会上面基本思路的得出方法,状态转移方程的意义,以及空间复杂度怎样被优化。
2完全背包问题2.1题目有N种物品和一个容量为V的背包,每种物品都有无限件可用。
放入第i种物品的费用是C i,价值是W i。
求解:将哪些物品装入背包,可使这些物品的耗费的费用总和不超过背包容量,且价值总和最大。
2.2基本思路这个问题非常类似于01背包问题,所不同的是每种物品有无限件。
也就是从每种物品的角度考虑,与它相关的策略已并非取或不取两种,而是有取0件、取1件、取2件……直至取⌊V/C i⌋件等许多种。
如果仍然按照解01背包时的思路,令F[i,v]表示前i种物品恰放入一个容量为v 的背包的最大权值。
仍然可以按照每种物品不同的策略写出状态转移方程,像这样:F[i,v]=max{F[i−1,v−kC i]+kW i|0≤kC i≤v}这跟01背包问题一样有O(V N)个状态需要求解,但求解每个状态的时间已经不是常数了,求解状态F[i,v]的时间是O(vC i ),总的复杂度可以认为是O(NVΣVC i),是比较大的。
将01背包问题的基本思路加以改进,得到了这样一个清晰的方法。
这说明01背包问题的方程的确是很重要,可以推及其它类型的背包问题。
但我们还是要试图改进这个复杂度。
2.3一个简单有效的优化完全背包问题有一个很简单有效的优化,是这样的:若两件物品i、j满足C i≤C j 且W i≥W j,则将可以将物品j直接去掉,不用考虑。
这个优化的正确性是显然的:任何情况下都可将价值小费用高的j换成物美价廉的i,得到的方案至少不会更差。
对于随机生成的数据,这个方法往往会大大减少物品的件数,从而加快速度。
然而这个并不能改善最坏情况的复杂度,因为有可能特别设计的数据可以一件物品也去不掉。
这个优化可以简单的O(N2)地实现,一般都可以承受。
另外,针对背包问题而言,比较不错的一种方法是:首先将费用大于V的物品去掉,然后使用类似计数排序的做法,计算出费用相同的物品中价值最高的是哪个,可以O(V+N)地完成这个优化。
这个不太重要的过程就不给出伪代码了,希望你能独立思考写出伪代码或程序。
52.4转化为01背包问题求解01背包问题是最基本的背包问题,我们可以考虑把完全背包问题转化为01背包问题来解。
最简单的想法是,考虑到第i种物品最多选⌊V/C i⌋件,于是可以把第i种物品转化为⌊V/C i⌋件费用及价值均不变的物品,然后求解这个01背包问题。
这样的做法完全没有改进时间复杂度,但这种方法也指明了将完全背包问题转化为01背包问题的思路:将一种物品拆成多件只能选0件或1件的01背包中的物品。
更高效的转化方法是:把第i种物品拆成费用为C i2k、价值为W i2k的若干件物品,其中k取遍满足C i2k≤V的非负整数。
这是二进制的思想。
因为,不管最优策略选几件第i种物品,其件数写成二进制后,总可以表示成若干个2k件物品的和。
这样一来就把每种物品拆成O(log⌊V/C i⌋)件物品,是一个很大的改进。
2.5O(V N)的算法这个算法使用一维数组,先看伪代码:F[0..V]←0for i←1to Nfor v←C i to VF[v]←max(F[v],F[v−C i]+W i)你会发现,这个伪代码与01背包问题的伪代码只有v的循环次序不同而已。
为什么这个算法就可行呢?首先想想为什么01背包中要按照v递减的次序来循环。
让v递减是为了保证第i次循环中的状态F[i,v]是由状态F[i−1,v−C i]递推而来。
换句话说,这正是为了保证每件物品只选一次,保证在考虑“选入第i件物品”这件策略时,依据的是一个绝无已经选入第i件物品的子结果F[i−1,v−C i]。