GPU提交作业方法详细介绍-1
- 格式:docx
- 大小:13.93 KB
- 文档页数:1
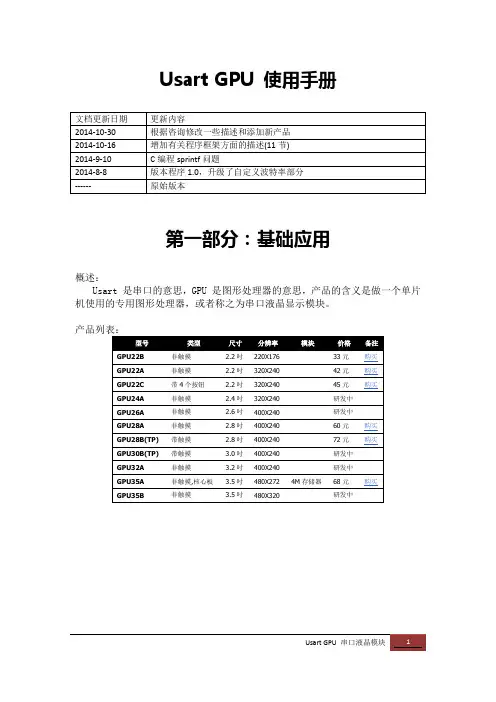
Usart GPU 使用手册第一部分:基础应用概述:Usart 是串口的意思,GPU 是图形处理器的意思,产品的含义是做一个单片机使用的专用图形处理器,或者称之为串口液晶显示模块。
一、接线开箱后,可以将串口输出的4根引脚焊上排插,使用杜邦线将串口接到USB 转TTL线上,即可接到电脑USB口上上电,屏幕即会显示第一屏的Hello界面;说明下:照片中是我调试用的,因此增加了RESET按钮和运行程序刷机切换的BOOT自锁开关,正常使用和产品中不带这两个东东;主板中使用XC6206接到5V的,6206是一个低压差稳压器,输出3.3V,160mV 的低压差,让板子在3.46V即可正常供电,实际使用中,电压低到3V,6206也可以正常输出电压但是不稳压;由于STM32 最低2V即可工作,因此本板子可以直接接单节锂电池即可工作;如果接不通,建议RX TX反一下,有些下载线是指接入单片机端的标志,不是自身标示;其他产品都有这4根线,3.5吋的核心板太小,导致字体印刷不清,请参考:二、上电,观看演示这是上电后的Hello界面,俗称欢迎界面,此界面属于第一个批界面,可以有上位机程序在PC下自由设计,用户可以在这个界面上设计自己产品的名字和公司的图标;开机界面十秒种,如果收不到串口命令,就会进入演示状态。
正常的量产之后,单片机需要在上电十秒内给串口液晶屏发送指令,只要一发送指令,就自动的进入串口命令状态。
三、接GpuMaker将USB转TTL接入计算机,注意由于程序的原因串口号不能超过10,即COM1~COM9方可使用;从:/dn/d.php?n=g7下载GpuMaker程序,程序是一个ZIP包,绿色软件,解压到硬盘中即可使用;如果您有多个使用串口屏的项目,请把此软件解压多份,每份一个项目;运行解开目录中的GpuMaker.exe,系统进入:选择,左上角的串口号,点击“打开按钮”,串口连接成功;此时点击“发送指令”,液晶屏即可显示表示连接正常;【备注:】如果没有反应,请自查1、TTL串口线是否接好;拔下TTL线,COM口消失,插上,就出现,就表示TTL对应的那个COM口正常2、注意不要选错串口号,和波特率,默认波特率(拿到新品未设置时),波特率都是1152003、COM口不能超过104、如果命令接收区不出现OK,请把TX 和RX两根线颠倒一下接;GPU上电会从串口传出序列号数据,如果接收区有,表示正常。
slurm作业提交系统常⽤命令
写下⾃⼰的关于slurm感悟⼀⼆
与各⼈pc不同,slurm的基本架构是,⼀个中专节点,之后有很多局域⽹ip对应不同的计算节点,在中专节点敲命令,命令中可以指定需要⽤到哪些计算节点
1. 查看有哪些分区 sinfo命令
2. 指定节点跑程序srun,⽐如这⾥我有⼀个run.py的⽂件,是print(1)
slurm最基本的命令是srun,⽐如上⾯⼀⾏是指定-p分区,-w节点名称运⾏⼀个run.py的⽂件,当然还有更⾼级的,指定gpu的数量和指定进程的数量
⽐如上⾯的命令,--gres=gpu:8表⽰每个节点上⽤⼏个gpu,-n表⽰有多少个进程,⼀般多线程的时候,⽤到多卡的时候会这么操作
3. 查看⾃⼰任务的run的情况,squeue -u +⽤户
⽐如上图,我运⾏了ipython命令,然后我⽤squeue -u +我的⽤户名,查看了⼀下我的任务占据的节点的名称,分区jobid等等,这个命令的主要作⽤还是有时候机器⽤完的时候,排队⽤机器,看看排队情况,或者是不指定节点名称的时候(刚刚我们说的-w指定节点名称,实际上也可以不指定,这个时候slurm系统⾃动分配),看看节点名称是多少,⽅便后续操作
4. 查看gpu使⽤情况
swatch +节点名称+nv
因为放到了cuda⾥⾯,确实占⽤⼀定的显存
查看cpu:swatch+节点名称+top
查看内存:swatch+节点名称+free
查看内存或者是gpu的使⽤的时候,可以使多个节点⼀起看,中间⽤逗号隔开即可。
gpu 需要掌握的知识摘要:1.GPU 的基本概念2.GPU 与CPU 的区别3.GPU 的主要应用领域4.GPU 的关键技术5.如何学习GPU 编程正文:GPU,全称为图形处理器(Graphics Processing Unit),是一种专门用于处理图形和图像任务的计算机硬件。
GPU 的发展和应用,使得计算机在处理图形、图像和视频等任务方面取得了极大的性能提升。
与CPU(中央处理器)相比,GPU 具有更强大的并行计算能力。
在处理大量图形计算任务时,GPU 可以同时执行成千上万的计算,从而在短时间内完成复杂的计算任务。
而CPU 更擅长串行计算,对于大量并行任务的处理效率较低。
GPU 的主要应用领域包括计算机图形学、影视制作、游戏开发、科学模拟和数据分析等。
在这些领域中,GPU 可以大幅提高计算速度,使得复杂的任务可以在较短的时间内完成。
GPU 的关键技术包括着色器、渲染管线、纹理映射和几何处理等。
掌握这些技术,可以更好地利用GPU 进行高效计算。
对于如何学习GPU 编程,可以从以下几个方面入手:1.学习基本概念:了解GPU 的基本概念、结构和原理,为进一步学习打下基础。
2.学习编程语言:掌握CUDA(Compute Unified Device Architecture)等GPU 编程语言,熟悉编程环境和工具。
3.学习优化技巧:了解GPU 编程中的性能优化技巧,如内存管理、线程调度和数据传输等。
4.实践项目:通过实际项目,不断积累经验,提高GPU 编程水平。
总之,GPU 作为现代计算机的重要组成部分,已经成为许多领域中必不可少的工具。
gpu与cpu协调工作的基本操作和时序
GPU与CPU之间的协调工作需要通过一系列的操作和时序来完成。
以下是其基本操作和时序的示例:
1. 数据准备:CPU首先将需要处理的数据从主内存中复制到GPU的显存中。
这可以通过CPU向GPU发送复制指令来完成。
2. 核函数调用:GPU通过执行核函数对数据进行并行处理。
CPU会向GPU发送相应的调用指令,告诉GPU执行哪个核函数以及如何划分数据。
3. 数据处理:GPU并行地对数据进行计算或运算。
每个线程束(thread block)中的多个线程一起协同完成一部分计算。
GPU会根据核函数的调用指令来分配线程束和线程的数量。
4. 数据通信:如果在计算过程中需要进行数据通信,GPU和CPU之间会通过主内存进行数据交换。
例如,当每个线程束完成计算后需要将结果写回主内存。
5. 同步操作:为了确保GPU和CPU之间的数据一致性,需要进行同步操作。
CPU可以通过调用同步函数来等待GPU的计算完成,并从GPU读取计算结果。
6. 后续处理:CPU可以基于GPU的计算结果进行后续处理,如进一步计算、存储、显示等操作。
这需要通过GPU和CPU 之间的数据通信来获取计算结果。
在以上操作过程中,GPU和CPU之间的协调工作是基于一定
的时序进行的。
CPU通过发出指令来告知GPU何时进行数据
准备和核函数调用,而GPU则按照指令的顺序执行这些操作。
为了保证正确的数据流动和计算顺序,GPU和CPU之间需要
严格的指令调度和数据同步机制。

集群GPU队列使用指南1.单个GPU使用首先编写.cu文件,拷贝至用户的主目录下。
假设源文件是,编译出来vectorAdd, 编译指令如下(命令是一整行的):nvcc -I /opt/cuda/include -I /opt/cuda/NVIDIA_GPU_Computing_SDK/C/common/inc -I /opt/cuda/NVIDIA_GPU_Computing_SDK/shared/inc -L /opt/cuda/lib64 -L /opt/cuda/NVIDIA_GPU_Computing_SDK/C/lib -L /opt/cuda/NVIDIA_GPU_Computing_SDK/C/common/lib -L /opt/cuda/NVIDIA_GPU_Computing_SDK/shared/lib -o vectorAdd -lcutil_x86_64 –lcuda 接下来,编写提交的脚本内容如下:#!/bin/bash -x#PBS -N VectorAdd#PBS -l nodes=1:ppn=1:gpus=1#PBS -j oe#PBS -q gpu##define variables#PATH=/opt/cuda/bin:$PATHn_proc=$(cat $PBS_NODEFILE | wc -l)LD_LIBRARY_PATH=/opt/cuda/lib64:/opt/cuda/lib:$LD_LIBRARY_PATH:$LD_LIBRARY_PATH#binary file/home/users/yourname/vectorAddexit 0最后提交任务,qsub 即完成所有操作。
2.多个GPU使用(Cuda + Open MPI)由于目前gpu对列内每个节点有8个cpu核,只有1个gpu卡。
一般只需要一个cpu核绑定一块gpu卡。
所以在申请队列中如果需要同时申请多块gpu卡,那么需要控制好申请的cpu数。
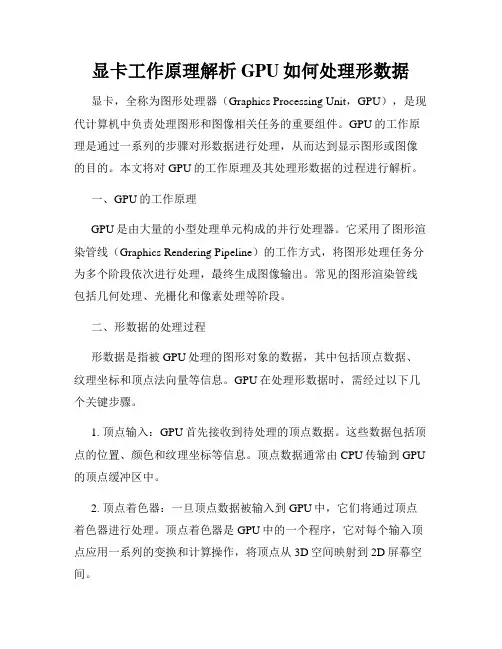
显卡工作原理解析GPU如何处理形数据显卡,全称为图形处理器(Graphics Processing Unit,GPU),是现代计算机中负责处理图形和图像相关任务的重要组件。
GPU的工作原理是通过一系列的步骤对形数据进行处理,从而达到显示图形或图像的目的。
本文将对GPU的工作原理及其处理形数据的过程进行解析。
一、GPU的工作原理GPU是由大量的小型处理单元构成的并行处理器。
它采用了图形渲染管线(Graphics Rendering Pipeline)的工作方式,将图形处理任务分为多个阶段依次进行处理,最终生成图像输出。
常见的图形渲染管线包括几何处理、光栅化和像素处理等阶段。
二、形数据的处理过程形数据是指被GPU处理的图形对象的数据,其中包括顶点数据、纹理坐标和顶点法向量等信息。
GPU在处理形数据时,需经过以下几个关键步骤。
1. 顶点输入:GPU首先接收到待处理的顶点数据。
这些数据包括顶点的位置、颜色和纹理坐标等信息。
顶点数据通常由CPU传输到GPU 的顶点缓冲区中。
2. 顶点着色器:一旦顶点数据被输入到GPU中,它们将通过顶点着色器进行处理。
顶点着色器是GPU中的一个程序,它对每个输入顶点应用一系列的变换和计算操作,将顶点从3D空间映射到2D屏幕空间。
3. 图元装配:在顶点着色器之后,图元装配阶段将顶点组合成一系列的图元,如点、线和三角形等。
图元装配的结果将被用于后续的光栅化处理。
4. 光栅化:光栅化是将图元转换为像素的过程。
在光栅化阶段,GPU会根据图元形状和位置等信息,确定它们对应的像素,并计算像素的颜色和深度值等属性。
5. 像素着色器:一旦图元被光栅化为像素,GPU将为每个像素调用像素着色器。
像素着色器是一段程序代码,它为每个像素计算最终的颜色值。
在像素着色器中,还可以进行纹理采样、光照计算和阴影处理等操作。
6. 输出合成:最后一步是将处理后的像素输出到帧缓冲区中,用于显示或后续处理。
输出合成时,GPU将像素的颜色值写入帧缓冲区的相应位置,并进行混合、遮罩和深度测试等操作。
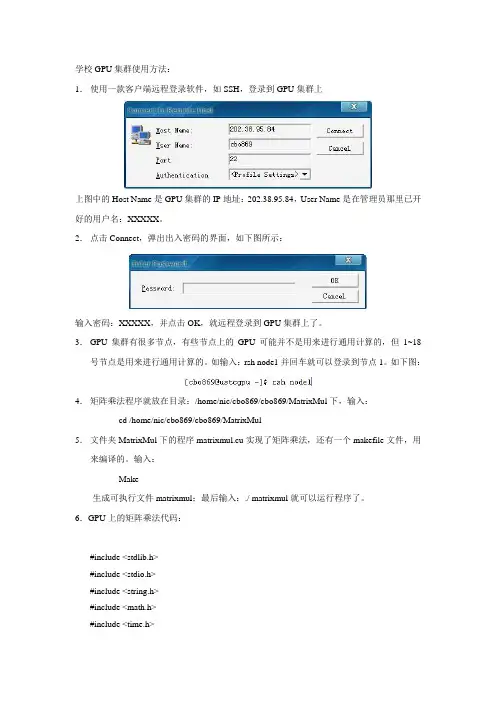
学校GPU集群使用方法:1.使用一款客户端远程登录软件,如SSH,登录到GPU集群上上图中的Host Name是GPU集群的IP地址:202.38.95.84,User Name是在管理员那里已开好的用户名:XXXXX。
2.点击Connect,弹出出入密码的界面,如下图所示:输入密码:XXXXX,并点击OK,就远程登录到GPU集群上了。
3.GPU集群有很多节点,有些节点上的GPU可能并不是用来进行通用计算的,但1~18号节点是用来进行通用计算的。
如输入:rsh node1并回车就可以登录到节点1。
如下图:4.矩阵乘法程序就放在目录:/home/nic/cbo869/cbo869/MatrixMul下,输入:cd /home/nic/cbo869/cbo869/MatrixMul5.文件夹MatrixMul下的程序matrixmul.cu实现了矩阵乘法,还有一个makefile文件,用来编译的。
输入:Make生成可执行文件matrixmul;最后输入:./ matrixmul就可以运行程序了。
6.GPU上的矩阵乘法代码:#include <stdlib.h>#include <stdio.h>#include <string.h>#include <math.h>#include <time.h>#include <sys/time.h>// includes, project#include <cutil.h>#include <cuda.h>#include <cuda_runtime.h>// Thread block size#define BLOCK_SIZE 16// Matrix dimensions// (chosen as multiples of the thread block size for simplicity)#define WA (30 * BLOCK_SIZE) // Matrix A width#define HA (50 * BLOCK_SIZE) // Matrix A height#define WB (80 * BLOCK_SIZE) // Matrix B width#define HB W A // Matrix B height#define WC WB // Matrix C width#define HC HA // Matrix C height//sequential code implemented on cpuvoid computeGold(float* C, const float* A, const float* B, int hA, int wA, int wB) {for (int i = 0; i < hA; ++i) {for (int j = 0; j < wB; ++j) {double sum = 0;for (int k = 0; k < wA; ++k) {double a = A[i * wA + k];double b = B[k * wB + j];sum += a * b;}C[i * wB + j] = sum;}}}// Initialize a matrix with random float entries.void randomInit(float* data, int size){for (int i = 0; i < size; ++i)data[i] = rand() / (float)RAND_MAX;}//Compare the cpu's result with gpu'svoid printDiff(float *data1, float *data2, int width, int height) {int i,j,k;int error_count=0;for (j=0; j<height; j++) {for (i=0; i<width; i++) {k = j*width+i;if (data1[k] != data2[k]){printf("diff(%d,%d) CPU=%4.4f, GPU=%4.4f n", i,j, data1[k], data2[k]);error_count++;}}}printf(" nTotal Errors = %d n", error_count);}/////////////////////////////////////////////////////////////////////////////////////////////////////__global__ void matrixMul( float* C, float* A, float* B, int wA, int wB){// Declaration of the shared memory array As used to// store the sub-matrix of A__shared__ float As[BLOCK_SIZE][BLOCK_SIZE];// Declaration of the shared memory array Bs used to// store the sub-matrix of B__shared__ float Bs[BLOCK_SIZE][BLOCK_SIZE];// Block indexint bx = blockIdx.x;int by = blockIdx.y;// Thread indexint tx = threadIdx.x;int ty = threadIdx.y;// Index of the first sub-matrix of A processed by the blockint aBegin = wA * BLOCK_SIZE * by;// Index of the last sub-matrix of A processed by the blockint aEnd = aBegin + wA - 1;// Step size used to iterate through the sub-matrices of Aint aStep = BLOCK_SIZE;// Index of the first sub-matrix of B processed by the blockint bBegin = BLOCK_SIZE * bx;// Step size used to iterate through the sub-matrices of Bint bStep = BLOCK_SIZE * wB;// Csub is used to store the element of the block sub-matrix// that is computed by the threadfloat Csub = 0;// Loop over all the sub-matrices of A and B// required to compute the block sub-matrixfor (int a = aBegin, b = bBegin; a <= aEnd; a += aStep, b += bStep) {// Load the matrices from device memory// to shared memory; each thread loads// one element of each matrixAs[ty][tx] = A[a + wA * ty + tx];Bs[ty][tx] = B[b + wB * ty + tx];// Synchronize to make sure the matrices are loaded__syncthreads();// Multiply the two matrices together;// each thread computes one element// of the block sub-matrixfor (int k = 0; k < BLOCK_SIZE; ++k)Csub += As[ty][k] * Bs[k][tx];// Synchronize to make sure that the preceding// computation is done before loading two new// sub-matrices of A and B in the next iteration__syncthreads();}// Write the block sub-matrix to device memory;// each thread writes one elementint c = wB * BLOCK_SIZE * by + BLOCK_SIZE * bx;C[c + wB * ty + tx] = Csub;}/////////////////////////////////////////////////////////////////////////////////////////////int main(void){// set seed for rand()srand((unsigned)time(NULL));struct timeval tv_start, tv_end;double time_used;// allocate host memory for matrices A and Bint size_A = W A * HA;size_t mem_size_A = sizeof(float) * size_A;float* h_A = (float*) malloc(mem_size_A);int size_B = WB * HB;size_t mem_size_B = sizeof(float) * size_B;float* h_B = (float*) malloc(mem_size_B);// initialize host memoryrandomInit(h_A, size_A);randomInit(h_B, size_B);// allocate device memoryfloat* d_A;cudaMalloc((void**) &d_A, mem_size_A);float* d_B;cudaMalloc((void**) &d_B, mem_size_B);// copy host memory to devicecudaMemcpy(d_A, h_A, mem_size_A, cudaMemcpyHostToDevice) ;cudaMemcpy(d_B, h_B, mem_size_B, cudaMemcpyHostToDevice) ;// allocate device memory for resultint size_C = WC * HC;size_t mem_size_C = sizeof(float) * size_C;float* d_C;cudaMalloc((void**) &d_C, mem_size_C);// allocate host memory for the resultfloat* h_C = (float*) malloc(mem_size_C);// setup execution parametersdim3 BlockDim(BLOCK_SIZE, BLOCK_SIZE);dim3 GridDim(WC / BlockDim.x, HC / BlockDim.y);gettimeofday(&tv_start, NULL);// execute the kernelmatrixMul<<<GridDim, BlockDim>>>(d_C, d_A, d_B, WA, WB); cudaThreadSynchronize();gettimeofday(&tv_end, NULL);time_used=(tv__sec-tv__sec)*1000000+(tv__usec-tv__usec); printf("\nMA(%dx%d) X MB(%dx%d)\n\n", HA, W A, HB, WB);printf("GPU_USE_TIME=%fms\n\n", time_used/1000);// copy result from device to hostcudaMemcpy(h_C, d_C, mem_size_C, cudaMemcpyDeviceToHost) ;// compute reference solutionfloat* reference = (float*) malloc(mem_size_C);gettimeofday(&tv_start, NULL);computeGold(reference, h_A, h_B, HA, W A, WB);gettimeofday(&tv_end, NULL);time_used=(tv__sec-tv__sec)*1000000+(tv__usec-tv__usec); printf("CPU_USE_TIME=%fms\n\n", time_used/1000);// check resultCUTBoolean res = cutCompareL2fe(reference, h_C, size_C, 1e-6f);printf("%s\n\n", (1 == res) ? "Right!" : "Failed!");if (res!=1)printDiff(reference, h_C, WC, HC);// clean up memoryfree(h_A);free(h_B);free(h_C);free(reference);cudaFree(d_A);cudaFree(d_B);cudaFree(d_C);cudaThreadExit();return 0;}。
Getting Started GuideTable of ContentsChapter 1. Introduction To Docker And Containers (1)Chapter 2. Preparing Your DGX System For Use With NVIDIA Container Runtime (2)2.1. Version 2.x Or Earlier: Installing Docker And nvidia-docker2 (3)2.2. Preventing IP Address Conflicts With Docker (3)2.2.1. Version3.1.1 And Later: Preventing IP Address Conflicts Between Docker AndDGX (4)2.2.2. Version 2.x Or Earlier: Preventing IP Address Conflicts Between Docker AndDGX (5)2.3. Configuring The Use Of Proxies (6)2.4. Enabling Users To Run Docker Containers (6)Chapter 3. Preparing To Use The Container Registry (8)Chapter 1.Introduction To DockerAnd ContainersDGX-2™ , DGX-1™ , and DGX Station™ are designed to run containers. Containers holdthe application as well as any libraries or code that are needed to run the application. Containers are portable within an operating system family. For example, you can create a container using Red Hat Enterprise Linux and run it on an Ubuntu system, or vice versa. The only common thread between the two operating systems is that they each need to have the container software so they can run containers.Using containers allows you to create the software on whatever OS you are comfortable with and then run the application wherever you want. It also allows you to share the application with other users without having to rebuild the application on the OS they are using.Containers are different than a virtual machine (VM) such as VMware. A VM has a complete operating system and possibly applications and data files. Containers do not contain a complete operating system. They only contain the software needed to run the application. The container relies on the host OS for things such as file system services, networking, and an OS kernel. The application in the container will always run the same everywhere, regardless of the OS/compute environment.DGX-2, DGX-1, and DGX Station all use Docker. Docker is one of the most popular container services available and is very commonly used by developers in the Artificial Intelligence (AI) space. There is a public Docker repository that holds pre-built Docker containers. These containers can be a simple base OS such as CentOS, or they may bea complete application such as TensorFlow™ . You can use these Docker containers for running the applications that they contain. You can use them as the basis for creating other containers, for example for extending a container.To enable portability in Docker images that leverage GPUs, NVIDIA developed the NVIDIA Container Runtime for Docker (also known as nvidia-docker2) . We will refer to the NVIDIA Container Runtime simply as nvidia-docker2 for the remainder of this guide for brevity. nvidia-docker2 is an open-source project that provides a command line tool to mount the user-mode components of the NVIDIA driver and the GPUs into the Docker container at launch.These containers ensure the best performance for your applications and should provide the best single-GPU performance and multi-GPU scaling.Chapter 2.Preparing Your DGXSystem For Use WithNVIDIA Container RuntimeAbout this taskSome initial setup is required to be able to access GPU containers from the Docker command line for use on DGX-2, DGX-1, or on a DGX Station, or NGC. As a result of differences between the releases of the DGX™ OS and DGX hardware, the initial setup workflow depends on the DGX system and DGX OS version that you are using.To determine the DGX OS software version on either the DGX-2, DGX-1, or DGX Station, enter the following command:$ grep VERSION /etc/dgx-releaseDGX_SWBUILD_VERSION="3.1.1"Based on the output from the command, choose from below which workflow best reflects your environment. Select the topics and perform the steps within that workflow. DGX-2 or DGX-1 with DGX OS Server 3.1.1 or Later Workflow1.Version 3.1.1 And Later: Preventing IP Address Conflicts Between Docker And DGX2.Configuring The Use Of Proxies3.Enabling Users To Run Docker ContainersDGX-1 with DGX OS Server 2.x or Earlier1.Version2.x Or Earlier: Installing Docker And nvidia-docker22.Version 2.x Or Earlier: Preventing IP Address Conflicts Between Docker And DGX3.Configuring The Use Of Proxies4.Enabling Users To Run Docker ContainersDGX Station Workflow1.Version 3.1.1 And Later: Preventing IP Address Conflicts Between Docker And DGX2.Configuring The Use Of Proxies3.Enabling Users To Run Docker Containers2.1. Version 2.x Or Earlier: InstallingDocker And nvidia-docker2About this taskDocker and nvidia-docker2 are included in DGX OS Server version 3.1.1 and later. Therefore, if DGX OS Server version 3.1.1 or later is installed, you can skip this task. Docker and nvidia-docker2 are not included in DGX OS Server version 2.x or earlier. If DGX OS Server version 2.x or earlier is installed on your DGX-1, you must install Docker and nvidia-docker2 on the system.Currently, there are two utilities that have been developed: nvidia-docker and nvidia-docker2. You can determine which are installed on your system by running:$ nvidia-docker version‣If the response is NVIDIA Docker: 1.0.x, then you are using nvidia-docker.‣If the response is NVIDIA Docker: 2.0.x (or later), then you are using nvidia-docker2. Procedure1.Install Docker.$ sudo apt-key adv --keyserver hkp://:80 --recv-keys58118E89F3A912897C070ADBF76221572C52609D$ echo deb https:///repo ubuntu-trusty main | sudo tee /etc/apt/ sources.list.d/docker.list$ sudo apt-get update$ sudo apt-get -y install docker-engine=1.12.6-0~ubuntu-trusty2.Download and install nvidia-docker2.a).Download the .deb file that contains v1.0.1 of nvidia-docker2 and nvidia-docker-plugin from GitHub.$ wget -P /tmp https:///NVIDIA/nvidia-docker/releases/download/v1.0.1/nvidia-docker_1.0.1-1_amd64.debb).Install nvidia-docker2 and nvidia-docker-plugin and then delete the .deb file youjust downloaded.$ sudo dpkg -i /tmp/nvidia-docker*.deb && rm /tmp/nvidia-docker*.deb2.2. Preventing IP Address ConflictsWith DockerTo ensure that your DGX system can access the network interfaces for Docker containers, ensure that the containers are configured to use a subnet distinct from other network resources used by your DGX system.By default, Docker uses the 172.17.0.0/16 subnet. If addresses within this range are already used on your DGX system’s network, change the Docker network to specify the IP address of the DNS server, bridge IP address range, and container IP address range to be used by your GPU containers. Consult your network administrator to find out which IP addresses are used by your network.Note: If your network does not use addresses in the default Docker IP address range, nochanges are needed and you can omit this task.This task requires sudo privileges.2.2.1. Version3.1.1 And Later: Preventing IPAddress Conflicts Between Docker AndDGXAbout this taskTo ensure that the DGX can access the network interfaces for Docker containers, configure the containers to use a subnet distinct from other network resources usedby the DGX. By default, Docker uses the 172.17.0.0/16 subnet. If addresses within this range are already used on the DGX network, change the Docker network to specify the bridge IP address range and container IP address range to be used by Docker containers. Before you beginThis task requires sudo privileges.Procedure1.Open the /etc/systemd/system/docker.service.d/docker-override.conf file in aplain-text editor, such as vi.$ sudo vi /etc/systemd/system/docker.service.d/docker-override.conf2.Append the following options to the line that begins ExecStart=/usr/bin/dockerd,which specifies the command to start the dockerd daemon:‣--bip=bridge-ip-address-range‣--fixed-cidr=container-ip-address-rangebridge-ip-address-rangeThe bridge IP address range to be used by Docker containers, for example,192.168.127.1/24.container-ip-address-rangeThe container IP address range to be used by Docker containers, for example,192.168.127.128/25.This example shows a complete /etc/systemd/system/docker.service.d/docker-override.conf file that has been edited to specify the bridge IP address range and container IP address range to be used by Docker containers.[Service]ExecStart=ExecStart=/usr/bin/dockerd -H fd:// -s overlay2 --default-shm-size=1G --bip=192.168.127.1/24 --fixed-cidr=192.168.127.128/25LimitMEMLOCK=infinityLimitSTACK=67108864Note: Starting with DGX release 3.1.4, the option --disable-legacy-registry=falseis removed from the Docker CE service configuration file docker-override.conf. Theoption is removed for compatibility with Docker CE 17.12 and later.3.Save and close the /etc/systemd/system/docker.service.d/docker-override.conf file.4.Reload the Docker settings for the systemd daemon.$ sudo systemctl daemon-reload5.Restart the docker service.$ sudo systemctl restart docker2.2.2. Version 2.x Or Earlier: Preventing IPAddress Conflicts Between Docker AndDGXAbout this taskDGX OS versions 2.x and earlier include a version of the Ubuntu operating system that uses Upstart for managing services. Therefore, the dockerd daemon is configured through the /etc/default/docker file and managed through the service command. Procedure1.Open the /etc/default/docker file for editing.$ sudo vi /etc/default/docker2.Modify the /etc/default/docker file, specifying the correct bridge IP address andIP address ranges for your network. Consult your IT administrator for the correct addresses.For example, if your DNS server exists at IP address 10.10.254.254, and the192.168.0.0/24 subnet is not otherwise needed by the DGX-1, you can add thefollowing line to the /etc/default/docker file:DOCKER_OPTS=”--dns 10.10.254.254 --bip=192.168.0.1/24 --fixedcidr=192.168.0.0/24”If there is already a DOCKER_OPTS line, then add the parameters (text between the quote marks) to the DOCKER_OPTS environment variable.3.Save and close the /etc/default/docker file when done.4.Restart Docker with the new configuration.$ sudo service docker restart2.3. Configuring The Use Of ProxiesAbout this taskIf your network requires the use of a proxy, you must ensure that APT is configured to download Debian packages through HTTP, HTTPS, and FTP proxies. Docker will then be able to access the NGC container registry through these proxies.Procedure1.Open the /etc/apt/apt.conf.d/proxy.conf file for editing and ensure that thefollowing lines are present:Acquire::http::proxy "http://<username>:<password>@<host>:<port>/";Acquire::ftp::proxy "ftp://<username>:<password>@<host>:<port>/";Acquire::https::proxy "https://<username>:<password>@<host>:<port>/";Where:‣username is your host username‣password is your host password‣host is the address of the proxy server‣port is the proxy server port2.Save the /etc/apt/apt.conf.d/proxy.conf file.3.Restart Docker with the new configuration.$ sudo service docker restart2.4. Enabling Users To Run DockerContainersAbout this taskTo prevent the docker daemon from running without protection against escalation of privileges, the Docker software requires sudo privileges to run containers. Meeting this requirement involves enabling users who will run Docker containers to run commands with sudo privileges. Therefore, you should ensure that only users whom you trustand who are aware of the potential risks to the DGX of running commands with sudo privileges are able to run Docker containers.Before allowing multiple users to run commands with sudo privileges, consult your IT department to determine whether you would be violating your organization's security policies. For the security implications of enabling users to run Docker containers, see Docker security.You can enable users to run the Docker containers in one of the following ways:‣Add each user as an administrator user with sudo privileges.‣Add each user as a standard user without sudo privileges and then add the user to the docker group. This approach is inherently insecure because any user who can send commands to the docker engine can escalate privilege and run root-user operations.To add an existing user to the docker group, run this command:$ sudo usermod -aG docker user-login-iduser-login-idThe user login ID of the existing user that you are adding to the docker group.Chapter 3.Preparing To Use TheContainer RegistryAfter you've set up your DGX-2, DGX-1, or DGX Station, you next need to obtain access to the NGC container registry where you can then pull containers and run neural networks, deploy deep learning models, and perform AI analytics in these containers on your DGX system.For DGX-2, DGX-1, and DGX Station users, for step-by-step instructions on getting setup with the NGC container registry see the NGC Container Registry For DGX User Guide.NoticeThis document is provided for information purposes only and shall not be regarded as a warranty of a certain functionality, condition, or quality of a product. NVIDIA Corporation (“NVIDIA”) makes no representations or warranties, expressed or implied, as to the accuracy or completeness of the information contained in this document and assumes no responsibility for any errors contained herein. NVIDIA shall have no liability for the consequences or use of such information or for any infringement of patents or other rights of third parties that may result from its use. This document is not a commitment to develop, release, or deliver any Material (defined below), code, or functionality.NVIDIA reserves the right to make corrections, modifications, enhancements, improvements, and any other changes to this document, at any time without notice.Customer should obtain the latest relevant information before placing orders and should verify that such information is current and complete.NVIDIA products are sold subject to the NVIDIA standard terms and conditions of sale supplied at the time of order acknowledgement, unless otherwise agreed in an individual sales agreement signed by authorized representatives of NVIDIA and customer (“Terms of Sale”). NVIDIA hereby expressly objects to applying any customer general terms and conditions with regards to the purchase of the NVIDIA product referenced in this document. No contractual obligations are formed either directly or indirectly by this document.NVIDIA products are not designed, authorized, or warranted to be suitable for use in medical, military, aircraft, space, or life support equipment, nor in applications where failure or malfunction of the NVIDIA product can reasonably be expected to result in personal injury, death, or property or environmental damage. NVIDIA accepts no liability for inclusion and/or use of NVIDIA products in such equipment or applications and therefore such inclusion and/or use is at customer’s own risk.NVIDIA makes no representation or warranty that products based on this document will be suitable for any specified use. Testing of all parameters of each product is not necessarily performed by NVIDIA. It is customer’s sole responsibility to evaluate and determine the applicability of any information contained in this document, ensure the product is suitable and fit for the application planned by customer, and perform the necessary testing for the application in order to avoid a default of the application or the product. Weaknesses in customer’s product designs may affect the quality and reliability of the NVIDIA product and may result in additional or different conditions and/or requirements beyond those contained in this document. NVIDIA accepts no liability related to any default, damage, costs, or problem which may be based on or attributable to: (i) the use of the NVIDIA product in any manner that is contrary to this document or (ii) customer product designs.No license, either expressed or implied, is granted under any NVIDIA patent right, copyright, or other NVIDIA intellectual property right under this document. Information published by NVIDIA regarding third-party products or services does not constitute a license from NVIDIA to use such products or services or a warranty or endorsement thereof. Use of such information may require a license from a third party under the patents or other intellectual property rights of the third party, or a license from NVIDIA under the patents or other intellectual property rights of NVIDIA.Reproduction of information in this document is permissible only if approved in advance by NVIDIA in writing, reproduced without alteration and in full compliance with all applicable export laws and regulations, and accompanied by all associated conditions, limitations, and notices.THIS DOCUMENT AND ALL NVIDIA DESIGN SPECIFICATIONS, REFERENCE BOARDS, FILES, DRAWINGS, DIAGNOSTICS, LISTS, AND OTHER DOCUMENTS (TOGETHER AND SEPARATELY, “MATERIALS”) ARE BEING PROVIDED “AS IS.” NVIDIA MAKES NO WARRANTIES, EXPRESSED, IMPLIED, STATUTORY, OR OTHERWISE WITH RESPECT TO THE MATERIALS, AND EXPRESSLY DISCLAIMS ALL IMPLIED WARRANTIES OF NONINFRINGEMENT, MERCHANTABILITY, AND FITNESS FOR A PARTICULAR PURPOSE. TO THE EXTENT NOT PROHIBITED BY LAW, IN NO EVENT WILL NVIDIA BE LIABLE FOR ANY DAMAGES, INCLUDING WITHOUT LIMITATION ANY DIRECT, INDIRECT, SPECIAL, INCIDENTAL, PUNITIVE, OR CONSEQUENTIAL DAMAGES, HOWEVER CAUSED AND REGARDLESS OF THE THEORY OF LIABILITY, ARISING OUT OF ANY USE OF THIS DOCUMENT, EVEN IF NVIDIA HAS BEEN ADVISED OF THE POSSIBILITY OF SUCH DAMAGES. Notwithstanding any damages that customer might incur for any reason whatsoever, NVIDIA’s aggregate and cumulative liability towards customer for the products described herein shall be limited in accordance with the Terms of Sale for the product.HDMIHDMI, the HDMI logo, and High-Definition Multimedia Interface are trademarks or registered trademarks of HDMI Licensing LLC.OpenCLOpenCL is a trademark of Apple Inc. used under license to the Khronos Group Inc.TrademarksNVIDIA, the NVIDIA logo, and cuBLAS, CUDA, DALI, DGX, DGX-1, DGX-2, DGX Station, DLProf, Jetson, Kepler, Maxwell, NCCL, Nsight Compute, Nsight Systems, NvCaffe, PerfWorks, Pascal, SDK Manager, Tegra, TensorRT, Triton Inference Server, Tesla, TF-TRT, and Volta are trademarks and/or registered trademarks of NVIDIA Corporation in the U.S. and other countries. Other company and product names may be trademarks of the respective companies with which they are associated.Copyright© 2017-2023 NVIDIA Corporation & Affiliates. All rights reserved.。
多媒体计算与通讯实验室GPU集群Torque排队系统使用手册袁平波 2016.5.20本实验室新购进24块K80 tesla GPU。
为了充分利用GPU计算资源,我们利用Torque来管理同学们的计算任务队列。
头结点的IP是192.168.17.240。
下面说明使用本GPU集群的几个步骤。
1.申请帐号.本集群有一个头结点和多个服务结点构成,因此提交计算作业需要在头结点上拥有帐号,需要使用集群的学生需要给我发一个申请邮件,同时cc给自己的导师,在导师批准后相应的帐号会被建立。
2.建立job脚本文件Torque管理系统不能直接提交二进制可执行文件,需要编写一个文本的脚本文件,来描述相关参数情况。
一个示例脚本文件myjob1.pbs如下:#PBS -N myjob1#PBS -o /home/username/myjob1.out#PBS -e /home/username/myjob1.err#PBS -l nodes=1:gpus=1:S#PBS -r ycd $PBS_O_WORKDIRecho Time is `date`echo Directory is $PWDecho This job runs on following nodes:cat $PBS_NODEFILEcat $PBS_GPUFILE./my_proc脚本文件中定义的参数默认是以#PBS开头的。
其中:-N 定义的是job名称,可以随意。
-o 定义程序运行的标准输出文件,如程序中printf打印信息,相当于stdout;-e 定义程序运行时的错误输出文件,相当于stderr。
-l 定义了申请的结点数和gpus数量。
nodes=1代表一个结点,一般申请一个结点,除非采用mpi并行作业;gpus=1定义了申请的GPU数量,根据应用实际使用的gpu数量来确定,S表示job类型,后面有详细描述。
队列系统的默认job请求时间是一周,如果运行的job时间估计会超过,则可以使用下面的参数:#PBS -l nodes=1:gpus=1:S,walltime=300:00:00表示请求300小时的job时间。
gpu工作逻辑-回复GPU工作逻辑: 解密图形处理器的运作过程图形处理器(GPU)是一种专用于图像和图形处理的硬件设备。
它的运作逻辑与中央处理器(CPU)有所不同,旨在通过并行计算加速图形渲染和图像处理。
本文将一步一步解密GPU的工作逻辑,从数据输入到图像输出,探索这一强大设备背后的运行原理。
第一步: 数据输入在开始介绍GPU的工作原理之前,我们先了解一下数据输入过程。
GPU 通常通过主机中央处理器(CPU)来获取数据。
CPU将数据发送给GPU,然后等待GPU处理完毕后再将结果返回。
这意味着GPU与CPU之间需要进行数据交互,同时也需要考虑如何将数据在GPU内部进行处理。
第二步: 程序准备GPU工作的第一步是准备程序。
与CPU不同,GPU并不是通过指令逐个执行,而是通过运行大量的线程并行处理。
在开始处理之前,GPU需要准备并加载所需的程序以支持并行计算。
这些程序通常是基于图形和图像处理的高级编程语言(如OpenGL和DirectX)编写的,并且需要进行特定的编译和优化以适应GPU的特殊架构。
第三步: 内存分配和数据传输接下来,GPU需要分配内存来存储数据和程序。
与CPU类似,GPU也有自己的内存系统。
在数据输入过程中,GPU会从主机内存中分配一块内存用于存储数据和程序。
这些数据和程序的传输通常由CPU负责,通过PCI Express或其他高速接口进行数据传输。
这一步骤确保GPU可以访问到所需的数据和程序。
第四步: 并行计算一旦程序和数据加载到GPU内存中,GPU便开始进行并行计算。
这是GPU最重要的工作环节,也是其强大性能的关键所在。
GPU通过同时运行大量的线程来加速计算过程。
线程是任务的最小执行单位,可以独立运行,并通过各自的数据进行计算。
与CPU不同,GPU可以同时运行成千上万个线程,从而实现极高的并行度。
第五步: 数据处理和计算GPU的计算过程主要涉及两个方面:数据处理和计算。
数据处理是指对输入数据进行某种操作或变换,例如图像滤镜、几何变换等。
一种gpu并行处理的方法引言随着计算机科学的快速发展,图形处理器(GPU)的功能和性能也得到了显著提升。
在过去,GPU主要用于处理图形渲染等图像处理任务,但如今越来越多的领域开始应用GPU并行计算,如机器学习、大数据分析、科学计算等。
GPU并行处理具有高并行性的特点,能够同时执行大量相同或类似的计算任务。
然而,要充分利用GPU的并行计算能力并提高计算效率,需要使用一种有效的GPU并行处理方法。
GPU并行处理方法以下将介绍一种常用的GPU并行处理方法——CUDA(Compute Unified Device Architecture),它是由NVIDIA推出的一种通用并行计算架构。
CUDA通过使用C语言或C++语言的扩展来编写并行计算任务,然后将其加载到GPU上进行执行。
下面是CUDA的基本工作流程:1. 将计算任务分解为多个可并行执行的子任务。
2. 将数据从主机存储器(CPU)传输到设备存储器(GPU)。
3. 在GPU上并行执行子任务。
4. 将结果数据从设备存储器传输回主机存储器。
CUDA将计算任务分解为多个线程块,每个线程块包含多个线程。
线程块中的线程可以协同工作,对数据进行并行计算。
多个线程块可以同时运行,并发执行计算任务。
这种线程块和线程的层次结构使得CUDA能够更好地利用GPU的并行计算能力。
CUDA还支持共享内存的概念,通过共享内存,不同线程可以共享数据,减少数据访问延迟。
这对于需要频繁读取数据的计算任务非常重要。
CUDA编程模型CUDA提供了一组API函数,使得开发者可以方便地在代码中使用并行计算功能。
下面是一个基本的CUDA编程模型示例:cinclude <stdio.h>__global__ void parallelTask(int *data) {int tid = blockIdx.x * blockDim.x + threadIdx.x;data[tid] += 1;}int main() {int dataSize = 1024;int *hostData, *deviceData;hostData = (int*) malloc(dataSize * sizeof(int));cudaMalloc(&deviceData, dataSize * sizeof(int));for (int i = 0; i < dataSize; ++i) {hostData[i] = i;}cudaMemcpy(deviceData, hostData, dataSize * sizeof(int), cudaMemcpyHostToDevice);int threadsPerBlock = 256;int numBlocks = (dataSize + threadsPerBlock - 1) / threadsPerBlock;parallelTask<<<numBlocks, threadsPerBlock>>>(deviceData); cudaMemcpy(hostData, deviceData, dataSize * sizeof(int), cudaMemcpyDeviceT oHost);cudaFree(deviceData);free(hostData);for (int i = 0; i < dataSize; ++i) {printf("%d ", hostData[i]);}printf("\n");return 0;}上述示例代码演示了一个简单的并行任务:将数据数组的每个元素加1。
T esla GPU集群服务器使用手册v0.93 (2010-1-11)一、系统环境简介T esla GPU集群服务器域名为,IP地址为159.226.49.76(暂定),内部用户可以在办公网内直接使用SSH登录该集群,外部用户同样需要经过防火墙身份认证之后(认证过程请参见《深腾7000远程登录指南》)再进行SSH登录。
数据的上传与下载仍然是通过scp或者sftp方式进行。
T esla GPU集群服务器的系统环境如下: 1)硬件环境:● 头节点1个,机器名console,配备一颗Intel Xeon E5504四核处理器,2.0GHz 主频,2*4MB缓存,8G内存,6块300GB SAS硬盘,工作于Raid5模式。
● 计算节点90个,存在两种不同硬件配置,其机器名分别如下:c0101-c0110、c0201-c0203、c0301-c0305(共18个节点)以上节点配置一颗AMD Phenom 9850四核处理器,2.5GHz主频,4*256KB 二级缓存,4MB三级缓存,3块T esla C1060 GPU处理器,8GB内存,一块500GB SATA硬盘。
c0204-c0233、c0401-0442(共72个节点)以上节点配置一颗Intel Xeon E5410四核处理器,2.33GHz主频,2*6MB二级缓存,2块T esla C1060 GPU处理器,8GB内存,一块500GB SATA硬盘。
各节点间通过DDR 4X Infiniband高速网络和千兆以太网进行连接,分别用于计算数据和系统管理信息的通讯。
2)软件环境:RHEL 5.3 x64操作系统,内核版本2.6.18-128.el5。
GNU C/C++/Fortran编译器。
Nvidia CUDA T oolkit 2.1开发工具。
Mvapich/OpenMPI并行编程环境。
Atlas/GotoBlas数学函数库。
T orque/Maui资源管理系统及作业调度器。
测试服务器gpu的简单命令-概述说明以及解释1.引言1.1 概述概述部分应该简要介绍本文的主题和内容。
可以参考以下范例来撰写概述内容:在当今科技发展迅猛的时代,GPU(图形处理器)已经成为计算机领域中不可或缺的重要组件。
GPU测试服务器作为测试和评估GPU性能、功能和稳定性的关键工具,对于开发人员和研究人员来说具有重要意义。
本文将简要介绍GPU测试服务器的基本概念、作用以及其在计算机领域中的重要性。
接下来,我们将探讨如何使用简单的命令来进行GPU测试,并为读者提供一些常用的测试指南和技巧。
通过本文的阅读,读者将能够了解如何更好地利用GPU测试服务器来提升计算机性能和应用程序的表现。
文章结构部分的内容可以按照以下方式进行编写:1.2 文章结构本文将按照以下结构进行阐述和讨论:1. 引言:在引言部分,将对测试服务器GPU的背景、意义和重要性进行简要介绍,并明确本文的目的。
2. 正文:在正文部分,将分为两个主要部分进行讨论。
2.1 GPU测试服务器的介绍:本部分将详细介绍GPU测试服务器的概念、原理和应用范围。
包括对GPU测试服务器的定义、工作原理和优势进行阐述,并举例说明GPU测试服务器在不同领域的实际应用。
2.2 GPU测试服务器的配置:本部分将详细介绍GPU测试服务器的配置要求和常用组件,包括GPU型号、CPU型号、内存容量等。
同时,还将介绍如何选择适合的GPU测试服务器配置,并提供一些配置优化的建议。
3. 结论:在结论部分,将对GPU测试服务器的重要性进行总结,并展望其未来发展趋势。
通过总结本文的内容,强调GPU测试服务器在加速计算、提升性能等方面的重要作用,并探讨未来GPU测试服务器可能的发展方向。
通过以上文章结构的安排,读者可以清晰地了解本文的内容和结构,方便阅读和理解。
每个部分的内容都将有助于读者对测试服务器GPU的简单命令有更全面的了解。
1.3 目的本文的目的是介绍一些简单的命令,用于测试服务器上的GPU性能。
天河系统GPU使用说明在天河大系统上,每个计算节点通过PCI-E总线连接一块GPU卡,型号为Tesla M2050,可用显存2.6GB。
目前用户可用的GPU结点在gpu_test分区中。
CUDA编译环境包含三个部分:toolkit、SDK和driver,目前在登陆节点上已安装的最新版本为CUDA 4.0,计算节点上安装的driver版本为304.54。
由于天河大系统存在3套lustre文件系统,分别挂载到目录/vol-th, /WORK, /vol6,因此处在不同根目录下的用户应使用对应路径下的CUDA编译环境。
如果账号主目录在/vol-th下,请使用路径为/vol-th/software/cuda下的编译环境;如果账号主目录在/WORK下,请使用路径为/WORK/software/cuda下的编译环境;如果账号主目录在/vol6下,请使用路径为/vol6/software/cuda下的编译环境。
以账号主目录在/vol-th下为例,说明在天河上使用CUDA的设置过程:1.设置环境变量:a)在~/.bashrc中添加关于CUDA的编译环境export CUDA_HOME=/vol-th/software/cuda/cuda-4.0export PATH=$CUDA_HOME/bin:$PATHexport LD_LIBRARY_PATH=$CUDA_HOME/lib64:$LD_LIBRARY_PATHb)保存并退出~/.bashrc,命令行输入source ~/.bashrc更新环境变量2.编译运行:使用nvcc编译按正常编译方法编译CUDA C程序3.提交作业:使用yhrun或yhbatch提交作业,注意一定要使用gpu_test计算分区。
当用户的GPU作业在运行状态时,可通过ssh登录到任意处于作业执行状态的GPU结点,然后输入nvidia-smi -a命令,可以查看该结点的GPU详细信息。
DU-07757-001 | September 2015 User GuideDOCUMENT CHANGE HISTORY DU-07757-001Chapter 1.Introduction (1)1.1How licensing works (1)1.2License editions (2)Chapter 2.GRID Virtual GPU (3)2.1vGPU License requirements (3)2.2Licensing on Windows (4)2.3Licensing on Linux (7)Chapter 3.GRID Virtual Workstation (8)3.1GRID Virtual Workstation features (8)3.2Licensing on Windows (8)3.2.1Disabling GRID Virtual Workstation (11)3.3Licensing on Linux (13)Chapter 4.Advanced topics (14)4.1Licenses obtained after boot (14)4.2Operating with intermittent connectivity to the license server (14)4.3Applying Windows license settings via registry (15)Chapter 5.Troubleshooting (17)5.1Known issues (17)5.2Troubleshooting steps (17)LIST OF FIGURESFigure 1 GRID licensing architecture (1)Figure 2 GRID license editions (2)Figure 3 Managing vGPU licensing in NVIDIA Control Panel (5)Figure 4 Successful acquire of vGPU license (6)Figure 5 Sample gridd.conf for GRID vGPU (7)Figure 6 Managing Virtual Workstation Licensing in NVIDIA Control Panel (9)Figure 7 Applying GRID Virtual Workstation license (10)Figure 8 Success acquire of Virtual Workstation license (11)Figure 9 Disabling GRID Virtual Workstation (12)Figure 10 Sample gridd.conf for GRID Virtual Workstation (13)Figure 11 Configuring vGPU licensing via registry settings (16)LIST OF TABLESTable 1 Virtual GPUs licensed on Tesla M6, M60 (4)Table 2 Licensing registry settings (14)Chapter 1. INTRODUCTIONCertain NVIDIA GRID TM products, such as GRID vGPU TM and GRID VirtualWorkstation, are available as licensed features on NVIDIA Tesla TM GPUs. This guide describes the licensed features and how to enable and use them on supported hardware.1.1 HOW LICENSING WORKSFigure 1 provides an overview of GRID licensing:Figure 1 GRID licensing architectureGRID ServerGRID License ServerVMNVIDIA Tesla GPUNVIDIATesla GPUGRID Virtual Workstation GraphicsVMGRID vGPUVMGRID vGPULicensesLicense borrow, returnIntroduction When enabled on Tesla GPUs, licensed features such as Virtual GPU are activated by obtaining a license over the network from an NVIDIA GRID License Server. The licensed is “checked out” or “borrowed” at the time the Virtual Machine (VM) is booted, and returned when the VM is shut down.1.2LICENSE EDITIONSGRID licenses come in three editions that enable different classes of GRID features. The GRID software automatically selects the right license edition based on the features being used:Figure 2 GRID license editionsThe remainder of this guide is organized as follows:④Chapter 2 describes licensing of GRID Virtual GPU.④Chapter 3 describes licensing of GRID Virtual Workstation features with GPUpassthrough.④Chapter 4 discusses advanced licensing settings.④Chapter 5 provides guidance on troubleshooting.Chapter 2.This chapter describes licensing of NVIDIA GRID vGPU.2.1VGPU LICENSE REQUIREMENTSNVIDIA GRID Virtual GPU (vGPU) is offered as a licensable feature on Tesla M6 and M60 GPUs. When a vGPU is booted on these GPUs, a license must be obtained by the Virtual Machine (VM) in order to enable the full features of the vGPU. The VM retains the license until it is shut down; it then releases the license back to the license server.Table 1 lists the vGPU types that are supported on Tesla M6 / M60, and the license edition that each vGPU type requires.Table 1 Virtual GPUs licensed on Tesla M6, M60The higher-end GRID license editions are inclusive of lower editions: for example virtual GPUs that require a GRID Virtual PC license are also usable with a GRID Virtual Workstation or GRID Virtual Workstation Extended license.2.2LICENSING ON WINDOWSTo license vGPU, open NVIDIA Control Panel by right-clicking on the Windows desktop and selecting NVIDIA Control Panel from the menu, or by opening Windows Control Panel and double-clicking the NVIDIA Control Panel icon.In NVIDIA Control Panel, select Manage License task in the Licensing section of the navigation pane, as shown in Figure 3.Figure 3 Managing vGPU licensing in NVIDIA Control PanelThe Manage License task pane shows that GRID vGPU is currently unlicensed. Enter the address of your local GRID License Server in the License Server field. The address can be a fully-qualified domain name such as , or an IP address such as 10.31.20.45.The Port Number field can be left unset and will default to 7070, which is the default port number used by NVIDIA GRID License Server.Select Apply to assign the settings. The system will request the appropriate license for the current vGPU from the configured license server and, if successful, vGPU’s full capabilities are enabled (see Figure 4). If the system fails to obtain a license, refer to 4.3 for guidance on troubleshooting.Once configured in NVIDIA Control Panel, licensing settings persist across reboots.Figure 4 Successful acquire of vGPU licenseGRID Virtual GPU2.3LICENSING ON LINUXTo license GRID vGPU, edit /etc/nvidia/gridd.conf:[nvidia@localhost ~]$ sudo vi /etc/nvidia/gridd.confSet ServerURL to the address and port number of your local NVIDIA GRID License Server. The address can be a fully-qualified domain name such as, or an IP address such as 10.31.20.45. The port number is appended to the address with a colon, for example :7070.Set FeatureType to 1, to license vGPU:Figure 5 Sample gridd.conf for GRID vGPURestart the nvidia-gridd service:[nvidia@localhost ~]$ sudo service nvidia-gridd restartThe service should automatically obtain a license. This can be confirmed with log messages written to /var/log/messages, and the vGPU within the VM should now exhibit full framerate, resolution, and display output capabilities:[nvidia@localhost ~]$ sudo grep gridd /var/log/messages…Sep 13 15:40:06 localhost nvidia-gridd: Started (10430)Sep 13 15:40:24 localhost nvidia-gridd: License acquired successfully.Once configured in gridd.conf, licensing settings persist across reboots and need only be modified if the license server address changes, or the VM is switched to running GPU passthrough.Chapter 3.This chapter describes how to enable the GRID Virtual Workstation feature on supported Tesla GPUs.3.1GRID VIRTUAL WORKSTATION FEATURES GRID Virtual Workstation is available on Tesla GPUs running in GPU passthrough mode to Windows and Linux VMs. Virtual Workstation requires a GRID Virtual Workstation – Extended license edition, and provides these features:④Up to four virtual display heads at 4k resolution (unlicensed Tesla GPUs support asingle virtual display head with maximum resolution of 2560x1600).④Workstation-specific graphics features and accelerations.④Certified drivers for professional applications3.2LICENSING ON WINDOWSTo enable GRID Virtual Workstation, open NVIDIA Control Panel by right-clicking on the Windows desktop and selecting NVIDIA Control Panel from the menu, or by opening Windows Control Panel and double-clicking the NVIDIA Control Panel icon. In NVIDIA Control Panel, select Manage License task in the Licensing section of the navigation pane, as shown in Figure 6.Figure 6 Managing Virtual Workstation Licensing in NVIDIA Control PanelThe Manage License task pane shows the current License Edition being used, and defaults to unlicensed.Select GRID Virtual Workstation, and enter the address of your local GRID License Server in the License Server field (see Figure 7). The address can be a fully-qualified domain name such as , or an IP address such as10.31.20.45.The Port Number field can be left unset and will default to 7070, which is the default port number used by NVIDIA GRID License Server.Figure 7 Applying GRID Virtual Workstation licenseSelect Apply to assign the settings. The system will request a license from the configured license server and, if successful, GRID Virtual Workstation features are enabled (see Figure 8). If the system fails to obtain a license, refer to 4.3 for guidance on troubleshooting.Once configured in NVIDIA Control Panel, licensing settings persist across reboots.Figure 8 Success acquire of Virtual Workstation license3.2.1Disabling GRID Virtual WorkstationTo disable the GRID Virtual Workstation licensed feature, open NVIDIA Control Panel; in the Manage License task, select Tesla (unlicensed) and select Apply (see Figure 9). The setting does not take effect until the next time the system is shutdown or rebooted; GRID Virtual Workstation features remain available until then.Figure 9 Disabling GRID Virtual Workstation3.3LICENSING ON LINUXTo license GRID Virtual Workstation, edit /etc/nvidia/gridd.conf:[nvidia@localhost ~]$ sudo vi /etc/nvidia/gridd.confSet ServerURL to the address and port number of your local NVIDIA GRID License Server. The address can be a fully-qualified domain name such as, or an IP address such as 10.31.20.45. The port number is appended to the address with a colon, for example :7070.Set FeatureType to 2, to license GRID Virtual Workstation:Figure 10 Sample gridd.conf for GRID Virtual WorkstationRestart the nvidia-gridd service:[nvidia@localhost ~]$ sudo service nvidia-gridd restartThe service should automatically obtain a license. This can be confirmed with log messages written to /var/log/messages, and the GPU should now exhibit Virtual Workstation display output and resolution capabilities:[nvidia@localhost ~]$ sudo grep gridd /var/log/messages…Sep 13 15:40:06 localhost nvidia-gridd: Started (10430)Sep 13 15:40:24 localhost nvidia-gridd: License acquired successfully.Once configured in gridd.conf, licensing settings persist across reboots and need only be modified if the license server address changes, or the VM is switched to running GPU passthrough.Chapter 4.This chapter discusses advanced topics and settings for GRID licensing.4.1LICENSES OBTAINED AFTER BOOTUnder normal operation, a GRID license is obtained by a platform during boot, prior to user login and launch of applications. If a license is not available, indicated by a popup on Windows or log messages on Linux, the system will periodically retry its license request to the license server. During this time, GRID vGPU runs at reduced capability described in section 2.1; similarly, GRID Virtual Workstation features described in section 3.1 are not available.When a license is obtained, the licensed features are dynamically enabled and become available for immediate use. However, any application software launched prior to the license becoming available may need to be restarted in order to recognize and utilize the licensed features.4.2OPERATING WITH INTERMITTENTCONNECTIVITY TO THE LICENSE SERVERGRID vGPU and Virtual Workstation clients require connectivity to a license server when booting, in order to check out a license. Once booted, clients may operate without connectivity to the license server for a period of up to 7 days, after which time the client will warn of license expiration.4.3APPLYING WINDOWS LICENSE SETTINGS VIAREGISTRYGRID licensing settings can be controlled via the Windows Registry, removing the need for manual interaction with NVIDIA Control Panel. Settings are stored in this registry key:HKEY_LOCAL_MACHINE\SOFTWARE\NVIDIA Corporation\Global\GridLicensingRegistry values are summarized in Table 2.Table 2 Licensing registry settingsFigure 11 shows an example of configuring virtual GPU licensing settings in the registry. Note it is sufficient to simply configure FeatureType = 1 (GRID vGPU) and set the license server address in ServerAddress.Figure 11 Configuring vGPU licensing via registry settingsChapter 5.This chapter describes basic troubleshooting steps.5.1KNOWN ISSUESBefore troubleshooting or filing a bug report, review the release notes that accompany each driver release, for information about known issues with the current release, and potential workarounds.5.2TROUBLESHOOTING STEPSIf a GRID system fails to obtain a license, investigate the following as potential causes for the failure:④Check that the license server address and port number are correctly configured.④Run a network ping test from the GRID system to the license server address to verifythat the system has network connectivity to the license server.④Verify that the date and time are configured correctly on the GRID system. If the timeis set inaccurately or is adjusted backwards by a large amount, the system may fail to obtain a license.④Verify that the license server in use has available licenses of the type required by theGRID feature the GRID system is configured to use.GRID LICENSING DU-07757-001| 17 NoticeALL NVIDIA DESIGN SPECIFICATIONS, REFERENCE BOARDS, FILES, DRAWINGS, DIAGNOSTICS, LISTS, AND OTHER DOCUMENTS (TOGETHER AND SEPARATELY, “MATERIALS”) ARE BEING PROVIDED “AS IS.” NVIDIA MAKES NO WARRANTIES, EXPRESSED, IMPLIED, STATUTORY, OR OTHERWISE WITH RESPECT TO THE MATERIALS, AND EXPRESSLY DISCLAIMS ALL IMPLIED WARRANTIES OF NONINFRINGEMENT, MERCHANTABILITY, AND FITNESS FORA PARTICULAR PURPOSE.Information furnished is believed to be accurate and reliable. However, NVIDIA Corporation assumes no responsibility for the consequences of use of such information or for any infringement of patents or other rights of third parties that may result from its use. No license is granted by implication of otherwise under any patent rights of NVIDIA Corporation. Specifications mentioned in this publication are subject to change without notice. This publication supersedes and replaces all other information previously supplied. NVIDIA Corporation products are not authorized as critical components in life support devices or systems without express written approval of NVIDIA Corporation.HDMIHDMI, the HDMI logo, and High-Definition Multimedia Interface are trademarks or registered trademarks of HDMI Licensing LLC.OpenCLOpenCL is a trademark of Apple Inc. used under license to the Khronos Group Inc.TrademarksNVIDIA and the NVIDIA logo are trademarks or registered trademarks of NVIDIA Corporation in the U.S. and other countries. Other company and product names may be trademarks of the respective companies with which they are associated.Copyright© 2015 NVIDIA Corporation. All rights reserved.。
目前GPU平台提供以下两种使用方式,禁止直接在登录节点上运行程序。
1. 任务提交方式:qsub提交作业例子:$qsub mpi.pbs作业提交例子脚本mpi.pbs:#!/bin/bash#PBS -N test (作业名,限15 个字符,首字符为字母,无空格) #PBS -l nodes=2:ppn=8 (请求N 个节点,每个节点M 个处理器)#PBS -l walltime=07:30:00 (估计最大运算时间为1000 小时,若没有设置这项,系统为自动按所在队列默认walltime 处理)#PBS -j oe (将标准输出信息与标准错误信息合并输出到文件) (#PBS –q XXX)#PBS –m e (发送邮件给用户,n 不发送邮件;a 当作业被批处理系统中断时,发送邮件;b 当作业开始执行时,发送邮件;e 当作业执行结束时,发送邮件)#PBS –M XXXX@ (申明邮箱地址)cd $PBS_O_WORKDIR (进入作业调度目录)MPI_HOME=/state/partition1/soft/compiler/mvapich2/1.2p1/gcc.pgf90NSLOTS=`cat ${PBS_NODEFILE} | wc -l` (计算申请到的cpu数目)time -p ${MPI_HOME}/bin/mpirun_rsh -ssh -np ${NSLOTS} -hostfile ${PBS_NODEFILE} ./XXX chn >&out.dat (程序运行部分,XXX为程序名,chn为输入数据,out.dat为输出数据)exit 0 (退出)2. 直接使用命令行方式登录计算节点提交作业。
方法:首先通过ssh登录进去后先查看哪些计算节点是空闲的,有2种方法:1. 输入pestat命令看到所有计算节点状况,其中状态为“free”的就是空闲计算节点。
2. 进入ganglia网页查看:/ganglia/网页下方各节点状况图中,白色图的、名字以compute开头的节点属于空闲计算节点。
GPU\CPU协同并行计算非对称走时叠前时间偏移处理系统The A symmetric T ravel—time P re-S tack T ime M igration System(ATPSTM)by GPU\CPU C o-P rocessing P arallel C omputing(CPPC)用户手册USER’S MANUAL(因软件升级,请选择相应版本使用)北京吉星吉达科技有限公司Beijing Geo-Star Science & Technical Ltd.GPU\CPU协同并行计算非对称走时叠前时间偏移系统用户手册(试行版)2009年8月GPU\CPU协同并行计算(CPPC)非对称走时叠前时间偏移处理系统(ATPSTM)使用手册(试行版)内容导航1.编者前言......................................................................................................................................... - 4 -2.系统综述......................................................................................................................................... - 6 -2.1GPU\CPU协同并行计算机的构成 (6)1)GPU的发展历程 (6)2)GPU与传统CPU的主要区别 (6)3)GPU的优势 (7)2.2协同并行计算(CPPC)的概念 (8)2.3软件开发平台 (9)2。
4CUDA介绍 (9)3 安装与启动....................................................................................................................................- 11 -3。
目前GPU平台提供以下两种使用方式,禁止直接在登录节点上运行程序。
1. 任务提交方式:qsub
提交作业例子:
$qsub mpi.pbs
作业提交例子脚本mpi.pbs:
#!/bin/bash
#PBS -N test (作业名,限15 个字符,首字符为字母,无空格) #PBS -l nodes=2:ppn=8 (请求N 个节点,每个节点M 个处理器)
#PBS -l walltime=07:30:00 (估计最大运算时间为1000 小时,若没有设置这项,系统为自动按所在队列默认walltime 处理)
#PBS -j oe (将标准输出信息与标准错误信息合并输出到文件) (#PBS –q XXX)
#PBS –m e (发送邮件给用户,n 不发送邮件;a 当作业被批处理系统中断时,发送邮件;b 当作业开始执行时,发送邮件;e 当作业执行结束时,发送邮件)
#PBS –M XXXX@ (申明邮箱地址)
cd $PBS_O_WORKDIR (进入作业调度目录)
MPI_HOME=/state/partition1/soft/compiler/mvapich2/1.2p1/gcc.pgf90
NSLOTS=`cat ${PBS_NODEFILE} | wc -l` (计算申请到的cpu数目)
time -p ${MPI_HOME}/bin/mpirun_rsh -ssh -np ${NSLOTS} -hostfile ${PBS_NODEFILE} ./XXX chn >&out.dat (程序运行部分,XXX为程序名,chn为输入数据,out.dat为输出数据)exit 0 (退出)
2. 直接使用命令行方式登录计算节点提交作业。
方法:
首先通过ssh登录
进去后先查看哪些计算节点是空闲的,有2种方法:
1. 输入pestat命令
看到所有计算节点状况,其中状态为“free”的就是空闲计算节点。
2. 进入ganglia网页查看:/ganglia/
网页下方各节点状况图中,白色图的、名字以compute开头的节点属于空闲计算节点。
注意:
提供给用户使用的30个计算节点是从compute-0-19到compute-0-48。
选择空闲计算节点的顺序应该从标号由大到小的顺序选,如compute-0-37到compute-0-48空闲时,应先选compute-0-48,其次compute-0-47这样。
输入: ssh 空闲计算节点
即可登录到相应的空闲计算节点。
如:$ssh compute-0-43
compute-0-43是空闲计算节点名。