Juniper EX交换机系统恢复
- 格式:doc
- 大小:58.00 KB
- 文档页数:7

j u n i p e r防火墙如何恢复出厂设置我的j u n i p e r防火墙恢想要恢复出厂设置,该怎么办呢?下面由学习啦小编给你做出详细的j u n i p e r防火墙恢复出厂设置方法介绍!希望对你有帮助!j u n i p e r防火墙恢复出厂设置方法一:和防火墙配套C O N S O L E线也两头都C O M口线边连接防火墙C O M口边连接电脑C O M口用超级终端登录进去按下方法恢复出厂设置①记录下防火墙序列号(又称 S e r i a l N u m b e r防火墙机身上面找)②使用控制线连接防火墙 C o n s o l e端口并重起防火墙③防火墙正常启动登录界面用记录下来序列号作登录用户名/密码根据防火墙提示恢复出厂配置 R E S E T 复位键j u n i p e r防火墙恢复出厂设置方法二:想要恢复之前的设置可以用r o l l b a c k0-50想要恢复出厂设置可以使用l o a d f a c t o r y-d e f a u l t 前提是设置了r o o t密码j u n i p e r防火墙恢复出厂设置方法三:1、先介绍软方法.用C o n s o l e(串口)访问N e t S c r e e n,在用户名和密码处都输入该设备的序列号(在设备背面的标签上有),再输入两次y确认后,就可以将N e t S c r e e n设备初始化至出厂状态.2、硬办法.找出后面板上的重置针孔,使用回形针,推压针孔四至六秒然后松开.状态L E D闪烁琥珀黄色.等待一至二秒,在第一次重置之后,电源L E D闪烁重新变成绿色;设备正等待第二次推压再次推压重置针孔四至六秒.状态L E D亮琥珀黄色半秒,然后返回到闪烁绿色状态.当设备重置时,状态L E D变为琥珀黄色半秒,然后返回到闪烁绿色状态此时配置已被删除并且设备被重置.设备重启后,即将N e t S c r e e n恢复至出厂设置。

为防止Juniper防火墙设备故障情况下造成网络中断,保障用户业务不间断运行,现针对Juniper防火墙故障情况下的快速恢复做具体描述。
一、设备重启动:Juniper防火墙在工作期间出现运行异常时,如需进行系统复位,可通过console线缆使用reset命令对防火墙进行重启,重启动期间可以在操作终端上查看防火墙相关启动信息。
二、操作系统备份:日常维护期间可将防火墙操作系统ScreenOS备份到本地设备,操作方式为:启动tftp 服务器并在命令行下执行:save software from flash to tftp x.x.x.x filename。
三、操作系统恢复:当防火墙工作发生异常时,可通过两种方式快速恢复防火墙操作系统,命令行方式:save software from tftp x.x.x.x filename to flash,或通过web方式:Configuration > Update > ScreenOS/Keys下选中Firmware Update (ScreenOS)选项,并在Load File栏选中保存在本地的ScreenOS文件,然后点击apply按钮,上传ScreenOS后防火墙将自动进行重启。
四、配置文件备份:日常维护期间可将防火墙配置信息备份到本地以便于故障时的恢复,操作方式有三种:1、启动tftp 服务器并在命令行下执行:save config from flash to tftp x.x.x.x filename。
2、通过超级终端远程telnet/ssh到防火墙,通过log记录方式将get config配置信息记录到本地。
3、通过web页面进行配置文件备份:Configuration > Update > Config File,点击save to file。
五、配置文件恢复:防火墙当前配置信息若存在错误,需进行配置信息快速恢复,操作方式有三种:1、启动tftp 服务器并在命令行下执行:save config from tftp x.x.x.x filename to flash,配置文件上传后需执行reset命令进行重启。

juniper防火墙之恢复出厂默认设置用过Juniper产品的人都应该知道一点,Juniper产品密码忘了的话是一件很痛苦的事,为什么这么说呢?下来就来听我给大家讲讲嘛!密码丢失是无法恢复的,那么我们就只有通过恢复出厂默认设置的方法来重新获得管理权限(原来配置的参数、证书等都将被删除)。
有两种办法恢复出厂默认配置:1、在Console模式下,用设备的序列号作用用户名/密码进行登录。
成功后系统出现警告提示,将擦去现有配置,确认后系统开始恢复默认配置,随后重启。
整个过程约3分钟。
那么我们如何获得这个序列号呢?要获得这个序列号的办法有两种,第一种就是在产品的背后有一个序列号。
第二种办法就是通过输入“get sys”来获取。
这里我们先来看看Juniper防火墙的启动过程:NetScreen NS-5GT Boot Loader Version 2.1.0 (Checksum: 61D07DA5)Copyright (c) 1997-2003 NetScreen Technologies, Inc.Total physical memory: 128MBTest - PassInitialization.... DoneHit any key to run loaderHit any key to run loaderHit any key to run loaderHit any key to run loaderLoading default system image from on-board flash disk...Done! (size = 11,108,352 bytes)Ignore image authentication!Start loading... ................................................................. ................................................................. ................................................................. ................................................................. ................................................................. ................................................................. ................................................................. ................................................................. ................................................................. ................................................................. ................................................................. ................................................................. ................................................................. ......................................Done.Juniper Networks, IncNS-5GT System SoftwareCopyright, 1997-2008Version 6.2.0r1.0Load Manufacture Information ... DoneInitialize FBTL 0.... DoneLoad NVRAM Information ... (6.2.0)DoneSYIMAGEInstall module init vectorsbuild and grow heap:system, order:13Initial port mode trust-untrust(1)Install modules (00fdc800,01bf5c70) ...PPP IP-POOL initiated, 256 poolsSystem config (1945 bytes) loadedDone.Load SystemConfiguration ................................................................. .................................................................Disabled licensekey auto update...................Donesystem init done..login: trust interface change physical state to Upuntrust interface change physical state to Uplogin: System change state to Active(1)以上就是我们Juniper防火墙的启动过程,这里学过cisco的应该大至是能够理解的。

JuniperSRX恢复主分区引导系统
突然停电或者非正常关机后Juniper OS的主分区受损重启失败后会从备件分区启动系统,并收到如下的提示:
注:以下操作是在超级终端完成的,以及所有命令是在命令模式(>)下进行的.
1.首先可以查看是在那个分区启动系统
命令:show system storage partitions
如下图所示是在备份分区启动的:
2.查看备份分区系统版本和主分区系统版本,因为还原后会把主分区版本覆盖
命令:show system snapshot media internal
3.可通过下面的命令从备份分区恢复JunOS 镜象到主分区:
request system snapshot internal slice alternate
4.还原后,用下面的命令重启设置,以让其从主分区启动
命令:request system reboot media internal
注:官网的例子版是10.4R3,用的命令是request system reboot slice alternate media internal 但我的12.1的版是无效的。
5.重启完成后可验证是否从主分区启动
命令:show system storage partitions。


有两种办法恢复出厂默认配置:1、在Console模式下,用设备的序列号作用用户名/密码进行登录。
成功后系统出现警告提示,将擦去现有配置,确认后系统开始恢复默认配置,随后重启。
整个过程约3分钟。
那么我们如何获得这个序列号呢?要获得这个序列号的办法有两种,第一种就是在产品的背后有一个序列号。
第二种办法就是通过输入“get sys”来获取。
这里我们先来看看Juniper防火墙的启动过程:NetScreen NS-5GT Boot Loader Version 2.1.0 (Checksum: 61D07DA5)Copyright (c) 1997-2003 NetScreen Technologies, Inc.Total physical memory: 128MBTest - PassInitialization.... DoneHit any key to run loaderHit any key to run loaderHit any key to run loaderHit any key to run loaderLoading default system image from on-board flash disk...Done! (size = 11,108,352 bytes)Ignore image authentication!Start loading... ................................................................. ................................................................. ................................................................. ................................................................. ................................................................. ................................................................. ................................................................. ................................................................. ................................................................. ................................................................. ................................................................. ................................................................. ................................................................. ......................................Done.Juniper Networks, IncNS-5GT System SoftwareCopyright, 1997-2008Version 6.2.0r1.0Load Manufacture Information ... DoneInitialize FBTL 0.... DoneLoad NVRAM Information ... (6.2.0)DoneSYIMAGEInstall module init vectorsbuild and grow heap:system, order:13Initial port mode trust-untrust(1)Install modules (00fdc800,01bf5c70) ...PPP IP-POOL initiated, 256 poolsSystem config (1945 bytes) loadedDone.Load SystemConfiguration ................................................................. .................................................................Disabled licensekey auto update...................Donesystem init done..login: trust interface change physical state to Upuntrust interface change physical state to Uplogin: System change state to Active(1)以上就是我们Juniper防火墙的启动过程,这里学过cisco的应该大至是能够理解的。

Juniper EX3200 EX4200 OS升级方法Step1. 通过console线连接交换机使用下面的步骤连接路由器的Console接口:1.准备好EX交换机设备自带的Console线缆(如果没有的话,采用Cisco或者安耐特等厂家的Console线也可可以)2.将Console线缆的DB9插头一头插到PC或者笔记本电脑的COM口上,另外一端插到路由器的CONSOLE口上。
若电脑无COM口,则需要使用USB2.0 TO RS232转换器转换一下。
3.打开计算机中的终端软件工具。
例如:CRT或者Windows自带的超级终端。
设置如下:⏹端口:选择第二步中Console线缆插入到PC上的端口,通常为COM 1或者COM 2,使用SB2.0 TO RS232转换器在设备管理中查看相应的COM ID。
⏹波特率:9600⏹数据位:8位⏹奇偶校验:无⏹停止位:1位⏹数据流控制:无打开配置到的CRT或者超级终端,按“Enter”键,屏幕出现登陆的提示符,即连接成功。
如果没有显示,请检查线缆或者终端的配置是否正确。
Step2. 开局准备设置1.交换机初始化用户名是root是没有密码的,在进行commit之前必须修改root密码。
用set system root-authentication命令修改root密码:% cliroot> configureroot# set system root-authentication plain-text-passwordNew password:【键入密码root123】Retype new password:【再次键入root123】{master:0}[edit]2.添加一个super-user用户,用于交换机开启ftp服务后客户端登录上传os使用:root# set system login user lab class super-user authentication plain-text-passwordNew password: 【键入密码lab123】Retype new password: 【再次键入lab123】{master:0}[edit]3.开启ftp服务和telnet服务,配置完使用show system services检查:root# set system services ftp{master:0}[edit]root# set system services telnet{master:0}[edit]root# commitconfiguration check succeedscommit complete{master:0}[edit]root#root# show system servicesftp;telnet;{master:0}[edit]root#4.在交换机上配置ge-0/0/0端口IP地址(192.168.1.1/24),在电脑上配置网卡的IP地址(192.168.1.2/24),使这两个地址在同一地址段:lab# delete interfaces ge-0/0/0.0 family ethernet-switching{master:0}[edit]lab# set interfaces ge-0/0/0.0 family inet address 192.168.1.1/24{master:0}[edit]root# commitconfiguration check succeedscommit complete{master:0}[edit]root#lab# show interfaces ge-0/0/0unit 0 {family inet {address 192.168.1.1/24}}{master:0}[edit]5.使用show interface ge-0/0/0检查配置,使用run show interface terse检查端口状态,使用ping命令检查连通性,:root# run show interfaces terseInterface Admin Link Proto Local Remote ge-0/0/0 up upge-0/0/0.0 up up inet 192.168.1.1/24root# run ping 192.168.1.2PING 192.168.1.2 (192.168.1.2): 56 data bytes64 bytes from 192.168.1.2: icmp_seq=0 ttl=64 time=3.583 ms64 bytes from 192.168.1.2: icmp_seq=1 ttl=64 time=3.497 ms6.测试telnet,将电脑网口与交换机ge0/0/0口用网线直连,使用CRT或超级终端telnet交换机,地址为之前设置的192.168.1.1,若连接不上或登录错误请检查上面的配置: (ttyp1)login: labPassword:【输入密码lab123】--- JUNOS 10.2R1.8 built 2010-05-27 21:05:57 UTC{master:0}lab>Step3. 上传并加载os1.在电脑上使用cuteftp或类似ftp客户端软件,新建交换机ftp站点,连接,若连接不成功,请检查交换机ftp服务设置:2.将Juniper EX4200的原路径“/var/home/lab”修改为“/var/tmp/”,回车:3.将电脑本地os文件拖至交换机的/var/tmp目录下,通常/var/tmp的目录空间比较大:4.使用root用户名console到交换机,在交换机上加载上传的os,重启的过程比较长:root> request system software add /var/tmp/jinstall-ex-4200-10.4R5.5-domestic-signe....tgz no-validate no-copy Checking pending install on fpc0fpc0:WARNING: A reboot is required to install the softwareWARNING: Use the 'request system reboot' command immediately{master:0}5.装完os后重新启动交换机,交换机会加载新的os,若重启正常,交换机会在第二次重启正常后自动将原有的os删除:root> request system rebootReboot the system ? [yes,no] (no) yes*** FINAL System shutdown message from root@ ***System going down IMMEDIATELY Shutdown NOW!6.重启交换机后验证os版本,使用命令show version:junos版本由出厂时的版本已跟新为10.4R5.5。

JuniperEX系列交换机命令行配置手册JuniperEX系列交换机命令行配置手册目录第一章交换机基础知识 (7)1.1认识J UNIPER交换机 (7)1.2J UNOS操作系统基础 (9)1.2.1 交换机配置模式 (9)1.2.2 交换机配置结构 (10)1.2.3 TAB和空格键的使用 (15)1.2.4 用户模式和配置模式show的区别 (16)1.2.5 如何将配置转换成set命令 (19)1.2.6 commit和rollback (20)1.3EX交换机命令菜单结构 (22)第二章操作指导 (35)2.1通过CONSOLE线连接交换机 (35)2.2 SYSTEM系统参数配置 (36)2.2.1设置root密码 (37)2.2.2设置主机名 (37)2.2.3设置DNS服务器 (37)2.2.4设置日期时间 (37)2.2.5设置NTP服务器 (38)2.2.6开启远程Telnet登陆服务 (38)2.2.7开启远程Ftp服务 (39)2.2.8开启远程ssh登陆 (39)2.2.9开启远程http登陆服务 (39)2.2.10添加/删除用户 (40)2.2.10.1添加用户 (40)2.2.10.2修改用户类别 (40)2.2.10.3 修改用户密码 (40)2.2.11用户权限设置 (41)2.3VLAN配置 (43)2.3.1 VLAN配置步骤 (43)2.3.2 VLAN配置规范要求 (44)2.3.3 添加VLAN (44)2.3.4 修改端口VLAN (46)2.3.5 删除VLAN (46)2.3.6 配置VLAN网关IP (47)2.4T RUNK配置 (47)2.4.1 Trunk配置步骤 (47)2.4.2如何设置Trunk (48)2.4.3允许/禁止VLAN通过Trunk (48)2.5端口配置 (48)2.5.1端口配置规范要求 (48)2.5.2修改端口速率 (49)2.5.3修改端口工作模式 (49)2.5.4修改端口为L3模式 (49)2.5.5 修改端口为L2模式 (50)2.6生成树配置 (50)2.6.1 RSTP协议概览 (50)2.6.2 MSTP协议概览 (53)2.6.3 STP配置实例(生成树) (54)2.6.4 RSTP配置实例(快速生成树) (55) 2.6.5 MSTP配置实例(多生成树协议) (61) 2.7端口捆绑 (66)2.7.1 端口捆绑步骤 (66)2.8ECMP负载均衡配置 (68)2.9路由协议配置 (70)2.9.1 静态路由配置 (70)2.9.1.1添加静态路由 (70)2.9.1.2 删除静态路由 (70)2.9.1.3调整静态路由优先值 (70)2.9.1.4设置备份静态路由 (70)2.9.1.5指定静态路由下一跳端口 (71) 2.9.2 OSPF配置 (71)2.9.2.1 OSPF配置步骤 (71)2.9.2.2 OSPF配置实例(单区域) (75) 2.9.2.3 OSPF路由过滤 (78)2.10端口镜像 (79)2.10.1 端口镜像的概述 (79)2.10.2 端口镜像的目的 (80)2.10.3 端口镜像的功能 (80)2.10.4 端口镜像工作原理 (80)2.10.5 端口输入输出流量镜像 (82) 2.10.6 带过滤条件的端口镜像 (83) 2.11端口MAC地址限制 (85)2.12端口广播风暴控制 (85)2.13VRRP虚拟路由冗余协议 (86)2.13.1 VRRP概览 (86)2.13.2 VRRP工作原理 (87)2.13.3 如何配置VRRP (88)2.14BFD配置(双向转发检测) (92) 2.14.1 BFD概览 (92)2.14.2 BFD介绍 (93)2.14.3 BFD的报文格式 (93)2.14.4检测模式 (95)2.14.5发送周期及检测时间 (96)2.14.6参数修改 (96)2.14.7会话建立 (97)2.14.8BFD的标准化 (100)2.14.9OSPF中配置BFD (100)2.14.10静态路由中配置BFD (101)2.15交换机F IREWALL限制功能 (101) 2.15.1限制IP地址 (102)2.15.2限制MAC地址 (102)2.16V IRTUAL-C HASSIS设置 (103)2.16.1VC知识 (103)2.16.2如何建立VC组 (104)2.16.3如何扩充VC组交换机 (106)2.16.4如何利用uplink链路组成VC (107) 2.16.5如何对VC组进行切换 (110)2.17SNMP配置 (110)2.17.1SNMP协议概览 (110)2.17.2SNMP基本简介 (110)2.17.3配置SNMP (111)2.18S YSLOG配置 (113)第三章交换机维护操作 (113)3.1交换机启动和关闭 (113)3.1.1 交换机重启 (113)3.1.2交换机关闭 (113)3.2配置备份和恢复 (114)3.2.1 交换机文件备份 (114)3.2.2配置文件的恢复 (116)3.3如何升级交换机OS (116)3.4如何恢复出厂设置 (117)3.5密码恢复 (117)3.6日常维护命令 (119)3.6.1查看序列号show chassis hardware (120)3.6.2查看硬件show chassis hardware (120)3.6.3查看软件版本show version (120)3.6.4查看CPU show chassis routing-engine (120)3.6.5ping命令 (120)3.6.6查看设备告警信息 show chassis alarms (120)3.6.7查看详细的硬件温度及状态信息show chassis environment (120)3.6.8查看接口VRRP状态信息show vrrp (120)第一章交换机基础知识1.1 认识Juniper交换机产品型号端口数端口类型PoE端口数最大电源容量(包括 PoE)EX 3200-24T 2410/100/1000B-T 8 190 (320) W EX 3200-24P 2410/100/1000B-T 24 190 (600) W EX 3200-48T 4810/100/1000B-T 8 190 (320) W EX 3200-48P 4810/100/1000B-T 48 190 (930) W产品型号端口数端口类型PoE端口数最大电源容量(包括 PoE)EX 4200-24T 24 10/100/1000B-T 8 190 (320) W EX 4200-24P 24 10/100/1000B-T 24 190 (600) W EX 4200-24F 24 100B-FX/1000B-X N/A 190 (190) WEX 4200-48T 48 10/100/1000B-T 8190 (320) WEX 4200-48P 48 10/100/1000B-T 48 190 (930) WEX 3200-48T前面面板EX 3200-48T 后面面板USBGbE管理口Console可插拔uplink模块LCD电源模块风扇模块RPS 连接头至少8 PoE端口EX 4200-48T 前面面板EX 4200-48T Rear ViewVCP (Virtual Chassis Port) 0 and1USB GbE管理口Console可插拔uplink模块LCD冗余可热插拔电源模块可插拔风扇模块至少8 PoE端口1.2 Junos操作系统基础Juniper交换机支持两种配置方式:采用命令行的CLI(command-line interface)配置方式,以及采用web浏览器界面JWeb配置方式。


锐捷-交换机密码恢复方法第一篇:锐捷-交换机密码恢复方法网络实验室锐捷系列交换共有S2026、S2126、S3550、S3760等几个型号。
总结一下各自的修复密码方法:1,S2026交换机密码修复(1)建立超级终端,默认设置参数(参数9600);(2)重启交换机,同时不停得按ctrl+C(应该是有规律的),直到出现ctrl工具菜单。
(3)输入 4——file management utilities,如果文件不关紧要,可以输入1—— Remove a file,文件名输入“config.text”,回车,即可恢复到出厂设置。
(4)按下ctrl+q,就会转到命令行模式,此时,可直接输入load命令,重启交换机。
至此交换机恢复密码工作完成。
2,S21系列交换机密码修复方法就和s2026有所不同。
(1)打开超级终端,默认参数后,将波特率更改成57600。
(2)交换机重启上电,在3秒内完成如下工作:点击“确定”、不间断有节奏得按下ESC键,进入交换机ctrl层。
Continue with configuaration dialog ?[y/n] y----输入y,回车。
在这里选择4——delete file;input filename :config.text ;确认y,选择6运行主程序即可。
3,S35系列交换机密码修复修复方法与S21系列相同; 4,S3760交换机密码修复(1)建立超级终端,默认设置参数(参数9600);(2)交换机重启上电,在3秒内完成如下工作:点击“确定”、不间断有节奏得按下CTRl+C键,进入交换机ctrl层。
(3)在这里选择1,删除config.text;The filename you want to remove :config.text;回车确认。
(4)按下ctrl+Q进入命令行界面,在ctrl>下输入load,加载主程序。
修复成功。
5,RCMS修复(1)建立超级终端,默认设置参数(参数9600);(2)交换机重启上电,在3秒内完成如下工作:点击“确定”、不间断有节奏得按下CTRl+C键,进入交换机ctrl层。

JUNOS OS主分区损坏,从备分区启动的修复方法以JUNIPER EX交换机为例说明:设备亮经灯,使用命令show chassis alarms去查看,得到以下信息:Alarm:The following alarm message is generated:user@switch> show chassis alarms1 alarms currently activeAlarm time Class Description2011-02-17 05:48:49 PST Minor Host 0 Boot from backup rootWarning:********************************************************************* ************ **** WARNING: THIS DEVICE HAS BOOTED FROM THE BACKUP JUNOS IMAGE **** **** It is possible that the primary copy of JUNOS failed to boot up ** ** properly, and so this device has booted from the backup copy. **** **** Please re-install JUNOS to recover the primary copy in case **** it has been corrupted. **** *********************************************************************** *********以上信息,说明OS从一个备份的分区启动了,需要修复才能正常。
以下为验证方法:To verify if the primary partition is rebuilt, run one of the following show commands. The same commands also inform about which partition is the current active partition.show system storage partitionsSample output:root> show system storage partitionsfpc0:--------------------------------------------------------------------------Boot Media: internal (da0)Active Partition: da0s1aBackup Partition: da0s2a <-- this is the backup sliceCurrently booted from: backup (da0s2a) <-- shows booted from that slicePartitions information:Partition Size Mountpoints1a 184M altroots2a 184M /s3d 369M /var/tmps3e 123M /vars4d 62M /configs4e unused (backup config)ORshow system snapshot media internalSample output:root> show system snapshot media internalInformation for snapshot on internal (/dev/da0s1a) (primary) Creation date: Feb 24 11:32:07 2012JUNOS version on snapshot:jbase : 10.4I20120224_1123_bshekarjcrypto-ex: 10.4I20120224_1123_bshekarjdocs-ex: 10.4I20120224_1123_bshekarjkernel-ex: 10.4I20120224_1123_bshekarjroute-ex: 10.4I20120224_1123_bshekarjswitch-ex: 10.4I20120224_1123_bshekarjweb-ex: 10.4I20120224_1123_bshekarjpfe-ex42x: 10.4I20120224_1123_bshekarInformation for snapshot on internal (/dev/da0s2a) (backup) <-- provides info for this slice/partition the switch booted off of and the date the file system was createdCreation date: Feb 14 05:42:42 2012 <-- if less than alarm date then customer should snapshot (it is a good way to confirmJUNOS version on snapshot:jbase : 11.2-20120214.0jcrypto-ex: 11.2-20120214.0jdocs-ex: 11.2-20120214.0jkernel-ex: 11.2-20120214.0jroute-ex: 11.2-20120214.0jswitch-ex: 11.2-20120214.0jweb-ex: 11.2-20120214.0jpfe-ex42x: 11.2-20120214.0以下是修复方法:Step-by-step recovery procedure for this situation:1.Copy the Junos image from the backup partition to the primary partition,by using the following snapshot command:request system snapshot media internal slice alternateNote: This step ensures that you have consistent images on both theprimary and backup partitions.2.The above command ensures that the alternate partition is repaired,without requiring a reboot. You can verify both the partitions by usingthe following command:show system storage partitions3.The command used in step 1 will only repair the partition and not clearthe alarm. So, you will still see the following alarm:root> show system alarms2 alarms currently activeAlarm time Class Description2012-03-02 13:01:03 UTC Minor Host 0 Boot from backuproot <-- shows date stamp of alarm4.To get rid of the above alarm, use the following command to ensure thatthe switch boots from the primary partition:request system reboot slice alternate media internalThe system, after the above command is executed, will reboot from the primary partition. The alarm or the warning message will no longer be displayed.5. The following commands are issued to verify the Junos image installed on each slice:user@switch>show system snapshot media internal slice 1user@switch>show system snapshot media internal slice 2操作1、备份配置文件2、开启WEB访问root@TEST# set system services web-management http3、升级系统4、备份系统user@switch>request system snapshot slice alternate 升级后快照备份系统5、如果从备份分区启动的需要从主分区启动user@switch>request system reboot slice alternate media internal 系统从主分区启动保存当前配置为救援配置,消除alarm 告警>run request system configuration rescue save 升级系统之后备份一下系统:request system snapshot slice alternate消除管理端口告警set chassis alarm management-ethernet link-down ignore端口捆绑set chassis aggregated-devices Ethernet device-count 10set interface fe-0/0/0 fastether-options 802.3ad ae0set interface fe-0/0/1 astether-options 802.3ad ae0set interface ae0 aggregated-rther-options lacp activeset interface ae0 unit 0 family init address 10.10.10.1/24当NAT 地址与外网口地址在同一网段时,必须设置ARP 代理set security nat proxy-arp interface ge-0/0/1.0 address 172.21.1.1 to 172.21.1.100消除management-ethernet link-down 的告警set management-ethernet link-down ignore 消除Rescue configuration is not set 告警request system configuration rescue save 磁盘分区损坏—配置会丢,提前拷出配置request system snapshot media internal slice alternaterequest system reboot slice alternate media internal junos升级requset system software add ftp://192.168.1.2/文件名no-copy reboot 修改web 页面timeout 时间set system services web-management session idle-timeout 10强制所有正在登陆的账号退出request system logout user all。

交换机恢复出厂设置及其基本配置一、实验目的1、了解交换机的文件管理;2、了解什么时候需要将交换机恢复成出厂设置;3、了解交换机恢复出厂设置的方法;4、了解交换机的一些基本配置命令。
二、应用环境1、实际环境下:a)教学楼的DCS-3926S坏了,网络管理员把实验楼的一台交换机拿过去先用着。
这台交换机的配置是按照实验楼的环境设置的,我需要改成教学楼的环境,一条条修改比较麻烦,也不能保证正确,不如清空交换机的所有配置,恢复到刚刚出厂的状态。
b)我正在配置一台DCS-3926S,做了很多功能的配置,完成之后发现它不能正常工作。
问题出在哪里了?我检查了很多遍都没有发现错误。
排错的难度远远大于重新做配置,不如清空交换机的所有配置,恢复到刚刚出厂的状态。
2、实验环境下:上一节网络实验课的同学们刚刚做完实验,已经离去。
桌上的交换机他们已经配置过,我通过show run命令发现他们对交换机作了很多的配置,有些我能看明白,有些我看不明白。
为了不影响我这节课的实验,我必须把他们做的配置都删除,最简单的方法就是清空配置,恢复到刚刚出厂的状态,让交换机的配置成为一张白纸,这样我就能按照自己的思路进行配置,也能更清楚地了解我的配置是否生效,是否正确。
三、实验设备1、DCS-3926S交换机1台2、PC机1台3、Console线1根四、实验拓扑五、实验要求1、先给交换机设置enable密码,确定enable密码设置成功;2、对交换机做恢复出厂设置,重新启动后发现enable密码消失,表明恢复成功;3、了解show flash命令以及显示内容;4、了解clock set命令以及显示内容;5、了解hostname命令以及显示内容;6、了解language命令以及显示内容;六、实验步骤第一步:为交换机上设置enable密码。
(详见实验二)switch>enableswitch#config t !进入全局配置模式switch(Config)#enable password level adminCurrent password: !原密码为空,直接回车New password:***** !输入密码Confirm new password:*****switch(Config)#exitswitch#writeswitch#验证配置:验证方法1:重新进入交换机switch#exit !退出特权用户配置模式switch>switch>enable !进入特权用户配置模式Password:*****switch#验证方法2:show命令来查看switch#show running-configCurrent configuration:!enable password level admin 827ccb0eea8a706c4c34a16891f84e7b !该行显示了已经为交换机配置了enable密码。

JuniperEX交换机系统恢复1 交换机无法正常启动的解决办法EX交换机在突然掉电或非正常关机的情况下,设备重新启动后,可能会出现一直卡着启动进程或OS引导失败的场景,本文列出几种常见的模式及解决方法(注:本文档中提到的操作可能出现设备原有配置丢失情况出现,另外,对于通过命令关机时,强烈建议等到所有进程都halt时再对进行掉电操作)。
通常,交换机无法正常启动时,通过console输出为:1.系统直接进入Loader模式,Loader Prompt ( loader >) ;2.系统进入Debug模式,Debug Prompt (db>) ;3.系统进入UBoot模式,UBoot Prompt (=>);4.系统能正常启动,但各系统进程无法正常加载;5.系统提示Can't load kernel error ;2 系统直接进入Loader模式解决办法方法一 TFTP方式恢复交换机1.准备好TFTP服务器,然后把Junos安装文件上传至TFTP的root目录层次下;2.用console连接交换机,并对设备进行加电;# When you see the "loading /boot/defaults/loader.conf" display hit ENTER.Then press [Enter] to boot immediately, or space bar for command prompt.Hit the space bar to enter the manual loader. The loader > prompt displays.(NOTE: There is a 1 second delay for hitting the space bar) (TIPS: you can hit space bar after you see "Loading /boot/defaults/loader.conf" message)3.配置交换机的管理ip地址;loader> set ipaddr=192.168.100.2loader> set netmask=255.255.255.0 loader> set serverip=192.168.100.14.从TFTP安装Junos;loader> install tftp://192.168.100.1/jinstall-ex-9.1R2.7-domestic-signed.tgz====================================== ========This part of the boot log is related to the steps listed above ========================================= =====Consoles: U-Boot console Found compatible API, ver. 7FreeBSD/PowerPC U-Boot bootstrap loader, Revision 2.1 (marcelm@/doc/2d12446631.html,, Wed Feb 6 11:23:55 PST 2008) Memory: 1024MB Loading /boot/defaults/loader.conf /kernel data=0x9dc348+0x6df44 syms=[0x4+0x87bb0+0x4+0x8e152]Hit [Enter] to boot immediately, or space bar for command prompt. <-------HIT SPACE BAR-------Type '?' for a list of commands, 'help' for more detailed help.loader>loader> set ipaddr=192.168.100.2 loader> set netmask=255.255.255.0 loader> set serverip=192.168.100.1 loader> install tftp://192.168.100.1/jinstall-ex-9.1R2.7-domestic-signed.tgz Speed: 100, full duplex Package /jinstall-ex-9.1R2.7-domestic-signed.tgz is signed.../kernel data=0x504104+0x32e60 syms=[0x4+0x50a00+0x4+0x6366f] Kernel entry at 0xa0000100 ...GDB: no debug ports present KDB: debugger backends: ddb KDB: current backend: ddb Copyright (c) 1996-2008, Juniper Networks, Inc.All rights reserved.Copyright (c) 1992-2006 The FreeBSD Project.... snip ...====================================== ========或参考KB11752 - Installing EX-Series software from a TFTP server from Loader promp t OR Recovering from a Failed Software Upgrade on an EX Series Switch.方法二、USB方式恢复交换机步骤一、将需要安装的Junos软件copy至U盘根目录下;步骤二、用console连接交换机,并对设备进行加电;# When you see the "loading /boot/defaults/loader.conf" display hit ENTER.Then press [Enter] to boot immediately, or space bar for command prompt.Hit the space bar to enter the manual loader. The loader > prompt displays.(NOTE: There is a 1 second delay for hitting the space bar) (TIPS: you can hit space bar after you see "Loading /boot/defaults/loader.conf" message)步骤三、输入install file:///jinstall-ex-3200-10.0S1.1-domestic-signed.tgz 注:交换机将从U盘进行安装;或参考KB10386 - Boot from USB and Recovering from a Failed Software Upgrade on an EX-series Switch OR Booting an EX Series Switch Using a Software Package Stored on a USB Flash Drive3 系统进入Debug模式解决办法步骤一,在db>模式下输入以下命令收集相关信息:db> x/s versiondb> alltrace db> ps db> show allvms db> show msgbuf db> show registers db> show lock db> show uma步骤二,完成以上步骤后,输入contdb> contDo you get the CLI prompt?No - Continue with 步骤三.Yes - Jump to 步骤四.步骤三,重启交换机,从loader模式进行恢复;如果交换机无法进入loader模式,请开case 进行处理或采用install format方式解决;步骤四,在cli下用show system core-dumps看是否存在core-dump文件,如果有的话,可先进入shell模式层下,然后进入/var/core-dumps directory目录下,将文件上传至FTP服务器;或参考KB20635 - While booting up, switch stuck in db> mode4 系统进入UBoot模式解决办法按照以下三个步骤进行操作:1. 在UBoot模式输入reset重启交换机;2. Break启动顺序进入loader>模式# When you see the "loading /boot/defaults/loader.conf" display hit ENTER.Then press [Enter] to boot immediately, or space bar for command prompt.Hit the space bar to enter the manual loader. The loader > prompt displays.(NOTE: There is a 1 second delay for hitting the space bar) (TIPS: you can hit space bar after you see "Loading /boot/defaults/loader.conf" message)3. 然后按照方法一中的Loader模式进行处理;5 系统能正常启动,但其它各系统进程无法加载的解决方法设备启动后存在以下报错root@GZ-EX4200-1> show chassis alarms no-forwardingerror: the alarm-control subsystem is not runningroot@GZ-EX4200-1> show chassis hardware detail no-forwardingerror: the chassis-control subsystem is not running1. 对于10.4R3以前的版本,可按照Loader模式的方法进行处理;2. 对于10.4R3之后的版本,存在双分区双系统,而Junos loader 默认是用disk99,如果这个分区的系统坏了之后,会一直卡着Loader>模式;步骤一,设备加电后,输入以下命令;=> setenv loaddev disk99:=> saveenv=> reset步骤二,在JunOS loader模式下选择从internal NAND flash 启动Junosloader> set currdev=disk0:loader> boot步骤三,在shell模式删除以下文件;(Login as root)# ls -al /boot/loader.conf.local# rm /boot/loader.conf.local步骤四,Revert the change made in step one:# nvram unsetenv loaddev步骤五,Reboot6 Can't load kernel error解决办法如果设备重启后,一直显示以下错误:can't load '/kernel'can't load '/kernel.old'可参照DB模式进行恢复;7 Junos在备用分区启动(KB23180)开机提示:Warning:***************************************************** ************************************* **** WARNING: THIS DEVICE HAS BOOTED FROM THE BACKUP JUNOS IMAGE **** **** It is possible that the primary copy of JUNOS failed to boot up **** properly, and so this device has booted from the backup copy. **** **** Please re-install JUNOS to recover the primary copy in case **** it has been corrupted. **** ***************************************************************** ************************设备告警信息:user@switch> show chassis alarms1 alarms currently activeAlarm time Class Description2011-02-17 05:48:49 PST Minor Host 0 Boot from backup root查看加载路径:root> show system storage partitionsfpc0:--------------------------------------------------------------------------Boot Media: internal (da0)Active Partition: da0s1aBackup Partition: da0s2a <-- this is the backup sliceCurrently booted from: backup (da0s2a) <-- shows booted from that slicePartitions information:Partition Size Mountpoints1a 184M altroots2a 184M /s3d 369M /var/tmps3e 123M /vars4d 62M /configs4e unused (backup config)root> show system snapshot media internalInformation for snapshot on internal (/dev/da0s1a) (primary) Creation date: Feb 24 11:32:07 2012JUNOS version on snapshot:jbase : 10.4I20120224_1123_bshekarjcrypto-ex: 10.4I20120224_1123_bshekarjdocs-ex: 10.4I20120224_1123_bshekarjkernel-ex: 10.4I20120224_1123_bshekarjroute-ex: 10.4I20120224_1123_bshekarjswitch-ex: 10.4I20120224_1123_bshekarjweb-ex: 10.4I20120224_1123_bshekarjpfe-ex42x: 10.4I20120224_1123_bshekarInformation for snapshot on internal (/dev/da0s2a) (backup) <-- provides info for this slice/partition the switch booted off of and the date the file system was createdCreation date: Feb 14 05:42:42 2012 <-- if less than alarmdate then customer should snapshot (it is a good way to confirm JUNOS version on snapshot:jbase : 11.2-20120214.0jcrypto-ex: 11.2-20120214.0jdocs-ex: 11.2-20120214.0jkernel-ex: 11.2-20120214.0jroute-ex: 11.2-20120214.0jswitch-ex: 11.2-20120214.0jweb-ex: 11.2-20120214.0jpfe-ex42x: 11.2-20120214.0解决办法:把备用junos镜像copy到主用junos镜像request system snapshot media internal slice alternate查看junos启动镜像show system storage partitions确保开机启用主用junos镜像命令:request system reboot slice alternate media internaluser@switch>show system snapshot media internal slice 1 user@switch>show system snapshot media internal slice 2。

在意外断电的情况下,SRX和EX交换机都有机会出现分区损坏,而从备份分区启动的问题,要恢复分区的话,可以用以下方法做:故障现象:一般断电可能会出现以下问题,如果在设备启动过程中断电,那么是一定会出现以下问题:root@EX2200> show system storage partitionsBoot Media: internal (da0)Active Partition: da0s1aBackup Partition: da0s2aCurrently booted from: backup (da0s2a) 在这里可以看到是从backup分区启动的1、手工恢复:EX交换机:request system snapshot media internal slice alternate 这个是将目前启用的软件copy到另外一个分区,时间长短视乎设备的型号,2200的话,大概10分钟request system reboot media internal slice alternate用恢复好的分区启动。
SRX:request system snapshot media internal slice alternate 这个是将目前启用的软件copy到另外一个分区,时间长短视乎设备的型号由于srx不支持request system reboot media internal slice alternate,之前的命令已经将双分区的软件做成一致了,所以我们可以通过调换系统分区来解决报错问题request system software rollbackrequest system reboot 这个reboot命令可以立即做,也可以以后做,只有设备重启后,软件的告警才会消失。
2、脚本自动恢复:目前脚本只可以自动将损坏的分区修复好,但没办法自动重启,因为修复需要时间,所以目前还没办法将时间控制好去重启:EX交换机:set event-options policy init-chk-1 events systemset event-options policy init-chk-1 attributes-match system.message matches "Host 0 Boot from backup root"set event-options policy init-chk-1 then execute-commands commands "request system snapshot media internal slice alternate"SRX:set event-options policy init-chk-1 events systemset event-options policy init-chk-1 attributes-match system.message matches "Host 0 Boot from backup root"set event-options policy init-chk-1 then execute-commands commands "request system software rollback"set event-options policy init-chk-1 then execute-commands commands "request system snapshot media internal slice alternate"。

EX3200交换机维护手册1、日常维护的两种方式日常维护时我们可以通过两种方式登录EX3200交换机,console口和web 登录,设备初始化配置时和系统故障时,我们可以通过console线连接交换机,使用下面的步骤连接路由器的Console接口:1.准备好EX交换机设备自带的Console线缆(如果没有的话,采用Cisco或者安耐特等厂家的Console线也可可以)2.将Console线缆的DB9插头一头插到PC或者笔记本电脑的COM口上,另外一端插到路由器的CONSOLE口上。
3.打开计算机中的终端软件工具。
例如:CRT或者Windows自带的超级终端。
设置如下:⏹端口:选择第二步中Console线缆插入到PC上的端口,通常为COM1或者COM 2⏹波特率:9600⏹数据位:8位⏹奇偶校验:无⏹停止位:1位⏹数据流控制:无4.打开配置到的CRT或者超级终端,按“Enter”键,屏幕出现登陆的提示符,即连接成功。
如果没有显示,请检查线缆或者终端的配置是否正确。
2、EX3200交换机配置详细说明下面我们以仪征农信社配置为例来对配置加以详细说明:YZ_YZ_KF_SW_1 (ttyu0)login: jsnxPassword:#设备登录的用户名/密码:jsnx/juniper123 #--- JUNOS 10.0R4.7 built 2010-08-22 02:54:43 UTCjsnx@YZ_YZ_KF_SW_1>jsnx@YZ_YZ_KF_SW_1> configureEntering configuration mode#进入设备配置模式#[edit]jsnx@YZ_YZ_KF_SW_1# run show configuration |display setet version 10.0R4.7set system host-name YZ_YZ_KF_SW_1set system time-zone Asia/Shanghai#设备命名为YZ_YZ_KF_SW_1(扬州地区_仪征_开发网_交换机_1)#set system root-authentication encrypted-password "$1$.QxXIQNC$suZg5pmx8bOXUM1ytZQSd1"set system login user jsnx uid 2000set system login user jsnx class super-userset system login user jsnx authentication encrypted-password "$1$zPDEH7v8$XtL3zeN8fHagcfXQdtobn/"set system services ssh root-login denyset system services telnetset system services web-management http port 8480set system syslog user * any emergencyset system syslog file messages any noticeset system syslog file messages authorization infoset system syslog file interactive-commands interactive-commands anyset chassis alarm management-ethernet link-down ignore#设置设备的超级用户密码、开启http服务和telnet服务#set interfaces ge-0/0/1 unit 0 family ethernet-switchingset interfaces ge-0/0/2 unit 0 family ethernet-switchingset interfaces ge-0/0/3 unit 0 family ethernet-switchingset interfaces ge-0/0/4 unit 0 family ethernet-switchingset interfaces ge-0/0/5 unit 0 family ethernet-switchingset interfaces ge-0/0/6 unit 0 family ethernet-switchingset interfaces ge-0/0/7 unit 0 family ethernet-switchingset interfaces ge-0/0/8 unit 0 family ethernet-switchingset interfaces ge-0/0/9 unit 0 family ethernet-switchingset interfaces ge-0/0/10 unit 0 family ethernet-switchingset interfaces ge-0/0/11 unit 0 family ethernet-switchingset interfaces ge-0/0/12 unit 0 family ethernet-switchingset interfaces ge-0/0/13 unit 0 family ethernet-switchingset interfaces ge-0/0/14 unit 0 family ethernet-switchingset interfaces ge-0/0/15 unit 0 family ethernet-switchingset interfaces ge-0/0/16 unit 0 family ethernet-switchingset interfaces ge-0/0/17 unit 0 family ethernet-switchingset interfaces ge-0/0/18 unit 0 family ethernet-switchingset interfaces ge-0/0/19 unit 0 family ethernet-switchingset interfaces ge-0/0/20 unit 0 family ethernet-switchingset interfaces ge-0/0/21 unit 0 family ethernet-switchingset interfaces ge-0/0/22 unit 0 family ethernet-switchingset interfaces ge-0/0/23 unit 0 family ethernet-switchingset interfaces ge-0/1/0 unit 0 family ethernet-switchingset interfaces xe-0/1/0 unit 0 family ethernet-switchingset interfaces ge-0/1/1 unit 0 family ethernet-switchingset interfaces xe-0/1/1 unit 0 family ethernet-switchingset interfaces ge-0/1/2 unit 0 family ethernet-switchingset interfaces ge-0/1/3 unit 0 family ethernet-switching#设置设备的接口是二层交换模式#set interfaces lo0 unit 0 family inet address 66.192.250.1/32#设置设备的loopback0接口的IP地址#set interfaces me0 unit 0 family inet address 192.168.254.1/30#设置设备背后的管理口的IP地址#set interfaces vlan unit 64 description OAset interfaces vlan unit 64 family inet address 66.192.64.254/24 #设置Vlan 64为OA网段,配置其IP地址#set interfaces vlan unit 97 description kaifawangset interfaces vlan unit 97 family inet address 66.192.97.254/24 #设置Vlan 97为开发网段,配置其IP地址#set interfaces vlan unit 128 description SHIPINset interfaces vlan unit 128 family inet address 66.192.128.254/24 #设置Vlan 128为视频网段,配置其IP地址#set protocols ospf enableset protocols ospf area 0.0.0.0 interface ge-0/0/0.0set protocols ospf area 0.0.0.0 interface vlan.64set protocols ospf area 0.0.0.0 interface vlan.128set protocols ospf area 0.0.0.0 interface vlan.97set protocols ospf area 0.0.0.0 interface lo0.0#启用OSPF路由协议,加入网段和L0接口#set protocols igmp-snooping vlan allset protocols rstpset protocols lldp interface allset protocols lldp-med interface allset ethernet-switching-options storm-control interface all set vlans vlan128 vlan-id 128set vlans vlan128 interface ge-0/0/10.0set vlans vlan128 interface ge-0/0/11.0set vlans vlan128 interface ge-0/0/12.0set vlans vlan128 interface ge-0/0/13.0set vlans vlan128 l3-interface vlan.128set vlans vlan64 vlan-id 64set vlans vlan64 interface ge-0/0/2.0set vlans vlan64 interface ge-0/0/3.0set vlans vlan64 interface ge-0/0/4.0set vlans vlan64 interface ge-0/0/5.0set vlans vlan64 interface ge-0/0/6.0set vlans vlan64 interface ge-0/0/7.0set vlans vlan64 interface ge-0/0/8.0set vlans vlan64 interface ge-0/0/9.0set vlans vlan64 l3-interface vlan.64set vlans vlan97 vlan-id 97set vlans vlan97 interface ge-0/0/14.0set vlans vlan97 interface ge-0/0/15.0set vlans vlan97 interface ge-0/0/16.0set vlans vlan97 interface ge-0/0/17.0set vlans vlan97 interface ge-0/0/18.0set vlans vlan97 interface ge-0/0/19.0set vlans vlan97 interface ge-0/0/20.0set vlans vlan97 interface ge-0/0/21.0set vlans vlan97 interface ge-0/0/22.0set vlans vlan97 interface ge-0/0/23.0set vlans vlan97 l3-interface vlan.97#设置交换机的端口加入不同的网段#set poe interface all disable#关闭交换机上POE供电的功能#3、EX3200交换机上信息命令行查看在EX3200的交换机上我们可以通过以下命令来参看一些日常的维护信息:通过run show vlans命令我们可以查看到现有EX3200交换机各端口所属Vlan的信息。

juniper ssg 140系统修复前段时间由于关闭电源,juniper防火墙再打开时,发现web无法登录,status的led灯也不亮,reset后也不管用,后来发现是juniper ssg 140的系统出了问题,联系了客服,已经出了保修期,于是花了一天时间,找了各种文档,才将系统修复,先整理一下整个的修复过程,供大家参考,希望可以节省更多人的宝贵时间。
一、前期准备1.硬件:win7-64位电脑一台、com转USB连接线一根,com线一根,网线一根。
2.软件:usb转com驱动、SecureCRT64位终端仿真程序(和超级终端类似)、TFTP 64位、juniper的系统固件[ssg140.6.3.0r22.0]。
固件根据juniper机器自行选择版本,网上搜一下即可,注意别找错了。
3.将usb与com线连接,然后usb口与电脑连接,com线的一端与juniper的console 连接;网线一端连接电脑,另一端连接juniper的Ethernet0/0二、工具安装b转com的驱动安装安装:先安装PL2303_Prolific_DriverInstaller_v1.7.0.exe,貌似不太管用,因为设备管理器中的端口(COM和LPT)中出现带叹号的prolific,更新驱动也不行。
安装:后安装PL-2303 Driver Installer(recommend).exe、PL-2303 Driver Installer1.exe,成功,如下显示:2.scrt_sfx833-x64超级终端的安装三、打开超级终端工具,对juniper进行命令行操作,首先,按照如下配置点击连接后,显示白窗口,貌似没有反应但是没有关系,使用别针按一下juniper的reset,超级终端的窗口会显示如下信息:Juniper Networks SSG-140 Boot Loader Version 3.2.6 (Checksum: 23062A3A)Copyright (c) 1997-2006 Juniper Networks, Inc.Total physical memory: 256MBTest - PassInitialization - DoneHit any key to run loaderHit any key to run loaderHit any key to run loaderHit any key to run loaderLoading system image "$BABOOT$.BIN" from on-board flash disk...Done! (size = 12,582,912 bytes)cksum = cf59bef9, p_hdr->cksum = 79f86c69### image corrupted ###Loading default system image from on-board flash disk...Done! (size = 12,582,912 bytes)cksum = dfab3944, p_hdr->cksum = 79f86c69### image corrupted ###Serial Number [0185012015600165]: READ ONLYHW Version Number [1010]: READ ONLYSelf MAC Address [44f4-7738-f33e]: READ ONLYBoot File Name [screenOS]:这些信息的大概意思是juniper在加载系统文件时出现了问题,显示“image corrupted”,需要指定启动的文件。
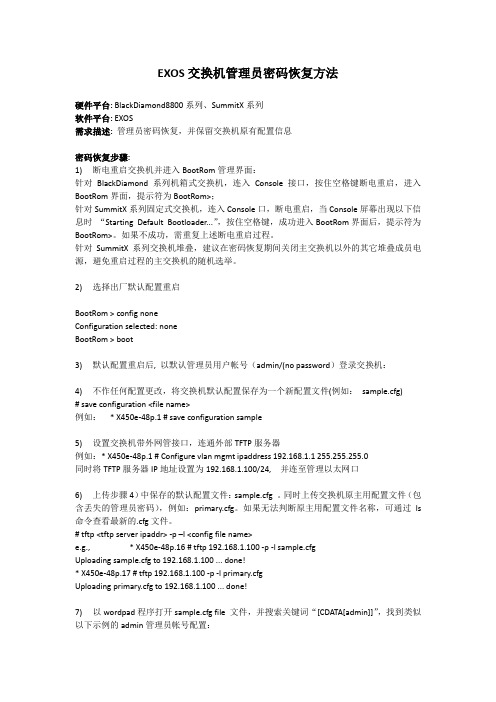
EXOS交换机管理员密码恢复方法硬件平台: BlackDiamond8800系列、SummitX系列软件平台: EXOS需求描述: 管理员密码恢复,并保留交换机原有配置信息密码恢复步骤:1)断电重启交换机并进入BootRom管理界面:针对BlackDiamond系列机箱式交换机,连入Console接口,按住空格键断电重启,进入BootRom界面,提示符为BootRom>;针对SummitX系列固定式交换机,连入Console口,断电重启,当Console屏幕出现以下信息时“Starting Default Bootloader...”,按住空格键,成功进入BootRom界面后,提示符为BootRom>。
如果不成功,需重复上述断电重启过程。
针对SummitX系列交换机堆叠,建议在密码恢复期间关闭主交换机以外的其它堆叠成员电源,避免重启过程的主交换机的随机选举。
2)选择出厂默认配置重启BootRom > config noneConfiguration selected: noneBootRom > boot3)默认配置重启后, 以默认管理员用户帐号(admin/(no password)登录交换机:4)不作任何配置更改,将交换机默认配置保存为一个新配置文件(例如:sample.cfg)# save configuration <file name>例如:* X450e-48p.1 # save configuration sample5)设置交换机带外网管接口,连通外部TFTP服务器例如:* X450e-48p.1 # Configure vlan mgmt ipaddress 192.168.1.1 255.255.255.0同时将TFTP服务器IP地址设置为192.168.1.100/24, 并连至管理以太网口6)上传步骤4)中保存的默认配置文件:sample.cfg 。


SRX Getting Started - Factory Reset[KB15725] Show KB PropertiesCategories:∙SRXKnowledge Base ID: KB15725SeriesLast Updated: 27 Oct 2011Version: 4.0 SUMMARY:This article describes how to return the configuration on an SRX Series device to the factory default version (configuration file that is shipped with the device).For other topics, go to the SRX Getting Started main page.PROBLEM OR GOAL:Reset the configuration to the factory default.CAUSE:SOLUTION:There are three ways to reset an SRX Series device to its factory default configuration.∙Using the Reset Config Button (requires access to the front panel of the device)∙Using the load factory-default Command (requires login to the CLI)∙Using the Root Password Recovery Process (requires console access to the device)Using the Reset Config ButtonNote: The Reset Config button is available only on the SRX100, SRX210, SRX240, and SRX650 devices.You can use the Reset Config button on the front panel of the SRX Series device to reset the device to its factory default configuration. The Reset Config button is recessed to prevent it from being pressed accidentally, so you need to insert a small probe (for example, a straightened paper clip) to press the button.Caution: If you use the Reset Config button to reset the device to its factory default configuration, all the configuration files, including the rescue configuration and backup configurations, are deleted.For more information, see the Hardware Guide for your device at/techpubs/hardware/junos-srx/index.html.To reset the device to its factory default configuration, press and hold the Reset Config button on the front panel of the SRX Series device for at least 15 seconds, until the Status LED glows amber.Using the load factory-default CommandIf you are still able to log in to the device with the CLI, you can use the load factory-default command to return the device to its factory default configuration. The load factory-default command loads and commits the factory configuration, but using this command does not delete other configuration files on the device.For more information about the load factory-default command, see/techpubs/software/junos-security/junos-security10.0/junos-security-admin-guide/f actory-defaults-router-context-to-secure-context-section.html#factory-defaults-router-context-to-secure-c ontext-section.1. Enter the load factory-default command.root@host# load factory-default2. Use the set system root-authentication plain-text-password command toset a new root password for the device.root@host# set system root-authentication plain-text-password3. Enter the root password, and enter it again for confirmation.New password:Retype new password:Caution: Before you commit changes, if you do not assign an IP address for the ge-0/0/0 interface, create a local user account, and enter routing information, either from CLI configuration or using DHCP, the SRX device is no longer remotely accessible. To manage the SRX device, you must connect a PC or laptop to the physical console, or attach the PC or laptop to a subnet that is directly connected to thege-0/0/0 interface, which is assigned an IP address of 192.168.2.1.4. Use the commit and-quit command to commit the configuration and exit fromconfiguration mode if the configuration contains no errors and the commit succeeds.root@host# commit and-quitAfter the commit, the factory default configuration is the running configuration.Using the Root Password Recovery ProcessIf you can no longer log in to the device, you can use the root password recovery process to reset the device to its factory default configuration. You must have console access to use the password recovery process.For instructions on how to recover the root password, see/techpubs/en_US/junos10.4/information-products/topic-collections/config-guide-sy stem-basics/index.html?topic-31396.html.Note that for SRX Branch devices running 10.0R1 or later JUNOS versions password recovery may fail due to watchdog timeout while entering single-user mode. Refer to KB17565 for details.PURPOSE:ImplementationRELATED LINKS:。

Juniper EX 系列以太网交换机操作手册Version 1.0Copyright © 2008 Juniper Networks, Inc.Juniper EX系列以太网交换机操作手册Juniper EX系列以太网交换机操作手册Juniper EX系列以太网交换机操作手册Juniper EX系列以太网交换机操作手册Juniper EX系列以太网交换机操作手册Juniper EX系列以太网交换机操作手册Juniper EX系列以太网交换机操作手册Juniper EX系列以太网交换机操作手册Juniper EX系列以太网交换机操作手册Juniper EX系列以太网交换机操作手册Juniper EX系列以太网交换机操作手册Juniper EX系列以太网交换机操作手册Juniper EX系列以太网交换机操作手册Juniper EX系列以太网交换机操作手册Juniper EX系列以太网交换机操作手册Juniper EX系列以太网交换机操作手册Juniper EX系列以太网交换机操作手册Juniper EX系列以太网交换机操作手册Juniper EX系列以太网交换机操作手册Juniper EX系列以太网交换机操作手册Juniper EX系列以太网交换机操作手册Juniper EX系列以太网交换机操作手册Juniper EX系列以太网交换机操作手册Juniper EX系列以太网交换机操作手册Juniper EX系列以太网交换机操作手册Juniper EX系列以太网交换机操作手册Juniper EX系列以太网交换机操作手册Juniper EX系列以太网交换机操作手册Juniper EX系列以太网交换机操作手册Juniper EX系列以太网交换机操作手册Juniper EX系列以太网交换机操作手册Juniper EX系列以太网交换机操作手册Juniper EX系列以太网交换机操作手册Juniper EX系列以太网交换机操作手册Juniper EX系列以太网交换机操作手册Juniper EX系列以太网交换机操作手册Juniper EX系列以太网交换机操作手册Juniper EX系列以太网交换机操作手册Juniper EX系列以太网交换机操作手册Juniper EX系列以太网交换机操作手册Juniper EX系列以太网交换机操作手册Juniper EX系列以太网交换机操作手册Juniper EX系列以太网交换机操作手册Juniper EX系列以太网交换机操作手册Juniper EX系列以太网交换机操作手册Juniper EX系列以太网交换机操作手册Juniper EX系列以太网交换机操作手册Juniper EX系列以太网交换机操作手册Juniper EX系列以太网交换机操作手册。
1 交换机无法正常启动的解决办法EX交换机在突然掉电或非正常关机的情况下,设备重新启动后,可能会出现一直卡着启动进程或OS引导失败的场景,本文列出几种常见的模式及解决方法(注:本文档中提到的操作可能出现设备原有配置丢失情况出现,另外,对于通过命令关机时,强烈建议等到所有进程都halt时再对进行掉电操作)。
通常,交换机无法正常启动时,通过console输出为:1.系统直接进入Loader模式,Loader Prompt ( loader >) ;2.系统进入Debug模式,Debug Prompt (db>) ;3.系统进入UBoot模式,UBoot Prompt (=>);4.系统能正常启动,但各系统进程无法正常加载;5.系统提示Can't load kernel error ;2 系统直接进入Loader模式解决办法方法一 TFTP方式恢复交换机1.准备好TFTP服务器,然后把Junos安装文件上传至TFTP的root目录层次下;2.用console连接交换机,并对设备进行加电;# When you see the "loading /boot/defaults/loader.conf" display hit ENTER.Then press [Enter] to boot immediately, or space bar for command prompt.Hit the space bar to enter the manual loader. The loader > prompt displays.(NOTE: There is a 1 second delay for hitting the space bar) (TIPS: you can hit space bar after you see "Loading /boot/defaults/loader.conf" message)3.配置交换机的管理ip地址;loader> set ipaddr=192.168.100.2loader> set netmask=255.255.255.0 loader> set serverip=192.168.100.14.从TFTP安装Junos;loader> install tftp://192.168.100.1/jinstall-ex-9.1R2.7-domestic-signed.tgz==============================================This part of the boot log is related to the steps listed above ==============================================Consoles: U-Boot console Found compatible API, ver. 7FreeBSD/PowerPC U-Boot bootstrap loader, Revision 2.1 (marcelm@, Wed Feb 6 11:23:55 PST 2008) Memory: 1024MB Loading /boot/defaults/loader.conf /kernel data=0x9dc348+0x6df44 syms=[0x4+0x87bb0+0x4+0x8e152]Hit [Enter] to boot immediately, or space bar for command prompt. <-------HIT SPACE BAR-------Type '?' for a list of commands, 'help' for more detailed help.loader>loader> set ipaddr=192.168.100.2 loader> set netmask=255.255.255.0 loader> set serverip=192.168.100.1 loader> install tftp://192.168.100.1/jinstall-ex-9.1R2.7-domestic-signed.tgz Speed: 100, full duplex Package /jinstall-ex-9.1R2.7-domestic-signed.tgz is signed.../kernel data=0x504104+0x32e60 syms=[0x4+0x50a00+0x4+0x6366f] Kernel entry at 0xa0000100 ...GDB: no debug ports present KDB: debugger backends: ddb KDB: current backend: ddb Copyright (c) 1996-2008, Juniper Networks, Inc.All rights reserved.Copyright (c) 1992-2006 The FreeBSD Project.... snip ...==============================================或参考KB11752 - Installing EX-Series software from a TFTP server from Loader promp t OR Recovering from a Failed Software Upgrade on an EX Series Switch.方法二、USB方式恢复交换机步骤一、将需要安装的Junos软件copy至U盘根目录下;步骤二、用console连接交换机,并对设备进行加电;# When you see the "loading /boot/defaults/loader.conf" display hit ENTER.Then press [Enter] to boot immediately, or space bar for command prompt.Hit the space bar to enter the manual loader. The loader > prompt displays.(NOTE: There is a 1 second delay for hitting the space bar) (TIPS: you can hit space bar after you see "Loading /boot/defaults/loader.conf" message)步骤三、输入install file:///jinstall-ex-3200-10.0S1.1-domestic-signed.tgz 注:交换机将从U盘进行安装;或参考KB10386 - Boot from USB and Recovering from a Failed Software Upgrade on an EX-series Switch OR Booting an EX Series Switch Using a Software Package Stored on a USB Flash Drive3 系统进入Debug模式解决办法步骤一,在db>模式下输入以下命令收集相关信息:db> x/s versiondb> alltrace db> ps db> show allvms db> show msgbuf db> show registers db> show lock db> show uma步骤二,完成以上步骤后,输入contdb> contDo you get the CLI prompt?No - Continue with 步骤三.Yes - Jump to 步骤四.步骤三,重启交换机,从loader模式进行恢复;如果交换机无法进入loader模式,请开case 进行处理或采用install format方式解决;步骤四,在cli下用show system core-dumps看是否存在core-dump文件,如果有的话,可先进入shell模式层下,然后进入/var/core-dumps directory目录下,将文件上传至FTP服务器;或参考KB20635 - While booting up, switch stuck in db> mode4 系统进入UBoot模式解决办法按照以下三个步骤进行操作:1. 在UBoot模式输入reset重启交换机;2. Break启动顺序进入loader>模式# When you see the "loading /boot/defaults/loader.conf" display hit ENTER.Then press [Enter] to boot immediately, or space bar for command prompt.Hit the space bar to enter the manual loader. The loader > prompt displays.(NOTE: There is a 1 second delay for hitting the space bar) (TIPS: you can hit space bar after you see "Loading /boot/defaults/loader.conf" message)3. 然后按照方法一中的Loader模式进行处理;5 系统能正常启动,但其它各系统进程无法加载的解决方法设备启动后存在以下报错root@GZ-EX4200-1> show chassis alarms no-forwardingerror: the alarm-control subsystem is not runningroot@GZ-EX4200-1> show chassis hardware detail no-forwardingerror: the chassis-control subsystem is not running1. 对于10.4R3以前的版本,可按照Loader模式的方法进行处理;2. 对于10.4R3之后的版本,存在双分区双系统,而Junos loader默认是用disk99,如果这个分区的系统坏了之后,会一直卡着Loader>模式;步骤一,设备加电后,输入以下命令;=> setenv loaddev disk99: <enter>=> saveenv <enter>=> reset <enter>步骤二,在JunOS loader模式下选择从internal NAND flash 启动Junosloader> set currdev=disk0: <enter>loader> boot <enter>步骤三,在shell模式删除以下文件;<login> (Login as root)# ls -al /boot/loader.conf.local <enter># rm /boot/loader.conf.local步骤四,Revert the change made in step one:# nvram unsetenv loaddev步骤五,Reboot6 Can't load kernel error解决办法如果设备重启后,一直显示以下错误:can't load '/kernel'can't load '/kernel.old'可参照DB模式进行恢复;7 Junos在备用分区启动(KB23180)开机提示:Warning:****************************************************************************************** **** WARNING: THIS DEVICE HAS BOOTED FROM THE BACKUP JUNOS IMAGE **** **** It is possible that the primary copy of JUNOS failed to boot up **** properly, and so this device has booted from the backup copy. **** **** Please re-install JUNOS to recover the primary copy in case **** it has been corrupted. **** *****************************************************************************************设备告警信息:user@switch> show chassis alarms1 alarms currently activeAlarm time Class Description2011-02-17 05:48:49 PST Minor Host 0 Boot from backup root查看加载路径:root> show system storage partitionsfpc0:--------------------------------------------------------------------------Boot Media: internal (da0)Active Partition: da0s1aBackup Partition: da0s2a <-- this is the backup sliceCurrently booted from: backup (da0s2a) <-- shows booted from that slicePartitions information:Partition Size Mountpoints1a 184M altroots2a 184M /s3d 369M /var/tmps3e 123M /vars4d 62M /configs4e unused (backup config)root> show system snapshot media internalInformation for snapshot on internal (/dev/da0s1a) (primary)Creation date: Feb 24 11:32:07 2012JUNOS version on snapshot:jbase : 10.4I20120224_1123_bshekarjcrypto-ex: 10.4I20120224_1123_bshekarjdocs-ex: 10.4I20120224_1123_bshekarjkernel-ex: 10.4I20120224_1123_bshekarjroute-ex: 10.4I20120224_1123_bshekarjswitch-ex: 10.4I20120224_1123_bshekarjweb-ex: 10.4I20120224_1123_bshekarjpfe-ex42x: 10.4I20120224_1123_bshekarInformation for snapshot on internal (/dev/da0s2a) (backup) <-- provides info for this slice/partition the switch booted off of and the date the file system was createdCreation date: Feb 14 05:42:42 2012 <-- if less than alarm date then customer should snapshot (it is a good way to confirmJUNOS version on snapshot:jbase : 11.2-20120214.0jcrypto-ex: 11.2-20120214.0jdocs-ex: 11.2-20120214.0jkernel-ex: 11.2-20120214.0jroute-ex: 11.2-20120214.0jswitch-ex: 11.2-20120214.0jweb-ex: 11.2-20120214.0jpfe-ex42x: 11.2-20120214.0解决办法:把备用junos镜像copy到主用junos镜像request system snapshot media internal slice alternate查看junos启动镜像show system storage partitions确保开机启用主用junos镜像命令:request system reboot slice alternate media internaluser@switch>show system snapshot media internal slice 1 user@switch>show system snapshot media internal slice 2。