8口USB自动KVM切换器使用说明书(带OSD菜单功能)
- 格式:docx
- 大小:113.90 KB
- 文档页数:3
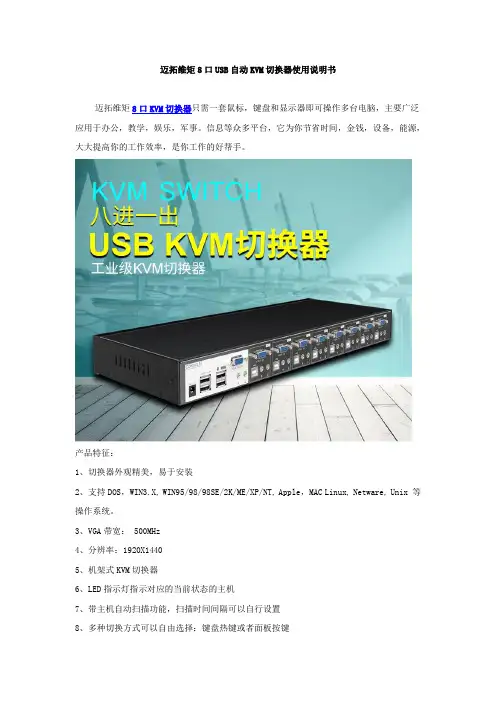
迈拓维矩8口USB自动KVM切换器使用说明书迈拓维矩8口KVM切换器只需一套鼠标,键盘和显示器即可操作多台电脑,主要广泛应用于办公,教学,娱乐,军事。
信息等众多平台,它为你节省时间,金钱,设备,能源,大大提高你的工作效率,是你工作的好帮手。
产品特征:1、切换器外观精美,易于安装2、支持DOS,WIN3.X, WIN95/98/98SE/2K/ME/XP/NT, Apple,MAC Linux, Netware, Unix 等操作系统。
3、VGA带宽: 500MHz4、分辨率:1920X14405、机架式KVM切换器6、LED指示灯指示对应的当前状态的主机7、带主机自动扫描功能,扫描时间间隔可以自行设置8、多种切换方式可以自由选择:键盘热键或者面板按键切换方法:A、前面板上的按键主机1-8:直接按按键①-----⑧B、键盘上的热键:“SCROLL LOCK”,“SCROLL LOCK”,“1,2,3,4,5,6,7,8……”,例如:切换到第5台主机:“SCROLL”,“SCROLL”,“5”,“Enter”切换到第8台主机:“SCROLL LOCK”,“SCROLL LOCK”,“8”切换时,如果要切换到的目标主机端口,正好是当前操作的主机端口,那么切换不执行!例如:当前正在操作第五台主机,按下前面板上的数字⑤,或者按下键盘上的热键:“SCROLL LOCK”,“SCROLL LOCK”,“5”,那么切换动作都不会执行。
LED指示当前主机状态:LED上的三位数字中,最右边表示输出,此处恒为“1”,左边两位指示当前主机,例如:“03”表示当前是操作第三台主机,使用步骤:1)用配线将主机逐个和KVM切换器连接好配线中USB头,VGA头的一端连接主机配线中单个的VGA头连接到KVM的主机端口2)将鼠标,键盘,显示器,和KVM切换器的控制端连接好3)按顺序给各台主机上电,在一台主机完全启动后(鼠标键盘可以正常操作了之后),再接着启动另一台主机,直到所有的主机完全启动启动扫描方式:2)键盘热键:“SCROLL LOCK”,“SCROLL LOCK”,“空格键”,扫描顺序是从当前状态的主机开始,回到当前状态的主机结束,例如:当前是第5台主机,开始扫描时,到第6台主机,结束后回到第5台主机。
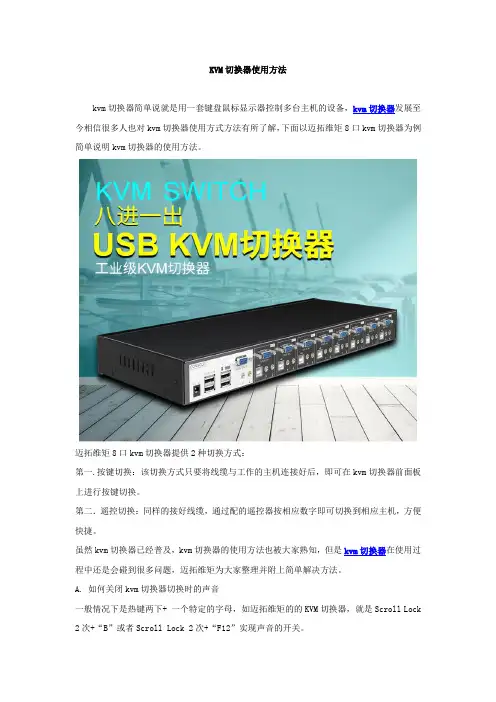
KVM切换器使用方法kvm切换器简单说就是用一套键盘鼠标显示器控制多台主机的设备,kvm切换器发展至今相信很多人也对kvm切换器使用方式方法有所了解,下面以迈拓维矩8口kvm切换器为例简单说明kvm切换器的使用方法。
迈拓维矩8口kvm切换器提供2种切换方式:第一.按键切换:该切换方式只要将线缆与工作的主机连接好后,即可在kvm切换器前面板上进行按键切换。
第二.遥控切换:同样的接好线缆,通过配的遥控器按相应数字即可切换到相应主机,方便快捷。
虽然kvm切换器已经普及,kvm切换器的使用方法也被大家熟知,但是kvm切换器在使用过程中还是会碰到很多问题,迈拓维矩为大家整理并附上简单解决方法。
A. 如何关闭kvm切换器切换时的声音一般情况下是热键两下+ 一个特定的字母,如迈拓维矩的的KVM切换器,就是Scroll Lock 2次+“B”或者Scroll Lock 2次+“F12”实现声音的开关。
B. MT-262KL/462KLKVM切换器切换后提示要求安装驱动在电脑端更新电脑USB驱动即可解决。
C. 2口KVM切换器切换后闪屏怎么办1.调节电脑分辨率和刷新频率2..把显示器线材换产品原配线3.更新电脑显卡驱动;希望可以帮到你D. 迈拓维矩8进1出KVM切换器开机进入系统后没显示怎么办?1. 迈拓维矩8进1出KVM切换器开机进入系统后没显示,关闭 BIOS USB开机自动检测功能。
2.显示部分的情况检查EDID是否读取到,可以开好机之后,再接产品,查看是否有显示;3.没显示,有可能是线材或者产品故障,有显示的情况,判定线材是否是3+4规格以上的线材,显卡驱动最新,才可以读取到EDID,才可以显示。
希望可以帮到您。
E. 新买的的KVM切换器不能使用的原因可能你使用过KVM切换器,很多时候可能买回来后连接不能使用,或者出现显示效果不好,有重影、视频失真等状况,可能你第一时间想到的是产品质量,质量是一个原因,但不是唯一的。

kvm切换器使用方法KVM切换器使用方法。
KVM切换器是一种非常方便的设备,它可以让用户同时控制多台电脑,而无需使用多个键盘、鼠标和显示器。
在本文中,我们将介绍KVM切换器的使用方法,以便用户能够更好地利用这一设备。
首先,使用KVM切换器之前,我们需要准备好以下设备,KVM切换器本身、多台电脑、键盘、鼠标和显示器。
确保所有设备都处于正常工作状态,并且连接线缆齐全。
接下来,我们将按照以下步骤来正确地使用KVM切换器:1. 将KVM切换器连接到电源,并确保其处于工作状态。
一般来说,KVM切换器会有一个电源指示灯,当其点亮时表示设备已经开启。
2. 将多台电脑分别连接到KVM切换器的相应端口上。
通常情况下,KVM切换器会有标有“PC1”、“PC2”等端口,用户只需将各台电脑连接到相应的端口上即可。
3. 将键盘、鼠标和显示器连接到KVM切换器的相应端口上。
同样地,KVM切换器会有标有“Keyboard”、“Mouse”和“Monitor”的端口,用户只需将这些设备连接到相应的端口上即可。
4. 确保所有设备连接正确后,打开KVM切换器。
在KVM切换器上,通常会有一个按钮或者转盘,用户可以通过按下按钮或者旋转转盘来切换不同的电脑。
在切换电脑时,用户只需按下按钮或者旋转转盘即可完成切换。
5. 最后,用户可以通过键盘和鼠标来控制所选择的电脑,而显示器上也会显示所选择的电脑的画面。
当需要切换至另一台电脑时,只需重复步骤4即可。
需要注意的是,不同型号的KVM切换器可能会有一些细微的差异,因此在使用KVM切换器时,最好先阅读一下相应的使用手册,以确保能够正确地操作设备。
总的来说,KVM切换器是一种非常实用的设备,它可以大大提高用户的工作效率,尤其是需要频繁切换多台电脑时。
通过本文所介绍的使用方法,相信用户能够更好地利用KVM切换器,从而更轻松地完成工作。
KVM-CS8/L8口KVM共享器使用手册感谢使用MICROCODE 公司产品为确保您能正确使用产品及安全,请在使用前阅读本说明书包装和附件A.KVM装置一台B.连接电缆8套C.使用说明书键盘应是PS/2接口,AT接口键盘应使用AT-PS/2转换头,可联系经销商定购。
鼠标应是PS/2接口,本机不支持RS-232接口和USB接口鼠标。
监视器应是VGA兼容格式,本机不支持CGA/EGA/MDA等其他格式。
使用前请确保附件完整,并且没有损坏;包装如有损坏或不全,请联系您的经销商。
1.概述KVM装置可在多计算机系统中有效减少您的投资和管理成本,您可不必为每台电脑配置操纵装置。
通过装置的面板,或键盘的特定组合键(热键),您可以使一套键盘/鼠标/监视器在多台机器之间切换。
安装容易,节省能源,无需配置软件,无需考虑操作系统平台及其兼容性,节省了安装空间并使您无需在多台电脑之间移动。
2. 特点支持微软、罗技、IBM及所有其他兼容鼠标;支持所有IBM标准及兼容键盘;监视器可即插即用,分辨率支持至1920X1440;无须安装驱动软件,兼容所有操作系统和软件平台;支持自动扫描功能;多模式操作,面板和键盘热键遥控操作;LED状态和通道指示;节省时间、安装空间和成本;可脱离外接电源使用,完全连接时可从计算机取得电源。
3. 安装连线安装之前,请确认关闭KVM装置的电源。
a.将监视器、鼠标、键盘接入KVM装置的“MASTER”接口。
b.用附件中的配套电缆连接所有的计算机和KVM装置的相应接口,并检查对应的接口号码和类型是否对应。
c. 打开KVM装置的电源开关。
d. 选中需启动的计算机通道,并启动。
在所有的已启动计算机之间,可任意操作。
4. 单机应用操作单机应用模式:当机壳后的级联地址设置跳线都悬空时,本机工作于单机应用模式,并支持以下三种操作方式:a. 手工操作b. 热键操作c.自动扫描单机应用系统连接图使用方法:本机面板设置两个按键:左、右箭头键,8个通道指示灯,1个EXT/STOP 即级联/停机指示灯,电源开关。

kvmcs84u使用说明书KVMCS84U使用说明书一、产品概述KVMCS84U是一款8路端口的KVM切换器,可以实现多台计算机共享一台显示器、鼠标和键盘,方便快捷地进行计算机切换。
该产品具有高清晰度、高质量音频和视频传输功能,支持多种操作系统,适用于各种场合的应用。
二、产品特点1. 支持8个计算机的切换。
2. 高清晰度视频传输,支持最高分辨率达1920*1440。
3. 高质量音频传输。
4. 支持多种操作系统:Windows、Linux、Unix等。
5. 无需安装驱动程序即可使用。
6. 自动调整视频模式和增益值,确保图像质量优良。
三、产品规格1. 支持8个计算机的切换。
2. 最大分辨率:1920*1440。
3. 电源输入:DC 9V 500mA。
4. 支持USB键盘和鼠标接口。
四、产品包装清单1. KVM切换器主机一台2. DC 9V电源适配器一只3. 用户手册一份五、使用方法1. 将KVM切换器主机插入显示器、键盘和鼠标等外设中间。
2. 将各台计算机和KVM切换器主机连接,确保连接好电源和音频线。
3. 启动计算机并等待系统自动检测外设。
4. 通过按下KVM切换器主机上的按键或使用热键(默认为Scroll Lock + Scroll Lock + 端口号)进行计算机的切换。
六、注意事项1. 请勿在高温、潮湿或有腐蚀性气体的环境中使用本产品。
2. 请勿将本产品与其他电子设备存放在一起,以免干扰其正常工作。
3. 操作前,请确保所有设备处于关闭状态。
4. 操作时,请勿频繁切换计算机端口,以免影响设备的正常使用寿命。
七、故障处理1. 如果出现无法正常切换计算机端口的情况,请检查是否正确连接了外设和电源线,并重新启动所有设备。
2. 如果出现图像模糊或色彩失真等问题,请检查是否正确调整了视频模式和增益值,并重新启动所有设备。
八、维护保养1. 定期清洁本产品表面,以确保其正常工作。
2. 请勿拆卸本产品,以免影响其正常工作。
八位堂USB接收器使用指南切换工作模式:连接Switch 时可自动识别,若需要在其他平台使用,可在连接手柄后通过按住组合键3 秒进行切换:【SELECT+RIGHT】:mac 模式,【SELECT+UP】:Xinput 模式【SELECT+LEFT】:Dinput 模式*切换工作模式时部分手柄会断开或关闭,重新开启手柄连接即可。
USBAdapter for Switch连接Dualshock 4 手柄:1.同时按住Dualshock 4 手柄的Share 键和PS 键直到指示灯快速闪烁。
2.将接收器插入设备USB端口。
3.轻按接收器的PAIR键进入快速连接状态,指示灯快速闪烁。
4.等待Dualshock 4 手柄与接收器自动连接,连接成功后Dualshock 4 手柄指示灯常亮。
*再次连接Dualshock 4 手柄时按下PS 键即可自动连接。
连接Wii Remote / Wii U Pro 手柄:1.按下Wii Remote / Wii U Pro 手柄背面的红色PAIR键,指示灯快速闪烁。
2.将接收器插入设备USB端口。
3.轻按接收器的PAIR键进入快速连接状态,指示灯快速闪烁。
4.等待Wii Remote /WiiUPro手柄与复古接收器自动连接,连接成功后WiiRemote /WiiUPro 手柄的1 号指示灯常亮。
*首次配对连接后,Wii Remote 手柄同时按下1、2 键即可连接,Wii Remode Plus / Wii U Pro按下A 键即可连接。
连接Dualshock 3 手柄:1.访问选择“工具栏”,下载macOS / Windows 对应平台的“复古接收器/USB接收器PS3工具”并解压运行。
2.按住接收器的PAIR 键不放,再连接至PC。
3.将Dualshock 3 手柄使用USB 线连接到你的PC。
4.确认接收器与Dualshock 3 手柄都正常连接到PC 后,运行配对工具并点击PAIR按钮进行配对;提示配对成功后即可拔下接收器和Dualshock 3 手柄。
User Manual8 Port Full HD Multiviewer Real-Time USB/KVM SwitchHDMV-8XView up to eight different HD digital video sources on onedisplay device simultaneouslyMade in U.S.A .1-800-AVI-2131www.Smart TABLE OF CONTENTSWHAT’S IN THE BOX 2FRONT AND BOX 2ACCESSORIES 2SPECIFICATIONS 3INTRODUCTION 3FEATURES 3PANEL LAYOUT 4CONNECTING THE BOX 4APPLICATION DIAGRAM 4AVAILABLE CONFIGURATIONS 5COMMAND SET7LIMITED WARRANTY STATEMENT82WHAT’S IN THE BOXSM-HDMV-8X18-Port HDMI, USB Real-Time Multiviewer and KVM switch 1Power CordFRONT AND BACKFigure 2-1ACCESSORIESCONTROLLING THE MULTIVIEWER VIA ETHERNETThe SMTCP-2 TCP/IP control moduleis available from ATTACHING A DVI-D DEVICEAn inexpensive HDMI to DVI-D adapter will enable you to input or output your signals to DVI-D devicesTable 3-13Video Bandwidth Single-link 340MHz [10.2Gbps]Resolution HDTV 480i,480p,720i,720p,1080i,1080p PC Resolution 800 x 600 up to 1920 x 1200Input Video Signal 1.2 volts Input DDC Signal 5 volts Single Link Range 1080p FormatHDMI 1.4DVI Compliance Single-link DVI-D 2.0HDCP Compliance 1.0/2.0Video Bandwidth Single-link 340MHz [10.2Gbps]Input Interface (4) HDMI Output Interface HDMIConnectorType A [19-pin female]InputUSB 2.0, 1.1, and 1.0Input Interface (4) USB Type B Keyboard & MouseUSB 1.0 (Type A)Front Panel T act Switches RS-232DB9 (female)PowerInternal 100-240 VAC Dimensions 17” W x 1.7” H x 10.2” D Weight 4.05 lbs.ApprovalsUL, CE, ROHS Compliant Operating Temperature +23 to +95°F (-5 to +35°C)Storage Temperature -4 to 185°F (-20 to 85°C)HumidityUp to 90% (No Condensation)specificationsINTRODUCTIONThe HDMV-8X allows you to view up to eight different high definition video sources simultaneously on one display device. Connections to video sources are managed via HDMI connectors. Use this device to simplify management of multiple sources by controlling them all through a single display using the front panel, RS-232, and either through TCP-IP or the optional KVM.Features• View up to eight computers (8x) on a single monitor at the press of a button • On-screen display (OSD) makes setup and switching easy• Change views by pressing the Control Panel switches, RS-232, USB keyboard, or through LAN depending on your model• Display each computer with clean and crisp high-resolution video • Supports HD resolutions up to 1920x1080p• Delivers uncompressed digital video with zero signal loss • HDCP and HDMI 1.4 compliant• Supports EDID for total control of compliant displays •Outputs HDMI up to 20 feet4panel layoutConnecting the BoxThe power connection and switch are located at the back of the unit as well as the RS-232 connection and all HDMI inputs and output. Connect all peripheral devices first and turn them on before powering on the HDMV-8X.1. Control panel2. Status OSD1. HDMI Input2. HDMI Output3. USB Input4. USB Output5. RS-232 Control6.Power SupplyHDMV-8X8 Port HD KVM MultiviewerSelectStationPOWERSTATUS MADE IN THE USARS-232 CONTROL887654321OUTHDMI IN USB INUSB 2.0/765432111342562Figure 4-1Figure 4-2Figure 4-3application diagramHDMI INPUT HDMI OUTPUT USB INPUT USB OUTPUT AUDIO INPUTAUDIO OUTPUTHDMV-8X8 Port HD KVM Multiviewer5AVAILABLE CONFIGURATIONSFULL SCREEN WITH PIP MODEIn Full Screen with PIP Mode, the full screen displays one of the eight video sources, and is accompanied by seven smaller images (thumbnails) evenly displayed along the bottom and the right-hand margin of the screen from left to right, from bottom to top, allowing simultaneous monitoring. Mode changing or selecting video sources will be done via buttons on the front mand layout : Ctrl, Ctrl, t.87654321FULL SCREEN WITH BOTTOM PIP MODEIn Full Screen with Bottom PIP Mode, the full screen displays one of the eight video sources, and is accompanied by seven smaller images (thumbnails) evenly displayed along the bottom of the screen from left to right, allowing simultaneous monitoring. Mode changing or selecting video sources will be done via buttons on the front mand layout : Ctrl, Ctrl, b.246357812X4 MODEIn 2x4 Mode, all eight video sources are displayed on the screensimilar to 8S1 mode except that they have original aspect ratio. Mode changing or selecting video sources will be done via buttons on the front panel.13572468876513242X2 WITH PIP MODEIn 2x2 with PIP Mode, the full screen displays four of the eight video sources evenly from left to right, from top to bottom with the first two are on top and the second two are on the bottom of the screen. The other four video sources are smaller images (thumbnails) evenly displayed along the right-hand margin of the screen from bottom to top, allowing simultaneous monitoring. Mode changing will be done via buttons on the front panel.8X MODE14725836hdmv-8xIn 8x Mode, all eight video sources are displayed on the screen evenly from left to right, from top to bottom of the screen, each takes one ninth the size of the screen, allowing the user to simultaneously monitor the sources. Mode changing or selecting video sources will be done via buttons on the front panel.6AVAILABLE CONFIGURATIONS (continued)DUAL SCREEN MODE 5-6In Dual Screen Mode 5-6, the full screen displays the fifth and the sixth video sources side by side with their original aspect ratios, allowing simultaneous monitoring. Mode changing will be done via buttons on the front panel.Command layout : Ctrl, Ctrl, d, 3.56DUAL SCREEN MODE 1-2In Dual Screen Mode 1-2, the full screen displays the first and the second video sources side by side with their original aspect ratios, allowing simultaneous monitoring. Mode changing will be done via buttons on the front panel.Command layout : Ctrl, Ctrl, d, 1.12DUAL SCREEN MODE 3-4In Dual Screen Mode 3-4, the full screen displays the third and the fourth video sources side by side with their original aspect ratios, allowing simultaneous monitoring. Mode changing will be done via buttons on the front panel.Command layout : Ctrl, Ctrl, d, 2.34DUAL SCREEN MODE 7-878QUAD SCREEN MODE 1-4In Quad Screen Mode 1-4, the full screen displays the first four video sources evenly from left to right, from top to bottom (the first two are on top, the third and fourth are on the bottom of the screen), allowing simultaneous monitoring. Mode changing will be done via buttons on the front panel.Command layout : Ctrl, Ctrl, q, 1.1234QUAD SCREEN MODE 5-8In Quad Screen Mode 5-8, the full screen displays the fifth to the eighth video sources evenly from left to right, from top to bottom (the fifth and sixth are on top, the seventh and eighth are on the bottom of the screen), allowing simultaneous monitoring. Mode changing will be done via buttons on the front mand layout : Ctrl, Ctrl, q, 2.5678In Dual Screen Mode 7-8, the full screen displays the seventh and the eighth video sources side by side, allowing simultaneous monitoring. Mode changing will be done via buttons on the front mand layout : Ctrl, Ctrl, d, 4.Command SetFULL SCREEN MODECtrl, Ctrl, o/, /, oCtrl, Ctrl,/, /, rIN1 through IN8 divided into 8 displays with all functions on IN1.Restarts unit.Ctrl, Ctrl, d, 1/, /, d, 1Ctrl, Ctrl, d, 3/, /, d, 3Ctrl, Ctrl, d, 2/, /, d, 2Ctrl, Ctrl, d, 4/, /, d, 4Ctrl, Ctrl, q, 1/, /, q, 1Ctrl, Ctrl, q, 2/, /, q, 2IN1, IN2 divided with all functions on IN1.IN5, IN6 divided with all functions on IN5.IN3, IN4 divided with all functions on IN3.IN7, IN8 divided with all functions on IN7.IN1, IN2, IN3, IN4 divided into 4 displays with all functions on IN1.IN5, IN6, IN7, IN8 divided into 4 displays with all functions on IN5.Ctrl, Ctrl, t, 1/, /, t, 1Ctrl, Ctrl, t, 2/, /, t, 2Ctrl, Ctrl, t, 3/, /, t, 3Ctrl, Ctrl, t, 4/, /, t, 4Ctrl, Ctrl, t, 5/, /, t, 5Ctrl, Ctrl, t, 6/, /, t, 6Ctrl, Ctrl, t, 7/, /, t, 7Ctrl, Ctrl, t, 8/, /, t, 8Ctrl, Ctrl, b, 1/, /, b, 1Ctrl, Ctrl, b, 2/, /, b, 2Ctrl, Ctrl, b, 3/, /, b, 3Ctrl, Ctrl, b, 4/, /, b, 4Ctrl, Ctrl, b, 5/, /, b, 5Ctrl, Ctrl, b, 6/, /, b, 6Ctrl, Ctrl, b, 7/, /, b, 7Ctrl, Ctrl, b, 8/, /, b, 8One large screen and seven thumbnail screens on the bottom and left side. Large screen has active keyboard, mouse, USB 2.0, and sound.One large screen and seven thumbnail screens on the bottom of large screen. Large screen has active keyboard, mouse, USB 2.0 and sound.Ctrl, Ctrl, m, 1/, /, m, 1Ctrl, Ctrl, m, 2/, /, m, 2Ctrl, Ctrl, m, 3/, /, m, 3Ctrl, Ctrl, m, 4/, /, m, 4Ctrl, Ctrl, m, 5/, /, m, 5Ctrl, Ctrl, m, 6/, /, m, 6Ctrl, Ctrl, m, 7/, /, m, 7Ctrl, Ctrl, m, 8/, /, m, 8Full screen selection with keyboard, mouse, USB 2.0, and sound.Ctrl, Ctrl, c, 1/, /, c, 1Ctrl, Ctrl, c, 2/, /, c, 2Ctrl, Ctrl, c, 3/, /, c, 3Ctrl, Ctrl, c, 4/, /, c, 4Ctrl, Ctrl, c, 5/, /, c, 5Ctrl, Ctrl, c, 6/, /, c, 6Ctrl, Ctrl, c, 7/, /, c, 7Ctrl, Ctrl, c, 8/, /, c, 8Ctrl, Ctrl, u, 1/, /, u, 1Ctrl, Ctrl, u, 2/, /, u, 2Ctrl, Ctrl, u, 3/, /, u, 3Ctrl, Ctrl, u, 4/, /, u, 4Ctrl, Ctrl, u, 5/, /, u, 5Ctrl, Ctrl, u, 6/, /, u, 6Ctrl, Ctrl, u, 7/, /, u, 7Ctrl, Ctrl, u, 8/, /, u, 8Multiscreen selectionwith keyboard, mouse and USB 2.0Ctrl, Ctrl, a, 1/, /, a, 1Ctrl, Ctrl, a, 2/, /, a, 2Ctrl, Ctrl, a, 3/, /, a, 3Ctrl, Ctrl, a, 4/, /, a, 4Ctrl, Ctrl, a, 5/, /, a, 5Ctrl, Ctrl, a, 6/, /, a, 6Ctrl, Ctrl, a, 7/, /, a, 7Ctrl, Ctrl, a, 8/, /, a, 8Multiscreen and full screen selection for sound.Ctrl, Ctrl, s, 1/, /, s, 1Ctrl, Ctrl, d, o, n/, /, d, o, nSet resolution for 1920x1080p monitor.Serial message reporting on.7Full screen selection with keyboard, mouse and s ound.Set resolution for 3840x1080 monitor.Serial message reporting off. Off is the default setting.Ctrl, Ctrl, s, 2/, /, s, 2Ctrl, Ctrl, d, o, f, f/, /, d, o, f, fLIMITED WARRANTY STATEMENTA. EXTENT OF LIMITED WARRANTYSmart-AVI Technologies, Inc. warrants to the end-user customers that the Smart-AVI product specified above will be free from defects in materials and workmanship for the duration of 1 year, which duration begins onthe date of purchase by the customer. Customer is responsible for maintaining proof of date of purchase.Smart-AVI limited warranty covers only those defects which arise as a result of normal use of the product, and do not apply to any:a. Improper or inadequate maintenance or modificationsb. Operations outside product specificationsc. Mechanical abuse and exposure to severe conditionsIf Smart-AVI receives, during applicable warranty period, a notice of defect, Smart-AVI will at its discretion replace or repair defective product. If Smart-AVI is unable to replace or repair defective product covered by the Smart-AVI warranty within reasonable period of time, Smart-AVI shall refund the cost of the product.Smart-AVI shall have no obligation to repair, replace or refund unit until customer returns defective product to Smart-AVI.Any replacement product could be new or like new, provided that it has functionality at least equal to that of the product being replaced.Smart-AVI limited warranty is valid in any country where the covered product is distributed by Smart-AVI.B. LIMITATIONS OF WARRANTYTo the extant allowed by local law, neither Smart-AVI nor its third party suppliers make any other warranty or condition of any kind whether expressed or implied with respect to the Smart-AVI product, and specifically disclaim implied warranties or conditions of merchantability, satisfactory quality, and fitness for a particular purpose.C. LIMITATIONS OF LIABILITYTo the extent allowed by local law the remedies provided in this warranty statement are the customers sole and exclusive remedies.To the extant allowed by local law, except for the obligations specifically set forth in this warranty statement,in no event will Smart-AVI or its third party suppliers be liable for direct, indirect, special, incidental, or consequential damages whether based on contract, tort or any other legal theory and whether advised of the possibility of such damages.D. LOCAL LAWTo the extent that this warranty statement is inconsistent with local law, this warranty statement shall be considered modified to be consistent with such law.8Designed and Manufactured in the USANOTICEThe information contained in this document is subject to change without notice. Smart-AVI makes no warranty of any kind with regard to this material, including but not limited to, implied warranties of merchantability and fitness for particular purpose. Smart-AVI will not be liable for errors contained herein or for incidental or consequential damages in connection with the furnishing, performance or use of this material. No part of this document may be photocopied, reproduced, or translated into another language without prior written consent from Smart-AVI Technologies, Inc.20181112Tel: (800)AVI-2131, (702) 500-00082455 W Cheyenne Ave, Las Vegas, NV 89032。
kvm切换器使用方法KVM切换器使用方法。
KVM切换器是一种非常实用的设备,可以帮助用户轻松管理多台电脑或服务器,提高工作效率。
接下来,我将为大家介绍KVM切换器的使用方法,希望能够帮助大家更好地使用这一设备。
首先,我们需要准备好KVM切换器、显示器、键盘和鼠标。
确保所有设备都处于关闭状态,然后按照以下步骤进行连接和设置。
1. 连接电源和设备。
首先,将KVM切换器的电源适配器插入电源插座,并将其与KVM切换器连接。
接下来,将显示器、键盘和鼠标分别连接到KVM切换器的相应端口上,确保连接牢固。
2. 连接电脑。
将需要管理的电脑分别连接到KVM切换器的各个通道上。
通常情况下,KVM 切换器会标有不同的通道号,用户可以根据需要选择连接到对应的通道上。
3. 设置KVM切换器。
接通KVM切换器的电源,等待设备启动完成。
在显示器上会出现KVM切换器的操作界面,用户可以通过按键或者遥控器来进行设置。
根据设备的使用说明书,设置KVM切换器的相关参数,例如切换快捷键、显示模式等。
4. 使用KVM切换器。
设置完成后,就可以开始使用KVM切换器了。
通过按下设定的切换快捷键或者操作遥控器,可以方便地在多台电脑之间进行切换。
在切换的过程中,显示器、键盘和鼠标都会自动切换到当前选中的电脑上,用户可以直接进行操作。
5. 注意事项。
在使用KVM切换器的过程中,需要注意以下几点:确保KVM切换器和连接的设备都处于稳定的电源状态,避免因电源问题导致设备无法正常工作。
注意KVM切换器的兼容性,确保连接的设备和KVM切换器之间的接口类型和信号兼容。
定期检查KVM切换器的连接线路,确保连接稳固,避免因连接问题导致设备无法正常切换。
总结。
通过以上步骤,我们可以轻松地使用KVM切换器管理多台电脑或服务器,提高工作效率。
在实际使用中,用户还可以根据自己的需求,对KVM切换器进行更多的个性化设置,以满足不同场景下的需求。
希望以上内容能够帮助大家更好地了解和使用KVM切换器,如果在使用过程中遇到问题,可以参考设备的使用说明书,或者寻求相关技术支持。
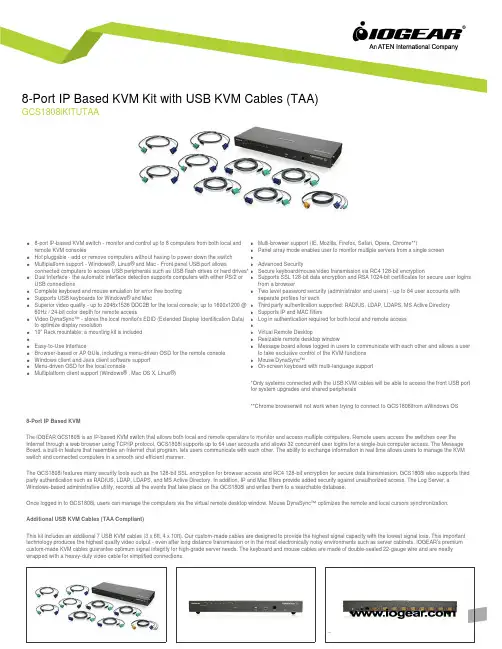
q8-port IP-based KVM switch - monitor and control up to 8 computers from both local and remote KVM consoles q Hot pluggable - add or remove computers without having to power down the switch qMultiplatform support - Windows®, Linux® and Mac - Front panel USB port allows connected computers to access USB peripherals such as USB flash drives or hard drives* qDual Interface - the automatic interface detection supports computers with either PS/2 or USB connectionsq Complete keyboard and mouse emulation for error free booting q Supports USB keyboards for Windows® and MacqSuperior video quality - up to 2048x1536 DDC2B for the local console; up to 1600x1200 @ 60Hz / 24-bit color depth for remote access qVideo DynaSync™ - stores the local monitor's EDID (Extended Display Identification Data) to optimize display resolution q 19” Rack mountable; a mounting kit is included q q Easy-to-Use Interface q Browser-based or AP GUIs, including a menu-driven OSD for the remote console q Windows client and Java client software support q Menu-driven OSD for the local console qMultiplatform client support (Windows® , Mac OS X, Linux®)q Multi-browser support (IE, Mozilla, Firefox, Safari, Opera, Chrome**)q Panel array mode enables user to monitor multiple servers from a single screen qq Advanced Securityq Secure keyboard/mouse/video transmission via RC4 128-bit encryptionq Supports SSL 128-bit data encryption and RSA 1024-bit certificates for secure user logins from a browserq Two level password security (administrator and users) - up to 64 user accounts with separate profiles for eachq Third party authentication supported: RADIUS, LDAP, LDAPS, MS Active Directory q Supports IP and MAC filtersq Log in authentication required for both local and remote access qq Virtual Remote Desktopq Resizable remote desktop windowq Message board allows logged in users to communicate with each other and allows a user to take exclusive control of the KVM functions q Mouse DynaSync™q On-screen keyboard with multi-language support*Only systems connected with the USB KVM cables will be able to access the front USB port for system upgrades and shared peripherals**Chrome browserwill not work when trying to connect to GCS1808ifrom aWindows OS8-Port IP Based KVMThe IOGEAR GCS1808i is an IP-based KVM switch that allows both local and remote operators to monitor and access multiple computers. Remote users access the switches over the Internet through a web browser using TCP/IP protocol. GCS1808i supports up to 64 user accounts and allows 32 concurrent user logins for a single-bus computer access. The Message Board, a built-in feature that resembles an Internet chat program, lets users communicate with each other. The ability to exchange information in real time allows users to manage the KVM switch and connected computers in a smooth and efficient manner.The GCS1808i features many security tools such as the 128-bit SSL encryption for browser access and RC4 128-bit encryption for secure data transmission. GCS1808i also supports third party authentication such as RADIUS, LDAP, LDAPS, and MS Active Directory. In addition, IP and Mac filters provide added security against unauthorized access. The Log Server, a Windows-based administrative utility, records all the events that take place on the GCS1808i and writes them to a searchable database.Once logged in to GCS1808i, users can manage the computers via the virtual remote desktop window. Mouse DynaSync™ optimizes the remote and local cursors synchronization. Additional USB KVM Cables (TAA Compliant)This kit includes an additional 7 USB KVM cables (3 x 6ft, 4 x 10ft). Our custom-made cables are designed to provide the highest signal capacity with the lowest signal loss. This important technology produces the highest quality video output - even after long distance transmission or in the most electronically noisy environments such as server cabinets. IOGEAR's premium custom-made KVM cables guarantee optimum signal integrity for high-grade server needs. The keyboard and mouse cables are made of double-sealed 22-gauge wire and are neatly wrapped with a heavy-duty video cable for simplified connections.8-Port IP Based KVM Kit with USB KVM Cables (TAA)GCS1808iKITUTAAProduct Requirementsq For best results during remote access:q Computers used to access the 8-Port IP Based KVM should have at least a P III 1 GHz processor and screen resolution should be set to 1024x768q Internet connection speed of at least 128kbpsq Browsers must support 128-bit data encryptionq To run the Windows® client, DirectX 8.0 or higher is requiredq To run the Java client, Sun’s Java Runtime Environment (JRE) 6, Update 3, or higher is requiredq To run the Log Server, Microsoft Jet OLEDB 4.0 (or higher) driver is requiredqq Local Console:q 1 VGA monitorq 1 USB or PS/2 Mouseq 1 USB or PS/2 Keyboardqq Local Computers:q Video graphics card with an HDB-15 VGA portq Type A USB port and USB host controllerq orq6-pin mini-DIN keyboard and mouse portqq Operating Systemq Windows Vista® (32-bit / 64-bit ), Windows® 7 (32-bit / 64-bit ), Windows® 8.x (32-bit / 64-bit )q Apple Mac OS X 9.0 to 10.xq Linux®Package Contentsq 1 x GCS1808i 8-Port IP Based KVMq 1 x 6ft KVM PS/2 Cableq 4 x 6ft KVM USB Cableq 4 x 10ft KVM USB Cableq 1 x Console Cableq 1 x Firmware Upgrade Cableq 1 x Foot Pad Set (4 pcs)q 1 x Power Adapterq 1 x Mounting Kitq 1 x Quick Start Guideq 1 x Software CDq1 x Warranty CardSpecificationsFunction GCS1808iKITUTAA Dimensions GCS1808iKITUTAAUnit DimensionsHeight 1.75" (4.45cm)Depth 6.25" (15.88cm)Length17.00" (43.18cm)Unit Package DimensionsHeight9.25" (23.50cm)Depth 4.5" (11.43cm)Length21.5" (54.61cm)Master CartonWidth22.3" (56.64cm)Height15.1" (38.35cm)Depth10.5" (26.67cm)Master Carton Qty.3WeightMaster Carton Wt.27.7lbs (12.58kg)Unit Pack Wt.8.6lbs (3.9kg)Unit Wt. 5.7lbs (2.58kg)GCS1808iKITUTAA© 2015 IOGEAR®IOGEAR, the IOGEAR logo, are trademarks or registered trademarks of IOGEAR. Microsoft and Windows are registered trademarks of Microsoft Corporation. All other brand and product names are trademarks or registered trademarks of their respective holders. IOGEAR makes no warranty of any kind with regards to the information presented in this document. All information furnished here is for informational purposes only and is subject to change without notice. IOGEAR assumes no responsibility for any inaccuracies or errors that may appear in this document.。
8口KVM切换器8口KVM切换器分LCDkvm控制平台和KVM切换器两类。
制平台能更好的适应机房使用,键盘,鼠标,显示器一体,操作方便,兼容性也更好。
控制平台只占IU的机柜空间,抽拉折叠式液晶,更方便使用。
切换器比较节约成本,用户可以自配鼠标、键盘、显示器,或者使用原有的鼠标、键盘、显示器。
8口切换器又有USB切换器、PS2切换器、混接切换器、CA T5切换器以及基于IP的切换器。
1、型号: XP0108产品说明:一组PS/2控制端·PS/2或USB混接控制8~256台服务器(OSD)·专用级联口类型:基于VGA KVM电源:外置PC接口: PS/2、USB2、型号: XU0108产品说明:一组USB控制端·PS/2或USB混接控制8~256台服务器(OSD)·专用级联口类型:基于VGA KVM电源:外置PC接口: PS/2、USB3、型号: XM0108产品说明:一组PS/2和USB控制端·PS/2或USB混接控制16~521台服务器(OSD)·专用级联口类型:基于VGA KVM电源:外置PC接口: PS/2、USB4 、型号: XM0108i产品说明:一组PS/2和USB控制端·PS/2或USB混接控制16~521台服务器(OSD)·专用级联口·KVM Over IP类型:基于VGA KVM电源:外置PC接口: PS/2、USB5、型号: KP1108产品说明:一组PS/2控制端·可控制8台服务器(OSD)·PS/2或USB接口类型:基于VGA KVM电源:内置ACPC接口: PS/2、USB6、型号: KC1108产品说明:一组PS/2控制端·8口CA T5切换器控制8台服务器(OSD)·最远距离150m 类型:基于CA T5 KVM电源:内置ACPC接口: PS/2、USB7、型号: KC2108i产品说明:一组PS/2和USB控制端·8口CA T5切换器控制8台服务器(OSD)·最远距离150m·KVM Over IP类型:基于CA T5 KVM电源:内置ACPC接口: PS/2、USB。
深圳市秦安科技有限公司KVM-1708/1716-P3.0控制平台(8口/16口)用户手册产品描述KVM-1708/1716是一个集成了多端口KVM切换功能于1U高度空间的控制平台,它通过一组设备(包含LCD显示器、键盘、鼠标)实现对多台计算机的操作。
从而节省了为每台计算机单独配置键盘、鼠标、监视器的费用以及它们所占用的空间。
安装快速简单,只需要将电缆连接到正确的端口上,而无须软件配置,因此不存在复杂的安装过程或不兼容问题。
产品特性●17” LCD TFT 液晶显示屏,高亮度,高清晰,高分辨率显示●1U 高度,适应于19”标准机柜安装,金属结构●超薄键盘99键,带数字小键盘,标准PS/2接口●采用触摸板鼠标,高分辨率,高灵敏度。
2个功能按键和滚轮功能(触摸板右边横条区域为滚轮功能区),符合PS/2 标准接口切换器功能●可直接连接8/16台电脑并实现切换操作●警音提示切换完成●无需安装附加软件,通过OSD菜单或热键操作,非常容易地在多台电脑间切换●切换电脑时,会自动记录并存储键盘、鼠标原有的工作状态●在自动扫描(auto-scan)模式下鼠标可正常使用●DDC模拟功能- 每台服务器的视讯设定会自动调整至屏幕显示的最佳状态●只用鼠标即可完成主机间的切换操作●具有热插拔功能(直接增加或移除主机而无需关闭KVM电源)外观图1-1.1整体外观尺寸图前视图(见图1-1.2)图1-1.2 KVM-1708前视图1.液晶显示屏2.后挂耳导槽3.LCD OSD控制键4.键盘5.前挂耳6.触摸鼠标7.拉手8.锁扣9.显示面板后视图(见图1-1.3)图1-1.3 KVM-1708后视图1 PC连接端口: 8个端口(集成VGA/键盘/鼠标信号输入端)2 电源输入插座(AC 或DC)3 电源开关4 接地螺钉5 Console : 外接显示器使用6 Update前视图(见图1-1.4)图1-1.4 KVM-1716 前视图1.液晶显示屏2.后挂耳导槽3.LCD OSD控制键4.键盘5.前挂耳6.触摸鼠标7.拉手8.锁扣9.显示面板后视图(见图1-1.5)图1-1.5 KVM-1716 后视图1 PC连接端口: 16个端口(集成VGA/键盘/鼠标信号输入端)2 电源输入插座(AC or DC)3 电源开关4 接地螺钉5 Console : 外接显示器使用6 Update机架安装KVM-1708/1716控制平台符合标准19”机柜的安装要求,由前向后安装,后挂耳插入导槽内,安装好后,锁紧前后挂耳螺丝。
8口kvm多电脑切换器操作方法说明二可能刚看到这篇文章的时候您会刚到奇怪,为什么一开始就是8路kvm多电脑切换器操作方法说明二?不要急,迈拓维矩小编告诉大家第一篇的浏览方法:百度直接搜索“8路kvm多电脑切换器操作方法说明一”然后找到百度文库即可查看。
好了,话不多少,紧接着一继续。
F7:进入用户设置当你按键盘F7进入用户设置,进入的画面如图4,securiy:y代表是要密码进入;n代表不用密码进入,按键盘↓进入user account按键盘enter进入,进入画面如图5F1:修改用户名称(用户名称:admin user1、user2、user3……后面的6个x是隐藏的密码,需要按F9查看)F9:查看当前密码(上图按F9显示第一个用户的默认密码是000000)F4:修改密码当设置为y的时候,OSD多出F5:logout选项。
每次进入会进行登入提示,如下图6:图6user name:是图5上面的用户名,password:是用户名后面的密码,这时你需要输入“用户名”和对应的“密码”才能进入;当你要设置管理员进入osd菜单操作时,需要按F5,这时osd菜单界面就恢复图6画面F6:设置分配管理员用户主机(用户1-7可以操作哪些主机)当你按键盘F6进入图7画面,浅绿色部分按键盘F1/F2/F3/F4/F5/F6/F7在osd菜单上面就出现了1.2.3.4.5.6.7这些数字,这些数字代表user1-7用户,按F12是分配所以用户;del 删除所有用户的权限例如:图7画面server-01~server-03这3台主机都有8个用户,当你输入任何一个用户都可以进入控制这3台主机;这时你按F5进入用户登入界面图6输入用户名称如:user1,密码:111111界面如下图8,可以看到界面里是有1.2.3.5.6台电脑你是可以操作的。
输入用户名:user-03,密码333333,界面如图9,这时只有1.2.3台电脑可以操作,以此类推默认管理员用户名:admin,密码:000000,当你输入这个账号时,就可以操作任何一台主机注:当客户忘记密码时,用户名设置:admin,密码MTVIKI,进入,这时按键盘home+home+f+l+a+s+h+enter就可以恢复出厂设置六:级联安装步骤安装前注意事项:确保要联接的所以设备都已经切断电源,为了保证你的安装不受损坏,请确保所以设备都连接良好,如有需要,可以与迈拓维矩索取详细支持。
Omniview Pro2 Series 8-Port KVM Switch with On-Screen DisplayPart # F1DA108TukBelkin OmniView PRO2 Series KVM Switches deliver the reliable performance and centralized control best for managing medium to large server environments. Each Switch gives a system administrator control over multiple-platform computers from a single console. Offering both PS/2 and USB support, the PRO2 Series provides superior features such as computer naming and selection through On-Screen Display (OSD) and hot key switching, as well as easy manual switching with direct-access port selectors and active-port LEDs. Daisy-chaining up to 16 PRO2 and PRO KVM Switches expands your control over servers and computers. A seven-segment display indicates the active computer's BANK address for daisy-chained units.NOTE: The OmniView PRO2 Series KVM Switches uses standard DB25 KVM cables. Coaxial VGA cabling is recommended for support of video resolutions of up to************************************************************* Windows® 95, 98, 2000, Me, NT, XP, Novell® NetWare 4.x/5.x, Mac USB and Sun USB platforms, Turbolinux® and all Linux® distributions.Advantages :• Enables firmware upgrades via web downloads• Features direct-access port selectors to allow for easy manual port selection• Displays BANK address on front panel with seven-segment LEDs when units are daisy-chained together• Reduces required rack space with 1U EIA height enclosure (19" rack-mountable)• Includes two rack-mount brackets with screws, 12V DC, 1A power supply, flash cable, registration card, user manual, quick installation guideFeatures• On-Screen Display (OSD)• Hot key switching• PS/2 keyboard and mouse emulation• PS/2 keyboard and mouse emulation• Video resolution support to 2048x1536@85Hz • User-defined AutoScan• Dedicated daisy-chain ports• Natively rack-mountable and stackable construction ©2000-2005 Belkin Corporation。
使用说明书KVM-USB延长器KVM延长器使用说明书一、产品概述:ZY-KVM(键盘﹑视频﹑鼠标)延长器利用单根网线,可以将键盘鼠标VGA信号延长至50~450米,改变电脑主机对键盘鼠标和显示器的长度限制,用户可以通过本产品远距离使用键盘鼠标和显示器。
键盘鼠标操作灵活,无延时滞后现象。
显示清晰,图像亮丽。
并可对主机实施开关机和复位控制。
二、产品特点:﹒可以把电脑主机键盘鼠标和显示接口延长至最远150-300米﹒使用单根网线(CAT5,CAT5E,CAT6 )连接成本低廉﹒在远端和本地端各提供一套KVM接口﹒支持USB接口的键盘和鼠标﹒具有键盘鼠标模拟功能,任何时间可以接入或取下键盘鼠标或更换类型﹒无需驱动程序,安装使用简单方便﹒支持DOS,Windows,NT,Linux等任意操作系统﹒成本低廉,使用方便三、系统需求远端:1个USB键盘,1个USB鼠标,1个VGA输出接口,一个RJ45接口。
本地:1个PS2的公对公键盘线缆用于连接键盘1个PS2的公对公鼠标线缆用于连接鼠标.1个HDB15的公对母线缆用于连接显卡和本地显示器.1个标准的直通网线用于连接本地端和远端设备。
四、设备安装:A.本地安装●将USB电缆同主机USB接口连接;●将电脑VGA输出接口(显卡接口)同KVM(T)的VGA输入口(VGA-in)连接;●将KVM(T)的VGA输出接口(VGA-out)同本地显示器连接;●将网线接入KVM(T)的网口(CAT5)●将KVM(T)接上电源(DC9V).B、远端安装:●将USB键盘连接到KVM(R)的USB键盘口(Mouse);●将USB鼠标连接到KVM(R)的USB鼠标口(keyboard);●将KVM(R)VGA输出(VGA-out)T同显示器连接●将网线接入KVM(T)的网口(CAT5)●然后将KVM(R)接上电源(DC9V)使用本地端注意:当使用本地端ZY-KVM时应确保键盘鼠标已接在ZY-KVM(T)的本地主机上.远端●在远端你可以任意地使用键盘鼠标,加入﹑取下或更换类型。
8口USB自动KVM切换器使用说明书(带OSD菜单功能)
8口型号:MT-0801VK
通过本产品你只需一套鼠标,键盘和显示器即可操作多台电脑,主要广泛应用于办公,教学,娱乐,军事。
信息等众多平台,它为你节省时间,金钱,设备,能源,大大提高你的工作效率,是你工作的好帮手。
产品特征:
1、切换器外观精美,易于安装
2、支持DOS,WIN3.X, WIN95/98/98SE/2K/ME/XP/NT, Apple,MAC Linux, Netware, Unix 等操作系统。
3、VGA带宽: 500MHz
4、分辨率:1920X1440
5、机架式KVM切换器
6、数字指示灯指示对应的当前状态的主机
7、带主机自动扫描功能,扫描时间间隔可以自行设置
8、多种切换方式可以自由选择:OSD菜单或者面板按键和热键切换
9、带音频和麦克风一起切换
切换方法:
A、前面板上的按键
主机1-8:直接按按键①-----⑧
B、键盘上的热键调出OSD菜单:“SCROLL”,“SCROLL”然后根据菜单上的说明自
主选择切换或者扫描。
OSD菜单说明:
A、“ON”指示主机的连接状态。
带三角符号表示该主机已经连接KVM并且已经开机,不带三角符号表示当前端口的主机没有连接或者没有开机
B、“ESC”表示按下键盘上的“ESC”按键,退出当前菜单
C、“Enter”表示按下键盘上“Enter”按键,切换到红条指示的主机,并退出当前OSD菜单
D、“F2”表示,在当前菜单条件下,按下键盘上的“F2”按键,退出当前OSD菜单,并执行扫描功能。
扫描从当前主机开始,回到当前主机结束。
数字指示灯指示当前主机状态:
LED上的三位数字中,最右边表示输出,此处恒为“1”,左边两位指示当前主机,例如:“03”表示当前是操作第三台主机,“14”表示当前是操作第十四台主机
使用步骤:
1)用配线将主机逐个和KVM切换器连接好
配线中带音频头,麦克风头,USB头,VGA头的一端连接主机
配线中单个的VGA头连接到KVM的主机端口
2)将鼠标,键盘,显示器,音箱,麦克风和KVM切换器的控制端连接好
3)按顺序给各台主机上电,在一台主机完全启动后(鼠标键盘可以正常操作了之后),再接着启动另一台主机,直到所有的主机完全启动
启动扫描方式:
键盘OSD菜单热键:“SCROLL”,“SCROLL”,“F2”
扫描顺序是从当前状态的主机开始,回到当前状态的主机结束,例如:
当前是第5台主机,开始扫描时,到第6台主机,结束后回到第5台主机。
取消扫描方式:
1)按下前面板上的①---⑧之间的任何一个按键,扫描停止,并切换到对应的端口;
2)按下键盘上的“ESC”,扫描立即停止,并切换到对应的端口。
设置扫描时间间隔:
在扫描过程中,如果要延长扫描时间间隔,按下小键盘上的“+”,每按一次,扫描时间间隔约延长0.5秒;如果要缩短扫描时间间隔,按下小键盘上的“-”,每按一次,扫描时间间隔月缩短0.5秒。
注意:只有在扫描过程中,按下小键盘上的“+”或者“-”才可以设置扫描时间间隔!
常见问题解答:
1)键盘按键无法切换
答:按下前面板上的按键,进行切换,然后再切换回本机;
将键盘重新插拔一次;
将切换器彻底断电后,重新上电
2)鼠标键盘无法使用
答:稍等1~~~5秒钟,等待主机识别USB设备(USB鼠标和键盘);
按下前面板上的按键,先切换到其他端口,再切换回本端口进行操作;
将鼠标键盘重新插拔一次;
将切换器彻底断电后,重新上电
3)音箱和耳麦无法使用
答:确认主机端的音频和耳麦接头顺序没有接反,KVM配线中有两个3.5mm的接头,其中一个是音频接头,另外一个是麦克风接头;
确认KVM控制端的音频和麦克风接头顺序无误,“AUD”表示接音频,“MIC”表示接麦克风4)显示器屏幕闪屏
答:对KVM供电不足。
多连接几台主机,并开机;或者给KVM插上电源适配器。