HP瘦客户机t5740
- 格式:pdf
- 大小:572.20 KB
- 文档页数:14


浅谈域环境中网络计算机的应用作者:吴秋林来源:《科技与企业》2013年第12期【摘要】班组计算机的管理历来都是件头痛的事情,本文介绍了通过使用网络计算机结合域的控制可以很好地实现对班组计算机的管理控制。
并可以收到较好的经济效益,提高安全可靠性等。
【关键词】网络计算机(NC);域;管理控制;应用一、网络计算机简介网络计算机(Network Computer),简称为NC,也称瘦客户机。
它采用C/S(CLIENT/SERVER)工作模式,NC客户端没有配置硬盘,所使用的全部应用和数据都来自服务器,当NC远程登录到服务器以后,就像操作本地的PC机一样方便。
采用NC进行工作,所有的升级工作和管理维护工作均集中在服务器端。
近年来,由于应用系统的不断增加,班组计算机的数量也相应的有所增加,给维护带了一定压力。
为了更好地对班组计算机进行更好的管理。
公司在2010年采购了一台服务器和一批NC,为了保证NC用户的正常办公需求和以后的扩容,服务器选用了HP DL580,配置了8核2.7G CPU、16G内存和6*300G硬盘。
NC客户端则采用HP T5740w/Intel Atom N280/4GB闪存/1GB DDR3内存。
客户端采用远程连接服务器的方式,登录到服务器上进行相关操作。
在服务器上安装办公所需的全部应用系统和软件。
客户端也配置了4GB的闪存,在本端也可以进行网页浏览和一些简单的办公操作。
二、网络计算机部署及管理控制广东粤电云河发电有限公司早在2006年就建立了自己的内部域(YFPP),由于用户计算机并没有加入到域中,因而就不能对用户计算机进行统一管理控制。
为了较好地控制和管理客户端,给每个班组用户分配一个域账号,在服务器端设置远程连接的账户权限。
只有被授予了权限的班组才可以连接使用服务器上的资源。
在服务器上为每个账号分配一个私有空间用于存放资料,资料空间的大小可以根据实际所需进行相应的调整。
客户端连上服务器后可以使用服务器上所有安装的公用软件,并且访问自己的空间。

《车站信号自动控制》课内实验指导书适用专业:轨道通号技术主编:曹加云轨道交通学院2011年10月前言计算机联锁系统采用了最新计算机技术、总线技术、网络技术,实现了一套性能可靠、具有故障安全性、功能完善、操作简单、维护方便的车站联锁系统。
本课程的目的是通过本目录课程的教学使学生计算机联锁的基本知识、基本原理和基本技能,熟悉计算机联锁的使用和维护,使计算机联锁更加安全可靠地运行,充分发挥其效能。
前言实验一(联锁设计实验1)进路选择实验 (4)实验二(联锁设计实验1)进路解锁实验 (7)实验三(系统认识实验)进路模拟行车实验 (9)实验四(接口电路实验)进路故障模拟及处理实验 (11)实验五车站联锁维修实验 (13)参考文献 (15)前言车站信号自动控制(联锁)系统是保证行车安全的信号基础设备,必须保证工作可靠,并符合“故障-安全”原则。
实现车站联锁的基本功能,完成列车进路建立、锁闭、解锁、道岔控制、信号机控制,完成轨道电路和信号设备状态的监督。
通过车站联锁实验的教学使学生掌握联锁系统的基本知识、基本原理和基本技能,熟悉车站联锁系统的使用和维修,使联锁系统更加安全可靠地运行,充分发挥其效能。
实验1 进路选择实验一、实验目的1.了解车站联锁车务仿真培训系统,熟悉系统的操作。
2.通过办理进路过程过程,验证各种进路的选路处理过程。
二、实验设备及工作原理1.实验设备:⑴PC机E8000 1台⑵瘦客户机T5740W 20台⑶服务器E8100 2台⑷交换机ProCurve 1台⑸集群软件Pink E8000 1套⑹车站联锁车务仿真培训系统1套2. 车站联锁车务仿真培训系统的体系结构,如下图1-1所示。
图1-1 车站联锁车务仿真培训系统体系结构图三、工作原理本系统把联锁上位机操作平台,底层联锁逻辑和模拟现场设备的状态及变化过程集合到一台计算机上构成学员机,在一台计算机上实现了联锁系统的所有功能。
同时结合教学及培训的特点,设置了一台教师机来完成学员操作过程的记录、回放并设置设备故障及行车命令以供考核学员的处理作业的能力。
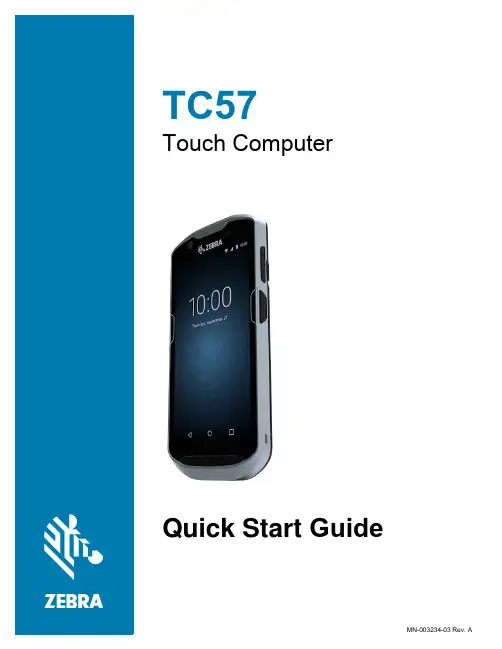
Touch ComputerTC57Quick Start GuideCopyrightZEBRA and the stylized Zebra head are trademarks of Zebra Technologies Corporation, registered in manyjurisdictions worldwide. All other trademarks are the property of their respective owners. ©2019 ZebraTechnologies Corporation and/or its affiliates. All rights reserved.COPYRIGHTS & TRADEMARKS: For complete copyright and trademark information, go to/copyright.WARRANTY: For complete warranty information, go to /warranty.END USER LICENSE AGREEMENT: For complete EULA information, go to /eula. Terms of UseProprietary StatementThis manual contains proprietary information of Zebra Technologies Corporation and its subsidiaries (“ZebraTechnologies”). It is intended solely for the information and use of parties operating and maintaining theequipment described herein. Such proprietary information may not be used, reproduced, or disclosed to anyother parties for any other purpose without the express, written permission of Zebra Technologies.Product ImprovementsContinuous improvement of products is a policy of Zebra Technologies. All specifications and designs aresubject to change without notice.Liability DisclaimerZebra Technologies takes steps to ensure that its published Engineering specifications and manuals arecorrect; however, errors do occur. Zebra Technologies reserves the right to correct any such errors anddisclaims liability resulting therefrom.Limitation of LiabilityIn no event shall Zebra Technologies or anyone else involved in the creation, production, or delivery of theaccompanying product (including hardware and software) be liable for any damages whatsoever (including,without limitation, consequential damages including loss of business profits, business interruption, or loss ofbusiness information) arising out of the use of, the results of use of, or inability to use such product, even ifZebra Technologies has been advised of the possibility of such damages. Some jurisdictions do not allow theexclusion or limitation of incidental or consequential damages, so the above limitation or exclusion may notapply to you.Provide Documentation FeedbackIf you have comments, questions, or suggestions about this guide, send an email to**********************.FeaturesPTT ButtonScan Button MicrophoneInterface ConnectorSpeakerTouch ScreenLight SensorCharging/Notification LEDProximity SensorMicrophoneData Capture LEDReceiverFront CameraActiveEdge Touch ZoneActiveEdge Touch ZoneProgrammableButton Battery Release LatchBattery Release Latch Volume Up/Down ButtonNFC AntennaCamera FlashExit WindowScan Button Rear Camera Power ButtonHeadphone JackBatteryMicrophoneInstalling a microSD CardThe microSD card slot provides secondary non-volatile storage. The slot is located under the battery pack.Refer to the documentation provided with the card for more information, and follow the manufacturer’srecommendations for use.CAUTION: Follow proper electrostatic discharge (ESD) precautions to avoid damaging the microSD card. Proper ESD precautions include, but are not limited to, working on an ESD mat and ensuring that the operator is properly grounded.1.Lift the access door.Installing the SIM CardNOTE: Only use a nano SIM card. Not applicable to TC57JO.CAUTION: For proper electrostatic discharge (ESD) precautions to avoid damaging the SIM card. Proper ESD precautions include, but not limited to, working on an ESD mat and ensuring that the user is properly grounded.1.Remove access cover.Figure 1 Remove Access DoorInstalling the BatteryNOTE: User modification of the device, particularly in the battery well, such as labels, asset tags, engravings, stickers, etc., may compromise the intended performance of the device or accessories. Performance levels such as sealing (IngressProtection (IP)), impact performance (drop and tumble), functionality, temperature resistance, etc. could be effected. DONOT put any labels, asset tags, engravings, stickers, etc. in the battery well.1.Insert the battery, bottom first, into the battery compartment in the back of the device.Figure 8 Insert Bottom of Battery into Battery Compartment2.Press the battery down into the battery compartment until the battery release latches snap into place. Charging the DeviceUse one of the following accessories to charge the device and/or spare battery.Table 1 Charging and Communication1-Slot USB/Charge Only Cradle Kit CRD-TC51-1SCU-01Yes No Yes With OptionalModule5-Slot Charge Only Cradle Kit CRD-TC51-5SCHG-01Yes No No No 4-Slot Charge Only Cradlewith Battery Charger KitCRD-TC51-5SC4B-01Yes Yes No No 5-Slot Ethernet Cradle Kit CRD-TC51-5SETH-01Yes No No Yes 4-Slot Battery Charger Kit SAC-TC51-4SCHG-01No Yes No No Rugged Charge/USB Cable CBL-TC51-USB1-01Yes No Yes NoCharging the DeviceNOTE: Ensure that you follow the guidelines for battery safety described in the TC57 User Guide.Battery: >15.48 Watt hours (typical) / > 4,150 mAh PowerPrecision+ Lithium-ion battery1.To charge the main battery, connect the charging accessory to the appropriate power source.2.Insert the device into a cradle or attach to a cable. The device turns on and begins charging. TheCharging/Notification LED blinks amber while charging, then turns solid green when fully charged.The battery charges from fully depleted to 90% in approximately 2.5 hours and from fully depleted to 100% in approximately three hours. In many cases the 90% charge provides plenty of charge for daily use. A full 100% charge lasts for approximately 14 hours of use. To achieve the best charging results use only Zebra charging accessories and batteries. Charge batteries at room temperature with the device in sleep mode.Charging the Spare Battery1.Insert a spare battery into the spare battery slot.2.Ensure the battery is seated properly.The Spare Battery Charging LED blinks indicating charging. See Table 2 for charging indicators.The battery charges from fully depleted to 90% in approximately 2.3 hours and from fully depleted to 100% in approximately three hours. In many cases the 90% charge provides plenty of charge for daily use. A full 100% charge lasts for approximately 14 hours of use. To achieve the best charging results use only Zebra charging accessories and batteries.Table 2 Charging/Notification LED Charging IndicatorsTable 2 Charging/Notification LED Charging Indicators (continued)Solid Red Charging complete but the battery is at end of usefullife.Fast Blinking Amber (2 blinks/second)Charging error, e.g.:•Temperature is too low or too high.•Charging has gone on too long without completion(typically eight hours).Fast Blinking Red (2 blinks/second)Charging error but the battery is at end of useful life.,e.g.:•Temperature is too low or too high.•Charging has gone on too long without completion(typically eight hours).Charge batteries in temperatures from 5°C to 40°C (41°F to 104°F). The device or cradle always performs battery charging in a safe and intelligent manner. At higher temperatures (e.g. approximately +37°C (+98°F)) the device or cradle may for small periods of time alternately enable and disable battery charging to keep the battery at acceptable temperatures. The device and cradle indicates when charging is disabled due toabnormal temperatures via its LED.1-Slot USB Charging CradlePower LED5-Slot Charge Only CradlePower LED4-Slot Charge Only Cradle with Battery ChargerSpare BatteryCharging LEDPower LED Spare Battery Slot Device Charging Slot5-Slot Ethernet Cradle4-Slot Battery Charger 1000 LEDDevice Charging Slot 100/100 LEDSpare Battery ChargingLEDs (4)Power LEDSpare Battery SlotRugged Charge/USB CableScanningTo read a bar code, a scan-enabled application is required. The device contains the DataWedge applicationthat allows the user to enable the imager, decode the bar code data and display the bar code content.1.Ensure that an application is open on the device and a text field is in focus (text cursor in text field).2.Point the exit window on the top of the device at a bar code.3.Press and hold the scan button.The red laser aiming pattern turns on to assist in aiming.NOTE: When the device is in Picklist mode, the imager does not decode the barcode until the crosshair or aiming dot touchesthe barcode.4.Ensure the barcode is within the area formed by the cross-hairs in the aiming pattern. The aiming dot isused for increased visibility in bright lighting conditions.Aiming Pattern5.The Data Capture LED lights green and a beep sounds, by default, to indicate the barcode was decodedsuccessfully.6.Release the scan button.NOTE :Imager decoding usually occurs instantaneously. The device repeats the steps required to take a digital picture(image) of a poor or difficult barcode as long as the scan button remains pressed.7.The barcode content data displays in the text field.Ergonomic ConsiderationsPick List Mode with Multiple Barcodes in Aiming PatternAVOID EXTREME WRIST ANGLES。
Wyse 5470 一体式瘦客户端服务手册Identifier GUID-5B8DE7B7-879F-45A4-88E0-732155904029Version13Status Translation Validated注意、小心和警告:“注意”表示帮助您更好地使用该产品的重要信息。
:“小心”表示可能会损坏硬件或导致数据丢失,并告诉您如何避免此类问题。
:“警告”表示可能会导致财产损失、人身伤害甚至死亡。
© 2019- 2020 Dell Inc. 或其子公司。
保留所有权利。
Dell、EMC 和其他商标是 Dell Inc. 或其附属机构的商标。
其他商标可能是其各自所有者的商标。
Rev. A011 处理瘦客户机 (5)安全说明 (5)处理瘦客户机之前 (5)安全预防措施 (6)静电放电—ESD 保护 (6)ESD 现场服务套件 (7)运输敏感组件 (7)处理瘦客户机之后 (8)2 瘦客户机的主要组件 (9)3 卸下和安装组件 (11)建议的工具 (11)螺钉列表 (11)支架 (13)卸下立式支架 (13)安装立式支架 (14)后盖 (16)卸下后盖 (16)安装后盖 (17)Vesa 固定支架 (19)卸下 VESA 固定支架 (19)安装 VESA 固定支架 (20)屏幕显示屏板 (21)卸下 OSD 板 (21)安装 OSD 板 (21)固态硬盘 (22)卸下固态驱动器 (22)安装固态驱动器 (23)内存模块 (24)卸下内存模块 (24)安装内存模块 (25)无线网卡 (26)卸下无线网卡 (26)安装无线网卡 (27)散热器 (28)卸下散热器 (28)安装散热器 (29)币形电池 (30)取出币形电池 (30)安装币形电池 (31)摄像头 (32)卸下摄像头 (32)安装摄像头 (33)目录3系统板 (34)卸下系统板 (34)安装系统板 (36)扬声器 (37)卸下扬声器 (37)安装扬声器 (38)中框 (39)卸下中框 (39)安装中框 (40)橡胶脚垫 (42)卸下橡胶脚垫 (42)安装橡胶脚垫 (43)显示屏面板 (44)卸下显示屏面板 (44)安装显示屏面板 (45)4 系统设置程序 (46)系统设置概述 (46)访问瘦客户端 BIOS 设置 (46)导航键 (46)引导顺序 (47)通用屏幕选项 (47)系统配置屏幕选项 (48)视频屏幕选项 (49)安全屏幕选项 (50)安全引导屏幕选项 (51)Intel Software Guard Extensions 屏幕选项 (52)性能屏幕选项 (52)电源管理屏幕选项 (53)POST 行为屏幕选项 (53)无线屏幕选项 (54)虚拟化支持屏幕选项 (54)维护屏幕选项 (54)系统日志屏幕选项 (55)高级配置 (55)5 系统故障排除 (56)Enhanced Pre-Boot System Assessment 诊断程序 (56)运行 ePSA 诊断程序 (56)电源行为 (57)电源状态和LED 指示灯状态 (58)6 获取帮助 (59)联系戴尔 (59)4目录IdentifierGUID-C18B324F-1FEE-4042-96B8-4B4C0962E23F Version1Status Translation approved 处理瘦客户机IdentifierGUID-D74016DC-239D-4340-BDF4-DF5E7E635E82Version1Status Translation approved安全说明前提条件遵循以下安全原则可防止您的瘦客户机受到潜在损坏并确保您的人身安全。

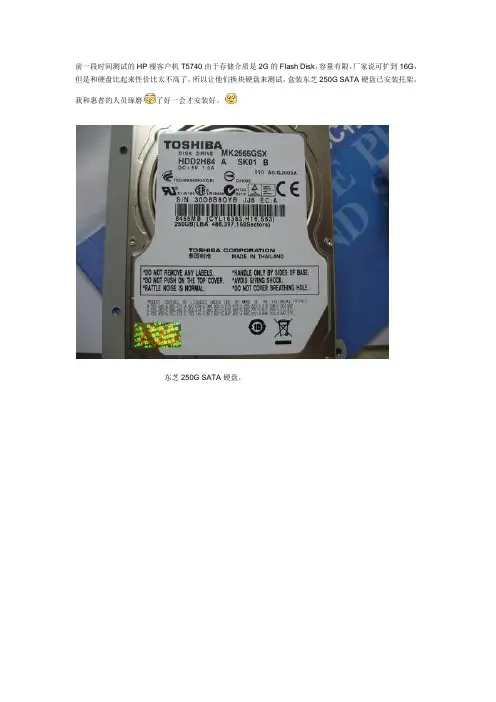
前一段时间测试的HP瘦客户机T5740由于存储介质是2G的Flash Disk,容量有限,厂家说可扩到16G,但是和硬盘比起来性价比太不高了,所以让他们换块硬盘来测试。
盒装东芝250G SATA硬盘已安装托架。
我和惠普的人员琢磨了好一会才安装好。
东芝250G SATA硬盘。
原来的Flash Disk 2G容量太小
只有虚线区域才能放下硬盘,用螺丝反着固定在金属机壳上。
这样一来势必硬盘盒电容、内存挨得特别特别近。
散热??
固定硬盘前,先卸掉1个VESA孔座,用钳子一敲OK。
线缆是一体的。
由于金属机壳上没有螺丝标注位。
给硬盘找最佳位置返工了两三回。
安装后金属机壳螺丝位置。
这时还要把塑料机壳的1个卡扣卸掉。
装上即可完工。

同方瘦客户机卖点指导手册同方(深圳)云计算技术股份有限公司2012-12目录一、瘦客户机和Mini PC概念浅谈 (3)1、瘦客户机概念 (3)2、Mini PC概念 (3)二、同方瘦客户机优势 (3)1、同方瘦客户机与PC及Mini PC比较 (3)2、同方瘦客户机与国内厂商瘦客户机比较 (5)一、瘦客户机和Mini PC概念浅谈1、瘦客户机概念瘦客户机是使用专业嵌入式处理器,小型本地闪存,精简版操作系统的基于工业标准设计的行业专用产品。
其追求的目标是设备具有总拥有成本低、安全性高、可靠性强、易于管理维护等优点。
2、Mini PC概念所谓Mini PC,其实就是体积小巧的PC。
与普通PC相比,Mini PC的最大特征就是电脑主机在体积上进行“缩水“,例如将光驱盒硬盘安装位都竖立起来,主机内部电源的安装位也出现了相应的改变等。
二、同方瘦客户机优势同方凭借其在瘦客户机市场的多年积累和挖掘,提炼出品质上佳的同方瘦客户机产品。
下面,将与PC,Mini PC和其他瘦客户机厂商的品质进行比较:1、同方瘦客户机与PC及Mini PC比较1)无风扇,静音PC内部安装有CPU风扇,电源风扇等,运行时,CPU风扇,电源风扇等声音明显,且后期使用时由于灰尘,润滑等问题,噪声日益提高;由于Mini PC体积较PC小,相应的内部空间也变得很狭小,空气在如此狭小的空间内不易流通,因此散热性能成为Mini PC的一个瓶颈;而为了加强散热,Mini PC的主机内部会采用多个散热风扇,而随着风扇的增多,电脑运行时的噪音问题也随之而来,运行时的噪音根本得不到很好的控制,降低了客户的环境舒适度;而同方瘦客户机采用硬件嵌入式方案,整机无风扇设计,设备运行时可以完美的控制噪声问题,保证静音,提高客户的环境舒适度;2)稳定性高PC和Mini PC采用高功耗CPU,CPU采用PGA封装方式,易松动,主板稳定性低;同方瘦客户机采用硬件一体化设计,高速低功耗CPU,CPU采用BGA封装方式,尺寸小,直接封装到主板上,主板稳定性高;3)接口设计丰富,且为主板支持PC和Mini PC内采用机械插拔式接口,随着使用时间的加长,易出现松脱等现象;连接线多,布线复杂;且主板直接支持外设接口少,后期扩展需要使用各类扩展卡,由于扩展卡为小器件,本身质量低,且供应厂商各异,外设兼容性降低,稳定性也随之降低;同方瘦客户机为满足外设需求丰富的环境使用,有加强设计。
目录安装惠普瘦客户机系统xpe wes2009 (2)如何下载镜像(一) (2)如何下载镜像(二) (2)如何下载镜像(三) (3)刷新镜像至U盘(四) (4)更改参数加-y –xb (五) (5)U盘启动做完之后把U盘插到瘦客户机上(六) (5)机器启动默认是USER用户,切换到管理员模式(七) (6)安装常用的软件(八) (6)方法一:抓配置好的系统镜像(九) (9)方法二:快速部署(建议使用)Rdeploy 抓取镜像 (12)IE7降到IE6(十) (15)打印机驱动安装(十一) (15)USB U盘控制(十二) (18)给User用户赋予右键权限(十三) (19)安装惠普瘦客户机系统xpe wes2009如何下载镜像(一)登录找到驱动程序软件下载,在产品名称型号输入瘦客户机的型号,例如:T5740 或者vc4820如何下载镜像(二)选择要下载的语音(中文选择简体中文)和要下载的系统。
如何下载镜像(三)下载的程序是.exe格式()刷新镜像至U盘(四)把U盘查到电脑上,面是往U盘里写程序,同时做U盘启动。
选择U盘的盘符U盘里面的东西,释放完之后的。
更改参数加-y –xb(五)进入\UFD\IBRPE用记事本编辑THINSTATE.CMD还下面一样。
在\FLASH.IBR 前面添加-Y -XB@ECHO OFFCLSCOLOR 17\IBRPE\IBRPE.EXE–Y –XB \FLASH.IBR HD0U盘启动做完之后把U盘插到瘦客户机上(六)要进行HP ThinState部署,请执行以下操作:1. 将F10 系统BIOS 中的引导顺序设为USB boot(USB 引导)。
2. 将USB 闪存驱动器连接到您要部署捕获映像的瘦客户机设备,然后打开该设备。
3. 按照屏幕中的说明执行操作。
当您拔下USB 闪存驱动器并重启系统电源后,映像将解包。
此过程需要3–5 分钟,具体取决于闪存驱动器速度和内部闪存大小。
办公用HP瘦客户机—基于服务器终端服务解决方案目录一、项目概述................................................................................................... 错误!未定义书签。
1.1项目背景............................................................................................. 错误!未定义书签。
1.2需求分析—系统现状......................................................................... 错误!未定义书签。
1.3需求分析—系统分析......................................................................... 错误!未定义书签。
1.4收益分析............................................................................................. 错误!未定义书签。
2方案设计........................................................................................................ 错误!未定义书签。
2.1方案体系架构..................................................................................... 错误!未定义书签。
2.2基于服务器方案描述......................................................................... 错误!未定义书签。
jiu目录安装惠普瘦客户机系统xpe wes2009 (2)如何下载镜像(一) (2)如何下载镜像(二) (2)如何下载镜像(三) (3)刷新镜像至U盘(四) (4)更改参数加-y –xb (五) (5)U盘启动做完之后把U盘插到瘦客户机上(六) (5)机器启动默认是USER用户,切换到管理员模式(七) (6)安装常用的软件(八) (6)方法一:抓配置好的系统镜像(九) (9)方法二:快速部署(建议使用)Rdeploy 抓取镜像 (12)IE7降到IE6(十) (15)打印机驱动安装(十一) (15)USB U盘控制(十二) (18)给User用户赋予右键权限(十三) (19)安装惠普瘦客户机系统xpe wes2009如何下载镜像(一)登录找到驱动程序软件下载,在产品名称型号输入瘦客户机的型号,例如:T5740 或者vc4820如何下载镜像(二)选择要下载的语音(中文选择简体中文)和要下载的系统。
如何下载镜像(三)()刷新镜像至U盘(四)把U盘查到电脑上,面是往U盘里写程序,同时做U盘启动。
选择U盘的盘符U盘里面的东西,释放完之后的。
更改参数加-y –xb (五)进入\UFD\IBRPE用记事本。
在\FLASH.IBR 前面添加-Y -XB@ECHO OFFCLSCOLOR 17–Y –XB \FLASH.IBR HD0U盘启动做完之后把U盘插到瘦客户机上(六)要进行HP ThinState 部署,请执行以下操作:1. 将F10 系统BIOS 中的引导顺序设为USB boot(USB 引导)。
2. 将USB 闪存驱动器连接到您要部署捕获映像的瘦客户机设备,然后打开该设备。
3. 按照屏幕中的说明执行操作。
当您拔下USB 闪存驱动器并重启系统电源后,映像将解包。
此过程需要3–5 分钟,具体取决于闪存驱动器速度和内部闪存大小。
在此过程中不要中断或重启计算机。
机器启动默认是USER用户,切换到管理员模式(七)点击注销一直按住Shift会提示输入用户名和密码,管理员用户名:Administrator密码默认是:Administrator 区分大小写。
HT3300-瘦客户机用户使用手册文档版本01发布日期2021-10-22HT3300瘦客户机用户使用手册版本v1.0日期2021-10-22文件维护日志修改日期修改者修改内容确认2021-10-22 侯帅初稿完成目录目录目录 (4)1. 系统概述 (5)1.1. 产品简介 (5)1.2. 终端接口介绍 (6)2. 基本使用 (7)2.1. HT3300开关机、重启、注销。
(7)2.1.1. 开机 (7)2.1.2. 关机 (8)2.1.3. 重启 (9)2.1.4. 注销 (9)2.2. HT3300 UI简介 (10)2.2.1. 启动器菜单 (10)2.2.2. 浏览器 (11)2.2.3. SWTMS (12)2.2.4. 输入法配置 (12)2.2.5. 控制中心 (13)2.2.6. 云客户端 (26)2.2.7. 系统监视器 (27)2.2.8. 设备管理器 (28)2.2.9. 网络工具 (31)3. HDP云桌面 (32)3.1. 增加账号 (32)3.2. 管理账号 (33)3.3. 连接云桌面 (34)结束语 (35)1.系统概述1.1.产品简介HT3300为朝歌、统信和华为共同开发的新一代智能云终端产品。
产品采用四核64位RK3568芯片,运行UOS 20操作系统,整机平均功耗小于20W,是高性能低功耗的智能云终端。
HT3300集成了华为CloudClient云客户端,尽享云桌面高清流畅的体验。
支持1080P 视频播放。
配套SWTMS终端管理系统,可以使管理员更方便有效地管理远程终端。
产品主要应用于虚拟化多媒体培训教室、虚拟化办公、家庭娱乐等领域。
1.2. 终端接口介绍正面:编号描述1 电源按扭:关机状态下,短按开机。
2 3.5mm 耳机/Mic 二合一插孔3 1个USB3.0接口,用于接连USB 键盘、USB 鼠标等USB 设备。
41个Type-C 接口,用于连接Type-C 耳机、Type-C 接口的硬盘等设备。
安装步骤:
1.在HP官网上的支持与驱动程序栏目中下载HP T5740系统
Microsoft Windows Embedded Standard 2009 镜像文件
sp56107.exe,插入U盘后在PC上执行,选择USB Format,然后
选择U盘盘符,选择Format进行系统镜像文件的制作。
2.打开U盘,找到IBRPE/THINSTATE.CMD文件,用记事本打开在
\IBRPE\IBRPE.EXE -xb \FLASH.IBR HD%sysHD%中加入-xb,然后插
入瘦客户机进行系统安装。
(如瘦客户机系统已经安装系统,可
跳过以上步骤)。
3.瘦客户机开机后,按住shift不放进行注销,输入用户
administrator,输入密码Administrator登录管理员权限进入系统。
4.首先打开系统文件保护锁EFW,鼠标反键点击桌面右下角绿色小
锁图标disabled EFW,要求重新启动,可以暂时不重启。
进入
控制面板,点击HP RAMDisk Manager,将RAM拉到最
大96MB,OK确定。
5.进入控制面板—系统,选择高级TAB,点击环境变量,修改用户
变量TRMP/TMP值,将Z:\盘符改为C:\。
在系统变量中继续将TRMP/TMP值,将Z:\盘符改为C:\。
6.完成以上配置后重新启动系统,然后以administrator登录系统。
7.依次安装软件.
8.完成安装后关闭系统文件保护锁EFW,鼠标反键点击桌面右下角
绿色小锁图标Enable EFW,重新启动后硬盘被锁定。