LNMP搭建
- 格式:doc
- 大小:81.50 KB
- 文档页数:11

详解⽤Nginx搭建CDN服务器⽅法(图⽂)利⽤Nginx的proxy_cache搭建缓存服务器⼀:编译ngx_cache_purge1、Nginx的Proxy_cache是根据Key值md5哈希存储缓存,⽀持任意的Key,例如你可以根据”域名、URI、参数”组合成key,也⽀持⾮200状态码,如404/302等。
2、要利⽤Nginx的Proxy_cache,你需要在Nginx编译进ngx_cache_purge 模块,执⾏:nginx -V,查看有没有ngx_cache_purge 字样,没有的话需要⾃⼰⼿动编译。
Nginx搭建CDN⼿动编译3、这⾥以Oneinstack编译ngx_cache_purge 模块作为操作演⽰,如果你⽤的是其它的LNMP包可以参考,基本过程是差不多的。
命令如下:cd /root/oneinstack/src #进⼊安装包⽬录nginx -Vtar xzf nginx-1.10.3.tar.gz #根据上⾯查看到的nginx版本选择解压包wget /files/ngx_cache_purge-2.3.tar.gztar zxvf ngx_cache_purge-2.3.tar.gzcd /root/oneinstack/src/nginx-1.10.3# 下⾯的./configure 后加的参数,你可以直接复制刚刚⽤nginx -V得到的参数,然后在最后加上–add-module=../ngx_cache_purge-2.3即可,参考:./configure –prefix=/usr/local/nginx –user=www –group=www –with-http_stub_status_module –with-http_v2_module –with-http_ssl_module –with-http_gzip_static_module –with-http_realip_module –with-http_flv_module –with-http_mp4_module –with-openssl=../o makemv /usr/local/nginx/sbin/nginx{,$(date +%m%d)}cp objs/nginx /usr/local/nginx/sbin #oneinstack,其它的可以不⽤这个操作nginx -tservice nginx restart4、安装完成后,再次nginx -V你就可以看到Nginx已经成功编译进了ngx_cache_purge 了。

Linux牛逼命令大全∙壹、底层辅助支持软件的安装o1、安装OpenSSLo2、安装Curl库o3、安装expato4、安装libxml2o5、安装libxslto6、安装libmcrypto7、安装mhasho8、安装mcrypto9、安装zlibo10、安装libpngo11、安装jpego12、安装freetypeo13、安装m4o14、安装autoconfo15、安装libiconvo16、安装bzip2o17、安装GD库∙贰、安装Apache方法一o18、安装apro19、安装apr-utilo20、安装pcreo21、安装apache方法一∙叁、安装Apache方法二o18、处理apro19、处理apr-utilo20、安装pcreo21、安装apache方法二∙Apache启动管理方式o I、手工管理apacheo II、chkconfig管理apache∙肆、安装MySQLo22、安装cmakeo23、安装bisono24、安装ncurseso25、安装MySQL∙MySQL启动管理方式o I、手工管理MySQLo II、chkconfig管理MySQL∙伍、安装PHPo26、安装PHPo27、安装memcached服务器端o28、安装php扩展功能memcacheo29、安装php扩展memcachedo30、安装Zend加速器Linux+Apache+Mysql/MariaDB+Perl/PHP/Python一组常用来搭建动态网站或者服务器的开源软件,本身都是各自独立的程序,但是因为常被放在一起使用,拥有了越来越高的兼容度,共同组成了一个强大的Web应用程序平台。
随着开源潮流的蓬勃发展,开放源代码的LAMP已经与J2EE和.Net商业软件形成三足鼎立之势,并且该软件开发的项目在软件方面的投资成本较低,因此受到整个IT界的关注。
从网站的流量上来说,70%以上的访问流量是LAMP来提供的,LAMP是最强大的网站解决方案.本实验采用64位CentOS6.8进行部署,系统最小化安装,apache选用httpd-2.4.7,mysql选用mysql-5.6.32,php选用php-5.6.26。
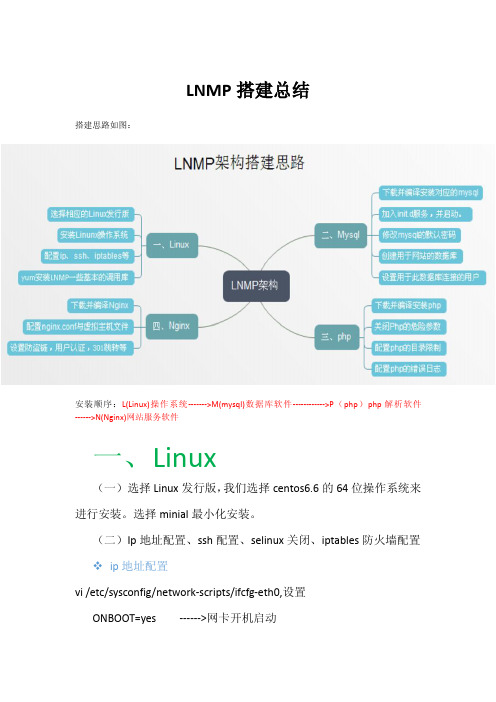
Linux(6.4)+Nginx(1.4.1)+Mysql(5.6.12)+Php(5.5.0)源码编译安装环境介绍内核2.6.32,系统为CentOS6.4的64为系统,ip地址为192.168.2.103。
如下:[root@ASANGE ~]# uname -r2.6.32-358.el6.x86_64[root@ASANGE ~]# cat /etc/redhat-releaseCentOS release 6.4 (Final)[root@ASANGE ~]# ifconfig | grep addr: |awk '{print $2}' |awk -F: '{print $2}'192.168.2.103127.0.0.1配置本地yum源:创建本地yum源,挂载光盘并创建repo文件:[root@ASANGE ~]# mount /dev/cdrom /media/cdrom/[root@ASANGE ~]# vim /etc/yum.repos.d/local.repo //添加如下内容[LOCAL]name=localbaseurl=file:///media/cdromenabled=1gpgcheck=0[root@ASANGE ~]# yum clean all解决依赖关系:在编译安装nginx、mysql、和php时依赖的包提前安装:1 [root@ASANGE ~]# yum -y install gcc pcre pcre-devel gcc-c++ autoconf libxml2 libxml2-devel zlib zlib-develglibc libjepg libjepg-devel libpng libpng-devel glibc-devel glib2 glib2-devel ncurses ncurses-devel curl curl-devele2fsprogs e2fsprogs-devel openssl openssl-devel openldap openldap-devel nss_ldap openldap-clients openldap-serversmake简单介绍一下:GCC(GNU Compiler Collection,GNU编译器套装),是一套由GNU开发的编程语言编译器。

云服务器安装宝塔面板完整教程展开全文下面稍微介绍一下如何使用阿里云服务器安装宝塔面板。
概述如果还有不了解宝塔面板怎么使用的小伙伴,可以看下前文:•宝塔面板教程(1)基于云服务器搭建宝塔面板教程最全详解•宝塔面板教程(2)宝塔面板添加WordPress站点详细图文教程•宝塔面板教程(3)基于宝塔面板成功配置网站SSL安全证书•宝塔面板教程(4)WordPress网站的备份与恢复(宝塔面板)•宝塔面板教程(5)WordPress网站程序和数据库定时备份到七牛云存储图文教程•宝塔面板教程(6)WordPress网站程序和数据库定时备份到又拍云存储空间图文教程•宝塔面板教程(7)宝塔面板版本升级更新教程汇总—升级宝塔面板一、准备阿里云的云服务器,即阿里云ECS,默认的用户名 root,密码的话可以修改。
当然你也可以选择腾讯云服务器,都能满足需求。
远程连接云服务器使用 ssh 软件工具,使用的是公网ip。
注意事项:出于性能考虑,服务器的操作系统一定要选Linux版本(centos或者ubuntu),不要选Window。
主要步骤:拥有一台云服务器》ssh工具连接云服务器》安装宝塔面板》配置云服务器安全组(放行端口)》宝塔面板在线访问成功二、安装面板1、使用ssh工具连接云服务器本站提供ssh客户端软件下载【Xshell6下载+Xftp6下载】【FinalShell下载】windows下可以使用XShell,macOs的可以使用终端。
因为SSH工具有很多种,找到自己用的舒服的工具就可以,不用纠结使用哪一种。
我自己是用的FinalShell这一款SSH工具来进行Linux远程连接的,如何认为不安全的话,也可以选择用xshell来进行服务器ssh远程连接,如下图2、输入宝塔面板安装命令温馨提示:宝塔面板最近升级到了7.0版本,Centos7以上的系统建议安装宝塔面板最新版:/bbs/thread-19376-1-1.html(宝塔面板7.x版本,点击查看安装命令)/bbs/thread-30562-1-1.html(宝塔面板6.x版本,点击查看安装命令)安装方法这里也有介绍(以宝塔面板 5.x版本举例):http:///bbs/thread-1186-1-1.html以下安装命令是宝塔面板5.x版本的,请注意。

lnmp简单案例下面就给你整一个超简单的LNMP案例,就像讲故事一样,保证你轻松理解。
一、啥是LNMP呢?先简单说一下,LNMP就是由Linux操作系统、Nginx服务器、MySQL数据库和PHP 编程语言组成的一个超棒的网络应用环境。
这几个家伙凑一块儿,就能让好多超酷的网站跑起来啦。
二、案例场景搭建一个超简单的博客网站。
1. 准备工作安装Linux操作系统。
咱就假设你已经有一台服务器或者虚拟机装了Linux系统,像CentOS或者Ubuntu都挺不错的。
要是没有,那就像搭积木一样先装一个呗。
2. 安装Nginx。
在Linux系统里打开命令行(就像打开一个魔法盒子,你输入指令就能让电脑干各种事儿)。
对于CentOS系统,你可以输入像这样的命令(当然要先确保你有足够的权限哦,一般用sudo或者切换到root用户):`yum install nginx -y`。
这个命令就像是告诉电脑:“电脑兄,给我把Nginx 装上,别啰嗦。
”对于Ubuntu系统呢,就是 `apt get install nginx -y`。
安装好之后,你可以通过浏览器访问你的服务器IP地址,如果看到了Nginx的欢迎页面,那就说明Nginx 安装成功啦,就像你敲开了一扇通往博客世界的大门。
3. 安装MySQL数据库。
在CentOS系统里,你可以这样干:先添加MySQL的yum源,就像告诉电脑到哪里去找MySQL这个宝藏。
然后再执行`yum install mysql server -y` 命令来安装MySQL服务器。
安装好之后,启动MySQL服务,用命令 `systemctl start mysqld`。
在Ubuntu系统下,是 `apt get install mysql server -y`。
安装完之后,你可以用 `mysql u root p`(这里是登录MySQL,输入密码后就进入MySQL的命令行界面啦)来测试一下是不是安装成功了。
php安装将libiconv-1.13.1.tar.gz上传至/software#tar zxf libiconv-1.13.1.tar.gz#cd libiconv-1.13.1#./configure --prefix=/usr/local/#make && make install#cd ..将libmcrypt-2.5.8.tar.gz 上传至/software#tar zxf libmcrypt-2.5.8.tar.gz#cd libmcrypt-2.5.8#./configure#make && make install#/sbin/ldconfig#cd libltdl#./configure --enable-ltdl-install#make && make install#cd ../../将mhash-0.9.9.9.tar.gz上传至/software#tar zxf mhash-0.9.9.9.tar.gz#cd mhash-0.9.9.9/#./configure#make && make install#cd ../#ln -s /usr/local/lib/ /usr/lib/#ln -s /usr/local/lib/libmcrypt.so /usr/lib/libmcrypt.so#ln -s /usr/local/lib/libmcrypt.so.4 /usr/lib/libmcrypt.so.4#ln -s /usr/local/lib/libmcrypt.so.4.4.8 /usr/lib/libmcrypt.so.4.4.8 #ln -s /usr/local/lib/libmhash.a /usr/lib/libmhash.a#ln -s /usr/local/lib/ /usr/lib/#ln -s /usr/local/lib/libmhash.so /usr/lib/libmhash.so#ln -s /usr/local/lib/libmhash.so.2 /usr/lib/libmhash.so.2#ln -s /usr/local/lib/libmhash.so.2.0.1 /usr/lib/libmhash.so.2.0.1 #ln -s /usr/local/bin/libmcrypt-config /usr/bin/libmcrypt-config将mcrypt-2.6.8.tar.gz上传至/software#tar zxvf mcrypt-2.6.8.tar.gz#cd mcrypt-2.6.8/#/sbin/ldconfig#./configure#make && make install#cd ../将php-5.4.3.tar.gz上传至/softwarephp5.3.3以后的版本源码不需要再打php-fpm补丁,该补丁已集成进php5.3.3, 在编译时,不需再–enable-fastcgi了,在php5.3.3中强制启用fastcgi了。
linuxlnmp搭建实训总结在Linux环境下搭建LNMP(Linux+Nginx+MySQL+PHP)是一项常见的实训任务,该任务旨在让学生通过实际操作了解和掌握LNMP架构的搭建和配置。
我参与了这个实训,并总结了以下的经验和收获。
首先,Linux是一个非常稳定和安全的操作系统,因此我们首先需要安装和配置Linux。
在实训中,我们使用了Ubuntu作为我们的Linux发行版。
我们学习了如何在虚拟机中安装Ubuntu,并进行基本的配置,例如网络设定、用户管理等。
这些基本操作对于后续的LNMP 的搭建非常重要,因为我们需要建立合适的开发和测试环境。
接下来,我们安装和配置了Nginx。
Nginx是一个高性能的Web服务器,经常被用于承载高并发的Web应用。
我们学习了如何从官方网站下载和安装Nginx,以及如何对其进行基本的配置。
我们了解了Nginx的配置文件结构,学习了如何创建和编辑这些配置文件,以及如何重载配置文件以使更改生效。
在配置Nginx时,我们还学习了如何设置虚拟主机,以便我们能够在同一台服务器上承载多个网站。
我们了解了虚拟主机配置文件的结构和语法,并学习了如何将请求从域名映射到正确的网站目录。
接下来,我们安装和配置了MySQL。
MySQL是一个流行的关系型数据库管理系统,经常被用于存储和管理数据。
我们学习了如何从官方网站下载和安装MySQL,以及如何对其进行基本的配置。
我们了解了MySQL的配置文件结构和默认值,并学习了如何创建和管理数据库和用户。
在配置MySQL时,我们还学习了如何设置远程访问权限,以便通过其他主机连接和管理MySQL服务器。
我们了解了如何修改MySQL的配置文件以允许远程连接,并学习了如何创建和管理远程MySQL用户。
最后,我们安装和配置了PHP。
PHP是一种常用的脚本语言,经常被用于开发Web应用。
我们学习了如何从官方网站下载和安装PHP,并进行了基本的配置。
我们了解了PHP的配置文件结构和选项,并学习了如何设置PHP的运行参数和扩展。
通过docker容器搭建lamp架构的流程⽬录1. 拉取centos镜像2. 构建nginx镜像3. 构建mysql镜像4. 构建php镜像5. 配置lnmp1. 拉取centos镜像[root@localhost ~]# docker pull centosUsing default tag: latestlatest: Pulling from library/centosa1d0c7532777: Pull completeDigest: sha256:a27fd8080b517143cbbbab9dfb7c8571c40d67d534bbdee55bd6c473f432b177Status: Downloaded newer image for centos:latestdocker.io/library/centos:latest[root@localhost ~]# docker imagesREPOSITORY TAG IMAGE ID CREATED SIZEcentos latest 5d0da3dc9764 2 months ago 231MB[root@localhost ~]#2. 构建nginx镜像[root@localhost ~]# docker run --name nginx -it centos[root@522006030d19 /]# useradd -r -M -s /sbin/nologin nginx[root@522006030d19 /]# yum -y install pcre-devel pcre gcc gcc-c++ openssl-devel zlib zlib-devel make vim wget openssl openssl-devel gd-devel[root@522006030d19 /]# mkdir -p /var/log/nginx[root@522006030d19 /]# chown -R nginx.nginx /var/log/nginx[root@522006030d19 /]# cd /usr/src/[root@522006030d19 src]# wget https:///download/nginx-1.20.1.tar.gz[root@522006030d19 src]# tar xf nginx-1.20.1.tar.gz[root@522006030d19 src]# cd nginx-1.20.1[root@522006030d19 nginx-1.20.1]# ./configure \> --prefix=/usr/local/nginx \> --user=nginx \> --group=nginx \> --with-debug \> --with-http_ssl_module \> --with-http_realip_module \> --with-http_image_filter_module \> --with-http_gunzip_module \> --with-http_gzip_static_module \> --with-http_stub_status_module \> --http-log-path=/var/log/nginx/access.log \> --error-log-path=/var/log/nginx/error.log[root@522006030d19 nginx-1.20.1]# make -j $(grep 'processor' /proc/cpuinfo | wc -l) && make install[root@522006030d19 nginx-1.20.1]# echo 'export PATH=/usr/local/nginx/sbin:$PATH' > /etc/profile.d/nginx.sh[root@522006030d19 nginx-1.20.1]# source /etc/profile.d/nginx.sh [root@522006030d19 nginx-1.20.1]# nginx[root@522006030d19 nginx-1.20.1]# ss -antlState Recv-Q Send-Q Local Address:Port Peer Address:Port ProcessLISTEN 0 128 0.0.0.0:80 0.0.0.0:*[root@522006030d19 nginx-1.20.1]#[root@522006030d19 nginx-1.20.1]# echo "daemon off;" >> /usr/local/nginx/conf/nginx.conf[root@522006030d19 nginx-1.20.1]# tail -1 /usr/local/nginx/conf/nginx.confdaemon off;[root@522006030d19 nginx-1.20.1]#//打开另外⼀个终端[root@localhost ~]# docker commit -c 'CMD ["/usr/local/nginx/sbin/nginx"]'-p nginx pengyudong/nginx:v1sha256:2153a12060f6cca88646f285a1ae2af2a94c0d489ad8393f931d29c8fdd8af6e[root@localhost ~]# docker imagesREPOSITORY TAG IMAGE ID CREATED SIZEpengyudong/nginx v1 2153a12060f6 27 seconds ago 576MBcentos latest 5d0da3dc9764 2 months ago 231MB[root@localhost ~]#[root@localhost ~]# docker psCONTAINER ID IMAGE COMMAND CREATED STATUS PORTS NAMES[root@localhost ~]# docker ps -aCONTAINER ID IMAGE COMMAND CREATED STATUS PORTS NAMES522006030d19 centos "/bin/bash" 14 minutes ago Exited (0) 38 seconds ago nginx[root@localhost ~]# docker rm 522006030d19522006030d19[root@localhost ~]# docker run pengyudong/nginx:v1[root@localhost ~]# docker psCONTAINER ID IMAGE COMMAND CREATED STATUS PORTS NAMES9c129a20e7c7 pengyudong/nginx:v1 "/usr/local/nginx/sb…" About a minute ago Up 2 seconds blissful_perlman[root@localhost ~]# docker inspect 9c129a20e7c7......省略N⾏"Gateway": "172.17.0.1","GlobalIPv6Address": "","GlobalIPv6PrefixLen": 0,"IPAddress": "172.17.0.2",.....省略N⾏[root@localhost ~]# curl 172.17.0.2<!DOCTYPE html><html><head><title>Welcome to nginx!</title><style>body {width: 35em;margin: 0 auto;font-family: Tahoma, Verdana, Arial, sans-serif;}</style></head><body><h1>Welcome to nginx!</h1><p>If you see this page, the nginx web server is successfully installed andworking. Further configuration is required.</p><p>For online documentation and support please refer to<a href="/" rel="external nofollow" ></a>.<br/>Commercial support is available at<a href="/" rel="external nofollow" ></a>.</p><p><em>Thank you for using nginx.</em></p></body></html>[root@localhost ~]#3. 构建mysql镜像[root@localhost ~]# docker run --name mysql -it centos[root@16256ee64b9e /]# cd /usr/src/[root@16256ee64b9e src]# lsdebug kernels[root@16256ee64b9e src]#//开启另外⼀个终端[root@localhost src]# lsdebug kernels mysql-5.7.34-linux-glibc2.12-x86_64.tar.gz[root@localhost ~]# cd /usr/src/[root@localhost src]# docker cp mysql-5.7.34-linux-glibc2.12-x86_64.tar.gz mysql:/usr/src/[root@16256ee64b9e src]# lsdebug kernels mysql-5.7.34-linux-glibc2.12-x86_64.tar.gz[root@16256ee64b9e src]#[root@16256ee64b9e src]# yum -y install ncurses-devel openssl-devel openssl cmake mariadb-devel ncurses-compat-libs libaio numactl[root@16256ee64b9e src]# useradd -r -M -s /sbin/nologin mysql[root@16256ee64b9e src]# tar xf mysql-5.7.34-linux-glibc2.12-x86_64.tar.gz[root@16256ee64b9e src]# mv mysql-5.7.34-linux-glibc2.12-x86_64 /usr/local/mysql[root@16256ee64b9e src]# cd /usr/local/[root@16256ee64b9e local]# lsbin etc games include lib lib64 libexec mysql sbin share src[root@16256ee64b9e local]# chown -R mysql.mysql /usr/local/mysql[root@16256ee64b9e local]# mkdir /opt/data[root@16256ee64b9e local]# chown -R mysql.mysql /opt/data[root@16256ee64b9e local]# /usr/local/mysql/bin/mysqld --initialize-insecure --user=mysql --datadir=/opt/data2021-12-06T02:53:34.095554Z 0 [Warning] TIMESTAMP with implicit DEFAULT value is deprecated. Please use --explicit_defaults_for_timestamp server option (see documentation for more details).2021-12-06T02:53:35.482793Z 0 [Warning] InnoDB: New log files created, LSN=457902021-12-06T02:53:35.506011Z 0 [Warning] InnoDB: Creating foreign key constraint system tables.2021-12-06T02:53:35.562063Z 0 [Warning] No existing UUID has been found, so we assume that this is the first time that this server has been started. Generating a new UUID: b4aa24d8-563f-11ec-80a8-0242ac110003. 2021-12-06T02:53:35.562798Z 0 [Warning] Gtid table is not ready to be used. Table 'mysql.gtid_executed' cannot be opened.2021-12-06T02:53:35.979249Z 0 [Warning] CA certificate ca.pem is self signed.2021-12-06T02:53:36.217615Z 1 [Warning] root@localhost is created with an empty password ! Please consider switching off the --initialize-insecure option.[root@16256ee64b9e local]#[root@16256ee64b9e local]# echo 'export PATH=/usr/local/mysql/bin:$PATH' > /etc/profile.d/mysql.sh[root@16256ee64b9e local]# . /etc/profile.d/mysql.sh[root@16256ee64b9e local]# echo $PATH/usr/local/mysql/bin:/usr/local/sbin:/usr/local/bin:/usr/sbin:/usr/bin:/sbin:/bin[root@16256ee64b9e local]# cat > /etc/f <<EOF> [mysqld]> basedir = /usr/local/mysql> datadir = /opt/data> socket = /tmp/mysql.sock> port = 3306> pid-file = /opt/data/mysql.pid> user = mysql> skip-name-resolve> EOF[root@16256ee64b9e local]# cat /etc/mmachine-id modprobe.d/ motd fmakedumpfile.conf.sample modules-load.d/ mtab f.d/[root@16256ee64b9e local]# cat /etc/f[mysqld]basedir = /usr/local/mysqldatadir = /opt/datasocket = /tmp/mysql.sockport = 3306pid-file = /opt/data/mysql.piduser = mysqlskip-name-resolve[root@16256ee64b9e local]#[root@16256ee64b9e local]# sed -ri 's#^(basedir=).*#\1/usr/local/mysql#g' /usr/local/mysql/support-files/mysql.server[root@16256ee64b9e local]# sed -ri 's#^(datadir=).*#\1/opt/data#g' /usr/local/mysql/support-files/mysql.server[root@16256ee64b9e local]# sed -n '46,1p' /usr/local/mysql/support-files/mysql.serverbasedir=/usr/local/mysql[root@16256ee64b9e local]# sed -n '47,1p' /usr/local/mysql/support-files/mysql.serverdatadir=/opt/data[root@16256ee64b9e local]# sed -n '46,47p' /usr/local/mysql/support-files/mysql.serverbasedir=/usr/local/mysqldatadir=/opt/data[root@16256ee64b9e local]#[root@16256ee64b9e ~]# /usr/local/mysql/support-files/mysql.server startStarting MySQL.Logging to '/opt/data/16256ee64b9e.err'.SUCCESS![root@16256ee64b9e ~]# ss -antlState Recv-Q Send-Q Local Address:Port Peer Address:Port ProcessLISTEN 0 80 *:3306 *:*[root@16256ee64b9e ~]# mysqlWelcome to the MySQL monitor. Commands end with ; or \g.Your MySQL connection id is 2Server version: 5.7.34 MySQL Community Server (GPL)Copyright (c) 2000, 2021, Oracle and/or its affiliates.Oracle is a registered trademark of Oracle Corporation and/or itsaffiliates. Other names may be trademarks of their respectiveowners.Type 'help;' or '\h' for help. Type '\c' to clear the current input statement.mysql> set password = password('123');Query OK, 0 rows affected, 1 warning (0.00 sec)mysql> exitBye[root@16256ee64b9e ~]#[root@16256ee64b9e ~]# mkdir /scripts[root@16256ee64b9e ~]# vi /scripts/start.sh[root@16256ee64b9e ~]# sed -n '1,3p' /scripts/start.sh#!/bin/bash/usr/local/mysql/support-files/mysql.server start/bin/bash[root@16256ee64b9e ~]# chmod +x /scripts/start.sh[root@localhost ~]# docker imagesREPOSITORY TAG IMAGE ID CREATED SIZEpengyudong/nginx v1 2153a12060f6 28 minutes ago 576MBcentos latest 5d0da3dc9764 2 months ago 231MB[root@localhost ~]# docker commit -c 'CMD ["/scripts/start.sh"]' -p mysql pengyudong/mysql:v1sha256:9c8b9aa2d9177e737138f7a42976210fd6e7b039cb543c306281be72c351806e[root@localhost ~]# docker imagesREPOSITORY TAG IMAGE ID CREATED SIZEpengyudong/mysql v1 9c8b9aa2d917 4 seconds ago 3.81GBpengyudong/nginx v1 2153a12060f6 30 minutes ago 576MBcentos latest 5d0da3dc9764 2 months ago 231MB[root@localhost ~]# docker run --name mysql-1 -dit --net=container:97c5a3076d39 pengyudong/mysql:v1[root@localhost ~]# docker psCONTAINER ID IMAGE COMMAND CREATED STATUS PORTS NAMESade839dc292e pengyudong/mysql:v1 “/scripts/start.sh” 12 minutes ago Up 12 minutes mysql-129007b1a67a8 pengyudong/nginx:v1 “/usr/local/nginx/sb…” 2 hours ago Up About an hour[root@localhost ~]# docker exec -it mysql-1 /bin/bash[root@29007b1a67a8 /]# ss -antlState Recv-Q Send-Q Local Address:Port Peer Address:Port ProcessLISTEN 0 128 0.0.0.0:80 0.0.0.0:*LISTEN 0 80 *:3306 :4. 构建php镜像[root@localhost ~]# cd /usr/src/[root@localhost src]# lsdebug kernels mysql-5.7.34-linux-glibc2.12-x86_64.tar.gz php-8.0.10.tar.gz[root@localhost src]# docker cp php-8.0.10.tar.gz php8:/usr/src/[root@a116c2a489fe src]# lsdebug kernels php-8.0.10.tar.gz[root@a116c2a489fe src]# yum -y install epel-release[root@a116c2a489fe src]# yum -y install sqlite-devel libzip-devel libxml2 libxml2-devel openssl openssl-devel bzip2 bzip2-devel libicu-devel libjpeg libjpeg-devel libpng libpng-devel openldap-devel pcre-devel freetype freetype-devel gmp gmp-devel readline readl [root@a116c2a489fe src]# yum -y install /centos/8-stream/PowerTools/x86_64/os/Packages/oniguruma-devel-6.8.2-2.el8.x86_64.rpm[root@a116c2a489fe src]# tar xf php-8.0.10.tar.gz[root@a116c2a489fe src]# cd php-8.0.10[root@a116c2a489fe php-8.0.10]# ./configure --prefix=/usr/local/php8 \> --with-config-file-path=/etc \> --enable-fpm \> --disable-debug \> --disable-rpath \> --enable-shared \> --enable-soap \nable-exif \--enable-ftp \--enable-gd \--with-jpeg \--with-zlib-dir \--with-freetype \--with-gettext \--enable-mbstring \--enable-pdo \--with-mysqli=mysqlnd \--with-pdo-mysql=mysqlnd \--with-readline \--enable-shmop \--enable-simplexml \--en> --with-openssl \> --enable-bcmath \> --with-iconv \> --with-bz2 \> --enable-calendar \> --with-curl \> --enable-exif \> --enable-ftp \> --enable-gd \> --with-jpeg \> --with-zlib-dir \> --with-freetype \> --with-gettext \> --enable-mbstring \> --enable-pdo \> --with-mysqli=mysqlnd \> --with-pdo-mysql=mysqlnd \> --with-readline \> --enable-shmop \> --enable-simplexml \> --enable-sockets \> --with-zip \> --enable-mysqlnd-compression-support \> --with-pear \> --enable-pcntl \> --enable-posix[root@a116c2a489fe php-8.0.10]# make -j $(grep 'processor' /proc/cpuinfo | wc -l) && make install[root@a116c2a489fe php-8.0.10]# echo 'export PATH=/usr/local/php7/bin:$PATH' > /etc/profile.d/php.sh[root@a116c2a489fe php-8.0.10]# source /etc/profile.d/php.sh[root@a116c2a489fe php-8.0.10]# cp -f /usr/src/php-8.0.10/php.ini-production /etc/php.icp: overwrite '/etc/php.i'? yes[root@a116c2a489fe php-8.0.10]# cp -f /usr/src/php-8.0.10/sapi/fpm/init.d.php-fpm /etc/init.d/php-fpm[root@a116c2a489fe php-8.0.10]# chmod +x /etc/init.d/php-fpm[root@a116c2a489fe php-8.0.10]# cp -f /usr/local/php8/etc/php-fpm.conf.default /usr/local//php8/etc/php-fpm.conf[root@a116c2a489fe php-8.0.10]# cp -f /usr/local/php8/etc/php-fpm.d/www.conf.default /usr/local/php8/etc/php-fpm.d/www.conf[root@a116c2a489fe php-8.0.10]# mkdir /scripts[root@a116c2a489fe php-8.0.10]# vi /scripts/start.sh[root@a116c2a489fe php-8.0.10]# cat /scripts/start.sh#!/bin/bash/etc/init.d/php-fpm start/bin/bash[root@a116c2a489fe php-8.0.10]# chmod +x /scripts/start.sh[root@a116c2a489fe php-8.0.10]# /etc/init.d/php-fpm startStarting php-fpm done[root@a116c2a489fe php-8.0.10]# ss -antlState Recv-Q Send-Q Local Address:Port Peer Address:Port ProcessLISTEN 0 128 127.0.0.1:9000 0.0.0.0:*[root@a116c2a489fe php-8.0.10]#[root@0e6298ebe47d php-8.0.10]#[root@0e6298ebe47d php-8.0.10]# mkdir -p /var/www/html[root@0e6298ebe47d php-8.0.10]# vi /var/www/html/index.php[root@0e6298ebe47d php-8.0.10]# cat /var/www/html/index.php<?php phpinfo(); ?>[root@0e6298ebe47d php-8.0.10]#[root@localhost src]# docker commit -c 'CMD ["/bin/bash","/scripts/start.sh"]' -p php8 pengyudong/php8:v1sha256:8ee4d3fb7bd27b0242cf096464932ff98fbc42d641d1f6b9cac7ddccb429f450[root@localhost src]# docker imagesREPOSITORY TAG IMAGE ID CREATED SIZEpengyudong/php8 v1 8ee4d3fb7bd2 22 seconds ago 1.52GBpengyudong/mysql v1 9c8b9aa2d917 30 minutes ago 3.81GBpengyudong/nginx v1 2153a12060f6 About an hour ago 576MBcentos latest 5d0da3dc9764 2 months ago 231MB[root@localhost src]#5. 配置lnmp//配置nginx[root@localhost ~]# docker psCONTAINER ID IMAGE COMMAND CREATED STATUS PORTS NAMESa116c2a489fe centos "/bin/bash" 28 minutes ago Up 28 minutes php816256ee64b9e centos "/bin/bash" 55 minutes ago Up 29 minutes mysql9c129a20e7c7 pengyudong/nginx:v1 "/usr/local/nginx/sb…" 59 minutes ago Up 57 minutes blissful_perlman[root@localhost ~]# docker exec -it 9c129a20e7c7 /bin/bash[root@9c129a20e7c7 ~]# vi /usr/local/nginx/conf/nginx.conf...location / {root html;index index.php index.html index.htm; //加⼊index.php}...location ~ \.php$ {root /var/www/html; //修改fastcgi_pass 127.0.0.1:9000;fastcgi_index index.php;fastcgi_param SCRIPT_FILENAME $Document_root$fastcgi_script_name; //修改include fastcgi_params;}...[root@localhost ~]# docker psCONTAINER ID IMAGE COMMAND CREATED STATUS PORTS NAMESa116c2a489fe centos "/bin/bash" 35 minutes ago Up 35 minutes php816256ee64b9e centos "/bin/bash" About an hour ago Up 36 minutes mysql9c129a20e7c7 pengyudong/nginx:v1 "/usr/local/nginx/sb…" About an hour ago Up 46 seconds blissful_perlman[root@localhost ~]# docker commit -c 'CMD ["/usr/local/nginx/sbin/nginx"]'-p 9c129a20e7c7 pengyudong/nginx:v2sha256:8ca4733bb94edf9dac98982610e626b663052000d2c165127e257eeebec34027[root@localhost ~]#sha256:dd9ec3401a3df247bc19cb792a076cfa915e67cb88fdbdfbf2284bbda6ac9a78[root@localhost ~]# docker imagesREPOSITORY TAG IMAGE ID CREATED SIZEpengyudong/nginx v2 dd9ec3401a3d 7 seconds ago 576MBpengyudong/php8 v1 8ee4d3fb7bd2 8 minutes ago 1.52GBpengyudong/mysql v1 9c8b9aa2d917 38 minutes ago 3.81GBpengyudong/nginx v1 2153a12060f6 About an hour ago 576MBcentos latest 5d0da3dc9764 2 months ago 231MB[root@localhost ~]#//配置php[root@localhost ~]# docker exec -it php8 /bin/bash[root@a116c2a489fe /]# mkdir -p /var/www/html[root@a116c2a489fe /]# vi /var/www/html/index.php[root@a116c2a489fe /]# cat /var/www/html/index.php<?phpphpinfo();>[root@a116c2a489fe /]#[root@localhost ~]# docker psCONTAINER ID IMAGE COMMAND CREATED STATUS PORTS NAMESa116c2a489fe centos "/bin/bash" 37 minutes ago Up 37 minutes php816256ee64b9e centos "/bin/bash" About an hour ago Up 38 minutes mysql9c129a20e7c7 pengyudong/nginx:v1 "/usr/local/nginx/sb…" About an hour ago Up 3 minutes blissful_perlman[root@localhost ~]# docker commit -c 'CMD ["/bin/bash","/scripts/start.sh"]' -p php8 pengyudong/php8:v2sha256:6e582cd9d5e8ce4b91addb12e6a53a6e3f5cf762aabe2ce24e5f6396ec3f15ed[root@localhost ~]# docker imagesREPOSITORY TAG IMAGE ID CREATED SIZEpengyudong/php8 v2 6e582cd9d5e8 8 seconds ago 1.52GBpengyudong/nginx v2 dd9ec3401a3d 2 minutes ago 576MBpengyudong/php8 v1 8ee4d3fb7bd2 10 minutes ago 1.52GBpengyudong/mysql v1 9c8b9aa2d917 40 minutes ago 3.81GBpengyudong/nginx v1 2153a12060f6 About an hour ago 576MBcentos latest 5d0da3dc9764 2 months ago 231MB[root@localhost ~]#//使⽤container模式使容器间通信[root@localhost ~]# docker psCONTAINER ID IMAGE COMMAND CREATED STATUS PORTS NAMESa116c2a489fe centos "/bin/bash" 38 minutes ago Up 38 minutes php816256ee64b9e centos "/bin/bash" About an hour ago Up 40 minutes mysql9c129a20e7c7 pengyudong/nginx:v1 "/usr/local/nginx/sb…" About an hour ago Up 4 minutes blissful_perlman[root@localhost ~]# docker rm -f a116c2a489fe 16256ee64b9e 9c129a20e7c7a116c2a489fe16256ee64b9e9c129a20e7c7[root@localhost ~]# docker psCONTAINER ID IMAGE COMMAND CREATED STATUS PORTS NAMES[root@localhost ~]#[root@localhost ~]# docker run --name nginx -dit -p 80:80 pengyudong/nginx:v2f64441e51181b9dc41806a9b1363a22ce28fd83f4cbd7f85df6eed88774a4197[root@localhost ~]# docker psCONTAINER ID IMAGE COMMAND CREATED STATUS PORTS NAMESf64441e51181 pengyudong/nginx:v2 "/usr/local/nginx/sb…" 7 seconds ago Up 7 seconds 0.0.0.0:80->80/tcp, :::80->80/tcp nginx [root@localhost ~]#[root@localhost ~]# docker run --name mysql -dit --net=container:f64441e51181 pengyudong/mysql:v196530de34b37a5fc6af1564df64f423321b04641f6aea5a3dd5be199f02a8510[root@localhost ~]# docker run --name php8 -dit --net=container:f64441e51181 pengyudong/php8:v227834149fc66f007ba1cca5d298351d39f7d819af3f1ec6fcf8e12bbdc39fb4d[root@localhost ~]#[root@localhost ~]# docker psCONTAINER ID IMAGE COMMAND CREATED STATUS PORTS NAMES 27834149fc66 pengyudong/php8:v2 "/bin/bash /scripts/…" 29 seconds ago Up 28 seconds php8 96530de34b37 pengyudong/mysql:v1 "/scripts/start.sh" About a minute ago Up About a minute mysqlf64441e51181 pengyudong/nginx:v2 "/usr/local/nginx/sb…" 2 minutes ago Up 2 minutes 0.0.0.0:80->80/tcp, :::80->80/tcp nginx [root@localhost ~]# docker exec -it nginx /bin/bash[root@f64441e51181 /]# ss -antlState Recv-Q Send-Q Local Address:Port Peer Address:Port ProcessLISTEN 0 128 127.0.0.1:9000 0.0.0.0:*LISTEN 0 128 0.0.0.0:80 0.0.0.0:*LISTEN 0 80 *:3306 *:*[root@f64441e51181 /]#到此这篇关于docker容器搭建lamp架构的⽂章就介绍到这了,更多相关docker搭建lamp内容请搜索以前的⽂章或继续浏览下⾯的相关⽂章希望⼤家以后多多⽀持!。
1:首先安装如下rpm包,以满足LNMP环境需求。
Yum -y install libjpeg-devel libpng-devel libtiff-devel fontconfig-devel freetype-devel libXpm-devel gettext-devel openssl-devel libtool-ltdl-devel gcc* openssl* libxml*( libjpeg-devel ,libpng-devel ,libtiff-devel ,fontconfig-devel ,freetype-devel,libXpm-devel 这些都是图片与字体相关的开发包,为了使 php 可以对其做更好的支持。
gettext 是语言相关的一个函数库。
openssl-devel 是一套工具,用于生成 X.509 协议中所使用的密钥,公钥等文件。
libtool 是一个通用库支持脚本,在 php 编译过程中会需要使用到。
)2安装nginx(1)先要安装pcre,系统自带的pcre版本过低,不能满足我们的需求。
pcre 是一个正则表达式相关的包,要想Nginx使用Rewrite,那么就需要正则的支持。
tar xf pcre-8.10.tar.gzcd pcre-8.10./configuremake && make install(2)编译安装NginxUseradd nginxtar xf nginx-0.7.67.tar.gz cd nginx-0.7.67./configure --user=nginx --group=nginx --prefix=/usr/local/nginx/ --with-http_stub_status_module --with-http_ssl_module --with-sha1=/usr/libmake && make install--user与--group的参数指定Nginx运行时的所有者,以提高安全性。
基于安全与优化的LNMP一系统安装为了安全,减少系统漏洞,所以最小化安装系统二搭建LNMP环境1 安装nginx需要的软件包:libtool-ltdl-devellibjpeg-devellibpng-devellibtiff-develfontconfig-develfreetype-devellibXpm-develgettext-developenldap-serversopenssl-devellibX11-devellibgcjlibXau-devellibXdmcp-develxorg-x11-proto-develmesa-libGL-devel安装pcre-8.10[root@server lnmp]#tar zxvf pcre-8.10.tar.bz2 [root@server lnmp]#cd pcre-8.10[root@server lnmp]#./configure && make && make install 安装nginx[root@server lnmp]#useradd nginx[root@server lnmp]# tar xf nginx-0.8.46.tar.gz[root@server lnmp]# cd nginx-0.8.46[root@server nginx-0.8.46]# ./configure \--user=nginx \--group=nginx \--prefix=/usr/local/nginx/ \--with-http_stub_status_module \--with-http_ssl_module[root@server nginx-0.8.46]# make && make install2 编译安装mysql[root@server lnmp]# tar xf mysql-5.1.49.tar.gz[root@server lnmp]# cd mysql-5.1.49[root@server mysql-5.1.49]# ./configure \"--prefix=/usr/local/mysql" \"--localstatedir=/var/lib/mysql/" \"--enable-assembler" \"--with-extra-charsets=all" \"--enable-thread-safe-client" \"--with-client-ldflags=-all-static" \"--with-mysqld-ldflags=-all-static" \"--without-debug" \"--with-big-tables" \"--without-debug" \"--with-ssl"[root@server mysql-5.1.49]# make && make install[root@server mysql-5.1.49]# useradd mysql[root@server mysql-5.1.49]# /usr/local/mysql/bin/mysql_install_db --user=mysql [root@server ~]# cd /usr/local/mysql[root@server mysql]# chown -R root:mysql .[root@server mysql]# chown mysql. /var/lib/mysql -R[root@server mysql]# cp share/mysql/f /etc/f[root@server mysql]# cp share/mysql/mysql.server /etc/init.d/mysqld[root@server mysql]# chmod 755 /etc/init.d/mysqld[root@server mysql]# chkconfig --add mysqld[root@server mysql]# service mysqld start[root@server mysql]# echo 'export PATH=$PATH:/usr/local/mysql/bin' >> ~/.bashrc [root@server mysql]# . ~/.bashrcmysql安装配置完成之后,可以根据实际情况,对mysql做下优化。
3. 编译安装php需要用到的包:libiconvlibmcryptlibltdlmhashspawn-fcgilibevent[root@server libiconv-1.13.1]# ./configure --prefix=/usr[root@server libiconv-1.13.1]# make && make install编译安装libmcrypt:[root@server libmcrypt-2.5.7]# ./configure --prefix=/usr[root@server libmcrypt-2.5.7]# make && make install编译安装mhash:[root@server mhash-0.9.9.9]# ./configure --prefix=/usr/local/mhash [root@server mhash-0.9.9.9]# make && make install编译安装spawn-fcgi:[root@server spawn-fcgi-1.6.3]# ./configure[root@server spawn-fcgi-1.6.3]# make && make install编译安装ibevent:[root@server libevent-1.4.14b-stable]# ./configure --prefix=/usr [root@server libevent-1.4.14b-stable]# make && make install编译安装php:[root@server php-5.2.14]# ./configure \"--prefix=/usr/local/php" \"--enable-fastcgi" \"--enable-fpm" \"--enable-discard-path" \"--enable-force-cgi-redirect" \"--with-config-file-path=/usr/local/php/etc" \"--with-mysql=/usr/local/mysql" \"--with-mysqli=/usr/local/mysql/bin/mysql_config" \"--with-iconv-dir=/usr" \"--with-freetype-dir" \"--with-jpeg-dir" \"--with-png-dir" \"--with-gd" \"--with-zlib" \"--with-libxml-dir" \"--with-curl" \"--with-curlwrappers" \"--with-openssl" \--with-mhash=/usr/local/mhash/ \"--with-xmlrpc" \"--with-mcrypt" \"--with-ldap" \"--with-ldap-sasl" \"--enable-xml" \"--disable-rpath" \"--enable-discard-path" \"--enable-safe-mode" \"--enable-bcmath" \"--enable-shmop" \"--enable-sysvsem" \"--enable-inline-optimization" \"--enable-mbregex" \"--enable-mbstring" \"--enable-gd-native-ttf" \"--enable-ftp" \"--enable-pcntl" \"--enable-sockets" \"--enable-zip" \"--disable-debug" \"--disable-ipv6"[root@server php-5.2.14]# make ZEND_EXTRA_LIBS='-liconv'[root@server php-5.2.14]# make install[root@server php-5.2.14]# cp php.ini-dist /usr/local/php/etc/php.ini其中"--enable-discard-path" 打开这个选项,用户就不能透过浏览器读取.htaccess等和系统安全相关的文件。
"--enable-force-cgi-redirect" 若使用CGI VERSION 模式来执行PHP 的设,打开本选项会增加安全性。
例如用户读http://my.host/cgi-bin/php/secret/doc.html 遇到比较了解PHP 系统的黑客级用户可能会自已输入以下网址http://my.host/secret/doc.html 来读取相关信息。