坚果家庭影院Gl-cs说明书
- 格式:docx
- 大小:13.46 KB
- 文档页数:2
投影机使用手册与问题解答(doc 8页)⏹当前文档修改密码:8362839⏹当前文档修改密码:8362839投影机的亮度指标随着投影机产品的发展,各厂家不断推出具有更高亮度的投影机产品,投影机的亮度已经达到2000ANSI流明以上,但在用户购买过程中,对投影机亮度指标的理解常有偏驳,不同品牌,相同亮度指标的机器在比较中也相差较远,那么如何理解投影机的亮度指标呢?“light out” 是投影机主要的技术指标, "light out" 通常以光通量来表示,光通量是描述单位时间内光源辐射产生视觉响应强弱的能力,单位是流明。
LCD 投影机表示光通量的单位是ANSI流明,ANSI流明是美国国家标准化协会制定的测量投影机光通量的方法,它测量屏幕“田”字形九个交叉点上的各点照度,乘以面积,再求九点的平均值,即为该投影机的ANSI流明值,液晶投影机的光输出主要决定于光源的亮度和光路系统以及液晶板的透射或反射能力。
目前高亮度投影机在不增加光源功率的前提下通过技术提高光利用率,在光路上设置P.S光转换板,把起偏以后的垂直方向震动的S光反射转向,P 光透射来提高光的效率。
DLP 投影机的亮度单位为ANSI流明。
DLP投影机(数字光处理技术美国德州仪器公司技术)以数字微反射镜器件(DMD)作为光阀成像器件通过信号放大,输出大屏幕图像。
大多数DLP投影机都采用1块DMD光阀片,用滤色片旋转出色彩。
液晶投影机和DLP投影机是目前中国市场上主要机种,其亮度指标由于测试环境的差异,各品牌的机器ANSI流明指标有所差异。
但是厂家提供的ANSI流明数值基本反映了投影机的亮度水平。
CRT(三枪)投影机的光输出用峰值流明来表示,即在一个白窗口的测试图像上,以扫描线尚清晰可见的情况下,测量白窗口的最大照度(LUX)乘以白窗面积(m²)来确定投影机光通量,峰值流明具有很好的实际意义,由于您看到的任何一帧视频图像不可能全部都是白场,白色所占的比例一般占图像面积的20%左右。
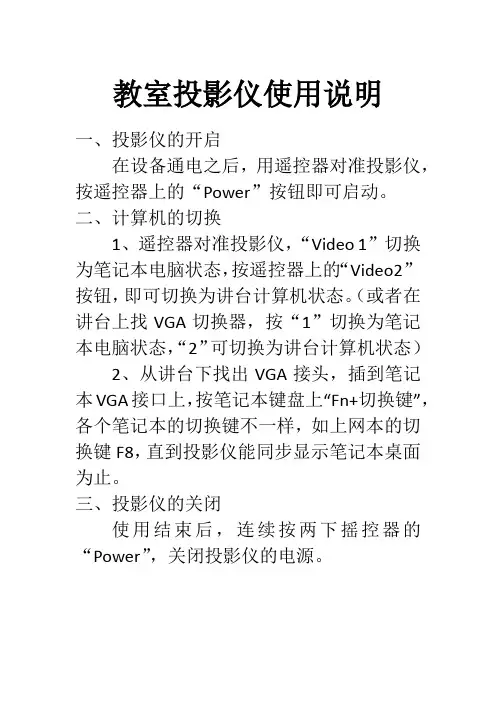
教室投影仪使用说明
一、投影仪的开启
在设备通电之后,用遥控器对准投影仪,按遥控器上的“Power”按钮即可启动。
二、计算机的切换
1、遥控器对准投影仪,“Video 1”切换为笔记本电脑状态,按遥控器上的“Video2”按钮,即可切换为讲台计算机状态。
(或者在讲台上找VGA切换器,按“1”切换为笔记本电脑状态,“2”可切换为讲台计算机状态)
2、从讲台下找出VGA接头,插到笔记本VGA接口上,按笔记本键盘上“Fn+切换键”,各个笔记本的切换键不一样,如上网本的切换键F8,直到投影仪能同步显示笔记本桌面为止。
三、投影仪的关闭
使用结束后,连续按两下摇控器的“Power”,关闭投影仪的电源。
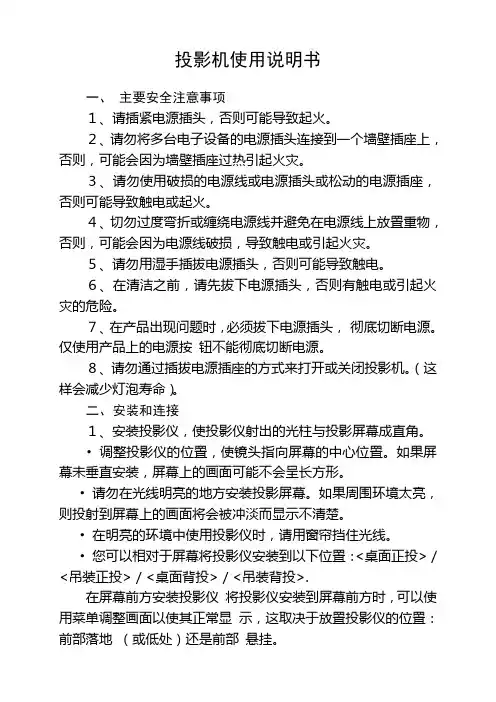
投影机使用说明书一、主要安全注意事项1、请插紧电源插头,否则可能导致起火。
2、请勿将多台电子设备的电源插头连接到一个墙壁插座上,否则,可能会因为墙壁插座过热引起火灾。
3、请勿使用破损的电源线或电源插头或松动的电源插座,否则可能导致触电或起火。
4、切勿过度弯折或缠绕电源线并避免在电源线上放臵重物,否则,可能会因为电源线破损,导致触电或引起火灾。
5、请勿用湿手插拔电源插头,否则可能导致触电。
6、在清洁之前,请先拔下电源插头,否则有触电或引起火灾的危险。
7、在产品出现问题时,必须拔下电源插头,彻底切断电源。
仅使用产品上的电源按钮不能彻底切断电源。
8、请勿通过插拔电源插座的方式来打开或关闭投影机。
(这样会减少灯泡寿命)。
二、安装和连接1、安装投影仪,使投影仪射出的光柱与投影屏幕成直角。
•调整投影仪的位臵,使镜头指向屏幕的中心位臵。
如果屏幕未垂直安装,屏幕上的画面可能不会呈长方形。
•请勿在光线明亮的地方安装投影屏幕。
如果周围环境太亮,则投射到屏幕上的画面将会被冲淡而显示不清楚。
•在明亮的环境中使用投影仪时,请用窗帘挡住光线。
•您可以相对于屏幕将投影仪安装到以下位臵:<桌面正投> / <吊装正投> / <桌面背投> / <吊装背投>.在屏幕前方安装投影仪将投影仪安装到屏幕前方时,可以使用菜单调整画面以使其正常显示,这取决于放臵投影仪的位臵:(1).对于前部落地,请按:菜单 > 设臵 > 安装 > 桌面正投(2).对于前部悬挂,请按:菜单 > 设臵 > 安装 > 吊装正投2、缩放和调焦(在投影机侧面)(1).缩放旋钮,可以转动缩放旋钮,以便在缩放范围内调整图像大小。
(2). 聚焦环,转动聚焦环调整屏幕画面的焦距。
四、更换和清洁过滤器更换投影仪过滤器的注意事项:•过滤器位于投影仪底面。
•关闭投影仪电源,在投影仪充分散热冷却后拔下电源线。


家庭影院系统操作说明书一、简介家庭影院系统是一种集成了音频和视频设备的高级娱乐系统,通过该系统,用户可以享受到电影院级别的音视频效果,提升家庭观影体验。
本操作说明书将详细介绍家庭影院系统的使用方法,帮助用户快速熟悉和操作系统中的各项功能。
二、准备工作1. 检查包装:打开包装箱,核对所购买的家庭影院系统是否完好无损。
2. 接线准备:将家庭影院系统与电视机、音箱、蓝光播放器等设备进行正确的接线连接。
确保连接稳固,信号传输良好。
3. 电源连接:将各个设备的电源线插入电源插座,并确认电源开关处于开启状态。
三、系统设置1. 语言选择:开启系统后,根据屏幕上的提示,选择系统语言并确认。
2. 屏幕调整:进入系统设置菜单,根据个人需求,调整屏幕显示的亮度、对比度和色彩等参数,以获得最佳的观影效果。
3. 声音设置:通过系统设置菜单,调整音频输出的音量和音效模式,以满足个人喜好和家庭环境要求。
四、播放影片1. 蓝光碟片播放:将蓝光碟片小心放入蓝光播放器中,使用遥控器或系统的触摸屏选择播放选项,并按下播放按钮。
系统会自动读取碟片并开始播放。
2. USB影片播放:将USB设备插入家庭影院系统的USB接口,通过系统菜单选择USB选项,浏览并选择要播放的影片文件,按下播放按钮即可开始播放。
3. 网络流媒体播放:通过家庭影院系统上的媒体资源应用,连接到互联网,访问在线影片库或流媒体平台,选择要播放的影片并开始观看。
五、其他功能操作1. 音频调整:在观影过程中,可以通过遥控器上的音量加/减按键调整音量大小。
同时,系统还提供了不同音效模式的选择,如立体声、杜比环绕等,用户可以根据实际情况进行设置。
2. 画面调整:在观影过程中,可以通过遥控器上的亮度、对比度和色彩调整按键来调整屏幕显示效果,以获得最佳的画面效果。
3. 播放控制:通过遥控器上的播放、暂停、快进、快退等按键,用户可以自由控制影片的播放进度,并随时进行暂停或继续操作。
4. 媒体库管理:通过媒体资源应用,可以管理和整理家庭影院系统中存储的音频和视频文件,方便快速查找和播放。
家庭影院使用说明书欢迎您购买家庭影院,为了更好地使您享受视听盛宴,我们提供以下使用说明。
请仔细阅读本说明书,并按照指示正确操作。
祝您使用愉快!第一部分:家庭影院的基本介绍家庭影院是一套高品质视听设备,它将电影院的观影体验带到您的家中。
通过家庭影院,您可以在舒适的环境中观看高清电影、追剧,甚至享受音乐会的现场感。
第二部分:家庭影院的组成部分及其功能1. 音频系统家庭影院的主要功能之一是提供出色的音效。
音频系统由以下部分组成:- AV接收器:接收并解码音频信号,可连接各种音频设备。
- 声道扬声器:包括前置、中置、环绕和低音扬声器,提供环绕立体声音效。
- 混音器:用于调整音频输入信号的音量、声音效果等参数。
2. 视频系统家庭影院的视频系统用于提供高清的影像效果。
视频系统主要由以下组件组成:- 投影仪或者电视:显示电影、电视剧和其他视频内容。
- 屏幕:影像投影在屏幕上,提供清晰的影像效果。
3. 控制系统家庭影院的控制系统让您可以方便地控制影院的各种功能。
例如:- 遥控器:通过遥控器,您可以调整音量、切换影像源、选择播放媒体等。
- 控制面板:位于家庭影院的主控制区域,提供更多高级设置选项。
第三部分:家庭影院的设置与操作1. 安装在安装家庭影院之前,请确保您具备以下条件:- 适当的房间大小:家庭影院需要相对较大的空间以容纳音箱和屏幕。
- 电源插座:为各个设备提供稳定的电源。
- 适当的摆放位置:根据您的需求和房间布局,安装各个设备的合适位置。
2. 连接连接家庭影院的各个部分时,请确保按照以下步骤进行:- 将AV接收器与电源插座连接,并通过HDMI线或其他适当的音视频线缆连接到投影仪或电视上。
- 将各个扬声器正确地连接到AV接收器上,确保正确的声道配置。
3. 开机与关闭- 开机:首先将各个设备的电源打开,然后使用遥控器或控制面板打开AV接收器。
随后,在电视或投影仪上选择正确的输入源。
- 关闭:按照相反的步骤关闭设备。
包装箱内有哪些物件?确认包装箱内下列各项物件是否齐全。
如有任何遗漏,请向您的经销商洽询。
请保存原始包装箱及捆包用物品,以便需运送投影机时之用。
篇二:投影仪使用说明投影仪使用说明1.投以仪大家都认识,下面就是我们公司经常用的投影仪2. 将投影仪连接电源3. 将投影仪与电脑连接,通过vga连接线(也就是两头都是梯形口15针的线)连接到投影仪的vga接口上。
4. 打开投影仪,按电源开机,电源指示灯变为绿色时,投影仪启动5. 进入启动完成界面后,按回车按钮(投影仪上的enter键),进入使用页面。
调试投影仪7. 图像清晰度调节,图像大小调节。
屏幕的大小和投影仪距投以幕布之间的距离理论上是越大图像越大,但是需要根据现场的实际使用情况调试。
8. 通过投影仪上的梯形调试按钮可以调节图像的形状。
以上是对投影仪的简单使用介绍,下面为投影仪控制面板上按钮的实际作用。
笔记本切换不到投影仪上故障解决办法(一)2010-06-04 20:20 1.将vga线(接头为15针的线缆)与笔记本电脑连接。
2.按笔记本电脑的功能键“fn” +“f2”/“f3”/“f4”/“f7”等,不同笔记本,切换键有所不同,但功能键(f1~f8)上会有一个键印有两个屏幕的图标,若按了没有效果,则可能是笔记本的快捷键没有驱动,此时则参考附件解决方法。
3.切换不了有可能是因为笔记本本身的分辨率太高,建议调整为1024*768 。
4.电脑本身的屏幕刷新率可能太高了,建议调成70hz以下。
附件:(1)安装笔记本快捷键驱动,可查看安装盘或到官方网站下载相应驱动。
(2)根据显卡的不同型号,设置方法有所不同ati显卡设定方法:桌面点右键,出现ati 显卡管理程序,选择显示器管理器, 选择主显示器(图标),托到右边的显示器2上, 右键选复制方式, 显示器与投影机屏幕同步。
笔记本接到投影仪上时,桌面上的图标在投影仪上不显示,投影仪只显示笔记本桌面背景,可能在显示属性里面选择了扩展桌面的选项,如果是这样,投影仪上显示的是扩展的桌面,也就是说你的鼠标可以从你的笔记本屏幕移动到投影仪上,所以桌面图标不显示,因为只有一个桌面。
Home CinemaSPECIFICATION SHEETHome Cinema 600SVGA 3LCD ProjectorThe home theater projector for big-screen entertainment made easy.Up to 3x Brighter Colors 1, and reliable performance — 3LCD, 3-chip technology One measurement of brightness is not enough — look for both high color brightness and high white brightness. The Home Cinema 600 has: Color Brightness: 3000 lumens 2 White Brightness: 3000 lumens 2HD quality with just one cable — easy, all-digital, HDMI TMconnectivity, compatiblewith the latest laptops, Blu-ray Disc ®players, game consoles and moreGreat sound anywhere with built-in speaker — no external speakers needed Easy-Slide horizontal image correction — place the projector virtually anywhere Game Mode — one of four special color modes to choose from; ideal forSpecifications and terms are subject to change without notice. EPSON and Instant Off are registered trademarks, EPSON Exceed Your Vision is a registered logomark and Better Products for a Better Future is a trademark of Seiko Epson Corporation. PrivateLine is a registered trademark, Duet is a trademark and Epson Connection and Extra Care are service marks of Epson America, Inc. Mac is a trademark of Apple Inc., registered in the U.S. and other countries. SmartWay is a service mark of the U.S. Environmental Protection Agency. All other product and brand names are trademarks and/or registered trademarks of their respective companies. Epson disclaims any and all rights in these marks. Copyright 2014 Epson America, Inc. Com-SS.Oct-13 CPD-41471 7/14Epson America, Inc.3840 Kilroy Airport Way, Long Beach, CA 90806Epson Canada Limited185 Renfrew Drive, Markham, Ontario L3R 6G3 www.epson.ca1 Compared to leading 1-chip DLP Home Entertainment Projectors. Epson 720p projectors are 3x Brighter; Epson 1080p projectors are consistently 2x and up to 3x Brighter. Based on NPDdata, July 2011 through June 2012. Color brightness (color light output) measured in accordance with IDMS 15.4. Color brightness will vary depending on usage conditions. | 2 Color brightness (color light output) and white brightness (white light output) will vary depending on usage conditions. Color light output measured in accordance with IDMS 15.4; white light output measured in accordance with ISO 21118. | 3 Lamp life will vary depending upon mode selected, environmental conditions and usage. Lamp brightness decreases over time. | 4 For convenient and reasonable recycling options, visit /recycle | 5 SmartWay is an innovative partnership of the U.S. Environmental Protection Agency that reduces greenhouse gases and other air pollutants and improves fuel efficiency.Contrast Ratio Up to 10,000:1Color Reproduction Up to 1.07 billion colorsProjection LensType Digital zoom/Manual focus F-number 1.44Focal Length 16.7 mmZoom Ratio Digital zoom 1.0 – 1.35OtherDisplay Performance NTSC: 480 lines PAL: 560 lines (Depends on observation of the multi-burst pattern) Input Signal NTSC/NTSC4.43/PAL/M-PAL/N-PAL/ PAL60/SECAMSpeaker 2 W (mono)Operating Temperature 41 ˚ to 95 ˚F (5 ˚ to 35 ˚C) Power Supply Voltage 100 – 240 V ±10%, 50/60 Hz Power Consumption 283 W (Normal Mode) 207 W (ECO Mode)Fan Noise 37 dB (Normal Mode) 29 dB (ECO Mode)Security Kensington ®-style lock provision password protect functionCountry of Origin China/PhilippinesSource search selection, power, volume, e-zoom, A/V Mute, freeze, menu, page up and down, help, auto, mouse functionsOperating Angle Right/left: ± 30 degrees Upper/ lower: ± 15 degreesOperating Distance 19 ft (6 m)SupportThe Epson Connection SMPre-sales supportU.S. and Canada 800-463-7766 Internet website Service Programs Two-year projector limited warranty, Epson Extra Care SM Home Service program, PrivateLine ® dedicated toll-free support and 90-day limited lamp warrantyWhat’s in the BoxHome Cinema 600 projector, power cable, projector remote control, batteries, user manual CD, Quick Setup SheetAccessory Part Numbers Product NameProduct CodeHome Cinema 600V11H617320Accessories Product CodeGenuine Epson lamp V13H010L67 Replacement air filter V13H134A32 Universal projector ceiling mount ELPMBPJF Belkin Pro Series VGA / SVGA cable – 6 ft F3H982-06 Belkin Pro Series VGA / SVGA cable – 10 ft F3H982-10Belkin Pro Series VGA / SVGA cable – 25 ftF3H982-25 Component to VGA video cable ELPKC19 HDMI cable – 6 ft AV22300-06 HDMI cable – 12 ft AV22300-12 Duet™ ultra-portable projector screen ELPSC80 ES1000 ultra-portable tabletop screen (16:10) V12H002S4Y ES3000 ultra-portable projector screen (16:10) V12H002S3Y Portable projection screen 50" ELPSC06 Kensington security lock ELPSL01 Wireless LAN Module (ELPAP07) V12H418P12 Quick Wireless Connection USB Key V12H005M09。
Multimedia ProjectorQuick Reference GuideMODEL103-011100-01Use this book as a reference guid e when setting up the projector.For detailed information about installation, setup, and operation of the projector, refer to the owner’s manual on the CD-ROM.READ THE SAFETY INSTRUCTIONS IN THE OWNER’S MANUAL (CD-ROM) BEFORE USING THE PROJECTOR.E n g l i s hD e u t s c hF r a n ça i s I t a l i a n o E s p a ñol✽Projection lens is optional.E n g l i s hThis projector uses nominal input voltages of 100-120 V or 200-240V AC. This projector automatically selects correct input voltage. It is designed to work with single-phase power systems having a grounded neutral conductor. To reduce risk of electrical shock, do not plug into any other type of power system.Consult your authorized dealer or service station if you are not sure of type of power supply being in use.Connect a projector with a peripheral equipment before turning a projector on.CONNECTING AC POWER CORDAC outlet must be near this equipment and must be easily accessible.LENS SHIFT ADJUSTMENTProjection lens can be moved up and down with motor-driven lens shift function. This function makes it easy to provide projected image where you want.NOTEScreen size and lens shift ratio on the above charts are standard values and they may change by positioning conditions.POSITIONING PROJECTORThis projector is designed to project on a flat projection surface.Before setting up a projector, install Projection Lens on Projector.1.Before installation, check where a projector is used and prepare a suitable lens. For specifications of a Projection Lens, contact sales dealer where you purchased a projector.2.For installation, refer to installation manual in the optional lens.LENS INSTALLATIONWhen installing the lens, remove the cover cap in the projector.NOTE;E n g l i s hADJUSTABLE FEETPicture tilt and projection angle can be adjusted by rotating ADJ USTABLE FEET. Projection angle can be adjusted to 10.5 degrees.Lift front of a projector and pull FEET LOCK LATCHES on both sides of a projector.1Release FEET LOCK LATCHES to lock ADJ USTABLE FEET and rotate ADJ USTABLE FEET to fine tune position and tilt.2To shorten ADJ USTABLE FEET, lift front of a projector and pull and undo FEET LOCK LATCHES.Position and keystone distortion of image can be adjusted using Menu Operation.3INSTALLING PROJECTOR IN PROPER POSITIONInstall the projector properly. Improper installation may reduce the lamp lifetime and cause a fire hazard.Do not tilt the projector more than 10 degrees above and below.Do not point the projector up to project an image.Do not point the projector down to project an image.Do not put the projector on either side to project an image.LATCHESMOVING PROJECTORWhen moving a projector, replace lens cap and retractfeet to prevent damage to lens and cabinet.When this projector is not in use for an extended period,put it into case (not supplied with this projector).E n g l i s hThis projector has input and output terminals on its back for connecting computers and video equipment. Refer to figures on pages 12 to 14 and connect properly.E n g l i s hEn g l i s h●Avoid contact with water or liquid.●Do not expose Remote Control Unit to moisture, or heat.●Do not drop Remote Control Unit.●If a battery has leaked on Remote Control Unit, carefully wipe case clean and install new batteries.●Danger of explosion if battery is incorrectly replaced.●Dispose of used batteries according to batteries manufacturers instructions and local rules.REMOTE CONTROL BATTERIES INSTALLATIONThis projector has CONTROL BUTTONS (TOP CONTROLS) and INDICATORS on its top.En g l i s h HOW TO OPERATE ON-SCREEN MENUFLOW OF ON-SCREEN MENU OPERATIONDisplay ON-SCREEN MENU Press MENU button to display ON-SCREEN MENU (MENU BAR). A red frame is POINTER.Move POINTER (red frame) to MENU ICON that you want to select by pressing POINT RIGHT / LEFT buttons.Adjust ITEM DATA by pressing POINT RIGHT/LEFT buttons.Refer to following pages for details of respective adjustments.Press POINT UP/DOWN buttons and move POINTER (redframe or red arrow)to ITEM that you want to adjust, and then press SELECT button to show ITEM DATA.Select Menu to be adjusted Control or adjust item through ON-SCREEN MENU 1243POINTER (red frame)Press POINT UP/DOWN buttons to move POINTER.POINTER (red frame)ITEMITEM DATAPress POINT LEFT/RIGHTbuttons to adjust value orset function.ContrastAutoTURNING ON THE PROJECTOR Connect the projector's AC power cord into an AC outlet.The LAMP Indicator lights RED, and READY Indicator lights GREEN.Press the POWER ON-OFF button on the top control or onthe remote control to ON. The LAMP Indicator dims, and the cooling fans start to operate. The preparation display appears on the screen and the count down starts. 231The preparation display disappears after 20 ~30 seconds.4After the count-down, the input source that was selected lastand the Lamp control status icon appear on the screen.If the projector is locked with a PIN code, PIN code Input Dialog Box will appear. Enter the PIN code as instructed below.Complete peripheral connections (with a computer, VCR,etc.) before turning on the projector.What is PIN code?PIN code is a security code using Personal Identification Number that allows the person who knows it to operate the projector. Setting PIN code prevents others except the specific users from operating the projector.A PIN code consists of a four-digit number. Refer to PIN Code Lock function in Setting menu in the user’s manual for locking operation of the projector with your PIN code.Pointer PIN code Input Dialog Box Enter a PIN codeSelect a number by pressing the POINT LEFT/RIGHT button and fix the number with the SELECT button. The number will change to "✳". If you fixed a wrong number, move the pointer to "Set" or "Clear" once by pressing the POINT DOWN button, then return to "PIN code". Enter the correct number again.Repeat this step to complete entering a four-digit number.When the four-digit number is fixed, the pointer will automatically move to "Set". Press the SELECT button so that you can start to operate the projector.If you entered a wrong PIN code, "PIN code" and the number (✳✳✳✳) will turn red and disappear. Enter a correct PIN code all over again.After the OK ico n disappears, yo u can operate the projector.En g l i s h Press the POWER ON-OFF button on the top control or onthe remote control, and a message "Power off?" appears on the screen.Press the POWER ON-OFF button again to turn off theprojector. The LAMP Indicator lights bright and READY Indicator turns off. After projector is turned off, Cooling Fans operate (for 90 seconds). During this "Cooling Down" period,this appliance cannot be turned on. 12TO MAINTAIN THE LIFE OF LAMP, ONCE YOU TURN PROJ ECTOR ON, WAIT AT LEAST 5 MINUTES BEFORE TURNING IT OFF.DO NOT DISCONNECT AC POWER CORD WHILE COOLING FANS ARE RUNNING OR BEFORE READY INDICATOR LIGHTS GREEN AGAIN. OTHERWISE IT WILL RESULT IN SHORTENING LAMP LIFE.3When the projector has cooled down, READY Indicator lightsGREEN again and you can turn projector on. After cooling down completely, disconnect AC Power Cord.The message disappears after 4 seconds.• The projector cannot be turned on during the cooling period with the READY indicator turned off. You can turn it on again after the READY indicator GREEN again.• When the On start function is on, this projector is turned on automatically by connecting the AC power cord to an AC outlet.• Do not operate the projector continuously without rest. Continuous use may result in shortening the lamp life. Turn off the projector and give it a rest about an hour in every 24 hours.• This projector monitors internal temperature and automatically controls the running speed of the cooling fans.• If the WARNING TEMP indicator flashes red, see “WARNING TEMP INDICATOR ” in the user’s manual.TURNING OFF THE PROJECTORNOTE;。
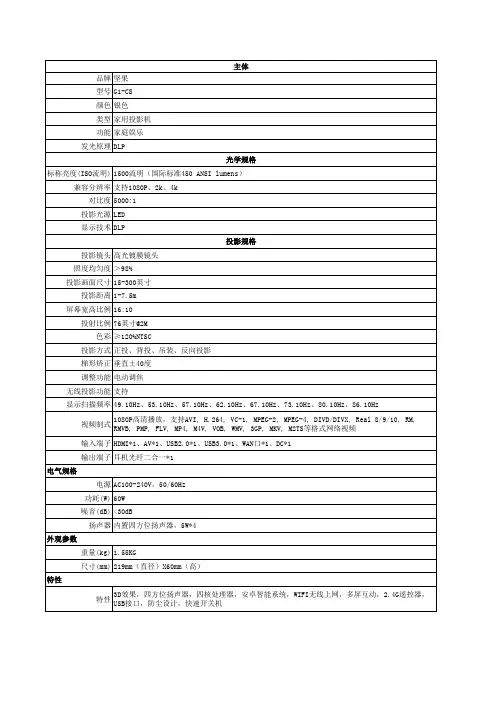
坚果家庭影院Gl-cs说明书
拆开坚果投影仪遥控器,置入电池,将坚果投影仪接通电源。
直接按下遥控器开关机键或机身开关机键,进行开机,进入首页后即可使用。
1、坚果智能投影仪怎么操作。
如何进行画面对焦,长按坚果遥控器的设置键、坚果键,让投影仪进行自动对焦。
自动对焦完成后,如未完全清晰,可通过遥控器的调焦键微调画面清晰度。
坚果投影仪支持自动对焦的话,可打开系统设置、选择投影设置、开启自动对焦功能。
如何进行梯形校正,按下坚果遥控器的设置键或在主页点击设置打开系统设置界面。
通过遥控器方向键找到投影设置,并点击进入相应界面。
点击手动梯形校正,打开梯形校正的参考图。
④通过遥控器的方向键调整投影仪的画面,直到画面方正即可。
2、如何调节画面亮度,点击主页我的版块中的设置或按下遥控器设置键打开系统设置。
选择投影设置,点击打开投影设置中的光源亮度。
选择相应的亮度模式,使用用户模式时可手动调节三色光源亮度。
如何翻转投影画面,点击遥控器的坚果键/设置键打开系统设置界面。
选择系统设置中的头晕设置,并点击进入。
③找到投影方式并点击打开,选择相应的安装方式来翻转画面。
3、如何更改信号源,在主页我的板块中找到设置并点击打开系统设置。
选择信号源设置,点击进入想要界面。
根据接入的设备选择
相应信号源,以及更改默认信号源。
4、坚果投影仪怎么用手机投屏。
打开坚果投影仪的网络设置,将坚果投影仪与手机连接同一网络。
进入坚果投屏软件,根据需要选择影音,游戏或办公投屏。
手机打开屏幕镜像,安卓手机打开对应的无线投屏进行连接即可。
将坚果投影仪和手机连接到同一网络,同一WiFi或者手机热点。
在坚果投影仪上打开坚果投屏软件,记录下设备编号。
打开手机端的屏幕镜像或多屏互动功能,搜索周边设备。
找到投影设备后,点击进行配对连接,等待连接完成后即可投屏。
5、坚果投影仪手机投屏失败问题及解决方法。
检查坚果投影仪和手机是否连接在同一网络中。
检查坚果投影仪自带的坚果投屏软件是否为最新的版本,如不是,将其更新为最新版本,或者在当贝市场搜索下载乐播投屏。
如在同一网络,仍然无法连接,可以尝试重启路由器,然后再进行搜索配对。
如果是投屏软件问题,可以按下菜单键打开设置界面,然后选择一键修复来解决无法配对连接的问题5.如果通过手机热点可以进行配对连接,那么就是路由器的问题,可以登陆路由器后台,将APP隔离关闭,勿连接访客模式。