斑马GKT条码机设置指南
- 格式:docx
- 大小:63.46 KB
- 文档页数:3

斑马条码打印机的三种测纸设置第一篇:斑马条码打印机的三种测纸设置斑马ZEBRA条码打印机提供3种测纸方式:不测纸、开机测纸、关上打印机头测纸,供客户根据实际情况选择采用。
通常在固定打印一种规格条码标签的客户,选择方式。
这种方式可以减少标签因为测纸而造成浪费。
而当客户在同一台标签打印机打印多种规格的条码标签纸时,测纸就是必要的,否则标签将无法正常打印!下面就介绍如何设置ZEBRA条码打印机的测纸方式:一、不测纸方式:按打印机的Menu键进入设置菜单,按翻页到菜单项Medea power up ,选择No Motion选项;翻页到Head Close,选择选项二、开机测纸方式:按条码打印机的Menu键进入设置菜单,按PW翻页到菜单项Medea power up ,选择 Calibration选项;翻页到Head Close,选择No Motion选项三、关上打印机头测纸方式:按条形码打印机Menu键进入设置菜单,按PW翻页到菜单项Medea power up ,选择 Calibration选项;翻页到Head close,选择No Motion选项斑马打印机菜单英文-中文:操作者可根据自己要求选择打印方式,选SETUP进入设置: Print Method---HERMAL TRANS(热转印方式)Tear off----------标签撕离位置Print mode-----PEEL OFF(撕离方式)Darkness--------温度值Media type-----NON-CONTINOUS(不连续纸)Print Width-----打印宽度Label Top--------标签打印位置顶部调节 Left Position---标签左边打印位置调节Media and Ribbon Calibrate------测纸和碳带其他:FEED(走纸),CALIBRATION(测纸),LENGTH(纸长),NO MOTION(不动),BACKFEED(标签回撤),HEAD CLOSE(打印头翻开合上后标签状态的选择)PAUSE 键--暂停与开始打印;FEED 键--走一张纸;CANCEL键--取消;当打印数据传输到打印机时,但不需打印可先按下PAUSE,然后多次按CANCEL直到数据灯关闭为止。
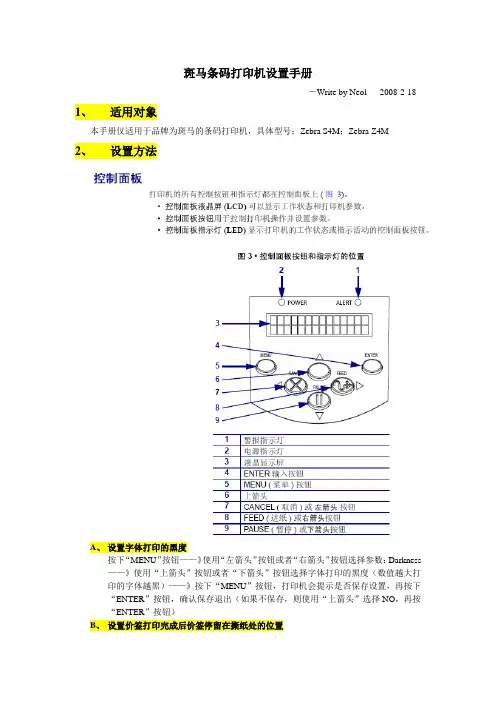
斑马条码打印机设置手册
-Write by Neol 2008-2-18 1、适用对象
本手册仅适用于品牌为斑马的条码打印机,具体型号:Zebra S4M;Zebra Z4M
2、设置方法
A、设置字体打印的黑度
按下“MENU”按钮——》使用“左箭头”按钮或者“右箭头”按钮选择参数:Darkness ——》使用“上箭头”按钮或者“下箭头”按钮选择字体打印的黑度(数值越大打印的字体越黑)——》按下“MENU”按钮,打印机会提示是否保存设置,再按下“ENTER”按钮,确认保存退出(如果不保存,则使用“上箭头”选择NO,再按“ENTER”按钮)
B、设置价签打印完成后价签停留在撕纸处的位置
按下“MENU”按钮——》使用“左箭头”按钮或者“右箭头”按钮选择参数:Tear off——》使用“上箭头”按钮或者“下箭头”按钮选择价签停留的位置(注意:调节此参数数值的同时,价签会同步的前伸或者后退,当发现价签停留的位置合适时,就不要再调节参数值了)——》按下“MENU”按钮,再按下“ENTER”按钮,确认保存退出
C、设置价签定位方式:黑标定位
按下“MENU”按钮——》使用“左箭头”按钮或者“右箭头”按钮选择参数:Media Type——》使用“上箭头”按钮或者“下箭头”按钮选择参数:MARK——》按下“MENU”按钮,再按下“ENTER”按钮,确认保存退出
D、设置打印宽度
按下“MENU”按钮——》使用“左箭头”按钮或者“右箭头”按钮选择参数:PRINTE WIDTH——》使用“上箭头”按钮或者“下箭头”按钮调节参数数值为:832——》按下“MENU”按钮,再按下“ENTER”按钮,确认保存退出。
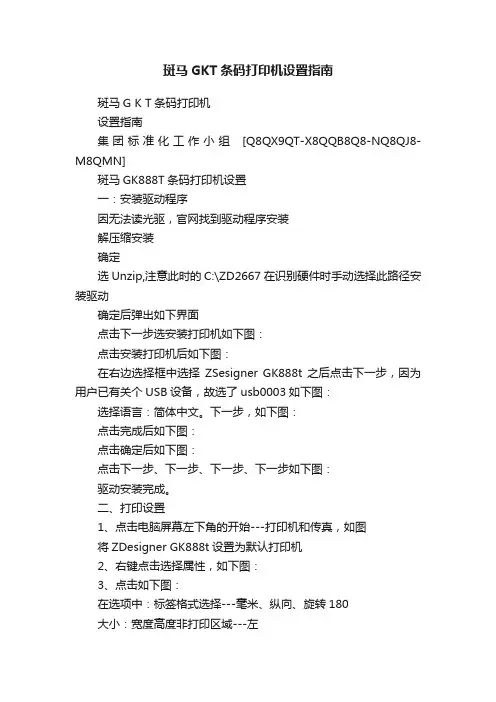
斑马GKT条码打印机设置指南斑马G K T条码打印机设置指南集团标准化工作小组[Q8QX9QT-X8QQB8Q8-NQ8QJ8-M8QMN]斑马GK888T条码打印机设置一:安装驱动程序因无法读光驱,官网找到驱动程序安装解压缩安装确定选Unzip,注意此时的C:\ZD2667在识别硬件时手动选择此路径安装驱动确定后弹出如下界面点击下一步选安装打印机如下图:点击安装打印机后如下图:在右边选择框中选择ZSesigner GK888t 之后点击下一步,因为用户已有关个USB设备,故选了usb0003如下图:选择语言:简体中文。
下一步,如下图:点击完成后如下图:点击确定后如下图:点击下一步、下一步、下一步、下一步如下图:驱动安装完成。
二、打印设置1、点击电脑屏幕左下角的开始---打印机和传真,如图将ZDesigner GK888t设置为默认打印机2、右键点击选择属性,如下图:3、点击如下图:在选项中:标签格式选择---毫米、纵向、旋转180大小:宽度高度非打印区域---左完成以上设置后点击4、在高级设置中选择撕纸、热敏、Web检测完成以上设置后点击5、完成以上设置后点击,此时打印机会自动对打印纸进行校正。
6、关闭打印机电源,开启打印机电源(重启打印机)7、斑马打印机GK 888t设置完成。
三、大客户发件平台设置1、从顺丰官网下载顺丰大客户发件管理系统,安装并打开2.选择“设置打印方式”选择“Zabar专用”之后可以正常使用。
如果在使用过程中遇到其它问题欢迎与我们联系!天津区IT服务部。

Zebra Zebra Gk888t Gk888t Gk888t 标签打印机的安装与使用说明标签打印机的安装与使用说明一、打印机的安装打印机的安装1、连接打印机连接打印机打印机能够正常运转需要一根电源线、一根打印机线、一台打印机和电源。
连接时确保电源开关处于关闭位置(向下)。
(注:电源开关在打印机背面)A、连接电源线:一端接打印机的电源插孔,另一端接交流电源插座。
B、连接打印机线:一端接打印机,另一端接电脑主机箱的打印机接口。
注:仔细比较插口,不要错插。
安装打印机驱动程序22、安装打印机驱动程序1.打印机正常连接后,在连接打印机的计算机上安装斑马打印机的驱动,因在操作系统Windows 98、2000、XP下安装过程略有不同,安装时请根据使用的电脑的操作系统来安装相应的驱动。
2.Windows XP 驱动安装说明放入Zebra Gk888t打印机驱动光盘,双击运行光盘中的setup.exe 文件,选择“Windows驱动程序”进行驱动安装。
1.进入安装向导后点“next”进入下一步。
2.现在“Manufacturer(生产厂商)”选择框里选中“ZEBRA EPL”,然后在“Printer(打印机型号)”选择框里选中“Zebra Gk888t”,然后点击“next”进入下一步。
3.在“Available Ports”中找到并选中“LPT1”,选中后将在其左边的小框中显示一个小钩,然后点击“next” 进入下一步。
4.使用默认的名称“Zebra Gk888t”,直接点“next”进入下一步。
5.开始安装驱动,这时将弹出该对话框,点击“仍然继续”按钮。
6.之后的选项均采用默认值,点击“next”一步步下去,直到点击“Finish”完成驱动的安装。
安装完成后,点击“开始” →“打印机和传真”,进入后就可以看见“Zebra Gk888t”打印机的图标了。
右击图标,选择“设为默认打印机”。
打印机图标上出现一个“√”即为设置成功。
斑马条码打印机安装以及配置使用说明安装部分一、准备工作1、操作系统建议windows XP,32位或64位win7。
要用硬装的系统,别用G版的。
2、驱动安装建议使用随机自带的驱动光盘,没有光驱的话可以使用这个光盘的镜像文件:“888tt.iso”。
解压后也可以正常安装。
3、安装时建议关闭其他正在使用的软件。
4、安装的时候关闭斑马打印机电源,或者干脆不连接斑马打印机到电脑。
二、安装过程1、以解压后的安装包为例。
解压后运行目录下的RunCD.exe这个文件。
2、一开始的弹出界面,有个选项,选择:888-TT。
3、之后,弹出界面如下。
5、选择“安装其他软件”。
然后选择“安装Zerbra Setup Utilities”之后按“下一步”,到这个界面勾选下。
安装完成后,保持勾选,点“Finish”。
6、之后弹出的界面,选择“USB”。
7、点击“Finish”完成安装8、之后,点“Close”,关闭这个界面。
9、斑马条码打印机连接电脑,打开电源。
电脑会自动识别到打印机并自动安装好驱动。
10、再次打开这个界面,点击安装“ZebraDesigner”,后面的安装方法跟常规软件一样,直接下一步,直到安装完成。
设置部分准备阶段运行桌面上“ZebraDesigner 2”这个程序,在“欢迎向导”界面点“取消”,不打开程序自带的示范标签。
打开后界面如下:点击“文件”,在下拉菜单里面选择“打开”,选择发过来的“广州条码模板.lbl”。
打开后界面如下:一、快速打印设置鼠标移动到条码上,双击左键,出现如下界面。
起始值就是要打的条码的第一个数字,默认的是每打一个条码,其数值就是上个打印的值+1。
其他的累加法,可以按“下一步”,直接看设置界面的介绍调整设置值。
鼠标移动到条码下面的一排“…”上,双击左键,出现如下界面。
这个界面的起始值和设置情况必须与上面条码的保持一致,因为这个数值实际上就是上面条码的可读说明。
由于客户有排版上的要求,分两个部分处理一个条码的打印信息是不可避免的。

VIF - Maintenance of computer systemsinfrastructureZebra GK420t User Guide VIF-NA-BG-136, V3.0© IZUM, 2016COBISS, COMARC, COBIB, COLIB, IZUM are registered trademarks owned by IZUM.CONTENTS1Introduction (1)2Using the GK420t printer (1)2.1Description of the printer (1)2.2Connecting to power supply and installing printer (3)2.3Cleaning the printhead (4)2.4Placing the media roll and loading black ribbon cartridge (5)2.5Resetting printer (7)2.6Status light (7)3Installing driver (8)4Printer settings (for COBISS3) (10)5Setting logical destinations in COBISS3 (13)6Potential printing problems (15)6.1Printing an extra blank label (15)6.2Printing an extra blank label (17)Zebra GK420t User Guide VIF FIGURESFigure 1: Back side of the printer (1)Figure 2: Front side of the printer (1)Figure 3: Opening the printer (2)Figure 4: Closing the printer (2)Figure 5: Printhead (2)Figure 6: Connecting to power supply (3)Figure 7: USB connection (3)Figure 8: Serial connection (4)Figure 9: Cleaning the printhead (5)Figure 10: Opening the printer and placing the media roll (5)Figure 11: Pushing the media under the media guides (6)Figure 12: Loading black ribbon cartridge (6)Figure 13: Final loading of the black ribbon cartridge (7)Figure 14: Selecting the right model (GK420t) (9)Figure 15: Selecting the right software package with drivers for GK420t (10)Figure 16: Control Panel with Devices and Printers (11)Figure 17: Printing settings (11)Figure 18: Advance printing settings (12)Figure 19: Colour dithering (12)Figure 20: COBISS3 user interface (13)Figure 21: Local destinations editor (13)Figure 22: Setting local destinations (14)Figure 23: Detailed settings (14)Figure 24: Refreshing settings in the COBISS3 user interface (15)Figure 25: Setting the printer (16)Figure 26: Sending factory settings (16)Figure 27: Printer settings (17)Figure 28: Media calibration (18)VIF Zebra GK420t User Guide 1IntroductionThis document presents how the GK420t printer is used in the COBISS system (connecting to power supply, changing paper, etc.).2Using the GK420t printer2.1Description of the printerPower switchPower switchPower OFF Power ONPower switchFigure 1:Back side of the printerFEED button and status lightFEEDbuttonStatuslightFigure 2:Front side of the printerFEED Button– In normal operating mode, the label ribbon advances to the next label.Status light– In normal operating mode the status light is green. If it turns red, an error has occurred: the printer either ran out of label ribbon or black ribbon cartridge or the service is needed because of a more complex error.Zebra GK420t User Guide VIF Opening and closing the printerFigure 3:Opening the printerFigure 4:Closing the printerPrinthead positionFigure 5:PrintheadVIF Zebra GK420t User Guide 2.2Connecting to power supply and installing printerTo connect your printer to a computer use the serial cable or the USB cable supplied with the printer.Connecting to power supplyFigure 6:Connecting to power supplyUSB connectionUSB cableFigure 7:USB connectionZebra GK420t User Guide VIF Serial connectionFigure 8:Serial connectionThe printer comes with a serial and a USB interface. To connect the printer use the appropriate cable.During installation you can use the drivers available:∙on CD supplied with your printer,∙via /id/zebra/na/en/index/products/printers/desktop/gk420t.4.tabs.html,∙via /downloads/drivers/archive/7.2/7.2/Zebra_7.2.exe,To use the printer from several workstations, it is recommended to connect it only to one workstation enabling shared use of the printer to other workstations. For help, call +386 (0)2 2520 333 (Call center) or send an email to ********************.2.3Cleaning the printheadTo clean the printhead, use the cleaning pen supplied with your printer containing the cleaning solution. Use the cleaning pen tip to remove debris and dust that has built-up on the heater element of the thermal printhead.The cleaning pen can be used only once and make sure that you use it only for this purpose. If you use it once again, the contaminants from previous uses may damage the printhead. Instead of a cleaning pen, you can also use a soft cloth and pure alcohol.VIF Zebra GK420t User GuideFigure 9:Cleaning the printhead2.4Placing the media roll and loading black ribboncartridgeGo through the following steps of the procedure:1.Open the printer lid. Place the media roll on the green roll holder.Figure 10:Opening the printer and placing the media rollZebra GK420t User Guide VIF2. The media roll must go under both media guides.Figure 11: Pushing the media under the media guides3. Place a new ribbon roll on the inner holder. Then, place an empty ribbon core, remained from the ribbon, on the front holder. Pay attention to lock the notches of the ribbon core properly. Attach the adhesive strip of the black ribbon cartridge to the empty ribbon core. Prior to use, pull the ribbon cartridge tight across the printhead.Figure 12:Loading black ribbon cartridgeUnder media guidesFigure 13: Final loading of the black ribbon cartridge2.5 Resetting printerOnce the media roll is placed and the black ribbon cartridge loaded, go through the following steps (make sure that the printer’s cover is closed and the status lig ht is green): 1. Turn off the printer.2. Press and hold the FEED button.3. Turn on the printer.4. The green status light flashes in sequences: once, then in the two-flash-, three-flash- and four-flash sequence.5. Release the FEED button after the four-flash sequence.6. The printer starts calibration process and advances the label ribbon to the next label.7. Once the calibration process is complete, turn off and on the printer.2.6 Status lightTable 1:Status light3Installing driverIf the original or the latest version of the driver for Zebra GK420t is not installed on your local computer, which is connected to the printer, install the driver or upgrade it. Drivers are available on Zebra’s official web page/id/zebra/na/en/index/drivers_downloads.html or on the user’s CD supplied with your printer.When the downloading web page opens, select GK420t Desktop Printer from the Printer Support drop-down list (see Figure 14).Figure 14:Selecting the right model (GK420t)Then, select the Drivers tab and click Download under "Zebra Setup Utilities" to download the drivers to your computer (see Figure 15).Figure 15:Selecting the right software package with drivers for GK420tBefore downloading the driver package, the confirmation window will open and ask if you agree to the specified terms. Click the field to start the download:After the package has been downloaded, run the package (administrator privileges are required for the installation of drivers) and follow the instructions (select ZDesigner GK420t if asked for which printer model you wish to install the driver).4Printer settings (for COBISS3)Once you have installed the drivers, update Zebra GK420t printer settings before you start printing labels. Go to Control Panel and select Devices and Printers. All available printers aredisplayed. Select ZDesigner GK420t and right-click the icon. Select Printing Preferences from the option list (see Figure 16).Figure 16:Control Panel with Devices and PrintersWhen you click Printing Preferences, a new window will appear in which you can set up parameters as illustrated in Figure 17. In the Options tab, pay particular attention to fields in the red boxes.Figure 17:Printing settingsOnce you set up parameters under the Options tab, click the Advanced Settings tab and make sure that Thermal Transfer is selected under "Media Type" (see Figure 18).Figure 18:Advance printing settingsAt the end, check if Smooth is selected under the Dithering tab (see Figure 19).Figure 19:Dithering5Setting logical destinations in COBISS3In COBISS3, select a printer for printing labels for the material in logical destinations. Select System/Settings/Logical destinations (see Figure 20).Figure 20:COBISS3 user interfaceA new Local destinations editor window will open in which you will select Label – material: [default local printer] and click Edit (see Figure 21).Figure 21:Local destinations editorThe User destinations window will open in which you will click Add printer. In the new window select ZDesigner GK420t from the drop down list which you intend to use to print labels for the material (see Figure 22).Figure 22:Setting local destinationsOnce you select the printer, click the Details button to check if these detailed settings are correct for this type of printer (as shown in Figure 23):Figure 23:Detailed settingsWhen all settings are set, click the OK button to confirm each choice. At the end, in the System menu, select Refresh settings (see Figure 24). If this option is not available, refresh the newly configured settings by first logging out and then logging in to the COBISS3 software.Figure 24:Refreshing settings in the COBISS3 user interfaceNow, you can start printing labels for the material.6Potential printing problems6.1Printing an extra blank labelIf labels cannot be printed properly after installing the drivers and setting the logical destinations (e.g. printing an extra blank label), the factory settings should be sent to the printer via original drivers.The procedure is as follows: Go to Control Panel and click the Devices and Printers icon. Find the printer, that is the Designer GK420t icon and right-click on it.Select Printer properties from the list of options. A new window should pop up in which you will click the Preferences... button (see Figure 25).Figure 25:Setting the printerBy clicking the Preferences… button a new window with additional settings should pop up again, then select the Tools tab (see Figure 26).Figure 26:Sending factory settingsVIF Zebra GK420t User Guide Select Action under Command type and Load factory defaults under Command Name, then click the Send button. This command sends the default factory settings to the printer. After that retry printing a label.6.2Printing an extra blank labelIf the settings do not resolve problems with an extra blank label, you can try with label calibration. You can use this method even if the printer prints one extra blank label besides the label for the material.The procedure is as follows: go to the Control panel and click the Devices and Printers icon. Find the printer, that is the Designer GK420t icon and right-click on it. Select Printer properties from the drop-down menu.When a new window pops up, click the Preferences... button (see Figure 27).Figure 27:Printer settingsBy clicking the Preferences… button a new window with additional settings should pop up again, then select the Tools tab (see Figure 28).Zebra GK420t User Guide VIFFigure 28:Media calibrationSelect Action under Command type and Calibrate media under Command name as shown in Figure 28. By clicking the Send button new re-calibration parameters are sent to the printer. After that retry printing a label.。
斑马GK888T条码打印机设置一:安装驱动程序
因无法读光驱,官网找到驱动程序安装
解压缩安装
确定
选Unzip,注意此时的C:\ZD2667在识别硬件时手动选择此路径安装驱动
确定后弹出如下界面
点击下一步选安装打印机如下图:
点击安装打印机后如下图:
在右边选择框中选择ZSesigner GK888t 之后点击下一步,因为用户已有关个USB设备,故选了usb0003如下图:
选择语言:简体中文。
下一步,如下图:
点击完成后如下图:
点击确定后如下图:
点击下一步、下一步、下一步、下一步如下图:
驱动安装完成。
二、打印设置
1、点击电脑屏幕左下角的开始---打印机和传真,如图将ZDesigner GK888t设置为默认打印机
2、右键点击选择属性,如下图:
3、点击如下图:
在选项中:标签格式选择---毫米、纵向、旋转180大小:宽度97.5.00高度131.3.00
非打印区域---左 5.00
完成以上设置后点击
4、在高级设置中选择撕纸、热敏、Web检测完成以上设置后点击
5、完成以上设置后点击,此时打印机会自动对打印纸进行校正。
6、关闭打印机电源,开启打印机电源(重启打印机)
7、斑马打印机GK 888t设置完成。
三、大客户发件平台设置
1、从顺丰官网下载顺丰大客户发件管理系统,安装并打开
2.选择“设置打印方式”选择“Zabar专用”
之后可以正常使用。
如果在使用过程中遇到其它问题欢迎与我们联系!
天津区IT服务部
IT服务热线4006633333。
980602-001 Rev.AEnsure that the appropriate power cord with a three (3) prong plug and an IEC 60320-C13connector is used at all times. This power cord must bear the relevant certification mark of the country in which the product is being used.Utilisez toujours un cordon d'alimentation approprié comportant une fiche femelle à 2 pôles + terre et un connecteur C.E.I. 60320-C13. Ces cordons d'alimentation doivent porter la marque de certification en vigueur dans le pays où ils sont utilisés.Das Gerät darf nur über ein dreiadriges Stromkabel (mit Erdung) und einen Netzstecker gemäß IEC 60320-C13 an das Stromnetz angeschlossen werden. Das verwendete Stromkabel muss zudem das Zertifizierungszeichen einer Prüforganisation des Landes aufweisen, in dem das Gerät betrieben wird.Asegúrese de que en todo momento se utilicen el cable de alimentación eléctrica con un enchufe de tres (3) patas y el conector IEC 60320-C13 que sean apropiados. Estos cables de alimentación eléctrica deben tener la marca de certificación pertinente del país en el cual se está utilizando el producto.Assicurarsi che venga utilizzato un appropriato cavo di alimentazione con spina tripolare e che sia sempre utilizzato un connettore IEC 60320-C13. Questi cavi devono riportare il marchio di certificazione del paese nel quale il prodotto viene utilizzato.Verifique se o cabo de alimentação apropriado com um plug de três (3) pinos e um conector IEC 60320-C13 está sendo usado todo o tempo. Esses cabos de alimentação devem ter a marca de certificação relevante para o país em que o produto está sendo usado.Убедитесь, что используется шнур питания с трехконтактной штепсельной вилкой и разъемом IEC 60320-C13. На данных шнурах питания должна быть нанесена эмблема сертификата страны, в которой они используются.항상 3구 플러그와 IEC 60320-C13 커넥터가 달린 적절한 전원 코드를 사용해야 합니다.이러한 전원 코드는 제품이 사용되는 국가의 해당 인증 마크를 부착해야 합니다.请确保一直在使用对应的带有三相插头的电源线和 I EC 60320-C13 接头。


ZebraGK888t条码打印机说明书ZebraGK888t是一款高效、可靠、稳定的条码打印机,广泛应用于仓库管理、进销存、物流配送等领域。
该打印机采用热转印和热感纸技术,能够高效、清晰地打印各种类型的条码,包括一维码、二维码等。
下面我们来详细了解一下ZebraGK888t的特点和使用方法。
第一章:产品特点1. 可以打印多种条码类型ZebraGK888t可以打印多种类型的条码,包括一维码、QR码、PDF417码、MaxiCode码等。
用户可以通过软件设置,根据需求选择合适的条码类型,并且可以自由调整条码的大小和位置。
2. 打印速度快,效率高ZebraGK888t采用热转印和热感纸技术,能够在很短的时间内打印出高质量的条码。
它的打印速度可达127毫米/秒,每分钟可打印一百多个标签,适用于快速、高效的打印需求。
3. 可靠性高,稳定性强ZebraGK888t采用的是工业级机身材质,经过严格的质量控制,可以在复杂的工作环境中保持高效、稳定的工作状态。
它不仅具有防尘、防水、防静电等性能,同时也能够承受恶劣条件下的工作,保证打印质量的稳定。
4. 易于维护,寿命长ZebraGK888t使用的是易于更换的易撕型、易换型打印头,可以方便快捷地更换,维护成本低。
它的寿命长,能够承受高强度的工作使用,在运作期间可以提供长期可靠的性能保障。
第二章:使用指南1. 连接电源首先,我们需要将ZebraGK888t条码打印机与电源连接,通过电源开关打开电源。
然后,连接打印机电源(如果是并口打印机,请与计算机连接并口数据线;如果是USB打印机,则需要与计算机连接USB数据线)。
2. 安装驱动程序我们需要在计算机中安装正确的驱动程序,以确保该打印机与计算机能够成功通讯。
将驱动程序安装到计算机中后,打开驱动程序,并根据需要设置参数,如:打印机型号、串口号等。
3. 加载标签纸将标签纸放入打印机中的标签纸盒内,调整标签纸盒中的底部纸盘和背部侧纸辊,使其与标签纸相贴合。

ZEBRA用户手册一、1、设置模式按SETUP/EXIT键可以进入设置模式。
按NEXT/SAVE或PREVIOUS键可以达到你需要的参数2、改变口令保护的参数注意:有些参数有口令保护,工厂默认的口令是:12343、离开设置模式在任何时候可以通过按SETUP/EXIT键离开设置模式。
出现SAVE CHANGES提示。
按+或-键有5个选择,当需要的选择出现时,按NEXT/SAVE键保存设置:PERMANENT:保存当前参数设置,即使电源关闭也不会丢失TEMPORARY:暂时保存设置,电源关闭后丢失CANCEL:取消从进入设置模式后改变的参数,但如果DARKNESS和TEAR-OFF改变后除外LOAD DEFAULTS:读取工厂默认设置注意:读取工厂默认设置后需要对标签纸和碳带进行校验LOAD LAST SAVE:重新读取上一次保存的参数二、设置打印机参数1、黑度设置:该参数取决于各种因素,包括,碳带和标签类型,打印头状况。
尽量用最小的参数达到最佳的打印效果,如果该参数过高,可能烧穿碳带或导致墨水扩散默认参数:+10范围:0-30按NEXT 键显示TEAR-OFF2、撕下标签的位置的调整按右面黑色椭圆键增加数值, 按左面黑色椭圆键减少数值.显示的数值是点数,缺省值: +0范围: -120 到+120按NEXT 键显示PRINT MODE3、打印模式的选择;按右面及左面黑色椭圆键进行选择.缺省值: PEEL OFF可选类型:PEEL OFF (剥离), CUTTER (切刀) 和REWIND (回卷). 按NEXT 键显示MEDIA TYPE4、介质类型设置按右面及左面黑色椭圆键选择缺省值: CONTINUOUS选择: CONTINUOUS ( 连续) 和NON-CONTINUOUS ( 非连续).按NEXT 键显示SENSOR TYPE5、SENSOR TYPE ( 传感器类型)的选择该选项告诉打印机是否是穿透(说明标签之间有间隔)式或黑标的按右面及左面黑色椭圆键改变数值.传感器缺省值: WEB ( 穿透式)选择: WEB ( 穿透式传感)MARK(黑标)按NEXT 键显示PRINT METHOD6、打印方法的选择;默认:THERMAL TRANSFER选择: THERMAL TRANS按NEXT 键显示PRINT WIDTH7、打印宽度的选择如果打印宽度设置太小,可能导致标签的一部分没法打印,太大浪费内存度量单位可以选择毫米,英尺,以及点(DOT)按右面黑色椭圆键增加数值, 按左面黑色椭圆键减少数值默认,范围:根据不同的打印机型号有不同的宽度按" NEXT " 显示下一个参数; " MAXIMUM LENGTH注意:在校验介质和碳带时,确认最大打印长度的参数值比实际的介质大一点,如果小于实际长度,打印机默认为连续的打印模式,那么打印机就不能进行校验按右面黑色椭圆键增加数值, 按左面黑色椭圆键减少数值缺省值: 39.0 IN 9范围: 2.0 inches ( 50mm至39.0 inches ( 988mm ).按" NEXT " 显示下一个参数; " LIST FONTS8、打印所有内置字体按右面黑色椭圆键即能列出内置字体按" NEXT " 显示下一个参数; " LIST BAR CODES 9、打印所内置有条码按右面黑色椭圆键即能列印出内置条形码种类按" NEXT " 显示下一个参数" LIST IMAGES10、打印内存里所有的图形按右面黑色椭圆键即能列印出内存里所有的图形按" NEXT " 显示下一个参数; " LIST FORMATS 11、格式列表按右面黑色椭圆键即能打印出所有内存内的格式按" NEXT " 显示下一个参数; "LIST SETUP ”设置列表按右面黑色椭圆键打印出所有的设置按" NEXT " 显示下一个参数; LIST ALL”所有的列表按右面黑色椭圆键打印出前面所有的选项按" NEXT " 显示下一个参数:“INITIALIZE CARD”初始话内存卡这个选项可以初始化可选的内存卡注意:这个选项檫除存储在内存卡内的所有信息,可以按NEXT键跳过该选项按右面椭圆按键选择YES,如果有提示输入口令,输入口令后在按NEXT键面板提示:INITIAL CARD?按右面椭圆键选择YES,这时显示“RE YOU SURE ?”按右面椭圆按键选择YES,开始初始化,或按左面椭圆按键选择NO,取消该操作,返回到“NITIAL CARD”提示。
Standard Features∙Maximum speed 5 ips (127 mm/sec)∙OpenACCESS™design for easy media loading∙203 dpi print resolution (8 dots/mm)∙Direct thermal (d) and Thermal transfer (t) printing of bar codes, text, and graphics∙Fully-enclosed 5.0" (127 mm) media compartment∙Dual-wall frame construction∙ZPL II®programming language∙EPL2 page mode programming language∙EPL Line Mode support (GK420d)∙32 bit RISC processor∙8 MB Standard SDRAM memory (3 MB available to user)∙ 4 MB Standard Flash memory (1.5 MB available to user)∙Zebra E3™Printhead Energy Control∙Triple communications interface: Serial, USB & Parallel ∙User interface feed button (ZPL®style)∙Odometer for print length tracking∙Unicode™compliant for multi-language printing∙Auto-calibration of media∙16 resident expandable bitmap fonts (ZPL language)∙One resident scalable font (ZPL language)∙ 5 resident expandable bitmap fonts (EPL language)∙Auto-switching 100-240V power supply∙IEC 60601-1 Certified (GK420 Healthcare models only)∙Transmissive and reflective media sensing∙Head-up sensor∙Programmable print speed: 2, 3, 4 & 5 ips(51, 76, 102, 127 mm/sec)∙Standard tear-off mode feature∙Zebra printer driver for Windows®∙ENERGY STAR®2.0qualified Optional Features∙Dispenser (peeler)–Label peel and present with label present sensor(not available on GK420 Healthcare)∙Ethernet-10/100 internal offered in combination with USB interface(replaces Serial and Parallel ports)∙Font Packs–Asian and other international font kits∙Power Cord–US, Europe, UK, Australia, Argentina, Japan, and China∙ZBI 2.0™–Field installed via activation key Accessories∙ZKDU™and KDU Plus™–keyboard display units for stand-alone printing solutionsZebraLink SolutionsSoftware∙ZebraDesigner™Pro–An intuitive,easy-to-use software program for creating complex label designs (option)∙ZebraDesigner–Offers basic features for simple label design(standard)∙ZebraNet™Bridge Enterprise–Centrally manage Zebra printers anywhere on your global network from a single PC screen(option)∙ZebraNet Utilities v7.0–Provides printeradministration, management,alerting capabilities and more for Windows®95/98/2000/2003/ME/NT/XP(standard)∙ZebraDesigner™Windows Driver–Microsoft certified for Windows Vista®, Windows 7, Windows 8 Windows8.1, Windows 2008, and Windows 2012 (downloadablefrom )ZEBRA®GK420D™& GK420T™PRINTER SPECIFICATIONS Specifications are provided for reference and are based on printer tests using Genuine Zebra™supplies and accessories. Results may vary in actual application settings or when using other-than-recommended Zebra supplies. Zebrarecommends always qualifying any application with thorough testing.∙ZBI 2.0–Powerful programming language that lets printers run standalone applications, connect toperipherals, and much more (option)∙ZBI-Developer–Programming environment for developers to simplify creation, testing and distribution to printers of complex ZBI 2.0 programs (standard with ZBI 2.0)∙POS Driver–Supports i ntegration with Windows-based point-of-sale applications.Networking OptionsEthernet-10/100internal-Offered in combination with USB & Serial interface (replaces Serial and Parallel ports) Firmware∙EPL2–Eltron Programming Language simplifies label formatting and enables format compatibility with legacy applications∙EPL–Line Mode support (GK420d) enables format compatibility with legacy applications∙ZPL II–Zebra Programming Language Provides sophisticated label formatting and printer control.Compatible with tabletop and mobile Zebra printers.∙Web View–Connect and control Zebra bar code printers via the printer’s Web interface using a common Web browser∙Alert–Printers equipped with ZebraNet print servers will notify you via any email-enabled, wired, or wireless device to minimize downtimePrinting SpecificationsParameter203 dpi (8 dots/mm)Dot pitch0.0049" (0.125 mm) Maximum print length39.0" (991 mm)Minimum print length0.005" (0.127 mm–one dot) Print length in line mode Unlimited (GK420d) Maximum print width 4.09" (104 mm)Minimum print width0.005" (0.127 mm–one dot)Programmable print speed 2, 3, 4 & 5 ips (51, 76, 102, 127 mm/sec)Bar code modulus “X”dimension 203 dpi = 5 mil to 50 milMedia SpecificationsNOTE:For optimum print quality and printer performance,use of Zebra genuine supplies is recommended.∙Media Width: 0.75" (19 mm)–4.25" (108 mm)∙Label Length:-Using tear off mode:Minimum Length Model Printing Mode0.38" (9.7mm)GK420d Direct thermal0.38" (9.7mm)GK420t Thermal transfer0.5"(12.7mm)GK420t Direct thermal-Minimum using dispenser-0.50" (12.7 mm)-Maximum-39.00" (990 mm)∙Core Inner Diameter: 0.5" (12.7 mm), 1.0" (25.4 mm),1.5" (37.1 mm)∙Max Roll Diameter: 5.00" (127 mm)∙Media Thickness: 0.003" (0.08 mm)-0.0075" (0.19mm)∙Media Sensing: fixed reflective and transmissive gap,black line, and notch∙Media Types: Roll-fed or fan-fold,die cut or continuousdirect thermal labels with or without black line,tagstock, continuous receipt paper, and wristbands∙Dispenser peeler(optional) may not work with all mediatypes and should be tested for media compatibility.Calibration Procedure∙The GK420 is equipped with a standard auto-calibrationfeature that can be set to initiate automatically duringstart-up of the printer–utilizing two to four labels tocalibrate for efficient operation and less waste. Theprinter will also save the new settings in memory untilthe next calibration is performed.∙ A manual calibration procedure can also be performed,if required. Consult your User’s Guide for more detailson the specific manual calibration steps.ZPL Programming Language (ZPL/ZPL II)∙Communicates in printable ASCII characters∙Compatible with mainframe, mini, and PC hosts∙Downloadable objects include graphics and bitmapfonts, label templates and formats∙Automatic memory allocation for format while printing∙Automatic serialization of fields∙Format inversion (white on black)∙Mirror-image printing∙Four position field rotation (0º, 90º, 180º, 270º)∙Slew command∙Programmable label quantities with print, pause ∙Status messages to host upon requestZPL Font Specifications203 dpi (8 dots/mm)FontMatrix(in dots)(H x W)Type*MinimumChar.Size(H x W)MaximumC.P.I.A9x5U-L-D.044" x.030"33.3B11 x 7U.054" x.044"22.7 C,D18 x10U-L-D.089" x.059"16.9E28 x15OCR-B.138" x.098"10.2F26 x13U-L-D.128" x.079"12.7G60 x40U-L-D.295" x.236" 4.2H21 x13OCR-A.103" x.093"10.8 GS24 x24SYMBOL.118" x.118"8.5P-V U-L-D Backward compatible w/S-300Ø15 x12U-L-D Scalable(Smooth)Font*U = upper case, L = lower case, D = descenders∙Character Fonts: Standard bitmapped Zebra fonts: A, B, C, D, E (OCR-B), F, G, H (OCR-A), GS, P, Q, R, S, T, U, V & Ø Smooth font (CG Triumvirate™BoldCondensed)∙Supports user defined fonts and graphics–including custom logos∙Bitmap fonts are expandable up to 10 times, height and width independent. Fonts E and H (OCR-B and OCR-A), however, are not considered in spec whenexpanded.∙Smooth scalable font Ø (CG Triumvirate Bold Condensed) is expandable dot-by-dot, height and width independent, while maintaining edges to a max. 1500 x 1500 dots ZPL Barcode Symbologies∙Barcode Ratios: 2:1 (non-rotated) and 3:1∙Linear Barcodes:Code 11, Code 39, Code93, Code ∙128, UPC-A, UPC-E, EAN-8, EAN-13, EAN-14, UPC-∙ A and UPC-E with EAN 2 or 5 digit extensions, Plessey, POSTNET, Standard 2 of 5, Industrial 2 of 5, Interleaved2 of 5, LOGMARS, MSI, Codabar, andGS1 DataBar(formerly RSS)∙2-dimensional Barcodes:PDF417, MicroPDF-417, Code49, Maxicode, Codablock, Data Matrix, QR code, and AztecEPL Programming Language (EPL2)∙ASCII EPL2 programming language (Page Mode)∙Field Rotations∙Variable field support (up to 100)∙Counter support (up to 10)∙Variable field addition and subtraction∙Status reporting∙Form, fonts, and graphics storage∙Simple set of formatting commandsEPL Font Specifications203 dpi (8 dots/mm)Font Width (dot)Height (dot)CPI 181220.3 2101616.9 31220 4.5 4142412.7 53248 5.68-Simp3232 6.3*8-Trad3232 6.3** Spacing of Asian characters is controlled via the i command. The formula for CPI is 203 / (32 + i). Thus as i increases, CPI decreases. For example: If i = 2, CPI = 203/34 = 6.0EPL Barcodes Symbologies∙Linear barcodes: Code 39, Code 128A, B &C (User selectable/Auto), UCC/EAN-128, Code 93, Codabar, Interleaved 2 of 5, UPC-A, UPC-E, UPC-A with 2 and 5 add on, UPC-E with 2 and 5 add on, EAN 13, EAN 8, EAN 13 with 2 and 5 add on, EAN 8 with 2 and 5 add on, Postnet (5, 9, 11, & 13 digit)Japanese Postnet, Plessey (MSI-1), MSI-3, GermanPost Code, and GS1 DataBar(formerly RSS)∙2-dimensional Barcodes:Maxicode (modes 2,3,4,6), PDF417, MacroPDF417, QR Code, Data Matrix, and AztecCommunications Specifications∙Centronics®Parallel (36 Pin) connector ports∙RS-232auto-sensing, adaptive Serial interface, DB-9∙USB V1.1, bi-directional∙Internal 10/100 Ethernet–optional (replaces Serial and Parallel ports)Electrical Specifications∙Auto-detectable (PFC Compliant) 100-240VAC,50-60Hz rated at 70Watts∙ENERGY STAR2.0qualified printers∙IEC 60601-1 Certified(GK420 Healthcare models only) Agency ApprovalsG-Series GK420Models(excluding Healthcare):∙Emissions:FCC Part 15, Subpart B (Class B), ICES 003 ,VCCI, C-Tick, CQC, EAC, KCC, BSMI, ICES-003∙Emissions and Susceptibility:EN55022 (Class B), EN55024, EN61000-3-2, EN61000-3-3∙Safety:CB Scheme IEC 60950-1, TUV NRTL, C-Tick, CCC, NOM, EAC, KCC, BSMI, BISGK420 Healthcare Models:∙Emissions:FCC Part 15,Subpart B (Class B), ICES 003∙Emissions and Susceptibility: EN55022 (Class B), EN55024, EN61000-3-2, EN61000-3-3∙Safety: CB Scheme IEC 60950-1, TUV NRTL Physical Specifications(no options installed)GK420d GK420t Height 6.0"(152mm)7.5"(191mm)Width: 6.75"(171mm)7.6"(193mm)Depth:8.25"(210mm)10.0”(254mm)Weight: 3.0lbs (1.4kg) 4.6lbs (2.1kg) Environmental Specifications∙Operating Temperature: 40º to 105ºF (4.4º to 41ºC)∙Storage Temperature:-40º to 140ºF (-40º to 60ºC)∙Operating Humidity: 10% to 90% non-condensing R.H.∙Storage Humidity: 5% to 95% non-condensing R.H. Healthcare Features(Healthcare models only)∙Disinfectant-ready plastics∙Approved cleaning agent ingredients (see separate “Guide to Disinfecting and Cleaning Zebra Healthcare Printers” for more details):-Isopropyl and Ethyl alcohol (including wipes)-Ammonium-Hydrogen peroxide-Phosphoric acid-Bleach/sodium hypochlorite-Mild dish soap∙Medical-grade power supply certified to IEC 60601-1 standards to protect patient and staff safety by reducing the risk of electrical shock∙Enable production of labels that meet the Clinical and Laboratory Standards Institute®(CLSI) harmonization standard∙Certified and recommended by all of the leading Electronic Health Records (EHR) providers555Preventative MaintenanceZebra recommends cleaning the printer on a regular basis using standard Zebra printer parts and cleaning supplies. Consult your User’s Guide for further details.Cleaning:The exterior is cleaned with a lint-free cloth and, if necessary, a mild detergent solution or desktop cleaner. Interior components are cleaned with 70% isopropyl alcohol (IPA) or blown air to remove any particles. (For Healthcare models see separate “Guide to Disinfecting and Cleaning Zebra Healthcare Printers”)。
斑马GK888T条码打印机设置一:安装驱动程序
因无法读光驱,官网找到驱动程序安装
解压缩安装
确定
选Unzip,注意此时的C:\ZD2667在识别硬件时手动选择此路径安装驱动
确定后弹出如下界面
点击下一步选安装打印机如下图:
点击安装打印机后如下图:
在右边选择框中选择ZSesigner GK888t 之后点击下一步,因为用户已有关个USB设备,故选了usb0003如下图:
选择语言:简体中文。
下一步,如下图:
点击完成后如下图:
点击确定后如下图:
点击下一步、下一步、下一步、下一步如下图:
驱动安装完成。
二、打印设置
1、点击电脑屏幕左下角的开始---打印机和传真,如图将ZDesigner GK888t设置为默认打印机
2、右键点击选择属性,如下图:
3、点击如下图:
在选项中:标签格式选择---毫米、纵向、旋转180大小:宽度97.5.00高度131.3.00
非打印区域---左 5.00
完成以上设置后点击
4、在高级设置中选择撕纸、热敏、Web检测完成以上设置后点击
5、完成以上设置后点击,此时打印机会自动对打印纸进行校正。
6、关闭打印机电源,开启打印机电源(重启打印机)
7、斑马打印机GK 888t设置完成。
三、大客户发件平台设置
1、从顺丰官网下载顺丰大客户发件管理系统,安装并打开
2.选择“设置打印方式”选择“Zabar专用”
之后可以正常使用。
如果在使用过程中遇到其它问题欢迎与我们联系!
天津区IT服务部
IT服务热线4006633333。
斑马GK888t安装及使用说明2011-12-22 13:45:28 阅读人次:22斑马GK888t安装及使用说明一、硬件安装1、开箱后的检查打开包装后,检查所有部件,确保无一短缺。
遵循打印机检查步骤,了解打印机部件,以便能够按照说明进行操作。
2、打印机部件查看3、如何打开打印机盖要进入介质仓,必须打开打印机。
面向自己拉动释放杆,抬起顶盖。
4、如何关闭打印机抓住顶盖,并按“弹起”顶盖锁将其释放。
放下顶盖。
碳带拖架即会自动折叠到位。
向下按,直到顶盖咔哒一声合上5、连接电源检查电源,确保电源适合输入电压。
警告:使用打印机随附的电源。
千万不要在潮湿的地方使用打印机和电源。
否则会造成严重的人身伤害!1. 确保电源开关处于关闭位置(向下)。
2. 直流电源适配器的一端插入打印机背部的电源插孔。
3. 将交流电源线一端插入电源适配器。
4. 将交流电源线的另一端插入适当的交流电源插座。
6、加载成卷介质加载介质时,必须将成卷介质放在介质挂钩上,然后调节介质导杆。
必须使用所需打印类型的正确介质。
打印机的碳带传感器会检测供给轴是否在运动。
1.打开打印机。
注意要向打印机正面拉动释放杆。
2.除去介质的外面部分。
运输期间。
成卷介质会在搬运事弄脏或在储存时积灰。
除去外面部分可以避免将有粘性或不清洁的介质拖拽到打印头和打印辊之间。
3.将介质挂钩分开并保持打开状态。
4.确定成卷介质的方向,使其打印面在通过打印辊时朝上。
5.将成卷介质向下放到挂钩之间,然后将挂钩合上,穿过成卷介质的中心。
7、调节导杆1.将导杆调节器旋转,打开介质导杆2.将介质穿过导杆3.将导杆调节器旋转,合上介质导杆。
导杆应靠近介质边缘,且不限制介质8、加载碳带使用碳带时,必须使用热转印介质(接受从碳带上转印的蜡和/或树脂)。
加载碳带时,先安装供给辊和拾取辊,然后在托架上绷紧碳带。
1.在打印机打开状态下,将色带穿过色带支架。
将供应辊右端按在弹簧加载的供应毂上。
将色带芯缺口的左侧对准左侧供应辊(转轴)毂辐。
斑马标签打印机操作规程1. 引言斑马标签打印机是一款高效、可靠的标签打印设备,广泛应用于商品标签、物流标签等领域。
本文档旨在介绍斑马标签打印机的操作规程,帮助用户正确、安全地使用该设备,提高工作效率。
2. 设备准备在操作斑马标签打印机之前,需要进行以下设备准备工作:2.1 检查打印机连接确认斑马标签打印机与电脑的连接正常,确保打印机能够正常被电脑识别。
2.2 检查打印材料确保使用的打印材料(标签纸、碳带等)符合斑马标签打印机的规格要求,并检查材料是否充足。
2.3 检查墨带如果使用碳带进行打印,需要检查墨带是否安装正确,并确保墨带有足够的墨水。
2.4 预热打印机在使用斑马标签打印机之前,建议预热设备,让设备达到适宜的工作温度。
3. 打印机驱动安装与设置3.1 驱动安装连接斑马标签打印机的电脑上,安装打印机相关驱动。
可以从斑马官方网站或安装光盘中获取最新的驱动程序。
3.2 驱动设置安装完驱动后,需要进行相关设置,包括打印机型号、纸张尺寸、打印质量等,以确保打印机与电脑的兼容性并获得最佳打印效果。
4. 打印标签4.1 打开打印软件打开所选的打印软件,并创建一个新的打印项目。
4.2 导入标签模板根据需要打印的标签样式,导入相应的标签模板。
标签模板通常包含标签布局、文字、条形码及其他图形元素。
4.3 设计标签内容在标签模板中,根据实际需求设计标签的内容,包括文字、条形码、图片等。
4.4 预览打印效果在打印软件中,可以预览标签的打印效果,确保标签的布局和内容符合预期。
4.5 设置打印参数设置打印参数,包括打印份数、纸张类型、打印速度、打印质量等。
4.6 打印标签点击打印按钮,开始打印标签。
在打印过程中,注意观察打印机是否工作正常,确保标签正确无误地被打印出来。
5. 常见问题及解决方法5.1 打印机无法正常工作如果斑马标签打印机无法正常工作,可以尝试以下解决方法:•检查打印机的电源是否正常连接。
•检查打印机与电脑的连接是否稳定。
斑马GK888T条码打印机设置一:安装驱动程序
因无法读光驱,官网找到驱动程序安装
解压缩安装
确定
选Unzip,注意此时的C:\ZD2667在识别硬件时手动选择此路径安装驱动
确定后弹出如下界面
点击下一步选安装打印机如下图:
点击安装打印机后如下图:
在右边选择框中选择ZSesigner GK888t 之后点击下一步,因为用户已有关个USB设备,故选了usb0003如下图:
选择语言:简体中文。
下一步,如下图:
点击完成后如下图:
点击确定后如下图:
点击下一步、下一步、下一步、下一步如下图:
驱动安装完成。
二、打印设置
1、点击电脑屏幕左下角的开始---打印机和传真,如图将ZDesigner GK888t设置为默认打印机
2、右键点击选择属性,如下图:
3、点击如下图:
在选项中:标签格式选择---毫米、纵向、旋转180大小:宽度97.5.00高度131.3.00
非打印区域---左 5.00
完成以上设置后点击
4、在高级设置中选择撕纸、热敏、Web检测完成以上设置后点击
5、完成以上设置后点击,此时打印机会自动对打印纸进行校正。
6、关闭打印机电源,开启打印机电源(重启打印机)
7、斑马打印机GK 888t设置完成。
三、大客户发件平台设置
1、从顺丰官网下载顺丰大客户发件管理系统,安装并打开
2.选择“设置打印方式”选择“Zabar专用”
之后可以正常使用。
如果在使用过程中遇到其它问题欢迎与我们联系!
天津区IT服务部
IT服务热线4006633333。
斑马G K T条码机设置指
南
Company number【1089WT-1898YT-1W8CB-9UUT-92108】
斑马G K888T条码打印机设置一:安装驱动程序
因无法读光驱,官网找到驱动程序安装
解压缩安装
确定
选Unzip,注意此时的C:\ZD2667在识别硬件时手动选择此路径安装驱动确定后弹出如下界面
点击下一步选安装打印机如下图:
点击安装打印机后如下图:
在右边选择框中选择ZSesignerGK888t之后点击下一步,因为用户已有关个USB设备,故选了usb0003如下图:
选择语言:简体中文。
下一步,如下图:
点击完成后如下图:
点击确定后如下图:
点击下一步、下一步、下一步、下一步如下图:
驱动安装完成。
二、打印设置
1、点击电脑屏幕左下角的开始---打印机和传真,如图
将ZDesignerGK888t设置为默认打印机
2、右键点击选择属性,如下图:
3、点击如下图:
在选项中:标签格式选择---毫米、纵向、旋转180
大小:宽度97.5.00高度131.3.00
非打印区域---左5.00
完成以上设置后点击
4、在高级设置中选择撕纸、热敏、Web检测
完成以上设置后点击
5、完成以上设置后点击,此时打印机会自动对打印纸进行校正。
6、关闭打印机电源,开启打印机电源(重启打印机)
7、斑马打印机GK888t设置完成。
三、大客户发件平台设置
1、从顺丰官网下载顺丰大客户发件管理系统,安装并打开
2.选择“设置打印方式”选择“Zabar专用”
之后可以正常使用。
如果在使用过程中遇到其它问题欢迎与我们联系!
天津区IT服务部。