使用Eclipse开发Java Web应用
- 格式:docx
- 大小:38.13 KB
- 文档页数:6

JavaWeb应⽤的开发环境配置1:第⼀是下载好Eclipse开发⼯具,这⾥不做叙述,⾃⾏下载安装。
2:使⽤Eclipse开发WEB项⽬,启动Eclipse,选择File--->new --->other--->Web--->Dynamic Web Project(动态Web项⽬),打开,如下图所⽰:然后之后如下所⽰然后之后打开New Dynamic Web Project(新建动态web项⽬)对话框,在该对话框的Project name(项⽬名称)⽂本框输⼊项⽬的名称,在Dynamic web module version(动态⽹页模块版本)下拉列表框中选择3.0选项。
其他选择默认即可。
然后单击next按钮,打开如下图所⽰,这⾥选择默认的配置即可。
然后单击next之后打开Configure web module settings.(配置web模块设置)对话框,如下图所⽰,我这⾥默认即可。
然后点击Finish之后如下:然后创建好的web项⽬如下图所⽰:3:创建jsp⽂件(也可以选择创建其他类⽂件等等,这⾥创建jsp⽂件),如下图所⽰:在Eclipse的项⽬资源管理器中,⿏标右击webcontent,可以直接选择jsp File⽂件,或者去Other⾥⾯选择其他的更多的⽂件类型。
然后打开如下图所⽰的界⾯,在File name起好名字,单击next。
然后就打开选择jsp模板的对话框,这⾥选择默认即可。
然后点击Finish按钮,完成jsp⽂件的创建,在项⽬资源管理器的WEB-INF节点下多了⼀个jsp⽂件。
同时,Eclipse会⾃动以默认的与jsp⽂件关联的编辑器将⽂件在右侧的编辑窗⼝中打开。
我刚创建好就报错Multiple annotations found at this line: - The superclass "javax.servlet.http.HttpServlet" was not found on the Java Build Path - The superclass "javax.servlet.http.HttpServlet" was not found on the Java Build Path下⾯给出解决错误的⽅法。
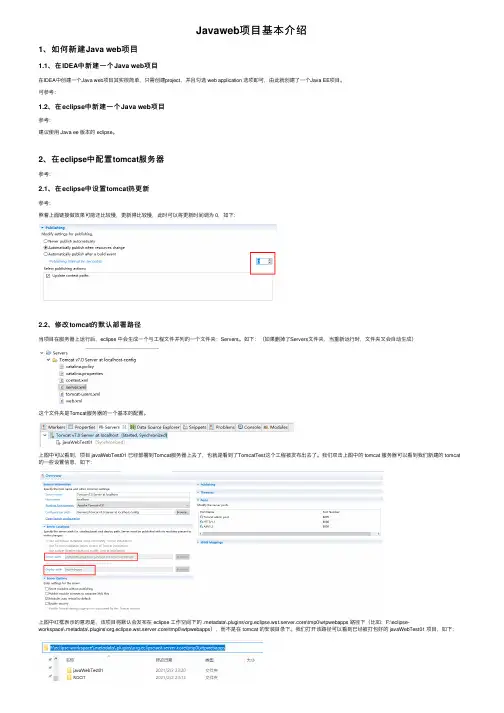
Javaweb项⽬基本介绍1、如何新建Java web项⽬1.1、在IDEA中新建⼀个Java web项⽬在IDEA中创建⼀个Java web项⽬其实很简单,只需创建project,并且勾选 web application 选项即可,由此就创建了⼀个Java EE项⽬。
可参考:1.2、在eclipse中新建⼀个Java web项⽬参考:建议使⽤ Java ee 版本的 eclipse。
2、在eclipse中配置tomcat服务器参考:2.1、在eclipse中设置tomcat热更新参考:照着上⾯链接做效果可能还⽐较慢,更新得⽐较慢,此时可以将更新时间调为 0,如下:2.2、修改tomcat的默认部署路径当项⽬在服务器上运⾏后,eclipse 中会⽣成⼀个与⼯程⽂件并列的⼀个⽂件夹:Servers。
如下:(如果删掉了Servers⽂件夹,当重新运⾏时,⽂件夹⼜会⾃动⽣成)这个⽂件夹是Tomcat服务器的⼀个基本的配置。
上图中可以看到,项⽬ javaWebTest01 已经部署到Tomcat服务器上去了,也就是看到了TomcatTest这个⼯程被发布出去了。
我们双击上图中的 tomcat 服务器可以看到我们新建的 tomcat 的⼀些设置信息,如下:上图中红框表⽰的意思是,该项⽬将默认会发布在 eclipse ⼯作空间下的 .metadata\.plugins\org.eclipse.wst.server.core\tmp0\wtpwebapps 路径下(⽐如:F:\eclipse-workspace\.metadata\.plugins\org.eclipse.wst.server.core\tmp0\wtpwebapps),⽽不是在 tomcat 的安装⽬录下。
我们打开该路径可以看到已经被打包好的 javaWebTest01 项⽬,如下:打开 javaWebTest01 ⽂件夹可以看到该项⽬打包后的⽬录结构:当然,我们也可以修改部署⽬录,将该项⽬默认部署在我们tomcat的安装⽬录下。
java web 实验报告Java Web 实验报告一、实验目的本次实验旨在通过搭建一个简单的 Java Web 应用,加深对 Java Web 开发的理解和实践能力。
通过实验,我们将学习如何使用 Java Servlet 和 JSP 技术来开发一个基本的 Web 应用。
二、实验环境本次实验使用的开发环境为 Eclipse IDE 和 Tomcat 服务器。
Eclipse 是一个强大的 Java 开发工具,而 Tomcat 是一个常用的 Java Web 服务器。
三、实验步骤1. 创建一个新的 Java Web 项目:在 Eclipse 中,选择 File -> New -> Dynamic Web Project,填写项目名称和目标运行环境(Tomcat),点击 Finish 完成项目创建。
2. 创建一个 Servlet 类:在项目的 src 目录下创建一个新的 Java 类,继承HttpServlet 类,并重写 doGet() 或 doPost() 方法来处理 HTTP 请求和响应。
3. 配置 Servlet 映射:在 web.xml 文件中添加 Servlet 的映射配置,使得请求能够正确地路由到对应的 Servlet 类。
4. 创建一个 JSP 页面:在项目的 WebContent 目录下创建一个新的 JSP 文件,用于展示动态生成的内容。
5. 在 JSP 页面中引用 Servlet:使用 JSP 的内置对象和标签来调用 Servlet,并将返回的数据展示在页面上。
6. 部署和运行项目:将项目部署到 Tomcat 服务器上,并启动服务器,通过浏览器访问项目的 URL 地址,验证应用的功能和正确性。
四、实验结果通过以上步骤,我们成功地搭建了一个简单的 Java Web 应用。
在浏览器中输入项目的 URL 地址后,可以看到我们编写的 JSP 页面被正确地渲染出来,并且能够与后台的 Servlet 进行交互。
使用Eclipse进行Java应用程序开发的入门教程第一章:介绍Eclipse和Java开发环境Eclipse是一款流行的集成开发环境(IDE),可用于开发各种编程语言,包括Java。
它提供了强大的工具和功能,使Java开发变得更加高效和便捷。
1.1 Eclipse的安装首先,下载适用于Java开发的Eclipse版本。
安装过程相对简单,按照向导提示顺序执行即可完成。
确保选择Java开发工具(Java Development Tools,JDT)的安装。
1.2 JDK的安装和配置Eclipse需要Java Development Kit(JDK)才能编译和运行Java 代码。
确保已安装最新版本的JDK,并将其配置为Eclipse的默认JDK。
1.3 创建Java项目启动Eclipse后,选择"File -> New -> Java Project"来创建一个新的Java项目。
在弹出的对话框中,输入项目名称并选择所需的JDK版本。
点击"Finish"来创建项目。
第二章:Eclipse的基本功能和工作空间2.1 工作空间Eclipse使用工作空间(Workspace)来组织项目和资源文件。
在启动Eclipse时,会要求选择工作空间文件夹。
一个工作空间可以包含多个项目。
2.2 项目资源Eclipse的"Package Explorer"窗口显示项目中的所有文件和文件夹。
你可以在此窗口中创建、删除和管理项目资源。
2.3 编辑器Eclipse的编辑器是主要的编码区域,用于编写和编辑Java代码。
当你双击项目中的Java文件时,它会在编辑器中打开。
2.4 调试器Eclipse提供强大的调试功能,可帮助你发现和修复代码中的错误。
你可以设置断点、单步执行代码、查看变量的值等。
调试器是开发过程中非常有用的工具。
第三章:Java项目的创建和配置3.1 创建包和类在Eclipse的"Package Explorer"窗口中,右键点击项目,选择"New -> Package"来创建一个包。
文章标题:深入探讨eclipse中Java Web项目反编译的方法与重要性在当今数字化时代,软件开发已经成为不可或缺的一部分。
Java作为一种流行的编程语言,在企业级应用开发中被广泛应用。
而在Java开发过程中,反编译在项目维护和安全性检查中扮演着至关重要的角色。
本文将从深度和广度两个方面对eclipse中Java Web项目反编译的方法与重要性进行全面评估,并提供有价值的观点和理解。
一、eclipse中Java Web项目的反编译方法1. 导入反编译工具:在eclipse中,可以通过导入各种反编译工具来实现对Java Web项目的反编译。
常用的工具包括JD-GUI、Procyon 等,它们能够将.class文件转换为易于阅读的源代码,帮助开发者更好地理解和维护项目。
2. 设置反编译快捷键:在eclipse的设置中,可以为反编译工具设置快捷键,便于开发者在需要时快速进行反编译操作。
这样可以提高效率,减少开发过程中出现的问题。
3. 调试和修复:通过反编译工具,开发者可以方便地进行调试和修复工作,及时解决项目中的bug和错误。
这也是保障项目质量的关键步骤。
二、eclipse中Java Web项目反编译的重要性1. 代码安全性检查:反编译工具可以帮助开发者检查项目代码的安全性,避免出现潜在的漏洞和安全隐患。
通过查看反编译后的源代码,可以及时发现并修复可能存在的安全问题。
2. 项目维护与升级:在项目维护和升级过程中,使用反编译工具可以更好地理解现有的代码结构和逻辑,有助于进行代码重构和优化。
这对于提升项目的可维护性和可扩展性非常重要。
3. 知识学习和技术共享:通过反编译工具,开发者还可以学习他人的优秀代码和技术经验,提高自身的编程能力和水平。
也可以共享自己的代码给他人学习,促进技术交流和共同进步。
个人观点与理解对我个人而言,eclipse中Java Web项目反编译不仅是一项必需的技能,更是一种重要的态度和责任。
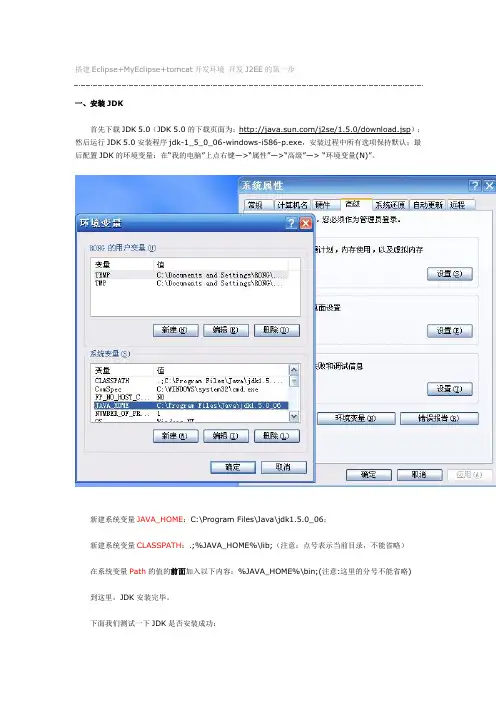
搭建Eclipse+MyEclipse+tomcat开发环境开发J2EE的第一步一、安装JDK首先下载JDK 5.0(JDK 5.0的下载页面为:/j2se/1.5.0/download.jsp);然后运行JDK 5.0安装程序jdk-1_5_0_06-windows-i586-p.exe,安装过程中所有选项保持默认;最后配置JDK的环境变量:在“我的电脑”上点右键—>“属性”—>“高级”—> “环境变量(N)”。
新建系统变量JAVA_HOME:C:\Program Files\Java\jdk1.5.0_06;新建系统变量CLASSPATH:.;%JAVA_HOME%\lib;(注意:点号表示当前目录,不能省略)在系统变量Path的值的前面加入以下内容:%JAVA_HOME%\bin;(注意:这里的分号不能省略) 到这里,JDK安装完毕。
下面我们测试一下JDK是否安装成功:将以下内容复制到记事本中:public class HelloJAVA{public static void main(String srg[]){System.out.println("Hello JAVA!");}}另存为“HelloJAVA.java”(不含引号,下同),并保存到D盘根目录下。
在命令行依次输入下图中红线所标注的命令:如果出现上图红框中所标注的内容,则说明JDK安装成功!注意:如果以后要安装诸如Eclipse、Borland JBuilder、JCreator、IntelliJ IDEA等集成开发环境(IDE,Integrated Developm ent Environment),应该在IDE中编译运行一个简单的HelloWorld程序,以保证IDE可以识别出JDK的位置。
二、安装Tomcat首先下载jakarta-tomcat-5.0.30.zip,之所以下载免安装版的好处是可以使用多个Tomcat (jakarta-tomcat-5.0.30.zip的下载页面为:/tomcat/tomcat-5/v5.0.30/bin/);然后将jakarta-tomcat-5.0.30.zip直接解压到D盘根目录:最后配置Tomcat的环境变量:在“我的电脑”上点右键—>“属性”—>“高级”—> “环境变量(N)”。
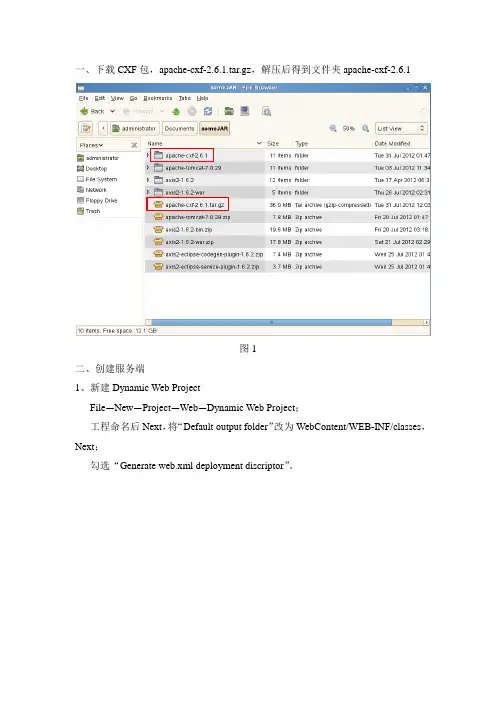
一、下载CXF包,apache-cxf-2.6.1.tar.gz,解压后得到文件夹apache-cxf-2.6.1图1二、创建服务端1、新建Dynamic Web ProjectFile—New—Project—Web—Dynamic Web Project;工程命名后Next,将“Default output folder”改为WebContent/WEB-INF/classes,Next;勾选“Generate web.xml deployment discriptor”。
图2图3图42、将解压后apache-cxf-2.6.1文件夹lib文件夹中的JAR文件导入工程下WebContent/WEB-INF/lib中,或直接复制到相应文件夹下,刷新工程。
3、创建服务接口工程右键—New—Interface,添加代码:package com.yxj;import javax.jws.WebService;import javax.jws.WebParam;import javax.jws.WebMethod;@WebServicepublic interface IcxfWB {@WebMethodString sayHello(@WebParam(name="name") String name);}说明:“@WebService”标记表示该接口是一个WebService服务,@ WebMethod标记表示WebService中的方法;@WebParam(name="paramName")表示方法中的参数,name属性限制了参数的名称,若没有指定该属性,参数将会被重命名。
4、创建服务实现类package com.yxj;public class CxfWBImpl implements IcxfWB {public String sayHello(String name) {return"Hello "+name;}}5、编辑WebContent/WEB-INF下web.xml文件<?xml version="1.0"encoding="UTF-8"?><web-app xmlns:xsi="/2001/XMLSchema-instance"xmlns="/xml/ns/javaee"xmlns:web="/xml/ns/javaee/web-app_2_5.xsd"xsi:schemaLocation="/xml/ns/javaee/xml/ns/javaee/web-app_3_0.xsd"id="WebApp_ID"version="3.0"><display-name>CXFService</display-name><context-param><param-name>contextConfigLocation</param-name><param-value>WEB-INF/service-beans.xml</param-value></context-param><listener><listener-class>org.springframework.web.context.ContextLoaderListener</listener-class></listener><servlet><servlet-name>CXFServlet</servlet-name><servlet-class>org.apache.cxf.transport.servlet.CXFServlet</servlet-class></servlet><servlet-mapping><servlet-name>CXFServlet</servlet-name><url-pattern>/*</url-pattern></servlet-mapping></web-app>其中,<context-param>指定了spring的相应配置,在<param-value>中指定了配置文件的位置;<servlet-mapping>下的<url-pattern>指明了服务访问时地址的形式,“/*”代表URL地址中,包名称后直接跟服务endpoint地址,若指明<url-pattern>为“/webservice/*”,则URL为包名/ webservice/endpoint?wsdl。
课题:第一章 Java Web概述【教学目标】掌握JSP运行环境的搭建,能进行简单的JSP程序编写与运行。
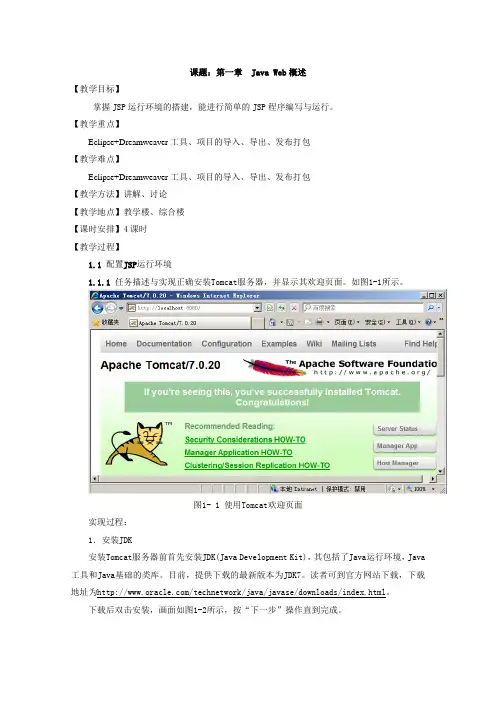
【教学重点】Eclipse+Dreamweaver工具、项目的导入、导出、发布打包【教学难点】Eclipse+Dreamweaver工具、项目的导入、导出、发布打包【教学方法】讲解、讨论【教学地点】教学楼、综合楼【课时安排】4课时【教学过程】1.1 配置JSP运行环境1.1.1 任务描述与实现正确安装Tomcat服务器,并显示其欢迎页面。
如图1-1所示。
图1- 1 使用Tomcat欢迎页面实现过程:1.安装JDK安装Tomcat服务器前首先安装JDK(Java Development Kit),其包括了Java运行环境,Java 工具和Java基础的类库。
目前,提供下载的最新版本为JDK7。
读者可到官方网站下载,下载地址为/technetwork/java/javase/downloads/index.html。
下载后双击安装,画面如图1-2所示,按“下一步”操作直到完成。
图1- 2 JDK安装界面2.安装TomcatTomcat官方网站下载地址:。
本书采用的版本是Tomcat-7.0.20。
下载后,双击安装,如图1-3所示。
点击Next到第一步,进行安装组件选择,如图1-4所示。
第二步选择路径,按照系统默认路径即可。
第三步为配置Tomcat端口信息和账号信息,如图1-5所示,按照实际配置即可。
第四步为选择JDK的安装路径,如图1-6所示,选择在之前第1步操作中安装的JDK所在的位置。
之后单击“Next”开始安装。
安装完毕后,提示安装完成,如图1-7所示。
单击“Finish”完成Tomcat的安装。
安装完成之后,在程序菜单中可以看到Tomcat的选项,如图1-8所示。
点击Monitor Tomcat,可在任务栏看到Tomcat的服务图标,如图1-9所示,双击该图标,弹出如图1-10所示的Tomcat 启动界面,在此界面中可以选择启动或停止Tomcat服务。
EclipseJava编程入门教程Eclipse Java编程入门教程第一章:介绍Eclipse和Java编程Eclipse是一个广泛使用的集成开发环境(IDE),用于开发各种应用程序,尤其是Java应用程序。
Java是一种面向对象的编程语言,广泛应用于企业级应用开发和移动应用开发。
本章将介绍Eclipse的基本概念和Java编程的基础知识。
1.1 Eclipse的安装和配置要使用Eclipse进行Java编程,首先需要在官方网站上下载并安装Eclipse IDE。
安装完成后,打开Eclipse,配置Java开发环境。
这包括设置JDK路径、创建工作空间和配置Eclipse的界面。
1.2 创建Java项目在Eclipse中,可以通过“New Project”选项创建一个Java项目。
选择项目类型和命名,在项目目录下创建源文件夹和包。
这样就能开始编写Java代码了。
第二章:Eclipse编程基础了解了Eclipse的基本使用方法后,本章将重点介绍Java编程的基础知识,包括变量、数据类型、运算符、流程控制和函数等。
2.1 变量和数据类型Java是一种强类型语言,每个变量都必须先声明,然后才能使用。
变量可以存储不同类型的数据,例如整数、浮点数、字符和布尔值等。
本节将介绍Java的各种数据类型,以及如何声明和使用变量。
2.2 运算符和表达式Java提供了多种运算符,包括算术运算符、赋值运算符、比较运算符和逻辑运算符等。
通过运算符和表达式,可以进行各种数学计算和逻辑判断。
本节将详细介绍Java的运算符和表达式的使用方法。
2.3 流程控制流程控制是编程中的重要概念,用于控制程序的执行流程。
Java提供了多种流程控制语句,包括条件语句(if-else语句、switch语句)、循环语句(for循环、while循环)和跳转语句(break语句、continue语句)。
本节将介绍这些流程控制语句的使用方法。
2.4 函数和方法函数是一段封装了特定功能的代码块,可以重复使用。
Developing Web applications withTomcat and EclipseRequired componentsThe Eclipse V3.2 Callisto integrated development environment (IDE) includes tools for doing Web development and integrating with servers. So, aside from the software development kit (SDK), you need only Eclipse and Apache Tomcat installed. The versions featured in this article are listed below.Table 1. Components and versions usedComponent Version used in this articleEclipse Platform 3.2.2Java EE 5 SDK 1.5.0_09Apache Tomcat 5.5.20The Eclipse IDE is an open source IDE used as the development environment for your Java™Server Pages (JSPs) and Java files. With the Web and Java 2 Platform, Enterprise Edition (J2EE) Development tools installed, Eclipse is great tool for creating HTML, JSPs, and servlets.You need the Java SDK to run servlets on your machine. Finally, Apache Tomcat is an open source Web and servlet container, used in the official reference implementations for Java Servlet and Java Server Pages. InstallationInstallation of Eclipse and Tomcat is similar —both are extracted from the archive file format into a folder on your hard disk. If you ever want to uninstall either, it's as simple as deleting the directory in which you extracted the files.Install EclipseTo install the Eclipse IDE, unpack the compressed (.zip or .tar.gz) file you downloaded from Eclipse, then move the unpacked folder into a convenient location. I try to install it in a location that follows the conventions of whatever operating system I'm using. If I'm installing Eclipse on a Macintosh, I put the Eclipse folder in the Applications folder. If I'm using Microsoft™ Windows™, I put the unpacked folder into the C:\Program Files directory.Once you've downloaded and installed Eclipse, start it up. Before you can create a Web project, you need to install the J2EE and Web Development plug-ins. Fortunately, it's easy to install the plug-in using the Callisto Discovery Site.Install the Web toolsWith the Eclipse IDE running, select Help > Software Updates > Find and Install. This option lets you download and install the Web tools without going to a Web site.Select Search for New Features to Install, as shown below, then click Next.Figure 1. Install/Update windowSelect Callisto Discovery Site, as shown below, then click Next.Figure 2. Select the Callisto Discovery SiteUnder Callisto Discovery Site, check the Web and J2EE Development box. The wizard immediately warns you that you're missing dependencies. Click Select Required, and these warnings should disappear. Some or all of the components in the Graphical Editors and Frameworks and Models and Model Development categories are selected (as shown in Figure 3) because they're required for the installation of the Web and J2EE plug-ins.Figure 3. Select features for installationClick Next to continue, and license agreements appear for each feature you've selected. If you agree with the licenses, accept them and follow the wizard through the rest of the process. When the IDE is finished installing the plug-ins, it asks you to restart Eclipse in order for the changes to take effect. Be sure you restart the IDE before continuing.After you restart the IDE, the new features are available to begin developing dynamic Web projects.Install TomcatTo install Apache Tomcat, extract the files from the downloaded archive and place them into a directory. I put them in my C:\apps directory to make them easy to locate later. That's it for now; use Eclipse as shown later to start Tomcat.Create a new Web projectFrom the Eclipse IDE, select File > New > Project to view the project wizards. Type Web in the Wizards box, and the New Project window filters the wizards to show the ones that match. This is an easy way to locate the wizard you want instead of going through each item.Choose Dynamic Web Project from the list. You use the Standard Web Project Wizard to make static HTML Web projects. You can technically use Tomcat to run static Web sites, although a Web server such as Apache Web Server may be a better choice for static content. Web servers built specifically for serving up static pages tend to have less overhead and are tuned for that purpose. Target a runtimeUnder Target Runtime, you see <None>, as shown in Figure 4, because you haven't created a runtime yet for Apache Tomcat. Click New to open the New Target Runtime Wizard. Select Apache Tomcat V5.5 from the Apache folder, as shown in Figure 5, then click Next.Figure 4. Create a new dynamic Web projectFigure 5. Create a new server runtimeNow you have the opportunity to name your runtime, although the default name Apache Tomcat V5.5 is fine. Click Browse to locate the base folder for your Apache Tomcat configuration (mine is C:\apps\apache-tomcat-5.5.20, as shown in Figure 6). I recommend leaving the IBM® Java Runtime Environment (JRE) version the same as the workbench default JRE, unless you have a specificreason to change it. Once you've entered a valid directory, click Finish to create the runtime configuration.Figure 6. Define the server locationYou're asked if you want to switch to the J2EE Perspective. I always answer yes because that perspective includes views like the Servers view, which help to start and stop Tomcat later. You can always open the Servers view by selecting Window > Show View.Add the serverIn the Servers view is a view that contains nothing. This view is for application and Web servers; it lets you control them and monitor their status. To control Tomcat directly from the comfort of the IDE, add a reference to Tomcat by selecting New > Server from the context-sensitive menu. The New Server wizard, as shown in Figure 7, will default to the Apache Tomcat V5.5 runtime you just created.Figure 7. Define a new serverClick Next. You're asked whether you want to add projects to the server.Select the project you created in the previous steps, then click Add.Figure 8. Add the projects to the serverClick Finish to close the wizard. Now the Servers view contains the TomcatV5.5 Server with the project under it.Figure 9. The Tomcat server in the Servers viewCreate a sample pageThe easiest way to test your new dynamic Web project and Tomcat server integration is to create a simple JSP and deploy it to Tomcat. You can create the new JSP file by selecting File > New > Other, or you can use the context-sensitive menu by right-clicking the project name in the Project Explorer view and selecting New > JSP.Make sure the parent folder is WebContent and name the file index.jsp. Click Finish to create the page using the default template. If you click Next, you can choose different templates to use (such as HTML or XHTML) for the new page. The defaults are fine for this test.The page code shown below displays a simple date so you can see it working.Listing 1. Contents of index.jspDeploy the pageNow that the test page is complete, use Eclipse to redeploy it to Apache Tomcat. In the Servers view, notice that State is set to Republish. That is because changes have been made since the project was last deployed to the server. Right-click the server and select Publish from the menu. The state changes to Synchronized once the project has been deployed to the server.With the project successfully deployed and the server started, open a browser and navigate to http://localhost:8080/[ProjectName]/ (where [ProjectName] is the name of the dynamic Web project you created). The new Web page you created appears, and the date should be current. If you refresh the page, the date changes.Figure 10. Output of index.jsp in a browserHello World servletYou can add Java servlets to your project and deploy them. To create a quick servlet you can use for testing purposes, use the Servlet Wizard by right-clicking your dynamic Web project in the Project Explorer view and selecting New > Other. Under the Web folder, select Servlet, then click Next.Add the package name com.example.servlets next to Java Package and add HelloServlet next to Class name. Click Finish. This is an example, so the defaults are fine. The Eclipse IDE generates a servlet class for you. To watch the test servlet in action, add a line in the doGet() method to print a message to the ResponseWriter. The servlet class should look like the one shown below.Listing 2. Contents of HelloServlet.javapackage com.example.servlets;import java.io.IOException;import javax.servlet.ServletException;import javax.servlet.http.HttpServletRequest;import javax.servlet.http.HttpServletResponse;/*** Servlet implementation class for Servlet: HelloServlet**/public class HelloServlet extends javax.servlet.http.HttpServletimplements javax.servlet.Servlet {/* (non-Java-doc)* @see javax.servlet.http.HttpServlet#HttpServlet()*/public HelloServlet() {super();}/* (non-Java-doc)* @see javax.servlet.http.HttpServlet#doGet(HttpServletRequest request, HttpServletResponse response)*/protected void doGet(HttpServletRequest request, HttpServletResponse response)throws ServletException, IOException {response.getWriter().write("Hello, world!");}/* (non-Java-doc)* @see javax.servlet.http.HttpServlet#doPost(HttpServletRequest request, HttpServletResponse response)*/protected void doPost(HttpServletRequest request, HttpServletResponse response)throws ServletException, IOException {// TODO Auto-generated method stub}}After you add the servlet, the Eclipse IDE notes that your project has changed. Look again at the Servers view; Restart now appears in the Status column next to the Tomcat server. To restart the server, right-click the server in the Servers view, then select Restart > Start. Open a browser and navigate to http://localhost:8080/[ProjectName]/HelloServlet (where [ProjectName] is the name of your dynamic Web project). The text "Hello, world!" appears in the browser window. You can add the date, similar to the code in the index.jsp file, to the doGet() method, and redeploy the servlet using the Eclipse IDE.用 Tomcat 和 Eclipse开发 Web 应用程序所需的组件Eclipse V3.2 Callisto 集成开发环境 (IDE) 包括了用于 Web 开发及与服务器集成的工具。
java创建项目的几种方法一、使用IDE创建项目。
1.1 Eclipse创建项目。
在Java开发的世界里,Eclipse就像一位老朋友,很多开发者对它情有独钟。
要在Eclipse中创建项目那是相当简单的。
首先打开Eclipse,映入眼帘的是熟悉的界面。
点击“File”菜单,然后选择“New”,再点击“Java Project”,就像走进一扇通往新征程的门。
在这里,你可以给项目取个响亮的名字,这名字就如同项目的招牌,要简洁明了又能体现项目的特色。
然后一路点击“Next”,设置一些项目相关的属性,比如源文件的编码格式等,这些设置虽然看似不起眼,但却是构建稳固项目大厦的小砖头。
最后点击“Finish”,一个崭新的Java项目就诞生了,就像一个新生儿呱呱坠地,充满了无限的可能。
1.2 IntelliJ IDEA创建项目。
IntelliJ IDEA可是Java开发界的明星,它的创建项目方式也独具魅力。
启动IDEA后,在欢迎界面直接选择“Create New Project”,这感觉就像是踏上了一段充满惊喜的冒险之旅。
接着选择“Java”,然后可以选择项目的SDK版本,这就好比给项目挑选合适的鞋子,合适的SDK版本能让项目跑得又快又稳。
之后同样给项目取个好名字,再根据自己的需求配置项目结构,比如模块的划分等。
这一系列操作下来,一个功能完备的Java项目就在你的手中诞生了,真可谓是一气呵成。
二、命令行创建项目。
2.1 手动创建项目结构。
用命令行创建Java项目就有点像手工打造一件艺术品,虽然麻烦点,但却充满了成就感。
首先要创建项目的目录结构,这就如同搭建房屋的框架。
比如创建“src”目录用来存放源代码,“bin”目录用来存放编译后的字节码文件。
这时候你得小心翼翼,就像走钢丝一样,不能有丝毫差错。
然后创建一个简单的Java类文件,在文件中编写代码,这代码就像是赋予这个项目灵魂的魔法咒语。
编写完代码后,通过命令行编译和运行这个项目,当看到程序成功运行的那一刻,就像挖到了宝藏一样兴奋。
使用eclipse工具开发servlet步骤
以下是使用 Eclipse 工具开发 Servlet 的步骤:
1. 打开 Eclipse IDE,并创建一个新的 Web 项目。
2. 在项目中创建一个新的 Java 类,并选择继承 javax.servlet.Servlet 接口。
3. 在类中实现 doGet 或 doPost 方法,根据需要处理 HTTP 请求。
4. 在 doGet 或 doPost 方法中编写逻辑,获取请求参数、处理请求并生成响应。
5. 如果需要使用数据库或其他外部资源,可以使用 JDBC 或其他相关技术进行集成。
6. 在 Eclipse 中配置 Tomcat 服务器,将项目部署到 Tomcat 上。
7. 启动 Tomcat 服务器,在浏览器中输入相应的 URL 访问 Servlet。
8. 使用 Eclipse 的调试功能调试 Servlet,检查变量的值、控制流程等。
9. 对 Servlet 进行测试,确保其正确性和稳定性。
10. 根据需要添加其他方法,如 doPut 和 doDelete,以处理不同类型的请求。
11. 可以使用过滤器、监听器等来增强 Servlet 的功能。
12. 最后,将开发完成的 Servlet 打包部署到生产环境中。
这是一个基本的使用 Eclipse 开发 Servlet 的步骤概述。
根据具体的需求和项目要求,可能会有一些额外的步骤或配置。
1 搭建Java Web开发环境1.1 Java Web开发环境概述设计与开发Java Web应用程序,需要开发的软件系统,称为“开发环境”。
Java Web应用程序的开发环境包括:JDK、Web服务器、数据库系统、Web浏览器。
1、JDK——Java语言程序包JDK的功能是编写、调试与运行Java程序,是Java程序设计的最基本的软件系统,最新的版本是Jdk-6u23(软件名称是:jdk1.6.0_23)。
JDK的主要部件及功能有:(1)编译与运行程序Java程序Javac.exe——用于将Java源程序文件编译为“字节码”文件。
Java.exe——运行编译好的字节码文件,显示程序运行结果。
(2)JREJRE是Java运行环境。
(3)JVMJVM是Java的虚拟机,是JRE的核心部分。
设计和运行Java程序,必须依靠JDK。
2、Java Web服务器(中间件)Web服务器是运行Java Web应用程序的容器,只有将设计开发的Java Web应用程序(B/S架构应用系统)放置在这样的容器中,才能使网络上的用户通过浏览器进行访问。
目前,主要的Java Web 服务器有以下几种:(1)Apache Tomcat是目前应用最广、最为流行的小型、轻量级Web服务器,它支持JSP和Servlet(服务器端的Applet)技术。
它是开源和免费的,也是目前学习与开发Java Web应用程序的首选。
可用于开发中小型的Java Web应用软件。
(2)EBA WebLogicEBA WebLogic是EBA公司开发的Java Web服务器,它有三个版本:企业版WebLogic Server,标准版WebLogic Enterprise,简化版WebLogic Portal。
WebLogic的功能强大,支持企业级、多层次的分布式Web应用。
但是使用成本高,一个标准版的WebLogic在一台计算机上使用授权费用需要8.5万元。
《SDET-软件开发环境与工具》课程实验报告实验六_Web开发和数据库一、实验目的:●熟悉Web开发的相关概念。
了解WTP工具的功能和使用方法。
了解如Web服务器、JSP和Jave Bean的概念和它们的关系。
学习下载、安装和使用Web服务器Tomcat。
●熟悉JSF的概念,使用JSF开发Wen应用(JSF项目)的流程和方法。
●熟悉数据库工具DTP的概念。
学习安装dtp-sdk。
安装MySQL数据库,使用DTP管理数据库。
学习数据库表的操作。
了解“对象持久化”的概念。
了解JPA的概念,以及JPA工具Dali。
学习应用Hibernate的概念和使用方法。
二、实验内容:(教材9~10章内容)1.教材第24章内容:熟悉Web开发的相关概念。
了解WTP工具的功能和使用方法。
了解如Web服务器、JSP和Jave Bean的概念和它们的关系。
学习下载、安装和使用Web服务器Tomcat。
2.教材第25章内容:熟悉JSF的概念,使用JSF开发Wen应用(JSF项目)的流程和方法。
3.教材第26章内容:熟悉数据库工具DTP的概念。
学习安装dtp-sdk。
安装MySQL数据库,使用DTP管理数据库。
学习数据库表的操作。
了解“对象持久化”的概念。
了解JPA的概念,以及JPA工具Dali。
学习应用Hibernate的概念和使用方法。
三、实验内容类型:验证、体验、操作型四、实验学时:6学时五、实验步骤:1.参照教材第24章:熟悉Web开发的相关概念。
了解WTP工具的功能和使用方法。
了解如Web服务器、JSP和Jave Bean的概念和它们的关系。
学习下载、安装和使用Web服务器Tomcat。
⏹看视频、看书(参见教材P376~386)⏹按照教材的实验步骤实现教材中示例程序。
2.参照教材第25章:熟悉JSF的概念,使用JSF开发Web应用(JSF项目)的流程和方法。
⏹看视频、看书(参见教材P387~395)⏹按照教材的实验步骤实现教材中示例程序。
一、直接建立Maven项目方法1,建立Maven项目接下来使用Eclipse的maven构建一个web项目,以构建SpringMVC项目为例:1.1 选择建立Maven Project选择File -> New -> Other,在New窗口中选择Maven -> Maven Project。
点击newxt。
1.2 选择项目路径Use default Workspace location默认工作空间。
1.3 选择项目类型在Artifact Id中选择maven-archetype-webapp1.4 输入Group ID和 Artifact ID,以及PackageGroup ID一般写大项目名称。
Artifact ID是子项目名称。
例如Spring的web包,Group ID:org.springframework,artifactId:spring-web。
Package是默认给你建一个包,不写也可以。
1.5 刚建立好后的文件结构如下图如果这里显示的内容多,一般是Filters设置的问题。
或perspective为JavaEE模式,改成Java模式就可以了。
2,配置项目接下来就需要更改好多配置了。
2.1 添加Source文件夹接下来需要添加src/main/java,src/test/java ,src/test/resources三个文件夹。
右键项目根目录点击New -> Source Folder,建出这三个文件夹。
注意不是建普通的Folder,而是Source Folder。
2.2 更改class路径右键项目,Java Build Path -> Source下面应该有4个文件夹。
src/main/java,src/main /resources,src/test/java ,src/test/resources。
双击每个文件夹的Output folder,选择路径。
javaeplicse使用方法JavaEclipse是一个强大的开发工具,可用于编写、调试和测试Java 应用程序。
以下是 Java Eclipse 的使用方法:1. 下载和安装 Eclipse您可以从 Eclipse 官网上下载最新版的 Eclipse IDE。
下载完成后,运行安装程序并按照提示进行安装。
2. 创建一个新项目在 Eclipse 中,您需要创建一个新项目来开始编写代码。
在Eclipse 的主界面上,单击“File”菜单,然后选择“New”和“Java Project”。
3. 添加类文件在 Eclipse 中,您需要创建一个或多个类文件来编写代码。
要添加一个新的类文件,请右键单击项目名称,然后选择“New”和“Class”。
4. 编写代码在 Eclipse 中,您可以使用代码编辑器编写代码。
在编辑器中输入代码,然后保存文件。
5. 编译代码在 Eclipse 中,您可以使用内置的编译器来编译代码。
单击“Project”菜单,然后选择“Build Project”。
如果代码存在语法错误,则编译器将显示错误消息。
6. 调试代码在 Eclipse 中,您可以使用内置的调试器来调试代码。
单击“Debug”按钮,在调试器中设置断点和监视变量。
7. 运行代码在 Eclipse 中,您可以使用内置的运行器来运行代码。
单击“Run”按钮,在运行器中选择要运行的类和方法。
8. 导出项目在 Eclipse 中,您可以将项目导出为可执行 JAR 文件。
单击“File”菜单,然后选择“Export”和“Java”和“Runnable JAR file”。
以上是 Java Eclipse 的使用方法,希望能帮助您快速入门。
简述使用eclipse开发java程序的基本步骤
1.安装eclipse:从官网下载eclipse安装程序,按照提示安装。
2. 创建java项目:打开eclipse,选择“File”菜单中的“New”-“Java Project”,输入项目名称和存储路径,点击“Finish”按钮创建项目。
3. 新建java类:在项目中右键点击“src”文件夹,选择“New”-“Class”,输入类名和包名,勾选“public static void main(String[] args)”选项,点击“Finish”按钮创建类。
4. 编写java代码:在新建的类中编写java代码。
5. 运行程序:点击“Run”菜单中的“Run”按钮或按下“Ctrl+F11”快捷键运行程序。
6. 调试程序:在代码中设置断点,点击“Debug”菜单中的“Debug”按钮或按下“F11”快捷键启动调试。
7. 导出程序:点击“File”菜单中的“Export”选项,选择“Java”-“Runnable JAR file”,按照提示设置导出选项,点击“Finish”
按钮导出程序。
以上是使用eclipse开发java程序的基本步骤,可以根据实际
需求进行扩展和优化。
- 1 -。
使用Eclipse开发Java Web应用Eclipse是一个开源的Java集成开发环境(IDE),被广泛应用
于Java开发领域。
使用Eclipse,开发人员可以方便地进行Java Web应用开发。
本文将介绍使用Eclipse来开发Java Web应用的
相关技术,以及一些常见的开发技巧。
一、Eclipse安装和配置
首先,需要下载并安装Eclipse IDE。
在官网上,有多个版本的Eclipse可以选择。
对于Java Web应用开发,我们可以选择Java
EE版本,其中已经包含了Web开发所需的插件。
安装完成后需要配置Eclipse,以便可以方便地进行Java Web应用开发。
1.配置Java环境:在Eclipse首次运行之前,需要配置Java环境。
进入Eclipse的“Windows”菜单,选择“Preferences”选项,打开“Java”-“Installed JREs”-“Add”菜单,选择JDK路径设置Java环境。
2.配置Tomcat服务器:Tomcat是一个开源的Java Web服务器。
我们需要在Eclipse中配置Tomcat服务器。
进入“Preferences”-“Server”-“Runtime Environment”设置Tomcat服务器的安装路径。
3.创建Web应用:需要在Eclipse中创建一个Web项目。
进入“File”菜单,选择“New”-“Other”,然后选择“Web”-“Dynamic Web Project”选项,按照提示设置项目名称、版本和目标运行时环境。
二、Java Web应用开发
在Eclipse中,可以使用JSP和Servlet进行Java Web应用开发。
JSP是Java服务器页面,它与HTML和CSS相结合,可以生成动
态的Web页面。
Servlet是Java编写的服务器端程序,用于接收并
处理HTTP请求,响应返回结果。
1.创建JSP页面:在Eclipse中创建JSP页面,可以通过“File”
菜单,选择“New”-“JSP”选项,然后按照提示设置页面的名称和存
储路径。
在JSP页面中,可以使用Java语言和标签库来生成动态
内容。
```
<%@ page language="java" contentType="text/html; charset=UTF-8"
pageEncoding="UTF-8"%>
<!DOCTYPE html>
<html>
<head>
<meta charset="UTF-8">
<title>首页</title>
</head>
<body>
<h1>欢迎访问我的网站!</h1>
<p>今天是 <%= new java.util.Date() %>。
</p>
</body>
</html>
```
2.创建Servlet程序:在Eclipse中创建Servlet程序,可以通过“File”菜单,选择“New”-“Servlet”选项,然后按照提示设置程序的名称、包名和继承关系。
在Servlet程序中,可以实现与客户端的交互,并生成动态的Web页面。
```
@WebServlet("/hello")
public class HelloWorldServlet extends HttpServlet {
private static final long serialVersionUID = 1L;
protected void doGet(HttpServletRequest request, HttpServletResponse response) throws ServletException, IOException {
response.setContentType("text/html; charset=UTF-8");
PrintWriter out = response.getWriter();
out.println("<html><head><title>Hello,
World</title></head>");
out.println("<body>");
out.println("<h1>Hello, World</h1>");
out.println("</body></html>");
}
}
```
3.发布和运行Web应用:在Eclipse中,可以直接将Web应用部署到Tomcat服务器中。
在项目上点击右键,选择“Run As”-“Run on Server”选项,选择已配置的Tomcat服务器,然后按照提示启动Web应用。
启动成功后,可以在浏览器中访问Web应用。
三、Eclipse常见技巧
除了以上介绍的Java Web应用开发技术之外,还有许多Eclipse的常见技巧可以提高开发效率。
1.代码自动提示:在Eclipse中,可以启用代码自动提示功能。
在输入Java代码时,Eclipse会自动列出所有可用的方法和变量,以提供开发人员方便快捷的代码补全。
2.调试功能:在Eclipse中,可以使用调试功能来排除代码中的错误。
在代码中添加断点,然后按下“Debug”按钮,Eclipse将在程序运行时停止在断点处,允许开发人员逐步执行代码和跟踪变量的值。
3.版本控制:Eclipse有丰富的版本控制插件,例如Git和SVN。
使用版本控制,可以方便地管理代码库和跟踪代码变更,从而保
证项目的稳定性和可靠性。
总结:
使用Eclipse开发Java Web应用,可以让开发人员更加高效地
完成Web应用的开发。
本文介绍了Eclipse的基本安装和配置,以及Java Web应用开发的相关技术和常见技巧。
通过运用这些技术
和技巧,开发人员可以更加高效地开发出高质量的Java Web应用。