JavaWeb应用开发J2EE和Tomcat
- 格式:ppt
- 大小:1.21 MB
- 文档页数:10
一、Tomcat Tomcat 服务器是一个免费的开放源代码的Web 应用服务器 它是Apache 软件基金会 Apache Software Foundation 的Jakarta 项目中的一个核心项目 由Apache、Sun 和其他一些公司及个人共同开发而成。
由于有了Sun 的参与和支持 最新的Servlet 和JSP 规范总是能在Tomcat 中得到体现 Tomcat 5 支持最新的Servlet 2.4 和JSP 2.0 规范。
因为Tomcat 技术先进、性能稳定 而且免费 因而深受Java 爱好者的喜爱并得到了部分软件开发商的认可 成为目前比较流行的Web 应用服务器。
Tomcat 很受广大程序员的喜欢 因为它运行时占用的系统资源小 扩展性好 支持负载平衡与邮件服务等开发应用系统常用的功能 而且它还在不断的改进和完善中 任何一个感兴趣的程序员都可以更改它或在其中加入新的功能。
Tomcat 是一个小型的轻量级应用服务器 在中小型系统和并发访问用户不是很多的场合下被普遍使用 是开发和调试JSP 程序的首选。
对于一个初学者来说 可以这样认为 当在一台机器上配置好Apache 服务器 可利用它响应对HTML 页面的访问请求。
实际上Tomcat 部分是Apache 服务器的扩展 但它是独立运行的 所以当你运行tomcat 时 它实际上作为一个与Apache 独立的进程单独运行的。
这里的诀窍是 当配置正确时 Apache 为HTML页面服务 而Tomcat 实际上运行JSP 页面和Servlet。
另外 Tomcat和IIS、Apache等Web服务器一样 具有处理HTML页面的功能 另外它还是一个Servlet和JSP容器 独立的Servlet容器是Tomcat的默认模式。
不过 Tomcat处理静态HTML的能力不如Apache 服务器。
Tomcat 最新版本是4.0x.4.0x与3.x的架构不同 而是重新设计的。
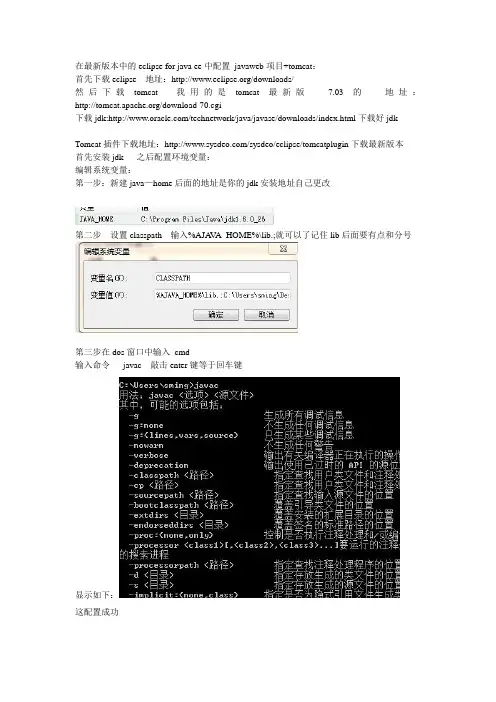
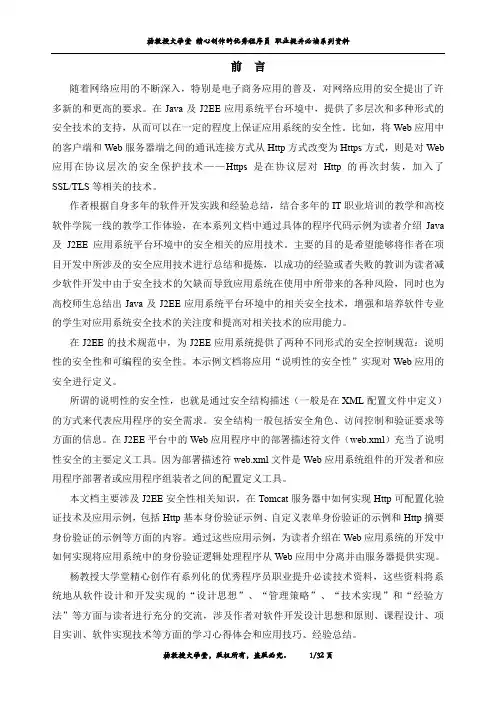
在最新版本中的eclipse for java ee中配置javaweb项目+tomcat:首先下载eclipse 地址:/downloads/然后下载tomcat 我用的是tomcat最新版7.03的地址:/download-70.cgi下载jdk:/technetwork/java/javase/downloads/index.html下载好jdkTomcat插件下载地址:/sysdeo/eclipse/tomcatplugin下载最新版本首先安装jdk 之后配置环境变量:编辑系统变量:第一步:新建java—home后面的地址是你的jdk安装地址自己更改第二步设置classpath 输入%AJA V A_HOME%\lib.;就可以了记住lib后面要有点和分号第三步在dos窗口中输入cmd输入命令javac 敲击enter键等于回车键显示如下:这配置成功配置tomcat7.03第一步:安装好tomcat7点击next同意第三步选择full之后输入4:点击next输入你的用户名和密码5:点击next6:finsh然后我的电脑->属性————系统保护-----------高级---------环境变量-----------按照如下在系统变量中输入1:2:3:4:在classpath下输入tomcat安装的地址在tomcat——lib目录下——找到servelt_api如下图之后安装javaEE 将tomcat插件解压放到:javaEE的plugins文件夹下在Step1:之后新建links文件夹上图有:Step2:在里面新建文件Step3:加入如下内容:你的eclipse中的pugins文件夹下的插件地址:path=F:\eclipse+tomcat\javaee\eclipse\plugins\com.sysdeo.eclipse.tomcat_3.3.0\启动:将看到tom猫图标表示配置插件成功eclipse:1:点击window2:按照如下操作3:按照如下选择advanced:4:点击java --------installedjres点击ok5:点击server 选择add添加一个server tomcat 7.0-------点击ok5新建一个dymaic webproject 如下图必须设置一样6,在webcontent目录下新建一个jsp页面6:点击右键——--选择————runas---RunOnServer运行如上图。
前言随着网络应用的不断深入,特别是电子商务应用的普及,对网络应用的安全提出了许多新的和更高的要求。
在Java及J2EE应用系统平台环境中,提供了多层次和多种形式的安全技术的支持,从而可以在一定的程度上保证应用系统的安全性。
比如,将Web应用中的客户端和Web服务器端之间的通讯连接方式从Http方式改变为Https方式,则是对Web 应用在协议层次的安全保护技术——Https是在协议层对Http的再次封装,加入了SSL/TLS等相关的技术。
作者根据自身多年的软件开发实践和经验总结,结合多年的IT职业培训的教学和高校软件学院一线的教学工作体验,在本系列文档中通过具体的程序代码示例为读者介绍Java 及J2EE应用系统平台环境中的安全相关的应用技术。
主要的目的是希望能够将作者在项目开发中所涉及的安全应用技术进行总结和提炼,以成功的经验或者失败的教训为读者减少软件开发中由于安全技术的欠缺而导致应用系统在使用中所带来的各种风险,同时也为高校师生总结出Java及J2EE应用系统平台环境中的相关安全技术,增强和培养软件专业的学生对应用系统安全技术的关注度和提高对相关技术的应用能力。
在J2EE的技术规范中,为J2EE应用系统提供了两种不同形式的安全控制规范:说明性的安全性和可编程的安全性。
本示例文档将应用“说明性的安全性”实现对Web应用的安全进行定义。
所谓的说明性的安全性,也就是通过安全结构描述(一般是在XML配置文件中定义)的方式来代表应用程序的安全需求。
安全结构一般包括安全角色、访问控制和验证要求等方面的信息。
在J2EE平台中的Web应用程序中的部署描述符文件(web.xml)充当了说明性安全的主要定义工具。
因为部署描述符web.xml文件是Web应用系统组件的开发者和应用程序部署者或应用程序组装者之间的配置定义工具。
本文档主要涉及J2EE安全性相关知识,在Tomcat服务器中如何实现Http可配置化验证技术及应用示例,包括Http基本身份验证示例、自定义表单身份验证的示例和Http摘要身份验证的示例等方面的内容。

Unit 1 Web应用体系架构简介1.有关C/S、B/S结构以下说法错误的选项是:a)在C/S结构,即客户端/效劳器结构中,有专门的数据库效劳器,但客户端还要运行客户端应用程序,这也叫做胖客户端。
b)在B/S结构中,客户端在阅读器中只负责表示层逻辑的实现,业务逻辑和数据库都在效劳器端运行。
也确实是说,应用程序部署在效劳器端,客户端通过阅读器访问应用程序。
c)通常B/S结构中,客户端发送HTTP请求消息传给效劳器,效劳器将请求传递给Web应用程序,Web应用程序处置请求,并把相应的HTML页面传给客户端。
d)Web应用是基于C/S结构的,也确实是客户端/效劳器结构。
d2.以下HTTP消息的题头域的含义明白得正确的选项是:(三个答案)a)Accept指示响应能够同意的媒体类型。
若是没有Accept题头域,那么效劳器能够平安的假设客户端同意所有的媒介类型。
如:accept :image/gif,accept:image/jpegb)Accept-Language 指示页面的编程语言,如:Accept-Language:javac)Content-Type 指示发送到接受者的消息体的媒介类型,如:Content-type:text/htmld)User-Agent包括发出请求消息的客户端的信息,如:User-Agent:Mozilla/acd3.以下HTTP响应状态码的含义描述正确的选项是?(两个答案)a)200 OK 表示请求成功b)400 不良请求表示服务器未发现与请求URI匹配的内容。
c)404 未发现表示由于语法错误而导致服务器无法理解请求信息d)500 内部服务器错误,无法处理请求ad5. 两大Web效劳器端技术和JSP的特性的对照说法错误的是:a)将页面表现和程序代码分离,在ASPX页面中只有负责页面显示的HTML标记、Web控件标记等。
而随后绑定的或页面包括了页面的程序代码。
b)JSP在 HTML 代码中混合程序代码、由语言引擎执行程序代码;c)的页面表现与代码的分离使得程序员能够在代码页面利用多种语言,如、C#等。
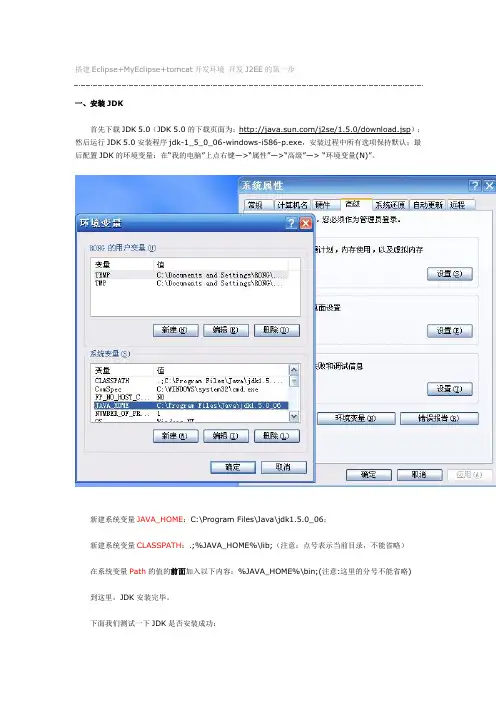
搭建Eclipse+MyEclipse+tomcat开发环境开发J2EE的第一步一、安装JDK首先下载JDK 5.0(JDK 5.0的下载页面为:/j2se/1.5.0/download.jsp);然后运行JDK 5.0安装程序jdk-1_5_0_06-windows-i586-p.exe,安装过程中所有选项保持默认;最后配置JDK的环境变量:在“我的电脑”上点右键—>“属性”—>“高级”—> “环境变量(N)”。
新建系统变量JAVA_HOME:C:\Program Files\Java\jdk1.5.0_06;新建系统变量CLASSPATH:.;%JAVA_HOME%\lib;(注意:点号表示当前目录,不能省略)在系统变量Path的值的前面加入以下内容:%JAVA_HOME%\bin;(注意:这里的分号不能省略) 到这里,JDK安装完毕。
下面我们测试一下JDK是否安装成功:将以下内容复制到记事本中:public class HelloJAVA{public static void main(String srg[]){System.out.println("Hello JAVA!");}}另存为“HelloJAVA.java”(不含引号,下同),并保存到D盘根目录下。
在命令行依次输入下图中红线所标注的命令:如果出现上图红框中所标注的内容,则说明JDK安装成功!注意:如果以后要安装诸如Eclipse、Borland JBuilder、JCreator、IntelliJ IDEA等集成开发环境(IDE,Integrated Developm ent Environment),应该在IDE中编译运行一个简单的HelloWorld程序,以保证IDE可以识别出JDK的位置。
二、安装Tomcat首先下载jakarta-tomcat-5.0.30.zip,之所以下载免安装版的好处是可以使用多个Tomcat (jakarta-tomcat-5.0.30.zip的下载页面为:/tomcat/tomcat-5/v5.0.30/bin/);然后将jakarta-tomcat-5.0.30.zip直接解压到D盘根目录:最后配置Tomcat的环境变量:在“我的电脑”上点右键—>“属性”—>“高级”—> “环境变量(N)”。
tomcat,Jboss,weblogic区别与⽐较⼀、tomcatTomcat 服务器是⼀个免费的开放源代码的Web 应⽤服务器,它是Apache 软件基⾦会(Apache Software Foundation)的Jakarta 项⽬中的⼀个核⼼项⽬,由Apache、和其他⼀些公司及个⼈共同开发⽽成。
由于有了Sun 的参与和⽀持,最新的和JSP 规范总是能在Tomcat 中得到体现,Tomcat 5 ⽀持最新的Servlet 2.4 和JSP 2.0 规范。
因为Tomcat 技术先进、性能稳定,⽽且免费,因⽽深受Java 爱好者的喜爱并得到了部分软件开发商的认可,成为⽬前⽐较流⾏的Web 应⽤服务器。
Tomcat 很受⼴⼤程序员的喜欢,因为它运⾏时占⽤的系统资源⼩,扩展性好,⽀持负载平衡与邮件服务等开发应⽤系统常⽤的功能;⽽且它还在不断的改进和完善中,任何⼀个感兴趣的程序员都可以更改它或在其中加⼊新的功能。
Tomcat 是⼀个⼩型的轻量级应⽤服务器,在中⼩型系统和并发访问⽤户不是很多的场合下被普遍使⽤,是开发和调试程序的⾸选。
对于⼀个初学者来说,可以这样认为,当在⼀台机器上配置好服务器,可利⽤它响应对页⾯的访问请求。
实际上Tomcat 部分是Apache 服务器的扩展,但它是独⽴运⾏的,所以当你运⾏tomcat 时,它实际上作为⼀个与Apache 独⽴的进程单独运⾏的。
这⾥的诀窍是,当配置正确时,Apache 为HTML页⾯服务,⽽Tomcat 实际上运⾏JSP 页⾯和Servlet。
另外,Tomcat和IIS、Apache等Web服务器⼀样,具有处理HTML页⾯的功能,另外它还是⼀个Servlet和JSP容器,独⽴的Servlet容器是Tomcat的默认模式。
不过,Tomcat处理静态HTML的能⼒不如Apache服务器。
相关连接:Tomcat是⼀个免费的开源的Serlvet容器,它是Apache基⾦会的Jakarta项⽬中的⼀个核⼼项⽬,由Apache,Sun和其它⼀些公司及个⼈共同开发⽽成。
Developing Web applications withTomcat and EclipseRequired componentsThe Eclipse V3.2 Callisto integrated development environment (IDE) includes tools for doing Web development and integrating with servers. So, aside from the software development kit (SDK), you need only Eclipse and Apache Tomcat installed. The versions featured in this article are listed below.Table 1. Components and versions usedComponent Version used in this articleEclipse Platform 3.2.2Java EE 5 SDK 1.5.0_09Apache Tomcat 5.5.20The Eclipse IDE is an open source IDE used as the development environment for your Java™Server Pages (JSPs) and Java files. With the Web and Java 2 Platform, Enterprise Edition (J2EE) Development tools installed, Eclipse is great tool for creating HTML, JSPs, and servlets.You need the Java SDK to run servlets on your machine. Finally, Apache Tomcat is an open source Web and servlet container, used in the official reference implementations for Java Servlet and Java Server Pages. InstallationInstallation of Eclipse and Tomcat is similar —both are extracted from the archive file format into a folder on your hard disk. If you ever want to uninstall either, it's as simple as deleting the directory in which you extracted the files.Install EclipseTo install the Eclipse IDE, unpack the compressed (.zip or .tar.gz) file you downloaded from Eclipse, then move the unpacked folder into a convenient location. I try to install it in a location that follows the conventions of whatever operating system I'm using. If I'm installing Eclipse on a Macintosh, I put the Eclipse folder in the Applications folder. If I'm using Microsoft™ Windows™, I put the unpacked folder into the C:\Program Files directory.Once you've downloaded and installed Eclipse, start it up. Before you can create a Web project, you need to install the J2EE and Web Development plug-ins. Fortunately, it's easy to install the plug-in using the Callisto Discovery Site.Install the Web toolsWith the Eclipse IDE running, select Help > Software Updates > Find and Install. This option lets you download and install the Web tools without going to a Web site.Select Search for New Features to Install, as shown below, then click Next.Figure 1. Install/Update windowSelect Callisto Discovery Site, as shown below, then click Next.Figure 2. Select the Callisto Discovery SiteUnder Callisto Discovery Site, check the Web and J2EE Development box. The wizard immediately warns you that you're missing dependencies. Click Select Required, and these warnings should disappear. Some or all of the components in the Graphical Editors and Frameworks and Models and Model Development categories are selected (as shown in Figure 3) because they're required for the installation of the Web and J2EE plug-ins.Figure 3. Select features for installationClick Next to continue, and license agreements appear for each feature you've selected. If you agree with the licenses, accept them and follow the wizard through the rest of the process. When the IDE is finished installing the plug-ins, it asks you to restart Eclipse in order for the changes to take effect. Be sure you restart the IDE before continuing.After you restart the IDE, the new features are available to begin developing dynamic Web projects.Install TomcatTo install Apache Tomcat, extract the files from the downloaded archive and place them into a directory. I put them in my C:\apps directory to make them easy to locate later. That's it for now; use Eclipse as shown later to start Tomcat.Create a new Web projectFrom the Eclipse IDE, select File > New > Project to view the project wizards. Type Web in the Wizards box, and the New Project window filters the wizards to show the ones that match. This is an easy way to locate the wizard you want instead of going through each item.Choose Dynamic Web Project from the list. You use the Standard Web Project Wizard to make static HTML Web projects. You can technically use Tomcat to run static Web sites, although a Web server such as Apache Web Server may be a better choice for static content. Web servers built specifically for serving up static pages tend to have less overhead and are tuned for that purpose. Target a runtimeUnder Target Runtime, you see <None>, as shown in Figure 4, because you haven't created a runtime yet for Apache Tomcat. Click New to open the New Target Runtime Wizard. Select Apache Tomcat V5.5 from the Apache folder, as shown in Figure 5, then click Next.Figure 4. Create a new dynamic Web projectFigure 5. Create a new server runtimeNow you have the opportunity to name your runtime, although the default name Apache Tomcat V5.5 is fine. Click Browse to locate the base folder for your Apache Tomcat configuration (mine is C:\apps\apache-tomcat-5.5.20, as shown in Figure 6). I recommend leaving the IBM® Java Runtime Environment (JRE) version the same as the workbench default JRE, unless you have a specificreason to change it. Once you've entered a valid directory, click Finish to create the runtime configuration.Figure 6. Define the server locationYou're asked if you want to switch to the J2EE Perspective. I always answer yes because that perspective includes views like the Servers view, which help to start and stop Tomcat later. You can always open the Servers view by selecting Window > Show View.Add the serverIn the Servers view is a view that contains nothing. This view is for application and Web servers; it lets you control them and monitor their status. To control Tomcat directly from the comfort of the IDE, add a reference to Tomcat by selecting New > Server from the context-sensitive menu. The New Server wizard, as shown in Figure 7, will default to the Apache Tomcat V5.5 runtime you just created.Figure 7. Define a new serverClick Next. You're asked whether you want to add projects to the server.Select the project you created in the previous steps, then click Add.Figure 8. Add the projects to the serverClick Finish to close the wizard. Now the Servers view contains the TomcatV5.5 Server with the project under it.Figure 9. The Tomcat server in the Servers viewCreate a sample pageThe easiest way to test your new dynamic Web project and Tomcat server integration is to create a simple JSP and deploy it to Tomcat. You can create the new JSP file by selecting File > New > Other, or you can use the context-sensitive menu by right-clicking the project name in the Project Explorer view and selecting New > JSP.Make sure the parent folder is WebContent and name the file index.jsp. Click Finish to create the page using the default template. If you click Next, you can choose different templates to use (such as HTML or XHTML) for the new page. The defaults are fine for this test.The page code shown below displays a simple date so you can see it working.Listing 1. Contents of index.jspDeploy the pageNow that the test page is complete, use Eclipse to redeploy it to Apache Tomcat. In the Servers view, notice that State is set to Republish. That is because changes have been made since the project was last deployed to the server. Right-click the server and select Publish from the menu. The state changes to Synchronized once the project has been deployed to the server.With the project successfully deployed and the server started, open a browser and navigate to http://localhost:8080/[ProjectName]/ (where [ProjectName] is the name of the dynamic Web project you created). The new Web page you created appears, and the date should be current. If you refresh the page, the date changes.Figure 10. Output of index.jsp in a browserHello World servletYou can add Java servlets to your project and deploy them. To create a quick servlet you can use for testing purposes, use the Servlet Wizard by right-clicking your dynamic Web project in the Project Explorer view and selecting New > Other. Under the Web folder, select Servlet, then click Next.Add the package name com.example.servlets next to Java Package and add HelloServlet next to Class name. Click Finish. This is an example, so the defaults are fine. The Eclipse IDE generates a servlet class for you. To watch the test servlet in action, add a line in the doGet() method to print a message to the ResponseWriter. The servlet class should look like the one shown below.Listing 2. Contents of HelloServlet.javapackage com.example.servlets;import java.io.IOException;import javax.servlet.ServletException;import javax.servlet.http.HttpServletRequest;import javax.servlet.http.HttpServletResponse;/*** Servlet implementation class for Servlet: HelloServlet**/public class HelloServlet extends javax.servlet.http.HttpServletimplements javax.servlet.Servlet {/* (non-Java-doc)* @see javax.servlet.http.HttpServlet#HttpServlet()*/public HelloServlet() {super();}/* (non-Java-doc)* @see javax.servlet.http.HttpServlet#doGet(HttpServletRequest request, HttpServletResponse response)*/protected void doGet(HttpServletRequest request, HttpServletResponse response)throws ServletException, IOException {response.getWriter().write("Hello, world!");}/* (non-Java-doc)* @see javax.servlet.http.HttpServlet#doPost(HttpServletRequest request, HttpServletResponse response)*/protected void doPost(HttpServletRequest request, HttpServletResponse response)throws ServletException, IOException {// TODO Auto-generated method stub}}After you add the servlet, the Eclipse IDE notes that your project has changed. Look again at the Servers view; Restart now appears in the Status column next to the Tomcat server. To restart the server, right-click the server in the Servers view, then select Restart > Start. Open a browser and navigate to http://localhost:8080/[ProjectName]/HelloServlet (where [ProjectName] is the name of your dynamic Web project). The text "Hello, world!" appears in the browser window. You can add the date, similar to the code in the index.jsp file, to the doGet() method, and redeploy the servlet using the Eclipse IDE.用 Tomcat 和 Eclipse开发 Web 应用程序所需的组件Eclipse V3.2 Callisto 集成开发环境 (IDE) 包括了用于 Web 开发及与服务器集成的工具。
java web应用开发职业技能证书考试大纲中级Java Web应用开发职业技能证书考试大纲中级主要包含以下内容:
1.Web应用开发基础:包括Web应用的基本概念、Web服务器和Web浏览器
的工作原理、HTTP协议以及Web页面开发的基础技术,如HTML、CSS和JavaScript 等。
2.Java语言基础:包括Java的基本语法、数据类型、运算符、控制流、面向对
象编程基础以及异常处理等内容。
3.Servlet和JSP技术:包括Servlet的基本概念、生命周期、处理用户请求和
响应的方法,以及JSP的页面指令、脚本元素、隐式对象以及自定义标签库等。
4.Web应用安全:包括Web应用的安全威胁和防护措施,如SQL注入、跨站脚
本攻击(XSS)、跨站请求伪造(CSRF)等,以及如何使用Java安全API进行安全控制。
5.Web应用性能优化:包括Web应用的性能测试、数据库性能优化、缓存策略
以及分布式系统的性能优化等。
6.常用框架和组件:包括Spring框架、Hibernate框架、Struts框架以及常用
的Java Web组件和工具等。
7.测试和部署:包括单元测试、集成测试和系统测试的方法和技术,以及Web应
用的部署和发布等。
以上是Java Web应用开发职业技能证书考试大纲中级的主要内容,考试要求考生熟练掌握Web应用开发的基础知识和技能,以及Java语言在Web应用开发中的应用,同时能够解决常见的安全和性能问题,并具备一定的测试和部署能力。
j2ee与java的区别j2ee与java的区别JTS是CORBA OTS事务监控的基本实现.JTS规定了事务管理的实现方法.下面是店铺整理的关于j2ee与java的区别,欢迎大家参考!1、Java分类Java分为JavaSE(Java标准版)、J2EE(Java企业版)和JavaME(Java微型版);JavaSE(Java Standard Edition),一般用来开发桌面应用程序,但是在开发桌面应用程序上相对VB,Delphi,VC++并没有什么优势。
JavaEE(Java Enterprise Edition),一般用于开发JavaWeb应用程序,初级的一般是用JSP(Java Server Pages)+servlet+JavaBean 来开发的,对大型的网站一般是使用框架来开发的,例如struts,hibernate,spring。
JavaME(Java Micro Edition),诺基亚手机上运行的Java程序就是用这个版本开发的程序。
2、JavaWeb与J2EE的区别J2EE是Java的企业应用开发,涵盖了B/S和C(Client客户端)/S(Server服务器),注重的是结构和框架,我们所熟知的struts2、hibernate和spring即ssh就是j2ee的一些基本框架。
JavaWeb是指Java在B(Browser浏览器)/S(Server服务器)方面的开发,做的是网络应用;javaweb开发和j2ee区别1 javaweb开发基于JAVA的一般WEB开发,包括了JSP/SERVLET 需要WEB服务器的支持,比如TOMCAT等.(因此只有一个服务器即可。
)2 j2ee开发然而基于J2EE企业级的开发,他需要的是不只是WEB 容器,还需要一个应用服务器,比如TOMCAT/RESIN是WEN容器,JBOSS等是作为应用服务器支持EJB.(需要web服务器和应用服务器)2. J2EE标准就是:解耦性,你的应用系统各个功能是否能够彻底脱离?是否不相互依赖,也只有这样,才能体现可维护性、可拓展性的软件设计目标。
课程标准所属系部:信息工程系课程名称:Java Web应用开发课程性质:专业必修课课程学时:96适用专业:云计算技术与应用Java Web应用开发课程标准1、课程概述课程定位Java Web应用开发是云计算技术与应用专业的核心课程之一,是该专业的专业必修课;通过本课程的学习,使学生具备Java Web应用开发相关知识、良好的编程习惯和应用软件开发的能力,能胜任基于Java Web开发等工作任务;Java的J2EE体系中,JSP/Servlct/JavaBcan占据了非常重要的位置,不仅成为web项目开发的利器,而且也是人们接触和使用J2EE的一个基础;通过详实的内容和丰富的案例,引领学生学习JSP/Scrvlet/JavaBcan的开发体系,以及这套技术在项目开发中的实际应用;同时,通过教学过程中的实际开发过程的规范要求,培养学生分析和解决实际问题的能力,强化学生的职业道德意识、职业素质养意识和创新意识,为学生以后从事更专业化的软件开发工作奠定基础;Java Web程序开发入门是面向计算机相关专业的一门专业Java Web入门课程,涉及XML 基础、Tomcat服务器、HTTP协议、Servlet技术以及JSP技术等内容,通过本课程的学习,学生能够了解XML的语法及其约束的定义,能够掌握JSP和Servlet技术并开发简单的Java Web项目、使用Tomcat服务器发布和运行Java Web项目;前导课程有Java程序设计、数据库技术基础,后续课程有J2EE项目开发、Java Web应用开发实训、毕业实习等;课程设计思路本课程标准以“开发”、“应用”为原则,彻底打破原来学科课程链路模式,根据基于工作过程专业建设模式,以能力为本位,构建以实际工作情境为单位的课程体系;课程内容的选取按照软件开发市场、软件企业、行业对Web开发程序员的需求情况,确定了“初级Web程序员”的职业岗位培养目标;在教学实施过程中基于实际工作的教学模式、通过各种各样的教学方法和教学手段,培养Web 程序员应具备的能力;每个项目的学习都是围绕职业能力的形成组织课程内容,以真实项目为核心整合Web程序员的所需的知识、技能和态度;实践中创设职业情境,围绕着软件企业、软件行业中的实际项目而展开的,学生通过各个环节的技能训练,感受职业环境,实现编程技能的逐步提升;本课程课时为96学时;本课程在教学过程中,倡导自主学习,启发学生对设定问题积极思考、分析,鼓励多种思维方式并将其表达出来,尊重个体差异;采用项目教学法进行教学,每个项目的成绩采取自评、互评、教师综合评价相结合的方式能激励学生的学习兴趣和自主学习能力的发展;教师在给学生评价成绩时应尽量以学习过程中的评价为主,注重培养和激发学生的学习积极性和自信心;最后期末的成绩评价应注重检测学生的知识应用能力;学生的最终课程成绩应由平时的各次项目成绩和期末的评定成绩按一定比例构成,在把握比例构成时要有利于促进学生的知识应用能力;建立以过程培养促进个体发展,以学生可持续发展能力评价教学过程的双向促进机制,以激发兴趣、展现个性、发展心智和提高素质为基本理念;本门课程主要涉及XML基础、Tomcat服务器、HTTP协议、Servlet技术以及JSP技术等内容,通过本课程的学习,学生能够了解XML的语法及其约束的定义,能够掌握JSP和Servlet技术并开发简单的Java Web项目、使用Tomcat服务器发布和运行Java Web项目;2、课程目标根据计算机软件技术专业的整体培养目标,该课程的目标定位为:通过本课程的学习使学生具备Java Web应用开发相关知识、良好的编程习惯和应用软件开发的能力,能胜任Java Web相关开发工作任务;培养学生规范编码和良好的程序设计风格;培养学生面向对象编程的思维和提高逻辑思维能力;培养学生发现问题、分析问题、解决问题的能力;培养良好的职业素质;培养团队协作和和谐的沟通能力;并为学生以后从事更专业化的软件开发工作或者学习后续课程打下良好的基础;能力目标1具备使用HTML,CSS,JavaScript等技术编写网站前台静态页面的能力;2具备使用JSP,Servlet,Filter,JavaBean等技术编写动态网站界面的能力;3具备在Web环境下创建,配置并编程访问MySQL数据库的能力;4具备项目开发中的团队协作能力;知识目标1掌握HTML,CSS,JavaScript等基本的网页编程知识;2掌握JSP,Servlet,Filter等动态网站开发的技术知识;3掌握JavaBean,JDBC等网站数据库访问的相关知识;4熟悉Web环境下文件操作,邮件编程等相关的知识;5了解JSTL,EL等知识网站中的常用技术;素质目标1沟通能力、团队合作及协调能力;2良好的编程习惯;3查阅相关手册及资料能力4掌握系统设计方法,培养严谨工作态度;5自我展示与语言表达能力;6责任意识;7分析和解决问题的能力;8科学的创造能力和创新精神;9获得适应未来岗位转变的迁移能力;10从事某一岗位可持续发展的能力;3、课程内容与要求本课程在教学过程中,提醒学生留意观察并思考生活中接触的Web系统应用,鼓励其结合生活中熟悉的操作方法提出问题或假设,在教师引导下,通过分析、推理,使学生自主学习、总结,以便增强学生对Java Web开发方法基本理论的理解;通过课堂讲解与讨论、案例分析等促进学生对所学理论的理解和运用,以培养其实际操作技能;充分利用现代教学手段,不断改进教学方式,突出典型案例的剖析,采用互动式教学使学生得到模拟训练,提高他们发现问题、分析问题、解决问题的能力;在课程内容的选择上,对Java Web开发工程师职业岗位的工作内容、工作过程、工作环境等加以分析提炼,进行相应的职业能力分解,对课程内容进行重构和重组,并按照循序渐进的教育规律进行深度加工,提取及序化教学内容;表1课程项目总体设计JSP声明page指令include指令JSP隐式对象include标签forward标签难点page指令include指令JSP隐式对象基本要求了解JSP的特点及其运行原理熟悉泛型的使用熟悉Collections和Arrays工具类的使用4、实施建议教学建议根据本课程的教学目标要求和课程特点以及有关学情,选择适合于本课程的最优化教学法;综合考虑教学效果和教学可操作性等因素,本课程选用项目教学法;项目教学法是学生在教师的指导下亲自处理一个项目的全过程,在这一过程中学习掌握教学计划内的教学内容;学生全部或部分独立组织、安排学习行为,解决在处理项目中遇到的困难,提高学生的兴趣,自然能调动学习的积极性;课程的教学以文件管理器项目为中心组织教学,并建立相应的教学情境,把Java Web开发知识与技能的学习置于真实的情境之中,让学生掌握工作过程性知识;在教学情境的逐步实施中,项目遵循从单一到综合,从简单到复杂的顺序安排,而教师指导工作量应逐渐减低,学生独立完成任务的程度应逐步提高,以逐步提高学生的综合职业能力;在每个学习情境的教学实施中,采用行动导向的教学方法,按照项目开发的具体过程进行组织教学,培养了学生的职业迁移能力;在教学中,注重团队合作、沟通协调能力、组织能力等软技能的培养;师资队伍建议本课程现有专任教师3名,本课程校内任课教师应通过硕士研究生以上相关专业的学习,本课程除在理论上指导学生外,在实践上也对教师提出了一定的要求,故而教师除Java Web 有较深的理解外,在实践操作能力上也应具备一定的能力,建议具有生产实践经验的教师担当此课程的教学任务,并具备相关教师资格证书,同时还应有相关岗位企业实践经历;企业兼职教师应具备工程师等级以上职称证书,语言表达能力达到要求;考核评价建议对课程考核内容、手段和方式进行改革与创新,课程考核围绕以能力为中心,将教学的全过程纳入考核范畴,增加学生日常知识积累、自主学习的考核,注重考核学生的实际编程能力,分析问题与解决问题的能力,从而使课程考核过程化、经常化和企业化;为了鼓励学生职业素质的培养,将考核内容多元化,而不局限于书本知识的考核,对学生的创新设计、职场能力、开源理念等都纳入考核范围,从而达到对学生知识、能力、素质的综合考察,形成对学生客观公正的评价;课程考核体系的实施以过程化考核为主导,量化考核指标,突出以学生为中心的指导思想;对职业素养的考核,突出学生的课堂表现和职业习惯,学生的每一次课堂突出表现都是其作为考核加分的机会,这有助于活跃课堂气氛,激发学生的学习热情和主动性;对综合能力的考核,将贯穿整个课程的案例项目分解为8个小任务,教师提供这些任务的详细的思维导图,学生根据这些帮助完成指定的任务;同时,在每个小任务中,都提出针对项目的具体优化设想和参考文档,鼓励学生在完成既有功能的基础上,个性化自己的项目功能;教材选用和编写建议1教材建设书名:JavaWeb程序开发入门主编:传播智客高教产品研发部出版社:清华大学出版社2网络资源建设学生学习端:课程资源开发与利用建议根据课程目标、学生实际以及本课程的专业性、应用性等特点,本课程的教学应该建设由文字教材、CAI课件等多种媒体教学资源为一体的配套教材,全套教材各司其职;以文字教材为中心,提供内涵不同,形式多样的学习支持服务,共同完成教学任务,达成教学目标;并辅以多媒体课件、项目设计思维导图、习题库、试题库、案例库等资源构建学生自主学习环境;1建设本课程学习网站,增加课程资源库建设,力争在在线拓展资源方面做到完整、全面;2产学合作开发实验实训课程资源,充分利用本行业典型的生产企业的资源,进行产学合作,建立实习实训基地,实践“做中学、学中做、边做边学”的育人理念,满足学生的实习实训,同时为学生的就业创造机会;3建立本专业开放实验室及实训基地,使之具备现场教学、实验实训、职业技能证书考证的功能,实现教学与实训合一、教学与培训合一、教学与考证合一,满足学生综合职业能力培养的要求;其它说明1本课程标准适用于物联网技术专业的学生;2本课程标准教学内容和要求与教材选用无直接关系;5、附录编制人:审核人:编制日期:年月日。
java常⽤的中间件tomcatWeblogicJBOSSColdfusionWebsphereGlassFish⼀般本地开发的话建议使⽤tomcat。
linux系统建议使⽤jetty或apache hpptd⼤型的项⽬就⽤JBOSS或webloigc⼩项⽬,或者是个⼈开发tomcat ⼤项⽬或者商业项⽬⼀般采⽤:weblgoic/webshere其他的还有jboss、glasshfish等⼀些⽰例项⽬或者⼩项⽬常采⽤jettytomcat , jboss, weblogic, websphere ⼀般项⽬tomcat就可以了Tomcat是Sun的JSWDK(JavaServer Web Development Kit)中Servlet的运⾏环境(servlet容器)。
Tomcat是Apache Jakarta软件组织的⼀个⼦项⽬,Tomcat是⼀个JSP/Servlet容器,它是在SUN公司的JSWDK(Java Server Web Development Kit)基础上发展起来的⼀个JSP和Servlet规范的标准实现,使⽤Tomcat可以体验JSP和Servlet的最新规范。
经过多年的发展,Tomcat不仅是JSP和Servlet规范的标准实现,⽽且具备了很多商业Java Servlet容器的特性,并被⼀些企业⽤于商业⽤途。
JBoss是⼀个运⾏EJB的J2EE应⽤服务器。
它是开放源代码的项⽬,遵循最新的J2EE规范。
从JBoss项⽬开始⾄今,它已经从⼀个EJB容器发展成为⼀个基于的J2EE的⼀个web 操作系统(operating system for web),它体现了J2EE规范中最新的技术WebLogic服务器是企业级的应⽤服务器,⽀持EJB, 集群以及 ERP(企业资源计划)的连通性,开发公司:BEA。
WebSphere产品系列是IBM公司⼀套典型的电⼦商务应⽤开发⼯具及运⾏环境1.Java中间件的定义 在Java web开发的演进与进化中,我们对于消息系统,数据库,服务化接⼝的抽象等,涉及数据分离的过程中,在分离过程中,就会涉及到分离后系统间,数据库间的交互。
J2EE的13种核心技术简介Java最初是在浏览器和客户端机器中粉墨登场的。
当时,很多人质疑它是否适合做服务器端的开发。
现在,随着对Java2平台企业版(J2EE)第三方支持的增多,Java被广泛接纳为开发企业级服务器端解决方案的首选平台之一。
J2EE平台由一整套服务(Services)、应用程序接口(APIs)和协议构成,它对开发基于Web的多层应用提供了功能支持。
在本文中将解释支撑J2EE的13种核心技术:JDBC,JNDI,EJBs,RMI,JSP,Javaservlets,XML,JMS,JavaIDL,JTS,JTA,JavaMail和JAF,同时还将描述在何时、何处需要使用这些技术。
当然,我还要介绍这些不同的技术之间是如何交互的。
此外,为了让您更好地感受J2EE的真实应用,将在WebLogic应用服务器,来自BEA Systems公司的一种广为应用的产品环境下来介绍这些技术。
不论对于WebLogic应用服务器和J2EE的新手,还是那些想了解J2EE能带来什么好处的项目管理者和系统分析员,相信本文一定很有参考价值。
1、宏观印象:分布式结构和J2EE过去,二层化应用--通常被称为client/server应用--是大家谈论的最多的。
在很多情况下,服务器提供的惟一服务就是数据库服务。
在这种解决方案中,客户端程序负责数据访问、实现业务逻辑、用合适的样式显示结果、弹出预设的用户界面、接受用户输入等。
client/server 结构通常在第一次部署的时候比较容易,但难于升级或改进,而且经常基于某种专有的协议,通常是某种数据库协议。
它使得重用业务逻辑和界面逻辑非常困难。
更重要的是,在Web 时代,二层化应用通常不能体现出很好的伸缩性,因而很难适应Internet的要求。
Sun设计J2EE的部分起因就是想解决二层化结构的缺陷。
于是,J2EE定义了一套标准来简化N层企业级应用的开发。
它定义了一套标准化的组件,并为这些组件提供了完整的服务。
WEB服务器、应用程序服务器、HTTP服务器有何区别?IIS、Apache、Tomcat、Weblogic、WebSphere都各属于哪种服务器,这些问题困惑了很久,今天终于梳理清楚了:Web服务器的基本功能就是提供Web信息浏览服务。
它只需支持HTTP协议、HTML文档格式及URL。
与客户端的网络浏览器配合。
因为Web服务器主要支持的协议就是HTTP,所以通常情况下HTTP服务器和WEB服务器是相等的(有没有支持除HTTP之外的协议的web服务器,作者没有考证过),说的是一回事。
应用程序服务器(简称应用服务器),我们先看一下微软对它的定义:"我们把应用程序服务器定义为“作为服务器执行共享业务应用程序的底层的系统软件”。
就像文件服务器为很多用户提供文件一样,应用程序服务器让多个用户可以同时使用应用程序(通常是客户创建的应用程序)"通俗的讲,Web服务器传送(serves)页面使浏览器可以浏览,然而应用程序服务器提供的是客户端应用程序可以调用(call)的方法 (methods)。
确切一点,你可以说:Web服务器专门处理HTTP请求(request),但是应用程序服务器是通过很多协议来为应用程序提供 (serves)商业逻辑 (business logic)。
以这样的定义,IIS、Apache、Tomcat都可以属于Web服务器,Weblogic、WebSphere都属于应用服务器。
Apache:在Web服务器中,Apache是纯粹的Web服务器,经常与Tomcat配对使用。
它对HTML页面具有强大的解释能力,但是不能解释嵌入页面内的服务器端脚本代码(JSP/Servlet。
Tomcat:早期的Tomcat是一个嵌入Apache内的JSP/Servlet解释引擎Apache+Tomcat就相当于IIS+ASP。
后来的 Tomcat已不再嵌入Apache内,Tomcat 进程独立于Apache进程运行。
WebLogic、WebSphere、JBOSS、Tomcat之间的区别1:产品介绍:weblogicWebLogic是美国bea公司出品的一个application server确切的说是一个基于j2ee架构的中间件。
BEA WebLogic是用于开发、集成、部署和管理大型分布式Web应用、网络应用和数据库应用的Java应用服务器。
将Java的动态功能和Java Enterprise标准的安全性引入大型网络应用的开发、集成、部署和管理之中。
webSphereWebSphere是 IBM 的集成软件平台。
它包含了编写、运行和监视全天候的工业强度的随需应变 Web 应用程序和跨平台、跨产品解决方案所需要的整个中间件基础设施,如服务器、服务和工具。
WebSphere 提供了可靠、灵活和健壮的集成软件。
JBossJBoss是一个管理EJB的容器和服务器,支持EJB 1.1、EJB 2.0和EJB3.0的规范。
但JBoss核心服务不包括支持servlet/JSP的WEB容器,一般与Tomcat或Jetty绑定使用。
2006年,Jboss 公司被Redhat公司收购。
TomcatTomcat是Apache 软件基金会的Jakarta 项目中的一个核心项目,由Apache、Sun 和其他一些公司及个人共同开发而成。
由于有了Sun 的参与和支持,最新的Servlet 和JSP 规范总是能在Tomcat 中得到体现,Tomcat 5 支持最新的Servlet 2.4 和JSP 2.0 规范。
因为Tomcat 技术先进、性能稳定,而且免费,因而深受Java 爱好者的喜爱并得到了部分软件开发商的认可,成为目前比较流行的Web 应用服务器。
2:价位不同:JBoss与Tomcat的是免费的。
WebLogic与WebSphere是收费的,而且价格不菲。
3:开源性不同:JBoss与Tomcat的是完全开源的,而其他两个不是。
j2ee服务器有哪些众所周知,J2EE应用服务器百花齐放,种类众多。
那么J2EE应用服务器有哪些?又有哪些功能呢?一起来看看吧!从功能实现上划分:有实现完整J2EE规范(full profile)的Weblogic, WebSphere, GlassFish有实现web应用规范(web profile)的 TomEE, JBoss/WildFly有基本的Servlet及Jsp规范的Web容器(Web Container) Tomcat, Jetty, Resin回顾过去的2015年,各应用服务器市场占有率各有千秋。
下图为各个应用服务器使用率饼图我们看到,在众多J2EE应用服务器中,Tomcat使用率达到58.66%,稳坐第一。
相较2014年,Tomcat使用率大幅增长,增长将近19%。
整体而言,Tomcat做为Servlet和Jsp规范的参考实现(Reference implementation ,简称RI),一般都会在第一时间实现规范的新特性并通过Oracle的CTS 测试认证。
目前最新的Tomcat 9.0,虽还是alpha版,但已经实现了Servlet 4.0草案,感兴趣的朋友,可以下载尝鲜哦!Tomcat是一个实现了JAVA EE标准的最小的WEB服务器,是Apache 软件基金会的Jakarta 项目中的一个核心项目,由Apache、Sun 和其他一些公司及个人共同开发而成。
因为Tomcat 技术先进、性能稳定,而且开源免费,因而深受Java 爱好者的`喜爱并得到了部分软件开发商的认可,成为目前比较流行的Web 应用服务器。
学习JavaWeb开发一般都使用Tomcat服务器,该服务器支持全部JSP以及Servlet规范,启动界面如图:Tomcat 是一款非常优秀的 Java Web 服务器,以致于很多开源 Java 应用服务器(如 JOnAS) 直接集成它作为 servlet 容器。
Tomcat的总体结构Tomcat中主要涉及Server,Service,Engine,Connector,Host,Context组件,之前用过Tomcat的童鞋是不是觉得这些组件的名称有点似曾相识的赶脚,没赶脚?!您再想想。