计算机网络基础实验及子网划分方法与例题
- 格式:docx
- 大小:246.84 KB
- 文档页数:10
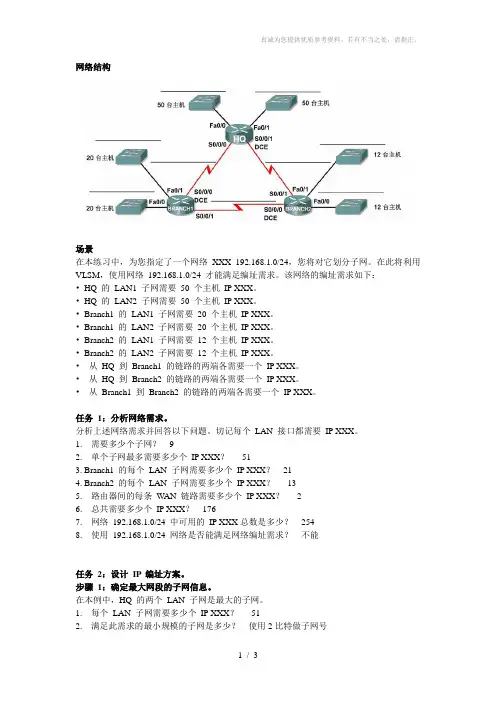
网络结构场景在本练习中,为您指定了一个网络XXX 192.168.1.0/24,您将对它划分子网。
在此将利用VLSM,使用网络192.168.1.0/24 才能满足编址需求。
该网络的编址需求如下:•HQ 的LAN1 子网需要50 个主机IP XXX。
•HQ 的LAN2 子网需要50 个主机IP XXX。
•Branch1 的LAN1 子网需要20 个主机IP XXX。
•Branch1 的LAN2 子网需要20 个主机IP XXX。
•Branch2 的LAN1 子网需要12 个主机IP XXX。
•Branch2 的LAN2 子网需要12 个主机IP XXX。
•从HQ 到Branch1 的链路的两端各需要一个IP XXX。
•从HQ 到Branch2 的链路的两端各需要一个IP XXX。
•从Branch1 到Branch2 的链路的两端各需要一个IP XXX。
任务1:分析网络需求。
分析上述网络需求并回答以下问题。
切记每个LAN 接口都需要IP XXX。
1. 需要多少个子网?_9______2. 单个子网最多需要多少个IP XXX?__51_____3. Branch1 的每个LAN 子网需要多少个IP XXX?_21______4. Branch2 的每个LAN 子网需要多少个IP XXX?__13_____5. 路由器间的每条WAN 链路需要多少个IP XXX?__2_____6. 总共需要多少个IP XXX?_176______7. 网络192.168.1.0/24 中可用的IP XXX总数是多少?_254______8. 使用192.168.1.0/24 网络是否能满足网络编址需求?__不能_____任务2:设计IP 编址方案。
步骤1:确定最大网段的子网信息。
在本例中,HQ 的两个LAN 子网是最大的子网。
1. 每个LAN 子网需要多少个IP XXX?__51_____2. 满足此需求的最小规模的子网是多少?_使用2比特做子网号______3. 在此规模的子网中最多可以分配多少个IP XXX?_62_____步骤2:为HQ 的LAN 子网分配子网。
计算机网络复习资料实验一Telnet方式远程登陆配置配置命令使用配置线连接电脑与交换机的C口后,在电脑上开启终端进展配置第一步:配置全局、终端和线程模式的密码Switch>enable ---->进入特权模式Switch# config terminal ---->进入全局配置模式Switch(config) enable password test ---->配置进入特权模式的密码为test Switch(config) line console 0 ---->进入Consloe口配置模式(Consloe口即物理口)Switch(config-line) password test1 ---->配置进入Consloe口密码为test1 Switch(config-line) login ---->启用Switch(config-line) exitSwitch(config) line vty 0 4 ---->进入telnet密码配置模式,0 4表示允许共5 个用户同时telnet登入到交换机Switch(config-line) password test2 ---->将telnet密码设置为test2Switch(config-line) login ---->启用需输入密码才能telnet成功Switch(config-line) exit第二步:对交换机进展IP和网关设置Switch(config)interface vlan1Switch(config-if)ip address 192.168.1.1 255.255.255.0Switch(config-if)no shutdownSwitch(config-if)exitSwitch(config)ip default-gateway 192.168.1.1跨交换机VLAN的配置与实现交换机端口属性:Access端口:终端主机收发端口Trunk端口:交换机之间的连接端口,也称为干道口,用穿插线连接配置命令PC1、PC2、PC3、PC4全通交换机1:S1> enableS1# conf tS1(conf-if)> exitS1(config)> interface f 0/24S1(conf-if)> switchport mode trunk ---->设置端口24为trunk端口S1(config)> vlan 10 ---->添加vlan 10S1(config)> vlan 20 ---->添加vlan 20S1(config)> interface f 0/1S1(conf-if)> switchport access vlan 10 ---->为端口1分配vlan 10 S1(conf-if)> exitS1(config)> interface f 0/2S1(conf-if)> switchport access vlan 20 ---->为端口2分配vlan 20 S1(conf-if)> exit交换机2:配置同上结果:PC1、PC3互通PC2、PC4互通其他命令show vlan 显示交换机vlan信息no vlan 删除对应的vlanReload 重启交换机配置命令未配置路由情况下,PC1不能ping通PC2期望在S3560上启用静态路由,PC1到192.168.1.0走10.0.0.1,到192.168.2.0走10.0.0.2可以ping通PC2端口IP配置交换机1:Switch1(config)# interface f 0/1Switch1(config-if)# no switchportSwitch1(config-if)# ip address 192.168.1.1 255.255.255.0Switch1(config-if)# exitSwitch1(config)# interface f 0/24Switch1(config-if)# no switchportSwitch1(config-if)# ip address 10.0.0.1 255.255.255.0Switch1(config-if)# exit交换机2:Switch2(config)# interface f 0/1Switch2(config-if)# no switchportSwitch2(config-if)# ip address 192.168.2.1 255.255.255.0Switch2(config-if)# exitSwitch2(config)# interface f 0/24Switch2(config-if)# no switchportSwitch2(config-if)# ip address 10.0.0.2 255.255.255.0Switch2(config-if)# exit启用三层交换机上的路由模块交换机1:Switch1(config)# ip route 192.168.2.0 255.255.255.0 10.0.0.2交换机2:Switch2(config)# ip route 192.168.1.0 255.255.255.0 10.0.0.1注:建议在以太网链路,配置静态路由的时候,配置为下一跳的ip地址,假设是在网络出口配置默认路由,切勿配置为本地出接口。
划分子网例题详细解析
例题一、IPv4地址位202.112.14.137 ,子网掩码为
255.255.255.224,所在的子网的网络地址和广播地址是什么。
分析:根据子网掩码255.255.255.224得出该子网的主机ID分布在IPv4 的最后一个字节里,
各个地址块的大小为:1
(256-255).1(256-255).1(256-255).32(256-224)
而起着关键作用的是包含主机ID中的第一个字节,包含主机ID 的是第四个字节,地址块是32,可以知道各个网段该字节的取值范围为:0 - 31 、32-63、64-95、96-127、128-159……而202.112.14.137在第5个网段上,202.112.14.128 202.112.14.159 广播地址:202.112.14.159
网络地址:202.112.14.128
例题二、有一个IP地址范围10001100 00010001 10101010 0~255,这是一个B类IP地址,可以表示2的16次方台主机,现将该IP地址分给4个子公司,a公司有8000台电脑,b公司有1600台电脑,c公司有2700台电脑,d公司有6000台电脑,请问怎样分配,请给出每个公司的mask地址。
从大到小一个一个切,2的10次方是1024,10位主机号的子网容纳主机=1024-2=1022个,依次类推,容纳8000台的要13位主机号,容纳6000的也要13位主机号,容纳2700的要12位主机号,
容纳1600的要12位主机号。
如果允许全0和全1子网的话,B类可以划分为8个13位主机号的子网。
取第一个和第二个子网给8000和6000,再取第三个子网划分为2个12位主机,分别给2700和1600的就OK了。
子网划分方法大全,如何划分子网公式和例题(一)-电脑资料子网划分方法大全,如何划分子网公式和例题子网划分基础:子网划分(subnetting)的优点:1.减少网络流量2.提高网络性能4.易于扩大地理范围怎么样创建一个子网:如何划分子网?首先要熟记2的幂:2的0次方到9次方的值分别为:1,2,4,8,16,32,64,128,256和512,子网掩码(SubnetMasks):子网掩码用于辨别IP地址中哪部分为网络地址,哪部分为主机地址,有1和0组成,长32位,全为1的位代表网络号.不是所有的网络都需要子网,因此就引入1个概念:默认子网掩码(defaultsubnetmask).A类IP地址的默认子网掩码为255.0.0.0;B 类的为255.255.0.0;C类的为255.255.255.0。
ClasslessInter-DomainRouting(CIDR):CIDR叫做无类域间路由,ISP常用这样的方法给客户分配地址,ISP提供给客户1个块(blocksize),类似这样:192.168.10.32/28,这排数字告诉你你的子网掩码是多少,/28代表多少位为1,最大/32.但是你必须知道的一点是:不管是A类还是B 类还是其他类地址,最大可用的只能为/30,即保留2位给主机位。
CIDR值:1.掩码255.0.0.0:/8(A类地址默认掩码)2.掩码255.255.0.0:/16(B类地址默认掩码)3.掩码255.255.255.0:/24(C类地址默认掩码)划分A类B类C类地址子网:划分子网的几个捷径:1.你所选择的子网掩码将会产生多少个子网?:2的x次方-2(x代表子网位,即2进制为1的部分)PS:这里的x是指除去默认掩码后的子网位,例如网络地址192.168.1.1,掩码255.255.255.192,因为是C类地址,掩码为255.255.255.0,2.每个子网能有多少主机?:2的y次方-2(y代表主机位,即2进制为0的部分)3.有效子网是?:有效子网号=256-10进制的子网掩码(结果叫做blocksize或basenumber)4.每个子网的广播地址是?:广播地址=下个子网号-15.每个子网的有效主机分别是?:忽略子网内全为0和全为1的地址剩下的就是有效主机地址.最后有效1个主机地址=下个子网号-2(即广播地址-1)根据上述捷径划分子网的具体实例:C类地址例子1:网络地址192.168.10.0;子网掩码255.255.255.192(/26)1.子网数=2*2-2=22.主机数=2的6次方-2=623.有效子网?:blocksize=256-192=64;所以第一个子网为192.168.10.64,第二个为192.168.10.1284.广播地址:下个子网-1.所以2个子网的广播地址分别是192.168.10.127和192.168.10.1915.有效主机范围是:第一个子网的主机地址是192.168.10.65到192.168.10.126;第二个是192.168.10.129到192.168.10.190C类地址例子2:网络地址192.168.10.0;子网掩码255.255.255.128(/26)我知道我举的这个例子只有一个子网位,这通常是不。
需要进行子网规划一般两种情况:一、给定一个网络,整网络地址可知,需要将其划分为若干个小的子网二、全新网络,自由设计,需要自己指定整网络地址后者多了一个根据主机数目确定主网络地址的过程,其他一样。
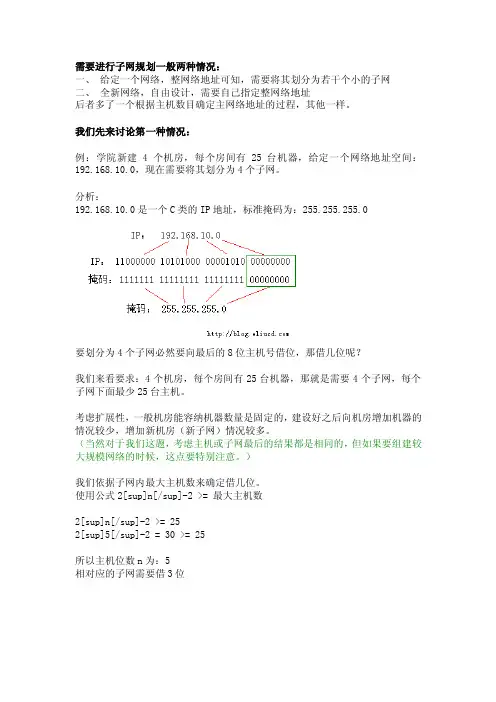
我们先来讨论第一种情况:例:学院新建4个机房,每个房间有25台机器,给定一个网络地址空间:192.168.10.0,现在需要将其划分为4个子网。
分析:192.168.10.0是一个C类的IP地址,标准掩码为:255.255.255.0要划分为4个子网必然要向最后的8位主机号借位,那借几位呢?我们来看要求:4个机房,每个房间有25台机器,那就是需要4个子网,每个子网下面最少25台主机。
考虑扩展性,一般机房能容纳机器数量是固定的,建设好之后向机房增加机器的情况较少,增加新机房(新子网)情况较多。
(当然对于我们这题,考虑主机或子网最后的结果都是相同的,但如果要组建较大规模网络的时候,这点要特别注意。
)我们依据子网内最大主机数来确定借几位。
使用公式2[sup]n[/sup]-2 >= 最大主机数2[sup]n[/sup]-2 >= 252[sup]5[/sup]-2 = 30 >= 25所以主机位数n为:5相对应的子网需要借3位确定了子网部分,后面就简单了,前面的网络部分不变,看最后的这8位得到6个可用的子网地址:全部转换为点分十进制表示11000000 10101000 00001010 00100000 = 192.168.10.3211000000 10101000 00001010 01000000 = 192.168.10.6411000000 10101000 00001010 01100000 = 192.168.10.9611000000 10101000 00001010 10000000 = 192.168.10.12811000000 10101000 00001010 10100000 = 192.168.10.16011000000 10101000 00001010 11000000 = 192.168.10.192子网掩码:11111111 11111111 11111111 11100000 = 255.255.255.224 这就得出了所有子网的网络地址,那个子网的主机地址呢?注意在一个网络中主机地址全为0的IP是网络地址,全为1的IP是网络广播地址,不可用所以我们的子网地址和子网主机地址如下:我们只要取出前面的4个子网就可以完成题目了。

实验8 子网划分授课时数:2学时授课日期: 上课教室:实训目的:掌握IP地址的分配和划分子网的方法。
实训环境:(1)在网络实验室进行;(2)提前一周通知网络实验室工作人员做好以下准备工作:长度为1.5M的5类UTP双绞线(直连线六根);(3)每5-10人一组,每组准备路由器一台、交换机两台。
实训重点:划分子网和IP地址分配。
实训难点:划分子网。
实训内容、方法步骤及时间分配:(1)子网规划(35分钟)IP地址分配前需进行子网规划;选择的子网号部分应能产生足够的子网数;选择的主机号部分应能容纳足够的主机;路由器需要占用有效的IP地址。
(2)在局域网上划分子网(35分钟)子网编址的初衷是为了避免小型或微型网络浪费IP地址; 将一个大规模的物理网络划分成几个小规模的子网。
(3)配置计算机的IP地址和子网掩码(5分钟)根据小组成员共同协商好的规则给每一台计算机配置网络参数。
(4)测试子网划分、IP分配和计算机配置是否正确(15分钟)处于不同子网的计算机是否能够通信?;处于同一子网的计算机是否能够通信?实训要求:(1)实验前检查设备和器材的准备情况;(2)在实验过程中注意设备的保护;(3)实验结束后点清器材的数量。
实验报告:按实训报告的要求,完成实训报告。
第六周C类B类子网划分的捷径(2005-03-28 21:49)教案序号:15-16教学目标:1、掌握C类子网快速划分的方法2、掌握B类子网快速划分的方法教学重点:1、掌握C类子网快速划分的方法2、掌握B类子网快速划分的方法教学过程一、C类地址的子网划分:当为网络选择了一个可用的子网掩码,并需要推断由这个掩码所决定的子网数量、合法主机号及广播地址时,所需要做的就是,回答下面这五个简单的问题:这个被选用的子网掩码,到底产生多少个子网?每个子网中又会有多少个合法的主机号可用?这些合法的子网号是什么?每个子网的广播地址是什么?在每个子网中,哪些是合法的主机号?在这里,理解并牢记2的幂值是非常重要的。
子网划分练习题子网划分练习题在计算机网络中,子网划分是一项重要的技术,用于将一个大的网络划分成多个较小的子网,以提高网络的性能和管理效率。
子网划分不仅需要考虑网络的规模和拓扑结构,还需要合理地分配IP地址,以确保每个子网都能够正常运行。
为了帮助大家更好地理解和掌握子网划分的方法和技巧,下面将给出一些练习题,供大家进行实践和思考。
练习题一:假设有一个公司有一个IP地址段为192.168.0.0/24的网络,现需要将该网络划分为4个子网,要求每个子网能够容纳的主机数量相同。
请问如何划分子网,并给出每个子网的网络地址和子网掩码。
解答:首先,根据需要将网络划分为4个子网,每个子网需要容纳相同数量的主机。
由于初始网络的子网掩码为/24,即255.255.255.0,可以确定该网络最多能容纳2^8-2=254个主机。
接下来,我们需要确定每个子网能够容纳的主机数量。
由于需要4个子网,每个子网容纳主机数量相同,因此每个子网最多能容纳254/4=63个主机。
然后,我们需要确定每个子网的网络地址和子网掩码。
根据子网划分的原则,我们需要将初始网络的IP地址段按照二进制位进行划分。
由于需要4个子网,我们可以使用2个二进制位来表示子网的标识。
因此,新的子网掩码为/26,即255.255.255.192。
根据新的子网掩码,可以确定每个子网的网络地址。
第一个子网的网络地址为192.168.0.0,第二个子网的网络地址为192.168.0.64,第三个子网的网络地址为192.168.0.128,第四个子网的网络地址为192.168.0.192。
练习题二:假设有一个公司有一个IP地址段为10.0.0.0/8的网络,现需要将该网络划分为多个子网,要求每个子网能够容纳的主机数量不同。
请问如何划分子网,并给出每个子网的网络地址和子网掩码。
解答:首先,根据需要将网络划分为多个子网,每个子网需要容纳不同数量的主机。
由于初始网络的子网掩码为/8,即255.0.0.0,可以确定该网络最多能容纳2^24-2=16777214个主机。
划分子网例题详解划分子网例题详解例题一、某公司想把原来使用的172.16.0.0/16标准网络划分为12个子网,其中最大的子网节点数在4000个左右。
求每个子网的范围,子网掩码、网络地址和广播地址。
分析172.16.0.0/16是标准的B类地址现想划分为12个子网,且最大子网节点数为4000故根据VLSM技术划分成16个子网,每个子网的最大可用节点地址数为2^12 - 2 = 4094个我们只使用其中的12个子网例题二、某单位分匹配到一个地址块136.23.12.64/26。
需要进一步划分为4个一样大的子网。
求1.每个子网的子网掩码。
2.每个子网中有多少个可用地址。
3.每个子网的地址块是什么?解:原IP地址:136.23.12.64/26 【/26代表的是ip的掩码】则原ip化成二进制为:10001000.00010111.00001100.01|000000 【红线表示从左往右数26位分隔】已知要划分为4个子网。
则由公式:2的n次方=划分子网数=> 2的n次方=4 n=2n=2,则需要在原ip的掩码中红线分隔的地方向后借用两位,借用掩码两位足够划分四个子网原ip掩码是26,借用两位后为28,所以每个划分的子网掩码都是/28借用黑线后两位划分的子网二进制为:1.10001000.00010111.00001100.01|0000002.10001000.00010111.00001100.01|0100003.10001000.00010111.00001100.01|1000004.10001000.00010111.00001100.01|110000 将4个划分的子网换成IP地址:1.136.23.12.64/282.136.23.12.80/283.136.23.12.96/284.136.23.12.112/28。
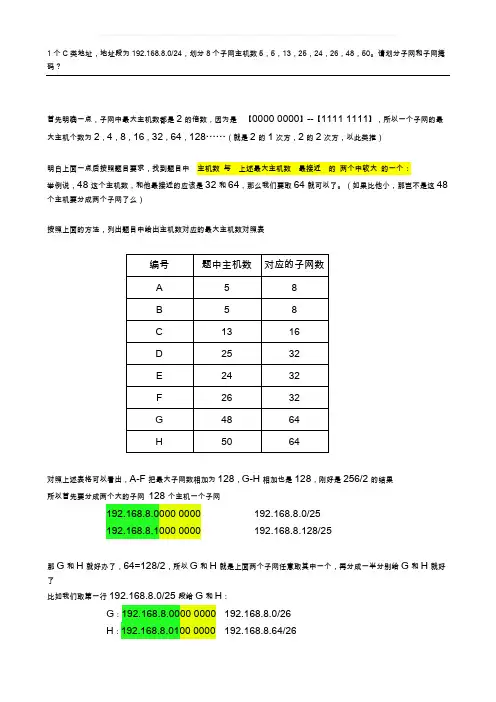
1个C类地址,地址段为192.168.8.0/24,划分8个子网主机数5,5,13,25,24,26,48,50。
请划分子网和子网掩码?首先明确一点,子网中最大主机数都是2的倍数,因为是【0000 0000】--【1111 1111】,所以一个子网的最大主机个数为2,4,8,16,32,64,128……(就是2的1次方,2的2次方,以此类推)明白上面一点后按照题目要求,找到题目中主机数与上述最大主机数最接近的两个中较大的一个:举例说,48这个主机数,和他最接近的应该是32和64,那么我们要取64就可以了。
(如果比他小,那岂不是这48个主机要分成两个子网了么)按照上面的方法,列出题目中给出主机数对应的最大主机数对照表对照上述表格可以看出,A-F把最大子网数相加为128,G-H相加也是128,刚好是256/2的结果所以首先要分成两个大的子网128个主机一个子网192.168.8.0000 0000 192.168.8.0/25192.168.8.1000 0000 192.168.8.128/25那G和H就好办了,64=128/2,所以G和H就是上面两个子网任意取其中一个,再分成一半分别给G和H就好了比如我们取第一行192.168.8.0/25段给G和H:G:192.168.8.0000 0000 192.168.8.0/26H:192.168.8.0100 0000 192.168.8.64/26剩下的就是A-F了A+B+C的子网数是32,和DEF的子网数相等,这样就是4个32主机数的子网了所以,我们把上面第二行的子网192.168.8.128/25再分成4个32主机数的子网好了4个子网,就是要有4中变化,用二进制表示就00 ,01,10,11 ;所以,4个子网如下A-C:192.168.8.1000 0000 192.168.8.128/27D: 192.168.8.1010 0000 192.168.8.160/27E: 192.168.8.1100 0000 192.168.8.192/27F: 192.168.8.1110 0000 192.168.8.224/27这样的话,DEF的3个子网就划分好了。
划分子网例题详解(网络基础考试题目)1,假设取得网络地址200.200.200.0 ,子网掩码为255.255.255.0。
现在一个子网有100台主机,另外4个子网有20台主机,请问如何划分子网,才能满足要求。
请写出五个子网的子网掩码、网络地址、第一个主机地址、最后一个主机地址、广播地址。
(子网号可以全0和全1)。
请直接写出最后答案。
还没做题之前先要明确IP地址的命名方式、划分子网的实质、以及子网掩码的作用。
IP地址的格式是(32bit)= net-id + host-id当外界要和我的电脑通信时,他首先找到和我的net-id一样的路由器,然后通过路由器再找到我的host-id。
IP地址一般分为三类:A类:IP(32bit) =net-id(8bit) + host-id(24bit)通式是:IP=X. 0 . 0 . 0 后面的0是主机号B类:IP(32bit)=net-id(16bit) + host-id(16bit)通式:IP= X. X.0 .0 后面的0是主机号C类:IP(32bit)=net-id(24bit) + host-id(8bit)通式:IP= X. X. X .0 后面的0是主机号明白了IP地址的格式,接下来我们就可以了解子网划分的实质了。
子网划分是为了解决网络IP不够用的情况,它的实质其实就是,在A,B,或者C类中把原先分配给它的主机号位数拿出若干个位来作网络号.这样就可以缓解网络IP不够用的情况了.比如我们拿一个B类IP来划分:X.X.0.0 里面host-id位数有16位,这时可以根据具体需要(具体需要几位后面会讲)拿出若干位来作net-id,剩下的作host-id. (这时你可能会问,把主机号位数拿去分了,那可以连的主机数不是少了?确实是这样,划分子网就是以牺牲主机数来增加网络数。
事实也如此,很多企业单位本来没有那么多主机,但他就是要了个大的网络ID,IP地址不够用也是这种原因引起的)好了,知道划分子网的实质就是把host-id分出若干位数来作net-id,这时外界是怎样和划分好了的子网内的主机联系的呢?在没有子网掩码的情况下,外界要和子网内的主机联系必须通过先前没划分的总的网络路由器,然后由路由器查找网内的各主机,这样效率就很低下。
子网划分例题讲解在计算机网络中,子网划分是一种网络管理技术,它将一大块IP地址空间分割成多个更小的子网,使得网络管理员可以更有效地分配IP地址和管理网络流量。
子网划分是网络设计和配置的关键步骤之一,因此深入了解子网划分过程和技巧对于网络管理人员来说至关重要。
本文将通过一个例题的讲解,介绍子网划分的基本原则和步骤。
例题描述:假设公司A有一个IP地址段为192.168.0.0/24的网络,需要将该网络划分为4个子网来满足不同部门的需求。
具体要求如下:1. 部门1需要256个IP地址2. 部门2需要128个IP地址3. 部门3需要64个IP地址4. 部门4需要32个IP地址解题思路:首先,我们需要确定所需IP地址最大的部门,以便为其分配对应大小的子网。
根据题目要求,部门1需要256个IP地址,而/24的网络只能提供256个IP地址,因此我们需要至少划分一个/24的子网给部门1。
接下来,我们需要确定其他部门所需的子网大小。
从题目给出的需求来看,部门4所需的IP地址最少,为32个IP地址。
而/24的子网能够提供256个IP地址,所以我们可以使用更小的子网来满足部门4的需求。
步骤1:为部门4分配子网根据部门4的需求,我们可以使用一个/27的子网来分配IP地址。
因为/27的子网有32个IP地址,正好满足部门4的需求。
而/27的子网子网掩码为255.255.255.224,可以通过将主机位全部置1得到。
步骤2:为部门3分配子网接下来,我们需要为部门3分配子网。
根据题目要求,部门3需要64个IP地址。
我们可以使用一个/26的子网来满足需求。
/26的子网有64个IP地址,而子网掩码为255.255.255.192。
步骤3:为部门2分配子网部门2需要128个IP地址,我们可以使用一个/25的子网来满足需求。
/25的子网有128个IP地址,子网掩码为255.255.255.128。
步骤4:为部门1分配子网最后,我们需要为部门1分配子网。
子网划分和计算方法(附习题详解)子网划分和计算方法(附习题详解)一.子网划分作用1.计算网络号,通过网络号选择正确的网络设备连接终端设备1)清楚IP地址四点段点分十进制数和子网掩码,对应的网络号是什么2)交换机是用来连接相同网络的设备,路由器是用来连接不同网段的设备网络号一样的,即在相同网段,网络号不一样的,即不同网段3)计算方法把十进制数的IP地址换算成二进制数,把子网掩码也由十进制数换算成二进制数,两对二进制数对齐做“与”运算,即可得出网络号。
2.根据网络的规模,可以对局域网(内网)进行网络地址规划二.IP地址格…大家好。
又见面了。
我是你的朋友全詹俊。
目录一.子网划分二.IP地址格式三.IP地址的分类四.计算网络号五.子网数,主机容量和有效主机容量的计算方法总结一.子网划分作用1.计算网络号,通过网络号选择正确的网络设备连接终端设备1)清楚IP地址四点段点分十进制数和子网掩码,对应的网络号是什么2)交换机是用来连接相同网络的设备,路由器是用来连接不同网段的设备网络号一样的,即在相同网段,网络号不一样的,即不同网段3)计算方法把十进制数的IP地址换算成二进制数,把子网掩码也由十进制数换算成二进制数,两对二进制数对齐做“与”运算,即可得出网络号。
2.根据网络的规模,可以对局域网(内网)进行网络地址规划二.IP地址格式IP地址=网络部分+主机部分网络部分用来确定终端是不是同一个网段;主机部分是用来确定终端的容量大小;(这个网段最多可以容纳多少台主机)同一个部门应该要确保其所有的终端在同一个网段;规划的主机的数量应该在你的主机部分可容纳的范围内;一个字节(byte)=8个比特(bit)IPV4地址是32位二进制数,点分四段十进制数表示IP地址=网络部分+主机部分=32位现在用到的IP地址的版本是IPV4(第四个版本),之后将会过渡到IPV6(第六版本),IPV6位数是128位二进制数因为IPV4全球通用的公网地址已经耗尽,没有办法做到一人一个全球通用的公网IP,所以将会过渡到IPV6,IPV6可以满足一人一个全球通用的公网IP在子网掩码中,连续的1代表网络部分,连续的0代表主机部分。
划分子网例题详解大全
例题一、假设某网络公司下有4个部门,每个部门都有一个局域网。
这4个部门中营销部有30台主机,财务部有32台主机,维修部有30台主机。
采购部有30台主机。
请问该单位需要申请几个IP 地址?这些IP地址是哪个类别的?如何规划主机地址?
申请一个C类地址进行一下子网划分就足够了。
具体参考如下:例如申请到C类IP为:212.22.33.0/24。
划分结果:
财务部ip段:212.22.33.1/26----212.22.33.62
营销部ip段:212.22.33.65/27---212.22.33.94/27
维修部ip段:212.22.33.97/27---212.22.33.126/27
采购部ip段:212.22.33.129/27---212.22.33.128/27
例题二、一公司原来使用192.168.1.0/24这个标准网络,现在想为公司的每个部门(共六个)单独配置一个子网,其中最大的部门要分配IPv4地址的数量不超过25个。
求每个子网的子网掩码、地址范围、网络地址和广播地址。
分析:192.168.1.0/24 共有254个可用的IPv4 地址,现在要划分6个子网且最大子网地址数目不超过25个,也就是划分成8个子网,每个子网可用的IPv4地址最多30个,只使用其中的6个子网。
子网的划分和解答子网的划分和解答1、子网掩码为255.255.0.0 ,下列哪个IP 地址不在同一网段中()A. 172.25.15.201B. 172.25.16.15C. 172.16.25.16D. 172.25.201.15答案:C解析:使用与运算来判断IP地址是否在同一个网段。
A、B、C的网段都是172.25.0.02、B类地址子网掩码为 255.255.255.248 ,则每个子网内可用主机地址数为()A. 10B. 8C. 6D. 4答案:C解析:该掩码说明有29个网络位,3个主机位。
2^3-2=63、对于C 类 IP 地址,子网掩码为 255.255.255.248 ,则能提供子网数为()A. 16B. 32C. 30D. 128答案:B解析:C类默认子网掩码为:255.255.255.0,255.255.255.248借了五个主机位作为网络位来划分子网。
子网数为:2^5=324、IP 地址219.25.23.56 的缺省子网掩码有几位?A.8B.16C.24D.32答案::C解析:该IP地址为C类地址5、某公司申请到一个C 类IP 地址,但要连接6 个的子公司,最大的一个子公司有26 台计算机,每个子公司在一个网段中,则子网掩码应设为?A.255.255.255.0B.255.255.255.128C.255.255.255.192D.255.255.255.224答案:D解析:2^3=8>6 借3个主机位化为网络位,掩码为:255.255.255.2246、.一台IP 地址为10.110.9.113/21 主机在启动时发出的广播IP 是?A.10.110.9.255B.10.110.15.255C.10.110.255.255D.10.255.255.255答案:B解析:主机位都为1时为广播地址。
10.110.9.113可写成“10.110.00001 | 001.01110001”当竖线后面全变成1时就是广播IP及“10.110.15.255”7、没有任何子网划分的IP 地址125.3.54.56 的网段地址是?A.125.0.0.0B.125.3.0.0C.125.3.54.0D.125.3.54.32答案:A解析:该地址为A类地址,子网掩码默认为255.0.0.0。
计算机网络《子网划分》题库1.已知对一个标准的C类网络192.168.1.0/24进行了子网划分,每个子网可以容纳6台主机,现有一个主机IP地址为192.168.1.11,请问下列地址中,哪一个主机地址与该主机地址在同一个网段()。
A.19.2.168.1.6B.192.168.1.9C.192.168.1.7D.192.168.1.15正确答案:A2.某公司有128台电脑,采用172.16.0.0/16网段进行子网划分,描述正确的是()A.新产生的第1个子网是172.16.0.0/25B.可以产生128个子网C.新产生的第1个子网是172.16.0.0/24D.主机部分应满足8位正确答案:ABC3.在进行子网划分,是利用(),划分成若干个较小的网络。
A.最高位的网络地址B.最高位的主机地址C.最低位的网络地址D.最低位的主机地址正确答案:A4.三层交换机上可以划分子网,划分IP子网的主要好处是()A.可以隔离广播流量B.可减少网管人员IP地址分配的工作量C.可增加网络中的主机数量D.可有效使用IP地址正确答案:AB5.将地址块192.168.0.0/按照可变长子网掩码的思想进行子网划分,若某部门所需地址总数为30个,那么该部门的子网位的长度为()。
A.4B.8C.5D.16正确答案:A6.对于一个没有经过子网划分的传统C类网络来说,允许安装多少台主机?A.1024B.65025C.254D.16正确答案:A7.能经济地解决子网划分之后子网之间必须依赖路由器进行通信的问题,最好使用()A.二层交换机;B.网桥;c.三层交换机;D.集线器正确答案:A8.对一个B类网络进行子网划分,要划分出510个子网,则子网掩码是()。
A.255.255.255.128B.255.255.255.192C.255.255.255.252D.255.255.255.0正确答案:A9.子网划分技术是在自然分类IP地址划分的基础上增加了哪个部分实现的?A.网络号部分B.主机号部分C.子网号部分D.以上答案都不正确正确答案:A10.有一段B类地址,要求进行子网划分,并且每个子网的主机数至少1000个。
计算机网络实验报告实验名称:子网编址报告人:学号:成绩:【实验目的】:1.熟练掌握仿真软件使用方法2.熟练交换机,路由器命令以及命令模式3.对交换机进行ospf设置4.对不同网络进行地址划分【实验原理】:IP地址共计32位,对于B类地址,前16位是固定的网络号,对于后16为可以跟据,不同网络所需要IP地址的个数进行调整,将后16位一部分化为网络号,一部分化为主机号,实现边长子网。
【实验设备】:Ciso Packet Tracer 仿真软件【实验内容】:对行政部门及个设计室进行IP地址划分。
【操作步骤】:如图:1、PC的IP设置部门网段子网掩码PC IP10 128.10.4.100 行政部门128.10.4.0/22 255.255.252.011 128.10.4.2003 128.10.8.100 设计室128.10.8.0/23 255.255.254.02 128.10.8.2000 128.10.10.100 开发一室128.10.10.0/23 255.255.254.01 128.10.10.2004 128.10.12.100 开发二室128.10.12.0/23 255.255.254.05 128.10.12.2006 128.10.14.100 测试一室128.10.14.0/23 255.255.254.07 128.10.14.2008 128.10.16.100 测试二室128.10.16.0/23 255.255.254.09 128.10.16.2002、路由IP配置路由器号端口号IP0/0 128.10.8.254 Router80/1 128.10.10.10/0 128.10.8.253 Router90/1 128.10.12.10/0 128.10.8.252 Router100/1 128.10.14.10/0 128.10.8.251 Router110/1 128.10.16.10/0 128.10.4.1 Router120/1 128.10.8.13、ospf设置对Router12进行设置R outer# configure terminalRouter(config)#router ospf 100Router(config-router)#network 128.10.4.0 0.0.3.255 area 0 /*第一个网络段*/Router(config-router)#network 128.10.8.0 0.0.1.255 area 0 /*第二个网络段*/对Router8进行设置R outer# configure terminalRouter(config)#router ospf 100Router(config-router)#network 128.10.10.0 0.0.1.255 area 1 /*第一个网络段*/Router(config-router)#network 128.10.8.0 0.0.1.255 area 1 /*第二个网络段*/对Router9进行设置R outer# configure terminalRouter(config)#router ospf 100Router(config-router)#network 128.10.12.0 0.0.1.255 area 1 /*第一个网络段*/Router(config-router)#network 128.10.8.0 0.0.1.255 area 1/*第二个网络段*/对Router10进行设置R outer# configure terminalRouter(config)#router ospf 100Router(config-router)#network 128.10.14.0 0.0.1.255 area 1 /*第一个网络段*/Router(config-router)#network 128.10.8.0 0.0.1.255 area 1 /*第二个网络段*/对Router11进行设置R outer# configure terminalRouter(config)#router ospf 100Router(config-router)#network 128.10.16.0 0.0.1.255 area 1 /*第一个网络段*/Router(config-router)#network 128.10.8.0 0.0.1.255 area 1 /*第二个网络段*/【测试及分析】:由以上的测试可知,各个部门之间可以进行通信。
实验四子网划分一、实验目的了解IP地址的分类。
子网掩码的运用,会划分子网。
二、实验要求用A类地址将实验室的计算机分为个6子网。
1、分组安排(1)A1-A10为1号子网;(2)B1-B10为2号子网;(3)C1-C10为3号子网;(4)D1-D10为4号子网;(5)E1-E10为5号子网;(6)F1-F10为6号子网。
2、设置要求每个IP最后8bit为计算机号。
A类地址126.x.y.z要求每个子网间的计算机可以互相探测到。
例如用A类地址划分1号子网,因为划分为6个子网,所以在高3位置为即×××00000,1号子网为00100000其掩码为11111111.11100000.00000000.00000000转化为十进制就是255.224.0.0。
IP地址第二字节设置为00100000-00111111均可,例如可以设置为126.34.114.76三、实验步骤采用A类地址组网1、设置地址(分成小组)第一组10.*.*.*第二组11.*.*.*第三组12.*.*.*第四组13.*.*.*第五组14.*.*.*第六组15.*.*.*2、设置地址为统一的A类地址255.0.0.03、设置掩码,划分子网按照试验要求更改子网掩码和IP地址。
其中126不要改动。
不同网络相同网络组内不同子网共同子网:四、实验报告内容1、实验目的2、实验要求3、实验内容(1)A类地址的设置过程,包括每一步设置的IP是什么,子网掩码是什么,能否探测到其它计算机。
4、实验结果分析参考资料:网络地址我们把整个internet看成一个单一的,抽象的网络。
Ip地址就是给每个连接在因特网上的主机分配一个在全世界范围是唯一的32bit的标识符。
Ip地址的结构使我们可以在因特网上很方便地进行寻址,这就是:IP地址中的网络号net-id把网络找到,再按主机号host-id把主机找到。
所以IP地址并不只是一个计算机的号,而是指出了连接到某网络上的某计算机。
计算机网络复习资料实验一配置终端,熟悉交换机各种工作模式之间的切换模式 命令提示符用户模式 Switch> 特权模式 Enable Switch#全局配置模式 Config terminal Switch (config )# 端口配置模式 Interface fastethernet 端口号 Switch (config -if )#控制设置模式 Line control 控制口 Switch (config -line )# 线路设置模式 Line vty 线路口 Switch (config -line )# VLAN 设置模式 Vlan databaseSwitch (vlan )#Telnet 方式远程登陆配置配置命令使用配置线连接电脑与交换机的C 口后,在电脑上开启终端进行配置第一步:配置全局、终端和 线程模式的密码 Switch>enable ---->进入特权模式 Switch# config terminal ---->进入全局配置模式Switch(config) enable password test ---->配置进入特权模式的密码为test Switch(config) line console 0 ---->进入Consloe 口配置模式(Consloe 口即物理口) Switch(config -line) password test1 ---->配置进入Consloe 口密码为test1 Switch(config -line) login ---->启用Switch(config -line) exitSwitch(config) line vty 0 4 ---->进入telnet 密码配置模式,0 4表示允许共5个用户同时telnet 登入到交换机Switch(config -line) password test2 ---->将telnet 密码设置为test2 Switch(config -line) login ---->启用需输入密码才能telnet 成功Switch(config -line) exit第二步:对交换机进行IP 和网关设置Switch(config)interface vlan1Switch(config -if)ip address 192.168.1.1 255.255.255.0 Switch(config -if)no shutdown Switch(config -if)exitSwitch(config)ip default -gateway 192.168.1.1Switch Pc 1192.168.1.2 Pc 2 192.168.1.3跨交换机VLAN 的配置与实现交换机端口属性:Access 端口:终端主机收发端口Trunk 端口:交换机之间的连接端口,也称为干道口,用交叉线连接 配置命令PC1、PC2、PC3、PC4全通 交换机1:S1> enable S1# conf tS1(conf -if)> exitS1(config)> interface f 0/24S1(conf -if)> switchport mode trunk ---->设置端口24为trunk 端口 S1(config)> vlan 10 ---->添加vlan 10 S1(config)> vlan 20 ---->添加vlan 20 S1(config)> interface f 0/1S1(conf -if)> switchport access vlan 10 ---->为端口1分配vlan 10S1(conf -if)> exitS1(config)> interface f 0/2S1(conf -if)> switchport access vlan 20 ---->为端口2分配vlan 20S1(conf -if)> exit交换机2:配置同上结果:PC1、PC3互通PC2、PC4互通其他命令show vlan 显示交换机vlan 信息 no vlan 删除对应的vlan Reload 重启交换机Switch1Switch2Pc 1 192.168.1.1 Pc 2 192.168.1.2 Pc 3 192.168.1.3 Pc 4 192.168.1.4三层交换机静态路由配置配置命令未配置路由情况下,PC1不能ping 通PC2期望在S3560上启用静态路由,PC1到192.168.1.0走10.0.0.1,到192.168.2.0走10.0.0.2可以ping 通PC2 端口IP 配置 交换机1:Switch1(config)# interface f 0/1 Switch1(config -if)# no switchportSwitch1(config -if)# ip address 192.168.1.1 255.255.255.0 Switch1(config -if)# exitSwitch1(config)# interface f 0/24 Switch1(config -if)# no switchportSwitch1(config -if)# ip address 10.0.0.1 255.255.255.0 Switch1(config -if)# exit交换机2:Switch2(config)# interface f 0/1 Switch2(config -if)# no switchportSwitch2(config -if)# ip address 192.168.2.1 255.255.255.0 Switch2(config -if)# exitSwitch2(config)# interface f 0/24 Switch2(config -if)# no switchportSwitch2(config -if)# ip address 10.0.0.2 255.255.255.0 Switch2(config -if)# exit启用三层交换机上的路由模块 交换机1:Switch1(config)# ip route 192.168.2.0 255.255.255.0 10.0.0.2交换机2:Switch2(config)# ip route 192.168.1.0 255.255.255.0 10.0.0.1注:建议在以太网链路,配置静态路由的时候,配置为下一跳的ip 地址,若是在网络出口配置默认路由,切勿配置为本地出接口。
Switch1 F 0/24 10.0.0.1Switch2 F 0/24 10.0.0.2Pc 1 192.168.1.2 192.168.1.1Pc 2 192.168.2.2 192.168.2.1F 0/1 192.168.1.1 F 0/1 192.168.2.1路由器静态路由配置配置命令PC1,PC2互通 PC3,PC4互通,而PC1,PC2与PC3,PC4因不处于同一网段不通 路由器1:Reijie(config)# interface f0/0 Reijie(config -if)# no shutdownReijie(config -if)# ip address 192.168.1.1 255.255.255.0 Reijie(config -if)# exitReijie(config)# interface f0/1 Reijie(config -if)# no shutdownReijie(config -if)# ip address 10.0.0.1 255.255.255.0 Reijie(config -if)# exitReijie(config)# ip route 192.168.2.0 255.255.255.0 10.0.0.2//目的地址是192.168.2.0/24的数据包,转发给10.0.0.2 路由器2:Reijie(config)# interface f0/0 Reijie(config -if)# no shutdownReijie(config -if)# ip address 192.168.1.1 255.255.255.0 Reijie(config -if)# exitReijie(config)# interface f0/1 Reijie(config -if)# no shutdownReijie(config -if)# ip address 10.0.0.1 255.255.255.0 Reijie(config -if)# exitReijie(config)# ip route 192.168.1.0 255.255.255.0 10.0.0.1注:配置静态路由的下一跳有2种表现形式(下一跳ip 地址和本地出接口) 在以太网链路,配置静态路由的时候,配置为出接口+下一跳的ip 地址的形式。
Switch1Switch2Pc 1 192.168.1.2192.168.1.1Pc 4 192.168.2.3 192.168.2.1Pc 2 192.168.1.3 192.168.1.1 Pc 3 192.168.2.2 192.168.2.1 F 0/0 192.168.1.1 F 0/0 192.168.2.1Router 1 F 0/1 10.0.0.1 Router 2F 0/1 10.0.0.2实验四路由器静态配置和动态路由配置配置命令 路由器1:Ruijie(config)# interface f 0/0uijie(config -if -FastEthernet 0/0)# ip address 192.168.2.1 255.255.255.0 Ruijie(config -if -FastEthernet 0/0)# no shutdown Ruijie(config -if -FastEthernet 0/0)# exit Ruijie(config)# interface f 0/1Ruijie(config -if -FastEthernet 0/1)# ip address 192.168.1.1 255.255.255.0 Ruijie(config -if -FastEthernet 0/1)# no shutdown Ruijie(config -if -FastEthernet 0/1)# exit路由器2:Ruijie(config)#interface f 0/0Ruijie(config -if -FastEthernet 0/0)# ip address 192.168.2.2 255.255.255.0 Ruijie(config -if -FastEthernet 0/0)# no shutdown Ruijie(config -if -FastEthernet 0/0)# exit Ruijie(config)#interface f 0/1Ruijie(config -if -FastEthernet 0/1)# ip address 192.168.3.1 255.255.255.0 Ruijie(config -if -FastEthernet 0/1)# no shutdown Ruijie(config -if -FastEthernet 0/1)# exit路由器3:Ruijie(config)# interface f 0/0Ruijie(config -if -FastEthernet 0/0)# ip address 192.168.3.2 255.255.255.0 Ruijie(config -if -FastEthernet 0/0)# no shutdown Ruijie(config -if -FastEthernet 0/0)# exit Ruijie(config)# interface f 0/1Ruijie(config -if -FastEthernet 0/1)# ip address 192.168.4.1 255.255.255.0 Ruijie(config -if -FastEthernet 0/1)# no shutdown Ruijie(config -if -FastEthernet 0/1)# exitRouter 1 F 0/0 192.168.2.1 Router 2 F 0/0 192.168.2.2Router 3 F 0/1 192.168.3.1Router 4 F 0/0 192.168.3.2F 0/1 192.168.1.1F 0/1 192.168.4.1Pc 1 192.168.1.2 192.168.1.1 Pc 2 192.168.4.2 192.168.4.1动态路由配置(RIP)路由器1:Ruijie(config)# route rip---->启用RIPRuijie(config-router)# network 192.168.1.0---->把192.168.1.0网段通告进RIP进程Ruijie(config-router)# network 192.168.2.0---->把192.168.2.0网段通告进RIP进程Ruijie(config-router)# end路由器2:Ruijie(config)# route ripRuijie(config-router)# network 192.168.2.0---->把192.168.2.0网段通告进RIP进程Ruijie(config-router)# network 192.168.3.0---->把192.168.3.0网段通告进RIP进程Ruijie(config-router)# end路由器3:Ruijie(config)# route ripRuijie(config-router)# network 192.168.3.0---->把192.168.3.0网段通告进RIP进程Ruijie(config-router)# network 192.168.4.0- ---->把192.168.4.0网段通告进RIP进程Ruijie(config-router)# end子网划分七步法地址计算例:IP地址172.16.2.160子网掩码255.255.255.192Step1:将IP地址转换为二进制172162160 10101100000100000000001010100000Step2:将子网掩码地址转换为二进制Step3:划分网络号和主机号,全1为网络号172162160 10101100000100000000001010100000255255255192 11111111111111111111111111000000Step4:Step5:子网地址+1得到第一个可用IP地址10101100000100000000001010000000172162128+1 10101100000100000000001010000000172162129得到第一个可用IP地址Step7:广播地址-1得到最后一个可用IP地址10101100000100000000001010111111172162191-1 10101100000100000000001010000000172162190得到最后一个可用IP地址整理结果IP地址172.16.2.160子网掩码255.255.255.192子网地址172.16.2.128广播地址172.16.2.191第一个可用IP地址172.16.2.129最后一个可用IP地址172.16.2.190子网拥有主机数量2n-2=62注:n为主机号位数(本例中为6)子网划分例题例:如图所示172.16.1.0/24如何划分以适应网络的需求并避免了IP 地址的浪费 解题思路:(1)网络从大到小进行规划(选取主机数量需求最多的网络)(2)根据主机数量及路由器端口数量,选取合适的段长(即网段内地址个数) (3)路由器端口需配置IP 地址,且与路由器端口直接连接的需在同一网段 Step1:规划子网规模30台主机子网,需IP 地址26,主机位6,网络位32-6=26 20台主机子网,需IP 地址25,主机位5,网络位32-5=27 10台主机子网,需IP 地址24,主机位4,网络位32-4=28路由器center 与路由器A ,需IP 地址22,主机位2,网络位32-2=30 路由器center 与路由器B ,需IP 地址22,主机位2,网络位32-2=30 路由器center 与路由器C ,需IP 地址22,主机位2,网络位32-2=30 Step2:IP 地址分配 30台主机子网 172 16 1 0 10101100 00010000 00000001 00000000 10101100 00010000 00000001 00111111 子网地址 172.16.1.0/26 广播地址 172.16.1.63/26 第一个可用地址 172.16.1.1/26 最后第一个可用地址 172.16.1.62/26 20台主机子网 172 16 1 0 10101100 00010000 00000001 00000000 10101100 00010000 00000001 00111111 10101100 00010000 00000001 01000000 10101100 00010000 00000001 01011111 子网地址 172.16.1.64/27 广播地址 172.16.1.95/27 第一个可用地址 172.16.1.65/26 最后第一个可用地址 172.16.1.94/26102030ABCCenter10台主机子网1721610 10101100000100000000000100000000 10101100000100000000000100111111 10101100000100000000000101000000 10101100000100000000000101011111 10101100000100000000000101100000 10101100000100000000000101111111子网地址172.16.1.96/28广播地址172.16.1.111/28第一个可用地址172.16.1.97/28最后第一个可用地址172.16.1.110/28Step3:路由器IP地址分配172161255 10101100000100000000000111111111 10101100000100000000000111111100 10101100000100000000000111111000 10101100000100000000000111110100 172.16.1.252/30172.16.1.248/30172.16.1.244/30结果:1020 30ABCCenter172.16.1.96~172.16.1.111 172.16.1.64~172.16.1.95 172.16.1.0 ~172.16.1.63172.16.1.96/28172.16.1.64/27172.16.1.0/26172.16.1.252/30172.16.1.248/30172.16.1.244/30练习题:202.77.10.0/24结果:荆楚理工学院18.1.730504030ABCCenterD30504030ABCCenterD202.77.10.128202.77.10.191202.77.10.0 202.77.10.63202.77.10.64 202.77.10.127202.77.10.192 202.77.10.223202.77.10.128/26202.77.10.0/26202.77.10.64/26202.77.10.192/27202.77.10.252202.77.10.255202.77.10.248202.77.10.251202.77.10.244202.77.10.247202.77.10.240202.77.10.243202.77.10.252/30202.77.10.248/30202.77.10.244/30202.77.10.240/30。