zigbee模块的配置说明5-20
- 格式:pdf
- 大小:331.93 KB
- 文档页数:6
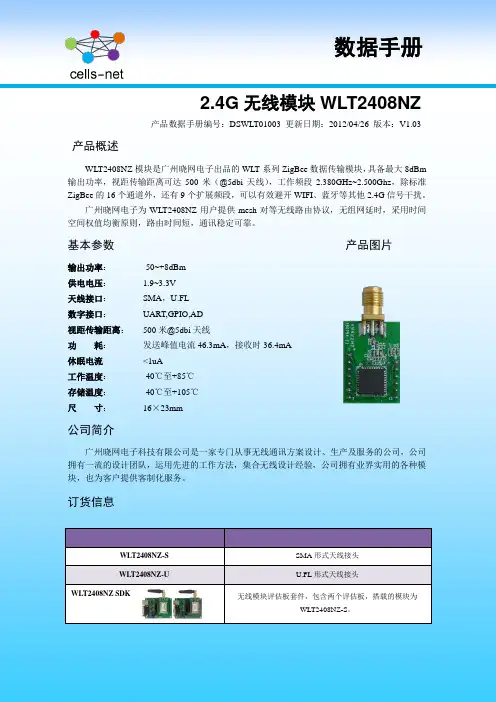
2.4G无线模块WLT2408NZ产品数据手册编号:DSWLT01003 更新日期:2012/04/26 版本:V1.03产品概述WLT2408NZ模块是广州晓网电子出品的WLT系列ZigBee数据传输模块,具备最大8dBm 输出功率,视距传输距离可达500米(@5dbi天线),工作频段2.380GHz~2.500Ghz,除标准ZigBee的16个通道外,还有9个扩展频段,可以有效避开WIFI、蓝牙等其他2.4G信号干扰。
广州晓网电子为WLT2408NZ用户提供mesh对等无线路由协议,无组网延时,采用时间空间权值均衡原则,路由时间短,通讯稳定可靠。
基本参数产品图片输出功率:供电电压:天线接口:数字接口:视距传输距离:功耗:休眠电流工作温度:存储温度:尺寸:-50~+8dBm1.9~3.3VSMA,U.FLUART,GPIO,AD500米@5dbi天线发送峰值电流46.3mA,接收时36.4mA <1uA-40℃至+85℃-40℃至+105℃16×23mm公司简介广州晓网电子科技有限公司是一家专门从事无线通讯方案设计、生产及服务的公司,公司拥有一流的设计团队,运用先进的工作方法,集合无线设计经验,公司拥有业界实用的各种模块,也为客户提供客制化服务。
订货信息WLT2408NZ-S SMA形式天线接头WLT2408NZ-U U.FL形式天线接头WLT2408NZ SDK 无线模块评估板套件,包含两个评估板,搭载的模块为WLT2408NZ-S。
数据手册版权声明本文档提供有关晓网电子产品的信息,并未授予任何知识产权的许可,并未以明示或暗示,或以禁止发言或其它方式授予任何知识产权许可,任何单位和个人未经版权所有者授权不得在任何形式的出版物中摘抄本手册内容。
产品命名规则图1-1 产品命名规则例如:WLT2408NZ-S表示晓网电子模块类的产品,频段为2.4GHz,理论输出功率为﹢8dBm(实际输出为﹢7.7dBm),超小封装,调制方式为ZigBee,外置SMA头的模块。

Zigbee 开关控制器一,产品参数:输入输出:85-265V 50/60Hz最大负载:250V / 10A无线标准:IEEE 802.15.4外壳材料:V0级阻燃材料外壳尺寸:92.8*44.2*23.6mm二,产品特点:1, 无需购买其他公司Zigbee hub 直接支持亚马逊智能音箱语音配对控制和Alexa App 控制2, 支持接入三星SmartThings hub ,或者其他公司Zigbee HA hub三,可连接电灯,插座,风扇,电机,冰箱,洗衣机,热水器等功率低于2200W 的电器AC 85-265V零线火线四,安装说明(图片在资料中):线径 : 20-12 AWG剥线长度 : 8-10mm接线方法:对准连接器孔径直接插入即可如果是硬电线,可以剥线8-10mm ,然后直接插入火线和零线的孔里,如果是软线可以用VE1008接线端子,软线塞到端子里用斜口钳压几下,也可以用螺丝刀用力按压控制器正面的小孔然后直接把软线塞入火线和零线的孔里。
如果需要取下已安装的电线,可以把螺丝刀放到控制器正面孔里,用力按压,就能把线拔出来。
各类电气设备五,产品配置说明:1,Work with Amazon Alexa(图片在资料中)Echo Plus(model:ZE39KL)Echo Show (2nd Gen) (model:DW84JL)Echo Plus (2nd Gen) (model:L9D29R)操作步骤1)确认Zigbee OnOff Controller红色指示灯处于闪烁状态,如果指示灯常亮,长按侧面按键(控制器侧面小孔),直到指示灯处于闪烁状态或者Zigbee OnOff Controller断电然后上电3-8s,重复五次,此时重新进入配置状态2)Ask, “Alexa, discover my devices."3)等待Zigbee OnOff Controller指示灯常亮,此时设备已经连接到echo plus或者第二代echo show4)Ask, “Alexa, turn off first light." 这样就可以把控制器断开,5)可以使用Amazon Alexa App修改添加group,routines或者修改设备名称比如bedroom light 或者office switch2,Work with Samsung SmartThings hub and Amazon Alexa (图片在资料中)操作步骤1)确认Zigbee OnOff Controller红色指示灯处于闪烁状态,如果指示灯常亮,长按侧面按键(控制器侧面小孔),直到指示灯处于闪烁状态或者Zigbee OnOff Controller断电然后上电3-8s,重复五次,此时重新进入配置状态2)打开SmartThings App添加设备,指示灯常亮,此时设备已经加入SmartThings hub,如果网关不能识别设备类型请参照SmartTings Config.pdf文档3)使用Amazon Alexa App或者网页,Enable SmartThings Skill4)ask, “Alexa, discover my devices."可以将设备加入Amazon Smart Home5)可以使用SmartThings App或者Amazon Alexa App修改添加group,routines或者修改设备名称,bedroom light 或者office switch6)最后可以使用音箱或者Amazon Alexa App,或者SmartThings App控制设备六,SmartThings App和Amazon Alexa App操作说明(添加device,group,routines)1,Amazon Alexa App1)在Alexa App界面右上方点击+号,可以添加设备和group,如下图示,设备列表界面可以控制或者修改设备类型和名称Alexa App设备列表界面2)在Alexa App上的Smart Home主界面可以很方便的操作设备Alexa App Smart Home主界面1)在Alexa App上的Routines界面,可以对一些设备和事件进行设置(比如,Ask, “Alexa, good morning."此时打开卧室灯,打开窗帘等,然后预报天气,交通状况以及待办事项等)Alexa App Routines界面2,SmartThings App1)在SmartThings App设备列表界面右上方点击+号,可以添加或者修改设备SmartThings App设备列表界面2)在SmartThings App上的Smart Home主界面可以加入把常用的设备和场景SmartThings App Smart Home主界面3)在SmartThings App上的Routines界面,可以对一些设备和触发条件进行设置SmartThings App Routines界面。
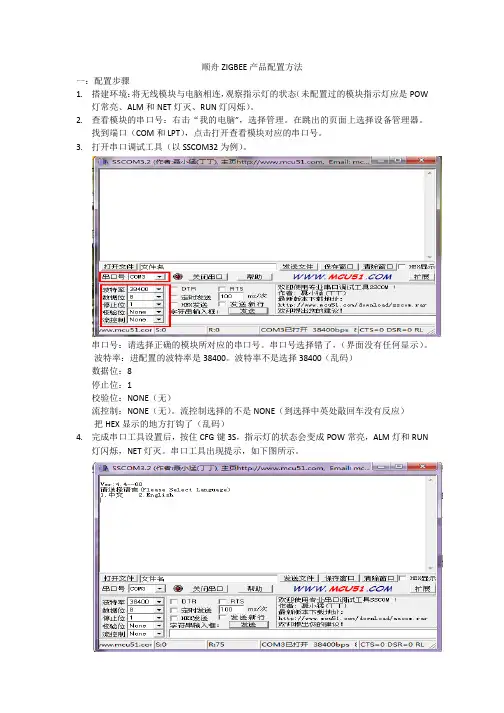
顺舟ZIGBEE产品配置方法
一:配置步骤
1.搭建环境:将无线模块与电脑相连,观察指示灯的状态(未配置过的模块指示灯应是POW
灯常亮、ALM和NET灯灭、RUN灯闪烁)。
2.查看模块的串口号:右击“我的电脑”,选择管理。
在跳出的页面上选择设备管理器。
找到端口(COM和LPT),点击打开查看模块对应的串口号。
3.打开串口调试工具(以SSCOM32为例)。
串口号:请选择正确的模块所对应的串口号。
串口号选择错了,(界面没有任何显示)。
波特率:进配置的波特率是38400。
波特率不是选择38400(乱码)
数据位:8
停止位:1
校验位:NONE(无)
流控制:NONE(无)。
流控制选择的不是NONE(到选择中英处敲回车没有反应)
把HEX显示的地方打钩了(乱码)
4.完成串口工具设置后,按住CFG键3S,指示灯的状态会变成POW常亮,ALM灯和RUN
灯闪烁,NET灯灭。
串口工具出现提示,如下图所示。
5.提示选择语言,直接敲击回车即可。
工具会提示你输入安全码,直接输入”SHUNCOM“。
6.安全码输入完毕后,工具会自动显示出配置参数。
7.工具会自动显示出配置参数,如需修改参数设置,输入参数选项前的编号即可修改成功。
二、配置方案
①.模块之间通讯,网络ID和无线频点必须相同。
②.地址编码、波特率、校验、数据位必须与用户终端设备相同。
③.节点地址:中心节点的地址是固定的0000,中继路由与终端节点的地址是0001-FFFF 之间可选择。
ZigBee⽹络配置低数据速率的WPAN中包括两种⽆线设备:全功能设备(FFD)和精简功能设备(RFD)。
其中,FFD可以和FFD、RFD通信,⽽RFD只能和FFD通信,RFD之间是⽆法通信的。
RFD的应⽤相对简单,例如在传感器⽹络中,它们只负责将采集的数据信息发送给它的协调点,并不具备数据转发、路由发现和路由维护等功能。
RFD占⽤资源少,需要的存储容量也⼩,成本⽐较低。
在⼀个ZigBee⽹络中,⾄少存在⼀个FFD充当整个⽹络的协调器,即PAN协调器,ZigBee中也称作ZigBee协调器。
⼀个ZigBee⽹络只有⼀个PAN协调器。
通常,PAN协调器是⼀个特殊的FFD,它具有较强⼤的功能,是整个⽹络的主要控制者,它负责建⽴新的⽹络、发送⽹络信标、管理⽹络中的节点以及存储⽹络信息等。
FFD和RFD都可以作为终端节点加⼊ZigBee⽹络。
此外,普通FFD也可以在它的个⼈操作空间(POS)中充当协调器(路由),但它仍然受PAN协调点的控制。
ZigBee中每个协调点最多可连接255个节点,⼀个ZigBee⽹络最多可容纳65535个节点。
ZigBee⽹络的拓扑结构ZigBee⽹络的拓扑结构主要有三种,星型⽹、⽹状(mesh)⽹和混合⽹。
星型⽹是由⼀个PAN协调点和⼀个或多个终端节点组成的。
PAN协调点必须是FFD,它负责发起建⽴和管理整个⽹络,其它的节点(终端节点)⼀般为RFD,分布在PAN协调点的覆盖范围内,直接与PAN协调点进⾏通信。
星型⽹通常⽤于节点数量较少的场合。
Mesh⽹⼀般是由若⼲个FFD连接在⼀起形成,它们之间是完全的对等通信,每个节点都可以与它的⽆线通信范围内的其它节点通信。
Mesh⽹中,⼀般将发起建⽴⽹络的FFD节点作为PAN协调点。
Mesh⽹是⼀种⾼可靠性⽹络,具有“⾃恢复”能⼒,它可为传输的数据包提供多条路径,⼀旦⼀条路径出现故障,则存在另⼀条或多条路径可供选择。
Mesh⽹可以通过FFD扩展⽹络,组成Mesh⽹与星型⽹构成的混合⽹。
Zigbee简介:Zigbee网络通常由三种节点构成:z协调器(Coordinator):用来创建一个Zigbee网络,并为最初加入网络的节点分配地址,每个Zigbee网络需要且只需要一个Coordinator.z路由器(Router):也称为Zigbee全功能节点,可以转发数据,起到路由的作用,也可以收发数据,当成一个数据节点,还能保持网络,为后加入的节点分配地址.z终端节点(End Device):通常定义为电池供电的低功耗设备,通常只周期性发送数据。
或者通过休眠按键控制节点的休眠或工作。
注意:三种Zigbee节点的P ANID在相同的情况下,可以组网并且互相通讯(上电即组网,不需要人为干预)。
这样可以通过P ANID区分zigbee网络,在同一个区域内,可以同时并存多个zigbee网络,互相不会干扰。
Panid设置见下。
管脚定义:z P1.5:休眠键,输入脚,p1.5拉高时,休眠有效。
模块如果是Cornidator、Router 时此脚无效,只有模块是Enddevice时,此脚才有效,如果不需要休眠功能,则此脚与GND连接。
z p1.7:Set键,输入脚,p1.7拉高时候,设置功能有效,平时模块处于数据收发状态时,此引脚应为低电平,具体设置功能见下节z p2.0 网络连接状态灯,输出脚,模块如果是Router或Enddevice时,此按键表明当前模块是否入网,高电平表明入网,低电平表明没有入网。
z p0.2:Rx,与外置MCU的Tx连接z P0.3:Tx,与外置MCU的Rx连接z GND:电源地z VCC:电源3.3V用户在使用时候,可以根据自己需要选择引脚。
最简单的情况是只使用Rx、Tx.、GND、VCC四个脚,但需要将P1.5(休眠键)、P1.7(设置键)接地。
P2.0(网络连接状态)悬空。
当P1.7为高,通过串口对模块进行设置,数据格式如下(以下数据均为16进制):说明:模块处于设置状态时,波特率固定为38400.即P1.7为高时,模块波特率为38400;P1.7为低时,波特率为设置的波特率,波特率设置见下面命令。
Zigbee操作说明一.Android软件安装配置,导入项目安装pad驱动测试对应源码是否成功使用无线路由器组建局域网,并将摄像头配置进来ZIGBEE用万用表测出2,3,5口:具体使用:将万用表的开关拨到箭头的地方,然后测线路是否通,如果有响声,即是联通的。
串口线和ZIGBEE连接时对应的点:2口:tx; 3口:rx 5口:GND 继电器Vin1连接12伏电源GND2连接地D+5连接智能终端的RS485的左边D-6连接智能终端的RS485的右边使用智能终端的使用:1) 连接电源:PWR:左黑右红,红为5伏电源,黑为底线2)串口线连接PC,进行配置查询:AT+AA_BASE_ADDRESS=1返回结果,0,硬件地址设置地址:AT+AA_BASE_ADDRESS=0,A1108 注意:1108为自己设定的硬件地址(0——F)查询:AT+R_AA_Z_NODE返回结果AT+AA_Z_NODE=C 注:C为协调器设置信道:AT+AA_Z_CHANNEL=11 注:11为自行设定的信道(值为11-26)设组网地址:AT+AA_Z_PAN_ID=1105 注:1105为自行设定的组网地址自此,智能终端设置完成设置ZIGBEE连接电源连接串口线,设置235,黑的是5,黄的是2,绿的是3通过串口线连接PC,进行设置:查询硬件地址:AT+AZ_BASE_ADDRESS=1返回结果0,Z硬件地址设置硬件地址:AT+AZ_BASE_ADDRESS=0,Z1109 注:1109为自行设定的硬件地址(这个地址必须区别于智能终端的硬件地址)设置工作模式:AT+AZ_BASE_WORKMODE=0,2设置为路由器:AT+AZ_Z_NODE=R设置信道:AT+AZ_Z_CHANNEL=11 注:11为上述设置的信道AT+AZ_Z_PAN_ID=1105 注:1105为上述设置的组网地址设置工作模式:AT+AZ_BASE_WORKMODE=0,2将门磁连上:门磁的两头分别连接ZIGBEE的GND和IN两口关于继电器1)继电器就是一个开关2)一个继电器有四对:第一队:AG,A1,A2,;第二队:10,11,12;第三队:13,14,15;第四对:16,17,18。

ZigBee模块产品数据手册广州星博信息技术有限公司Guangzhou Great Symbol Information Technology Co.,Ltd一、概述ZigBeee模块分为基本型和增强,增强型/基本型模块开放了许多外设端口,两个模块的引脚完全兼容,可以通过SDK对模块进行配置后,使用其相应的外设端口,实现数据的采集、外部设备的控制等,其上面有一个天线接口,用于外接天线。
增强型模块和基本型模块开放的外设端口有:基本型模组(1)1个串行通信接口(UART)(2)4个模拟量输入通道(ADC)(3)14个含复用的通用数字输入输出口(GPIO),不复用ADC/UART时最大为8个(复用:不使用UART/ADC功能时,所有IO可配置成GPIO)●增强型模组(1)42个含复用的通用数字输入输出口(GPIO),不复用ADC /DAC/ UART/ SPI/I2C/ CAN功能引脚时最大为9个(2)3个串行外设接口(SPI),其中1个复用ADC(3)2个内部集成总线接口(I2C),其中1个复用UART(4)1个工业现场总线接口(CAN)(5)4个串行通信接口(UART),其中1个复用I2C(6)12个模拟量输入通道(ADC),其中2个复用DAC,3个复用SPI(7)2个模拟量输出通道(DAC)(8)8个16位同步定时器二、产品特性●基本型模组◆尺寸:PCB贴片封装38.6*23.2*3mm◆重量:约3g◆电源:2V-3.6V 典型值:3.3V◆模块总功耗:A无线模块不工作时平均功耗12-13.5mWB无线模块工作时平均功耗97-121mWC无线模块工作时峰值功耗105-138mW◆天线功率:4dBm◆接收灵敏度:-97dBm◆电流:工作电流小于45mA ,待机电流小于1mA◆工作频率: 2.4G ISM频段◆环境温度:-20~75℃◆无线传输距离:200-250m(外接5dB鞭状天线),300-400m(外接9dB鞭状天线) 注:无线传输的距离测试时环境为:内部增益设定为4dB,空旷的环境下测出的直线距离,中间没有障碍物。
2.4G无线模块WLT2408NZ产品数据手册编号:DSWLT01003 更新日期:2012/04/26 版本:V1.03产品概述WLT2408NZ模块是广州晓网电子出品的WLT系列ZigBee数据传输模块,具备最大8dBm 输出功率,视距传输距离可达500米(@5dbi天线),工作频段2.380GHz~2.500Ghz,除标准ZigBee的16个通道外,还有9个扩展频段,可以有效避开WIFI、蓝牙等其他2.4G信号干扰。
广州晓网电子为WLT2408NZ用户提供mesh对等无线路由协议,无组网延时,采用时间空间权值均衡原则,路由时间短,通讯稳定可靠。
基本参数产品图片输出功率:供电电压:天线接口:数字接口:视距传输距离:功耗:休眠电流工作温度:存储温度:尺寸:-50~+8dBm1.9~3.3VSMA,U.FLUART,GPIO,AD500米@5dbi天线发送峰值电流46.3mA,接收时36.4mA <1uA-40℃至+85℃-40℃至+105℃16×23mm公司简介广州晓网电子科技有限公司是一家专门从事无线通讯方案设计、生产及服务的公司,公司拥有一流的设计团队,运用先进的工作方法,集合无线设计经验,公司拥有业界实用的各种模块,也为客户提供客制化服务。
订货信息WLT2408NZ-S SMA形式天线接头WLT2408NZ-U U.FL形式天线接头WLT2408NZ SDK 无线模块评估板套件,包含两个评估板,搭载的模块为WLT2408NZ-S。
数据手册版权声明本文档提供有关晓网电子产品的信息,并未授予任何知识产权的许可,并未以明示或暗示,或以禁止发言或其它方式授予任何知识产权许可,任何单位和个人未经版权所有者授权不得在任何形式的出版物中摘抄本手册内容。
产品命名规则图1-1 产品命名规则例如:WLT2408NZ-S表示晓网电子模块类的产品,频段为2.4GHz,理论输出功率为﹢8dBm(实际输出为﹢7.7dBm),超小封装,调制方式为ZigBee,外置SMA头的模块。
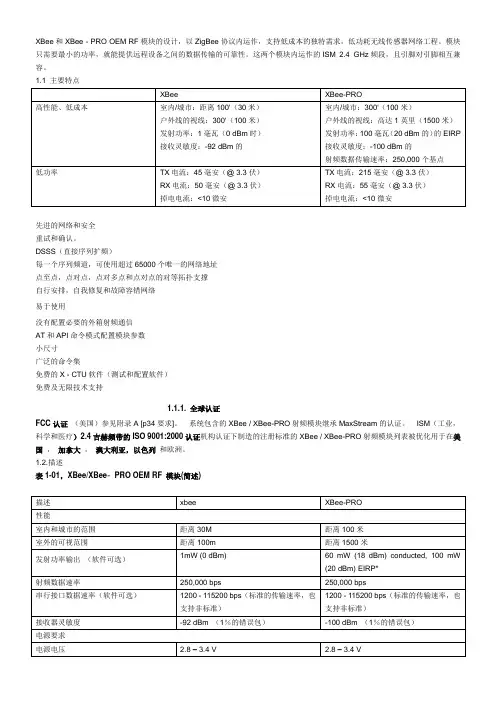
XBee和XBee - PRO OEM RF模块的设计,以ZigBee协议内运作,支持低成本的独特需求,低功耗无线传感器网络工程。
模块只需要最小的功率,就能提供远程设备之间的数据传输的可靠性。
这两个模块内运作的ISM 2.4 GHz频段,且引脚对引脚相互兼容。
1.1 主要特点先进的网络和安全重试和确认。
DSSS(直接序列扩频)每一个序列频道,可使用超过65000个唯一的网络地址点至点,点对点,点对多点和点对点的对等拓扑支撑自行安排,自我修复和故障容错网络易于使用没有配置必要的外箱射频通信AT和API命令模式配置模块参数小尺寸广泛的命令集免费的X - CTU软件(测试和配置软件)免费及无限技术支持1.1.1. 全球认证FCC认证(美国)参见附录A [p34要求]。
系统包含的XBee / XBee-PRO射频模块继承MaxStream的认证。
ISM(工业,科学和医疗)2.4吉赫频带的ISO 9001:2000认证机构认证下制造的注册标准的XBee / XBee-PRO射频模块列表被优化用于在美国,加拿大,澳大利亚,以色列和欧洲。
1.2.描述表1-01,XBee/XBee‐PRO OEM RF 模块(简述)当在欧洲运用时:XBee - PRO RF模块必须被配置为运行在一个最大发射功率为10 dBm的输出水平。
电源输出级别设置使用PL 命令。
PL参数必须等于“0”(10 dBm)。
此外,欧洲法规规定,EIRP最高功率为12.86 dBm的(19毫瓦),对于XBee – PRO的12.11 dBm和XBee时高增益天线天线选项:指定的范围内使用时是典型的集成块(1.5 dBi的)和偶极子(2.1 dBi的)天线。
该芯片天线选项提供要素优势,它的形式,但它通常会产生更短的选择范围比带和偶极子天线发射时,在户外。
1.3.机械尺寸图1 - 01 XBee / XBee - PRO OEM RF模块的机械尺寸(天线选项未显示)The XBee and XBee‐PRO RF Modules are pin‐for‐pin compatible.XBee和XBee - 专业射频模块的引脚- 为- 引脚兼容。
引脚号I/O 接口定义描述(多行代表复用)
1 I VCC 电源输入(+3.3V)
2 I/O P0.4 数字I/O
3 I/O P0.5 数字I/O
4 GND 数字地
5 I/O P1.4 数字I/O
6 I/O P1.5 数字I/O
7 I/O P1.6 数字I/O
8 I/O P1.7 数字I/O
9 I/O P0.3 数字I/O
10 I/O P0.2 数字I/O
1
1
11 I/O P0.6 数字I/O 12 I/O P0.7 数字I/O
13 GND 电源地
Debug 接口只需连接PIN13、PIN14、PIN15、PIN16、PIN17
14
I
REST_N
系统RESET 信号,低电平有效 15 I/O P2.2
Debug 口,调试口,悬空即
可/DC/时钟引脚 16 I/O P2.1
Debug 口,调试口,悬空即
可/DD/数据引脚 17 I VCC
电源输入(+3.3V)
烟感:
1、 第二脚P0.4为信号输入脚,平时为低电平,高电平表示检测到有烟雾报警,下降沿表
示报警恢复;(模块需要将该IO 配置为悬空输入)
2、 第五脚P1.4为按键脚,可以用作加网按键,平时为低电平,上升沿触发;(模块需要将
该IO 配置为悬空输入)
3、 第八脚P1.7为绿色LED 控制脚,高电平点亮;。
标准zigbee网络协议包括协调器、路由器和终端节点,而建立一个zigbee 网络除了必须要有协调器之外,仅需加上路由器或终端节点即可。
下面就给大家详细讲解一下吧。
1、ZigBee技术简介
ZigBee是一种短距离,低功耗,低速率,低成本的一种无线自组网通信技术。
2、ZigBee网络特点
ZigBee网络有如下特点:低功耗,自组网,多跳路由,高安全,抗干扰能力强……
3、ZigBee网络角色
①协调器
ZigBee协调器(英文名:ZigBee Coordinate,通常简写为:ZC)。
协调器在ZigBee网络中,有且只能有一个协调器,它在网络中起了网络搭建和网络维护的功能。
是整个网络的中心枢纽。
是等级最高的父节点。
②路由器
ZigBee路由器(英文名:ZigBee Router,通常简写为:ZR),路由器在ZigBee网络中既可以充当父节点,也可以充当子节点,有信息转发和辅助协调
器维护网络的功能。
③终端
ZigBee终端(英文名:ZigBee End-Device,通常简写为:ZED),终端在ZigBee网络中,其功能最为简单,只能加入网络,为最末端的子节点设备。
只能与其父节点进行通信,如果两个终端之间需要通信,必须经过父节点进行多跳或者单跳通信。
是ZigBee网络中可允许存在的数量最多的节点,也是唯一允许低功耗的网络设备。
以上就是ZigBee自组网的详细介绍,希望能够帮助到大家,如果大家在ZigBee自组网方面还有什么疑问,欢迎咨询专业人员。
一.Android软件安装配置,导入项目安装pad驱动测试对应源码是否成功使用无线路由器组建局域网,并将摄像头配置进来ZIGBEE用万用表测出2,3,5口:具体使用:将万用表的开关拨到箭头的地方,然后测线路是否通,如果有响声,即是联通的。
串口线和ZIGBEE连接时对应的点:2口:tx; 3口:rx 5口:GND继电器Vin1连接12伏电源GND2连接地D+5连接智能终端的RS485的左边D-6连接智能终端的RS485的右边使用智能终端的使用:1) 连接电源:PWR:左黑右红,红为5伏电源,黑为底线2)串口线连接PC,进行配置查询:AT+AA_BASE_ADDRESS=1返回结果,0,硬件地址设置地址:AT+AA_BASE_ADDRESS=0,A1108 注意:1108为自己设定的硬件地址(0——F)查询:AT+R_AA_Z_NODE返回结果AT+AA_Z_NODE=C 注:C为协调器设置信道:AT+AA_Z_CHANNEL=11 注:11为自行设定的信道(值为11-26)设组网地址:AT+AA_Z_PAN_ID=1105 注:1105为自行设定的组网地址自此,智能终端设置完成设置ZIGBEE连接电源连接串口线,设置235,黑的是5,黄的是2,绿的是3通过串口线连接PC,进行设置:查询硬件地址:AT+AZ_BASE_ADDRESS=1返回结果0,Z硬件地址设置硬件地址:AT+AZ_BASE_ADDRESS=0,Z1109 注:1109为自行设定的硬件地址(这个地址必须区别于智能终端的硬件地址)设置工作模式:AT+AZ_BASE_WORKMODE=0,2设置为路由器:AT+AZ_Z_NODE=R设置信道:AT+AZ_Z_CHANNEL=11 注:11为上述设置的信道AT+AZ_Z_PAN_ID=1105 注:1105为上述设置的组网地址设置工作模式:AT+AZ_BASE_WORKMODE=0,2将门磁连上:门磁的两头分别连接ZIGBEE的GND和IN两口关于继电器1)继电器就是一个开关2)一个继电器有四对:第一队:AG,A1,A2,;第二队:10,11,12;第三队:13,14,15;第四对:16,17,18。
09.ZG2819S.04841Function introductionImportant: Read All Instructions Prior to Installation Product DataOperation• This device contains AAA batteries that shall be stored and disposed properly.• DO NOT expose the device to moisture.Safety & WarningsZigBee Dim RemoteProtocol Operation Voltage Transmission Frequency Transmission Range (free field)Protection Type Dimming RangeDimension Protection GradeZigBee 3.04.5V(3xAAA battery)2.4GHz 30m IP200.1%-100%120x55x17mmIP20MagneticBracket1.This ZigBee Dim remote is a wireless transmitter that communicates with a variety of ZigBee compatible systems. This transmitter sends wireless radio signals that are used to remotely control a compatible system.2.This ZigBee remote supports 4 groups for binding max. 30 lighting devices and enables to control single color ZigBee lighting devices.3.ZigBee Network Pairing Through ZigBee Coordinator (Added to a ZigBee Network)1)Before pairing, please make sure that the remote does not belong to any ZigBee network. If yes, please firstremove it from the network, otherwise network pairing will fail.2)From your ZigBee Controller or hub interface, choose to add device and enter Pairing mode (Add device) as• ZigBee Dim remote based on ZigBee 3.0• Enables to control single color lighting devices• High sensitive & high stable touch color wheel, fast & precise color control • Battery powered remote with low power consumption• Enables to pair ZigBee lighting devices through touchlink commissioning • Supports find and bind mode to pair with ZigBee lighting devices• Supports 4 groups for binding max. 30 lighting devices • 2.4 GHz global operation• Transmission range up to 30m• Compatible with universal ZigBee Gateway products• Compatible with universal single color ZigBee lighting devicesBottom sideFront sidePress and hold down toinstructed by the controller.3)Press and hold down key until the LED status indicator turns on, then immediately short press S1 button to enable the remote to search nearby network, LED indicator will flash every 1 second. 20 seconds timeout if there is no network, the indicator will turn off, repeat the operation.4)Network Pairing Begins Automatically: LED indicator on the remote blinks 6 times quickly as it scans for a compatible network controller to pair with.5)After the remote is paired to the ZigBee network, the indicator will stop blinking and turn off, then the remote will appear in your controller's menu. (For Philips Hue bridge, no remote information will appear on APP menu ) 6)The remote is now paired to the ZigBee network.4. How to Check Whether the Remote Belongs to a Network or notActivate the remote by clicking All On/Off button (indicator on), then short press any other buttons except group buttons, indicator blinking 3 times means the remote does not belong to any network, blinking once or twice means it has already been added to a network.5.Pair to a ZigBee Lighting Device Through TouchLink Pairing1)The remote can pair to a ZigBee lighting device through Touchlink pairing and control the device.2)Directly TouchLink pairing with a device without Hub or TouchLink pairing after the remote and device are added to the same ZigBee network.3)Start TouchLink Commissioning of the ZigBee lighting device, please consult its manual to learn how.4)Bring the remote within 10cm of the ZigBee lighting device.5)Short press a group button 1/2/3/4 to choose a group that you would like to pair the device to.6)Press and hold down key until the LED indicator on the remote turns on.7)Short press button S2 to start TouchLink pairing procedure of the remote.8)The LED indicator will flash fast for 3s to start TouchLink and then flash 6 times slowly to indicate successful pairing to the device.Note: 1) Directly TouchLink (both not added to a ZigBee network), each remote can pair with 30 devices.2) TouchLink after added to a ZigBee network, each remote can pair with max. 30 devices.3) For Philips Hue & Amazon Echo Plus, add remote and device to network first then TouchLink.4) Philips Hue lights will enable TouchLink Commissioning after re-powered on.6.Form a Zigbee Network & Add Devices to the Network (No Coordinator Required)1)The remote can form a zigbee network through Touchlink pairing without coordinator and add other devicesto the network.2)Factory reset the remote and the lighting device to remove them from previous network if any (please refer to their manuals).3)Start TouchLink Commissioning of a ZigBee lighting device, please consult its manual to learn how.4)Bring the remote within 10cm of the ZigBee lighting device.5)Short press a group button 1/2/3/4 to choose a group that you would like to pair the device to.6)Press and hold down key until the LED indicator on the remote turns on.7)Short press button S2 to start TouchLink pairing procedure of the remote.8)The LED indicator will flash fast for 3s to start TouchLink and then flash 6 times slowly to indicate successful pairing to the device, which means a zigbee network is formed by the remote and the lighting device.9)Short press button S1 to enable the remote to discover and add devices, LED indicator will flash twice. 180 seconds timeout, repeat the operation.10) Set another remote into network pairing mode and pair it to the network. (please refer to its manual)11) There shall be indication on the remote while added to the network successfully.12) Add more remotes to the network as you would like.13) Factory reset the lighting devices that you would like to add to the network to remove them from previous network. (please refer to their manuals)14) Touchlink to pair the added remotes to the lighting devices you would like to add, the devices will be added to the network through Touchlink pairing. (please refer to their manuals)Note: Each remote can Touchlink pair max. 30 devices to add them to the network.7.Remove a Touchlink Paired ZigBee Lighting Device Through TouchLink Removing1)The remote can remove a Touchlink paired ZigBee lighting device through Touchlink removing.2)Start TouchLink Commissioning of the paired ZigBee lighting device, please consult its manual to learn how.3)Bring the remote within 10cm of the ZigBee lighting device.4)Short press the group button 1/2/3/4 to choose the group that the device was paired to.5)Press and hold down key until the LED indicator on the remote turns on.6)Short press button S2 twice to start TouchLink removing procedure of the remote.7)The LED indicator will flash fast for 3s to start TouchLink removing and then flash 6 times slowly to indicate successful removing of the selected device.8.Factory Reset A Lighting Device Through The Remote (Touch Reset)1)Make sure the lighting device is added to a network, the remote can be added to the same network or does not belong to any ZigBee network.2)Start TouchLink Commissioning of the ZigBee lighting device, please consult its manual to learn how.3)Bring the remote within 10cm of the ZigBee lighting device.4)Press and hold down key until the LED indicator on the remote turns on.5)Short press button S2 5 times continuously to start Touch Reset of the remote.6)The LED indicator will flash fast for 3s and then flash 3 times slowly to indicate successful reset of the device.Note: 1) Suitable for those light devices without manual reset function (Philips Hue lights).2) Only recommended when ZigBee Hub is missed or inoperable, reset from Hub is impossible.9.Battery Power Monitor Function, the remote will report battery power value to the coordinator under following situations:• When powered on.• When short pressing both S2 and S3 buttons simultaneously.• When operating the switch to send data packets (over 4 hours since last operation).• When added to the network by a coordinator.10.Pair with A ZigBee Lighting Device Through Find and Bind Mode1)Start find and bind mode on the ZigBee lighting device (initiator node) and enable it to find and bind target, please consult its manual to learn how.2)Short press 1/2/3/4 to choose a group that you would like to bind the device to.3)Press and hold down key on the remote until the LED indicator turns on.4)Short press button S3 to enable the remote (target node) to find and bind initiator.5)The binding will be successful within 4 seconds, and LED indicator on the remote will flash 4 times. If binding fails, LED indicator will flash twice.11.Unpair with A ZigBee Lighting Device Through Find and Bind Mode1)Start find and bind mode on the ZigBee lighting device (initiator node) and enable it to find and unbind target, please consult its manual to learn how.2)Short press 1/2/3/4 to choose the group that the device already bind to.3)Press and hold down key on the remote until the LED indicator turns on.4)Short press button S3 twice continuously to enable the remote (target node) to find and unbind initiator.5)The unbinding will be successful within 4 seconds, and LED indicator on the remote will flash 4 times. If unbinding fails, LED indicator will flash twice.12.Clear All Paired Lighting Devices of a Group Through Find and Bind Mode1)Short press button 1/2/3/4 to choose the group that you would like to unbind all devices.2)Press and hold down key on the remote until the LED indicator turns on.3)Short press button S3 five times continuously to clear all bind lighting devices with this group.4)LED indicator on the remote will flash 4 times to indicate successful unbinding.13.Binding Between the Remote and Devices Through Coordinator (Hub or Controller Interface)1)Once the remote and lighting devices are paired to the same network, short press any button to activate the remote, then from your ZigBee controller or hub interface, choose to bind devices to the remote as instructed by the controller. Then the devices can be controlled by the remote.2)Once the binding operation is done between the remote and ZigBee lighting devices, the remote can still control the devices in the event of gateway/coordinator loss.Note: 1) This remote supports 4 groups for binding max. 30 light devices.2) Philips Hue & Amazon Echo Plus do not support this function, please use TouchLink to bind.3) Each group can bind max. 30 devices, or bind 30 devices to 4 different groups.14.Unbinding Between the Remote and ZigBee Lighting DevicesTo unbind the remote and ZigBee lighting devices, first short press any button to activate the remote, then from your ZigBee controller or hub interface, choose to unbind the device from a remote as instructed by the controller.15.Factory Reset the Remote (Removed From a ZigBee Network)From the ZigBee Controller or Hub InterfaceFrom your ZigBee controller or hub interface, choose to remove or reset the remote as instructed. The LED indicator on the remote will turn on and flash 3 times quickly to indicate successful reset to factory default setting.ManualPress and hold down key until the LED indicator on the remote turns on -> immediately short press button 5 times continuously -> Indicator flashes 3 times quickly to indicate successful removal from the network and reset to factory default.Note: All configuration parameters will be reset after the remote is removed from the network.16.ZigBee Clusters Supported by This Remote Are As Follows:Input clusters:• Basic• Power Configuration• Identify• DiagnosticsOutput clusters:• Identify• Group• Scene• On/off• Level control• Ota。
2.接线方式
a)ZIGBEE采集器
接线方式如下图。
b)ZIGBEE网络终端
接线方式如下图。
3.外型尺寸与安装尺寸
a)ZIGBEE采集器
b)ZIGBEE网络终端
4.安装方式
采用35mm标准导轨安装方式,如下图3
5.使用说明
a)ZIGBEE采集器
ZIGBEE采集器出厂设置如下:网络ID位0xFF,通信信道位0x0F,网络类型是网状网,设备类型是中继路由,串口数据位8位,波特率9600bps,数据校验位无。
(建议:用户使用出厂设置,改设置通过试验测试,该出厂设置的信道为较好信道,可以屏蔽wifi带来干扰)。
b)ZIGBEE网络终端
ZIGBEE网络终端的ZIGBEE参数部分采用跟采集器一样出厂设置,相关以太网部分配置可以通过web方式进行配置,出厂IP地址为192.168.2.178,子网掩码为255.255.255.0,网关为192.168.2.1。
用户只要把自己计算机上的网络地址设置在跟ZIGBEE网络终端在同一网段下,就可以进行参数配置。
6.注意事项
为了便于用户使用及保证无线通信质量,ZIGBEE采集器及ZIGBEE网络终端
ZIGBEE部分参数均采用出厂设置。