全彩控制器软件使用手册-V1.1
- 格式:pdf
- 大小:2.17 MB
- 文档页数:20

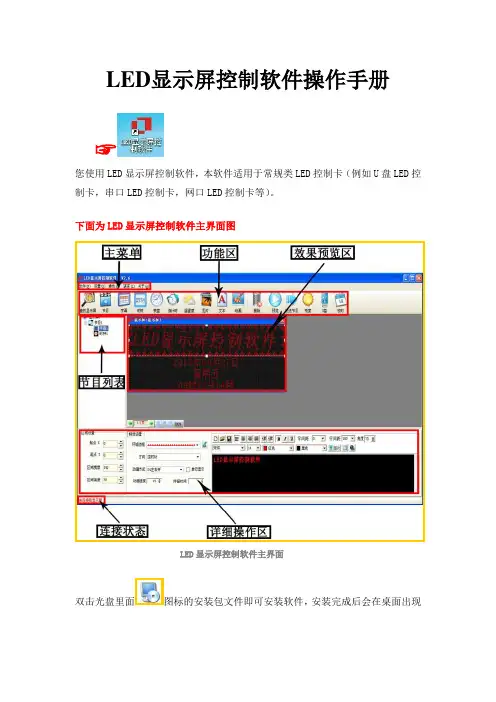
LED显示屏控制软件操作手册☞您使用LED显示屏控制软件,本软件适用于常规类LED控制卡(例如U盘LED控制卡,串口LED控制卡,网口LED控制卡等)。
下面为LED显示屏控制软件主界面图LED显示屏控制软件主界面双击光盘里面图标的安装包文件即可安装软件,安装完成后会在桌面出现图标,双击图标,即可进入LED显示屏控制软件的主界面。
☞下面是软件详细的操作说明控制卡查找和显示屏设置控制卡连接好显示屏和电脑后点击工具栏里面的查找屏查找屏使用串口卡或者网口卡连接会在红色字体区域自动显示控制卡的型号和版本号▲(注:使用U盘控制卡可以忽略查找屏步骤,直接设置屏参,编辑好节目点击发送即可)①点击屏参设置按钮设置屏参②输入密码168输入密码③设置好屏参后点击设置屏参按钮屏参设置▲(注:设置屏参里面有一些常用的单元板参数供参考选择)☞下面是一些常见的LED单元板的参数设置推荐1,如果是户外P10的屏,接口是12接口的:(单色)屏参为:数据极性:低,OE极性:高扫描方式: 1/4 扫描,默认4.1扫描方式2,如果是户外P16的屏,接口是12接口的:屏参为:数据极性:低,OE极性:高扫描方式: 1/4 扫描中的4.3扫描方式3,如果是户内φ3.75,φ5 的屏,接口是08接口的:屏参为:数据极性:低,OE极性:低扫描方式: 1/16 扫描4,如果是车载屏P7.62的屏,接口是08接口的:屏参为:数据极性:低,OE极性:低扫描方式: 1/8 扫描▲(注:以上推荐参数都是市面LED单元板的常见参数设置,不排除特殊规格的LED单元板,请以实际情况为准)编辑节目和节目类型介绍①设置好屏参后首先点击工具栏里面的节目按钮即可进入节目编辑节目②点击节目编号可以设置节目播放时段和次数③在工具栏选择不同的节目类型可以进一步详细编辑节目内容1.字幕型节目,在超文本RTF型文件节目中,RTF超文本可对每个字符设置字体、大小,不同的颜色,并可以单独保持该节目的超文本文件,以便以后恢复使用。
COLORPIXEL智能LED控制器使用手册第一版(2006.8)目录1 概述 (1)1.1控制方式 (1)1.2技术指标 (1)2 控制器安装与连接 (3)2.1控制器I/O线 (3)2.2工作模式选择 (4)2.3灯具连线 (4)2.4灯具与控制器、电源的连接方法 (5)2.5选择TTL还是双线驱动 (6)2.6网络线的连接 (6)2.7联机测试及故障排除 (7)3 参数配置 (9)3.1联机设置 (9)3.2参数配置 (10)4 附录 (11)4.1RS-232串口电缆 (11)User manualCOLORPIXEL 软件说明书概述本章简单介绍COLORPIXEL 控制器的控制方式及技术指标。
ColorPixel 控制器是ColorPixel 智能照明系统中的重要组成部分,它能实现对SDMX5124为主的LED 灯具的各种灯光控制。
ColorPixel 控制器目前具有三种控制方式: 1.1.1 联网控制ColorPixel 控制器上有一个以太网接口(10Base-T ),Pc 机能通过以太网络控制多台ColorPixel 控制器,向它们发送LED 控制数据,ColorPixel 控制器完成对ColorPixel 灯具的调光控制。
1.1.2 单机SD/MMC 卡存储播放ColorPixel 控制器上有一个SD/MMC 闪存卡接口,使用ColorPixel 应用软件记录的LED 控制文件,存放在SD/MMC 闪存卡中,每次ColorPixel 控制器上电,控制器就会自动检测SD/MMC 卡是否连接到控制器,如果已连接,则控制器会读取SD/MMC 存储卡上存储的LED 控制文件,自动对LED 灯具进行控制,并循环播放。
1.1.3 预编程播放ColorPixel 控制器中,预编程了一组灯光闪烁方案,在控制器上电后自动播放,但这个功能仅为测试用途。
1. 控制线数8条SDMX512单线控制线,每根控制线可连接最多512个灯,一个控制器可控最大灯具数量8X512=4096个。
LED产品使用说明书第一章前言感谢您选择使用我公司研制生产的显示屏控制系统,我们竭诚为广大用户服务。
为了使本系统屏能完美地为您服务,请您在使用前仔细查阅本说明书,以便于正确操作,并请您在使用后妥善保存它。
我公司开发研制的LED显示屏控制系统,支持单色或双色LED显示屏。
本系统具有如下功能:1、系统支持TXT、BMP等文件,可显示16×16至72×72点阵的宋、隶、草、行、楷等汉字,及英文、数字、符号等,也可显示简单的平面图画。
2、本系统具备脱机运行功能,即在显示内容编辑制作完成并发送至显示屏之后,即可关闭控制机。
下次打开显示屏前,如果显示内容不更改,可不打开控制机,直接打开屏体电源即可。
3、有三十九种显示方式。
立即显示:信息整体立即出现于显示屏。
从右向左移入←:信息整体从右向左逐列移动进入显示屏。
从左向右移入→:信息整体从左向右逐列移动进入显示屏。
从下向上卷入↑:信息从下向上逐行进入显示屏。
从上向下卷入↓:信息从上向下逐行进入显示屏。
从左向右展开→:信息从左向右逐列显示于显示屏。
从右向左展开←:信息从右向左逐列显示于显示屏。
从下向上展开↑:信息从下向上逐行显示于显示屏。
从上向下展开↓:信息从上向下逐行显示于显示屏。
等等4、显示内容停留时间可在0-255秒之间任意调节。
5、可自动循环显示用户所要显示的不同内容。
第二章软件运行环境◆ 操作系统中英文Windows98/me/2000/NT/XP◆ 硬件配置CPU: 奔腾300MHz以上内存:64M串口:有一空闲的串口◆ 相关软件OFFICE办公软件--如需播放WORD、EXCEL文件必须安装第三章安装与卸载本软件是绿色软件,只需将Project.exe文件夹拷贝到硬盘就可以运行,运行前将文件只读属性去掉第四章 Project使用说明操作界面如下图所示:注:画面说明主菜单按钮区域:包括发送、编辑文本、编辑图片、校准时间、保存列表、高级设置、发送方式、屏号、屏宽、屏高、串口选择、红绿交换、数据反向、几个命令菜单及设置功能:单屏或全部。
LED显示屏控制软件操作手册☞您使用LED显示屏控制软件,本软件适用于常规类LED控制卡(例如U盘LED控制卡,串口LED控制卡,网口LED控制卡等)。
下面为LED显示屏控制软件主界面图LED显示屏控制软件主界面双击光盘里面图标的安装包文件即可安装软件,安装完成后会在桌面出现图标,双击图标,即可进入LED显示屏控制软件的主界面。
☞下面是软件详细的操作说明控制卡查找和显示屏设置控制卡连接好显示屏和电脑后点击工具栏里面的查找屏查找屏使用串口卡或者网口卡连接会在红色字体区域自动显示控制卡的型号和版本号▲(注:使用U盘控制卡可以忽略查找屏步骤,直接设置屏参,编辑好节目点击发送即可)①点击屏参设置按钮设置屏参②输入密码168输入密码③设置好屏参后点击设置屏参按钮屏参设置▲(注:设置屏参里面有一些常用的单元板参数供参考选择)☞下面是一些常见的LED单元板的参数设置推荐1,如果是户外P10的屏,接口是12接口的:(单色)屏参为:数据极性:低,OE极性:高扫描方式: 1/4 扫描,默认4.1扫描方式2,如果是户外P16的屏,接口是12接口的:屏参为:数据极性:低,OE极性:高扫描方式: 1/4 扫描中的4.3扫描方式3,如果是户内φ3.75,φ5 的屏,接口是08接口的:屏参为:数据极性:低,OE极性:低扫描方式: 1/16 扫描4,如果是车载屏P7.62的屏,接口是08接口的:屏参为:数据极性:低,OE极性:低扫描方式: 1/8 扫描▲(注:以上推荐参数都是市面LED单元板的常见参数设置,不排除特殊规格的LED单元板,请以实际情况为准)编辑节目和节目类型介绍①设置好屏参后首先点击工具栏里面的节目按钮即可进入节目编辑节目②点击节目编号可以设置节目播放时段和次数③在工具栏选择不同的节目类型可以进一步详细编辑节目内容1.字幕型节目,在超文本RTF型文件节目中,RTF超文本可对每个字符设置字体、大小,不同的颜色,并可以单独保持该节目的超文本文件,以便以后恢复使用。
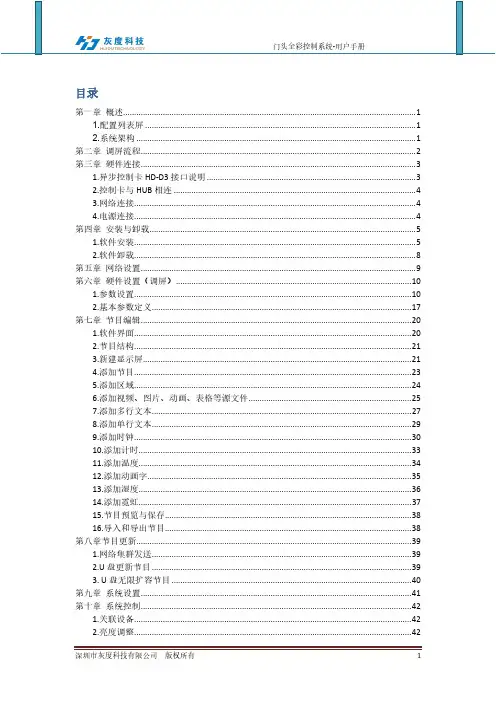
目录第一章概述 (1)1.配置列表屏 (1)2.系统架构 (1)第二章调屏流程 (2)第三章硬件连接 (3)1.异步控制卡HD-D3接口说明 (3)2.控制卡与HUB相连 (4)3.网络连接 (4)4.电源连接 (4)第四章安装与卸载 (5)1.软件安装 (5)2.软件卸载 (8)第五章网络设置 (9)第六章硬件设置(调屏) (10)1.参数设置 (10)2.基本参数定义 (17)第七章节目编辑 (20)1.软件界面 (20)2.节目结构 (21)3.新建显示屏 (21)4.添加节目 (23)5.添加区域 (24)6.添加视频、图片、动画、表格等源文件 (25)7.添加多行文本 (27)8.添加单行文本 (29)9.添加时钟 (30)10.添加计时 (33)11.添加温度 (34)12.添加动画字 (35)13.添加湿度 (36)14.添加霓虹 (37)15.节目预览与保存 (38)16.导入和导出节目 (38)第八章节目更新 (39)1.网络集群发送 (39)2.U盘更新节目 (39)3. U盘无限扩容节目 (40)第九章系统设置 (41)第十章系统控制 (42)1.关联设备 (42)2.亮度调整 (42)3.时间校正 (43)4.屏幕测试 (44)5.固件升级 (45)6.设置网络信息 (46)第十一章常见问题解答 (47)第一章概述DPlayer门头全彩控制系统是针对门头全彩屏推出的,是一套可远程控制、自主播放视频、动画、图片、文本等的LED显示屏异步控制方案。
门头全彩控制系统包括全彩异步控制卡HD-D3和控制软件DPlayer两部分。
异步控制卡HD-D3是连接屏体的核心控制板卡,相当于一个拥有存储、播控功能的控制卡,负责将配置参数和播放节目传给显示屏。
控制软件DPlayer控制LED显示屏的智能点屏、性能参数设置、亮度调节、屏体校正,使显示屏调整到最佳显示状态;也可编辑节目,发送节目,集群管理多个LED显示。
LED 显示屏控制软件 LED 条屏控制软件操作手册现在,使用 LED 显示屏的人员越来越多,为了方便更多的 LED 显示屏用户使用LED 显示屏控制软件 , 并快速学会使用 LED 显示屏控制软件, 特制作 LED 条屏控制软件操作手册简化版,方便大家使用。
LED 显示屏控制软件的操作步骤如下:第一步:在 LED 显示屏控制软件中设置屏参首次使用 LED 控制卡客户请用“ LED 条屏控制软件”通过 RS232交叉串口线进行设置;笔记本请使用 USB 转 232连接线。
软件运行后会自动“查找显示屏”,如果多次自动查找失败,请检查串口线是否“ 交叉电缆” ,有没有插好、控制卡是否正常工作。
注意:严禁在通电的状态下插串口线,请先关掉电源后,再插线。
控制卡密码为“ 168” , 显示屏屏参设置正确成功后屏显示“ 当前无信息” 。
例如:如果是户外 P10单红的屏,接口是 12接口的:屏参为:数据极性:低OE 极性 :高扫描方式:1/4 扫描,默认 4.1扫描方式第二步:在 LED 显示屏控制软件编辑节目显示屏设好屏参后,就可以直接点击工具栏图标添加节目了。
例如:1. 字幕型节目 ,在超文本 RTF 型文件节目中, RTF 超文本可对每个字符设置字体、大小, 不同的颜色,并可以单独保持该节目的超文本文件,以便以后恢复使用。
可输入 Windows 系统支持的所有语言文字(如韩文、阿拉伯文等 ,超文本中每个文字可单独设置颜色、大小、字体。
在字体栏内选择带“ @” 的字体可以设置对联屏字体显示。
2. 时间型节目 , 数字实时时钟(多种常用模式可选3. 倒计时节目 , 最大时间为 9999天4. 图片型节目 , 支持 bmp 、 jpeg 等各种图片格式。
5. 表格节目 , 支持电子表格。
6. 动画节目 , 支持 gif 等格式。
7. 温湿度节目 , 支持温湿度功能6. 文本节目 , 支持输入简体,繁体,英文等多种字体。
LED全彩联机控制系统使用说明书(适用:PC-9)江门市思域科技有限公司2011-10-01目录第1章概述 (3)1.1 主控型号类型 (3)1.2 控制系统适用方案选择指引 (3)1.3 控制器容量 (3)1.4 分控容量 (4)第2章编辑软件说明 (5)2.1使用环境 (5)2.2软件所需文件列表 (6)2.3调试目的 (7)2.4调试前的准备 (7)2.5调用播放器内部的测试文件(选做) (10)2.5.1播放器自动生成6种测试效果 (10)2.6带音控的电脑屏,音控部分的设置。
(11)第3章编播软件的使用 (16)3.1编播软件主要特点 (16)3.2界面说明 (16)3.3软件使用说明 (17)3.3.1实时播放 (17)3.3.2动画播放 (18)3.3.3 Win 7下的实时播放 (19)3.3.4录像播放 (20)3.3.5文字显示 (22)3.3.6录制功能(录像开始及录像结束) (25)3.4其它功能按钮使用说明 (26)3.4.1色彩调整 (26)3.4.2内置效果 (27)3.4.3安装设置 (37)第4章播放软件修改参数 (39)4.1第一步:软件设置: (39)4.1.1信号线走线方式选择: (39)4.1.2屏体尺寸及显示比例 (41)4.2第二步:灯板设置: (43)4.2.1第一类:思域特有的灯板 (44)4.2.2第二类:市场上比较通用的灯板 (44)4.2.3 第三类:客户自定义脚位的灯具 (46)4.3第三步:硬件设置: (46)4.4参数固化 (47)第1章概述1.1主控型号类型在订购控制器前,首先要了解本公司可提供客户的控制器类型及其相关性能。
本公司控制器有以下几种型号:控的型号及数量。
第2章编辑软件说明2.1使用环境1)系统环境须为Windows XP或Windows 7(win 7需使用基本主题和管理员权限)。
2)软件版本语言字符须与系统语言环境一致。
智能智能彩色液晶显示控制模块使用手册彩色液晶显示控制模块使用手册8.0”COLOR TFT-LCD MODULEMODEL NAME: JCR80HD-SVer: 1.01北京晶昌日盛科技有限公司BEIJING KINGL YVIEW TECHNOLOGY CO.,LTD第一章概述JCR80HD-S是一种真彩色(TFT) 智能液晶显示终端,自带64M字节Flash存储器,配备多种字库,并可预先存储多至上千张图片。
标准配置具有触摸屏控制电路及蜂鸣器,RS232,RS485两种接口,任选其一 。
终端支持精简指令集。
它可与具有UART的单片机或微机配合使用,组成液晶显示控制系统。
JCR80HD-S具有以下特色。
通过指令画点,线,圆,矩形,并显示中西文字。
背光可调,渐亮或渐灭。
可显示256或65536色。
256色方便文本编辑,显示速度快,65536色适合图像或图片,两种色表可交叉使用。
触摸屏可选返回健值或返回坐标。
具有数值直接显示指令,显示范围-0.999999999—999999999用户可自行配置字库和图片。
可选择屏幕横显或竖显方式。
4页帧存储。
JCR80HD-S适合应用于,军工、工业控制、医疗器械、通信、等行业,作为人机交互界面。
第二章结构与参数一、基本特性:项目规格备注屏幕尺寸8.0”显示区域162mm(W)×121.5mm(H)像素数目800(H)×3(R、G、B)×600(V)模块尺寸206mm×142mm背光方式LED像素尺寸0.0675mm(H)×0.2025mm(V)颜色数目256色(单字节) 或65535色(双字节) 指令调节接口方式RS232 或RS485二、接口定义:PIN NO 符号名称I/O 功能备注1 +5V P 电源+5V2 +5V P 电源+5V3 GND P 电源地4 GND P 电源地5 BU O DTR终端忙信号低为忙6 RX I RS232收7 TX O RS232发8 GND P 电源地9 D- USB 预留口暂未用10 D+ USB 预留口暂未用11 VB USB 预留口暂未用12 B RS485-B13 A RS485-A三、环境参数项目MIN MAX 操作温度-20℃70℃储存温度-30℃80℃操作湿度0% 80%储存湿度0% 90%四、电器参数参数符号名称MIN TYP MAX供给电压VDD 4.8V 5V 5.2V供给电流ICC 880mA 900mA 920mA五、65K色彩配置表(5:6:5)色彩数据高字节色彩数据低字节D7 D6 D5 D4 D3 D2 D1 D0 D7 D6 D5 D4 D3 D2 D1 D0 R4 R3 R2 R1 R0 G5 G4 G3 G2 G1 G0 B4 B3 B2 B1 B0 深←红 → 浅深←绿 → 浅深←蓝 → 浅256 色彩配置表(2:3:3)色彩数据(单字节)D7 D6 D5 D4 D3 D2 D1 D0B1 B0 G2 G1 G0 R2 R1 R0 深←蓝→ 浅深←绿 → 浅深←红 → 浅六、模块结构七、接口参考设计八、安装图第三章指令结构指令格式指令格式 参 数功 能报 头 指令123456 报尾 后缀99 01 00 000000000066握手99 02 Step00 00 00 00 00 66背光 调节 Step (0-255):背光亮度, 0:最暗 255:最亮 99 03 Time00 00 00 00 00 66背光 渐亮 Time (0-255):背光由灭到亮的时间 0:最快 255:最慢99 04 Time 00 00 00 00 00 66背光 渐灭 Time (0-255):背光由亮到灭的时间 0:最快 255:最慢 99 05PAGE_OPAGE_D0000000066页 操作 PAGE_O : 设定操作页。
输出DMX 信号符合DMX512/1990标准。
具有标准的DMX512输出170个全彩点的控制信号。
内部具有64个以上的灯光固定效果模式。
内部定义有程序组合模式可以把固定效果组合执行。
内部定义有部骤列举定义模式。
内部定义有简单的声控模式。
各种变化效果变化速度选择设定。
具有四个操作按键,可以方便进行功能操作。
具有LCD 输出指示,所有功能在LCD 上均有操作提示。
有无线遥控器可以远距离调试和更改操作。
具有DMX 地址编辑功能,方便地址的修改。
2、面板按键对应功能说明打开电源后,主机显示提示内容,特殊的程序会显示客户编码;开机两秒后会自动转入设定好的启动工作模式。
按下 设定为按下 切换到下一主功能按下设定为按下保存按下模式调整按下模式调整按下模式调整3、产品光效演示功能说明1,此功能用于输出DMX512控制信号,输出已设定好的各种控制效果。
2,此功能界面说明:3,光效演示功能表:4、参数设定功能说明1,此功能用于设定控制器运行的各项杂散参数。
2,参数设定功能表:5、遥控器按键功能设定说明1,此功能用于设定8个按键对应的功能,注意,遥控器最上面的4个按键功能是固定的,不能再定义。
2,遥控器界面图3,遥控器默认按键功能说明:4,此功能操作界面:6、接口定义7、电气规格1,输入电压、频率范围:100~240V AC /47~63Hz。
2,输入功率:小于5W。
3,工作温度、湿度:-20℃-50℃/20-95RH。
4,尺寸、重量:180mm*122mm*46mm5,包装方式: PE装/白盒。
8、配件1,电源线一条 2,无线遥控器一个(含电池) 3,无线接收天线一根 4,信号接线端子两个 5,用户使用手册一份。
J S-D K系列L E D全彩控制器使用说明书(V1.2)J S-D K-T1a_1024(L E D全彩单通道同步控制器) J S-D K-T2a_1024(L E D全彩双通道同步控制器) J S-D K-T4a_1024(L E D全彩四通道同步控制器) J S-D K-T8a_1024(L E D全彩八通道同步控制器) J S-D K-T1b_512(L E D全彩单通道单机控制器) J S-D K-T1b_1024(L E D全彩双通道单机控制器) J S-D K-T2b_1024(L E D全彩四通道单机控制器) J S-D K-T4b_1024(L E D全彩四通道单机控制器) J S-D K-T8b_1024(L E D全彩八通道单机控制器)一、概述J S-D K系列L E D全彩控制器目前上市九款:包括J S-D K-T1a_1024、J S-D K-T2a_1024、J S-D K-T4a_1024、J S-D K-T8a_1024、J S-D K-T1b_512、J S-D K-T1b_1024、J S-D K-T2b_1024、J S-D K-T4b_1024、J S-D K-T8a_1024。
L E D全彩同步控制器通过交流220V市电进行同步播放,可以多台联合使用。
L E D全彩灯单机控制器D C+5~+24V控制,只能单机使用。
L E D全彩同步控制器主要适用于:L E D模组、全彩穿孔灯、外控护栏管、灯条、全彩点光源等。
二、技术参数输入电压:同步控制器(交流220V,50H z市电)单机控制器(直流+5V~直流+24V)控制路数:J S-D K-T1a_1024(1路)、J S-D K-T2a_1024(2路)、J S-D K-T4a_1024(4路)、 J S-D K-T8a_1024(8路)、 J S-D K-T1b_512(1路)、J S-D K-T1b_1024(1路)、J S-D K-T2b_1024(2路)、J S-D K-T4b_1024(4路)、J S-D K-T8b_1024(8路)同步模式:自动检测50H工频信号(同步控制器)。
第一章:概述 (2)1.1 ZH系列Led Control System V3图文管理系统简介 (2)1.2 ZH系列Led Control System V3图文管理系统主要特性 (2)1.3 Led Control System V3图文管理系统运行环境 (2)第二章:常用参数设置 (3)2.1 屏参设置 (3)第三章:软件使用详解 (4)3.1 显示屏测试 (4)3.2 软件界面 (4)3.3 创建与编辑界面 (5)3.4 字幕区域 (5)3.5 动画编辑 (6)3.6 图文编辑 (8)3.7 表盘编辑 (9)3.8 时钟编辑 (10)3.9 计时编辑 (11)3.10 温度显示(需配18B20温度传感器) (12)第四章:其他功能设置 (14)4.1 定时开关 (14)4.2 亮度调节 (14)4.3 寻机 (15)4.4 预览 (16)4.5 发送数据 (16)4.6 U盘下载 (17)第五章:常见问题 (12)5.1 为什么系统启动后时间无法正确显示? (18)5.2 什么会发生传输错误? (18)5.3 何改变节目区域的位置和大小? (18)5.4 示屏的区域反色或亮度不够 (18)5.5 示屏花屏 (18)5.6 意事项 (18)第六章:硬件升级说明 (19)第七章: 硬件参数 (20)硬件指数表 (20)第八章:联系我们 (20)第一章概述1.1ZH系列图文管理系统简介ZH系列LED显示屏控制系统是由郑州中航软件开发有限公司和上海岩盛电子科技有限公司研发团队历经13个月的技术攻关而开发的全新概念LED控制系统,该控制系统在全行业首家率先采用LedOS操作系统,使得系统运行更加高效稳定,画面更流畅。
同时公司研发团队坚持技术创新理念,研发出2520种特技组合,并且首先解决了屏幕画面运行速度受显示屏面积影响的行业技术性难题,使左移效果更流畅,其性能在行业同类产品中遥遥领先.1.2ZH系列图文管理系统主要特性·软件自动生成字体动画和动态背景,无需第三方软件导入,操作更简单·两千余种动画背景组合,全行业特技最多·动态背景支持灰度处理,画面更清晰·支持字体动画,动态背景,魔幻跑边叠加播放·支持单双色、P20全彩、强力P13.33单元板、门头全彩P16·支持USB固件升级·支持串口和USB双通信·支持串口和485集群功能·支持USB数据上传进度指示·支持多国时钟播放1.3 操作系统:中文Windows98/2000/NT/XP/WIN7/WIN8;硬件:CPU: 奔腾300MHz以上内存:512M第二章常用参数设置2.1 屏参设置2.11 点击菜单栏里的设置→屏幕设置2.12 输入密码1682.13 按下确定按钮后弹出参数设置窗口,如下图2.14此界面可以根据供应商所提供的模组的扫描方来选择。
下面以(长100,宽10)为例,灯的排列如图:1、打开GridEditor2、设置画面大小和基点点打开下面对话框设置画布大小[我们这X轴100个灯,y轴10个灯;灯的间距是(5,5)所以画布大小是(100×5,10×5)]灯的间距根据您灯点的个数来定。
总之使排列之后的灯不超过画布就行。
设置基点,基点:即从哪个地方开始排灯,我们这是从左上角进线.所以是(2,2)如果是从左下角进线的话,基点则为(2,47)[5间距×(10灯个数-1)]+2左上角位置=47注:基点不要设为(0,0) 最好设为两灯点间距的中点, 如:灯的距离为(5,5),您基点最好就设为(2,2); 灯点的距离为(10,10),基点最好为(5,5). 这样是为了方便采取动画,防止采到灰点的情况发生画布大小=(X轴灯的个数×X轴灯的间距,Y轴灯的个数×Y轴灯的间距)画布不能超过屏幕不能小于163、添加分控点打开下面对话框设置分控类型和灯的个数4、排列分控,即灯点Tool-Apply to Pattern-Rect Array…打开下图对话框(灯与灯之间的距离,我设为5,这个可以根据自己的需要设。
灯多的话,间距就设小点,灯比较少的话,间距就可设大点这样是为了让灯不会排到屏幕外面去)由于我们的进线口是从上方进入,所以要将分控沿Y轴翻转(沿Y 轴翻转)打开对话框表示沿Y 轴的2像素位置翻转。
(DY:根据基点来定),点这个查看第一个点的位置在这个例子中,如果是(2,2)则是我们要的结果。
如果不是,则要调整。
由于第一个点的位置不是[0002,0002] 所以要改变一下位置点OK 后,就可以看到,第一个点和位置为[0002,0002]最终效果分控的排列如图注:灯要排在画布内,但画布的W,H都不能小于16 5、保存(1)保存成GMF 格式,(这个格式方便以后用打开修改)(2)保存为GDF格式,(这个格式只能导入这个软件)(直接点ENTER进入)10、这样,灯的排列就做好了。