Spring学习笔记
- 格式:docx
- 大小:61.16 KB
- 文档页数:10

Springcloud学习笔记24--JeecgBoot以微服务的⽅式启动jeecg-system⼀、配置host127.0.0.1 jeecg-boot-redis127.0.0.1 jeecg-boot-mysql127.0.0.1 jeecg-boot-nacos127.0.0.1 jeecg-boot-gateway127.0.0.1 jeecg-boot-system127.0.0.1 jeecg-boot-xxljob127.0.0.1 jeecg-boot-rabbitmqhost⽂件路径:C:\Windows\System32\drivers\etc⼆、启动Nacos(推荐启动nacos微服务,⾃动加载配置)a.执⾏ Nacos初始化脚本,创建nacos的Mysql库b.启动nacos服务:找到项⽬ jeecg-cloud-module/jeecg-cloud-nacos,右键执⾏类com.alibaba.nacos.JeecgNacosApplication以下是application.yml⽂件的部分内容。
db:num: 1password:'0': ${MYSQL-PWD:plj824}url:'0': jdbc:mysql://${MYSQL-HOST:127.0.0.1}:${MYSQL-PORT:3306}/${MYSQL-DB:nacos}?characterEncoding=utf8&connectTimeout=1000&socketTimeout=3000&autoReconnect=true&useUnicode=true&useSSL=false&serverTimezone user:'0': ${MYSQL-USER:root}替换完成后,执⾏类com.alibaba.nacos.JeecgNacosApplicationc.访问http://127.0.0.1:8848/nacos(账号密码都是nacos),默认所需配置已经创建好⼿动配置nacos教程可参考:/2187366注意:jeecg-dev.yaml⽂件存储经常要修改的内容,⼀般是个性化配置。

Spring实战学习笔记之SpEL表达式在Spring XML配置⽂件中装配Bean的属性和构造参数都是静态的,⽽在运⾏期才知道装配的值,就可以使⽤SpEL实现SpEL表达式的⾸要⽬标是通过计算获得某个值。
在计算这个数值的过程中,会使⽤到其他的值并会对这些值进⾏操作。
SpEL特性:(1)、使⽤Bean的ID来引⽤Bean;(2)、调⽤⽅法和访问对象的属性;(3)、对值进⾏算术、关系和逻辑运算;(4)、正则表达式匹配;(5)、集合操作#{ }标记会提⽰ Spring这个标记⾥的内容是SpEL表达式。
最简单的属性注⼊:<property name="count" value="#{5}" />还可以与⾮SpEL表达式的值混⽤:<property name="message" value="The value is #{5}" />浮点数value="#{89.7}" 科学记数法value="#{1e4}"=====>10000.0String类型的字⾯值:<property name="name" value="#{'Tom'}" />或<property name="name" value='#{"Tom"}' /> 单引号和双引号相互包含的⽅式使⽤布尔类型:<property name="enable" value="#{false}" />引⽤Bean:<property name="userDao" value="#{userDao}" />等价于<property name="userDao" ref="userDao" />引⽤Bean属性:<property name="orderOwner" value="#{}" />类似代码:User user=newUser();order.setOrderOwner(user.getName());引⽤Bean的⽅法:<property name="currUser" value="#{userDao.getCurrUser()}" />(假设userDao内有公共⽅法getCurrUser())现在如果想把userDao.getCurrUser()得到的当前英⽂⽤户名转为⼤写字母:<property name="currUser" value="# {userDao.getCurrUser().toUpperCase()}" />,这时如果得到的⽤户名为空(null),则会抛NullPointerException异常,为了避免异常,可以使⽤?.代替点(.),如:<property name="currUser" value="#{userDao.getCurrUser()?.toUpperCase()}" />这样null后⾯的⽅法不再执⾏SpEL表达式中使⽤T( )运算符访问指定类的静态⽅法和常量。

SpringBootActuator学习笔记spring boot ActuatorActuator概述Actuator指的是负责和移动装置的组件。
通过Actuator暴露的端点我们可以获取⼀个正在运⾏中的应⽤内部的状态导⼊依赖<dependency><groupId>org.springframework.boot</groupId><artifactId>spring-boot-starter-actuator</artifactId></dependency>Actuator具备⼀些开箱即⽤的端⼝Endpoints id描述HTTP⽅法是否敏感信息auditevents显⽰当前应⽤程序的审计事件信息GET Yesbeans显⽰应⽤上下⽂中创建的所有Bean GET Yescaches显⽰可⽤缓存信息GET Yesconditions显⽰⾃动装配类的状态及及应⽤信息GET Yesconfigprops显⽰所有 @ConfigurationProperties 列表GET Yesenv显⽰ ConfigurableEnvironment 中的属性GET Yesflyway显⽰ Flyway 数据库迁移信息GET Yeshealth显⽰应⽤的健康信息(未认证只显⽰status,认证显⽰全部信息详情)GET Noinfo显⽰任意的应⽤信息(在资源⽂件写info.xxx即可)GET Noliquibase展⽰Liquibase 数据库迁移GET Yesmetrics提供应⽤运⾏状态的完整度量指标报告GET Yesmappings显⽰所有 @RequestMapping 路径集列表GET Yes scheduledtasks显⽰应⽤程序中的计划任务GET Yessessions允许从Spring会话⽀持的会话存储中检索和删除⽤户会话。

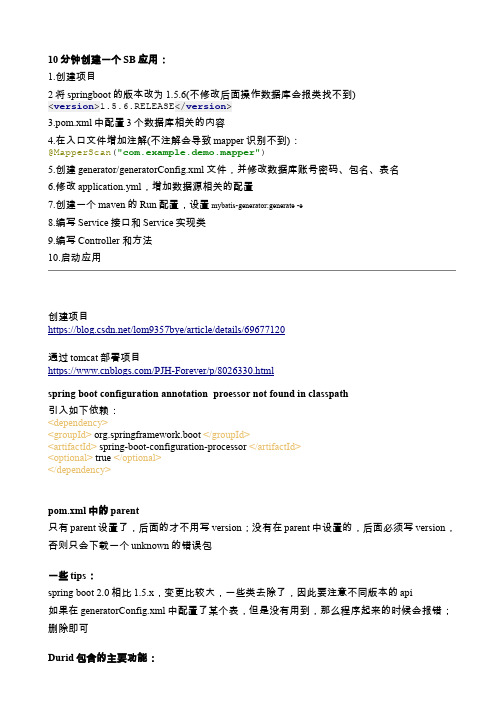
10分钟创建一个SB应用:1.创建项目2将springboot的版本改为1.5.6(不修改后面操作数据库会报类找不到)<version>1.5.6.RELEASE</version>3.pom.xml中配置3个数据库相关的内容4.在入口文件增加注解(不注解会导致mapper识别不到):@MapperScan("com.example.demo.mapper")5.创建generator/generatorConfig.xml文件,并修改数据库账号密码、包名、表名6.修改application.yml,增加数据源相关的配置7.创建一个maven的Run配置,设置mybatis-generator:generate -e8.编写Service接口和Service实现类9.编写Controller和方法10.启动应用创建项目https:///lom9357bye/article/details/69677120通过tomcat部署项目https:///PJH-Forever/p/8026330.htmlspring boot configuration annotation proessor not found in classpath引入如下依赖:<dependency><groupId> org.springframework.boot </groupId><artifactId> spring-boot-configuration-processor </artifactId><optional> true </optional></dependency>pom.xml中的parent只有parent设置了,后面的才不用写version;没有在parent中设置的,后面必须写version,否则只会下载一个unknown的错误包一些tips:spring boot 2.0相比1.5.x,变更比较大,一些类去除了,因此要注意不同版本的api如果在generatorConfig.xml中配置了某个表,但是没有用到,那么程序起来的时候会报错;删除即可Durid包含的主要功能:1)使用StaFilter插件进行监控数据库访问性能2)替换DBCP和C3P0,提供一个高效、可扩展的数据库连接池3)支持数据库密码的加密4)SQL执行日志5)提供了一个监控页面,可以查看sql情况控制器中通过@RequestBody获取POST参数报错:{"timestamp":1527154727083,"status":415,"error":"Unsupported Media Type","exception":"org.springframework.web.HttpMediaTypeNotSupportedException","message": "Content type 'application/json;charset=UTF-8' not supported","path":"/recomd/add"}经过排查,发现是参数中的类Recommend里面,有2个setIndexList()方法:setIndexList(List xxx);setIndexList(ArrayList xxx);删除一个就正常了,猜测是RequestBody在组装Recommend这个参数类的时候,无法判断该用哪一个set方法,从而报错了这应该算是框架的一个bug了Field userMapper in erServiceImpl required a bean of type 'erMapper' that could not be found.原因是在入口文件XxxApplication中,少加了一个注解:@MapperScan("com.zhouchangju.mapper")将项目启动方式从XxxApplication改为Artifact后,访问页面都是4041.没有将pom.xml里面的启动方式从jar改为war2.XxxApplication类没有继承自SpringBootServletInitializer类extends SpringBootServletInitializer安全插件配置url的时候,不用加artifactid比如项目叫做daily,我设置antMatchers的时候,不用加daily这一截:/**定义安全策略*/@Overrideprotected void configure(HttpSecurity http) throws Exception {//配置安全策略http.authorizeRequests()//定义/请求不需要验证.antMatchers("/","/**/*.css","/**/*.js","/**/*.jpg","/**/*.png","/**/*.jpeg","/user/getdynamicpassword","/user/login","/login.html").permitAll().anyRequest().authenticated()//其余的所有请求都需要验证.and().logout().permitAll()//定义logout不需要验证.and().formLogin()//使用form表单登录.loginPage("/login.html").failureUrl("/login?error=true");}本地开发时,Security验证的接口,总是报403需要在SecurityConfig中关闭csrf:.csrf().disable()Edit Configration时,没有Tomcat Serversettings->Build,Execution,Deploment->右侧ApplicationServer->添加本地tomcat信息误删了项目模块文件xxx.iml怎么办?可以在Project Structure里面的module里面,重新导入模块,注意每一步都是import,不是createKafkaConsumer is not safe for multi-threaded access配置文件中的属性无法加载: require a bean of type ng.String that could not be found 是因为写了一个带有String参数的构造函数导致的,删除构造函数即可解决,详见:https:///questions/40670099/im-not-including-the-java-lang-string-bean maven编译项目,报错:cannot find symbol原因是svn上面代码不全,缺少了一些文件如何修改打包后的war文件的存放位置?由于maven遵循“约定优先于配置”的思想,所以如果不做特殊配置,它默认是把打包之后产生的文件都放在target目录下的。

【Spring-AOP-学习笔记-5】@AfterReturning增强处理简单⽰例项⽬结构业务代码@Component("hello")public class HelloImpl implements Hello{// 定义⼀个简单⽅法,模拟应⽤中的业务逻辑⽅法public void foo(){System.out.println("执⾏Hello组件的foo()⽅法");}// 定义⼀个addUser()⽅法,模拟应⽤中的添加⽤户的⽅法public int addUser(String name , String pass){System.out.println("执⾏Hello组件的addUser添加⽤户:" + name);return 20;}}@Component("world")public class WorldImpl implements World{// 定义⼀个简单⽅法,模拟应⽤中的业务逻辑⽅法public void bar(){System.out.println("执⾏World组件的bar()⽅法");}}定义切⾯Bean@Aspectpublic class LogAspect{// 匹配org.crazyit.app.service.impl包下所有类的、// 所有⽅法的执⾏作为切⼊点@AfterReturning(returning="rvt", pointcut="execution(* org.crazyit.app.service.impl.*.*(..))")// 声明rvt时指定的类型会限制⽬标⽅法必须返回指定类型的值或没有返回值// 此处将rvt的类型声明为Object,意味着对⽬标⽅法的返回值不加限制public void log(Object rvt){System.out.println("获取⽬标⽅法返回值:" + rvt);System.out.println("模拟记录⽇志功能...");}}说明:returing属性所指定的形参名必须对应增强处理中的⼀个形参名,当⽬标⽅法执⾏返回后,返回值作为相应的参数值传⼊增强处理⽅法中。

SpringBoot踩坑笔记⼆:SpringBoot整合redis报Noqualifyin。
今天在学习Spring Boot整合redis的过程中遇到个问题,在使⽤@Autowiredprivate RedisTemplate<String, Object> redisTemplate;注⼊时,启动项⽬会报异常org.springframework.beans.factory.UnsatisfiedDependencyException: Error creating bean with name 'com.bh.redis.RedisTest': Unsatisfied dependency expressed through field 'redisTemplate'; nested exception is org.springframework.beans.facto at org.springframework.beans.factory.annotation.AutowiredAnnotationBeanPostProcessor$AutowiredFieldElement.inject(AutowiredAnnotationBeanPostProcessor.java:586) ~[spring-beans-5.0.9.RELEASE.jar:5.0.9.RELEASE]at org.springframework.beans.factory.annotation.InjectionMetadata.inject(InjectionMetadata.java:90) ~[spring-beans-5.0.9.RELEASE.jar:5.0.9.RELEASE]at org.springframework.beans.factory.annotation.AutowiredAnnotationBeanPostProcessor.postProcessPropertyValues(AutowiredAnnotationBeanPostProcessor.java:372) ~[spring-beans-5.0.9.RELEASE.jar:5.0.9.RELEASE]at org.springframework.beans.factory.support.AbstractAutowireCapableBeanFactory.populateBean(AbstractAutowireCapableBeanFactory.java:1341) ~[spring-beans-5.0.9.RELEASE.jar:5.0.9.RELEASE]at org.springframework.beans.factory.support.AbstractAutowireCapableBeanFactory.autowireBeanProperties(AbstractAutowireCapableBeanFactory.java:393) ~[spring-beans-5.0.9.RELEASE.jar:5.0.9.RELEASE]at org.springframework.test.context.support.DependencyInjectionTestExecutionListener.injectDependencies(DependencyInjectionTestExecutionListener.java:118) ~[spring-test-5.0.9.RELEASE.jar:5.0.9.RELEASE]at org.springframework.test.context.support.DependencyInjectionTestExecutionListener.prepareTestInstance(DependencyInjectionTestExecutionListener.java:83) ~[spring-test-5.0.9.RELEASE.jar:5.0.9.RELEASE]at org.springframework.boot.test.autoconfigure.SpringBootDependencyInjectionTestExecutionListener.prepareTestInstance(SpringBootDependencyInjectionTestExecutionListener.java:44) ~[spring-boot-test-autoconfigure-2.0.5.RELEASE.jar:2.0. at org.springframework.test.context.TestContextManager.prepareTestInstance(TestContextManager.java:246) ~[spring-test-5.0.9.RELEASE.jar:5.0.9.RELEASE]at org.springframework.test.context.junit4.SpringJUnit4ClassRunner.createTest(SpringJUnit4ClassRunner.java:227) [spring-test-5.0.9.RELEASE.jar:5.0.9.RELEASE]at org.springframework.test.context.junit4.SpringJUnit4ClassRunner$1.runReflectiveCall(SpringJUnit4ClassRunner.java:289) [spring-test-5.0.9.RELEASE.jar:5.0.9.RELEASE]at org.junit.internal.runners.model.ReflectiveCallable.run(ReflectiveCallable.java:12) [junit-4.12.jar:4.12]at org.springframework.test.context.junit4.SpringJUnit4ClassRunner.methodBlock(SpringJUnit4ClassRunner.java:291) [spring-test-5.0.9.RELEASE.jar:5.0.9.RELEASE]at org.springframework.test.context.junit4.SpringJUnit4ClassRunner.runChild(SpringJUnit4ClassRunner.java:246) [spring-test-5.0.9.RELEASE.jar:5.0.9.RELEASE]at org.springframework.test.context.junit4.SpringJUnit4ClassRunner.runChild(SpringJUnit4ClassRunner.java:97) [spring-test-5.0.9.RELEASE.jar:5.0.9.RELEASE]at org.junit.runners.ParentRunner$3.run(ParentRunner.java:290) [junit-4.12.jar:4.12]at org.junit.runners.ParentRunner$1.schedule(ParentRunner.java:71) [junit-4.12.jar:4.12]at org.junit.runners.ParentRunner.runChildren(ParentRunner.java:288) [junit-4.12.jar:4.12]at org.junit.runners.ParentRunner.access$000(ParentRunner.java:58) [junit-4.12.jar:4.12]at org.junit.runners.ParentRunner$2.evaluate(ParentRunner.java:268) [junit-4.12.jar:4.12]at org.springframework.test.context.junit4.statements.RunBeforeTestClassCallbacks.evaluate(RunBeforeTestClassCallbacks.java:61) [spring-test-5.0.9.RELEASE.jar:5.0.9.RELEASE]at org.springframework.test.context.junit4.statements.RunAfterTestClassCallbacks.evaluate(RunAfterTestClassCallbacks.java:70) [spring-test-5.0.9.RELEASE.jar:5.0.9.RELEASE]at org.junit.runners.ParentRunner.run(ParentRunner.java:363) [junit-4.12.jar:4.12]at org.springframework.test.context.junit4.SpringJUnit4ClassRunner.run(SpringJUnit4ClassRunner.java:190) [spring-test-5.0.9.RELEASE.jar:5.0.9.RELEASE]at org.eclipse.jdt.internal.junit4.runner.JUnit4TestReference.run(JUnit4TestReference.java:89) [.cp/:na]at org.eclipse.jdt.internal.junit.runner.TestExecution.run(TestExecution.java:41) [.cp/:na]at org.eclipse.jdt.internal.junit.runner.RemoteTestRunner.runTests(RemoteTestRunner.java:541) [.cp/:na]at org.eclipse.jdt.internal.junit.runner.RemoteTestRunner.runTests(RemoteTestRunner.java:763) [.cp/:na]at org.eclipse.jdt.internal.junit.runner.RemoteTestRunner.run(RemoteTestRunner.java:463) [.cp/:na]at org.eclipse.jdt.internal.junit.runner.RemoteTestRunner.main(RemoteTestRunner.java:209) [.cp/:na]Caused by: org.springframework.beans.factory.NoSuchBeanDefinitionException: No qualifying bean of type 'org.springframework.data.redis.core.RedisTemplate<ng.String, ng.Object>' available: expected at least 1 bean which qualifi at org.springframework.beans.factory.support.DefaultListableBeanFactory.raiseNoMatchingBeanFound(DefaultListableBeanFactory.java:1506) ~[spring-beans-5.0.9.RELEASE.jar:5.0.9.RELEASE]at org.springframework.beans.factory.support.DefaultListableBeanFactory.doResolveDependency(DefaultListableBeanFactory.java:1101) ~[spring-beans-5.0.9.RELEASE.jar:5.0.9.RELEASE]at org.springframework.beans.factory.support.DefaultListableBeanFactory.resolveDependency(DefaultListableBeanFactory.java:1062) ~[spring-beans-5.0.9.RELEASE.jar:5.0.9.RELEASE]at org.springframework.beans.factory.annotation.AutowiredAnnotationBeanPostProcessor$AutowiredFieldElement.inject(AutowiredAnnotationBeanPostProcessor.java:583) ~[spring-beans-5.0.9.RELEASE.jar:5.0.9.RELEASE]... 29 common frames omitted这么⼀⼤串看的是不是有点懵,其实咱们看⼀句可以了No qualifying bean of type 'org.springframework.data.redis.core.RedisTemplate<ng.String, ng.Object>' available:⼤致意思是没有与RedisTemplate<String, Object>匹配的bean解决⽅法1、不指定泛型,如@Autowiredprivate RedisTemplate redisTemplate;2、使⽤@Resource注解代替@Autowired,如@Resourceprivate RedisTemplate<String, Object> redisTemplate;。
Springcloud学习笔记09-常⽤注解01@PostMapping、@GetMapp。
.springframework.web.bind.annotation包下注解1.1 @PostMapping、@GetMapping、@RequestMapping、@RestController、@ResponseBody、@RequestParam、@RequestPart、@PutMapping(1)@RequestMapping@RequestMapping如果没有指定请求⽅式,将接收Get、Post、Head、Options等所有的请求⽅式.(2)@GetMapping@GetMapping是⼀个组合注解,是@RequestMapping(method = RequestMethod.GET)的缩写。
该注解将HTTP Get 映射到特定的处理⽅法上。
get是把参数数据队列加到提交表单的ACTION属性所指的URL中,值和表单内各个字段⼀⼀对应,在URL中可以看到。
get是从服务器上获取数据。
若符合下列任⼀情况,则⽤GET⽅法:* 请求是为了查找资源,HTML表单数据仅⽤来帮助搜索。
* 请求结果⽆持续性的副作⽤。
* 收集的数据及HTML表单内的输⼊字段名称的总长不超过1024个字符。
(3)@PostMapping@PostMapping是⼀个组合注解,是@RequestMapping(method = RequestMethod.POST)的缩写。
get⽅式的安全性较Post⽅式要差些,包含机密信息的话,建议⽤Post数据提交⽅式;post是向服务器传送数据。
若符合下列任⼀情况,则⽤POST⽅法:* 请求的结果有持续性的副作⽤,例如,数据库内添加新的数据⾏。
* 若使⽤GET⽅法,则表单上收集的数据可能让URL过长。
* 要传送的数据不是采⽤7位的ASCII编码。
(4)@requestBody(后端⽅法接收请求体)@requestBody注解常⽤来处理content-type不是默认的application/x-www-form-urlcoded编码的内容,⽐如说:application/json或者是application/xml等。
spring成神之路第三篇:Spring容器基本使⽤及原理(ApplicationCont。
1. jdk1.82. idea3. maven-3.6.14. spring-5.2.3.RELEASEIOC容器是具有依赖注⼊功能的容器,负责对象的实例化、对象的初始化,对象和对象之间依赖关系配置、对象的销毁、对外提供对象的查找等操作,对象的整个⽣命周期都是由容器来控制。
我们需要使⽤的对象都由ioc容器进⾏管理,不需要我们再去⼿动通过new的⽅式去创建对象,由ioc 容器直接帮我们组装好,当我们需要使⽤的时候直接从ioc容器中直接获取就可以了。
那么spring ioc容器是如何知道需要管理哪些对象呢?需要我们给ioc容器提供⼀个配置清单,这个配置⽀持xml格式和java注解的⽅式,在配置⽂件中列出需要让ioc容器管理的对象,以及可以指定让ioc容器如何构建这些对象,当spring容器启动的时候,就会去加载这个配置⽂件,然后将这些对象给组装好以供外部访问者使⽤。
这⾥所说的IOC容器也叫spring容器。
由spring容器管理的对象统称为Bean对象。
Bean就是普通的java对象,和我们⾃⼰new的对象其实是⼀样的,只是这些对象是由spring去创建和管理的,我们需要在配置⽂件中告诉spring容器需要创建哪些bean对象,所以需要先在配置⽂件中定义好需要创建的bean对象,这些配置统称为bean定义配置元数据信息,spring容器通过读取这些bean配置元数据信息来构建和组装我们需要的对象。
1. 引⼊spring相关的maven配置2. 创建bean配置⽂件,⽐如bean xml配置⽂件3. 在bean xml⽂件中定义好需要spring容器管理的bean对象4. 创建spring容器,并给容器指定需要装载的bean配置⽂件,当spring容器启动之后,会加载这些配置⽂件,然后创建好配置⽂件中定义好的bean对象,将这些对象放在容器中以供使⽤5. 通过容器提供的⽅法获取容器中的对象,然后使⽤spring内部提供了很多表⽰spring容器的接⼝和对象,我们来看看⽐较常见的⼏个容器接⼝和具体的实现类。
spring-data-redis序列化实践笔记(⼀)spring data redis 提供了多种可选择策略(RedisSerializer)JdkSerializationRedisSerializer:POJO对象的存取场景,使⽤JDK本⾝序列化机制,将pojo类通过ObjectInputStream/ObjectOutputStream进⾏序列化操作,最终redis-server中将存储字节序列。
是⽬前最常⽤的序列化策略。
StringRedisSerializer:Key或者value为字符串的场景,根据指定的charset对数据的字节序列编码成string,是“new String(bytes, charset)”和“string.getBytes(charset)”的直接封装。
是最轻量级和⾼效的策略。
JacksonJsonRedisSerializer:jackson-json⼯具提供了javabean与json之间的转换能⼒,可以将pojo实例序列化成json格式存储在redis中,也可以将json格式的数据转换成pojo实例。
因为jackson ⼯具在序列化和反序列化时,需要明确指定Class类型,因此此策略封装起来稍微复杂。
【需要jackson-mapper-asl⼯具⽀持】OxmSerializer:提供了将javabean与xml之间的转换能⼒,⽬前可⽤的三⽅⽀持包括jaxb,apache-xmlbeans;redis存储的数据将是xml⼯具。
不过使⽤此策略,编程将会有些难度,⽽且效率最低;不建议使⽤。
【需要spring-oxm模块的⽀持】(出⾃:)spring-data-redis提供了多种serializer策略,这对使⽤jedis的开发者⽽⾔,实在是⾮常便捷。
sdr提供了4种内置的serializer:JdkSerializationRedisSerializer:使⽤JDK的序列化⼿段(serializable接⼝,ObjectInputStrean,ObjectOutputStream),数据以字节流存储StringRedisSerializer:字符串编码,数据以string存储JacksonJsonRedisSerializer:json格式存储OxmSerializer:xml格式存储其中JdkSerializationRedisSerializer和StringRedisSerializer是最基础的序列化策略,其中“JacksonJsonRedisSerializer”与“OxmSerializer”都是基于stirng存储,因此它们是较为“⾼级”的序列化(最终还是使⽤string解析以及构建java对象)。
spring3.0学习笔记二---SpEL表达式1相对来讲,java是一门静态语言。
而我们今天要讲的是一门动态“语言”---SpEL。
动态语言和静态语言的最显著差别在于,举个例子," 'Hello'.toUperCase()"这只是一个普通的字符串,差别在于能否把它编译和运行起来得到结果。
就是说动态语言能把一个字符串解释成程序语句。
如果还不是很明白的话没关系,看下面的SpEL例子。
(接下去的我就用例子来做介绍了)public void testSpEL1() {//ExpressionParser是Spring3里的一个包,用来动态解释一个字符串。
ExpressionParser parser = new SpelExpressionParser();Expression exp = parser.parseExpression(" 'Hello,World' ");System.out.println((String)exp.getV alue());}这里'Hello,World' 是一个字符串,解释起来还是一个字符串,所以打印结果是:Hello,World第二个例子:调用方法public void testSpEL2() {ExpressionParser parser = new SpelExpressionParser();Expression exp=parser.parseExpression(" 'Hello'.concat(' World!')"); //这里调用了字符串String的concat 方法//Expression exp=parser.parseExpression("newString('helloworld').toUpperCase()");Stringmessage=(String)exp.getV alue();}第三个例子:调用属性ExpressionParser parser= new SpelExpressionParser();Expression exp=parser.parseExpression("'HelloWorld'.bytes"); //得到字符串的byte//Expression exp=parser.parseExpression("'HelloWorld'.bytes.length"); //得到属性的属性byte [] bytes=(byte[])exp.getV alue();第四个例子:调用类中的属性(下面开始复杂起来了)@Resourcepublic User user; //注入之后,user.getName() 为xiaolingpublic void testSpEL() {//设“值域”,限定在u这个对象里EvaluationContext context = new StandardEvaluationContext(user);ExpressionParser parser = new SpelExpressionParser();Expression exp = parser.parseExpression("username"); //==user.getUsername() System.out.println((String)exp.getV alue(context)); //结果:xiaoling}或者用更简洁的一个方式:System.out.println((String)exp.getV alue(user));这样就不用设值域了!呵呵!第五个例子:给对象中的属性设值StandardEvaluationContext context = new StandardEvaluationContext(user); parser.parseExpression("username").setV alue(context, "ling");第六个例子:做判断Expression exp=parser.parseExpression("name=='xiaoling' ");boolean result=exp.getV alue(context,Boolean.class); //evaluate stotrue打印出来,结果为true看到这,可能你还是一头雾水:这算什么新特性啊,哪有什么用处!用处就在于,SpEL把java变成“动”的了!(纯属我个人观点!!)接下来,我们把SpEL用到bean.xml中去先看个例子(例一)<bean id="numberGuess" class="cn.ling.spel.NumberGuess"><property name="randomNumber" value="#{T(ng.Math).random()*100.0}"/></bean>怎么样,可以在xml文件里面赋值了!呵呵!value里面都用#{}来赋值。
Spring学习笔记IOC控制反转:DI 依赖注入:低耦合,高内聚。
让程序之间自由装配成为完整系统功能。
整合各种第三方的框架。
1.Java基础补强:依赖:即耦合。
三种耦合:1.零耦合:两个对象之间没有依赖关系。
无法一起工作。
2.具体耦合:一个具体的对象依赖于另外一个具体的对象。
代码耦合太深,不容易维护,扩展。
3.抽象耦合:一个具体的对象依赖于一个抽象,另外一个对象实现该抽象。
代码详见SpringDemo01.rar例子1:com.demo.ch01.A;2.构建低耦合,高内聚的程序使用面向接口编程,以及设计模式中的依赖倒转原则。
代码详见SpringDemo01.rar例子3:com.demo.ch03步骤1:新建一个Java项目步骤2:在项目中新建各个层次分明的包:例如:com.demo.entitycom.demo.daocom.demo.servicecom.demo.testcom.demo.web.actionEntity:实体包/层,系统要操纵的数据/对象。
如User,Order等,简单的JavaBean,属性,set/get Dao:数据持久层。
为Entity对象提供对应的数据库操作。
Service:服务层/业务逻辑曾。
定义系统提供的服务/功能。
包含部分功能需要调用Dao层、业务逻辑、算法、邮件、JMS、JMX、授权、校验等等。
Test:一般Dao以及Service编写完成后,即可对系统提供的服务/功能进行测试。
Web Action:网络层,把系统提供的Service服务/功能提供给客户端访问/交互。
eclipse.exe快捷//alt+/ 代码提醒自动完成//ctrl+s ctrl+z ctrl+Y步骤3:编写Entity实体对象:如User 对需要操作的数据字段/类型进行封装。
并提供get和set方法:publicclass User{private String userName;private String password;//更多属性//getterpublic String getUserName() {return userName;}public String getPassword() {return password;}//setterpublicvoid setUserName(String userName) {erName = userName;}publicvoid setPassword(String password) {this.password = password;}}步骤4:编写Dao层接口为Entity实体对象提供数据库操作的抽象方法:publicinterface IUserDao{publicvoid save(User user);publicvoid update(User user);publicvoid delete(User user);public User find();}步骤5:为Dao层接口编写实现类,实现方法可以暂时简单输出一句话publicclass UserDao implements IUserDao {//实现抽象方法}步骤6:编写Service层接口为Entity实体对象提系统的功能/服务的抽象方法:publicinterface IUserService{publicvoid save(User user);publicvoid update(User user);publicvoid delete(User user);public User find();}步骤7:为Service层接口编写实现类,实现方法可以暂时简单输出一句话publicclass UserService implements IUserService {//实现抽象方法}步骤8:建议Dao层和Service层建立抽象的依赖关系,让程序解偶合。
publicclass UserService implements IUserService{//抽象耦合private IUserDao userDao;//依赖注入://1.构造注入public UserService(){}public UserService(IUserDao userDao){erDao = userDao;}//2.settrt注入publicvoid setUserDao(IUserDao userDao) {erDao = userDao;}}步骤9:编写测试类,测试Dao层和Service层是否成功一起工作:publicclass TestUserService {publicstaticvoid main(String[] args){//测试数据User user = new User();user.setUserName("admin");user.setPassword("123456");//初始化Service并构造注入UserService service = new UserService(new UserDao());//使用service.save(user);//初始化dao 并setter注入UserService service2 = new UserService();service2.setUserDao(new UserDao());//使用service2.save(user);}}步骤10:通过测试后最后提供到Web层的Action类供前台访问:也是依赖注入一起工作。
publicclass UserAction{private IUserService userService;//注入//使用}到此我们成功构建了一个低耦合,高内聚的模板程序,以后需要进一步完善或者替换成其他模块的时候只需要把关键的对象/数据替换即可。
3.第一个Spring程序:1)新建一个res的资源文件夹,并且创建Spring默认的配置文件applicationContext.xml <?xml version="1.0"encoding="UTF-8"?><beansxmlns="/schema/beans"xmlns:xsi="/2001/XMLSchema-instance"xsi:schemaLocation="/schema/beans/schema/beans/spring-beans-3.0.xsd"><!-- 配置通过IOC管理Bean --><bean id="orderService"class="com.demo.ch01.service.OrderService"></bean><bean id="orderDao"class="com.demo.ch01.dao.OrderDao"></bean></beans>2)导包:add to build pathcommons-logging-1.1.1.jarorg.springframework.core-3.1.1.RELEASE.jarorg.springframework.beans-3.1.1.RELEASE.jarorg.springframework.context-3.1.1.RELEASE.jarorg.springframework.asm-3.1.1.RELEASE.jarorg.springframework.expression-3.1.1.RELEASE.jar3)建立依赖关系a)构造注入publicclass OrderService implements IOrderService{private IOrderDao orderDao;//必须配置一个Set方法public OrderService(){}public OrderService(IOrderDao orderDao) {th is.orderDao = orderDao;}}<bean id="orderService2"class="com.demo.ch01.service.OrderService"> <constructor-arg ref="orderHibernateDao"/></bean>b)Set注入:容器new bean name="orderDao"为OrderService类中的属性名。
property寻找对应的属性名的Set函数进行注入ref属性指定引用。
publicclass OrderService implements IOrderService{private IOrderDao orderDao;//必须配置一个Set方法publicvoid set O rderDao(IOrderDao orderDao) {this.orderDao = orderDao;}}<bean id="orderService"class="com.demo.ch01.service.OrderService"><!--set注入对应OrderService的属性orderDao 的set方法 --><property name="orderDao"ref="orderDao"/></bean><bean id="orderDao"class="com.demo.ch01.dao.OrderDao"></bean>4)编写测试用例:publicclass TestSpringIOC{publicstaticvoid main(String[] args) {//1.初始化Spring ioc容器ApplicationContext context =new ClassPathXmlApplicationContext("applicationContext.xml");//2.通过context 获取容器中的 Bean orderServiceIOrderService service = (IOrderService) context.getBean("orderService2");//3.测试数据Order order = new Order();order.setOrderCode("001");order.setCreateDate(new Date());//4.测试获取到的Bean orderService的功能service.save(order);}}使用了Spring之后可以通过配置文件让程序的对象一起构建各种的功能和服务。