springboot-笔记
- 格式:docx
- 大小:3.87 MB
- 文档页数:123

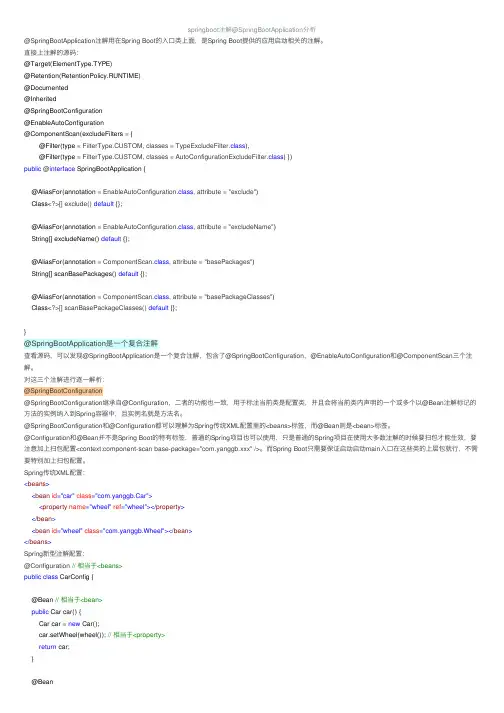
springboot注解@SpringBootApplication分析@SpringBootApplication注解⽤在Spring Boot的⼊⼝类上⾯,是Spring Boot提供的应⽤启动相关的注解。
直接上注解的源码:@Target(ElementType.TYPE)@Retention(RetentionPolicy.RUNTIME)@Documented@Inherited@SpringBootConfiguration@EnableAutoConfiguration@ComponentScan(excludeFilters = {@Filter(type = FilterType.CUSTOM, classes = TypeExcludeFilter.class),@Filter(type = FilterType.CUSTOM, classes = AutoConfigurationExcludeFilter.class) })public @interface SpringBootApplication {@AliasFor(annotation = EnableAutoConfiguration.class, attribute = "exclude")Class<?>[] exclude() default {};@AliasFor(annotation = EnableAutoConfiguration.class, attribute = "excludeName")String[] excludeName() default {};@AliasFor(annotation = ComponentScan.class, attribute = "basePackages")String[] scanBasePackages() default {};@AliasFor(annotation = ComponentScan.class, attribute = "basePackageClasses")Class<?>[] scanBasePackageClasses() default {};}@SpringBootApplication是⼀个复合注解查看源码,可以发现@SpringBootApplication是⼀个复合注解,包含了@SpringBootConfiguration,@EnableAutoConfiguration和@ComponentScan三个注解。
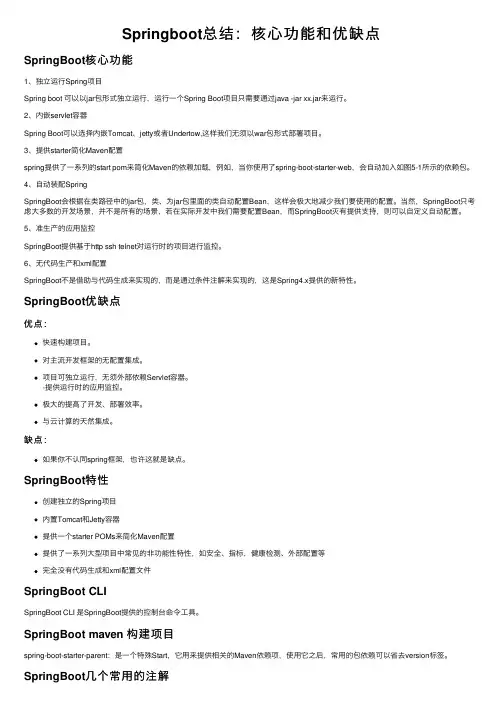
Springboot总结:核⼼功能和优缺点SpringBoot核⼼功能1、独⽴运⾏Spring项⽬Spring boot 可以以jar包形式独⽴运⾏,运⾏⼀个Spring Boot项⽬只需要通过java -jar xx.jar来运⾏。
2、内嵌servlet容器Spring Boot可以选择内嵌Tomcat、jetty或者Undertow,这样我们⽆须以war包形式部署项⽬。
3、提供starter简化Maven配置spring提供了⼀系列的start pom来简化Maven的依赖加载,例如,当你使⽤了spring-boot-starter-web,会⾃动加⼊如图5-1所⽰的依赖包。
4、⾃动装配SpringSpringBoot会根据在类路径中的jar包,类、为jar包⾥⾯的类⾃动配置Bean,这样会极⼤地减少我们要使⽤的配置。
当然,SpringBoot只考虑⼤多数的开发场景,并不是所有的场景,若在实际开发中我们需要配置Bean,⽽SpringBoot灭有提供⽀持,则可以⾃定义⾃动配置。
5、准⽣产的应⽤监控SpringBoot提供基于http ssh telnet对运⾏时的项⽬进⾏监控。
6、⽆代码⽣产和xml配置 SpringBoot不是借助与代码⽣成来实现的,⽽是通过条件注解来实现的,这是Spring4.x提供的新特性。
SpringBoot优缺点优点:快速构建项⽬。
对主流开发框架的⽆配置集成。
项⽬可独⽴运⾏,⽆须外部依赖Servlet容器。
-提供运⾏时的应⽤监控。
极⼤的提⾼了开发、部署效率。
与云计算的天然集成。
缺点:如果你不认同spring框架,也许这就是缺点。
SpringBoot特性创建独⽴的Spring项⽬内置Tomcat和Jetty容器提供⼀个starter POMs来简化Maven配置提供了⼀系列⼤型项⽬中常见的⾮功能性特性,如安全、指标,健康检测、外部配置等完全没有代码⽣成和xml配置⽂件SpringBoot CLISpringBoot CLI 是SpringBoot提供的控制台命令⼯具。
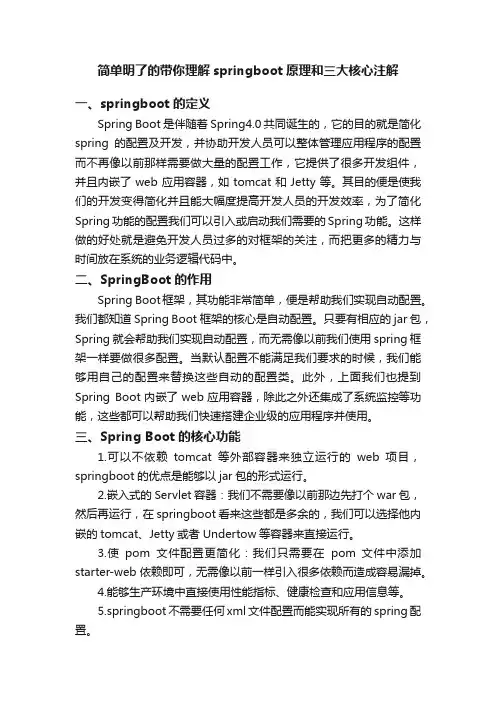
简单明了的带你理解springboot原理和三大核心注解一、springboot的定义Spring Boot是伴随着Spring4.0共同诞生的,它的目的就是简化spring的配置及开发,并协助开发人员可以整体管理应用程序的配置而不再像以前那样需要做大量的配置工作,它提供了很多开发组件,并且内嵌了web应用容器,如tomcat和Jetty等。
其目的便是使我们的开发变得简化并且能大幅度提高开发人员的开发效率,为了简化Spring功能的配置我们可以引入或启动我们需要的Spring功能。
这样做的好处就是避免开发人员过多的对框架的关注,而把更多的精力与时间放在系统的业务逻辑代码中。
二、SpringBoot的作用Spring Boot框架,其功能非常简单,便是帮助我们实现自动配置。
我们都知道Spring Boot框架的核心是自动配置。
只要有相应的jar包,Spring就会帮助我们实现自动配置,而无需像以前我们使用spring框架一样要做很多配置。
当默认配置不能满足我们要求的时候,我们能够用自己的配置来替换这些自动的配置类。
此外,上面我们也提到Spring Boot内嵌了web应用容器,除此之外还集成了系统监控等功能,这些都可以帮助我们快速搭建企业级的应用程序并使用。
三、Spring Boot的核心功能1.可以不依赖tomcat等外部容器来独立运行的web项目,springboot的优点是能够以jar包的形式运行。
2.嵌入式的Servlet容器:我们不需要像以前那边先打个war包,然后再运行,在springboot看来这些都是多余的,我们可以选择他内嵌的tomcat、Jetty或者Undertow等容器来直接运行。
3.使pom文件配置更简化:我们只需要在pom 文件中添加starter-web 依赖即可,无需像以前一样引入很多依赖而造成容易漏掉。
4.能够生产环境中直接使用性能指标、健康检查和应用信息等。
5.springboot不需要任何xml文件配置而能实现所有的spring配置。
1.1SpringBoot环境配置和常⽤注解Spring Boot常⽤注解:@Service: 注解在类上,表⽰这是⼀个业务层bean@Controller:注解在类上,表⽰这是⼀个控制层bean@Repository: 注解在类上,表⽰这是⼀个数据访问层bean@Component:注解在类上,表⽰通⽤bean ,value不写默认就是类名⾸字母⼩写@Autowired:按类型注⼊.默认属性required= true;当不能确定Spring 容器中⼀定拥有某个类的Bean 时,可以在需要⾃动注⼊该类Bean 的地⽅可以使⽤@Autowired(required = false),这等于告诉Spring:在找不到匹配Bean时也不抛出BeanCreationException 异常。
@Autowired 和 @Qualifier 结合使⽤时,⾃动注⼊的策略就从byType 转变byName 了。
@Autowired可以对成员变量、⽅法以及构造函数进⾏注释,⽽@Qualifier 的标注对象是成员变量、⽅法⼊参、构造函数⼊参。
正是由于注释对象的不同,所以 Spring 不将 @Autowired 和 @Qualifier 统⼀成⼀个注释类。
@Resource:按名称装配区别:@Resource默认按照名称⽅式进⾏bean匹配,@Autowired默认按照类型⽅式进⾏bean匹配@Resource(importjavax.annotation.Resource;)是J2EE的注解,@Autowired(importorg.springframework.beans.factory.annotation.Autowired;)是Spring的注解@Configuration:注解在类上,表⽰这是⼀个IOC容器,相当于spring的配置⽂件,java配置的⽅式。
IOC容器的配置类⼀般与@Bean 注解配合使⽤,⽤@Configuration 注解类等价与 XML 中配置 beans,⽤@Bean 注解⽅法等价于 XML 中配置 bean。
Springboot注解@ServletComponentScan和@ComponentS。
⼀、SpringBoot中使⽤Servlet在SpringBootApplication上使⽤@ServletComponentScan注解后,Servlet、Filter、Listener可以直接通过@WebServlet、@WebFilter、@WebListener注解⾃动注册,⽆需其他代码。
1.在⼊⼝Application类上加⼊注解@ServletComponentScanpackage com.hui;import org.springframework.boot.SpringApplication;import org.springframework.boot.autoconfigure.SpringBootApplication;import org.springframework.boot.web.servlet.ServletComponentScan;@SpringBootApplication@ServletComponentScanpublic class Application {public static void main(String[] args) {SpringApplication.run(Application.class, args);}}2.新建Servlet类,继承HttpServlet并且加⼊注解@WebServlet(name=“TestServlet”,urlPatterns="/test")package com.hui.qiang;import java.io.IOException;import javax.servlet.ServletException;import javax.servlet.annotation.WebServlet;import javax.servlet.http.HttpServlet;import javax.servlet.http.HttpServletRequest;import javax.servlet.http.HttpServletResponse;@WebServlet(name="TestServlet",urlPatterns="/test")public class TestServlet extends HttpServlet {private static final long serialVersionUID = 1L;@Overrideprotected void doGet(HttpServletRequest req, HttpServletResponse resp)throws ServletException, IOException {System.out.println("doGet");}}⼆、Spring, Spring Boot中的@ComponentScan注解⽤法介绍@ComponentScan如果你理解了ComponentScan,你就理解了Spring.Spring是⼀个依赖注⼊(dependency injection)框架。
Spring Boot1、什么是 Spring Boot?Spring Boot 是 Spring 开源组织下的子项目,是 Spring 组件一站式解决方案,主要是简化了使用 Spring 的难度,简省了繁重的配置,提供了各种启动器,开发者能快速上手。
2、Spring Boot有哪些优点?减少开发,测试时间和努力。
使用JavaConfig有助于避免使用XML。
避免大量的Maven导入和各种版本冲突。
提供意见发展方法。
通过提供默认值快速开始开发。
没有单独的Web服务器需要。
这意味着你不再需要启动Tomcat,Glassfish或其他任何东西。
需要更少的配置因为没有web.xml文件。
只需添加用@ Configuration注释的类,然后添加用@Bean注释的方法,Spring将自动加载对象并像以前一样对其进行管理。
您甚至可以将@Autowired添加到bean方法中,以使Spring自动装入需要的依赖关系中。
基于环境的配置使用这些属性,您可以将您正在使用的环境传递到应用程序:-Dspring.profiles.active = {enviornment}。
在加载主应用程序属性文件后,Spring将在(application{environment} .properties)中加载后续的应用程序属性文件。
3、Spring Boot 的核心配置文件有哪几个?它们的区别是什么?Spring Boot 的核心配置文件是 application 和 bootstrap 配置文件。
application 配置文件这个容易理解,主要用于 Spring Boot 项目的自动化配置。
bootstrap 配置文件有以下几个应用场景。
使用 Spring Cloud Config 配置中心时,这时需要在 bootstrap 配置文件中添加连接到配置中心的配置属性来加载外部配置中心的配置信息;一些固定的不能被覆盖的属性;一些加密/解密的场景4、Spring Boot 的配置文件有哪几种格式?它们有什么区别?v.properties 和 .yml,它们的区别主要是书写格式不同。
记⼀次SpringBootAspect不⽣效解决过程转⾃我的个⼈博客:问题描述项⽬中两个aspect,⼀个环绕controller,⽤于记录⽇志,能够正常在point处进⼊aspect处理;另⼀个aspect 的point设于service,死活不能进⼊。
解决思路1、⾸先排查pointcut配置是否正确,检查后发现没有问题;2、我们都知道spring的aop运⽤的是动态代理技术,由spring托管的bean⼤多为代理bean,controller层打印service对象,发现service对象竟然直接是service实现类的“本尊”。
如下图所⽰:再看springboot启动⽇志,发现roleServiceImpl实例化的时候有如下提⽰:Bean 'roleServiceImpl' of type [com.gaoxiaobo.wms.service.impl.RoleServiceImpl] is not eligible for getting processed by all BeanPostProcessors (for example: not eligible for auto-proxying)那么问题就明了了,我们在controller层调⽤的roleServiceImpl对象⾮代理对象⽽是其本⾝,那么对其的aspect是不会⽣效的,不仅aspsect不会⽣效,事务注解@Transactional也不会⽣效,问题还是相当严重的。
那么,why 没有⽣成其代理对象呢?⼀定是哪⾥先调⽤了roleServiceImpl导致spring优先实例化了该bean;通过排查,找到了罪魁祸⾸:shiro 的LifecycleBeanPostProcessor优先实例化⾃定义Realm,⾃定义的Realm依赖于roleService,导致roleService被初始化。
解决⽅法⾃定义realm中roleService设置成懒加载。
深入浅出SpringBootSpringBoot是一个快速创建基于Spring框架的Java应用程序的工具。
它支持各种编码和编译工具,可以容易的构建Spring应用程序。
在本文中,我们将深入浅出地学习SpringBoot框架,以帮助您更好地理解并使用它。
一、为什么选择SpringBoot?SpringBoot最大的好处是:快速启动、便于配置,同时又提供了丰富的功能,可以快速部署。
二、SpringBoot的主要优点有哪些?1、基于Spring,使用Spring的所有特性。
2、零配置,开箱即用,少了很多繁琐的配置3、对开发人员友好,简单高效,灵活配置,可以集成多种开发框架。
4、自动配置,快速创建各种类库、Web应用和单元测试。
三、SpringBoot项目搭建1、创建项目:在IDEA中创建Maven项目,勾选“Create from archetype”并选择“maven-archetype-quickstart”。
2、在pom.xml文件中添加SpringBoot的相关依赖:<!-- SpringBoot Web模块依赖--><dependency><groupId>org.springframework.boot</groupId><artifactId>spring-boot-starter-web</artifactId></dependency><!-- SpringBoot JDBC模块依赖--><dependency><groupId>org.springframework.boot</groupId><artifactId>spring-boot-starter-jdbc</artifactId></dependency>3、编写代码:在src/main/java下新建SpringBoot的主类,添加注解@EnableAutoConfiguration来启用自动配置,添加注解@RestController来创建一个RESTful控制器。
springboot解析xml_SpringBoot使用及原理浅尝Spring Boot 是一个用于构建Spring 应用程序的框架,它简化了Spring 应用程序的开发过程并提供了一种快速开发的方式。
Spring Boot可以使用XML配置,下面将介绍Spring Boot使用XML配置的方法及原理。
一、Spring Boot使用XML配置的方法1.添加依赖要使用Spring Boot的XML配置,首先需要在项目的pom.xml文件中添加相应的依赖。
Spring Boot提供了spring-boot-starter-parent这个父级依赖,可以继承这个依赖来快速配置相关的依赖版本。
同时,还需要添加spring-boot-starter-web依赖用于构建Web应用程序。
2.创建XML配置文件在src/main/resources目录下创建一个application.xml文件。
在这个文件中,可以配置Spring Boot需要的相关信息,比如数据源、事务管理器、登录验证等。
3. 创建Java配置类4.运行应用程序二、Spring Boot使用XML配置原理Spring Boot使用XML配置的原理其实和普通的Spring应用程序是相似的,只不过Spring Boot提供了更简便的配置方式。
主要原理如下:1.自动配置Spring Boot通过自动配置的方式简化了配置过程。
通过Spring Boot的自动配置机制,可以根据classpath中的jar包、类名、注解等信息,来推断应用程序的配置,并自动加载所需的配置。
2.配置加载3. Bean装载4.自动装配总结Spring Boot提供了使用XML配置的功能,可以通过添加依赖、创建XML配置文件和Java配置类来实现。
Spring Boot的配置原理主要包括自动配置、配置加载、Bean装载和自动装配。
Spring Boot的自动配置功能简化了配置过程,使开发者可以更快地搭建应用程序。
SpringBoot中常⽤注解及各种注解作⽤本篇⽂章将介绍⼏种SpringBoot 中常⽤注解其中,各注解的作⽤为:@PathVaribale 获取url中的数据@RequestParam 获取请求参数的值@GetMapping 组合注解,是@RequestMapping(method = RequestMethod.GET)的缩写@RestController是@ResponseBody和@Controller的组合注解。
@PathVaribale 获取url中的数据看⼀个例⼦,如果我们需要获取Url=localhost:8080/hello/id中的id值,实现代码如下:@RestControllerpublic class HelloController {@RequestMapping(value="/hello/{id}",method= RequestMethod.GET)public String sayHello(@PathVariable("id") Integer id){return "id:"+id;}}@RequestParam 获取请求参数的值直接看⼀个例⼦,如下@RestControllerpublic class HelloController {@RequestMapping(value="/hello",method= RequestMethod.GET)public String sayHello(@RequestParam("id") Integer id){return "id:"+id;}}在浏览器中输⼊地址:localhost:8080/hello?id=1000,可以看到如下的结果:当我们在浏览器中输⼊地址:localhost:8080/hello?id ,即不输⼊id的具体值,此时返回的结果为null。
基于SpringBoot的代码实现及其应用一、引言SpringBoot是一个优秀的企业级框架,它通过提供快速开发、轻量级、模块化设计等优势获得了很高的企业应用。
在本文中,我们将介绍关于SpringBoot的基于代码实现及其应用的相关知识。
二、SpringBoot概述1、SpringBoot是什么SpringBoot是一种基于Spring框架的轻量级应用程序开发框架。
它使用了Spring的开发原则,让开发人员可以快速构建基于Spring 框架的应用程序,而不需要繁琐的配置。
2、SpringBoot的优点SpringBoot的优点是它提供了快速开发的能力,支持自动装配和自动配置。
它还提供了可插拔的应用程序组件,让开发人员可以按照自己的需求扩展它。
3、SpringBoot的应用场景SpringBoot可以用于Web应用程序开发、构建微服务和RESTful Web服务。
通过SpringBoot,开发人员可以快速构建高效率、高性能、高稳定性的应用程序。
三、SpringBoot代码实现SpringBoot的代码实现需要遵循以下步骤:1、环境搭建安装JDK、Maven和Eclipse,或者使用Intellij IDEA。
2、创建新项目在Eclipse中,选择File->New->Other->Spring->SpringStarter Project。
这时就可以看到SpringBoot已经配置好了项目,并且有很多依赖,只需要选择需要的,然后点击Finish就可以了。
3、创建Controller在SpringBoot中,使用注解@Controller标记Controller类,然后使用该类中对应的方法来处理请求。
@Controllerpublic class HelloWorldController {@RequestMapping("/hello")public String hello() {return "hello world";}}4、编写配置文件在SpringBoot中,配置文件是非常重要的。
SpringBoot详解Spring Boot介绍:Spring Boot是由Pivotal团队提供的全新,其设计⽬的是⽤来新应⽤的初始搭建以及开发过程。
该框架使⽤了特定的⽅式来进⾏配置,从⽽使开发⼈员不再需要定义样板化的配置。
通过这种⽅式,Spring Boot致⼒于在蓬勃发展的快速应⽤开发领域(rapid application development)成为领导者什么是springboot ?⽤来简化spring应⽤的初始搭建以及开发过程使⽤特定的⽅式来进⾏配置(properties或yml⽂件)创建独⽴的spring引⽤程序 main⽅法运⾏嵌⼊的Tomcat ⽆需部署war⽂件简化maven配置⾃动配置spring添加对应功能starter⾃动化配置spring boot来简化spring应⽤开发,约定⼤于配置,去繁从简,just run就能创建⼀个独⽴的,产品级别的应⽤Spring Boot有哪些优点?-快速创建独⽴运⾏的spring项⽬与主流框架集成-使⽤嵌⼊式的servlet容器,应⽤⽆需打包成war包-starters⾃动依赖与版本控制-⼤量的⾃动配置,简化开发,也可修改默认值-准⽣产环境的运⾏应⽤监控-与云计算的天然集成SpringBoot所具备的特征:可以创建独⽴的Spring应⽤程序,并且基于其Maven或者Gradle插件,可以创建可执⾏的JARs和WARs;内嵌Tomcat或Jetty等Servlet容器;提供⾃动配置的“starter”项⽬对象模型(POMS)以简化Maven配置;尽可能⾃动配置Spring容器;提供准备好的特性,如指标、健康检查和外部化配置;绝对没有代码⽣成,不需要XML配置;SpringBoot启动类中的注解:@StringBootApplication注解标明此类为启动类@StringBootApplication注解是SpringBoot项⽬的核⼼注解,⽬的是开启⾃动配置在这个配置中包含了以下三种注解:@StringBootConfiguration(此注解意思为:标明此类为配置类)继承了@Configuration注解,⽤来加载配置⽂件@EnableAutoConfiguration(此注解意思为:⾃动配置)@ComponentScan(此注解意思为:扫描包实例化)递归扫描SpringBoot和SpringCloud的不同?SpringBoot是Spring推出⽤于解决传统框架配置⽂件冗余,装配组件繁杂的基于Maven的解决⽅案,旨在快速搭建单个微服务⽽SpringCloud专注于解决各个微服务之间的协调与配置,服务之间的通信,熔断,负载均衡等技术维度并相同,并且SpringCloud是依赖于SpringBoot的,⽽SpringBoot并不是依赖与SpringCloud,甚⾄还可以和Dubbo进⾏优秀的整合开发总结:SpringBoot专注于快速⽅便的开发单个个体的微服务SpringCloud是关注全局的微服务协调整理治理框架,整合并管理各个微服务,为各个微服务之间提供,配置管理,服务发现,断路器,路由,事件总线等集成服务SpringBoot不依赖于SpringCloud,SpringCloud依赖于SpringBoot,属于依赖关系SpringBoot专注于快速,⽅便的开发单个的微服务个体,SpringCloud关注全局的服务治理框架Thymeleaf模板: Thymeleaf代替了我们之前web开发的JSP它也可以轻易的与Springmvc等web框架进⾏集成Thymeleaf特点: 能直接在浏览器中打开并正确,显⽰模板页⾯,不需要重启整个web应⽤由于Thymeleaf使⽤了XMLDOM解析器,因此它并不适合⽤于处理⼤规模的XML⽂件共享Session:1、引⼊redis依赖<dependency><groupId>org.springframework.boot</groupId><artifactId>spring-boot-starter-data-redis</artifactId></dependency><dependency><groupId>mons</groupId><artifactId>commons-pool2</artifactId></dependency>2、添加注解@EnbaleRedisHttpSession(maxIncativeIntervaLInsecands=46561*50)maxIncativeIntervaLInsecands:设置Session失效时间SpringBootJpa: Java持久化规范、它的出现主要是为了简化,现有的持久化开发⼯作和整合ORM技术 SpringBoot是Spring基于ORM框架,JPA规范的基础上封装的⼀套JPA应⽤框架,可以⼤⼤提⾼开发效率 SpringBootJpa默认预先⽣成了⼀些基本的CURD⽅法:例如增删改查等SpringBoot中应当注意的注解及其作⽤: @PathVariable是spring3.0中的⼀个新功能;能接受请求路径中占位符的值,获取url中的数据@RestControllerAdvice注解和@ControllerAdvice的注解区别:注解有@ControllerAdvice的类,需要在具体⽅法上同时添加@ExceptionHandler和@ResponseBody注解;注解有@RestControllerAdvice的类,只需要在具体⽅法上添加@ExceptionHandler注解;@ExceptionHandler注解⽤来捕获并统⼀处理,减少代码重复率和复杂度@Resource和@Autowired注解都是⽤来实现依赖注⼊的区别:@Autowired注解是按by type⾃动注⼊;@Resource注解默认按byName⾃动注⼊@Resource注解有两个重要属性,分别是name和type@RequestBody和@RequestParam的区别:@RequestBody可以将body⾥⾯所有的json数据传⼊后端,后端进⾏解析;@RequestBody⼀般⽤户处理application/json、application/xml等类型的数据;@RequestBody不适⽤于GET请求,原因:GET请求中没有HttpEntity@RequestParam注解接受的参数是来⾃Http请求或url请求@RequestParam注解可以接受简单类型属性,也可以接收对象类型@RequestParam注解通常⽤来处理Content-Type为application/x-www-form-urlencoded编码的内容(这⾥指form表单数据)@RequestParam注解⽆法读取json格式数据Contnet-Type总结:form表单请求数据类型(application/x-www-form-urlencoded),不可以⽤@RequestBody注解;可以使⽤@RequestParam注解application/json:json字符串⽤@RequestBody注解@Compent注解把普通pojo实体类实例化到Spring容器中@MapperScan注解:递归扫描,⽐如扫描com.zy下的mapper包,例如:MapperScan("com.zy.Mapper")@Entity:标明该类是⼀个实体类@Table:当实体类与映射数据库表名不同时,需要使⽤⽐如:@Table(name="user_home",shema="test")@SpringBootTest:标明这个类是测试类@Runwith:运⾏测试类,相当于运⾏器@EnableCaching注解:是Springframework中注解驱动的缓存管理功能@Controller和@RestController区别: 在对应的⽅法上,视图解析器可以解析return的JSP、HTML页⾯并且跳转到相对应的页⾯使⽤@Controller注解若返回json字符串内容到页⾯,则需要加@RestController注解。
springboot考试复习题Spring Boot 是一个开源的Java基础框架,用于创建独立、生产级的基于Spring框架的应用程序。
以下是一些Spring Boot考试的复习题,帮助学生更好地掌握Spring Boot的核心概念和应用。
1. Spring Boot简介- 描述Spring Boot的主要特点。
- 阐述Spring Boot与Spring Framework的关系。
2. 自动配置- 解释Spring Boot的自动配置是如何工作的。
- 列举几个Spring Boot自动配置的例子。
3. Spring Boot Starter- 描述Spring Boot Starter的作用。
- 列举几个常用的Spring Boot Starter。
4. Spring Initializr- 说明如何使用Spring Initializr创建Spring Boot项目。
- 描述Spring Initializr提供的项目定制选项。
5. 依赖注入- 解释Spring Boot中的依赖注入是如何实现的。
- 举例说明如何自定义Spring Bean。
6. 配置文件- 描述Spring Boot支持的配置文件类型。
- 阐述如何使用application.properties和application.yml文件。
7. 环境抽象层(Environment Abstraction Layer)- 解释Spring Boot的环境抽象层的作用。
- 描述如何使用profiles来管理不同环境下的配置。
8. Actuator- 描述Spring Boot Actuator的功能。
- 列举Actuator提供的几个关键端点。
9. 数据访问- 解释Spring Data JPA在Spring Boot中的应用。
- 描述如何使用Spring Data JPA进行数据访问。
10. Web开发- 描述Spring MVC在Spring Boot中的使用。
SpringBoot框架入门指南Chapter 1:什么是Spring Boot?Spring Boot是一种基于Java语言的框架,它主要用于快速开发可独立运行、易于部署的Spring应用程序。
它通过提供默认的配置和简化的开发流程,使开发人员能够更快、更方便地构建高效的应用程序。
Spring Boot不需要额外的代码,可以自动配置多个Spring项目。
Chapter 2:Spring Boot的主要特点Spring Boot的主要特点如下:1. 自动配置:Spring Boot框架可以根据项目的依赖关系自动配置。
这个特性使得开发人员无需关注复杂的配置过程。
2. 微服务:Spring Boot旨在构建微服务架构,可以轻松创建微服务应用程序。
3. 快速开发:Spring Boot提供了大量的捷径和快捷方式,使开发人员可以更快、更轻松地开发应用程序。
4. 独立部署:Spring Boot框架提供了可独立运行的应用程序,这意味着你可以轻松地将应用程序部署到任何环境中。
Chapter 3:Spring Boot的核心组件Spring Boot由以下核心组件组成:1. Spring Boot CLI:它是Spring Boot Command-Line Interface 的缩写。
它允许开发人员使用命令行创建应用程序。
2. Spring Boot Starter:它是一种依赖关系集合,用于使开发人员更快、更轻松地构建应用程序。
3. Spring Boot Actuator:这是一种监控和管理Spring Boot应用程序的组件。
开发人员可以使用Actuator来监测应用程序的运行状况、性能和其他指标。
Chapter 4:如何使用Spring Boot以下是使用Spring Boot快速构建简单Web应用程序的步骤:1. 首先,您需要安装JDK和Maven。
2. 创建一个新的Maven项目并添加Spring Boot的起始器:```<dependency><groupId>org.springframework.boot</groupId><artifactId>spring-boot-starter-web</artifactId></dependency>```3. 创建一个应用程序类并添加`@SpringBootApplication`注解:```@SpringBootApplicationpublic class MyApp {public static void main(String[] args) {SpringApplication.run(MyApp.class, args); }}```4. 编写一个Spring MVC控制器:```@RestControllerpublic class MyController {@GetMapping("/hello")public String hello() {return "Hello, world!";}}```5. 启动应用程序,并在浏览器中访问`http://localhost:8080/hello`。
______________________________________________________________________________________________________________ 精品资料 1. 今日大纲 1、 了解Spring的发展 2、 掌握Spring的java配置方式 3、 学习Spring Boot 4、 使用Spring Boot来改造购物车系统
访问 www.mukedaba.com 了解更多
2. Spring的发展
2.1. Spring1.x 时代 在Spring1.x时代,都是通过xml文件配置bean,随着项目的不断扩大,需要将xml配置分放到不同的配置文件中,需要频繁的在java类和xml配置文件中切换。
2.2. Spring2.x时代 随着JDK 1.5带来的注解支持,Spring2.x可以使用注解对Bean进行申明和注入,大大的减少了xml配置文件,同时也大大简化了项目的开发。
那么,问题来了,究竟是应该使用xml还是注解呢? 最佳实践: 1、 应用的基本配置用xml,比如:数据源、资源文件等; 2、 业务开发用注解,比如:Service中注入bean等;
2.3. Spring3.x到Spring4.x 从Spring3.x开始提供了Java配置方式,使用Java配置方式可以更好的理解你配置的Bean,现在我们就处于这个时代,并且Spring4.x和Spring boot都推荐使用java配置的方式。
3. Spring的Java配置方式
Java配置是Spring4.x推荐的配置方式,可以完全替代xml配置。 ______________________________________________________________________________________________________________ 精品资料 3.1. @Configuration 和 @Bean Spring的Java配置方式是通过 @Configuration 和 @Bean 这两个注解实现的: 1、@Configuration 作用于类上,相当于一个xml配置文件; 2、@Bean 作用于方法上,相当于xml配置中的;
3.2. 示例 该示例演示了通过Java配置的方式进行配置Spring,并且实现了Spring IOC功能。 3.2.1. 创建工程以及导入依赖 xmlns:xsi="http://www.w3.org/2001/XMLSchema-instance" xsi:schemaLocation="http://maven.apache.org/POM/4.0.0 http://maven.apache.org/xsd/maven-4.0.0.xsd">
4.0.0 cn.itcast.springboot itcast-springboot 1.0.0-SNAPSHOT war
org.springframework spring-webmvc 4.3.7.RELEASE com.jolbox bonecp-spring 0.8.0.RELEASE ${project.artifactId} org.apache.maven.plugins maven-resources-plugin ______________________________________________________________________________________________________________ 精品资料 UTF-8 org.apache.maven.plugins maven-compiler-plugin 1.7 1.7 UTF-8 org.apache.tomcat.maven tomcat7-maven-plugin 2.2
3.2.2. 编写User对象 public class User { private String username; private String password; private Integer age; public String getUsername() { return username; }
public void setUsername(String username) { this.username = username; ______________________________________________________________________________________________________________ 精品资料 } public String getPassword() { return password; }
public void setPassword(String password) { this.password = password; }
public Integer getAge() { return age; }
public void setAge(Integer age) { this.age = age; }
}
3.2.3. 编写UserDAO 用于模拟与数据库的交互 public class UserDAO {
public List queryUserList(){ List result = new ArrayList(); // 模拟数据库的查询 for (int i = 0; i < 10; i++) { User user = new User(); user.setUsername("username_" + i); user.setPassword("password_" + i); user.setAge(i + 1); result.add(user); } return result; }
} ______________________________________________________________________________________________________________
精品资料 3.2.4. 编写UserService 用于实现User数据操作业务逻辑
@Service public class UserService {
@Autowired // 注入Spring容器中的bean对象 private UserDAO userDAO;
public List queryUserList() { // 调用userDAO中的方法进行查询 return this.userDAO.queryUserList(); }
} 3.2.5. 编写SpringConfig 用于实例化Spring容器 @Configuration //通过该注解来表明该类是一个Spring的配置,相当于一个xml文件 @ComponentScan(basePackages = "cn.itcast.springboot.javaconfig") //配置扫描包 public class SpringConfig {
@Bean // 通过该注解来表明是一个Bean对象,相当于xml中的 public UserDAO getUserDAO(){ return new UserDAO(); // 直接new对象做演示 }
}
3.2.6. 编写测试方法 用于启动Spring容器 public class Main {
public static void main(String[] args) { // 通过Java配置来实例化Spring容器 AnnotationConfigApplicationContext context = new AnnotationConfigApplicationContext(SpringConfig.class);
// 在Spring容器中获取Bean对象