Oracle vm manager安装
- 格式:docx
- 大小:175.31 KB
- 文档页数:21
部署指南 Cloudera Manager CDH官方共给出了3中安装方式。
第一种方法必须要求所有机器都能连网,由于各种网络超时错误,基本没法用。
第二种方法使用CM的在线yum源,在线下载很多包,同样是超时严重。
第三种方法是全离线方式,实际情况是也只能用这个。
1、Cloudera Manager的部署条件•CDH不支持在容器中部署。
•支持Oracle JDK7,目前可使用的最新版本为1.7u80,C5.3.x及以上版本也支持使用oracle JDK8,同一个CDH集群中的所有节点使用的JDK版本必须一致。
•使用Python2.4及以上,不支持Python3•仅支持IPv4,且IPv6必须要disabled•基于tar压缩包的离线安装方式,会在6.0.0中停止支持该方式。
•支持selinux,但如果不熟悉使用方法,建议关闭。
•管理端口为7180,此外还有很多基础应用使用的端口,可以运行iptables,需要确认有恰当的授权控制,例如至少要对同网段的访问放开全部端口。
2、Cloudera Manager部署的几个阶段和可选择的方式注:因为Cloudera Manager的官方yum源位于国外,受网速影响而无法正常使用。
所以上述部署方式中,一般是使用PATH C,或者在预先下载好相关RPM包的条件下参照PATH B方式。
3、主机节点信息和基础配置(1)主机信息本次部署使用以下主机,前两个作为NameNode使用。
后四个主机,分别额外挂载一块1TB的磁盘到本地的/dfs/dn目录下。
注1:用于大数据平台的数据磁盘不要配置RAID,直接祼盘即可。
如果有RAID 控制器,则直接对每块盘设置一个单独的RAID0,仍然当作单盘使用。
注2:在有第二块数据盘的情况下,继续挂载到/dfs/dn2,更多的数据盘则按命名规则和挂盘规则扩展即可。
注3:对于生产环境而言,NameNode所在的节点一般不要同时做数据节点使用。
OVM Manager 安装、备份与还原OVM Manager 安装OVM Manager是OVM Server的管理软件,安装在Linux操作系统下即可。
安装前的准备:1、安装libaio包,且版本在0.3.96以上,一般用yum安装即可。
yum -y install libaio2、计算机名要添加进/etc/hosts文件中,否则安装会无法继续。
3、安装过程会为多个账号设置密码,请做好笔记。
4、服务器要能解析域名,至少要能解析后面要设置的邮局域名安装步骤:拷贝安装镜像文件到Linux系统并挂载到一个目录mount -o loop,ro OracleVM-Manager-2.2.0.iso /mntcd /mntsh runInstaller.shPlease enter the choice:1 #选择1,安装Oracle VM ManagerDo you want to install a new database or use an existing one? 1 #选择1,在本地安装一个新的Oracle XE databaseSpecify the HTTP port that will be used for Oracle Application Express [8080]: #默认即可Specify a port that will be used for the database listener [1521]: #默认即可Specify a password to be used for database accounts. #指定一个数据库账号的密码,密码不能含有特殊字符Do you want Oracle Database 10g Express Edition to be started on boot (y/n) [y]: #默认开机自启动Please enter the password for account 'OVS': #输入OVS账号的密码,密码不能含有特殊字符Please enter the password for account 'oc4jadmin': #输入oc4jadmin账号的密码,密码不能含有特殊字符Please enter the keystore password for the Web Service: #输入web服务的keystore密码,密码不能含有特殊字符Do you want to use HTTPS access for Oracle VM Manager (Y|n)?Y #是否使用安装连接访问Oracle VM Manager,选Y,启用Please enter the password for the default account 'admin': #输入默认账号admin的密码,该账号就是用来登陆OVM Manager管理web界面的密码Please enter the outgoing SMTP mail server(e.g. - ,:25): #输入邮局服务器的域名,服务器要能解析域名Please enter an e-mail address for account 'admin': #输入admin的一个邮箱地址至此,安装完毕。
Oracle® VM Manager 安装说明版本2.22010年10月更新这篇安装说明是为了用户能学会安装和使用Oracle VM Manager,并且讲述Oracle VM Manager 安装过程,包括以下部分:索引1 介绍--------------------------------------------------------------------------------------------------------------------22 安装说明书----------------------------------------------------------------------------------------------------------23 安装前的准备-------------------------------------------------------------------------------------------------------3 3.1 硬件要求--------------------------------------------------------------------------------------------------------33.2 软件要求--------------------------------------------------------------------------------------------------------34 安装过程--------------------------------------------------------------------------------------------------------------5 4.1 Oracle VM Sever 的安装------------------------------------------------------------------------------------54.2 Oracle VM Manager 安装-----------------------------------------------------------------------------------65 安装日志--------------------------------------------------------------------------------------------------------------96 创建共享存储------------------------------------------------------------------------------------------------------10 6.1 查看磁盘分区-------------------------------------------------------------------------------------------------10 6.2 为共享磁盘分区---------------------------------------------------------------------------------------------10 6.3格式化磁盘,创建ocfs2文件系统---------------------------------------------------------------------11 6.4创建共享池-----------------------------------------------------------------------------------------------------126.5 设置域名-------------------------------------------------------------------------------------------------------127 设置虚拟机----------------------------------------------------------------------------------------------------------12 7.1 创建服务器池-------------------------------------------------------------------------------------------------12 7.2 装载镜像-------------------------------------------------------------------------------------------------------157.3 创建虚拟机----------------------------------------------------------------------------------------------------178 声明--------------------------------------------------------------------------------------------------------------------191 介绍Oracle VM Manager 是一个管理虚拟服务器的用户界面,它通过WEB浏览器管理虚拟服务器,Oracle VM Manager 提供虚拟机基本管理包括镜像、模板或网络安装虚拟机。
Oracle VM Manager 2.2.1安装部署指南目录1ORACLE VM MANAGER概述 (3)1.1O RACLE VM M ANAGER (3)1.2O RACLE D A TABASE 10G E XPRESS E DITION (O RACLE XE) (3)1.3O RACLE I NSTANT C LIENT (3)1.4O RACLE C ONTAINERS FOR J2EE(OC4J) (3)1.5XML-RPC3.0 (3)2最小硬件和软件需求 (4)2.1硬件需求 (4)2.2软件需求 (4)2.2.1操作系统 (4)2.2.2Web浏览器 (4)2.2.3必备软件包 (4)2.2.4端口 (4)2.2.5安装端口和密码 (5)3安装ORACLE VM MANAGER (6)4使用ORACLE VM MANAGER (9)4.1安装日志 (9)4.2更新O RACLE VM M ANAGER (9)4.3启动和停止O RACLE VM M ANAGER (10)4.4删除O RACLE VM M ANAGER (10)4.5开启或者关闭SSL (10)1 Oracle VM Manager概述Oracle VM Manager安装需要以下组件:1.1 Oracle VM ManagerOracle VM Manager应用程序1.2 Oracle Database 10g Express Edition (Oracle XE)如果是全新安装,Oracle Database 10g Express Edition会自动安装,如果你已经有了Oracle XE数据库,安装脚本会提示你使用现有的数据库实例。
1.3 Oracle Instant Client如果你使用已经存在的数据库,那么Oracle Instant Client将安装在:/opt/ovs-manager-2.2/instantclient-10.2.0.31.4 Oracle Containers for J2EE(oc4J)1.5 XML-RPC 3.0一个Apache XML-RPC 3.0库,2 最小硬件和软件需求2.1 硬件需求项目最小值内存2GBCPU速度 1.83GHz*1交换分区2GB硬盘空间4GB2.2 软件需求在你安装之前,确定你的计算机满足下列最小软件需求。
服务器磁盘分配一般C盘100G装系统、D盘80G放ORACLE基目录和软件位置、E盘剩余空间(最大)放数据库目录。
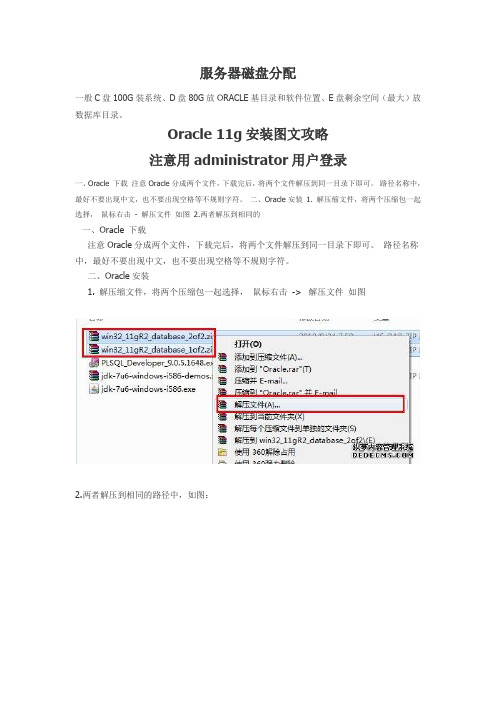
Oracle 11g安装图文攻略注意用administrator用户登录一、Oracle 下载注意Oracle分成两个文件,下载完后,将两个文件解压到同一目录下即可。
路径名称中,最好不要出现中文,也不要出现空格等不规则字符。
二、Oracle安装1. 解压缩文件,将两个压缩包一起选择,鼠标右击- 解压文件如图2.两者解压到相同的一、Oracle 下载注意Oracle分成两个文件,下载完后,将两个文件解压到同一目录下即可。
路径名称中,最好不要出现中文,也不要出现空格等不规则字符。
二、Oracle安装1. 解压缩文件,将两个压缩包一起选择,鼠标右击-> 解压文件如图2.两者解压到相同的路径中,如图:3. 到相应的解压路径上面,找到可执行安装文件【setup.exe 】双击安装。
如图:4. 安装第一步:配置安全更新,这步可将自己的电子邮件地址填写进去(也可以不填写,只是收到一些没什么用的邮件而已)。
取消下面的“我希望通过My Oracle Support接受安全更新(W)”。
如图:5. 安全选项,直接选择默认创建和配置一个数据库(安装完数据库管理软件后,系统会自动创建一个数据库实例)。
如图:6. 系统类,直接选择默认的桌面类就可以了。
(若安装到的电脑是,个人笔记本或个人使用的电脑使用此选项) 服务器类直接点击这里跳转如图:7. 典型安装。
重要步骤。
建议只需要将Oracle基目录更新下,目录路径不要含有中文或其它的特殊字符。
全局数据库名可以默认,且口令密码,必须要牢记。
密码输入时,有提示警告,不符合Oracel建议时不用管。
(因Oracel建议的密码规则比较麻烦,必须是大写字母加小写字母加数字,而且必须是8位以上。
麻烦,可以输入平常自己习惯的短小密码即可) 如图:8. 若输入的口令短小简单,安装时会提示如下。

Oracle 11g安装手册1、在linux的root用户下建立一个oracle用户//添加用户组及用户groupadd dbagroupadd oinstalluseradd oracle -g oinstall -G dbapasswd oracle//新建目录权限mkdir -p /u01chown -R oracle:dba /u01chmod -R 755 /u01安装时步骤8、9会指向此位置(建议:用户更改/opt/oracle11g)2、将Oracle11g安装文件复制到linux中的指定目录下(/home/oracle/tools)cp /光盘目录/linux.x64_11gR2_database_1of2 /home/oracle/tools3、执行目录中的runInstallsu - oracleLANG=zh_CN.gbk4、开始图像界面安装可能需要export DIAPLAY=:1.0xdpyinfo步骤1:将红框中的内容勾选去掉,点击下一步。
提示“未指定电子邮件地址”点击“是”步骤2:点选“创建和配置数据库”此选项也为默认选项,点击下一步。
步骤3:点击选中“服务器类”,点击“下一步”步骤4:点击选中“单实例数据库安装”,点击下一步。
步骤5:点击选中“高级安装”,点击“下一步”步骤6:选择需要的语言,点击“下一步”,此处客户确认是否需要增加其他语言步骤7:点击选中“企业版(4.29GB)”,点击“下一步”点击上图的“选择选项”,勾选需要的组件,此处全部勾选。
步骤8:此处为默认路径,u01的建立参考第1点orcale用户的建立,点击“下一步”步骤9:此处默认即可,点击“下一步”步骤10:点击选中“一般用途/事务处理”,点击“下一步”步骤11:此处默认,点击“下一步”vpmsdbs步骤12:此处可以设置内存、字符集、安全性、示例方案(可根据用户环境调整),点击“下一步”,内存分配建议至少50%步骤13:此处默认,点击“下一步”步骤14:此处默认处理,点击“下一步”步骤15:点击选中“不启用自动备份”,点击“下一步”步骤16:各帐号口令设定,此处统一使用相同口令,客户现场请在同客户确认口令设定规则步骤17:点击“下一步”步骤18:点击“修补并在此检查”,会产生修补文件,按照提示内容执行即可A、切换到root用户,此处为测试环境执行内容如上述步骤执行完成后依旧存在失败内容,请到linux光盘中寻找对应的rpm文件,复制到linux某一目录中,按下图命令执行步骤19:修补完成后,出现如下信息,点击“完成”步骤20:执行安装过程复制文件,创建实例过程完成后信息,点击“确定”完成后,如出现以下内容,请按照操作步骤,执行完成后,完成安装过程配置监听器1、执行su - oraclesh /u01/app/oracle/product/11.2.0/dbhome_1/bin/netca2、点击选中“监听程序配置”,点击“下一步”3、点击选中“添加”,点击“下一步”4、设定监听程序名,点击“下一步”5、选定协议所有协议,点击“下一步”6、设定标准端口号,点击“下一步”7、设定标准TCP/IP SSL端口号,点击“下一步”8、设置IPC键值,点击“下一步”9、提示是否配置另一个监听程序,点“是”,再点击“下一步”配置数据库1、执行sh /u01/app/oracle/product/11.2.0/dbhome_1/bin/dbca2、点击“下一步”3、点选“创建数据库”,点击“下一步”4、点选“一般用途或事物处理”,点击“下一步”5、设定数据库名及SID,点击“下一步”6、配置管理选项,此处暂时用7、设定口令,点击“下一步”8、网络配置,点击“下一步”9、数据库文件所在位置,点击“下一步”,按照实际的文件规划位置10、恢复配置,点击“下一步”11、数据库内容,点击“下一步”12、初始化参数,点击“下一步”13、数据库存储,点击“下一步”14、创建选项,点击“完成”15、概要显示,点击“确定”16、创建进行17、创建完成,点击“退出”环境变量设置及启动1、设置环境变量在服务器上配置环境变量,编辑vi /etc/profile,在末尾加入以下配置export ORACLE_HOME=/u01/app/oracle/product/11.2.0/dbhome_1export PATH=.:$ORACLE_HOME/bin:$PATHexport ORACLE_SID=VPMSDBS (数据库SID)保存并退出vi /etc/oratab最后的N 改成Y(否则dbstart和dbshut命令无效)lsnrctl start (启动oracle监听)提示:The listener supports no servicesThe command completed successfully这样启动后远程连接会造成oracle ORA-12514:TNS:listener does not currently know of service requested in connect descriptor-----方案一-------------------------在listener.ora里面添加了一行SID_LIST_LISTENER =(SID_LIST =(SID_DESC =(GLOBAL_DBNAME = VENDB)(ORACLE_HOME = /opt/oracle11g/app/oracle/product/11.2.0/dbhome_1)(SID_NAME = VENDB)))-----方案二-------------------------linux上面:[oracle@localhost ~]$ netmgr在下图的Listeners->Database Services中配置要监听的SID及ORACLE_HOME,退出保存。
基于 Oracle VM VirtualBox的Windows XP虚拟机安装与配置编辑者:个人宿醉注:安装路径必需是全英文的,装好才显示中文。
要不然装出来是英文的哦。
、如图:2一.安装Oracle VM VirtualBox1、先下载VirtualBox 最新版本:/wiki/Downloads 。
2、清理你的计算机,停止不必要的程序,准备VirtualBox 安装程序。
3、安装。
找到下载的安装程序VirtualBox-4.2.12-84980-Win.exe 如下图:点击进行安装, 选择安装路径:如果中途弹出安装驱动的提示请选择“继续安装”。
二.创建虚拟机1、首先运行VirtualBox,然后单击左上角的“新建”。
双击快捷键2、接下来给虚拟机取名,同时选择要安装的系统版本(注:取的名为系统名时自动识别版本)。
33、接下来就是为虚拟机分配内存的大小。
最小内存为512MB ,本例为1G 。
根据自己的内存而定。
以下保持默认。
4、到这里要选择存放硬盘镜像的位置以及硬盘虚拟空间的大小。
<本例40G>45、点击创建完成。
接下来开始设置。
效果如下图所示。
6、现在对“显示”、“存储”、“共享文件夹”进行设置。
其余的保持默认。
设置显存大小并勾上扩展特性的两项。
(显存大小设置在100左右即可<本例120MB>)6.1.2 添加Windows XP 镜像文件。
图中步骤2是打开文件位置。
5接下来是添加Windows XP镜像文件成功。
6.1.3 设置共享文件夹。
图中步骤2是打开已建好的共享文件夹。
如下图:6.1.4下图为添加共享文件夹成功点击确定。
到这里创建虚拟机完成。
三.设置虚拟机IP拨号,以方便系统装完后,设置系统IP拨号,当然,系统装完后,再弄这步也可以。
右键---设置。
如下图:网络--网卡1--连接方式选(桥接网卡)--高级模式--混杂模式--全部允许--接入网线上打勾如下图:6四.开始安装虚拟机操作系统1、单击左上角的“启动”。
6.安装Oracle 11g客户端双击之后出现如下界面:选择“管理员”选项之后默认安装Configuration assistant(配置助手)安装之后:6.1 Oracle的连接和使用将文件tnsnames.ora复制到安装目录X:\app\Administrator\product\11.1.0\client_1\network\ad min和X:\app\Administrator\product\11.1.0\client_1\network\admi n\sample下注:文件tnsnames.ora的IP需要改成数据库的IPX表示安装的驱动器,Administrator或登录账户如:CAOD:\app\CAO\product\11.1.0\client_1\network\admin\samp le6.2如果没有文件,需要自己在Net Manager进行配置:进入开始→Oracle→配置和移植工具→Net Manager在左侧树形图中选择 Oracle Net配置→本地→服务命名,若没有服务,点击工具条的”+”进行添加,右侧是地址配置,“主机号”填写服务器所在的IP,退出并保存。
6.2运行toad会出现OK,之后还会有一系列的界面,默认处理然后,进入Toad,用户名:SYSTEM 密码:sys左侧是已创建的登录用户,右侧输入用户名和密码,TNS选项卡选择数据库名称,Connect Using选择连接的Oracle ,选择TNSNames Editor对服务进行配置如图:OK,Connect7Oracle 11g 服务器版进入Toad 用户名system 密码:system选项注意TNSNames Editor选oracle服务器,将Connect Using 选为服务器即可Connect,成功登录界面如果连接不上,替换一下D:\app\CAO\product\11.1.0\db_1\NETWORK\ADMIN下的listener文件。
1、检查RapidWiz版本确实为12.1.1.13#cd /data/StageR12/startCD/Disk1/rapidwiz/./rapidwizVersion2、运行rapidwiz命令,启动安装界面3、RapidWiz欢迎界面4、该界面可选择新安装还是升级到12.1.1,此次选择安装12.1.15、该界面用于输入Oracle Support网站用户账号及密码,此次不输入跳过6、该界面可创建安装选项,还是加载已有安装选项文件,此次选新建7、该界面可选择将来ERP系统运行时用到的网络端口,Port Pool是端口偏移量。
此次选默认值08、该界面可选择安装数据库类型,例如Vision Demo演示数据库,还是Fresh空数据库;以及安装到哪个服务器的哪个目录下选择Fresh空数据库定义数据库名为TEST,更改OS User为之前创建的oratest,并设置安装的Base目录为/data/TEST9、点击上图中的Edit Paths可进入该界面,查看或更改Oracle Home或数据文件的安装目录。
此次安装没有更改10、点击Next后安装界面报错11、根据查看安装日志,发现是因为/oracle/TEST目录不存在,因此手工创建/oracle/TEST目录,并分配至oratest用户,同时chmod设置为dba组用户具备读写权限Component Licensing是按模块设置许可。
此次选后者13、该界面是选择具体模块许可。
按项目组要求及软件合同,分别对以下模块安装许可。
14、安装针对中国特有功能15、对软件添加简体中文(Simplified Chinese),考虑未来可能安装其它语种,因此更改数据库字符集(Database character set)为UTF8。
Default territory(默认地区)不要改16、该界面设置应用服务安装到哪个服务器、操作系统用户及安装目录17、点击上图中Edit Paths可查看更改应用服务组件的安装目录,此次无需更改,点击Cancel18、再次确认安装涉及的数据库服务器节点以及应用服务器界节点。
Oracle 11g安装1.解压下载的包,然后进入包内,点击setup.exe开始安装。
2.出现如下:一般把那个小对勾取消,点击下一步进行,弹出下图这个后点‘是’3.下图后,选择创建和配置数据库,点击下一步。
4.下图,选择服务器类,因为桌面类没有高级选项的功能,下一步。
5.下图,选择单实例数据库,下一步6.下图,选择高级安装,下一步7,下图选择语言,如果数据库内没有用到其他的语言,就这样默认的就可以了,下一步8.下图,选择安装版本,用企业版的,下一步更改,不要用这个默认的,删除的时候麻烦。
下面说一下怎么新建一个自定义目录。
新建一个文件夹,取名oracle. 注意:这两个文件夹的名字可以自己定义,但是最好不要用中文名作文件夹的名字,容易出问题。
最好是如下这样的目录结构。
如图,就是这个样子的:11.继续安装,点击‘oracle基目录’后面的那个浏览:12.选择刚新建的d:\myoracle\oracle这个文件夹:如图:好了,不用管下面的那个浏览了,直接点击下一步。
14.下图,选择‘一般用途事务处理’直接点击下一步:两个就使用默认的了。
下一步。
16.下图,就按照默认的来吧,点击下一步。
17.下图,也选择默认,下一步18.下图,还是默认的,点击下一步。
19.下图,直接下一步20.下图,配置口令,如果怕麻烦的话,如果仅仅是做学习用的话,统一口令就行。
如果以后高级了,可以分别设置口令。
这几个用户权限是不同的。
我就用统一口令了,输入了oracle123.。
注意一点:你的这个口令,必须以字母开头,数字开头的话,后面会有很多问题的。
21.22.输入上面那个oracle123后,会弹出如下:在这里要注意了,oracle的密码标准是要字母数字大小写组合的大于八位才行,一般要是仅供学习用的话,不用在意这个。
直接点‘是’就行。
23.下图,检测环境:24.环境检测完后,有的是可以直接点击下一步的,有的会出现如下图:这个时候,一般是下图这样的,那么就应该没多大问题,选择全部忽略,再点击下一步就行了。
Oracle® VM Manager Installation 1.最低硬件和软件需求您的计算机上要安装Oracle VM管理必须满足以下最低系统要求:∙∙1.1硬件要求表1 Oracle VM管理器的硬件要求1.2 软件要求Oracle VM管理器支持下列操作系统:Oracle企业级Linux 4更新5或更高版本红帽企业Linux第4版或更高版本注意:如需更多有关甲骨文公司的企业Linux的信息,请访问下列网站:Web浏览器Oracle VM管理器的用户界面支持以下Web浏览器:∙微软的Internet Explorer 5.5∙微软IE 6.0∙微软的Internet Explorer 7.0∙Mozilla Firefox浏览器1.7∙Mozilla火狐1.0.4的∙Mozilla Firefox 1.5中∙Mozilla Firefox 2.0中∙ 2.x中的Safari(Mac专用)∙Netscape的7.21.2.3 Prerequisite PackagesOracle VM Manager uses Oracle Database 10g Express Edition (Oracle XE) as the management data repository. Oracle XE requires the libaio package be installed. You can find the libaio package on the Oracle Enterprise Linux DVD or ISO file. You must install libaio release 0.3.96 or above.You can check if libaio is already installed on your operating system with the command:# /bin/rpm -q libaio.i386If no information is displayed, libaio is not installed. If it is installed, you may see a message similar to the following:libaio-0.3.106-3.2To install libaio, go to the directory where the libaio.rpm is located, and enter the command:# rpm -ivh libaio-version.i386.rpmTo upgrade libaio, you can use the command:# rpm -Uvh libaio-version.i386.rpm1.2.4 Prerequisite PortsMake sure that ports 8888 and 8899 are available. To verify if these ports are available, enter# netstat -na |grep 8888# netstat -na |grep 8899If the ports are available, no response is given. If these ports are not available, the services that occupy these two ports are displayed and you must release them.To release these port numbers, allow ports 8888 and 8899 through the firewall:1.Enter the following command to configure the firewall:2.# /usr/bin/system-config-securitylevel3.Select Enabled for Security Level.4.Click Customize. In the Other ports field, enter the following text:5.8888:tcp,8899:tcpIf you want to secure Oracle VM Manager using Secure Sockets Layer(SSL), also add the port 4443:8888:tcp,8899:tcp,4443:tcp1.2.5 Installation Ports and PasswordsDuring the Oracle VM Manager installation, you are required to set the following ports and passwords:∙The Oracle XE HTTP port. The default port number is 8080.∙The Oracle XE listening port. The default port number is 1521.∙The password for the Oracle XE SYS and SYSTEM accounts.∙The password for the Oracle VM Manager OVS database schema.∙The password for the OC4J oc4jadmin account.∙The password for the Web Service keystore file.∙The host name of an SMTP server.∙The Email address and password for the Oracle VM Manager admin account.2 Installing Oracle VM ManagerThis section describes the Oracle VM Manager installation process. It includes the following sections:∙Installation Process∙Installing TightVNC for Non-Linux Users∙Installation LogsNote:If you want to install Oracle VM Manager in a virtualized environment, do not install it on Oracle VM Server (dom0) directly; install it into a guest virtual machine running on Oracle VM Server. An Oracle VM Manager template is available for this purpose at /oraclevm. See the Oracle VM Manager template readme document for installation instructions.3.1 Installation ProcessIt takes approximately 5-15 minutes to complete the installation of Oracle VM Manager, depending on the performance of the Oracle VM Manager host, and the installation type you choose. To install Oracle VM Manager:1.Download the Oracle VM Manager software from:/oraclevm2.Log in to the Oracle VM Manager host as the root user.3.You can install Oracle VM Manager from a CDROM drive or from an ISOfile from the hard drive.o To install Oracle VM Manager from a CDROM, burn the Oracle VM Manager ISO file to a CDROM. Insert and mount the Oracle VMManager CDROM using the following commands:o# mkdir mount-pointo# mount /dev/cdrom mount-pointWhere mount-point refers to the directory on which you mountthe ISO file.o To install Oracle VM Manager from a hard drive, locate the folder that contains the ISO file. Mount the ISO file to an existingdirectory using the following commands:o# mkdir mount-pointo# mount -o loop,ro OracleVM-Manager-version.iso mount-point Where mount-point refers to the directory on which you mountthe ISO file. For example:# mkdir /OVMCD# mount -o loop,ro OracleVM-Manager-2.2.0.iso /OVMCDYou can find all the mounted files under the directory /OVMCD.4.Enter the mount point you created in the previous step, for example,/OVMCD and start the installation with the runInstaller script:5.# cd /OVMCD6.# sh runInstaller.shOn the command prompt, enter 1 to install Oracle VM Manager.Please enter the choice: [1|2|3]1. Install Oracle VM Manager2. Uninstall Oracle VM Manager3. Upgrade Oracle VM ManagerThe installation process starts, and the following is displayed:Starting Oracle VM Manager 2.2.0 installation ...7.There are two menus that may appear, one if no Oracle XE installation isfound, and one if an Oracle XE installation is found.o If no Oracle XE installation is found on the computer, you are prompted to install a new database, or use an exiting one on thenetwork:o Do you want to install a new database or use an existing one?[1|2]o 1. Install a new Oracle XE database on localhosto 2. Use an existing Oracle database in my networkThe installation varies on your selection.▪Enter 1 to install Oracle XE, and skip to Step 6.▪Enter 2 to use an existing database on the local areanetwork (LAN).A new schema named OVS is created. If the OVS schemaalready exists, the data in it is deleted. Back up thedatabase if you need to retain the data in the OVS schema.Oracle VM supports Oracle Database 10g Release 2, OracleDatabase 11g, and Oracle XE.When prompted, enter the following information asoutlined in Section 2.2.5, "Installation Ports andPasswords":Please enter the database hostname or ipaddress(Default: hostname):Specify a port that will be used for the databaselistener [1521]Please specify the database SID(Default: orcl)Please enter the password for database account 'SYS':Set default database schema to 'OVS'.Please enter the password for account 'OVS':Confirm the password:Skip to Step 10.o If you already have Oracle XE installed on your computer, you are prompted to choose whether to use the existing database or ainstall a new one:o The installation process detected an existing XE database.Do you want to use it? [1|2|3]o 1. Use existing Oracle XE database on localhosto 2. Remove the Oracle XE database and install a new oneo 3. Use an existing Oracle database in my networkThe installation process varies depending on your selection.Enter 1 to use the existing Oracle XE database on the computer.A new schema named OVS is created. If the OVS schemaalready exists, the data in it is deleted. Back up thedatabase if you need to retain the data in the OVS schema.When prompted, enter the following information asoutlined in Section 2.2.5, "Installation Ports andPasswords":Please enter the port of listener:Please enter the password for database account 'SYS':Set default database schema to 'OVS'.Please enter the password for account 'OVS':Confirm the password:Skip to Step 10.▪Enter 2 to remove the database and install a new one.Enter y when prompted:▪The existing Oracle XE database will be removed. Are you sure to continue?[y|n]▪Enter 3 to use the existing database on the local area network (LAN).A new schema named OVS is created. If the OVS schemaalready exists, the data in it is deleted. Back up thedatabase if you need to retain the data in the OVS schema.You can also select the default tablespace for the OVSschema; the default tablespace is USERS.Oracle VM supports Oracle Database 10g Release 2 and Oracle Database 11g.When prompted, enter the following information asoutlined in Section 2.2.5, "Installation Ports andPasswords":Please enter the database hostname or ipaddress(Default: hostname):Specify a port that will be used for the database listener [1521]Please specify the database SID(Default: orcl)Please enter the password for database account 'SYS': Provisioning Oracle instant client ...Checking the availability of the database ...Set default database schema to 'OVS'.Please enter the password for account 'OVS':Confirm the password:Please enter the default tablespace for userOVS(DEFAULT: USERS):Checking the availability of the tablespacetablespace ...Creating the Oracle VM Manager database schema ...Skip to Step 10.8.Enter the HTTP port and the listener port to be used for Oracle XE. PressEnter to accept the default setting, or enter new port numbers.9.Oracle Database 10g Express Edition Configuration10.-------------------------------------------------11.This will configure on-boot properties of Oracle Database 10gExpress12.Edition. The following questions will determine whether thedatabase should13.be starting upon system boot, the ports it will use, and thepasswords that14.will be used for database accounts. Press <Enter> to accept thedefaults.15.Ctrl-C will abort.16.17.Specify the HTTP port that will be used for Oracle ApplicationExpress [8080]:18.Specify a port that will be used for the database listener [1521]:19.Enter a password to use for the SYS and SYSTEM accounts for OracleXE.20.Specify a password to be used for database accounts. Note that thesame password will be used for SYS and SYSTEM. Oracle recommends the use of different passwords for each database account. This can be done after initial configuration:21.Confirm the password:22.The default setting is to start Oracle XE automatically on boot. PressEnter to enable the default setting, or enter n to start Oracle XEmanually.23.Do you want Oracle Database 10g Express Edition to be started onboot (y/n) [y]:To access the Oracle XE configuration home page, go to:http://127.0.0.1:8080/apex24.Enter a password to use for the OVS account for the Oracle VM Managerdatabase.25.Set default database schema to 'OVS'.26.Please enter the password for account 'OVS':27.Confirm the password:Note:A valid password must comply with the following rules:o The password must begin with an uppercase or lowercase letter.o The password may include the following characters: numbers (such as 1, 2, 3, and so on), letters (from a to z, A to Z), andunderscores (_).Examples of valid passwords: Password01, Password_123, password.28.After the database installation and/or configuration is complete, theinstallation script continues to install the Oracle VM Manager packages and OC4J.29.Installing the ovs-manager package (rpm) ...30.Done31.Installing the oc4j package (rpm) ...32.DoneIf the Oracle VM Manager package and OC4J is already installed, you are prompted to either retain or remove them:The package ovs-manager-version will be removed. Are you sure to continue? [Y|n](default=Y):The package oc4j-10.1.4 will be removed. Are you sure to continue?[Y|n](default=Y):33.Enter a password to use for the oc4jadmin account.34.Please enter the password for account 'oc4jadmin':35.Confirm the password:36.Enter a password to use for the default admin account. This is thedefault account when you first log into Oracle VM Manager.37.Please enter the password for the default account 'admin':38.Confirm the password:39.Enter a password to use for the Web Service keystore file:40.Please enter the keystore password for the Web Service:41.Confirm the password:42.Enter Y to configure SSL (HTTPS), and n to use HTTP:43.Do you want to use HTTPS access for Oracle VM Manager (Y|n)?44.Enter the host name of an SMTP server.45.Configuring SMTP server ...46.Please enter the outgoing mail server (SMTP) hostname:47.Enter the Email address for the admin account.48.Please enter an e-mail address for account 'admin':49.Confirm the e-mail address:A welcome Email is sent to this address. This Email address is used byOracle VM Manager to send new passwords when you use the Forgot Password feature.50.When the installation is complete, a message similar to the following isdisplayed:51.Installation of Oracle VM Manager completed successfully.52.53.To access the Oracle VM Manager version home page go to:54. http[s]://IP_address:port/OVS55.56.To access the Oracle VM Manager web services WSDL page go to:57. http[s]://IP_address:port/OVSWS/LifecycleService.wsdl58. http[s]://IP_address:port/OVSWS/ResourceService.wsdl59. http[s]://IP_address:port/OVSWS/PluginService.wsdl60. http[s]://IP_address:port/OVSWS/ServerPoolService.wsdl61. http[s]://IP_address:port/OVSWS/VirtualMachineService.wsdl62. http[s]://IP_address:port/OVSWS/AdminService.wsdl63.64.To access the Oracle VM Manager help page go to:65. http[s]://IP_address:port/help/helpYou can access the Oracle VM Manager user interface with a web browser using the following URL:http[s]://hostname:port/OVSHere, hostname refers to the host name or IP address of the Oracle VM Manager host, and port is the port on which the Oracle VM Manager process is listening.For example, if the host name is and the port is the standard (no SSL) port, the URL is::8888/OVSIf the host name is and the port is the standard SSL port, the URL is:https://:4443/OVSTo set up an environment to create and manage virtual machines using Oracle VM Manager, see the Oracle VM Manager User's Guide.3.2 Installing TightVNC for Non-Linux UsersTo access virtual machines from within the Oracle VM Manager UI using the Console feature, you must first install TightVNC. The TightVNC Java appletenables non-Linux users to connect to a virtual machine's console. TightVNC must be installed on the Oracle VM Manager host. You can get the latest TightVNC package from:/oraclevm/manager/RPMS/Install TightVNC with the command:# rpm -ivh tightvnc-java-version.noarch.rpmNote:If you are using Mozilla Firefox on Linux to log in to a virtual machine's console, you also need to install the Oracle VM Manager console plug in (ovm-console) on your computer. See the Oracle VM Manager User's Guide for information on how to install the plug in.3.3 Installation LogsIf any errors occur during installation, check the Oracle VM Manager log files in the directory:/var/log/ovm-managerThe following log files are located in this directory:Table 2 Installation Log Files4 Oracle VM Manager 配置和管理4.1Preparing External Storage and Storage Repositories 准备存储仓库。