高清数字电视一体机说明书
- 格式:pdf
- 大小:6.39 MB
- 文档页数:20
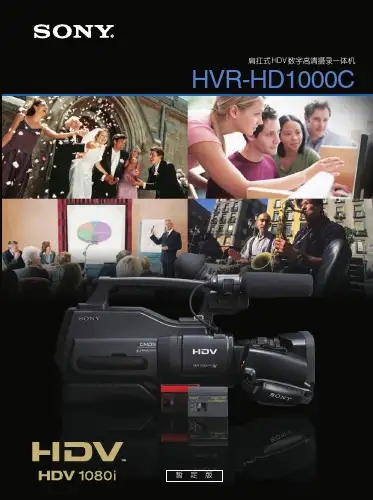
高清晰度数字摄录一体机 HVR-Z1C© 2005 Sony Corporation2-514-607-64(1)高清晰度数字摄录一体机HVR-Z1C使用说明书操作本摄像机之前,请先通读本手册,并妥善保存以备今后参考。
请首先阅读本手册警告为防止燃烧或电击危险,切勿将本摄像机暴露在雨中或受潮。
为避免触电,切勿打开机壳。
只能由专业人员进行维修。
b须知如果静电或电磁场导致数据传送失败,请重新启动应用软件或拔下i.LINK电缆后再将其插入。
对于欧洲的用户注意指定频率的电磁场可能会影响本机的图像和声音。
本产品经测试符合EMC规格中的有关使用短于3米的连接用电缆的限制。
2关于使用注意事项摄像机能够以HDV、DVCAM和DV格式进行拍摄。
当以HDV/DV格式进行拍摄时,建议使用小型DV 卡带。
当以DVCAM格式进行拍摄时,建议使用小型DVCAM卡带。
摄像机与Cassette Memory功能不兼容。
HDV标准•数码高清晰(HD)视频信号被录制到DV格式的卡式录像带上,并进行播放。
•HDV信号以MPEG2格式压缩,MPEG2格式在BS(广播卫星)数码、陆地数码HDTV广播和Blu-ray 光碟录像机情况下采用。
z提示•摄像机在HDV标准内采用HDV1080i规格,利用1080有效扫描线路,并以约25 Mbps的图像比特率拍摄图像。
i.LINK接口作为能够将电视机和与HDV格式兼容的个人计算机进行数字连接的数字接口使用。
摄影•开始拍摄之前,请先进行拍摄功能测试,以确保所录下的图像和声音没有任何问题。
•即使因摄像机、储存媒体等故障而造成无法拍摄或播放,对于所拍摄的内容将不予赔偿。
•电视机彩色制式视国家/地区而异。
若要在电视机上观看所拍摄的内容,您需要有基于PAL制式的电视机。
•电视节目、电影、录像带和其它资料可能受到版权保护。
未经授权拍摄这类资料可能违反版权法。
LCD面板、取景器和镜头•LCD显示屏和取景器是采用超高精密技术制造,因此超过99.99%的像素能有效使用。


高清音视频一体机用户手册请仔细阅读本手册,并严格按要求执行推荐您保存本手册,以便将来查阅目录产品说明 (2)注意事项 (2)主要特性和功能 (3)1.高清音视频一体机配件 (3)2.高清音视频一体机功能与特性 (3)产品外观及功能 (4)1.高清音视频一体机正面 (4)2.高清音视频一体机背面 (7)3.高清音视频一体机底部 (7)4.分布式无线麦克风拾音器 (8)5.充电盘 (9)6.遥控器 (9)操作指南 (11)1.高清音视频一体机的连接 (11)2.视频使用指南 (11)3.音频使用指南 (15)技术指标 (16)安装说明 (18)1.桌面安装 (18)2.支架安装 (19)3.墙壁支架安装 (19)常见故障解决 (20)版权声明 (20)产品保修卡 (21)保修条例 (22)1产品说明1)高清音视频一体机内置高清摄像头、高保真扬声器,根据用户选择,可配备多达3个独立无线分布式麦克风拾音器,可帮助用户解决大会议场景下的视频和远距离拾音问题。
2)无线分布式麦克风拾音器内置锂电池,最长可实现8小时连续拾音,并配备接触式充电盘,置于充电盘上即可充电,1小时可充满。
3)无线分布式麦克风拾音器通过2.4G与视频主机相连,可实现10米的远距离稳定传输。
4)音频部分采用国际一流的回声抵消技术、消噪技术、啸叫抑制技术、动态噪音抑制技术,能够在较复杂的环境下使用。
5)视频部分,提供全高清画质图像,最高支持1920x1080分辨率,支持YUY2、MJPEG和H.264编码输出,支持OSD菜单设置,并提供EPTZ的控制和独特的画中画功能。
注意事项1)在安装和使用高清音视频一体机前,请仔细阅读本说明书。
2)在运输、存储、安装及使用过程中要防止重压、剧烈震动、浸泡等对产品造成的损坏。
3)使用高清音视频一体机时,请放置于具有足够承受力的位置,对各个组件要轻拿轻放,避免用手直接触摸摄像机镜头,以免有手印造成镜头模糊。


高清电视机使用说明书使用说明书尊敬的用户:欢迎您购买我们的高清电视机。
为了您能更好地使用并享受高清电视机带来的优质视听体验,我们特别准备了本使用说明书。
在使用前,请仔细阅读本手册,并按照说明进行正确操作。
祝您使用愉快!一、外观及配件1. 电视机外观高清电视机外观精致简约,采用先进的工艺和材料制造而成。
包含主机、遥控器、电源线等配件。
2. 遥控器高清电视机配备一款功能齐全的遥控器,便于用户远距离操作。
遥控器上设有操作按钮及功能键,能够满足您对电视机的各种需求。
二、接口及线缆连接1. 电源线连接将电源线的一端插入电源插座,将另一端插入电视机背部的电源接口。
确保电源线连接牢固且没有松动。
2. 信号线连接高清电视机支持多种信号源输入,如HDMI、USB、AV、VGA 等。
根据需要,使用相应的线缆将外部设备与电视机连接,并确保连接稳定。
三、开机与设置1. 开机操作按下遥控器上的电源按钮,电视机即可开机。
您也可以直接在电视机主机上找到电源按钮并按下。
2. 初始设置首次使用高清电视机时,系统将自动进行初始设置。
按照屏幕提示进行操作,完成相关设置,包括语言选择、时区设置、电视频道搜索等。
四、基本操作1. 频道切换按下遥控器上的“频道+”和“频道-”按钮可以切换不同的电视频道。
2. 音量调节按下遥控器上的“音量+”和“音量-”按钮可以调整高清电视机的音量大小。
3. 输入源选择按下遥控器上的“输入源”按钮,可以选择电视机的输入源。
您可以根据需要切换到HDMI、USB或其他信号源。
五、高级功能1. 高清画质调节高清电视机拥有多种图像调节功能,如亮度、对比度、色彩等。
您可以通过遥控器上的相关按钮进行调整,以获得更佳的视觉效果。
2. 音效设置高清电视机支持多种音效模式,如标准、音乐、电影等。
您可以在遥控器上选择不同的音效模式,以获得更逼真的音效效果。
3. 多媒体播放高清电视机支持播放多种媒体格式的文件,包括图片、音乐和视频。
海信电视说明书LED46XT710G3D-LED55XT710G3D说明书LED42XT710G3DLED46XT710G3DLED55XT710G3D产品使用指南请在使用本机之前仔细阅读并妥善保管I尊敬的用户朋友您好感谢您购买海信产品相信这一全新产品会给您带来无限欢乐。
在使用本产品前请您认真阅读产品使用指南并妥善保管。
因违反本手册中的安全注意事项及使用说明事项而导致的事故本公司不承担任何责任。
海信集团全国统一客服热线海信集团服务质量监督电话-83091111本产品内有高压用户不得擅自打开机壳。
非维修人员不得擅自修理和换件以免发生触电和火灾事故。
用干净、柔软的棉布对整机进行清洁维护禁止反复用力擦拭。
禁止用硬物划刻、敲打、撞击或用各种研磨类物品摩擦显示屏。
本产品在安放、使用时应避免受到水滴、水溅。
遇到雷雨等不良天气应迅速拔下电源插头及有线电视或室外天线插头以免发生雷击损坏事故。
本机为II类设备不需要接地使用。
注意事项静止图像可能会导致电视屏幕永久性损坏。
1.不要在液晶电视屏幕上显示静止图像超过2小时因为这样会导致出现屏幕图像残影为避免此问题请您在显示静止图像时降低屏幕的亮度和对比度。
2.长时间观看4:3格式的节目时在屏幕的左、右两侧和图像的边缘会留下不同的痕迹所以请您不要长时间使用此模式。
3.显示电子游戏和电脑静止图像的时间过长可能会导致局部余像出现因荧光屏灼伤而造成的屏幕图像残影所以请您在使用时适当降低亮度和对比度。
上述原因导致的电视机屏幕出现图像残影、局部余像、痕迹问题显示屏不在保修范围之内。
节能提示在不观看电视节目时请选择交流关机通过电源开关关机以减少能耗。
2.在不影响观看质量的前提下可降低显示屏的亮度以减少电视机在使用过程中的能耗。
符号说明带闪电箭头的三角形图案为警告符号提醒您注意产品内的电压有危险。
√表示正确的做法。
带惊叹号的三角形图案为警告符号提醒您注意与产品有关的重要说明。
×表示错误的做法。
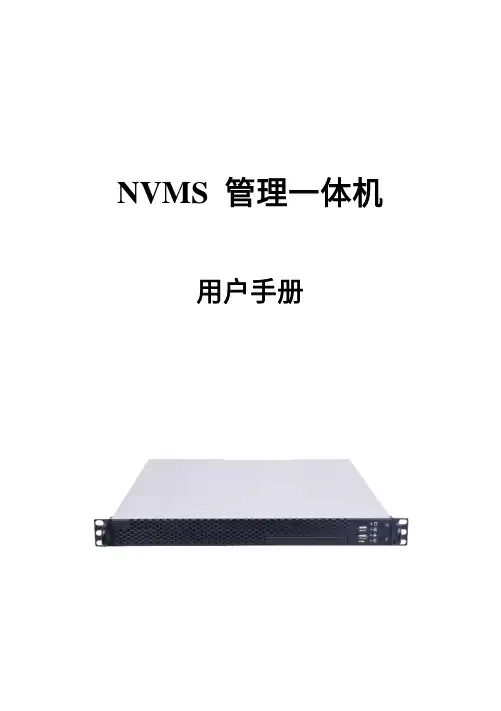
NVMS 管理一体机用户手册1 简介1.1 前面接口及指示灯说明以下图标仅供参考,具体接口及指示灯请参照实物。
电源开关硬盘指示灯;绿灯闪烁表示硬盘有读写//复位按键电源指示灯USB 接口网络连接指示灯,绿色灯亮表示网络连接正常;绿灯闪烁表示有数据传输1.2 后背板接口说明序号 说明序号 说明1 鼠标或键盘接口 9 音频输入(橙色)2 VGA 接口 10 后置扬声器(黑色)3 DVI 接口 11 光纤数字音频输出4 HDMI 接口12 音频输入(浅蓝色) 5 RJ-45 网络接口(LAN1) 13 前置扬声器(绿黄色) 6 USB3.0 接口(1~2) 14 耳机孔(粉色)7 RJ-45 网络接口(LAN2) 15 RJ-45 网络接口(LAN3) 8USB3.0 接口(3~4)16RJ-45 网络接口(LAN4)2 登录及网络配置启动服务器,启动前请确保电源,网线,显示器等均连接无误。
系统启动完毕后,屏幕上会显示如下登录框。
默认用户名:admin; 默认密码:123456勾选“记住密码”,下次登录可以不用输入密码直接登录。
勾选“自动登录”,下次启动服务器时可自动登录进入。
若忘记登录密码,可点击【重置密码】,确认服务器IP和配置服务器端口是正确的情况下,通过回答密保问题重置密码。
首次登录后,用户可对超级管理员进行密保设置以方便找回密码,具体设置请参见说明书用户管理章节。
●网络配置登录设备后,进入本地配置→网络配置界面,根据实际网络,配置设备网络参数。
在此界面用户可自行配置网络参数。
我们推荐设置勾选组IP(设置后4网口以自适应负载均衡模式自动绑定使用),同时出厂也是默认勾选。
主界面介绍客户端主界面主要分五个部分,各部分说明如下表:区域说明区域说明1 菜单栏 4 状态栏2 标签栏(显示已启动的功能页面) 5 报警信息栏3 功能区;点击显示更多菜单3 设备管理3.1添加编码设备在主界面,点击“设备管理”菜单,进入设备管理界面,如下图所示:点击【添加】按钮,如下图所示:用户可通过快速添加、手动添加以及主动上报等方式添加监控设备(例如:普通IPC/NVR/DVR,人脸IPC/人脸NVR,人脸平板,警戒IPC,车牌识别IPC等)。
电视产品说明书一步步教你如何设置和使用高清智能电视高清智能电视产品说明书一、简介高清智能电视是一种结合了高清画质和智能功能的电视产品,以其出色的视觉效果和多样的功能而备受消费者青睐。
本说明书将一步步为您介绍如何设置和使用高清智能电视,让您充分享受其带来的精彩体验。
二、设置步骤1. 连接电源在使用高清智能电视之前,请确保电视与电源连接正常。
将电视的电源线插入配备的电源插座中,并确保电源插座正常供电。
2. 连接天线或有线电视线若您使用的是天线信号接收电视节目,可使用天线线缆将天线与电视连接。
若您使用的是有线电视信号,可使用有线电视线缆将电视与有线电视线连接。
确保连接牢固后,可进行下一步设置。
3. 连接外部设备若您希望连接其他外部设备(如DVD播放器、游戏机等)至高清智能电视,请按照外部设备的使用说明书进行连接。
常见的连接方式包括HDMI、AV、USB等。
4. 开机设置将电视机顶部或遥控器上的电源按钮按下,等待电视启动。
按照屏幕上的引导进行基本设置,包括语言选择、地区选择、网络连接等。
确保网络连接成功后,您即可开始使用高清智能电视的各项功能。
三、使用方法1. 频道切换通过遥控器上的“频道+”和“频道-”按钮,您可以轻松切换不同的电视频道。
您还可以通过输入数字键直接定位到相应频道。
2. 音量调节通过遥控器上的音量加减按钮,您可以方便地调节电视的音量大小。
也可以将电视静音,并通过音量加减按钮调整到您所需的音量。
3. 菜单导航高清智能电视上往往配备了智能菜单导航功能,您可以通过遥控器上的导航键来浏览和选择不同的菜单选项。
智能菜单通常包括电视节目、应用商店、设置等选项。
4. 应用下载和使用通过智能电视上的应用商店,您可以下载并安装各种应用程序,如视频播放器、音乐播放器、游戏等。
安装后,您可以直接在电视上打开这些应用程序,并进行相关操作。
5. 媒体播放高清智能电视通常支持播放各种媒体文件,如视频、音频和图片。
您可以通过USB接口将存储媒体文件的设备连接至电视,然后通过电视上的媒体浏览器进行选择和播放。
长虹umax智能电视使用说明简介umax客厅电视是长虹采用umax观影技术生产的大尺寸(46英寸及以上)、超高清分辨率(3840*2160)电视,与imax巨幕电影相似,umax客厅电视能为用户提供更清晰的画面、更逼真的场景、更舒适专业的观影体验。
特性采用umax观影技术的长虹umax客厅电视,拥有6大核心特性: 1、65吋皇帝位长虹65英寸umax客厅电视每个像素大小与imax影院每个像素大小与是10倍的关系; imax等比例缩放十倍为长虹65英寸umax客厅电视。
影院皇帝位是从银幕起到放映窗口止的2/3截点周围区域,是整个影厅声音与画面结合得最好的区域。
在客厅放置长虹65英寸大屏巨幕,其最大仰视角保持在40°至45°之间,不但视效最好,音效效也最好,达到imax影院皇帝位的观看效果。
2、4k*2k无损超高清通过芯片解码4k*2k的节目源,有效处理内部信号,实现全程无损传送,真正达到8倍超高清的视觉冲击。
同时,即使观看的是2k*1k的节目源,长虹umax客厅电视也将按照4k*2k的信号传送方式进行处理,实现图象效果的最大化。
3、点阵式近距护眼长虹umax客厅电视为了呈现完美的视觉效果,采用专有的点阵式动态光控技术,背光亮度与画面对比度将随着画面的变化自动进行补偿处理,使得色彩更真实、画面更有层次感,同时改进了传统电视画面刺眼和层次感差的缺陷,实现更低能耗、护眼的作用。
4、极速光影驱动长虹umax客厅电视采用长虹最新的动态图像运动补偿技术,针对4k*2k信号和2k*1k 信号将分别采用动态优化方案,可以有效消除运动抖动和拖尾,增强清晰度,使得画面观看时更流畅、更清晰。
5、超高清蓝光解码长虹umax系列电视采用超高清蓝光解码技术,令屏幕分辨率的横向高达3840个像素、纵向2160个像素,总像素超过800万,颠覆了之前一致认可的720p、1080p标准,清晰度可以达到720p高清的9倍,完全带来身临其境的视觉观感体验。
ES-G1627E9-1Quick Start GuideHelp Hisense improve the environment by reducing paper waste.For detailed instructions and feature descriptions, access the full User Manual online.© 2016 Hisense Company Ltd. All Rights Reserved.All material in this Quick Start Guide is the property of Hisense Company Ltd. and its subsidiaries, and is protected under US, CANADA, MEXICO and International copyright and/or other intellectual property laws. Reproduction or transmission of the materials, in whole or in part, in any manner, electronic, print, or otherwise, without the prior written consent of Hisense Company Ltd. is a violation of Hisense Company Ltd. rights under the aforementioned laws.No part of this publication may be stored, reproduced, transmitted or distributed, in whole or in part, in any manner, electronic or otherwise, whether or not for a charge or other or no consideration, without the prior written permission of Hisense Company Ltd. Requests for permission to store, reproduce, transmit or distribute materials may be made to one of the following addresses:USA:Hisense USA CorporationPO Box 3289Suwanee, GA 30024CANADA: Hisense Canada Co., Ltd,405 Britannia Rd E., Suite 11Mississauga, Ontario,L4Z 3E6MEXICO: Hisense Mexico S de RL de CVBoulevard Miguel de Cervantes Saavedra No. 301, Torre Norte, Piso 2,Colonia Ampliación Granada, C.P. 11520, en México Distrito Federal.Hisense, and any and all other Hisense product names, logo’s, slogans or marks are registered trademarks of Hisense Company Ltd. and its subsidiaries. All other trademarks are the property of their respective holders.1Multiple Connection Methods• Built-in wireless connection• 2 USB Connectors (1 USB 2.0 Connectors and 1 USB 3.0 Connector)• 4 HDMI Connectors (2 HDMI 1.4 Connectors and 2 HDMI 2.0 Connectors)• 1 LAN (Ethernet) portHigh-Quality Picture and Sound• Vibrant contrast and brightness to display images accurately• Crisp sound and powerful TV speaker output due to dbx-tv® technology• 4K technology that supports 4K online streaming, 4K USB content, HDMI 2.0 devices and much more to maximize your entertainment experience • HDR processingSmart LED TV with Popular Features• Ultra-fast access to launch Netflix®• Numerous built-in social media, gaming and movie apps • Thousands of movie titles and streaming content to view • AirBridge technology to share content between the TV and your mobile device• Hisense-developed HiMedia Player to play back digital content that's stored on your USB drive or in a Cloud account• Many other cool featuresEasy Setup Menu and Simple Design• Short and easy-to-follow first-time setup menu• Simple user interface (UI) design to navigate the TV screens • Descriptive features to help make your selectionsWELCOME TO THE HISENSE FAMILY!Congratulations on the purchase of your new Hisense 4K Ultra High-Definition Smart TV! This Quick Start Guide will walk you through a few easy steps to set up your TV.Because we value your business, we want to keep you in the know of 'all things Hisense'. Using your mobile phone, scan the Registration page QR code to register your TV. Depending on the make and model of your phone, you may need to download a QR code scanning app.http://www.hisense-canada. com/support/ http://www.hisense- /support/ productReg.asp.mx/support/Disclaimer: This Quick Start Guide is intended as a general guideline to help you set up your Hisense TV. Images throughout this document are for illustrative purposes only and may differ from the actual product.23Packaged contentsYour package in which you purchased your new TV contains the following items: 2 AAA batteries2 legs that forms the TV stand4K UHD Smart TV Quick Start Guide Important Safety Information and Warranty Card leaflet 4 screws (ST4×16) Power CordRemote Control IMPORTANT:To prevent accidentally discarding items that came with your TV, be sure to check ALL of the foam in the carton box.Required tools and devicesWireless router (not included) for Internet connectivity Phillips screwdriver (not included) to secure the TV standHDMI and other types of cables (not included) to connect external devices to the TV Wall mount bracket (not included) if you prefer to mount the TV to the wall· Please check foam for accessories before discarding.· Veuillez vérifier la mousse pour qu'il n'y ait pas d'accessoires avant de la jeter. · Antes de desechar la espuma, asegúrese de retirar todos los accesorios.Buttons and Ports on the 4K UHD Smart TV4STEP 1. Attach the TV stand or wall mount bracket (not included)Attach the TV Stand (For steps to attach the wall mount see page 6)CAUTION:Be sure to disconnect the A/C power cord before installing a stand or Wall-Mount brackets.The LED display is very fragile and must be protected at all times when installing the legs that form the stand. Be sure to protect the TV screen from getting scratched or damaged by any hard objects. In addition, DO NOT exert pressure on the front of the TV at any time because it could crack.To attach the left and right leg that forms the stand:1.Carefully place your TV face down on a soft, flat surface to prevent damage to the TV or scratching to the screen.2.Remove the 2 legs from the foam and then insert the legs into the bottom slots of the TV.e the screws that came inside the carton with your TV to secure each leg tightly.56Attach the Wall Mount Bracket (not included)Before you begin the third-party manufacturer instructions, be sure to do the following things:1. Place the TV face down on a clean, safe and cushioned surface.2. Remove the TV stand if you already attached it.3. Place the spacers (not included) in the corresponding bracket holes.CAUTION:• When you attach the mount, be sure to use the spacers (provided by the third-party manufacturer) between the TV and the bracket.• To prevent internal damage to the TV and ensure it is mounted securely, be sure to use fixing screws (not provided) that are 9.5 - 11.5 mm in length when measured from the attaching surface of the mounting hook.Follow instructions provided with the Wall mount bracket.To complete the installation, please contact the wall-mount manufacturer or the retailer from which you purchased the TV.The selected screws are 9.5 - 11.5 mm in length when measured from the attaching surface of the rear cover. The diameter and length of the screws differ depending on the Wallmount bracket model.NOTE: The diameter and length of the screws differ depending on the wall mount bracket model.STEP 2. Connect devices to your TVCheck to ensure that you have selected the right cables for the ports and that they are connected securely. Loose connections can affect the quality of the picture image and color.TV label Port Cable External Equipment Brief DescriptionANT/CABLEAntenna VHF/UHF AntennaANT OUTConnect an outdoor VHF/UHF antenna.HDMIDVD Player/RecorderSet-top Box Satellite Receiver Satellite antenna cableVCRVideoCamera This 4K TV has two different software versions of HDMI ports to connect HDMI-enabled devices. The two high-powered HDMI version 2.0(HDMI 3, HDMI 4) inputs enable you to connect 4K Ultra-HD external devices that require more bandwidth to transmit to the TV screen. For example, if you have an X-box or Blu-ray player that supports the 2.0 standard. The two HDMI version 1.4 inputs are great for any of your external devices that support a standard full high-definition resolution of 1080p.COMPO-NENT IN YGreenConnect a component video cable and left-rightaudio cables from an external AV device.P BBlueP RRedLWhiteRRedAV IN VIDEOYellowConnect a composite video cable and left-rightaudio cables from an external AV device.LWhiteRRed7Infrared transmitterPower on / offEnter Channels / input numbersMedia content control function buttonsDash buttonSelect a digital sub-channel D-pad (up/down/left/rightnavigation buttons)Volume (up/down)Adjust Sleep timer settingQuick Setup menu Return to the previous place in the menu or appLive TVChange TV input sourceAll AppsChannel (up/down)Mute and restore sound Exit the applicationTurn Closed Caption On/OffSpecial function buttons Confirmation buttonQuick access buttons to appsDisplay the Home screen Buttons on your TV remoteSTEP 3. Begin using your remote1. Slide the back cover to open the battery compartment of the remote control.2. Insert two AAA size batteries. Make sure to match the (+) and (-) ends of the batteries with the (+) and ( - ) ends indicated in the battery compartment.3. Replace the battery compartment cover.Important Information about the remote and batteries:• Discard batteries in a designated disposal area. Do not throw them into a fire.• Remove old batteries immediately to prevent them from leaking into the battery compartment.• If you do not intend to use the remote control for a long time, then remove the batteries.• Battery chemicals can cause a rash. If the batteries leak, clean the battery compartment with a cloth. If chemicals touch your skin then wash it immediately.• Do not mix old and new batteries.• Do not mix alkaline, standard (carbon-zinc) or rechargeable (NiCd, NiMH, etc.) batteries.• Do not continue using the remote if it gets warm or hot.Call our Support Center immediately on the Hisense support website.Insert the batteriesGently push and slide Gently push and slideRemote Control Range InformationThe remote control can work at a distance of up to 26 feet in front of the TV set.It can work at a 30 degree horizontal or vertical angle.Program Your Universal Cable or Satellite Remote Control to Operate Your New Hisense Television (only for USA)If you would like to program your other household remote controls to your new Hisense television,please refer to the User's Manual supplied by your Cable or Satellite provider. The Cable or Satellite providers' User's Manuals should include instructions on how to program their remote to your television.A list of Hisense codes for the most common Cable and Satellite providers are listed below. Use the Hisense code that is associated with your Cable or Satellite provider (if applicable).DIRECTV ......0178, 10178, 10019, 10748, 11314, 11660, 11710, 11780, 12049, 10171, 11204, 11326, 11517, 11564, 11641, 11963, 12002, 12183Time Warner Cable ......386, 0178, 10178, 400, 450, 461, 456, 0748, 1463, 0463, 10463Comcast ......0178, 10178, 10463, 11463, 10748, 11314, 11660, 10171, 11204, 11326, 11517, 11641, 11780, 11785, 11892, 11963, 12002Cox Communications ......0178, 10178, 1326, 1463Dish Network ......505, 627, 538, 720, 659If the Hisense code associated with your Cable or Satellite provider is not listed, does not work or you cannot locate the instructions to program your remote, call your local Cable orSTEP 4. Power on the TVPlug the power cord into a power outlet.Satellite provider's customer service center.If your Cable or Satellite provider does not have a Hisense codeavailable, please contact us at one of the phone numbers on Page 2.Using Your Cable Set-top Box or Satellite Receiver Remote as a ‘Universal’ RemoteIf you prefer to use your Cable Set-top Box or Satellite Receiver Remote as a ‘Universal Remote’, then visit the Support page to view a list of the codes.STEP 5. Complete the first-time setup menuAfter the splash screen that shows the Hisense logo appears, begin the first-time setup menu.Press the Power buttonFirst-Time Setup Menu begins by prompting you to choose your Language , Country , and Time Zone.CONGRATULATIONS! Your TV is now ready to use.Press the OK confirmation button on your remote if you are fine with the selections that appear on the screen. Otherwise, navigate to the back arrow on the screen to change your selection.STEP 6. Begin to enjoy your TVYour Smart TV is easy to use and brag-worthy!Now that you’ve completed the first-time setup menu, the Home screen is your starting point for navigating the TV. Gone are the days where your TV only provides one way for you to be entertained. This showpiece provides you the convenience of watching a program on a live channel, accessing Video on Demand to watch a movie and many other entertainment options. Using your remote, press the Home button to begin enjoying your TV.Disclaimer:Subscriptions or other payments may be required to access content through some applications. Some or all of the included or downloaded application services in this Hisense device may not function depending on the Internet connection, local limitations of included applications or other reasons outside of Hisense’s control. HISENSE EXPRESSLY DISCLAIMS RESPONSIBILITY FOR ANY APPLICATION SERVICE FROM FUNCTIONING AT ANY TIME, FOR CONTENT IN ANY APPLICATION SERVICE, FOR DISRUPTIONS OF SERVICE, LOCAL OR REGIONAL LIMITATIONS, WARRANTIES OF TITLE, NO INFRINGEMENT, AND FOR IMPLIED WARRANTIES OF MERCHANTABILITY OR FITNESS FOR A PARTICULAR PURPOSE. By purchasing this device, you accept such Disclaimer without any claim on Hisense at any time.PRODUCT SPECIFICATIONS''+'' would be replaced by any number, letter or blank.Disclaimer: All product, product specifications, and data are subject to change without notice to improve reliability, function, design or otherwise.QUICK PROBLEM-SOLVING TIPSWhen you experience an issue with your TV, turn it off and on again. If this does not resolve the problem, then refer to the tips below. IfCertification and ComplianceFCC NoticeThis device has been tested and found to comply with the limits for a Class B digital device pursuant to Part 15 of the FCC Rules. These limits are designed to provide reasonable protection against harmful interference in a residential installation. This device generates, uses, and can radiate radio frequency energy and, if not installed and used in accordance with the instructions, may cause harmful interference to radio communications. However, there is no guarantee that interference will not occur in a particular installation. If this device does cause harmful interference to radio or television reception, which can be determined by turning the device off and on, the user is encouraged to try to correct the interference by one or more of the following measures:Reorient or relocate the receiving antenna.Increase the separation between the device and receiver.Connect the device into an outlet on a circuit different from that to which the receiver is connected.Consult the dealer or an experienced radio/TV technician for help.NOTE: The manufacturer is not responsible for any radio or TV interference caused by unauthorized modifications to this equipment. Such modifications could void the user’s authority to operate the equipment.The Wi-Fi Module complies with FCC radiation exposure limits set forth for an uncontrolled environment. This device should be installed and operated with a minimum distance of 20 centimeters between the radiator and your body.Manufactured under license from Dolby Laboratories. Dolby, DolbyAudio, and the double-D symbol are trademarks of Dolby Laboratories.The terms HDMI and HDMI High-Definition MultimediaInterface, and the HDMI Logo are trademarks or registered trademarks of HDMI Licensing LLC in the United States and othercountries.©2016. All rights reserved. Hisense and the Hisense logo are registered trademarks of Hisense. Other brand and product names are registered trademarks of their respective owners.This TV includes dbx-tv Technology. dbx-tv is a trademarkor registered trademark of THAT Corporation.。