LCD规格书天马
- 格式:pdf
- 大小:444.99 KB
- 文档页数:23
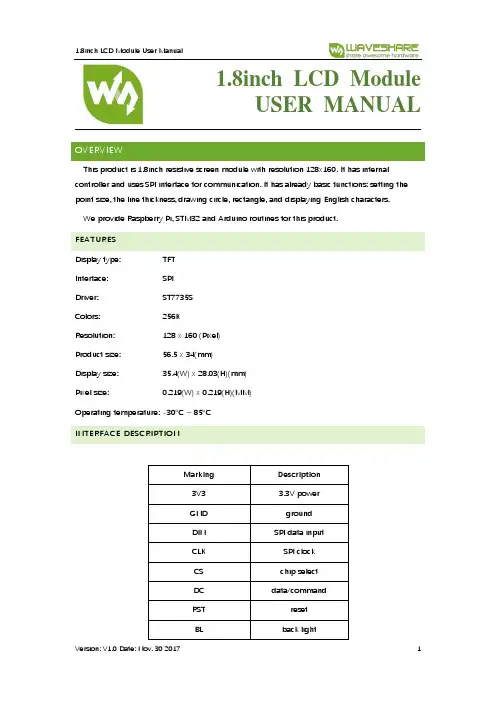
1.8inch LCD ModuleUSER MANUALOVERVIEWThis product is 1.8inch resistive screen module with resolution 128x160. It has internal controller and uses SPI interface for communication. It has already basic functions: setting the point size, the line thickness, drawing circle, rectangle, and displaying English characters.We provide Raspberry Pi, STM32 and Arduino routines for this product.FEATURESDisplay type: TFTInterface: SPIDriver: ST7735SColors: 256KResolution: 128 x 160 (Pixel)Product size: 56.5 x 34(mm)Display size: 35.4(W) x 28.03(H)(mm)Pixel size: 0.219(W) x 0.219(H)(MM)Operating temperature: -30°C ~ 85°CINTERFACE DESCRIPTIONMarking Description3V3 3.3V powerGND groundDIN SPI data inputCLK SPI clockCS chip selectDC data/commandRST resetBL back lightPROGRAM ANALYSIS1.Working principles:ST7735S is 132 x 162 pixels LCD panel, but the product is 128 x 160 pixels LCD display.In the display there are two processes: the horizontal direction scanning – from the 2nd pixel, the vertical direction scanning – from the 1st pixel. So, you can see that positions of pixels in RAM correspond to their actual positions while displaying.The LCD supports 12-bit, 16-bit and 18-bit per pixel input formats. They correspond to RGB444, RGB565 and RGB666 color formats. This routine uses the RGB565 color format, which is commonly used.LCD uses 4-wired SPI communication interface, which can save a lot of GPIO ports and provides fast data transfer to LCD as well.munication protocolNote: there is a difference from traditional SPI. Here we only need display, so sine wires come from slave to host are hidden. The detailed information please refer to datasheet at page 58RESX: Reset. Pull-down while powering on the module. Generally set as 1IM2: data communication mode pin, which define usage of SPICSX: chip selection control pin. If CS=0 – the chip is selectedD/CX: data/command control pin, if DC=0 – command is written, otherwise – data are writtenSDA: transmitted RGB dataSCL: SPI clockThe SPI communication protocol of the data transmission uses control bits: clock phase (CPHA) and clock polarity (CPOL):The value of CPOL determines the level when the serial synchronous clock is in idle state. CPOL=0, that its idle level is 0.The value of CPHA determines the timing of the data bits relative to the clock pulses. CPHA=0, data is sampled at the first clock pulse edge.The combination of these two parameters provides 4 modes of SPI data transmission. The commonly used is SPI0 mode, it is that GPOL=0 and CPHA=0.From the figure above, SCLK begins to transfer data at the first falling edge. 8 bits data are transferred at one clock period. Use SPI0 mode, High bits transfer first, and LOW bits following. DEMO CODERaspberry Pi, STM32 and Arduino programs are provided, wherein Raspberry Pi provides BCM2835, WiringPi and python programs. It implements common graphical functions as drawing dot, line, rectangle, circle, setting their sizes and line with; filling arias, and displaying English characters of 5 common fonts and other display’s functions.Following instructions are offered for you convenienceRASPBERRY1.Hardware connection1.8inch LCD module Raspberry Pi3.3V 3.3VGND GNDDIN MOSI (PIN 19)CLK SCLK (PIN23)CS CE0 (PIN 8)DC GPIO.6 (PIN 22)RST GPIO.2 (PIN13)BL GPIO.5 (PIN18)2.Enable SPI function of the Raspberry Pisudo raspi-configSelect: Advanced Options -> SPI -> yesActivate SPI hardware driver.3.Installation of librariesFore detailed information about libraries installation, please refer to this page:https:///wiki/Libraries_Installation_for_RPiIt is description of WiringPi, bcm2835 and python libraries installation.ageBCM2835 and WiringPi program should be only copied into directory of Raspberry Pi ()by samba or directly copy to the SD card). The following code are compied directly to the user directory of Pi.4.1Usage of BCM2835Run ls command as you can see below:bin: contains “.o” files.We don’t need to change it generallyFonts: contains 5 commonly used fontsPic: contains pictures used for displaying. The resolution of pictures must be 128x128,otherwise they cannot be displayed properly. And the format of pictures must be BMP.Obj: contains object files, like main.c, LCD_Driver.c, DEV_Config.c, LCD_GUI.c and theirheader files.main.c: The mian function. What need to note is that even though there are LCD_ScanDir used to control the direction of scanning, you need not to change it. Because this module is designed for Raspberry Pi, and for compatibility, we don’t recommend you to change it.DEV_Config.c:Definations of Raspberry Pi’s pins and the communication mode.LCD_Driver.c: Drive code of LCD. Need not change generally.LCD_BMP.c: Reading and analyzing BMP files and display themMakefile: This file contains compilation rules. If there are some changes in code, please run make clean to clean all the dependency file and executable files. Then execute make to compile the whole project and generate new executable files.tftlcd_1in8: executable file, generated by command makeTo run the program, you just need to run this command on terminal: sudo ./tftlcd_1in8 4.2WiringPiInput ls command, now you can see following:T he folders is similar to BCM2835’s. The only differences are that:1.WiringPi oprates by read/write the device files of Linux OS. and the bcm2835 is libraryfunction of Raspberry Pi’s CPU, it operates registers directly. Thus, if you have usedbcm2835 libraries firstly, the usage of WiringPi code will be failed. In this case, you just need to reboot the system and try again.2.Due to the first difference, they underlying configuration are different. In DEV_Config.c,use wiringpiPi and the corresponding wiringPiSPI to provide underlay interfaces.The program executed by command sudo ./tftlcd_1in8 as well4.3PythonInput ls command, you can see that:LCD_1in8.py: Driver code of LCDLCD_Config.py: configuration of hardware underlaying interface.Executing program: sudo python LCD_1in8.pyNote: Some of the OS don’t have image libraries. In this case, you can run: sudo apt-get install python-imaging to install the image library.Image is an image processing library of python, represents any image by an image object.Thus, we can create a blank image by new, its size must be same as the display size of LCD.Then draw picture by Draw library, finally, transfer the image to the LCD. Here usingImage.load() too read RGB888 data of pixel, and convert to RGB565. Scanning every pixel then we could get the whole image for displaying. Its most important code is as below:5.Auto-runInitialize autorun in Raspberry Pi by configuring code of /etc/rc.local file:sudo vim /etc/rc.localBefore exit0 add:sudo python /home/pi/python/demo.py &Important: to place the program /home/pi/python/demo.py at the same director, you can input command pwd to get the path. And & character is necessary at the end of command line, otherwise probable need to reinstall the system (impossible terminate the process by pressing ctrl+c, impossible to login with pi user permission).STM32This demo uses XNUCLEO-F103RB developing board and is based on HAT library.1.Hardware connection1.8inch LCD XNUCLEO-F103RBVCC 3V3GND GNDDIN PA7CLK PA5CS PB6DC PA8RST PA9BL PC72.Expected resultProgram the demo into the development Board. Firstly the screen is refreshed completely, then a solid line, dashed line, open circle, solid circle, rectangle, solid torque are drawn and English characters are shown.ARDUINOUNO PLUS Arduino development board is used here.1.Hardware connection1.8inch LCD Arduino3.3V 3V3GND GNDDIN D11CLK D13CS D10DC D7RST D8BL D92.Due to small global memory 2Kb of UNO PLUS, the display can’t work in graphical mode,but the calling method is the same. Just because there is no enough memory, this demo is not provided.COMPATIBLE CODE PORTINGOffered demo is the commonly used programs, which are able to be ported. They can be used with two screens and the difference is only in initialization of them and their sizes.The usage method is defined by macros. In LCD_Driver.h or in LCD.h:#define LCD_1IN44#define LCD_1in8.As the name of the macros, they are used for 1.44inch and 1.8inch LCD separately. To use for one LCD, just need to comment other one.For example://#define LCD_1IN44#define LCD_1IN8Here we use it for 1.8inch LCD, so we comment the 1.44 macro. After saving, Run make clean to remove dependency files, and then run make to generate new executable files.。


RSDS TM“intra-Panel”接口说明书翻译:Dawn天马微电子研发中心前言:这份规格书草稿不承担,不表达或暗指,包括任何商业的保证,没有任何特别的目的或任何理由,否则将出现与建议,规格书或样品不一致。
此文档的更改将不进行通知,使用此规格书的用户请仔细回顾厂商提供的规格书以确保一致性。
译者说明:本文在严格按照原文的基础上,对于晦涩或者难以翻译部分,根据个人理解进行处理,请参考原文以获取更准确的信息。
欢迎广大同事帮忙校对和交流。
目录1.范围。
42.介绍。
43.定义。
44.系统框图。
55.电气性能规格。
56.时钟/SP-数据关系。
87.位映射。
108.总线配置。
121.0范围RSDS TM,抑制摆幅差分信号,是一种面板内部(intra-panel)总线接口标准。
RSDS TM标准定义了芯片-芯片之间接口的发射、接收特性以及协议。
RSDS TM标准仅包括电气性能和数据协议。
此外,源级(列)驱动器和栅极(行)驱动器所需要的控制信号不包含在此规格书中,因为它们是由LCD制造商设计决定的。
2.0介绍RSDS TM总线在应用中有很多优点,包括下列几条:z减少总线宽度,能够缩小和减薄列驱动板z更低的动态电源消耗,延长系统运行时间z降低EMI,无需采用EMI抑制元件和保护z高的噪声抑制,维持信号图像z高吞吐量,能够用于高解析度显示RSDS TM接口用于解析度在VGA到UXGA或更高的显示场合。
使用RSDS TM可以支持更高解析度,而且仅由发射/接收器对提供的RSDS TM的总线宽度来决定。
与LVDS相似,RSDS TM是一个差分接口,名义上信号摆幅为200mV。
它保留了LVDS 作为经产业验证的,普遍用在主机和平板显示之间高带宽,强健的数字接口的很多优点。
值得一提的是RSDS TM应用于子系统中,信号的摆幅比LVDS减少到更低,所以RSDS TM的RS 意为“抑制摆幅”。
3.0定义FPD-Link 平板显示连接,实际上嵌入式显示数字接口的标准LVDS 低电压差分信号,更详细内容请查阅ANSI/TIA/EIA-644-ARSDS TM抑制摆幅差分信号OpenLDI 开放式LVDS显示接口SP有效数据到达列或源级驱动器的水平行起始脉冲,也可以称作STH(水平起始),或者载入(load)。
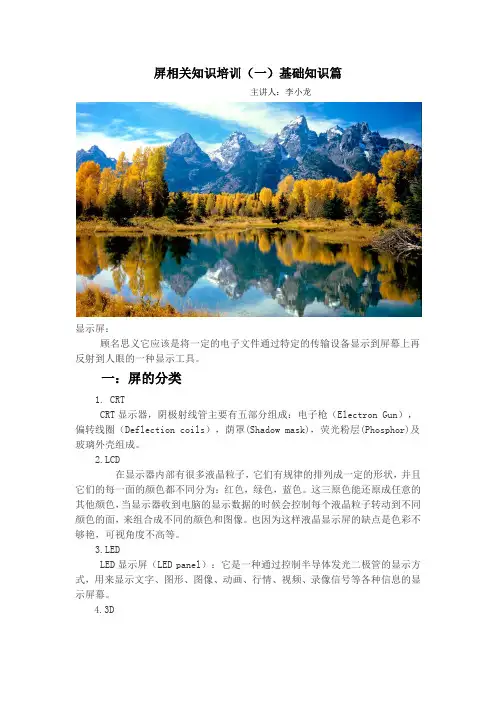
屏相关知识培训(一)基础知识篇主讲人:李小龙显示屏:顾名思义它应该是将一定的电子文件通过特定的传输设备显示到屏幕上再反射到人眼的一种显示工具。
一:屏的分类1.CRTCRT显示器,阴极射线管主要有五部分组成:电子枪(Electron Gun),偏转线圈(Deflection coils),荫罩(Shadow mask),荧光粉层(Phosphor)及玻璃外壳组成。
2.LCD在显示器内部有很多液晶粒子,它们有规律的排列成一定的形状,并且它们的每一面的颜色都不同分为:红色,绿色,蓝色。
这三原色能还原成任意的其他颜色,当显示器收到电脑的显示数据的时候会控制每个液晶粒子转动到不同颜色的面,来组合成不同的颜色和图像。
也因为这样液晶显示屏的缺点是色彩不够艳,可视角度不高等。
3.LEDLED显示屏(LED panel):它是一种通过控制半导体发光二极管的显示方式,用来显示文字、图形、图像、动画、行情、视频、录像信号等各种信息的显示屏幕。
4.3D3D显示器一直被公认为显示技术发展的终极梦想,多年来有许多企业和研究机构从事这方面的研究。
日本、欧美、韩国等发达国家和地区早于20世纪80年代就纷纷涉足立体显示技术的研发,于90年代开始陆续获得不同程度的研究成果,现已开发出需佩戴立体眼镜和不需佩戴立体眼镜的两大立体显示技术体系。
传统的3D电影在荧幕上有两组图像(来源于在拍摄时的互成角度的两台摄影机),观众必须戴上偏光镜才能消除重影(让一只眼只受一组图像),形成视差(parallax),产生立体感。
5.等离子成像原理:等离子显示技术的成像原理是在显示屏上排列上千个密封的小低压气体室,通过电流激发使其发出肉眼看不见的紫外光,然后紫外光碰击后面玻璃上的红、绿、蓝3色荧光体发出肉眼能看到的可见光,以此成像。
二.技术参数可视角度液晶显示器的可视角度通常左右对称,而上下则不一定对称。
当背光源的入射光通过偏光板、液晶及取向膜后,输出光便具备了特定的方向特性,也就是说,大多数从屏幕射出的光具备了垂直方向。
MODEL NO.:TM035KDHG04ISSUED DATE:2012-07-11VERSION:Ver2.0□Preliminary Specification■Final Product SpecificationCustomer:Approved by NotesSHANGHAI TIANMA Confirmed:Prepared by Checked by Approved byThis technical specification is subjected to change without noticeThe information contained herein is the exclusive property of SHANGHAI TIANMA MICRO-ELECTRONICS Corporation,and shall not be distributed,reproduced,or disclosed in whole or in part without prior writtenTable of ContentsCoversheet (1)Record of Revision (3)1.General Specifications (4)2.Input/Output Terminals (5)3Absolute Maximum Ratings (8)4Electrical Characteristics (8)5Timing Chart (10)6Optical Characteristics (18)7Environmental/Reliability Tests (22)8Mechanical Drawing (23)9Packing Drawing (22)10Precautions For Use of LCD modules (26)The information contained herein is the exclusive property of SHANGHAI TIANMA MICRO-ELECTRONICS Corporation,and shall not be distributed,reproduced,or disclosed in whole or in part without prior writtenThe information contained herein is the exclusive property of SHANGHAI TIANMA MICRO-ELECTRONICS Corporation,and shall not be distributed,reproduced,or disclosed in whole or in part without prior writtenRecord of Revision1.General SpecificationsNote1:Viewing direction for best image quality is different from TFT definition,there is a180degree shift.Note2:Requirements on Environmental Protection:Q/S0002Note3:LCM weight tolerance:±5%The information contained herein is the exclusive property of SHANGHAI TIANMA MICRO-ELECTRONICS Corporation,and shall not be distributed,reproduced,or disclosed in whole or in part without prior written2.Input/Output Terminals2.1TFT LCD Panel Matching connector of Kyocera elco:6240serialsThe information contained herein is the exclusive property of SHANGHAI TIANMA MICRO-ELECTRONICS Corporation,and shall not be distributed,reproduced,or disclosed in whole or in part without prior writtenThe information contained herein is the exclusive property of SHANGHAI TIANMA MICRO-ELECTRONICSCorporation,and shall not be distributed,reproduced,or disclosed in whole or in part without prior written 29Note2-1:I/O definition:I----InputO----OutputP----Power/GroundNote2-2:The information contained herein is the exclusive property of SHANGHAI TIANMA MICRO-ELECTRONICS Corporation,and shall not be distributed,reproduced,or disclosed in whole or in part without prior writtenThe information contained herein is the exclusive property of SHANGHAI TIANMA MICRO-ELECTRONICS Corporation,and shall not be distributed,reproduced,or disclosed in whole or in part without prior written 3Absolute Maximum Ratings3.1Driving TFT LCD PanelTa =25℃4Electrical Characteristics4.1Driving TFT LCD PanelGND=0V,Ta=25℃4.2Driving BacklightNote 1:The figure below shows the connectionof backlight LED.Note 2:Each LED :I =20mA,V =3.2VNote 3:The typical LED lifetime is 40,000hours.If LED is driven by high current,high ambient temperature &humidity condition,the lifetime of LED will be reduced.Operating life means brightness goes down to 50%initial brightness.Typical operating lifetime is estimated data.The information contained herein is the exclusive property of SHANGHAI TIANMA MICRO-ELECTRONICS Corporation,and shall not be distributed,reproduced,or disclosed in whole or in part without prior writtenThe information contained herein is the exclusive property of SHANGHAI TIANMA MICRO-ELECTRONICS Corporation,and shall not be distributed,reproduced,or disclosed in whole or in part without prior written4.3Block DiagramSPI Signal POWER SUPPLYB/LRGBITU-R BT 601/656RESET SignalThe information contained herein is the exclusive property of SHANGHAI TIANMA MICRO-ELECTRONICS Corporation,and shall not be distributed,reproduced,or disclosed in whole or in part without prior written 5Timing Chart5.1Timing Parameter(VCC=3.3V GND =0V,Ta=25different.The information contained herein is the exclusive property of SHANGHAI TIANMA MICRO-ELECTRONICS Corporation,and shall not be distributed,reproduced,or disclosed in whole or in part without prior written5.25.3RGB Mode 320RGB x 240Parameter Symbol Min Typ Max Unit Frequency Fclk --2730MHz Time Tclk --37--ns HSYNC toinput(NTSC)Ths 3570255CLKDDLYThe information contained herein is the exclusive property of SHANGHAI TIANMA MICRO-ELECTRONICS Corporation,and shall not be distributed,reproduced,or disclosed in whole or in part without prior written5.5ParameterSymbol Min Typ CLK Frequency Fclk --27CLK TimeTclk--37The information contained herein is the exclusive property of SHANGHAI TIANMA MICRO-ELECTRONICS Corporation,and shall not be distributed,reproduced,or disclosed in whole or in part without prior written Time5.63-Wire Serial Communication AC TimingParameter Symbol Typ Unit Clock T SPCK --Pulse Duty T scdut 50Data Setup T isu --Data Hold T ihd --Clock High/Low T ssw--T cdNote :DDLY Description (Ths=DDLY+Offset)SHANGHAI TIANMA MICRO-ELECTRONICS TM035KDHG04V2.05.73-WireNote:R03:c4h:ITU-R BT656Modec2h:ITU-R BT601Modec8h:8bit RGB Mode(HV Mode)c9h:8bit RGB Mode(DE Mode)cch(default):24bit RGB Mode(HV mode)cdh:24bit RGB Mode(DE mode)R0F:A4h(default):VGH=15V,VGL=-10V.24h(recommend):VGH=15V,VGL=-7V.The information contained herein is the exclusive property of SHANGHAI TIANMA MICRO-ELECTRONICS Corporation,and shall not be distributed,reproduced,or disclosed in whole or in part without prior writtenThe information contained herein is the exclusive property of SHANGHAI TIANMA MICRO-ELECTRONICS Corporation,and shall not be distributed,reproduced,or disclosed in whole or in part without prior written 5.8ResetTimingThe information contained herein is the exclusive property of SHANGHAI TIANMA MICRO-ELECTRONICS Corporation,and shall not be distributed,reproduced,or disclosed in whole or in part without prior written5.9Power Note1.Please exit to Standby Mode through 3-wire command,detail sequence that exit to Standby Modeunder power on mode presentation as below.2.Exit to standby mode,you can write data “0x03”to register “R00”,D09=1for writing data to register.D09=0for reading data from register.Under SPI write mode,D08=X ,and ‘X’means don’t care D08=‘1’or ‘0’.ParameterSymbol Min Typ Max Unit RemarksClock Tspck 320--ns Pulse Duty Tscdut 405060%Data Setup Time Tisu 120--ns Data Hold Time Tihd 120--ns Clock High/Low Tssw 120--ns Tckh or TcklSelect DistinguishTcd1--usThe information contained herein is the exclusive property of SHANGHAI TIANMA MICRO-ELECTRONICS Corporation,and shall not be distributed,reproduced,or disclosed in whole or in part without prior written5.10Power offSequenceNote1.1VS=1VSYNC.Please entry Standby Mode through 3-wire command,detail sequence which enterStandby Mode under power off mode presentation as below.2.Enter to standby mode,you can write data “0x01”to register “R00”,D09=1for writing data to register.D09=0for reading data from register.Under SPI write mode,D08=X ,and ‘X’means don’t care D08=‘1’or ‘0’.ParameterSymbol Min Typ Max Unit RemarksclockTspck 320--ns pulse dutyTscdut 405060%data setup Tisu 120--ns data hold Tihd 120--ns clock high/low Tssw 120--ns Tckh or Tcklselect distinguishTcd1--us6Optical Characteristics6.1Optical SpecificationTa=25℃Test Conditions:1.V F=19.2V,I F=20mA(LED current),the ambient temperature is25℃.2.The test systems refer to Note1and Note2.The information contained herein is the exclusive property of SHANGHAI TIANMA MICRO-ELECTRONICS Corporation,and shall not be distributed,reproduced,or disclosed in whole or in part without prior writtenThe information contained herein is the exclusive property of SHANGHAI TIANMA MICRO-ELECTRONICS Corporation,and shall not be distributed,reproduced,or disclosed in whole or in part without prior written Note 1:Definition of optical measurement system.The optical characteristics should be measured in dark room.After 5minutes operation,the optical properties are measured at the center point of the LCD screen.All input terminals LCD panel must be ground when measuring the center area of the panel.Photo PanelTFT-LCD Note 2:Definition of viewing angle range and measurement system.viewing angle is measured atthe center point of the LCD by CONOSCOPE(ergo-80)。
SyncMaster 700TSn-2 820TSn-2LCD 显示器用户手册安全说明标记注请务必遵守这些安全说明,以确保人身安全和防止财产损失。
请务必仔细阅读这些说明,并以正确的方法使用本产品。
警告/注意不遵守本符号提示的说明可能会导致身体伤害或设备损坏。
注禁止很重要,任何时候都要阅读并了解。
请勿拆卸将电源插头从插座上拔下请勿触摸接地以防止触电电源长时间不使用显示器时,请将您的计算机设置为 DPM。
如果使用屏幕保护程序,请将其设置为活动画面模式。
此处提供的图片仅供参考,不适用于所有情况(或国家/地区)。
“消除残影”功能说明的快捷方式请勿使用破损的电源线或电源插头以及破损或松动的电源插座。
•否则可能导致触电或起火。
将电源插头拔出或插入电源插座时,请勿用湿手触碰电源插头。
•否则可能导致触电。
确保将电源线连接到接地的电源插座。
•否则可能导致触电或人身伤害。
确保电源插头牢固正确地插入电源插座。
•否则可能导致起火。
请勿强行弯折或拉扯电源插头,也不要将任何重物压在其上。
•否则可能导致起火。
请勿将多台设备连接到同一个电源插座。
•则可能因过热导致起火。
请勿在使用本产品时断开电源线连接。
•否则可能会由于触电而损坏本产品。
要断开设备的电源,必须将插头从电源插座拔出,因此电源插头应易于操作。
•否则可能导致电击或火灾。
仅可使用本公司提供的电源线。
请勿使用其他产品随附的电源线。
•否则可能导致起火或触电。
安装如果要在多尘、高温或低温、湿度高或含化学物质的环境安装显示器,以及在需要 24 小时不间断运行的机场或火车站等地方安装显示器,请务必与授权服务中心联系。
否则,显示器可能会严重损坏。
请确保至少由两个人搬移本产品。
•否则可能将其跌落,而导致人身伤害甚或损坏本产品。
在将本产品安装到柜子中或架子上时,请确保本产品底部的前端没有突出来。
•否则,产品可能坠落或造成人身伤害。
•请使用大小适合本产品的柜子或架子。
请勿在本产品周围放置蜡烛、蚊香、香烟以及任何加热装置。
SyncMaster B1740R/ B1740RX/ B1940M/ B1940MX/ B1940R/ B1940RX/ B1940MR/ B1940MRX/ B1940W/ B1940WX/ B2240/ B2240X/ B2240W/ B2240WX/B2240M/ B2240MX/ B2240MW/ B2240MWX/ BX2240/ BX2240X/ B2340/B2440L/ B2440LX/B2440/ B2440X/ B2440M/ BX2440/ BX2440X/E1720NR/ E1720NRX/ E1920/ E1920X/ E1920R/ E1920N/ E1920NX/E1920NR/ E1920NRX/E1920ENW/E1920NW/ E1920NWX/ E1920W/E1920WX/ E2020/ E2020X/ E2020N/ E2020NX/ E2220/ E2220X/ E2220N/E2220NX/ E2220NW/ E2220W/ E2220WX/ EX2220/ EX2220X/ E2320/E2320X/ E2420L/ E2420NL/BX2340/BX2340X/BX2240W/EX1920/EX1920X/EX1920W/EX2020/EX2020XLCD 显示器用户手册颜色和外观可能根据产品的不同而有所变化,并且出于性能提高对规格进行的更改,恕不另行通知。
目录主要安全注意事项使用前注意事项 . . . . . . . . . . . . . . . . . . . . . . . . . . . . . . . . . . . . . . . . . . . . 1-1保管和维护 . . . . . . . . . . . . . . . . . . . . . . . . . . . . . . . . . . . . . . . . . . . . . . . . 1-2安全注意事项 . . . . . . . . . . . . . . . . . . . . . . . . . . . . . . . . . . . . . . . . . . . . . . 1-3安装产品包装清单 . . . . . . . . . . . . . . . . . . . . . . . . . . . . . . . . . . . . . . . . . . . . . . . . . . 2-1安装支架 . . . . . . . . . . . . . . . . . . . . . . . . . . . . . . . . . . . . . . . . . . . . . . . . . . 2-2安装壁挂支架 . . . . . . . . . . . . . . . . . . . . . . . . . . . . . . . . . . . . . . . . . . . . . . 2-3连接 PC . . . . . . . . . . . . . . . . . . . . . . . . . . . . . . . . . . . . . . . . . . . . . . . . . . 2-4使用 HDMI 缆线进行连接 . . . . . . . . . . . . . . . . . . . . . . . . . . . . . . . . . . . . . 2-5Kensington 防盗锁 . . . . . . . . . . . . . . . . . . . . . . . . . . . . . . . . . . . . . . . . . 2-6连接耳机 . . . . . . . . . . . . . . . . . . . . . . . . . . . . . . . . . . . . . . . . . . . . . . . . . . 2-7扬声器 . . . . . . . . . . . . . . . . . . . . . . . . . . . . . . . . . . . . . . . . . . . . . . . . . . . . 2-8使用本产品设置最佳分辨率. . . . . . . . . . . . . . . . . . . . . . . . . . . . . . . . . . . . . . . . . . . . 3-1标准信号模式表 . . . . . . . . . . . . . . . . . . . . . . . . . . . . . . . . . . . . . . . . . . . . 3-2标准信号模式表 . . . . . . . . . . . . . . . . . . . . . . . . . . . . . . . . . . . . . . . . . . . . 3-3标准信号模式表 . . . . . . . . . . . . . . . . . . . . . . . . . . . . . . . . . . . . . . . . . . . . 3-4标准信号模式表 . . . . . . . . . . . . . . . . . . . . . . . . . . . . . . . . . . . . . . . . . . . . 3-5标准信号模式表 . . . . . . . . . . . . . . . . . . . . . . . . . . . . . . . . . . . . . . . . . . . . 3-6标准信号模式表 . . . . . . . . . . . . . . . . . . . . . . . . . . . . . . . . . . . . . . . . . . . . 3-7标准信号模式表 . . . . . . . . . . . . . . . . . . . . . . . . . . . . . . . . . . . . . . . . . . . . 3-8标准信号模式表 . . . . . . . . . . . . . . . . . . . . . . . . . . . . . . . . . . . . . . . . . . . . 3-9标准信号模式表 . . . . . . . . . . . . . . . . . . . . . . . . . . . . . . . . . . . . . . . . . . . 3-10标准信号模式表 . . . . . . . . . . . . . . . . . . . . . . . . . . . . . . . . . . . . . . . . . . . 3-11标准信号模式表 . . . . . . . . . . . . . . . . . . . . . . . . . . . . . . . . . . . . . . . . . . . 3-12标准信号模式表 . . . . . . . . . . . . . . . . . . . . . . . . . . . . . . . . . . . . . . . . . . . 3-13标准信号模式表 . . . . . . . . . . . . . . . . . . . . . . . . . . . . . . . . . . . . . . . . . . . 3-14标准信号模式表 . . . . . . . . . . . . . . . . . . . . . . . . . . . . . . . . . . . . . . . . . . . 3-15标准信号模式表 . . . . . . . . . . . . . . . . . . . . . . . . . . . . . . . . . . . . . . . . . . . 3-16标准信号模式表 . . . . . . . . . . . . . . . . . . . . . . . . . . . . . . . . . . . . . . . . . . . 3-17标准信号模式表 . . . . . . . . . . . . . . . . . . . . . . . . . . . . . . . . . . . . . . . . . . . 3-18标准信号模式表 . . . . . . . . . . . . . . . . . . . . . . . . . . . . . . . . . . . . . . . . . . . 3-19标准信号模式表 . . . . . . . . . . . . . . . . . . . . . . . . . . . . . . . . . . . . . . . . . . . 3-20标准信号模式表 . . . . . . . . . . . . . . . . . . . . . . . . . . . . . . . . . . . . . . . . . . . 3-21标准信号模式表 . . . . . . . . . . . . . . . . . . . . . . . . . . . . . . . . . . . . . . . . . . . 3-22标准信号模式表 . . . . . . . . . . . . . . . . . . . . . . . . . . . . . . . . . . . . . . . . . . . 3-23标准信号模式表 . . . . . . . . . . . . . . . . . . . . . . . . . . . . . . . . . . . . . . . . . . . 3-24标准信号模式表 . . . . . . . . . . . . . . . . . . . . . . . . . . . . . . . . . . . . . . . . . . . 3-25标准信号模式表 . . . . . . . . . . . . . . . . . . . . . . . . . . . . . . . . . . . . . . . . . . . 3-26标准信号模式表 . . . . . . . . . . . . . . . . . . . . . . . . . . . . . . . . . . . . . . . . . . . 3-30标准信号模式表 . . . . . . . . . . . . . . . . . . . . . . . . . . . . . . . . . . . . . . . . . . . 3-31标准信号模式表 . . . . . . . . . . . . . . . . . . . . . . . . . . . . . . . . . . . . . . . . . . . 3-32标准信号模式表 . . . . . . . . . . . . . . . . . . . . . . . . . . . . . . . . . . . . . . . . . . . 3-33标准信号模式表 . . . . . . . . . . . . . . . . . . . . . . . . . . . . . . . . . . . . . . . . . . . 3-34标准信号模式表 . . . . . . . . . . . . . . . . . . . . . . . . . . . . . . . . . . . . . . . . . . . 3-35标准信号模式表 . . . . . . . . . . . . . . . . . . . . . . . . . . . . . . . . . . . . . . . . . . . 3-36标准信号模式表 . . . . . . . . . . . . . . . . . . . . . . . . . . . . . . . . . . . . . . . . . . . 3-37标准信号模式表 . . . . . . . . . . . . . . . . . . . . . . . . . . . . . . . . . . . . . . . . . . . 3-38标准信号模式表 . . . . . . . . . . . . . . . . . . . . . . . . . . . . . . . . . . . . . . . . . . . 3-39安装设备驱动程序 . . . . . . . . . . . . . . . . . . . . . . . . . . . . . . . . . . . . . . . . . . 3-40产品操作按钮 . . . . . . . . . . . . . . . . . . . . . . . . . . . . . . . . . . . . . . . . . . . . . 3-41使用屏幕调整菜单(OSD:屏幕菜单) . . . . . . . . . . . . . . . . . . . . . . . . . 3-42安装软件Natural Color . . . . . . . . . . . . . . . . . . . . . . . . . . . . . . . . . . . . . . . . . . . . . . 4-1 MagicTune . . . . . . . . . . . . . . . . . . . . . . . . . . . . . . . . . . . . . . . . . . . . . . . . 4-2 MagicRotation . . . . . . . . . . . . . . . . . . . . . . . . . . . . . . . . . . . . . . . . . . . . . 4-3 MultiScreen . . . . . . . . . . . . . . . . . . . . . . . . . . . . . . . . . . . . . . . . . . . . . . . 4-4故障排除显示器自诊断 . . . . . . . . . . . . . . . . . . . . . . . . . . . . . . . . . . . . . . . . . . . . . . 5-1常见故障检查 . . . . . . . . . . . . . . . . . . . . . . . . . . . . . . . . . . . . . . . . . . . . . . 5-2常见问题解答 . . . . . . . . . . . . . . . . . . . . . . . . . . . . . . . . . . . . . . . . . . . . . . 5-3更多信息规格 . . . . . . . . . . . . . . . . . . . . . . . . . . . . . . . . . . . . . . . . . . . . . . . . . . . . . 6-1省电功能 . . . . . . . . . . . . . . . . . . . . . . . . . . . . . . . . . . . . . . . . . . . . . . . . . . 6-2规格 . . . . . . . . . . . . . . . . . . . . . . . . . . . . . . . . . . . . . . . . . . . . . . . . . . . . . 6-3省电功能 . . . . . . . . . . . . . . . . . . . . . . . . . . . . . . . . . . . . . . . . . . . . . . . . . . 6-4规格 . . . . . . . . . . . . . . . . . . . . . . . . . . . . . . . . . . . . . . . . . . . . . . . . . . . . . 6-5省电功能 . . . . . . . . . . . . . . . . . . . . . . . . . . . . . . . . . . . . . . . . . . . . . . . . . . 6-6规格 . . . . . . . . . . . . . . . . . . . . . . . . . . . . . . . . . . . . . . . . . . . . . . . . . . . . . 6-7省电功能 . . . . . . . . . . . . . . . . . . . . . . . . . . . . . . . . . . . . . . . . . . . . . . . . . . 6-8规格 . . . . . . . . . . . . . . . . . . . . . . . . . . . . . . . . . . . . . . . . . . . . . . . . . . . . . 6-9省电功能 . . . . . . . . . . . . . . . . . . . . . . . . . . . . . . . . . . . . . . . . . . . . . . . . . 6-10规格 . . . . . . . . . . . . . . . . . . . . . . . . . . . . . . . . . . . . . . . . . . . . . . . . . . . . 6-11省电功能 . . . . . . . . . . . . . . . . . . . . . . . . . . . . . . . . . . . . . . . . . . . . . . . . . 6-12规格 . . . . . . . . . . . . . . . . . . . . . . . . . . . . . . . . . . . . . . . . . . . . . . . . . . . . 6-13省电功能 . . . . . . . . . . . . . . . . . . . . . . . . . . . . . . . . . . . . . . . . . . . . . . . . . 6-14规格 . . . . . . . . . . . . . . . . . . . . . . . . . . . . . . . . . . . . . . . . . . . . . . . . . . . . 6-15省电功能 . . . . . . . . . . . . . . . . . . . . . . . . . . . . . . . . . . . . . . . . . . . . . . . . . 6-16规格 . . . . . . . . . . . . . . . . . . . . . . . . . . . . . . . . . . . . . . . . . . . . . . . . . . . . 6-17省电功能 . . . . . . . . . . . . . . . . . . . . . . . . . . . . . . . . . . . . . . . . . . . . . . . . . 6-18省电功能 . . . . . . . . . . . . . . . . . . . . . . . . . . . . . . . . . . . . . . . . . . . . . . . . . 6-22规格 . . . . . . . . . . . . . . . . . . . . . . . . . . . . . . . . . . . . . . . . . . . . . . . . . . . . 6-23省电功能 . . . . . . . . . . . . . . . . . . . . . . . . . . . . . . . . . . . . . . . . . . . . . . . . . 6-24规格 . . . . . . . . . . . . . . . . . . . . . . . . . . . . . . . . . . . . . . . . . . . . . . . . . . . . 6-25省电功能 . . . . . . . . . . . . . . . . . . . . . . . . . . . . . . . . . . . . . . . . . . . . . . . . . 6-26规格 . . . . . . . . . . . . . . . . . . . . . . . . . . . . . . . . . . . . . . . . . . . . . . . . . . . . 6-27省电功能 . . . . . . . . . . . . . . . . . . . . . . . . . . . . . . . . . . . . . . . . . . . . . . . . . 6-28规格 . . . . . . . . . . . . . . . . . . . . . . . . . . . . . . . . . . . . . . . . . . . . . . . . . . . . 6-29省电功能 . . . . . . . . . . . . . . . . . . . . . . . . . . . . . . . . . . . . . . . . . . . . . . . . . 6-30规格 . . . . . . . . . . . . . . . . . . . . . . . . . . . . . . . . . . . . . . . . . . . . . . . . . . . . 6-31省电功能 . . . . . . . . . . . . . . . . . . . . . . . . . . . . . . . . . . . . . . . . . . . . . . . . . 6-32规格 . . . . . . . . . . . . . . . . . . . . . . . . . . . . . . . . . . . . . . . . . . . . . . . . . . . . 6-33省电功能 . . . . . . . . . . . . . . . . . . . . . . . . . . . . . . . . . . . . . . . . . . . . . . . . . 6-34规格 . . . . . . . . . . . . . . . . . . . . . . . . . . . . . . . . . . . . . . . . . . . . . . . . . . . . 6-35省电功能 . . . . . . . . . . . . . . . . . . . . . . . . . . . . . . . . . . . . . . . . . . . . . . . . . 6-36规格 . . . . . . . . . . . . . . . . . . . . . . . . . . . . . . . . . . . . . . . . . . . . . . . . . . . . 6-37省电功能 . . . . . . . . . . . . . . . . . . . . . . . . . . . . . . . . . . . . . . . . . . . . . . . . . 6-38规格 . . . . . . . . . . . . . . . . . . . . . . . . . . . . . . . . . . . . . . . . . . . . . . . . . . . . 6-39省电功能 . . . . . . . . . . . . . . . . . . . . . . . . . . . . . . . . . . . . . . . . . . . . . . . . . 6-40规格 . . . . . . . . . . . . . . . . . . . . . . . . . . . . . . . . . . . . . . . . . . . . . . . . . . . . 6-41省电功能 . . . . . . . . . . . . . . . . . . . . . . . . . . . . . . . . . . . . . . . . . . . . . . . . . 6-42规格 . . . . . . . . . . . . . . . . . . . . . . . . . . . . . . . . . . . . . . . . . . . . . . . . . . . . 6-43省电功能 . . . . . . . . . . . . . . . . . . . . . . . . . . . . . . . . . . . . . . . . . . . . . . . . . 6-44规格 . . . . . . . . . . . . . . . . . . . . . . . . . . . . . . . . . . . . . . . . . . . . . . . . . . . . 6-45省电功能 . . . . . . . . . . . . . . . . . . . . . . . . . . . . . . . . . . . . . . . . . . . . . . . . . 6-46规格 . . . . . . . . . . . . . . . . . . . . . . . . . . . . . . . . . . . . . . . . . . . . . . . . . . . . 6-47省电功能 . . . . . . . . . . . . . . . . . . . . . . . . . . . . . . . . . . . . . . . . . . . . . . . . . 6-48规格 . . . . . . . . . . . . . . . . . . . . . . . . . . . . . . . . . . . . . . . . . . . . . . . . . . . . 6-49省电功能 . . . . . . . . . . . . . . . . . . . . . . . . . . . . . . . . . . . . . . . . . . . . . . . . . 6-50规格 . . . . . . . . . . . . . . . . . . . . . . . . . . . . . . . . . . . . . . . . . . . . . . . . . . . . 6-51省电功能 . . . . . . . . . . . . . . . . . . . . . . . . . . . . . . . . . . . . . . . . . . . . . . . . . 6-52规格 . . . . . . . . . . . . . . . . . . . . . . . . . . . . . . . . . . . . . . . . . . . . . . . . . . . . 6-53省电功能 . . . . . . . . . . . . . . . . . . . . . . . . . . . . . . . . . . . . . . . . . . . . . . . . . 6-54规格 . . . . . . . . . . . . . . . . . . . . . . . . . . . . . . . . . . . . . . . . . . . . . . . . . . . . 6-55省电功能 . . . . . . . . . . . . . . . . . . . . . . . . . . . . . . . . . . . . . . . . . . . . . . . . . 6-56规格 . . . . . . . . . . . . . . . . . . . . . . . . . . . . . . . . . . . . . . . . . . . . . . . . . . . . 6-57省电功能 . . . . . . . . . . . . . . . . . . . . . . . . . . . . . . . . . . . . . . . . . . . . . . . . . 6-58规格 . . . . . . . . . . . . . . . . . . . . . . . . . . . . . . . . . . . . . . . . . . . . . . . . . . . . 6-59省电功能 . . . . . . . . . . . . . . . . . . . . . . . . . . . . . . . . . . . . . . . . . . . . . . . . . 6-60规格 . . . . . . . . . . . . . . . . . . . . . . . . . . . . . . . . . . . . . . . . . . . . . . . . . . . . 6-61省电功能 . . . . . . . . . . . . . . . . . . . . . . . . . . . . . . . . . . . . . . . . . . . . . . . . . 6-62规格 . . . . . . . . . . . . . . . . . . . . . . . . . . . . . . . . . . . . . . . . . . . . . . . . . . . . 6-63省电功能 . . . . . . . . . . . . . . . . . . . . . . . . . . . . . . . . . . . . . . . . . . . . . . . . . 6-64省电功能 . . . . . . . . . . . . . . . . . . . . . . . . . . . . . . . . . . . . . . . . . . . . . . . . . 6-68规格 . . . . . . . . . . . . . . . . . . . . . . . . . . . . . . . . . . . . . . . . . . . . . . . . . . . . 6-69省电功能 . . . . . . . . . . . . . . . . . . . . . . . . . . . . . . . . . . . . . . . . . . . . . . . . . 6-70规格 . . . . . . . . . . . . . . . . . . . . . . . . . . . . . . . . . . . . . . . . . . . . . . . . . . . . 6-71省电功能 . . . . . . . . . . . . . . . . . . . . . . . . . . . . . . . . . . . . . . . . . . . . . . . . . 6-72规格 . . . . . . . . . . . . . . . . . . . . . . . . . . . . . . . . . . . . . . . . . . . . . . . . . . . . 6-73省电功能 . . . . . . . . . . . . . . . . . . . . . . . . . . . . . . . . . . . . . . . . . . . . . . . . . 6-74规格 . . . . . . . . . . . . . . . . . . . . . . . . . . . . . . . . . . . . . . . . . . . . . . . . . . . . 6-75省电功能 . . . . . . . . . . . . . . . . . . . . . . . . . . . . . . . . . . . . . . . . . . . . . . . . . 6-76 ROHS . . . . . . . . . . . . . . . . . . . . . . . . . . . . . . . . . . . . . . . . . . . . . . . . . . . 6-77三星全球服务网 . . . . . . . . . . . . . . . . . . . . . . . . . . . . . . . . . . . . . . . . . . . 6-781主要安全注意事项1-1使用前注意事项本手册所用图标使用本手册•使用本产品前请仔细阅读安全注意事项。