路灯施耐德时控开关说明书ITM
- 格式:pdf
- 大小:771.11 KB
- 文档页数:4
施耐德时间继电器re17说明书
施耐德时间继电器RE17是一种高精度、可靠性能优异的时间控制设备,广泛应用于各种工业自动化系统中。
该设备采用先进的微电脑控制技术,具有多种计时模式、定时范围、报警及控制输出等功能,能够满足用户的多样化需求。
该继电器采用了数字化显示屏,使用户更加直观地了解设备的工作状态、剩余时间等信息,方便用户进行调试和维护。
同时,该设备具有多种输入输出方式,如电流信号、数字信号等,可以方便地与其他设备进行通信,实现自动化控制。
在使用该设备时,需要注意以下几点:
1.在安装过程中,必须确保设备的电源及信号输入输出等线路正确连接,以免出现故障。
2.在设备运行过程中,应定期检查设备的状态,若出现异常应及时进行维修。
3.在设备的计时模式设置上,应根据实际需要合理设置,以达到最佳的控制效果。
总之,施耐德时间继电器RE17是一款功能强大的时间控制设备,通过合理使用和维护,可以为各种工业自动化系统提供可靠的时间控制保障。
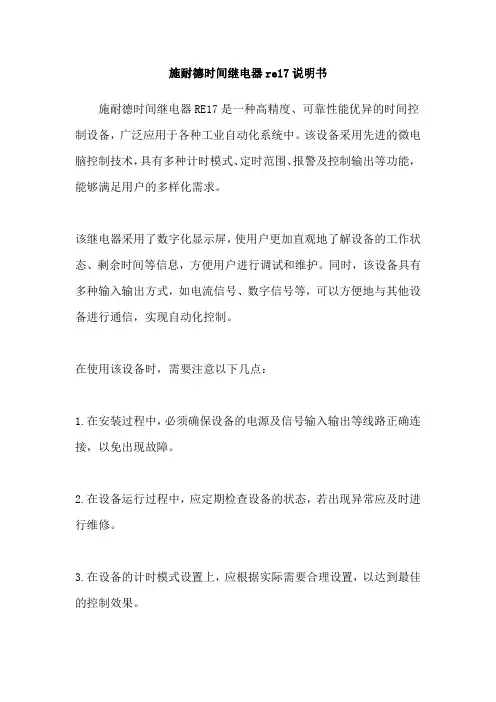
D 15365-561-03_e n 12/2020¼DANGERRisk of serious damage to property and per-sonal injury, e.g. from fire or electric shock, due to incorrect electrical installation.Safe electrical installation can only be ensured if the person in question can prove basic knowledge in the following areas:•Connecting to installation networks •Connecting several electrical devices •Laying electric cablesThese skills and experience are normally only pos-sessed by skilled professionals who are trained in the field of electrical installation technology. If these minimum requirements are not met or are disregard-ed in any way, you will be solely liable for any dam-age to property or personal injury.IH 24h is a mechanical time switch that switches con-nected loads on or off when the set time has been reached. It is installed on a DIN rail (DIN EN 60715).1Place the IH 24h onto the DIN rail.2Connect cables:–Remove 8 mm (max. 9 mm) of insulation –Open the plug-in terminal with a screwdriver and plug in the cable at a 45° angle. (max. 2 cables per plug-in terminal)IH 24hOperating instructionssrm: CCT16364 arm: CCT15365For your safetyG etting to know IH 24hProduct detailsA Manual switchB Setting discC SwitchingsegmentsD Automatic/perma-nent switchE Clock hands (hour, minutes)F Display: Morning(3/6/9), afternoon (15/18/21)G Rotary knob H Switch output I Mains connectionInstalling IH 24h3Connect the mains voltage.|IH 24h arm (art. no. CCT15365) is equipped with a quartz clock mechanism. The quartz clock mechanism only starts after a few minutes after having connected it a power supply. Complete power reserve is reached after 5 days.Setting the timeUse the rotary knob to set the time (hour, minutes). Y ou can turn the rotary knob clockwise and anti-clockwise.|The clock face changes between morning and af-ternoon times when the dial has gone past 24 and 12 hours.Setting the switching timeY ou can set the switching time using the switching seg-ments. Each switching segment stands for a 15-minute time period. The switching segments can be pushed in or out, for example, by using your index finger. The set-ting disc shows the switching period (+/- 5 minutes).Operating the manual switchY1Turn the manual switch by one position anti-clockwise.The current status is reversed and stays unchanged forSetting IH 24hTo set the time in the morning, 3/6/9 must be visible on the clock face.To set the time in the after-noon, 15/18/21 must be visible on the clock face.Switching segment out Load switched off Switching segment inLoad switched on Switching time 1 = 6:00 - 10:00Switching time 2= 17:00 - 21:00Operating IH 24hOperating the automatic/permanent switch With the automatic/permanent switch, you can switch the load permanently on or off or permanently set it to au-tomatic mode.•Set the switch to "1".The load is switched on permanently. The set switch-ing times are deactivated.•Set the switch to "0".The load is switched off permanently. The set switch-ing times are deactivated.•main activated. The load is switched on or off when the set switching time has been reached.|For permanent ON or permanent OFF , the set switching times are deactivated.If you have technical questions, please contact the Customer Care Centre in your country. T echnical dataNominal voltage:CCT16364AC 230 V , 50/ Hz CCT15365AC 110-230 V , 50-60 Hz Nominal current:16 A, cos φ = 14 A, cos φ = 0.6Incandescent lamps:AC 230V , max. 1100W Halogen lamps:AC 230V , max. 1000W Fluorescent tubes:AC 230V , max. 600VA Fluorescent lamps with electronic ballast:2 x 40W (12µF), parallel-compensatedCompact fluorescent lamps with electronic ballast:25 W LED lamps:<2W: 20 W>2W:180 W Power consumption:≈ 0.5 W Ambient temperature:-20°C to +55°C Connecting terminals: 2 x 0.5 - max. 2.5 mm², fixed and flexible wires Power reserve:CCT15365150 h (230V), 75 h (110V)Accuracy:CCT16364Network synchronous CCT15365≤ ±1s/day at +20°C Mode of operation:srm: Device of 1BRTU type in accordance with EN 60730-1arm: Device of 1BSTU type in accordance with EN 60730-1Degree of pollution:2Rated impulse voltage:4000 VProtection class:II per EN 60730-1 when installed correctly T ype of protection:IP 20 in accordance with EN 60529Schneider Electric Industries SAS。
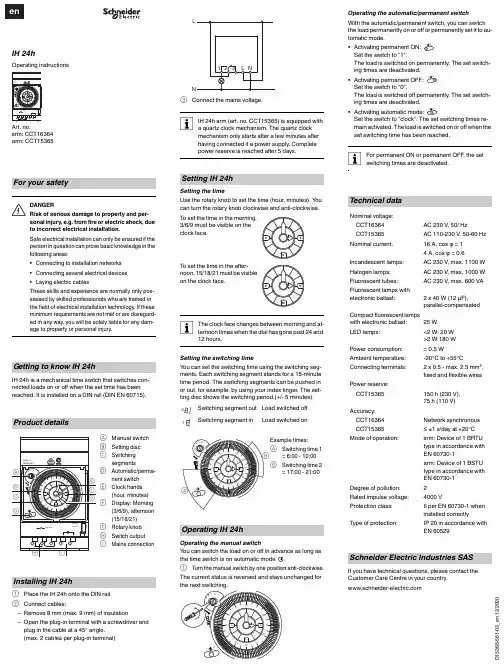
d d _E N 02/19IHP 1C/2CProduct information / menu descriptionCCT15440CCT15441CCT15442CCT15443d d _E N 02/19The IHP with weekly program controls lighting, air conditioning, flushing, etc.|The device must not control safety-relevant applications.G etting to know the timerDisplays and operating elementsA Time displayB Channel stateC Date displayD Programmed ON timesE Display of week daysF Display of active buttonsG OK buttonH Selection buttonsI MENU buttonOperationButton FunctionMENU button•Opens the menu•In menu mode: one step back:•In programming mode: cancel programming modeSelection buttons •Switch between menu items •Increase/decrease value OK button•In menu mode: select menu item •In programming mode: confirm settingMenu structurePROGRAM TIME/DATEMANUAL CONFIG ENDCHANNEL 1TIME CHANNEL 1LANGUAGENEW SET DATEPERM ON PIN CHECK SU-WI PERM OFF FACTORY SETTINGSMODIFY WEEK DAY OVERRI ONINFO DELETEFORM DATE HOLIDAYENDENDFORM TIMEENDd d _E N 02/19The basic settings, such as date, time, etc., must be carried out when starting for the first time or following a reset.The device starts in the settings menu with the item LANGUAGE .1Select the language.2Confirm the message FORM DATE .3Select the date format.4Set the year.5Set the month.6Set the day.7Confirm the message FORM TIME .8Select the time format.9Set the hours.0Set the minute.^Select summer time/winter time.A switching time always consists of one time at which the load is switched on and one time at which the load is switched off. Y ou can either set switching times for a specific day of the week or copy them for multiple week days. Copied week days are referred to as a block.T o set a switching time, perform the following steps once for ON and once for OFF :1Confirm message about free memory slots.2Select ON or OFF .3Set the hour.4Set the minute.5Set the day of the week.6If the switching time is only to be valid for one week day, select SAVE .The switching time is set.7If the switching time is to be copied as a block for multiple week days, select COPY .8Select further days of the week and confirm in each case.Week days contained in the block are indicated in the week days display.To remove a week day from the block, select the week day again using the selection buttons.9Once the desired week days have been set, select COPY .Initial setupSetting a switching timePROGRAMCHANNELC1CHANNELC2NEWNEWd d _E N 02/19Y ou can change the time for the switching times. In the case of switching times within a block, you can select whether the modification of the time is to apply to the whole block or only to a specific week day. This week day is then removed from the block.1Select the switching time.The display runs through all switching times in sequence. If no switching time is set for a week day, this is indicated in the display by --:--.If the selected switching time is part of a block, all days of the block are shown in the week day display. The selected week day flashes.2Set the hour.3Set the minute.4If the selected switching time is only set for one week day, only the option SAVE appears.5If the selected switching time is part of a block, select MODIFY BLOCK or MODIFY WEEK DAY .- MODIFY BLOCK changes the time for all switching times of the block.- MODIFY WEEK DAY changes the time for the selected switching time. The selected switching time is re-moved from the block.Y ou can delete switching times at any time. If a switching time is part of a block, you can delete the entire block or remove the switching time from the block. Y ou can also delete all switching times of a channel simultaneously.Deleting a switching time:1Select SINGLE .2Select the switching time.The display runs through all switching times in sequence. If no switching time is set for a week day, this is indicated in the display by --:--.If the selected switching time is part of a block, all days of the block are shown in the week day display. The selected week day flashes.3If the selected switching time is only valid for one week day, only the option DELETE WEEK DAY appears.4If the selected switching time is part of a block, select DELETE BLOCK or DELETE WEEK DAY .- DELETE BLOCK deletes all switching times of the block.- DELETE WEEK DAY removes the selected switching time from the block and deletes it.Deleting all switching times of a channel:1Select DELETE ALL .2Confirm with CONFIRM .Modifying a switching timePROGRAMCHANNELC1CHANNELC2MODIFYMODIFYDeleting a switching timePROGRAMCHANNELC1CHANNELC2DELETEDELETEd d _E N 02/19With the holiday function, you can switch a channel on or off completely for a longer period. The programmed switching times do not apply while the holiday function is active. Y ou can only set one holiday time per channel.1Select ON or OFF .2Confirm BEGIN HOLIDAY .3Set the year.4Set the month.5Set the day.6Set the hour.7Confirm END HOLIDAY .8Set the year.9Set the month.0Set the day.^Set the hour.A PIN protects against unauthorized use.If you have forgotten your PIN, contact the Customer Care centre in your country, stating the serial number of your device.1Select WITH PIN .NO PIN cancels the PIN protection function.2Confirm CURRENT PIN .3Set new PIN.|The PIN digits are set one after the other with +/- and confirmed with OK . A digit that has already been set can no longer be changed. When the last digit is confirmed with OK , the PIN is saved. If in any doubt, exit the PIN setting procedure with MENU .Setting the holiday functionMANUALCHANNELC1CHANNELC2HOLIDAYHOLIDAYSetting the PINCONFIGPINd d _E N 02/19Y ou can set override or permanent switching either via the MANUAL menu or using combinations of buttons on the device.Override switchingIf you wish to switch a channel briefly to the other switching state (e.g. from ON to OFF ), activate override. This state is only valid until the next switching time.If override is active, CHANNEL OVERRIDE appears briefly in the display.Permanent switchingIf you wish to switch a channel permanently, activate permanent switching. While permanent switching is activat-ed, switching times have no effect.If you want to select whether the channel is to be switched ON or OFF permanently, use the MANUAL menu.If you use the button combinations to activate permanent switching, the channel is switched to the other switching state (e.g. from ON to OFF ).If permanent switching is active, CHANNEL PERMANENT appears briefly in the display.Activating override and permanent switchingd d _E N 02/19Y ou can reset the basic settings, such as date, time, etc. and delete or keep all switching times.Y ou have two options: Y ou can either load the factory settings via the CONFIG menu or reset the device using combinations of buttons on the device.|Loading the factory settings will also delete all switching times. If you want to reset the basic settings and retain the switching times, use the reset function.Loading factory settings1Confirm the message LOAD FACTORY SETTINGS .2Set basic settings as described in chapter “Initial setup”.Resetting1Push all four buttons on the device simultaneously.2Select the language.3If you want to retain the switching times, select RETAIN PROGRAMS .4If you want to delete all switching times, select DELETE PROGRAMS .5Set basic settings as described in chapter “Initial setup”.If you have technical questions, please contact the Customer Care Centre in your /contactResetting basic settingsCONFIGFACTORY SET-TINGSSchneider Electric Industries SAS。
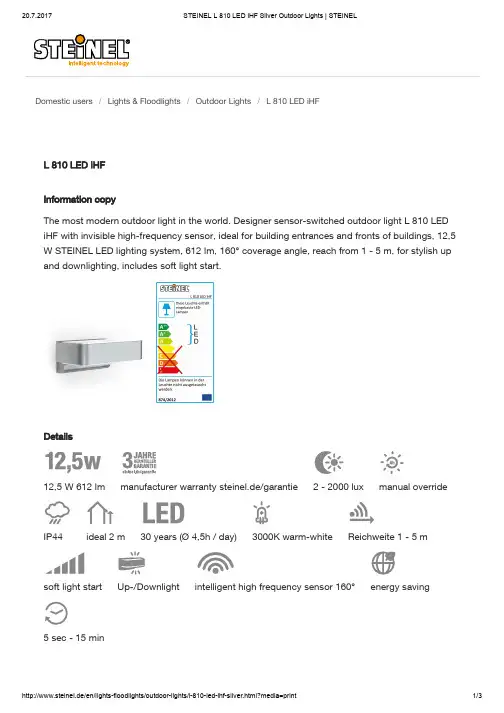
Domestic users/Lights & Floodlights/Outdoor Lights/L 810 LED iHFL 810 LED iHFInformation copyThe most modern outdoor light in the world. Designer sensor-switched outdoor light L 810 LED iHF with invisible high-frequency sensor, ideal for building entrances and fronts of buildings, 12,5 W STEINEL LED lighting system, 612 lm, 160° coverage angle, reach from 1 - 5 m, for stylish up and downlighting, includes soft light start.Details12,5 W 612 lm manufacturer warranty steinel.de/garantie 2 - 2000 lux manual override IP44ideal 2 m30 years (Ø 4,5h / day)3000K warm-white Reichweite 1 - 5 msoft light start Up-/Downlight intelligent high frequency sensor 160°energy saving5 sec - 15 minIncluded STEINEL LED-System Invisible high-frequency sensor intelligent soft start functionOptional basic lighting level 10 % High-quality aluminiumOptional manual override for 4 hoursTechnical specifications L 810 LED iHF SilverEuropean Article Number (EAN)4007841671310Dimensions(w x h x d):88 x 230 x 145 mmVoltage 230-240 V/50 HzSensor type iHF (intelligent high-frequency technology)HF-system 5.8 GHzTransmitter power:approx. 1 mWOutput 12.5 WBrightness 612 lmEfficiency 49 lm/WLight colour 3000 K / SDCM 3Colour rendering Ra ≥ 80LED life expectancy 50,000 h (L70B10 to LM80)LED cooling system Active and Passive Thermo Control Detection angle160° with sneak-by guardReach 1 - 5 mTime setting 5 sec. - 15 min.Basic light level10%Response brightness2-2000 lxManual override selectable, 4hSoft light start YesDegree of protection (IP)IP44Protection class IIImpact strength NoneTemperature range-20°C to +50°CMaterial Aluminium, UV-resistant plastic Lamp STEINEL LED systemVersion SilverApplicationoutdoors, ideal for building entrances and fronts of buildings.。


施耐德触摸屏说 明 及 操 作 手 册使用该设备前请务必仔细阅读本说明书柳州富达机械有限公司LIUZHOU TECH MACHINERY CO., LTDCode 2205 6010 41 Edition 7/2009柳州富达机械有限公司公司地址:柳州市阳和工业新区工业园,B-22-1,B-23-1 邮编:545006 商务部电话:(0772)3171004 3172024 3172648 3172248售后服务电话:(0772)3172247 3173004技术部电话:(0772)3171256 3171564传 真:(0772)3171027网 址:E-mail:fudalz@ liutech@授权及服务中心如果机器需要停机或者没有正常运行,请关闭机器但不要试图去修理他。
请联系一个拥有授权的服务中心来修理,并且需要采用原配件。
对本建议的疏忽将会对压缩机设备的安全造成损坏。
说 明请妥善保存本说明书,以便随时查用;本手册是该机器的一部分。
请您务必在使用本机器之前详细阅读本说明书。
.对设备进行的安装以及随后的操作都必须充分地考虑到电气设备的操作规定及个人安全因素。
性能和安全说明当需要对机器进行维修的时候应先停机。
即使是小的操作也需要由拥有资格的技术人员来进行。
制造商对任何因违反本手册所造成的损失不负任何责任。
本设备不允许安装在户外。
施耐德触摸屏XBT RT500操作说明一、本说明书仅适用于使用施耐德触摸屏XBT RT500的螺杆压缩机。
XBT RT500的操作为触摸+按键相结合的形式:二、运行参数的显示在该页面上,可翻看压缩机的各种状态信息。
三、参数的设定在运行参数显示页面,按下F2按键,可进入参数设定页面。
该页面有三个选项,通过三个触摸箭头分别进入。
通过返回箭头会到参数显示页面。
1、压力传感器调零在机器开动前,要对压力传感器调零。
通过两边的触摸按键,使压力传感器显示的压力在零压状态下显示为零。
2、运行参数的设定,该项参数不需密码3、保护参数的设定在进入设定前,必需输入密码。

I O 0000000981.02Modicon M221Logic Controller用户指南11/2020目录1Modicon M221 Logic Controller第I部分编程指南. . . . . . . . . . . . . . . . . . . . . . . . . . . . . . . . . . . . . . . . . . . . .2Modicon M221 Logic Controller第II部分高级功能库指南. . . . . . . . . . . . . . . . . . . . . . . . . . . . . . . . . . . . . . . .3Modicon M221 Logic Controller第III部分硬件指南. . . . . . . . . . . . . . . . . . . . . . . . . . . . . . . . . . . . . . . . . . . . .4Modicon TMH2GDB - 远程图形终端第IV部分用户指南. . . . . . . . . . . . . . . . . . . . . . . . . . . . . . . . . . . . . . . . . . . . .5Modicon TMC2 - 扩展板第V部分编程指南. . . . . . . . . . . . . . . . . . . . . . . . . . . . . . . . . . . . . . . . . . . . . .6Modicon TMC2 - 扩展板第VI部分硬件指南. . . . . . . . . . . . . . . . . . . . . . . . . . . . . . . . . . . . . . . . . . . . . .I O 0000003302.01Modicon M221Logic Controller编程指南02/2020本文档中提供的信息包含有关此处所涉及产品之性能的一般说明和/或技术特性。
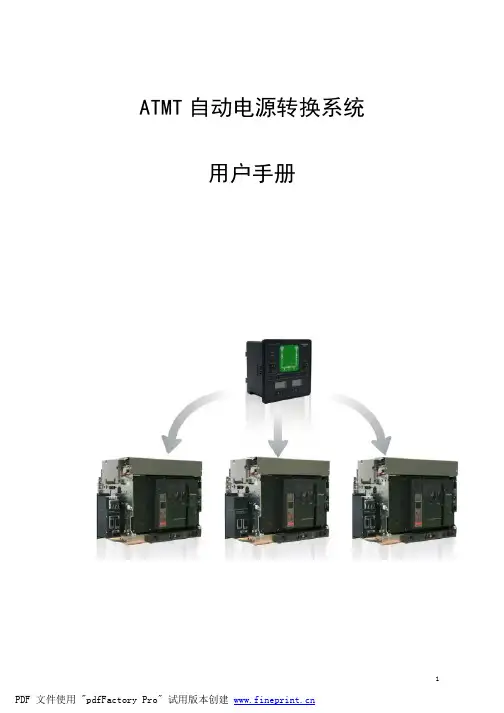
ATMT自动电源转换系统用户手册下面的符号将用于本手册的说明,提醒您注意潜在的危险,或者请您注意那些阐述、简化过程和关键操作。
开关的不可恢复性损坏。
X: 关键性操作,提示您使用不当时,可能使控制器工作于非正常状态。
请注意:电气设备应该让有资格的专业人员进行安装、操作、使用、维护。
未按使用手册操作而造成的不良后果,施耐德电气公司将不负任何责任。
目录一、控制器介绍 (1)1. 符合标准 (1)2. 污染等级 (1)3. 抗湿热等级 (1)4. 电磁兼容性 (1)5. 安装与操作指南 (1)6. 安全信息 (1)7. 控制器类型 (1)二、控制器操作及参数设置 (3)1. 2A/2B控制器面板介绍 (3)2. 3A/3B控制器面板介绍 (4)3. 显示及设置 (5)三、控制器端子说明 (11)四、安装及接线 (12)1. 控制器外形及安装尺寸 (12)2. 适配器外形及安装尺寸 (13)3. 适配器与开关接线图 (15)4. 2A/2B整体安装图 (16)5. 3A/3B整体安装图 (17)一、控制器介绍1.符合标准•GB14048.1-2006 低压开关设备和控制设备:总则•GB14048. 2-2008 低压开关设备和控制设备:断路器•GB/T14048.11-2008 低压开关设备和控制设备:多功能电器转换开关电器•IEC60947:2005 Low-voltage switchgear and controlgear•IEC60947-2:2005 Low-voltage switchgear and controlgear: Breakers•IEC60947-6-1:2005 Low-voltage switchgear and controlgear: Multiple function equipment- Transfer switching equipment2.污染等级•Level33.抗湿热等级A TMT已通过下列标准所规定的严格环境条件下的试验•IEC60068-2-1 干冷环境(-5℃)•IEC60068-2-1 干热环境(+40℃)•IEC60068-2 低温4.电磁兼容性•辐射等级B级执行标准GB4824(CISPR11)•静电放电空气放电Level3;接触放电Level2 执行标准GB1 7626.2-2006(IEC61000-4-2)•射频电磁场LE VEL3 执行标准GB1 7626. 3-2006 (IEC61000-4-3)和GB1 7626.6-2006 (IEC61000-4-6)•电快速瞬变脉冲群LE VEL3 执行标准GB1 7626.4-2008 (IEC61000-4-4)•浪涌LE VEL3 执行标准GB1 7626. 5-2008 (IEC61000-4-5)5.安装与操作指南即使控制单元处于待机状态,在手动操作断路器前需要将其断电,它可能在没有任何警告的情况下操作断路器。

施耐德re22r2型时间继电器说明书施耐德re22r2型时间继电器是一种高质量、高性能的电器设备,用于自动控制和计时监控各种电路设备。
此类型时间继电器可以用于监控状态、工艺和机器控制,有助于提高生产效率。
re22r2型时间继电器有8个操作模式,可用于多种控制场合。
其操作模式包括以下:单个和重复脉冲、滞后、自动和手动重置、连续和间歇、以及一般信号应用模式。
re22r2型时间继电器具有多种功能和特性,包括以下:1.可选择时间范围为0.1秒到300小时,能够满足不同应用的需要。
2.在负载电流达到10A时,具有出色的高功率继电器。
3.集成的LED指示灯,能够轻松确定时间继电器是否在工作。
4.可以便捷的设置时间继电器,采用数码旋钮进行操作,简单易用。
5.具有高精度和稳定的计时系统,能够保证时间的准确性,可高效的控制各种设备运行。
此外,re22r2型时间继电器还具有高可靠性和低噪音等特点,这些特性可以确保设备的长期稳定运行。
我们建议使用施耐德的re22r2型时间继电器,以提高电路的控制精度和效率。
在使用re22r2型时间继电器时,需要注意以下事项:1.在使用之前,请务必仔细阅读产品说明书,确保操作正确。
2.请仔细检查线路和继电器的连接,确保接触良好。
3.在操作之前,请确保电路和设备处于安全状态,并避免任何意外或电击危险。
4.请勿尝试对时间继电器进行任何非法修改或更改程序,以防止损坏设备。
总之,施耐德re22r2型时间继电器是一种高性能、高质量、适用于多种场合的电气设备。
其高可靠性和精确计时功能使其成为自动控制和计时监控的理想选择。
我们建议用户在使用re22r2型时间继电器时,充分了解其特性和规范操作,以确保设备的高效安全使用。
施耐德定时器使用说明书
1、按“定时”进入第1组定时开的设定(显示、开)。
2、按“星期、时、分”设定开启时间(星期、时、分)。
3、按“定时”进入第1组定时开关的设定(显示、关)。
4、按“星期、时、分”设定关的时间(星期、时、分)。
5、重复“1、2、3、4”步骤,可设定2--10组开关的时间。
6、重复按“定时”检查各组开关时间和星期是否与要求的一样,如果不正确,还应重复步骤2、4。
7、按“自动、手动”请根据当前时钟时间在设定的自控时间里处于开或关,确定开关符号从“开”调到“自动”或从“关”调到“自动”。
8、按“时钟”结束时间设定进入时钟显示状态。
说明书功能和用途本产品能根据用户设定的时间、自动打开和关闭各种用电设备的电源。
控制对象可以是路灯、霓虹灯、广告招牌灯、生产设置、广播电视设备等一切需要定时打开和关闭的电路器设备和家用电器。
技术参数1、工作电压220V/50Hz2、适用电压范围160V~240V3、开关容量阻性25A、感性20A4、消耗功率<1W5、内有电池保存数据6、每天最多可设置10次开和10次关手自动两用7、开关时间可按天循环或按周循环8、最长控制时间为168小时最短控制为1分9、环境温度-20~60℃10、计时误差每天走时小于0.5秒11、环境湿度<95%12、净重430g操作说明一、调时钟:(出厂时已调好如需重新调整)按住“时钟”键不放的同时再按“校星期”键,“校时”键和“校分”键。
二、定时设置用户阅读说明书时,请认清产品面板上的按键,一边阅读,一边操作。
用【自动/手动】键如图1所示调整至自动状态,然后如图5所示进行以下操作:①、按【定时】键,如图1,出现1开,用【小时】、【分钟】键设定开始时间,如图3所示设定18:30开,②、设定完开始时间后再按【定时】键,如图2所示,用【小时】、【分钟】键设定关闭时间,按【星期】键设定周期,不断按【星期】键,显示不同的周期,根据您的需要选择适合需要通电的周期,如图4所示,设定23:20关,表示18:30至23:20这段时间一直自动通电。
周一至周日都亮起,周期为周一至周日都按您设定的时间通电。
设定完后若需要设定下一组则再按【定时】键,以此类推,用【小时】、【分钟】键设定时间,按【定时】键进入下一步。
若要退出则按【时钟】键,数据自动保存,系统将按您设定时间按时通电。
如果设定完没按【时钟】键退出,30秒后自动退出,进入平常时钟显示状态。
数据也自动保存。
图5三、关闭定时设置如果需要关闭某一组,则按【定时】键,进入到某组时,按【取消/恢复】键,如图1所示,显示--:--表示这组关闭。