明基相机使用说明书
- 格式:doc
- 大小:1.42 MB
- 文档页数:31
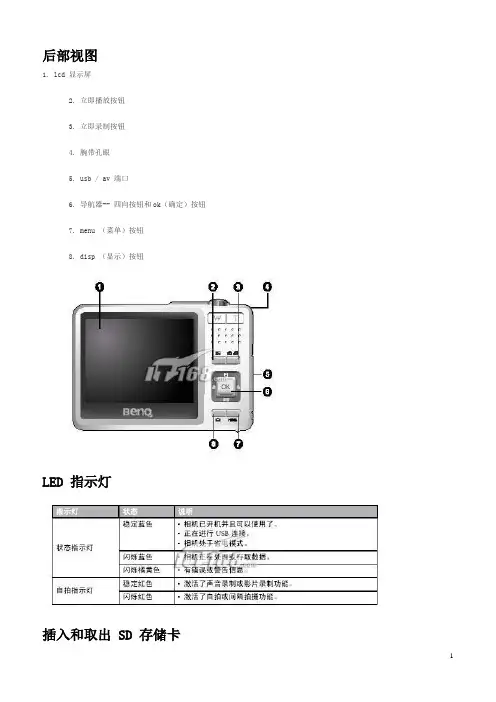
后部视图1. lcd 显示屏2. 立即播放按钮3. 立即录制按钮4. 腕带孔眼5. usb / av 端口6. 导航器-- 四向按钮和ok(确定)按钮7. menu (菜单)按钮8. disp (显示)按钮LED 指示灯插入和取出 SD 存储卡dc e600 配备24 mb 内部存储器,可让您在相机中录制视频剪辑、捕获图像或制作语音文件。
此外,还可以使用选购的sd (s ecure digital) 存储卡扩展存储容量,从而存储更多文件。
1. 在插入或取出存储卡之前,务必关闭相机的电源。
2. 按照如图所示的正确方向插入sd 存储卡。
3. 关闭电池/sd 存储卡仓盖。
如要取出sd 存储卡,请确保关闭相机电源。
轻轻地按一下存储卡的边缘,卡会弹出来。
1 在初次使用之前,务必利用本相机格式化sd 存储卡。
2 为防止意外消除sd 存储卡上的有用数据,可以将写保护开关(位于sd 存储卡侧面)推到lock (锁定)位置。
3 如需保存、编辑或消除sd 存储卡上的数据,必须解除卡锁定。
4 格式化内部存储器时,不要在相机中插入存储卡。
否则,将格式化存储卡而不格式化相机的内部存储器。
5 格式化是一个不可逆的操作,执行后无法恢复数据。
在格式化前备份您的数据。
6 存在读写问题的sd 存储卡可能无法正确格式化。
7 支持下列容量的sd 存储卡:8 mb、16 mb、32 mb、64 mb、128 mb、256 mb、512 mb 和1gb。
此相机相容由panas onic、toshiba 和sandisk 制造的sd 存储卡。
有关购买资讯,请与当地经销商联系。
设置日期和时间首次使用相机前,请先设置日期和时间。
有关的详细信息,请参见第20 页的3.4.1“设置模式菜单”中的表。
开始捕获图像2. 在拍照模式下,在lcd 显示屏中选景。
3. 先将快门按钮按下一半(1),然后完全按下(2)。
1、将快门按钮按下一半时,将自动对焦和调整曝光。


DC E800数码相机用户手册欢迎使用i 前言前言关于本手册本手册旨在帮助您使用新的数码相机。
我们尽可能保证所提供信息的准确,并会在不通知的情况下进行内容的修改。
版权版权所有 2008 by BenQ Corporation。
保留所有权利。
未经本公司事先书面许可,不得以任何形式和电子、机械、磁学、光学、化学、手册以及其它任何方式复制、传播、转录本出版物的任何部分,也不得将任何部分存储到检索系统中或翻译成任何语言或计算机语言。
免责声明BenQ Corporation对于本文档的内容不提供任何明示或隐含的陈述或担保,特别是对于针对特殊目的的适销性和适用性不提供任何担保。
另外,BenQ Corporation保留修订本出版物和随时修改本文档内容而不需要通知任何人的权利。
保管相机• 不要在下列环境范围条件下使用相机:温度低于0°C 或高于40°C。
• 不要在下列环境条件下使用或存放相机:-直接阳光照射-高且多尘的地方-靠近空调、电热器或其它热源的地方-在阳光直接照射的封闭汽车内-不稳定的位置• 如果相机潮湿,应尽快用干布擦拭。
• 盐或海水可能导致相机严重损坏。
• 不要使用酒精等溶剂清洁相机。
• 如果镜头脏了,应使用镜头刷或软布清洁镜头。
不要用手指触摸镜头。
• 为防止触电,不要尝试自行拆卸或修理相机。
• 水可能导致火灾或触电。
因此,将相机存放在干燥的地方。
• 当正在下雨或下雪时,不要在户外使用相机。
• 不要在水中或靠近水的地方使用相机。
• 如果异物或水进入相机,应立即关闭电源,并取出电池。
取出异物或擦干水,然后将相机送到维修中心进行检修。
• 将数据尽快转移到计算机以避免丢失图像和/或视频剪辑。
• 欧盟用户家用废旧电气和电子设备的废弃。
关于本手册前言 ii在产品或其包装上的此图案,说明勿将该产品视为一般家用废弃品处理。
该产品于报废时,请将该电气电子设备回收至当地的回收机构, 以确保正确处理该产品。

DC T800数码相机用户手册欢迎版权版权所有 2007 by BenQ Corporation。
保留所有权利。
未经本公司事先书面许可,不得以任何形式和电子、机械、磁学、光学、化学、手册以及其它任何方式复制、传播、转录本出版物的任何部分,也不得将任何部分存储到检索系统中或翻译成任何语言或计算机语言。
免责声明BenQ Corporation对于本文档的内容不提供任何明示或隐含的陈述或担保,特别是对于针对特殊目的的适销性和适用性不提供任何担保。
另外,BenQ Corporation保留修订本出版物和随时修改本文档内容而不需要通知任何人的权利。
保管相机• 本相机的工作温度范围是0到40摄氏度。
温度过低时使用时间会缩短,这是正常现象。
• 不要在下列环境条件下使用或存放相机:• 直接阳光照射• 高且多尘的地方• 靠近空调、电热器或其它热源的地方• 在阳光直接照射的封闭汽车内• 不稳定的位置• 如果相机潮湿,应尽快用干布擦拭。
• 盐或海水可能导致相机严重损坏。
• 不要使用酒精等溶剂清洁相机。
• 如果镜头脏了,应使用镜头刷或软布清洁镜头。
不要用手指触摸镜头。
• 为防止触电,不要尝试自行拆卸或修理相机。
• 水可能导致火灾或触电。
因此,将相机存放在干燥的地方。
• 当正在下雨或下雪时,不要在户外使用相机。
• 不要在水中或靠近水的地方使用相机。
• 如果异物或水进入相机,应立即关闭电源,并取出电池和断开电源适配器。
取出异物或擦干水,然后将相机送到维修中心进行检修。
• 将数据尽快转移到计算机以避免丢失图像和/或视频剪辑。
1.有毒有害物质或元素表依据中国政府针对"电子信息产品污染控制管理办法"为控制和减少电子信息产品废弃后对环境造成的污染,促进生产和销售低污染电子信息产品,保护环境和人体健康,仅提供有关本产品可能含有有毒及有害物质如后:表1有关中国"电子信息产品污染控制管理办法"之相关规定请参考信息产业部所公布之信息表中标示有"X"的所有部件都符合欧盟RoHS 法规 (欧盟关于电子电器设备中限制使用某些有害物质的2002/95/EC 号指令)2.产品环保使用期限的使用条件:在按照本产品的使用条件使用的情况下(说明书中对温湿度等使用条件有详细说明),从生产日期开始,在标志的年限内使用,本产品中含有的有毒有害物质或元素不会对环境造成严重污染或对人身、财产造成严重损害。


DVY31视频会议相机用户手册免责声明BenQ Corporation 对于本文档的内容不做任何明示或隐含的陈述或担保。
BenQ Corporation 保留修订本出版物和随时修改本文档内容而不需通知任何人的权利。
版权版权所有 2021 BenQ Corporation。
保留所有权利。
未经 BenQ Corporation 事先书面许可,不得以任何形式和电子、机械、磁性、光学、化学、手工以及其它任何方式复制、传播和转录本出版物的任何部分,也不得将任何部分存储到检索系统中或翻译成任何语言或电脑语言。
目录3目录重要注意事项 (4)应用程序说明 (4)电气安全 (4)运输注意事项 (4)小心安装 (4)磁干扰 (4)请勿随便拆卸 (4)包装内容 (5)功能 (6)安装说明 (7)产品界面 (7)使用产品 (8)使用隐私保护罩 (8)产品信息 (9)规格 (9)尺寸 (10)维护和故障排除 (11)维护 (11)故障排除 (11)12/29/214重要注意事项重要注意事项本手册简要介绍了相机功能、安装和操作。
请在应用前仔细阅读。
应用程序说明为防止对本相机或与其连接的任何产品的损坏,本产品只能在规定范围内使用:1.请勿将将本相机置于雨水或潮气中。
2.本产品不含用户可自行维护的零部件。
因用户未经许可而拆卸本产品所造成的任何损坏不属质保范围。
3.为防止电击,请勿拆卸相机;只有合格的技术人员才能进行安装和维护。
4.请勿在超出限制的温度、湿度或电源规格的情况下使用本产品。
5.清洁相机镜头时,请用干燥的软布擦拭。
如果本产品有严重脏污,请使用中性洗涤剂轻轻擦拭。
请勿使用强力或腐蚀性清洁剂,以免刮伤镜头和影响图像质量。
电气安全本产品必须严格按照当地的电气安全标准进行安装。
运输注意事项避免产品在运输、储存和安装过程中受到重压、剧烈振动、浸泡等损坏。
小心安装1.相机机身为有机材料制成,请让其远离腐蚀性液体、气体或固体材料。

DC X800 數位相機使用手冊歡迎使用版權版權所有©2007 BenQ Corporation。
保留所有權利。
未獲得本公司的書面同意之前,不可以任何形式或電子、機械、磁性、光學、化學、人工或其他任何方法再製、傳送、轉錄、儲存本指南在檢索系統中或轉譯成任何語言。
免責聲明BenQ Corporation 不作任何與本文件的內容有關的明示或暗示性陳述或擔保,並且特別聲明對任何特定用途的保固、商用性或適用性擔負任何責任。
此外,BenQ Corporation 保留修改本指南的權利,而且不定期修改本指南的內容時,恕不另行通知。
保養您的相機• 相機操作溫度在攝氏 0 度和 40 度之間。
操作時間在溫度太低時縮短是正常情況。
• 不可在下列環境中使用或存放您的相機:• 日光直射• 多灰塵的位置• 在冷氣機、電熱器或其他熱源旁• 陽光直射的密封車子內• 不穩定位置• 請用乾布擦拭沾到水的相機。
• 鹽份或海水可能對相機造成嚴重損壞。
• 切勿使用酒精等溶劑清潔相機。
• 若鏡頭髒污,請使用鏡頭專用軟刷或軟布清潔鏡頭。
請勿以手指碰觸摸鏡頭。
• 請勿嘗試自行拆解或維修相機以避免觸電。
• 水份可能導致火災或觸電。
因此請將相機存放於乾燥之處。
• 請勿在雨天或下雪時於戶外使用相機。
• 請勿在水中或近水處使用相機。
• 若有異物或水分不慎進入您的相機,請立刻關閉相機電源,然後取出電池。
取出異物或擦乾水份,並送至維修中心檢修。
• 請盡可能將拍攝檔案傳輸至電腦內,以避免遺失。
<備註>目錄目錄認識本相機 (1)檢查包裝中的物品 (1)相機元件 (1)前視圖和底視圖 (1)後視圖 (2)準備使用相機 (2)將電池充電 (3)使用多功能按鈕(相機模式) (3)使用多功能按鈕(可攜式媒體播放器模式) (4)使用 microSD 記憶卡 (4)設定語言 (5)設定日期和時間 (5)操作相機(相機模式) (5)操作相機(PMP 模式) (6)PMP 模式的設定 (7)場景模式 (9)閃光燈模式 (11)對焦模式 (12)驅動模式 (12)影像尺寸 (13)影像畫質 (13)對焦區 (13)面部捕捉 (14)電池狀態 (14)設定曝光值 (14)自動曝光測光 (15)白平衡 (15)ISO 感光度 (16)效果 (16)日期列印 (17)設定銳利度、飽和度與對比度 (17)錄影模式設定 .............................17其他設定 (18)播放模式(適用於相機拍攝的影像與視訊) (19)適用於播放和編輯的選項 (20)放大影像 (20)一次查看多個檔案 (20)保護 (20)刪除檔案 (20)旋轉影像 (21)幻燈片 (21)Z-Lighting (21)剪裁 (21)更改尺寸 (22)語音備忘錄 (22)開機畫面 (22)將相機搭配於電腦或影音系統 (22)隨附軟體 (22)將相機連接到電腦 (23)將本相機連接到影音系統 (23)列印影像 (23)使用 PictBridge 列印 (23)故障排除和維修資訊 (24)技術支援 (25)規格 (26)認識本相機 1繁體中文認識本相機檢查包裝中的物品打開包裝盒並檢查下列物品是否齊全。
明基相机使用说明书后部视图1. lcd 显示屏2. 立即播放按钮3. 立即录制按钮4. 腕带孔眼5. usb / av 端口6. 导航器-- 四向按钮和ok(确定)按钮7. menu (菜单)按钮8. disp (显示)按钮LED 指示灯插入和取出 SD 存储卡dc e600 配备24 mb 内部存储器,可让您在相机中录制视频剪辑、捕获图像或制作语音文件。
另外,还能够使用选购的sd (secure digital) 存储卡扩展存储容量,从而存储更多文件。
1. 在插入或取出存储卡之前,务必关闭相机的电源。
2. 按照如图所示的正确方向插入sd 存储卡。
3. 关闭电池/sd 存储卡仓盖。
如要取出sd 存储卡,请确保关闭相机电源。
轻轻地按一下存储卡的边缘,卡会弹出来。
1 在初次使用之前,务必利用本相机格式化sd 存储卡。
2 为防止意外消除sd 存储卡上的有用数据,能够将写保护开关(位于sd 存储卡侧面)推到lock (锁定)位置。
3 如需保存、编辑或消除sd 存储卡上的数据,必须解除卡锁定。
4 格式化内部存储器时,不要在相机中插入存储卡。
否则,将格式化存储卡而不格式化相机的内部存储器。
5 格式化是一个不可逆的操作,执行后无法恢复数据。
在格式化前备份您的数据。
6 存在读写问题的sd 存储卡可能无法正确格式化。
7 支持下列容量的sd 存储卡:8 mb、16 mb、32 mb、64 mb、128 mb、256 mb、512 mb 和1gb。
此相机相容由panasonic、toshiba 和sandisk 制造的sd 存储卡。
有关购买资讯,请与当地经销商联系。
设置日期和时间首次使用相机前,请先设置日期和时间。
有关的详细信息,请参见第20 页的3.4.1“设置模式菜单”中的表。
开始捕获图像2. 在拍照模式下,在lcd 显示屏中选景。
3. 先将快门按钮按下一半(1),然后完全按下(2)。
1、将快门按钮按下一半时,将自动对焦和调整曝光。
BENQ Digital Camera 1300 Electronic User’s Manual Introduction to Benq Digital Camera 1300 1 Touring Your Camera 2Preparing the Camera for Using 5Installing batteries and strap 5Installing Digital Camera Software 6 Using Your Camera 8The digital camera mode 8Taking pictures 8Managing photos in camera 11The continuous shooting mode 13The video camera mode 14The sound recording mode 15The PC camera mode 16Options 18Troubleshooting Tips 25Service Information 26CopyrightCopyright (c) 2002 by Benq Corporation. All rights reserved. No part of this publication may be reproduced, transmitted, transcribed, stored in a retrieval system or translated into any language or computer language, in any form or by any means, electronic, mechanical, magnetic, optical, chem-ical, manual or otherwise, without prior written permission from Benq.Brands and product names are trademarks or registered trademarks of their respective companies.DisclaimerBenq makes no warranty of any kind with regard to this material, including, but not limited to, the implied warranties of merchantability and fitness for a particular purpose. Benq assumes no responsibility for any error that may appear in this document. Benq makes no commitment to update nor to keep current the information contained in this document.Taking care of your camera• Do not use your camera over the following environmental range: temperature: O C to 40 C, relative humidity: 45% ~ 85%.• Do not use or store your camera in environments listed below:Direct sunlightHigh humidity and dusty places.Next to the air conditioner, electric heater or the other heat sources.In a closed car that is directly under the sun.Avoid shaky places.• If your camera becomes wet, wipe it with dry cloth as soon as possible.• Salt of seawater may cause severe camera damage.• Do not use organic solvents, such as alcohol, etc., to clean your camera.• If the lens or viewfinder is dirty, please use the lens brush or soft cloth to clean the lens. Do not touch the lens with your fingers.• To prevent electrical shock, do not attempt to disassemble or repair your camera by yourself.• Water may cause a fire or electric shock. Therefore, please store your camera in a dry place.• Do not use your camera outdoors when it is raining or snowing.• Do not use your camera in the water.• If the foreign substance or water gets in your camera, please tum the power off immediately and disconnect the batteries and the transformer. Remove the foreign substance or water, and send it to the maintenance center.Table of Contents1. Introduction to Benq Digital Camera 1300 (1)2. Touring Your Camera (2)3. Preparing the Camera for Using (5)3.1. Installing batteries and strap (5)3.2. Installing Digital Camera Software (6)4. Using Your Camera (8)4.1. The digital camera mode (8)4.1.1. Taking pictures (8)4.1.3. Managing photos in camera (11)4.2. The continuous shooting mode (13)4.3. The video camera mode (14)4.4. The sound recording mode (15)4.5. The PC camera mode (16)4.5.1. Using Digital Camera as a PC camera (16)4.5.2. The function of the DC 1300 monitor frame (17)4.6. Options (18)5. Troubleshooting Tips (25)6. Service Information (26)1. Introduction to Benq Digital Camera 1300 1. Introduction to Benq Digital Camera 1300Benq Digital Camera 1300 is equipped with the following features:• Small size for easy carriage and convenience of use• High resolution: 1280 x 1024 pixels in digital camera mode• Onboard 16 MB memory• Mode selectable flash light• Built-in self-timer• Fixed focus : 40 cm for macro mode, and 1.5 m to infinity from camera for normal mode• Electronic shutter• Easy recognizable LCD screen for camera and image handling• USB interface for easy and quick connection to PC• Automatic power-off system• 5 operation modes:Digital camera mode for taking photosPC camera mode for using the camera as an image capturing device for PCVideo camera mode for capturing motion clips with a PCContinuous shooting mode for taking photos continuouslySound recording mode for recording sound2. Touring Your CameraViewfinderShutter Flash lightLensMacro switch USB connection portFront ViewBusy indicator Status display Power/ Mode buttonStrap EyeletWhite Balance Mode/ + button Pixel Selection/ _ buttonRear ViewFlash/ Enter buttonSelf-timer activation indicatorViewfinderBottom ViewTripod setBattery compartment coverAuto mode (White Balance)Image counter Battery status Erase Mode The status displayPC Camera Mode Sound Recording Mode Video Camera Mode Continuous Shooting ModeDigital Camera ModeCompression Selection Mode (Fine/ Normal)Resolution Selection Mode (1280 X 1024)(1024 X 768)(640 X 480)Self-timer Mode Fluorescent Mode Overcast Mode Flash Mode Tungsten Light ModeDaylight Mode3. Preparing the Camera for Using3.1. Installing batteries and strapOpen the battery compartment cover and insert two AAA alkaline batteries into the compartment. Note the polarity of the batteries when you install.Refer to the illustration below to install the strap.Now you are ready to use your camera!3.2. Installing Digital Camera SoftwareThe CD that accompanies your camera contains the digital camera driver bundled with valuable image-editing software. To install digital camera software:Insert the utility CD into the CD-ROM drive. The software installation menu will appear automatically.1. If the software installation menu does not automatically display, open Windows Explore and double-click the “Autorun.exe” icon in the CD-ROM directory.2. If your Operating System is Windows XP, please feel comfortable to continue the installation process when the below dialog box appears on the screen. (In Windows 2000/NT, the same dialog box may also occur. Please feel comfortable to continue the installation process.)Click “Camera Driver” on the menu. Follow the on-line instructions to complete the driver intallation.You may be prompted to restart the computer at this point. Do not restart your computer until all the software has been installed.Click to install digital camera driver Click to install Video Impression Click to browse User’s Manual Click to install NetMeeting Click to install Photo Base Click to install Acrobat ReaderClick to close the menu and exitClick to install DirectX 8.13. Preparing the Camera for UsingClick on other items on the menu to install the bundled application software.Software DescriptionDirectX 8.1DirectX gives developers the tools to create amazing games for theWindows operating system and allows users the multimedia power torun the latest cutting-edge games.Acrobat Reader Install this software program to open document files in .pdf format.VideoImpression With VideoImpression you can edit and combine your video files. Newvideos can be created using existing video, animation, and image files.Quickly and easily create desktop video presentations for use at home,business or on the internet.PhotoBase You can use this application program to easily manage your pictures.NetMeeting This software program allows you to use your digital camera as avideo camera for video conferencing.A desktop shortcut of the program is automatically created after successful installation. Restart your computer when you have finished installing all of the above software.4. Using Your CameraBenq Digital Camera 1300 provides 5 different operation modes: Digital camera mode, Continuous shooting mode, video camera mode, Sound recording mode, PC camera mode. With these modes, you can not only use Digital Camera 1300 to take photos, but capture and show images in various ways by connecting to your PC.4.1. The digital camera modeIn digital camera mode, you can take photos, view and download them from your camera and save them as files.4.1.1. Taking picturesPress the POWER button for 3 seconds to turn on the power of the camera. The camera beeps once and enters camera mode. The status of camera will appear on the status display.: This icon indicates that the white balance value setting is in Auto mode. You can choose to change the white balance setting. See “4.6.3. White Balance Setting” on page 21.: The counter that indicates the number of photos taken. You can choose to let the counter display in another way.: Indicates the battery status. If the battery power becomes low, the battery icon will become empty.: This icon indicates the DC 1300 is in digital camera mode. You can change the mode setting by pressing thePower/ Mode button.: This icon indicates the flash mode is set to flash off mode. You can change the flash mode setting by pressing the Flash/ Enter button.: This icon indicates the compression setting is set to “Fine”. You can change the compression setting by pressing the Pix/ _ button.: This icon indicates the resolution setting is set to “1280 X 1024”. You can also change the resolution settingby pressing the Pix/ _ button.Look through the viewfinder to determine the object to be taken. Make the object appear in the center of the viewfinder.Make the object appear in the center of theviewfinder.Press the shutter. The image will be taken with a beep sound and the BUSY indicator will flash, indicating that the camera is saving the image to memory.When the indicator becomes off, you are ready to take the next photo.Note: Do not press the POWER button when the BUSY indicator flashes.After the shutter is pressed, hold the camera still until the BUSY indicator becomes OFF to prevent blurred images.To save battery power, if the camera power is turned on and not used for 1 minutes, it will be turned off automatically.4.1.2. Turning off the cameraPress and hold the POWER button of the camera for 3 seconds. The camera beeps once and the power will be turned off.4.1.3. Managing photos in camera4.1.3.1. Deleting the last photo takenPress the “Power/ Mode” button 4 times. The icon will appear on the status display. It indicates the camera is in Erase mode.Press the “Flash/ Enter” button, the camera will beep once and the BUSY indicator will flash, then the last photo taken will be deleted.4.1.3.2. Deleting all photosWhen in Erase mode, you can choose to delete the last photo or all the photos saved in the memory of camera by pressing the “ WB/ +” button or “Pix/ _ ” button.After choosing to delete all the photos saved in camera memory, press the “Flash/ Enter” button. The camera will beep once and the Busy indicator will flash, then all photos saved in camera memory will be deleted.4.1.3.3. Downloading photos from cameraTurn on the power of the camera by pressing the “Power/Mode” button.Refer to the illustration below to connect the camera to PC using the USB cable. When connected, the PC mode icon and the number of images in camera memory will appear on the status display.Then the system will transfer all the images from camera to PC automatically. The images will be downloaded to C drive and saved in the file folder named “My Medias”. Everytime you connect the camera and PC for transferring images, the system will set up a new folder in “My Medias” for downloading and saving these images. To change the transferringsettings, just right-click on the icon on Windows Taskbar and select “Setting” in the submenu which appears, then you can reset the transferring settings.4.2. The continuous shooting modeIn continuous shooting mode, you can take 3 photos a time by simply pressing the shutter button once.Taking picturesPress the POWER button for 3 seconds to turn on the power of the camera. The camera beeps once and enters camera mode.Then press the “Power/ Mode” button 1 times. The icon will appear on the status display. It indicates the camera is in continuous shooting mode. The status of camera will appear on the status display as follow shows.After entering the continuous shooting mode, press the shutter button once and the camera will capture 3 photos continuously. Every photo will be taken in the time sequence by every 0.6 second.4.3. The video camera modeIn video camera mode, you can shoot video by pressing the shutter button.Shoot videosPress the POWER button for 3 seconds to turn on the power of the camera. The camera beeps once and enters camera mode.Then press the “Power/ Mode” button 2 times. The icon will appear on the status display. It indicates the camera is in video camera mode. The status of camera will appear on the status display as follow shows.After entering the video camera mode, press the shutter button and the camera starts to shoot video. It will show “REC” on the status display at the same time and the Busy indicator will also keep on flashing. These activation will keep on until you stop shooting. Press the shutter button again to stop shooting video.In this mode, you can shoot video up to 90 seconds. The video recorded will be saved in camera memory as “AVI” file format.4.4. The sound recording modeIn sound recording mode, you can record sounds by pressing the shutter button.Record soundsPress the POWER button for 3 seconds to turn on the power of the camera. The camera beeps once and enters camera mode.Then press the “Power/ Mode” button 3 times. The icon will appear on the status display. It indicates the camera is in sound recording mode. The status of camera will appear on the status display as follow shows.After entering the sound recording mode, press the shutter button and the camera starts to record sounds. It will show “REC” on the status display at the same time and the Busy indicator will also keep on flashing. These activation will keep on until you stop shooting. Press the shutter button again to stop recording sounds.In this mode, you can record sounds up to 9 minutes. The sounds recorded will be saved in camera memory as “WAV” file format.4.5. The PC camera modeIn PC camera mode, you can use Digital Camera 1300 as a motion image capturing device for your PC. You can use it for video conferencing, capturing snapshots and so on.4.5.1. Using Digital Camera as a PC cameraTurn on the power of the camera by pressing the “Power/Mode” button.Refer to the illustration below to connect the camera to PC using the USB cable. When connected, the PC mode iconand the number of images in camera memory will appear on the status display.Right-click on the icon on Windows Taskbar and select “QuickSnap” in the submenu which appears, then you will see a DC 1300 frame appear on the screen. Wait several seconds and the frame will turn to be a DC 1300 monitor frame as follow shows.The motion images captured by camera will appear on the motion image display of the DC 1300 monitor frame. This means you are using your DC 1300 as a PC camera. It is shown as follows:4.5.2. The function of the DC 1300 monitor frameThere are 5 buttons on the buttom of the DC 1300 monitor frame. The fuctions of these 5 buttons are listed below:Motion Images CapturedMotion Image DisplayHelp Tool BoxExitSnapshotResolution Setting4.6. Options4.6.1. Using the flash lightYour camera is equipped with a flash light. It is recommended that you use the flash within the best working range as illustrated below.4.6.1.1. Turning on/off the flash lightTurn on the camera power and the default flash icon appears on the status display.Press the Flash/ Enter button, the camera will beep as the flash icon changes in the sequence as follow illustrated:Now you are ready to take pictures.Note: If the macro function is turned on, the flash light will be disabled.It takes about 11 seconds for the flash light to recharge for the next shot. During charging, the Flash indicator blinks. Charging is completed when the Flash indicator becomes off.Auto flash lightFlash light OFFForced flash light ON4.6.2. Using the macro functionIf you need to shoot objects at a very close distance (from 8 inches to 2 feet), turn on the macro function before shooting.To turn on, slide the Macro switch to the “macro on” position.To turn off the macro function, slide the switch to the position marked .Slide the switch to theposition marked.4.6.3. White Balance SettingUnder different environments, you can adjust white balance settings to get the best color registration image effect. The DC 1300 provides 5 white balance settings to modify white balance under different situations.Turn on the camera power and the default flash icon appears on the status display.Press the WB/ + button, the camera will beep as the white balance icon changes in the sequence as follow illustrated:White Balance Settings:Auto: The DC 1300 selects a white balance mode automatically.Tungsten light: Select this mode if you are taking photos under tungsten light bulb. Daylight: Select this mode if you are taking photos under direct daylight.Overcast: Select this mode if you are taking photos under windy sky.Fluorescent light: Select this mode if you are taking photos under fluorescent light.Now you are ready to take pictures under different situations.Daylight Auto Tungsten light Overcast Fluorescent light4.6.4. Enabling self-timerThe self-timer function allows you to let the camera take pictures 10 seconds after the shutter is pressed. To enable self-timer:Press the Power/ Mode button 5 times. The self-timer icon will appear on the status display.After10 seconds, the camera will take photos automatically.Press the shutter and the camera will start generating beep sound.The self-timer activation indicator on the front panel and the busyindicator on the rear panel will both blinks simultaneously.4.6.5. Pixel SettingThe pixel setting function allows you to let the camera take pictures in different compression and resolution. To adjust the pixel settings:Turn on the power. The default pixel setting icon will appear on the status display as illustrated below.Press the Pix/ _ button, the camera will beep as the pixel icon changes in the sequence as follow illustrates:Pixel Settings:1. Compression:Fine: Image with low compression.Normal: Image with high compression.2. Resolution:1280 X 1024 Resolution: Image with 1280 X 1024 resolution.1024 X 768 Resolution: Image with 1024 X 768 resolution.640 X 480 Resolution: Image with 640 X 480 resolution. Now you are ready to take photos in different compression and resolution.5. Troubleshooting Tips5. Troubleshooting Tips1. The LCD panel remains blank when I press the POWER button and can't take pictures.Check that the battery is correctly inserted. If it is old, replace it.2. The camera can not take a picture.When the FLASH indicator is on, it takes up about 15 seconds to charge the flash light for the next shot. During this timethe camera is busy and cannot take pictures. Wait until the indicator becomes OFF.3. Cannot download all my images from my camera to PC.The RAM memory installed in your computer may not have sufficient storage space. Close all software programs and pro-ceed to download your images. If the problem persists, download images in batches and store each batch in your hard drive before proceeding to the next batch. Make sure all the images you want are stored prior to clearing the camera memory.4. I have connected the camera to the computer, but the Digital Camera 1300 driver says “Device not ready!”.Make sure that the batteries are installed correctly and there is enough power in them.Check if the camera power is turned on. If not, turn it on and then connect the camera to the computer again.5. In Windows 2000, when I unplug the camera from my computer while running Benq Dgitial Camera 1300 driver, the computer freezes.Unplugging the camera from your computer while running the Digital Camera 1300 driver will cause the computer to become unstable. Do not unplug the camera from your computer when the camera or driver is in use.6. Service Information6. Service InformationTechnical supportIf you encountered problems using Digital Camera 1300 and the camera driver program, please send an E-mail (containing detailed descriptions of the problem you came upon, the hardware and software environment of your system) to the fol-lowing addresses:USA:*******************Europe:*******************Taiwan:*******************China:****************.cnAsiaandothercountries:*******************For free driver program updates, product information and news release, please visit the following web address:/global/For questions about the bundled application, please consult the following web addresses: (Adobe Active Share)。
2011BENQ DC T1460 数码相机用户手册安全警告和注意事项在使用相机之前,请务必阅读并完全理解此部分内容。
若忽视和违背此部分介绍的安全警告注意事项,可能导致相机的保修失效。
而且,除了相机外,您以及您周围的其他人和物品也可能受到严重损坏、受伤、甚至存在死亡危险。
安全注意事项• 将相机及其附件存放在婴幼儿触不到的地方。
特别要注意存储卡和电池等小部件,以免婴幼儿卸下和吞咽它们。
• 为符合所有相关的法律法规并避免可能的健康和财产损失等危险,只应使用原装附件。
• 无论在任何情况下,不要拆解相机。
• 请勿在靠近人眼(尤其是婴幼儿的眼睛)或动物眼睛的地方使用闪光灯。
否则当闪光灯发出闪光时,可能损坏人眼或使动物受惊。
• 例如,电池可能爆炸。
如果导电物品(如珠宝、钥匙或珠链等)接触到电池上裸露的端子,可能导致财产损坏、人身伤害或灼伤。
物品可能形成电路并变得高温。
放置电池时务必小心,特别是将其放入衣袋、钱包或其它带有金属物品的容器中时。
请勿将废弃电池投入火中,否则它们可能爆炸。
• 为防止触电,不要尝试自行拆卸或修理相机。
• 一些相机型号可以使用非充电电池。
当使用这些电池时,请勿对它们充电。
否则,存在爆炸和火灾危险。
环保使用期限部件名称有毒有害物质或元素铅(Pb)汞(Hg)镉(Cd)六价铬(Cr(VI))多溴联苯(PBB)多溴二苯醚(PBDE)LCD 面板X X O O O O塑胶件O O O O O O印刷电路板组件X O O O O O金属件O O O O O O镜头X O O O O O充电器X O O O O O电源适配器X O O O O O电池O O O O O O备注:O :表示该有毒有害物质在该部件所有均质材料中的含量均在『电子信息产品中有毒有害物质的限量要求』标准规定的限量要求以下。
X :表示该有毒有害物质至少在该部件的某一均质材料中的含量超出『电子信息产品中有毒有害物质的限量要求』标准规定的限量要求。
DC X725数码相机用户手册欢迎版权版权所有 2007 by BenQ Corporation。
保留所有权利。
未经本公司事先书面许可,不得以任何形式和电子、机械、磁学、光学、化学、手册以及其它任何方式复制、传播、转录本出版物的任何部分,也不得将任何部分存储到检索系统中或翻译成任何语言或计算机语言。
免责声明BenQ Corporation对于本文档的内容不提供任何明示或隐含的陈述或担保,特别是对于针对特殊目的的适销性和适用性不提供任何担保。
另外,BenQ Corporation保留修订本出版物和随时修改本文档内容而不需要通知任何人的权利。
保管相机• 本相机的工作温度范围是0到40摄氏度。
温度过低时使用时间会缩短,这是正常现象。
• 不要在下列环境条件下使用或存放相机:• 直接阳光照射• 高且多尘的地方• 靠近空调、电热器或其它热源的地方• 在阳光直接照射的封闭汽车内• 不稳定的位置• 如果相机潮湿,应尽快用干布擦拭。
• 盐或海水可能导致相机严重损坏。
• 不要使用酒精等溶剂清洁相机。
• 如果镜头脏了,应使用镜头刷或软布清洁镜头。
不要用手指触摸镜头。
• 为防止触电,不要尝试自行拆卸或修理相机。
• 水可能导致火灾或触电。
因此,将相机存放在干燥的地方。
• 当正在下雨或下雪时,不要在户外使用相机。
• 不要在水中或靠近水的地方使用相机。
• 如果异物或水进入相机,应立即关闭电源,并取出电池和断开电源适配器。
取出异物或擦干水,然后将相机送到维修中心进行检修。
• 将数据尽快转移到计算机以避免丢失图像和/或视频剪辑。
1.有毒有害物质或元素表依据中国政府针对"电子信息产品污染控制管理办法"为控制和减少电子信息产品废弃后对环境造成的污染,促进生产和销售低污染电子信息产品,保护环境和人体健康,仅提供有关本产品可能含有有毒及有害物质如后:表1有关中国"电子信息产品污染控制管理办法"之相关规定请参考信息产业部所公布之信息表中标示有"X"的所有部件都符合欧盟RoHS 法规 (欧盟关于电子电器设备中限制使用某些有害物质的2002/95/EC 号指令)2.产品环保使用期限的使用条件在按照本产品的使用条件使用的情况下(说明书中对温湿度等使用条件有详细说明),从生产日期开始,在标志的年限内使用,本产品中含有的有毒有害物质或元素不会对环境造成严重污染或对人身、财产造成严重损害。
后部视图1. lcd 显示屏2. 立即播放按钮3. 立即录制按钮4. 腕带孔眼5. usb / av 端口6. 导航器-- 四向按钮和ok(确定)按钮7. menu (菜单)按钮8. disp (显示)按钮LED 指示灯插入和取出 SD 存储卡dc e600 配备24 mb 内部存储器,可让您在相机中录制视频剪辑、捕获图像或制作语音文件。
此外,还可以使用选购的sd (s ecure digital) 存储卡扩展存储容量,从而存储更多文件。
1. 在插入或取出存储卡之前,务必关闭相机的电源。
2. 按照如图所示的正确方向插入sd 存储卡。
3. 关闭电池/sd 存储卡仓盖。
如要取出sd 存储卡,请确保关闭相机电源。
轻轻地按一下存储卡的边缘,卡会弹出来。
1 在初次使用之前,务必利用本相机格式化sd 存储卡。
2 为防止意外消除sd 存储卡上的有用数据,可以将写保护开关(位于sd 存储卡侧面)推到lock (锁定)位置。
3 如需保存、编辑或消除sd 存储卡上的数据,必须解除卡锁定。
4 格式化内部存储器时,不要在相机中插入存储卡。
否则,将格式化存储卡而不格式化相机的内部存储器。
5 格式化是一个不可逆的操作,执行后无法恢复数据。
在格式化前备份您的数据。
6 存在读写问题的sd 存储卡可能无法正确格式化。
7 支持下列容量的sd 存储卡:8 mb、16 mb、32 mb、64 mb、128 mb、256 mb、512 mb 和1gb。
此相机相容由panas onic、toshiba 和sandisk 制造的sd 存储卡。
有关购买资讯,请与当地经销商联系。
设置日期和时间首次使用相机前,请先设置日期和时间。
有关的详细信息,请参见第20 页的3.4.1“设置模式菜单”中的表。
开始捕获图像2. 在拍照模式下,在lcd 显示屏中选景。
3. 先将快门按钮按下一半(1),然后完全按下(2)。
1、将快门按钮按下一半时,将自动对焦和调整曝光。
2、当相机对焦完毕并确定曝光时,对焦区域框变成绿色。
3、如果相机无法自动判断出最佳的焦距与曝光值时,对焦区域框变成红色。
1、在强烈阳光或明亮光线条件下,lcd 显示屏会发暗。
这是正常现象。
2、为防止图像模糊,在按快门按钮时应拿稳相机。
在光线较弱的条件下拍摄时,这一点尤其重要,因为在这种情况下相机可能降低快门速度以确保图像正确曝光。
拍摄模式 LCD 显示屏信息1. 拍摄模式4. 白平衡(如果选择[ 详细信息] 显示)5. 曝光值(ev)-0.3, -0.6, -1.0, -1.3, -1.6, -2.0, +0.3,+0.6, +1.0, +1.3, +1.6, +2.0 6. iso10. 还可以拍摄的照片数11. 变焦状态12. 对焦区13. 电池电量指示器更改相机设置可以使用下面的四向按钮和ok 按钮更改相机设备。
1. 向上/ 曝光值:1、在菜单中向上滚动。
2、调整曝光值设置。
2. 向左/ 焦距:1、在菜单中向左滚动。
2、选择合适的焦距设置。
3. 向下/ 自拍/ 间隔拍摄/ 删除:1、在菜单中向下滚动。
2、切换自拍设置。
3、切换间隔拍摄。
4、删除图像、视频剪辑或语音记事。
4. 向右/ 闪光:1、在菜单中向右滚动。
2、选择合适的闪光设置。
5. ok:确认所选的设置。
设置拍摄模式您可以按照下列步骤设置拍摄模式以捕获图像。
下表将帮助您选择合适的拍摄模式:1 每种拍摄模式的描述仅作为一般性参考。
根据您的喜好来设置数码静态相机。
2 只有在拍照模式下能够设置拍摄模式。
使用闪光根据设计,闪光灯会在需要使用闪光的光线条件下自动闪光。
捕获图像时,可以根据具体情况选择合适的闪光模式。
改变闪光模式后,相机将一直保持该设置,即使关闭相机也不例外。
下表将帮助您选择合适的闪光模式。
1 在影片模式下不能使用闪光。
2 选择慢速同步时,为避免模糊,建议使用三角架拍摄静态景物使用自拍在拍照模式下可以设置自拍。
当您希望自己也在照片中时,此功能非常有用。
1. 将相机放在三角架上或稳定的表面上。
3. 选景后按快门按钮。
1、自拍功能被激活, lcd 显示屏上显示倒计时状态。
2、自拍指示灯闪烁,经过预设的时间后捕获图像。
捕获一个图像后,自拍设置自动关闭。
使用光学变焦利用变焦功能,您可以根据与景物的距离,捕获放大3 倍的照片或者广角照片图像。
此外,还可以使用数码变焦功能进一步放大屏幕中央区域,然后捕获图像。
2. 使用变焦键选景。
1、向右按该键放大景物,景物在lcd显示屏上变大。
2、向左按该键提供广角图像。
3、镜头位置仅在光学变焦时随着变焦设置而移动。
3. 将快门按钮按下一半以设置焦距和曝光,然后完全按下以捕获图像。
正在录制视频剪辑时不能使用变焦功能。
在开始录制前设置变焦。
使用数码变焦搭配使用3 倍光学变焦和4 倍数码变焦时,可以根据景物和距离将照片最多放大12倍。
数码变焦是一个有用的功能;但图像放大倍数越高,颗粒感越明显。
改变焦距2. 选景。
3. 先将快门按下一半,然后完全按下。
调整曝光值ev (曝光值)可以使图像变亮或变暗。
当物体和背景之间的亮度不均衡时,或者当物体仅占照片的一小部分时,使用此设置。
1. 在拍照模式下,确保拍摄模式设成[ 自动] 或[ 手动]。
有关设置拍摄模式的详细信息,请参见“设置拍摄模式”。
拍照模式菜单设置3.1.11.1 拍照模式菜单设置白平衡人眼会适应光线变化,即使光线发生变化,白色景物看起来仍然是白色。
但是,对于数码相机而言,景物颜色会受到周围光线颜色的影响。
这种颜色调整被称为“白平衡调整”。
在特定光线条件下捕获图像时,您可以使用此设置来设置白平衡。
3.1.11.2 使用间隔拍摄此相机具有根据设置进行间隔捕获图像的功能。
此模式在自拍时可用。
您可以指定捕获图像的间隔和数量。
调整间隔拍摄设置:1. 在拍照模式下,选择[ 间隔拍摄] 菜单。
1、interval (间隔时间):[15 秒]:录制间隔为15 秒。
[1 分钟]:录制间隔为1 分钟。
[3 分钟]:录制间隔为3 分钟。
[10 分钟]:录制间隔为10 分钟。
[60 分钟]:录制间隔为60 分钟。
2、count (张数):2 ~ 99 (指定拍摄多少张照片)。
2. 按快门按钮开始拍摄。
根据预设的[interval] (间隔时间)和[count] (张数)捕获图像。
3. 希望停止时,按快门按钮。
影片模式 LCD 显示屏信息1. 影片模式2. 尚余录制时间3. 影片质量4. 变焦状态5. 电池电量指示器影片模式菜单设置3.2.2.1 影片模式菜单定时录制利用特殊的“定时录制”功能,您可以按照下列步骤预先设置录制过程。
4. 设置[ start time] (开始时间)和[duration] (持续时间)后,按ok 按钮进行确认。
5. 显示[timer recording standby] (定时录制待机)屏幕。
您可以按变焦键调整距离。
6. 显示[ 定时录制] 屏幕。
相机进入待机模式,并显示过程信息。
如果希望取消操作,请按快门。
7. 录制过程开始时,相机进入录制模式。
录制过程结束后,相机将自动关机。
播放模式LCD 显示屏信息(图像)查看图像3.3.2.1 放大图像查看图像时,可以放大图像的局部。
放大后,您可以查看图像的更多细节。
dc e600在播放时提供4 倍放大倍数。
1. 调整变焦键设置变焦比例。
1、要放大,请向右调整变焦键。
2、要缩小,请向左调整变焦键。
3、lcd 显示屏上显示放大倍数。
2. 要查看图像的不同部分,请按您会看到一个大的外框,里面还有一个方框。
外框表示整个图像,方框显示当前放大区域的位置。
3. 要返回正常显示,一直向左调整变焦键,直至屏幕上出现正常图像(1 倍放大)。
如果内部存储器或存储卡中未存储任何图像, lcd 显示屏上将显示[no file!] (没有文件!)信息。
3.3.2.2 缩略图显示(索引播放)使用此功能时,可以在lcd 显示屏上同时查看九个缩略图,以便于搜索所需的图像。
1. 向左调整变焦键。
同时显示九个缩略图图像。
3.3.2.3 语音记事添加语音记事是在图像中添加注释和备忘的一种非常有用的方式。
2. 按ok 按钮开始录制。
lcd 显示屏上显示已经过的时间。
每个图像最多可以添加20 秒语音记事。
3. 再次按ok 按钮停止录制。
4. 再次按ok 按钮播放语音记事。
删除文件对图像、视频剪辑或语音记事不满意时,可以选择逐个或一次全部删除它们。
请注意,删除的文件无法恢复。
1、选择[delete one] (删除一个),然后按ok 按钮以删除当前不需要的文件。
2、选择[delete all] (全部删除),然后按ok 按钮以删除全部文件。
3、如果希望删除包含语音记事的图像,请选择[delete voice] (删除记事),然后按ok 按钮。
4、选择[exit] (退出)可以取消操作。
受保护的文件不能删除。
播放模式菜单设置3.3.4.1 播放模式菜单播放模式LCD 显示屏信息(视频)1. 播放模式2. 当前文件/ 文件总数3. 文件名称4. 文件大小5. 播放导航器6. 日期/ 时间7. 电池电量指示器播放视频剪辑设置模式菜单附带软件dc e600 附带下列软件:要安装软件,请参考相应光盘上提供的信息。
ulead photoexpressulead photo express 5.0 se 是用于处理数码图像的一套照片工程软件。
利用此软件,可以轻松地从数码相机或扫描仪获取照片;使用简单易用的编辑工具以及有趣的照相过滤器和效果来编辑和增强图像;制作有创意的照片作品并通过电子邮件和多种打印选项共享创作成果。
ulead photoexplorerulead photo explorer 8.0 se basic 为传送、浏览、修改和分发数字介质提供一种有效的途径。
对于拥有数码相机、webcams、dv 摄像机、扫描仪的用户或希望有效处理数字介质的用户来说,它提供了一整套工具。
ulead videostudio ulead videostudio 8 se vcd 是一款家用视频编辑软件,它使得视频编辑像拍摄视频一样充满乐趣。
利用新建影片向导模式,用户可以通过三个简单的步骤来制作影片。
然后,通过vcd、磁带、web 和移动设备来共享完成的作品。
USB 模式1. 将usb 线较小的插头连接到dc e600。
2. 将usb 线的另一端连接到计算机上可用的usb 端口。
3. 打开相机电源。
usb 屏幕显示出来。
4. [可移动磁盘] 图标出现在[我的电脑] 中。
单击此图标可以访问您的图像或视频剪辑。
当连接到计算机时,需要安装电池。
打印机模式如果配有支持pictbridge 的打印机,可以将相机直接连接到支持pictbridge 的打印机以打印图像,而不使用计算机。