JAVA实验-图形界面设计
- 格式:docx
- 大小:253.83 KB
- 文档页数:14
图形界面(GUI)程序设计一、课题内容和要求内容:设计和编写一个用于将人民币转换为等值的美元的程序,界面要求可以输入人民币的金额并可以得到转换后的结果。
要求:学习和理解JAVA SWING中的容器,部件,布局管理器和部件事件处理方法。
通过编写和调试程序,掌握JAVA图形界面程序设计的基本方法。
二、设计思路分析class RMBtoDollar:主类,调用主函数。
class change:设置界面,并通过界面上的事件触发实现汇率转换。
三、概要设计public class RMBtoDollar{public static void main(String[] args);}class change extends JFrame implements MouseListener { JLabel l1, l2,l3;JTextField tf1, tf2;JButton b;double RMB, Dollar;public change();public void mousePressed(MouseEvent e);public void mouseClicked(MouseEvent e);public void mouseEntered(MouseEvent e);public void mouseExited(MouseEvent e);public void mouseReleaseed(MouseEvent e);//鼠标释放时进行转换}四、详细设计import java.awt.*;import java.awt.event.*;import javax.swing.*;public class RMBtoDollar {public static void main(String[] args) {new change();}}class change extends JFrame implements MouseListener { JLabel l1, l2,l3;JTextField tf1, tf2;JButton b;double RMB, Dollar;public change() {//添加组件和设置布局l1 = new JLabel("人民币/元:");l2 = new JLabel("美元/dollar:");l3=new JLabel("(汇率:6.17)");tf1 = new JTextField(12);tf2 = new JTextField(12);b = new JButton("转换");add(l1);add(tf1);add(l2);add(tf2);add(l3);add(b);setLayout(new FlowLayout(FlowLayout.CENTER));setTitle("人民币转换为美元");setBounds(300, 300, 300, 150);setVisible(true);setDefaultCloseOperation(JFrame.EXIT_ON_CLOSE);b.addMouseListener(this);//鼠标事件监视器}public void mousePressed(MouseEvent e) {if (tf2.getText() != null) {// tf2 test 默认初始设为空tf2.setText("");}}public void mouseClicked(MouseEvent e) {}public void mouseEntered(MouseEvent e) {}public void mouseExited(MouseEvent e) {}public void mouseReleased(MouseEvent e) {if (tf1.getText() != null) {// 检查tf1 test 是否为空try {// 取异常RMB = Double.parseDouble(tf1.getText());// 字符转为double型Dollar = RMB / 6.17;//转换tf2.setText("" + Dollar);// 显示} catch (Exception ex) {tf1.setText("");// 如果输入不是数字,设为空}}}}五、测试数据及其结果分析1正常输入:2输入字符串不能转为double型时清空输入框:3结果:输出正常。
南邮Java实验报告1-综合图形界面程序设计英文回答:Hello, I'm glad to help you with your Java lab report on comprehensive graphical user interface programming.In this report, I will provide a detailed description of the steps I took to create a graphical user interface (GUI) for a simple application. I will also include screenshots of the GUI and discuss the challenges I faced and how I overcame them.Step 1: Create a new Java project。
The first step was to create a new Java project in my preferred development environment. I used IntelliJ IDEA, but you can use any IDE that you are comfortable with.Step 2: Design the GUI。
Once I had created a new project, I began designing the GUI. I sketched out a rough draft on paper and then usedthe Swing library to create the actual GUI.The Swing library provides a set of components that can be used to create GUIs. These components include buttons, text fields, labels, and menus.Step 3: Add functionality to the GUI。
一、实验目的1、掌握Java图形界面程序设计的基本思想和步骤。
2、掌握AWT包和Swing包的基本使用方法和区别。
3、掌握容器和布局的概念和使用。
4、掌握图形界面程序的事件处理机制。
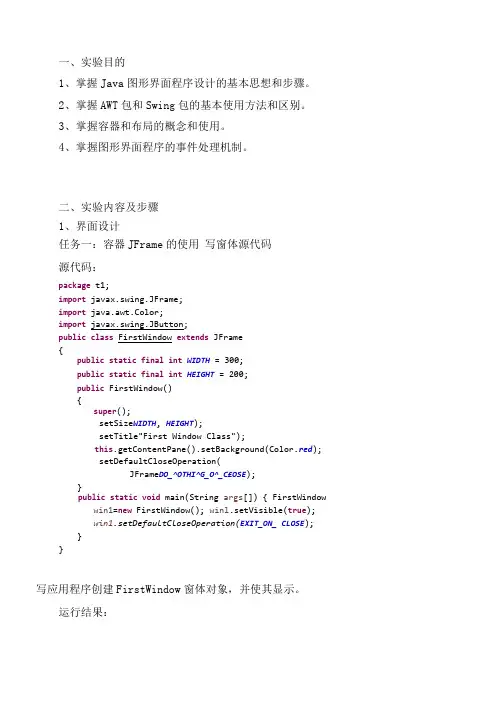
二、实验内容及步骤1、界面设计任务一:容器JFrame的使用写窗体源代码源代码:package t1;import javax.swing.JFrame;import java.awt.Color;import javax.swing.JButton;public class FirstWindow extends JFrame{public static final int WIDTH= 300;public static final int HEIGHT= 200;public FirstWindow(){super();setSize WIDTH, HEIGHT);setTitle"First Window Class");this.getContentPane().setBackground(Color.red);setDefaultCloseOperation(JFrame DO_^OTHI^G_O^_C£OSE);}public static void main(String args[]) { FirstWindow win1=new FirstWindow(); winl.setVisible(true);win1.setDefaultCloseOperation(EXIT_ON_ CLOSE);}}写应用程序创建FirstWindow窗体对象,并使其显示。
运行结果:(ij l2_i l-irst Window Class 一□任务二:布局管理器LayoutManager(l)FlowLayout布局管理器①FlowLayout布局管理器的简单应用实例,代码如下: 源代码:package t2;import java.awt.*;import javax.swing.*;public class TestFlowLayout {public static void main(String args[]){JFrame f= new JFrame();f.setLayout(new FlowLayout());//设置为FlowLayout 布局Button b1=new Button("OK");Button b2=new Button("Open");Button b3=new Button("Close");f.add(b1);//添加按钮b1f.add(b2);//添加按钮b2f.add(b3);//添加按钮b3f.setSize(300,100);f.setVisible(true); )private static void setLayout(FlowLayout flowLayout) { // TODO Auto-generated method stub))②编译运行程序,查看结果。
java图形用户界面实验报告Java图形用户界面实验报告一、引言图形用户界面(Graphical User Interface,简称GUI)是现代软件开发中不可或缺的一部分。
通过GUI,用户能够直观地与程序进行交互,提高了软件的易用性和用户体验。
本实验旨在通过使用Java编程语言,实现一个简单的GUI应用程序,并介绍相关的技术和方法。
二、实验目标本实验的目标是设计并实现一个简单的GUI应用程序,要求具备以下功能:1. 显示一个窗口,并在窗口中心显示一个标签;2. 在窗口中添加一个按钮,并实现按钮的点击事件;3. 当按钮被点击时,标签的文本发生变化。
三、实验过程1. 环境准备在开始实验之前,需要确保已经安装了Java开发环境(JDK)和集成开发环境(IDE),例如Eclipse或IntelliJ IDEA。
2. 创建GUI应用程序首先,创建一个Java项目,并创建一个名为"GUIApplication"的类。
在该类中,引入Java的GUI库,并继承JFrame类,实现一个窗口。
3. 设计窗口布局在窗口的构造方法中,设置窗口的标题、大小和关闭方式。
然后,创建一个JPanel对象,并将其添加到窗口中。
在JPanel中,使用布局管理器(例如FlowLayout或GridBagLayout)来安排组件的位置和大小。
4. 添加标签和按钮在JPanel中,创建一个JLabel对象,并设置其文本和位置。
然后,创建一个JButton对象,并设置其文本和点击事件。
在点击事件中,通过修改JLabel的文本来实现标签内容的变化。
5. 运行程序完成以上步骤后,编译并运行程序。
将会显示一个窗口,其中包含一个标签和一个按钮。
当按钮被点击时,标签的文本会发生变化。
四、实验结果经过以上步骤,成功实现了一个简单的GUI应用程序。
运行程序后,窗口显示如下图所示:(插入程序运行截图)在窗口中心显示了一个标签,标签的文本为"Hello, GUI!"。
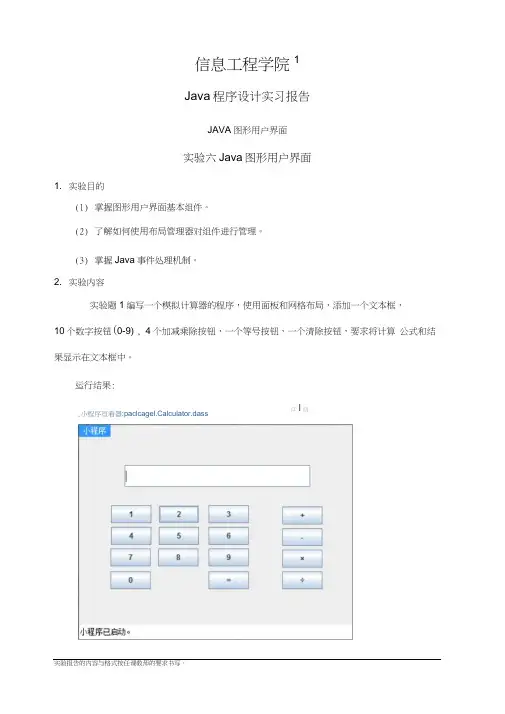
信息工程学院1Java 程序设计实习报告JAVA 图形用户界面实验六Java 图形用户界面1. 实验目的(1) 掌握图形用户界面基本组件。
(2) 了解如何使用布局管理器对组件进行管理。
(3) 掌握Java 事件处理机制。
2. 实验内容实验题1编写一个模拟计算器的程序,使用面板和网格布局,添加一个文本框,10个数字按钮(0-9) , 4个加减乘除按钮,一个等号按钮,一个清除按钮,要求将计算 公式和结果显示在文本框中。
运行结果:实验报告的内容与格式按任课教师的要求书写。
,小程序亘看器:paclcagel.Calculator.dass口 I 回加法:主要代码:private void in itComp onen ts() {jButt on1 = :new javax.swing.JButton();jButt on2 = :new javax.swing.JButton();jButt on3 = :new javax.swing.JButton();jButt on4 = :new javax.swing.JButton();jButt on5 = :new javax.swing.JButton();jButt on6 = :new javax.swing.JButton();jButt on7 = :new javax.swing.JButton();jButt on8 = :new javax.swing.JButton();jButt on9 = :new javax.swing.JButton();jButto n10 =new javax.swing.JButton();jButto n11 =new javax.swing.JButton();jButto n12 =new javax.swing.JButton();jButto n13 =new javax.swing.JButton();jButto n14 =new javax.swing.JButton();jButto n15 =new javax.swing.JButton();jTextField1 =new javax.swing.JTextField();setStub( null ); jButton1 .setText( "3" );jButton1 .addActionListener( new java.awt.event.ActionListener() {public void actionPerformed(java.awt.event.ActionEvent evt) {jButton1ActionPerformed(evt); }});jButton2 .setText( "1" );jButton2 .addActionListener( new java.awt.event.ActionListener() {public void actionPerformed(java.awt.event.ActionEvent evt) {jButton2ActionPerformed(evt); }});jButton3 .setText( "5" );jButton3 .addActionListener( new java.awt.event.ActionListener() {public voidactionPerformed(java.awt.event.ActionEvent evt) { jButton3ActionPerformed(evt);}});jButton4 .setText( "2" );jButton4 .addActionListener( new java.awt.event.ActionListener() {public void actionPerformed(java.awt.event.ActionEvent evt) {jButton4ActionPerformed(evt); }});jButton5 .setText( "6" );jButton5 .addActionListener(newjava.awt.event.ActionListener() {public void actionPerformed(java.awt.event.ActionEvent evt) {jButton5ActionPerformed(evt); }});jButton6 .setText( "8" );jButton6 .addActionListener( newjava.awt.event.ActionListener() {public voidactionPerformed(java.awt.event.ActionEvent evt) {jButton6ActionPerformed(evt); }});jButton7 .setText( "4" );jButton7 .addActionListener( newjava.awt.event.ActionListener() {public void actionPerformed(java.awt.event.ActionEvent evt) {jButton7ActionPerformed(evt); }});jButton8 .setText( "7" );jButton8 .addActionListener( newjava.awt.event.ActionListener() {public void actionPerformed(java.awt.event.ActionEvent evt) {jButton8ActionPerformed(evt); }});jButton9 .setText( "0" );jButton9 .addActionListener( newjava.awt.event.ActionListener() {public voidactionPerformed(java.awt.event.ActionEvent evt) {jButton9ActionPerformed(evt); }});jButton10 .setText( "9" );jButton10 .addActionListener( new java.awt.event.ActionListener() {public void actionPerformed(java.awt.event.ActionEvent evt) { jButton10ActionPerformed(evt);}});jButton11 .setText( "\u00f7" );jButton11 .addActionListener( new java.awt.event.ActionListener() {public void actionPerformed(java.awt.event.ActionEvent evt) {jButton11ActionPerformed(evt); }});jButton12 .setText( "\u00d7" );jButton12 .addActionListener( new java.awt.event.ActionListener() {public void actionPerformed(java.awt.event.ActionEvent evt) {jButton12ActionPerformed(evt); }});jButton13 .setText( "-" );jButton13 .addActionListener( new java.awt.event.ActionListener() {public void actionPerformed(java.awt.event.ActionEvent evt) {jButton13ActionPerformed(evt);});jButton14 .setText( "+" );jButton14 .addActionListener( newjava.awt.event.ActionListener() {public voidactionPerformed(java.awt.event.ActionEvent evt) {jButton14ActionPerformed(evt);}});jButton15 .setText( "=" );jButton15 .addActionListener( newjava.awt.event.ActionListener() {public voidactionPerformed(java.awt.event.ActionEvent evt) {jButton15ActionPerformed(evt);}});实验题2 编写一个程序,有一个窗口,该窗口为BorderLayout 布局。
java图形实验报告《Java图形实验报告》摘要:本实验通过使用Java编程语言,利用图形界面设计工具和图形库,实现了一个简单的图形界面程序。
本实验主要包括了界面设计和图形绘制两个部分,通过实验过程,我们深入了解了Java图形界面编程的基本原理和实现方法。
一、实验目的1. 了解Java图形界面编程的基本原理和实现方法;2. 掌握Java图形界面设计工具的使用;3. 掌握Java图形库的使用;4. 实现一个简单的图形界面程序。
二、实验内容1. 界面设计:使用Java图形界面设计工具,设计一个简单的界面,包括按钮、文本框等基本组件;2. 图形绘制:利用Java图形库,实现在界面上绘制简单的图形,如直线、矩形等。
三、实验步骤1. 界面设计:使用Java图形界面设计工具,创建一个新的界面窗口,添加按钮和文本框等组件,设置它们的位置和大小;2. 图形绘制:在界面上添加一个画布组件,利用Java图形库在画布上绘制简单的图形,如直线、矩形等;3. 编写Java代码,实现界面和图形的交互功能,如按钮点击事件等。
四、实验结果通过实验,我们成功实现了一个简单的图形界面程序。
界面上包括了按钮和文本框等组件,通过按钮点击事件,可以在画布上绘制直线、矩形等图形。
五、实验总结通过本次实验,我们深入了解了Java图形界面编程的基本原理和实现方法,掌握了Java图形界面设计工具和图形库的使用。
通过实验过程,我们对Java图形界面编程有了更深入的认识,为以后的学习和实践打下了坚实的基础。
六、参考资料1. 《Java图形界面编程实例详解》;2. 《Java图形库使用手册》。
通过本次实验,我们对Java图形界面编程有了更深入的认识,为以后的学习和实践打下了坚实的基础。
希望通过今后的实践和学习,能够更加熟练地运用Java图形界面编程技术,实现更加复杂和丰富的图形界面程序。
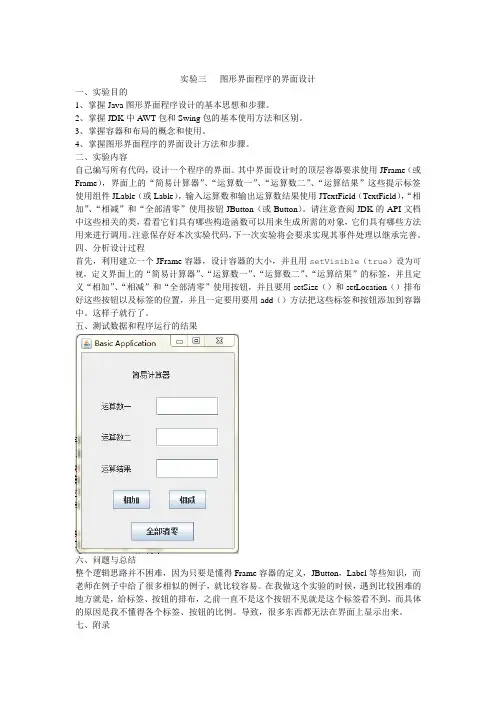
实验三图形界面程序的界面设计一、实验目的1、掌握Java图形界面程序设计的基本思想和步骤。
2、掌握JDK中A WT包和Swing包的基本使用方法和区别。
3、掌握容器和布局的概念和使用。
4、掌握图形界面程序的界面设计方法和步骤。
二、实验内容自己编写所有代码,设计一个程序的界面。
其中界面设计时的顶层容器要求使用JFrame(或Frame),界面上的“简易计算器”、“运算数一”、“运算数二”、“运算结果”这些提示标签使用组件JLable(或Lable),输入运算数和输出运算数结果使用JTextField(TextField),“相加”、“相减”和“全部清零”使用按钮JButton(或Button)。
请注意查阅JDK的API文档中这些相关的类,看看它们具有哪些构造函数可以用来生成所需的对象,它们具有哪些方法用来进行调用。
注意保存好本次实验代码,下一次实验将会要求实现其事件处理以继承完善。
四、分析设计过程首先,利用建立一个JFrame容器,设计容器的大小,并且用setVisible(true)设为可视,定义界面上的“简易计算器”、“运算数一”、“运算数二”、“运算结果”的标签,并且定义“相加”、“相减”和“全部清零”使用按钮,并且要用setSize()和setLocation()排布好这些按钮以及标签的位置,并且一定要用要用add()方法把这些标签和按钮添加到容器中。
这样子就行了。
五、测试数据和程序运行的结果六、问题与总结整个逻辑思路并不困难,因为只要是懂得Frame容器的定义,JButton,Label等些知识,而老师在例子中给了很多相似的例子,就比较容易。
在我做这个实验的时候,遇到比较困难的地方就是,给标签、按钮的排布,之前一直不是这个按钮不见就是这个标签看不到,而具体的原因是我不懂得各个标签、按钮的比例。
导致,很多东西都无法在界面上显示出来。
七、附录import java.awt.*;import java.awt.event.ActionEvent;import java.awt.event.ActionListener;import javax.swing.*;public class Jiemian extends JFrame implements ActionListener{JFrame jfr=new JFrame("Basic Application");//定义一个Frame容器的对象jfrLabel l1=new Label("简易计算器");//定义各个标签Label l2=new Label("运算数一");Label l3=new Label("运算数二");Label l4=new Label("运算结果");JTextField tf1=new JTextField(15);//定义各个JTextField类型的组件,并生成对象实例JTextField tf2=new JTextField(15);JTextField tf3=new JTextField(15);JButton b1=new JButton("相加");//定义各个按钮JButton b2=new JButton("相减");JButton b3=new JButton("全部清零");public Jiemian(){j fr.setSize(260,350);//设计界面的大小jfr.setLayout(null);//设计为null布局l1.setSize(90,30);//设计11的宽度和高度l1.setLocation(80,20);//设计11在界面上左上角的位置坐标l2.setSize(60,30);l2.setLocation(30,70);l3.setSize(60,30);l3.setLocation(30,120);l4.setSize(60,30);l4.setLocation(30,170);tf1.setSize(100,30);tf1.setLocation(120,70);tf2.setSize(100,30);tf2.setLocation(120,120);tf3.setSize(100,30);tf3.setLocation(120,170);b1.setSize(60,30);b1.setLocation(50,220);b2.setSize(60,30);b2.setLocation(140,220);b3.setSize(100,30);b3.setLocation(80,270);jfr.add(l1);//添加到容器上jfr.add(l2);jfr.add(l3);jfr.add(l4);jfr.add(tf1);jfr.add(tf2);jfr.add(tf3);jfr.add(b1);jfr.add(b2);jfr.add(b3);jfr.setLocation(500,150);jfr.setVisible(true);}public static void main(String args[]) { Jiemian ja=new Jiemian();}}。
广州大学学生实验报告开课学院及实验室:计算机科学与工程实验室2014年11月14日一、实验目的实验十图形用户界面(1)1.了解图形用户界面基本组件窗口、按钮、文本框、选择框、滚动条等的使用方法,·2.了解如何使用布局管理器对组件进行管理,以及如何使用Java 的事件处理机制。
实验十一图形用户界面(2)1.了解图形用户界面基本组件窗口、按钮、文本框、选择框、滚动条等的使用方法,2.了解如何使用布局管理器对组件进行管理,以及如何使用Java 的事件处理机制。
二、实验器材MacBook Pro一台操作系统:OS X Yosemite\编程软件:eclipse三、实验要求实验十图形用户界面(1)1. 理解Java 的事件处理机制,掌握为不同组件编写事件处理程序的方法。
2. 掌握编写独立运行的窗口界面的方法。
3. 了解Java Swing 组件的使用方法。
4. 了解对话框的使用方法。
实验十一图形用户界面(2)¥1. 理解Java 的事件处理机制,掌握为不同组件编写事件处理程序的方法。
2. 掌握编写独立运行的窗口界面的方法。
3. 了解Java Swing 组件的使用方法。
4. 了解对话框的使用方法。
四、实验过程原始数据记录实验十图形用户界面(1)…1. 如下图所示,用了三个文本框,第一个文本框给用户输入商品单价,第二个则是给用户输入商品数量,第三个用于显示总金额。
代码:import class test_2_1_1 extends JFrame implementsActionListener{public static void main(String[] args) {ddDocumentListener(new DocumentListener() {"@Overridepublic void removeUpdate(DocumentEvent e) {ddDocumentListener(new DocumentListener() {@Overridepublic void removeUpdate(DocumentEvent e){quals("计算")){?if (!canCal){showMessage("输入的数据不合法");return;}double sum = ()) *());(sum));#}}制作如下图所示的界面,当用户点击单选按钮时,会在一个标签上显示出当前所选定的数据库服务器类型。
南邮Java实验报告1-综合图形界面程序设
计
自查报告。
在本次综合图形界面程序设计的实验中,我使用Java语言完成
了一个简单的图形界面程序。
在完成实验过程中,我对自己进行了
一些自查,总结如下:
1. 程序功能完整性,在设计程序时,我充分考虑了程序的功能
完整性,确保程序能够实现预期的功能。
我在自查过程中,对程序
进行了多次测试,确保程序的各个功能模块都能正常运行。
2. 代码规范性,我在编写代码的过程中,遵循了Java编程规范,确保代码的可读性和可维护性。
在自查过程中,我对代码进行
了排版和注释,确保代码的规范性。
3. 用户体验,在设计图形界面时,我考虑了用户体验,确保界
面简洁明了,操作方便。
在自查过程中,我对界面进行了多次优化,确保用户能够顺利使用程序。
4. 错误处理,在程序中,我考虑了各种可能出现的错误情况,
并进行了相应的错误处理。
在自查过程中,我对程序进行了多次异
常测试,确保程序能够正确处理各种异常情况。
在自查过程中,我发现了一些问题,并及时进行了修改和优化。
通过本次自查,我对自己的程序设计能力有了更深入的认识,也提
高了对程序质量的要求。
在今后的学习和工作中,我将继续努力,
不断提升自己的编程能力和程序设计水平。
2012—2013学年第 1 学期合肥学院数理系实验报告课程名称:《面向对象程序设计》实验项目:图形用户界面实验类别:综合性□设计性√验证性□专业班级:10信息与计算科学班姓名:学号:实验地点:校内机房实验时间:2012.11.19 —2012.11.25指导教师:钱泽强成绩:一、实验目的掌握Java中图形界面设计的基本元素和方法,熟练使用常用组件设计图形界面,掌握布局管理器的使用,掌握事件的处理方法。
二、实验内容1、设计图形界面,掌握FlowLayout、BorderLayout、CardLayout、GridLayout布局管理器的使用,并掌握组件的精确定位方式;2、掌握事件处理的三种常见的实现方式:·通过主类创建监听器对象的实现方式;·通过自定义内部类创建监听器对象的实现方式;·在注册时通过匿名类直接创建监听器对象的实现方式。
3、设计图形用户界面的应用程序。
三、实验方案(程序设计说明)[题目1] 编写图形界面用户程序,采用事件处理的三种实现方法求一个数的平方。
1、在图形界面中提供“文本框、标签、按钮”,文本框用于输入数据,标签显示数据的平方,单击按钮可以实现求数据的平方;2、分别采用事件处理的三种方法实现。
[题目2] 编写图形界面用户程序,实现“幸运数”游戏。
要求如下:1、在图形界面用户程序中提供“按钮、标签”等组件;2、标签用于显示随机数,单击按钮可以改变随机数并实现对随机数的判断:若两数相等,则出现相等提示,否则出现不等提示。
四、实验程序和运行结果请附页记录正确的源程序五、实验总结六、教师评语及成绩1、求平方import javax.swing.*;import java.awt.*;import java.awt.event.*;//通过主类创建监听器对象class myFrame extends JFrame implements ActionListener{ JLabel l; JButton b; JTextField t;myFrame(JFrame f){ l=new JLabel("0"); b=new JButton("求平方"); t=new JTextField("0");f.setLayout(null);f.add(l); f.add(b); f.add(t);t.setBounds(1,1,60,20); b.setBounds(71,1,60,20); l.setBounds(141,1,60,20);b.addActionListener(this); }public void actionPerformed(ActionEvent e){ int x=Integer.parseInt(t.getText());int y=x*x; l.setText(Integer.toString(y)); }}//通过自定义内部类创建监听器对象class myFrame extends JFrame{ JLabel l; JButton b; JTextField t;myFrame(JFrame f){ l=new JLabel("0"); b=new JButton("求平方"); t=new JTextField("0");f.setLayout(null);f.add(l); f.add(b); f.add(t);t.setBounds(1,1,60,20); b.setBounds(71,1,60,20); l.setBounds(141,1,60,20); BHandler h=new BHandler();b.addActionListener(h); }private class BHandler implements ActionListener {public void actionPerformed(ActionEvent e){ int x=Integer.parseInt(t.getText());int y=x*x; l.setText(Integer.toString(y)); }}}//在注册时通过匿名类直接创建临听器对象class myFrame extends JFrame{ JLabel l; JButton b; JTextField t;myFrame(JFrame f){ l=new JLabel("0"); b=new JButton("求平方"); t=new JTextField("0");f.setLayout(null);f.add(l); f.add(b); f.add(t);t.setBounds(1,1,60,20); b.setBounds(71,1,60,20); l.setBounds(141,1,60,20);b.addActionListener(new ActionListener(){public void actionPerformed(ActionEvent e){ int x=Integer.parseInt(t.getText());int y=x*x; l.setText(Integer.toString(y)); }});}}public class test {public static void main(String[] args) {JFrame jf=new JFrame("平方数"); jf.setBounds(100,100,400,300); jf.setDefaultCloseOperation(JFrame.EXIT_ON_CLOSE);jf.setVisible(true);myFrame myf=new myFrame(jf); }}2、幸运数import javax.swing.*;import java.awt.*;import java.awt.event.*;import java.util.Random;class myJFrame extends JFrame implements ActionListener{ private JButton jb;private JLabel [] jl;public myJFrame(JFrame f){ f.setSize(300,300);f.setLayout(new FlowLayout());jl=new JLabel[3];for(int i=0; i<3; i++){ jl[i]=new JLabel("*");f.add(jl[i]); }jl[2].setText("试一试");jb=new JButton("开始");jb.addActionListener(this);f.add(jb);}public void actionPerformed(ActionEvent e){ Random x=new Random();Random y=new Random();jl[0].setText(Integer.toString(x.nextInt(10)));jl[1].setText(Integer.toString(x.nextInt(10)));if (jl[0].getText().equals(jl[1].getText()))jl[2].setText("恭喜您");elsejl[2].setText("再试试");}}public class test{public static void main(String[] args) {JFrame f=new JFrame("我的窗口");f.setBounds(100,100,400,300);f.setVisible(true);f.setDefaultCloseOperation(JFrame.EXIT_ON_CLOSE); myJFrame m=new myJFrame(f); }}。
实验项目7 Java 图形用户界面设计
1.实验目的
学会使用在Eclipse IDE 下编写和调试 Java Application 程序; 掌握图形用户界面基本组件的使用方法,熟悉布局管理器如何管理组件,掌握Java 事件处理机制;掌握异常概念和 Java 异常处理方法。
2.实验内容
● 设计一个java 应用程序,实现如图所
示的用户登录界面,当单击“确认”按
钮时,能根据预先设定的用户名和密码
进行判断(正确的用户名为“computer ”,
密码为“123456”)如果成功,则在显
示区显示“welcome ”,否则,显示“密
码错误”信息。
当单击“重置”按钮时,
清空用户名和密码的文本框。
● 设计一个java 应用程序,实现具有算术运算功能的简易计算器。
● 设计一个java 应用程
序,实现具有智力测验
功能;测验题自由给定,
界面自由设计,但使界
面美观友好,用户答题
交卷后应能显示答题成
绩和智力评价。
(选做)
登录界面。
实验9 图形用户界面设计及简单事件处理(一)一、实验目的:
掌握Java图形组件及容器的使用;
掌握图形界面的各种控件的使用,如:标签、菜单、文本框、按钮、复选框、列表框、窗框等。
(本实验以按钮、菜单、标签和文本框为例)
二、实验内容:
1.编写Application程序:TestOne.java
在Frame中加入2个按钮(Button)和1个标签(Label),单击两个按钮,显示按钮的标签于Label。
2. 编写Application程序:TestTwo.java
在Frame中加入下列菜单:文件、编辑。
要求:
(1)“文件”中包含:新建、打开和退出。
“新建”中包含:JAVA文档、HTML 文档。
(2)“编辑”中包含:粘贴、查找、全选。
(3)点击菜单项“退出”,可退出程序。
(4)“打开”和“退出”之间有分割线。
作业:
设计一个简单计算器(主类名:Calculator.java),如下图所示(采用BoxLayout布局,具体使用参见P157 例题7.16)。
在“操作数”标签右侧的两个文本框输入操作数,当单击操作符+,-,×,÷按钮时,对两个操作数进行运算并将结果填入到“结果”标签右侧的文本框中,窗体的大小不能改变。
(Frame类中的setResizable()设置此窗体是否可由用户调整大小。
)
三、实验要求:
1.参考教材中的例题对界面进行设计;
2. 学会对简单事件进行处理;
3.写出实验报告。
四、实验步骤:
1.界面设计;
2. 事件处理;
3. 编译运行程序,检查正确性;。
§5 Java 图形用户界面设计§实验目的、内容及性质掌握Java 的GUI 设计技术,掌握AWT 和Swing 的应用技巧。
实验性质:验证、必做实验学时:2学时§问题及思考1、最常见的AWT以及Swing控件用法。
2、几个常见布局总结3、区分容器控件和一般非容器控件4、Java事件几种关键组成部分以及事件处理流程§实验指导public class MyFrm extends JFrame{容器.setLayout(new FlowLayout);2)、网格布局:GridLayout 按照指定行数与列数,将容器分成大小相等的单元格每个单元格放置一个控件. 不能将控件放在指定单元格容器.setLayout(new GridLayout(3,4,10,15));3)、边界布局:BorderLayout 将容器分成东、西、南、北、中五个部分容器.setLayout(new BorderLayout());窗口的内容面板默认布局就是边界布局。
容器.add(控件,;4)、混合布局:使用JPanel,将多个布局组合在一起使用JPanel jp=(JPanel)();for(int i=0;i<;i++)btn[i]=new JButton("btn"+i);JPanel jp1=new JPanel();etLayout(null);每个控件在放置在容器之前,必须设置其边界setBounds(x,y,width,height); (10,100,30,60);3、Swing示例Grid布局..2)、事件Event:ActionEvent,KeyEvent,WindowEvent,TextEvent,...3)、事件侦听者Listener(接口)ActionListener,WindowListener,...class A implements ActionListener{public void actionPerformed(ActionEvent e){....}}A lis=new A();4)、事件处理函数public void actionPerformed(ActionEvent e){....}事件流程:事件源触发事件-->事件源侦听者接收事件-->自动调用相应事件处理函数.编程模板:class MyFrm extends JFrame implements ActionListener{JButton btn=new JButton("OK");...public MyFrm(){...(this);...}public void actionPerformed(ActionEvent e){....if()==btn){}}Java事件处理示例:import .*;import .*;import class MyFrm extends JFrame implements ActionListene r{ /* 界面中需要的组件作为属性声明*/JTextField txt = new JTextField(10);JLabel lbl = new JLabel("姓名");JButton btn = new JButton("查询");/* 组件在构造函数中放置在窗体JFrame上*/public MyFrm() {/* 获取JFrame的内容面板ContentPane,控件放在该面板上*/JPanel jp = (JPanel) ();/* 设置面板布局Layout,如何放*/(new FlowLayout());(lbl);(txt);(btn);/* 为事件源加一个侦听者*/(this);;}/* 事件处理方法*/public void actionPerformed(ActionEvent e){(this, "btn点击");}public static void main(String arg[]) {(true);;import .*;import class MyFrm extends JFrame implements ActionListener{JButton btn=new JButton("Click Me");public MyFrm(){JPanel jp=(JPanel)();(new FlowLayout());(btn);(this);("Action Event");;}public void actionPerformed(ActionEvent e){(this,"Click Me 按钮被点击");}}package Ex5_3;import .*;import .*;import class Test {public static void main(String[] args) {MyFrm frm = new MyFrm();(400, 300);(true);}}4、编写一个程序实现用户登录界面当用户登录按下确定键,判断用户是否录入了用户名与密码,如果没有按或用户名不为admin 密码不为1234 都需要提示错误。
广州大学学生实验报告开课学院及实验室:计算机科学与工程实验室2014年11月14日一、实验目的实验十图形用户界面(1)1.了解图形用户界面基本组件窗口、按钮、文本框、选择框、滚动条等的使用方法,2.了解如何使用布局管理器对组件进行管理,以及如何使用Java 的事件处理机制。
实验十一图形用户界面(2)1.了解图形用户界面基本组件窗口、按钮、文本框、选择框、滚动条等的使用方法,2.了解如何使用布局管理器对组件进行管理,以及如何使用Java 的事件处理机制。
二、实验器材MacBook Pro一台操作系统:OS X Yosemite编程软件:eclipse三、实验要求实验十图形用户界面(1)1. 理解Java 的事件处理机制,掌握为不同组件编写事件处理程序的方法。
2. 掌握编写独立运行的窗口界面的方法。
3. 了解Java Swing 组件的使用方法。
4. 了解对话框的使用方法。
实验十一图形用户界面(2)1. 理解Java 的事件处理机制,掌握为不同组件编写事件处理程序的方法。
2. 掌握编写独立运行的窗口界面的方法。
3. 了解Java Swing 组件的使用方法。
4. 了解对话框的使用方法。
四、实验过程原始数据记录实验十图形用户界面(1)1. 如下图所示,用了三个文本框,第一个文本框给用户输入商品单价,第二个则是给用户输入商品数量,第三个用于显示总金额。
代码:import class test_2_1_1 extends JFrame implementsActionListener{public static void main(String[] args) {ddDocumentListener(new DocumentListener() {@Overridepublic void removeUpdate(DocumentEvent e) {ddDocumentListener(new DocumentListener() {@Overridepublic void removeUpdate(DocumentEvent e){quals("计算")){if (!canCal){showMessage("输入的数据不合法");return;}double sum = ()) *());(sum));}}制作如下图所示的界面,当用户点击单选按钮时,会在一个标签上显示出当前所选定的数据库服务器类型。
代码:import class test_2_1_2 implements ActionListener{ private JFrame frmAsdfasdf;JLabel label;/*** Launch the application.*/public static void main(String[] args) {(new Runnable() {public void run() {try {test_2_1_2 window = new test_2_1_2();} catch (Exception e) {();}}});}/*** Create the application.*/public test_2_1_2() {initialize();}/*** Initialize the contents of the frame.*/private void initialize() {frmAsdfasdf = new JFrame();("数据库");(100, 100, 251, 301);;().setLayout(new GridLayout(0, 1, 0, 0));dd(rdbtnNewRadioButton_1);(this);JRadioButton rdbtnNewRadioButton = new JRadioButton("Oracle");().add(rdbtnNewRadioButton);(this);JRadioButton rdbtnNewRadioButton_2 = new JRadioButton("SQLite");().add(rdbtnNewRadioButton_2);(this);dd(label);}public void actionPerformed(ActionEvent event){if () instanceof JRadioButton){());}}}运行结果:启动截图点击Oracle选项实验十一图形用户界面(2)1.创建如图所示的菜单代码:import class test_2_2 {private JFrame frmMenu;/*** Launch the application.*/public static void main(String[] args) {(new Runnable() {public void run() {try {test_2_2 window = new test_2_2();} catch (Exception e) {();}}});}/*** Create the application.*/public test_2_2() {initialize();}/*** Initialize the contents of the frame. */private void initialize() {frmMenu = new JFrame();("Menu菜单使用");(100, 100, 349, 219);;JMenuBar menuBar = new JMenuBar();(menuBar);JMenu mnNewMenu = new JMenu("File");(mnNewMenu);JMenuItem mntmNewMenuItem = new JMenuItem("New"); (mntmNewMenuItem);JMenuItem mntmNewMenuItem_1 = new JMenuItem("Open"); (mntmNewMenuItem_1);JMenuItem mntmNewMenuItem_2 = new JMenuItem("Close"); (mntmNewMenuItem_2);JMenu mnNewMenu_1 = new JMenu("Option"); (mnNewMenu_1);JMenuItem mntmNewMenuItem_4 = new JMenuItem("Font..."); (mntmNewMenuItem_4);JMenu mnNewMenu_2 = new JMenu("Color..."); (mnNewMenu_2);JMenuItem mntmBlack = new JMenuItem("Black"); (mntmBlack);JMenuItem mntmNewMenuItem_5 = new JMenuItem("White"); (mntmNewMenuItem_5);JSeparator separator = new JSeparator();(separator);JCheckBox chckbxAlwaysOnTop = new JCheckBox("Always On Top"); (chckbxAlwaysOnTop);JSeparator separator_1 = new JSeparator();(separator_1);JRadioButton rdbtnNewRadioButton = new JRadioButton("Small"); (true);(rdbtnNewRadioButton);JRadioButton rdbtnLarge = new JRadioButton("Large"); (rdbtnLarge);JMenu mnHelp = new JMenu("Help");(mnHelp);JMenuItem mntmNewMenuItem_3 = new JMenuItem("联机救命");(mntmNewMenuItem_3);JMenuItem mntmNewMenuItem_6 = new JMenuItem("关于");(mntmNewMenuItem_6);}}运行结果:五、实验结果及分析<分析你的算法为什么可以实现目的。
总结一下这次实验的心得体会。
>。