DELL EqualLogic Snapshot 快照使用手册
- 格式:docx
- 大小:644.57 KB
- 文档页数:7

The tools you need to virtualize, optimize and protect your dataWith EqualLogic Array Software, you don’t need tochoose between data protection and performance. EqualLogic Array Software automatically virtualizes and optimizes resources within the SAN to deliver consistent application performance and features all the tools required for developing a sound data protection strategy. The EqualLogic Array Software family includes EqualLogic Firmware, EqualLogic Group Manager and EqualLogic Manual Transfer Utility.Delivering consistent performance with EqualLogic FirmwareEqualLogic Firmware is a SAN operating system integrated across the entire family of EqualLogic storage arrays; which virtualizes SAN resources and provides intelligent data management functionality. An essential component of the software is the capability to automatically adjust system resources, optimizing performance and capacity, and reducing human intervention.EqualLogic Firmware is a full-function SAN operating system providing features natively that are often expensive add-ons with other SAN vendors. Features like automatic load-balancing, thin provisioning, snapshots, replication and multi-path I/O are just a few of the features integrated in EqualLogic Firmware.You control the infrastructure and we make it workEqualLogic Group Manager is a SAN managementtool integrated with the EqualLogic Firmware that provides detailed information on SAN configuration, and provides storage managers with an easy-to-use tool for storage provisioning, replication scheduling and array management. The EqualLogic Group Manager is available as a command line interface (CLI) or java based graphical user interface (GUI) that can be accessed from Microsoft®Internet Explorer® or Mozilla® Firefox® web browsers with a connection to the EqualLogic SAN.EqualLogic Manual Transfer Utility is a host based tool that enables the secure transfer of large amounts of data using removable media. Integrated with the native replication function of the EqualLogic Firmware, EqualLogic Manual Transfer Utility is beneficial in environments where data protection is critical but bandwidth is limited. Investment protection with all-inclusive SAN solutionsWith the EqualLogic family of storage arrays, Dell provides comprehensive SAN solutions designed to meet a wide range of business needs. For one price, customers receive a fault-tolerant, fully-redundant array, as well as all the software features required to virtualize, optimize and protect their data; all this without the management hassles that come with multiple software licenses or support contracts. Additionally, customers who commit to a yearly Dell ProSupport* contract can implement new software features and enhancements as they become available, extending the value of their investment in EqualLogic products.Dell EqualLogic Array SoftwareDell™ delivers three categories of software for the EqualLogic™ family of storage arrays. EqualLogic Array Software provides advanced SAN functions that enable virtualized storage and best-practice data protection. EqualLogic Host Software extends the functionality of the array software enabling cooperation with the host. EqualLogic SAN Headquarters is a feature-rich monitoring and analysis tool that provides in-depth information on SAN functions providing storage managers with the toolsneeded to tune and optimize their storage infrastructure.†GB means 1 billion bytes, TB equals 1 trillion bytes and PB equals 1 quadrillion bytes; actual capacity varies with preloaded material and operating environment and will be less.. *Availability and terms of Dell Services vary by region. For more information, visit /servicedescriptions© 2010 Dell Inc. All rights reserved. Microsoft, Windows and Windows Vista are registered trademarks of Microsoft Corporation in the United States and/or other countries.Simplify your storage at /PSseriesSS654_EqualLogic_Array_Software_Spec_Sheet_113009_051910。

硬件用户手册© 版权所有 2011-2013 Dell Inc. 保留所有权利。
Dell™ 和 EqualLogic® 是 Dell Inc. 的商标。
本文使用的所有商标和注册商标均属其各自所有者的财产。
本说明文件中的信息如有更改,恕不另行通知。
未经 Dell 书面许可,严禁以任何形式进行复制。
发布时间:2013 年 10 月部件号:110-6179-ZH-CN R1目录前言v1 基本设备信息1设备组件1设备前面板功能部件1设备背面板功能部件2将设备连接至电源4打开和关闭电源5关闭控制器电源6打开控制器电源6所需工具6技术规格62 更换组件9安全建议9所需工具9使用防静电腕带9更换控制器10卸下控制器10安装控制器11更换 SFP+ 收发器11必需项11卸下 SFP+ 收发器12安装 SFP+ 收发器13更换电源设备13卸下电源设备13安装电源设备13卸下挡板14连接挡板15更换散热风扇15卸下风扇15安装风扇17更换设备17卸下设备17安装设备18返还故障硬件183 下一步操作19NAS 群集文档19附录 A: NOM 信息(仅限于墨西哥)21词汇表23索引25iiiDell EqualLogic FS7610硬件用户手册目录iv前言Dell™ EqualLogic® FS Series 设备与 PS Series 阵列相结合,提供高性能、高可用性、可扩展的 NAS 解决方案。
本手册介绍如何对 EqualLogic FS7610 设备的客户可更换组件进行维护和故障排除。
读者对象本指南中的信息适用于负责维护 EqualLogic FS7610 硬件的硬件管理员。
相关说明文件有关 FS Series 设备、PS Series 阵列、组、卷、阵列软件以及主机软件的详情,请登录到位于客户支持站点的说明文件页。
Dell 联机服务您可以使用以下步骤了解 Dell 产品和服务:1. 访问或在任何 Dell 产品信息中指定的 URL。

MARKETING NAME*: Dell EqualLogic PS6100X, PS6110X Dell Inc. REGULATORY MODEL: E04J REGULATORY TYPE: E04J001EFFECTIVE DATE: August 18, 2011TABLE OF CONTENTS FOR PRODUCT SAFETY, EMC & ENVIRONMENTAL DATASHEETRegulatoryI. Product SafetyII. Electromagnetic CompatibilityIII. Ergonomics, Acoustics, and Hygienics IV. Power Cords and User Documentation V. Datasheet Responsible Party Name and AddressVI. Trade Import/Export Compliance Data Environmental VII. System Dimension and WeightVIII. Declarations and CertificationsIX. Performance DataX. Product Materials InformationXI. PackagingXII. BatteriesXIII. Design for EnvironmentXIV. Recycling/End-of-Life Service Information XV. Dell Corporate Environmental InformationI. PRODUCT SAFETY1The product has been certified and bears the Mark, as applicable, of the Product Safety authorities as indicated below.Country/Region Authority or MarkArgentina IRAMBelarus BELLISCanada SCCCroatia KONCAREuropean Union CEGermany TUVSUDIECEE IECEE CBIsrael SIIKazakhstan OTAN–CKTKenya KEBSKuwait KUCASMexico NYCE (NOM)Moldova INSMNigeria SONCAPNorway NEMKORussia GOSTSaudi Arabia KSA ICCPSerbia KVALITETSouth Africa NRCSTaiwan BSMIUkraine UKRTESTUnited States NRTLUzbekistan STZ* Notice: This product has been assigned a unique regulatory model and regulatory type that is imprinted on the product shipping invoice and product labeling to provide traceability to the regulatory approvals noted on this datasheet. This datasheet applies to any product that utilizes the assigned regulatory model and type including marketing names other than those listed on this datasheet. Requests for specific information on product regulatory approvals should reference the assigned product regulatory model and type.1 The above-listed Product Safety certifications may vary depending upon the location of the factory and specific product configuration. Certification marks may not be applied on products for countries outside the purchaser’s country.II. ELECTROMAGNETIC COMPATIBILITY2The product has been certified and bears the Mark, as applicable, of the EMC authorities as indicated below.Country/Region Authority or Mark Class Australia / New Zealand ACMA (C-Tick)Class ABelarus BELLIS Class ABosnia & Herzegovina, Montenegro, Serbia KVALITET Class ACanada ICES Class ACroatia KONCAR Class AEuropean Union CE Class AIsrael SII Class AJapan VCCI Class A–CKT Class AKazakhstan OTANMoldova INSM Class ANorway NEMKO Class ARussia GOST Class ASouth Africa SABS Class ASouth Korea KC Class ATaiwan BSMI Class AUkraine UKRTEST Class AUnited States FCC Class AUzbekistan STZ Class AIII. ERGONOMICS, ACOUSTICS AND HYGIENICS3The product has been certified and bears the Mark, as applicable, of the Ergonomics, Acoustics and Hygienics authorities as indicated below.Country/Region Authority or MarkGermany GSIV. POWER CORDS AND USER DOCUMENTATIONDell products are provided with the power cord and user documentation suitable for the intended country of delivery. Products that are relocated to other countries should use nationally certified power cords and plugs to ensure safe operation of the product. Contact Dell to determine if alternate power cords or user documentation in other languages is available for your market.V. DATASHEET RESPONSIBLE PARTY NAME AND ADDRESSDell Inc.Department: Global Regulations and StandardsMS: PS4-30Round Rock, Texas 78682, USA******************************2 The above-listed EMC certifications may vary depending upon the location of the factory and specific product configuration. Certification marks may not be applied on products for countries outside the purchaser’s country.3 The above-listed Ergonomics, Acoustics and Hygienics certifications may vary depending upon the location of the factory and specific product configuration. Certification marks may not be applied on products for countries outside the purchaser’s country.VI. TRADE (IMPORT/EXPORT) COMPLIANCE DATAFor any questions related to importing & exporting classification of Dell products, please obtain information from the following link: /import_export_compliance or send request to*****************************VII. SYSTEM DIMENSION AND WEIGHTDepth, mm Width,mmHeight,mmWeight, kgProductRegulatoryModel #508 446 87 23.31 E04JVIII. DECLARATIONS AND CERTIFICATIONSThis system received the following approvals and may be labeled with one or more of these marks depending on point of purchase:Dell’s Energy Star qualified products are listed on the EPA website hereInformation on Dell’s participation in various Eco-labels and Green Standards can be found here.IX. PERFORMANCE DATAEnergy Consumption4Energy efficiency benefits the environment and lowers the total cost of equipment ownership by reducing power consumption. Dell offers energy calculators that help estimate power needs, potential emissions avoidance and potential cost savings. Click here for Dell’s Client Energy Savings Calculator, Data Center Capacity Planner, and Monitor Power Savings Calculator. Information on Energy Efficiency is available hereX. PRODUCT MATERIALS INFORMATION5Dell has implemented process controls and corrective actions throughout its organization and supply chain to ensure that its chemicals management objectives are met — and that the targeted restricted materials arereplaced and alternative materials are developed for future product generations. Process controls that Dellimplemented include piece-part supplier declarations and Dell factory and supplier material testing audits.To review Dell’s Restricted Material Guidance document click here.Information on Dell’s material use is available here.4 This document is informational only and reflects laboratory performance. Your product may perform differently, depending on the software, components and peripherals you ordered. Accordingly, the customer should not rely upon this information in making decisions about electrical tolerances or otherwise. No warranty as to accuracy or completeness is expressed or implied.5Waste Handling. Local regulations should be observed when disposing of this product due to the presence of the materials and substances as listed above.Restricted SubstancesThrough internal design controls and supply chain declarations, this system has been verified to comply with the EU RoHS Directive. For more details, see /rohsinfo.All Dell products shipping directly into China which are manufactured on or after March 1st, 2007, will be China RoHS compliant. For more details, see /chinarohs.All Dell products shipping to South Korea are compliant with South Korea RoHS requirements, declarations here. Information on Japan RoHS (J-MOSS) chemical disclosures is available here.REACH (Registration, Evaluation, Authorization and Restriction of Chemicals, 1907/2006) is the European Union’s (EU) chemical substances regulatory framework. Dell complies with the REACH directive. For more details, see /REACHThis Dell product does NOT contain any of the following substances (in concentrations exceeding legal threshold limits):∙ Asbestos∙Azo dyes/colorants in components that come into direct contact with human skin∙Cadmium and its compounds (except for use in applications exempted by the EU RoHS Directive)∙Ozone Depleting Substances; Class I and Class II CFCs (chlorofluorocarbons) and HCFCs (hydrofluorocarbons)∙Chloroparaffins, short chained (10-13 carbon chain)∙Chromium VI and its compounds (except for use in applications exempted by the EU RoHS Directive)∙Halogenated dioxins or furans (i.e. polychlorinated dibenzodioxines, polychlorinated dibenzofurans)∙Lead and its compounds (except for use in applications exempted by the EU RoHS Directive)∙Mercury (except for use in applications exempted by the EU RoHS Directive)∙Nickel and its compounds in components that are likely to result in prolonged skin exposure(polychlorobiphenyls)∙ PCBs(polychloroterphenyls)∙ PCTs(polybromobiphenyls)∙ PBBs∙PBDEs (polybrominated diphenylethers)∙BFR (brominated flame retardants) and PVC (polyvinyl chloride) in plastic parts greater than 25 grams ∙Polychlorinated naphthalenes (PCNs)∙Tributyl tin (TBT)∙Triphenyl tin (TPT)Additional Materials Information∙External and/or Internal cables may use PVC as an insulating material to ensure product safety∙The case material is, >PC+ABS <∙Product may contain post-industrial recycled content (plastics, metal, glass)∙This product contains 0% post-consumer recycled plastic∙Materials that may require special handling, please see WEEE Product End-of-Life Instructions here∙Marking of plastic parts greater than 25 grams are done in accordance with ISO 11469 (see below) Flame Retardants Used in MotherboardRetardantPart FlameMotherboard TBBPAFlame Retardants Used in Mechanical Plastic Parts > 25 gramsResin MaterialName Marking perISO11469:2000,11469:1996Flame RetardantMarking per ISO1043-4 (i.e. FR(16),FR(40), etc.)Flame Retardant(i.e. TBBPA, triarylphosphate ester,etc.)List applicableR-Phrase(s) orHazardStatement(s) perEU Directive67/548/EEG or1272/2008PC+ABS >PC+ABSFR(40)<FR(40)TPP(Triphenyl phosphate)N/AXI. PACKAGINGInformation on Dell’s sustainable packaging effort available here.No CFCs (chlorofluorocarbons), HCFCs (hydrofluorocarbons) or other ozone depleting substances are used in packaging material. Chromium, lead, mercury, cadmium are not intentionally added to packaging materials and are not present in a cumulative concentration greater than 100 ppm as incidental impurities. No halogenated plastics or polymers are used for packaging material. Dell complies with the EU Directive 94/62/EEC. Plastics packaging materials marked according to SPI (Society of Plastics Industry) Coding System.Additional materials restricted in Packaging as per Dell’s Restricted Material Guidance document found here.Packaging Materials for ModelE04J Total Weightof eachMaterialtype, (kg)% of Post-Consumer Recycled Content (PCR)APJ region DAO region EMEA regionCorrugated Fiberboard 5.80EPE 1.20Printed user documentation is bleached in a chlorine-free process.XII. BATTERIESBelow is a listing of batteries that could be present in the product:Battery Description – Internal Batteries Battery Type Battery Weight (kg) CR-2032 coin (button) cell Lithium Metal 0.003 ∙Batteries used in this product are in compliance with EU Battery Directive 2006/66/EC.∙Batteries in this product are not based on mercury, lead or cadmium technologies.∙Information about takeback and the recycling of batteries can be found in the in the Recyclability section below.∙The product documentation includes instructional information on the proper removal and disposal of the batteries used in this product.∙Dell MSDS sheets available here.XIII. DESIGN FOR ENVIRONMENTandUpgradingLongevityDell systems are, when applicable, designed for easy assembly, disassembly, and servicing. Connections are easy to find and accessible with commonly available tools. To extend the life of your system, you can install or upgrade certain system components (e.g., microprocessor, memory, expansion cards, optical drives, and storage devices). Spare parts (such as batteries, power supplies, keyboard parts) are available after the end of production for up to five years, or otherwise through the warranty period.RecyclabilityInformation for recycling is available here.For recyclability, this system incorporates the following design guidelines:∙EU WEEE mark is applied to products sold in Europe, EU recycling information can be found at /recycling∙WEEE Product End-of-Life Instructions are available here∙Plastic parts heavier than 25g have material codes according to ISO 11469:2000.∙Minimal use of composite structure materials.∙Minimal use of non-separable connections, such as gluing and welding between different materials∙Painting/coating of plastics <100 grams is compatible with recycling or reuse∙Mechanical plastic parts greater than 100 grams consist of one material or of easily separable materials.XIV. RECYCLING/ END-OF-LIFE SERVICE INFORMATIONTake back and recycling services are offered for this product in certain countries. If you want to dispose of system components, contact Dell for instructions by emailing *********************** or visit/recyclingworldwide and select the relevant country.XV. DELL CORPORATE ENVIRONMENTAL INFORMATIONInformation on Dell’s Environmental initiatives, policies, programs and goals can be found at/environment.Dell’s Corporate Responsibility Policies are available here.Product Safety, EMC and Environmental Datasheets for Dell products are located at:/regulatory_compliance_datasheetsDell is a member of the Electronic Industry Citizenship Coalition ()Dell’s commitment to accountability and assurance is further demonstrated in leveraging the Global Reporting Initiatives (GRI) G3 Guidelines in the preparation of our annual summary report and Web site. We are self-reporting at a B level and have submitted our self-report to GRI to check it against the criteria for GRI Application Level B. To view GRI Index 2009 click here.Dell holds International Organization for Standardization (ISO) and Occupational Health & Safety Assessment Series (OHSAS) certifications/registrations in a number of important areas including global product development and recycling/take-*back programs, quality, safety, and health and environment. You can view or download copies of certificates here.Information related to Supplier Responsibility is available here.。
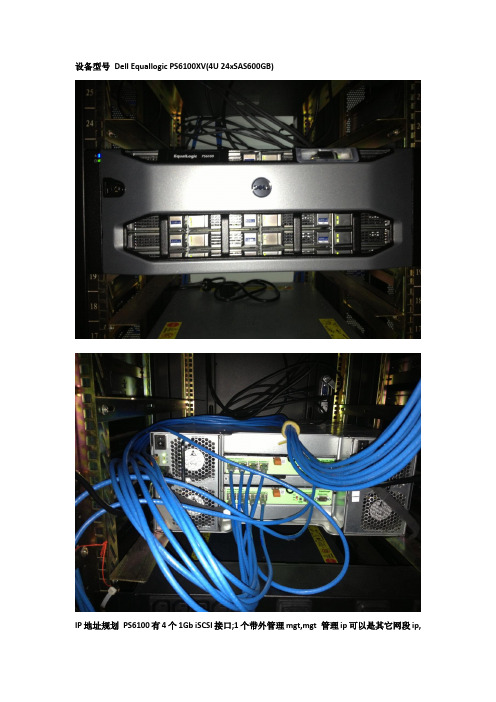
设备型号Dell Equallogic PS6100XV(4U 24xSAS600GB)IP地址规划PS6100有4个1Gb iSCSI接口;1个带外管理mgt,mgt 管理ip可以是其它网段ip,公司使用实践中存储网和管理网是隔离的GIP 172.17.8.100/24Eth0:172.17.8.101/24Eth1:172.17.8.102/24Eth2:172.17.8.103/24Eth3:172.17.8.104/24Eth4(mgt):IP-AGRP-mgt: IP-B抱歉真实环境隐藏2个真实ip地址用变量代替进入console模式初始化输入reset(注意所有数据及配置都会清空无法恢复,操作前请做好备份,如果是新存储则不需要此操作)开始简易安装setup;下面按步骤写下说明,配置太多被覆盖了配置member名称:PS6100XV-1配置member ip eth0:172.17.8.101Netmask:255.255.255.0配置grp名称:GRP-1配置grpip:172.17.8.100配置grpadmin密码配置管理员密码(高级操作会用到,例如升级固件)配置完成后,存储开始初始化请等待几分钟完成简易安装后,我们来做具体的操作配置{配置带外管理口}GRP-1> member select PS6100XV-1GRP-1(member_PS6100XV-1 eth_4)>upGRP-1(member_PS6100XV-1 eth_4)> ipaddress IP-1 netmask 255.255.255.0GRP-1(member_PS6100XV-1 eth_4)> exitGRP-1(member_PS6100XV-1)> exitGRP-1> grpparamsGRP-1(grpparams)> def-mgmt-gateway ipaddress a.b.c.dMake sure the management IP address has been configured. The dedicated management network is not enabled, until you add the management IP address.GRP-1(grpparams)> management-network ipaddress IP-2Dedicated management network is enabled. You must use the new management IP address to manage the group.{配置其他eth接口ip/netmask}GRP-1(grpparams)> exitGRP-1> member select PS6100XV-1GRP-1(member_PS6100XV-1)> eth select 1GRP-1(member_PS6100XV-1 eth_1)> ipaddress 172.17.8.102 netmask 255.255.255.0GRP-1(member_PS6100XV-1 eth_1)>upGRP-1(grpparams)> exitGRP-1(member_PS6100XV-1 eth_1)> exitGRP-1(member_PS6100XV-1)> eth select 2GRP-1(member_PS6100XV-1 eth_2)> ipaddress 172.17.8.103 netmask 255.255.255.0GRP-1(member_PS6100XV-1 eth_2)> upGRP-1(member_PS6100XV-1 eth_2)> exitGRP-1(member_PS6100XV-1)> eth select 3GRP-1(member_PS6100XV-1 eth_3)> ipaddress 172.17.8.104 netmask 255.255.255.0GRP-1(member_PS6100XV-1 eth_3)> upGRP-1(member_PS6100XV-1 eth_3)> exit{配置member RAID策略raid10}GRP-1(member_PS6100XV-1)> raid-policy raid101332:216:PS6100XV-1:SP:17-Dec-2012 02:01:19.080217:verify.c:843:INFO:14.2.12:1:Parity verification initiated on RAID LUN 1.1333:217:PS6100XV-1:SP:17-Dec-2012 02:01:19.080218:verify.c:843:INFO:14.2.12:1:Parity verification initiated on RAID LUN 1.1334:218:PS6100XV-1:SP:17-Dec-2012 02:01:19.080219:verify.c:843:INFO:14.2.12:1:Parity verification initiated on RAID LUN 1.1335:219:PS6100XV-1:SP:17-Dec-2012 02:01:19.080220:verify.c:843:INFO:14.2.12:1:Parity verification initiated on RAID LUN 1.1336:220:PS6100XV-1:SP:17-Dec-2012 02:01:19.080221:verify.c:843:INFO:14.2.12:1:Parity verification initiated on RAID LUN 1.1340:224:PS6100XV-1:SP:17-Dec-201202:01:20.620225:expansion.c:640:INFO:14.2.4:0:Expanding drive array from 10 drives, RAID 10 to 12 drives, RAID 10.1374:226:PS6100XV-1:SP:17-Dec-2012 02:01:35.430227:events.c:388:INFO:14.2.6:0:Expansion of RAID LUN 0 completed in 14 seconds at 228205 sect/sec.1375:227:PS6100XV-1:SP:17-Dec-2012 02:01:35.430228:verify.c:852:INFO:14.2.13:0:Resuming parity verification on RAID LUN 0.1376:228:PS6100XV-1:SP:17-Dec-2012 02:01:35.430229:verify.c:852:INFO:14.2.13:0:Resuming parity verification on RAID LUN 0.1377:229:PS6100XV-1:SP:17-Dec-2012 02:01:35.430230:verify.c:852:INFO:14.2.13:0:Resuming parity verification on RAID LUN 0.1378:230:PS6100XV-1:SP:17-Dec-2012 02:01:35.430231:verify.c:852:INFO:14.2.13:0:Resuming parity verification on RAID LUN 0.1379:231:PS6100XV-1:SP:17-Dec-2012 02:01:35.430232:verify.c:852:INFO:14.2.13:0:Resuming parity verification on RAID LUN 0.1380:232:PS6100XV-1:SP:17-Dec-2012 02:01:35.430233:verify.c:852:INFO:14.2.13:0:Resuming parity verification on RAID LUN 0.GRP-1(member_PS6100XV-1)>exit{配置时区Asia/Shanghai GMT+8}GRP-1> grpparamsGRP-1(grpparams)> timezone Asia/Shanghai1516:31:PS6100XV-1:psgd:17-Dec-201215:05:47.670032:psgd_:5173:WARNING:18.3.10:Group is using obsolete three-letter time zone names that can cause problems with daylight saving time.{配置NTP 服务器校准时间,注意不能使用域名}GRP-1(grpparams)> ntp-server-list 172.17.8.250{配置SNMP,只读密码public请自行修改}GRP-1(grpparams)> snmp read-only-comms public{ip替换为SAN-HQ服务器ip}GRP-1(grpparams)>snmp snmp-managers ipGRP-1(grpparams)> exit{创建一个名为vol-1,容量为512GB的普通卷}GRP-1> volume create vol-1 512GBVolume creation succeeded.iSCSI target name is .equallogic:4-52aed6-76699b19d-3d90000001950cec-vol-1.1552:516:PS6100XV -1:MgmtExec:17-Dec-2012 15:19:03.440517::83:INFO:8.2.2:Volume vol-1 successfully created.{删除vol-1}GRP-1> volume select vol-1GRP-1(volume_vol-1)> offlineDo you want to set volume vol-1 offline? (y/n) [n]y1585:543:PS6100XV-1:MgmtExec:17-Dec-201215:28:48.116164::227:INFO:7.2.49:Volume vol-1 was set offline by the administrator.GRP-1(volume_vol-1)>exitGRP-1> volume delete vol-1Deleting this volume will cause all volume data to be lost.The volume will NOT be placed in the recovery bin.All 512GB (0MB in use) of data will be lost.Do you want this volume's data to be permanently deleted? (y/n) [n]yVolume deletion succeeded.1594:550:PS6100XV-1:MgmtExec:17-Dec-2012 15:32:19.335851::357:INFO:7.2.58:Volume vol-1 was not savedin the recovery bin because it has no data written to it.1597:553:PS6100XV-1:MgmtExec:17-Dec-201215:32:19.435734::871:INFO:8.2.3:Volume vol-1 successfully deleted.{创建一个名为vol-2,容量为512GB的精简卷}GRP-1> volume create vol-2 512GB thin-provision1576:295:PS6100XV-1:SP:17-Dec-2012 15:26:43.100296:kern_time.c:209:INFO:28.2.112:The time value for the array has changed from 1355729203.10 to 1355729188.13.Volume creation succeeded.iSCSI target name is.equallogic:4-52aed6-93899b19d-1a70000002150cec-vol-2.1584:542:PS6100XV-1:MgmtExec:17-Dec-2012 15:26:48.333083::83:INFO:8.2.2:Volume vol-2 successfully created.{启用多主机访问此卷,vSphere,sqlserver cluster都需开启}GRP-1(volume_vol-2)> multihost-access enable{修改snapshot空间为原卷的40%}GRP-1(volume_vol-2)>snap-reserve 40%{设定快照空间溢出策略,删除最早的快照,新版本这是默认值,老固件需要修改}GRP-1(volume_vol-2)>snap-depletion delete-oldest{创建一个快照,并使快照online}GRP-1(volume_vol-2)> snapshot create-now onlineSnapshot creation succeeded.Snapshot name is vol-2-2012-12-17-15:46:09.1.11620:571:PS6100XV-1:MgmtExec:17-Dec-201215:46:09.670832::65:INFO:8.2.4:Successfully created snapshot vol-2-2012-12-17-15:46:09.1.1{配置vol access EQL支持CHAP,IP ACL,initiator name;CHAP方式可能会影响性能,如果对安全没有高要求建议使用后2种方式,ip acl可以使用泛匹配符号*}GRP-1(volume_vol-2)>access create ipaddress 172.17.8.*Equallogic基本的CLI配置完结; ixrjog。

Dell™ EqualLogic™ Storage Management Pack Suite版本 4.0 用于 Microsoft®System Center OperationsManager 2007 SP1/R2 和System Center Essentials 2007SP1用户指南注和小心注:“注”表示可以帮助您更好地使用计算机的重要信息。
小心:“注意”表示如果不遵循说明,就有可能损坏硬件或导致数据丢失。
___________________本说明文件中的信息如有更改,恕不另行通知。
© 2010Dell Inc.版权所有,翻印必究。
未经 Dell Inc. 书面许可,严禁以任何形式复制这些材料。
本文中使用的商标:Dell、DELL徽标、EqualLogic是 Dell Inc. 的商标;Microsoft、Windows、Windows Server和Windows Vista是 Microsoft Corporation 在美国和其它国家/地区的商标或注册商标。
本说明文件中述及的其它商标和产品名称是指拥有相应商标和产品名称的公司或其制造的产品。
Dell Inc. 对其它公司的商标和产品名称不拥有任何所有权。
Dell 对外部网站及其内容的可用性不负任何责任2010 年 4 月目录1简介 (7)访问管理包和说明文件 (8)重要特性和功能 (8)了解Dell EqualLogic Storage ManagementPack Suite (9)Dell硬件组定义 (9)Dell EqualLogic PS系列阵列和Dell EqualLogic MP (9)支持的操作系统 (10)有关管理站 (10)支持的EqualLogic PS系列阵列 (10)支持的EqualLogic设备固件版本 (10)您可能需要的其它说明文件 (11)获得技术帮助 (11)2使用入门 (13)Management Station要求 (13)Dell EqualLogic Helper (13)以普通用户权限配置Management ServerAction帐户 (13)目录3安装Dell EqualLogic Storage ManagementPack Suite v4.0 (14)EqualLogic Management Pack 的导入前任务..14使用安装程序中的各个选项 (15)卸载Dell EqualLogic Storage ManagementPack Suite v4.0 (15)删除Management Pack (16)Microsoft SCOM性能和可扩展性指导 (16)安全注意事项 (16)3Dell EqualLogic StorageManagement Pack Suite操作 (17)概览 (17)Web控制台 (17)查找 (17)监测 (18)警报视图 (19)图表视图 (19)状态视图 (22)启动EqualLogic控制台 (23)自定义EqualLogic Storage Management Pack (24)设备监测器. . . . . . . . . . . . . . . . 24对象查找. . . . . . . . . . . . . . . . . 26要指定覆盖参数:. . . . . . . . . . . . . 26规则. . . . . . . . . . . . . . . . . . . 26自定义规则. . . . . . . . . . . . . . . . 294目录A附录 (31)Microsoft System Center Operations Manager(SCOM) 2007 SP1/System Center Essentials (SCE)2007 SP1 中的已知问题 (31)SCOM的Microsoft修复程序 (32)目录56目录简介71简介本说明文件适用于使用 Dell™ EqualLogic™ Storage Management Pack Suite版本 4.0管理和监测 Dell EqualLogic PS 系列阵列的系统管理员。

Array ConfigurationRapid EqualLogic Configuration Series Implementation GuideJanuary 2015Revisions© 2012 Dell Inc. All Rights Reserved. Dell, the Dell logo, and other Dell names and marks are trademarks of Dell Inc. in the US and worldwide.All trademarks and registered trademarks mentioned herein are the property of their respective owners.1Establish console accessTo perform this configuration you will need the following:∙A serial null-modem cable with DB9 connectors (provided with the EqualLogic array).∙A management station (server, desktop, or laptop) running Windows (XP, 7, 2003, 2008) in closeproximity to the EqualLogic array (i.e. the serial cable must connect from this system to the storagearray). You may also use a Windows host server for this if one is available.∙A terminal emulator such as HyperTerminal, Putty, or TeraTerm. HyperTerminal is only available inWindows XP and 2003. Putty and TeraTerm can be found for download through a quick internetsearch.∙A range of IP addresses for the storage array. Each new group requires a single IP address, whileeach new storage requires 2-4 IP addresses. Refer to the prerequisites table.∙The name you want to use for the array∙Name of the PS Series group (new or existing)Perform the following array initialization steps using the CLI:1.If not already powered up, turn on the storage array.2.Open your terminal emulator and configure it to use the serial port (usually COM1 but this mayvary depending on your system). Configure serial communications for 9600,N,8,1 and no flowcontrol.3.Connect the serial cable between the management system and the storage array. The cable mustbe connected to the active controller –the active controller will have a green LED labeled “ACT”.4.Shortly after the storage is powered on, a login prompt should appear. If it doesn’t, then hit enterin the terminal emulator.5.Login with username grpadmin and password grpadmin.6.The array will prompt with: Would you like to configure the array now? Type Y.If not prompted, type setup to access the configuration7.When prompted: Do you want to proceed type Y again.8.When prompted with Member Name [ ]: provide a name for the storage array (Hint: this name willappear in Group Manager, so use something meaningful).9.When prompted with Network interface [eth0]: press [Enter].10.When prompted with IP address for network interface [ ]: type the IP address for the first port onthe array (example, 10.10.0.101).11.When prompted with Netmask [255.255.255.0]: type the appropriate network mask, or press[Enter] to accept the default.12.When prompted with Default Gateway [10.10.0.1]: type the appropriate default gateway or press[Enter] to accept the default.13.Next, for Group name [ ]: provide the name of an existing PS Group (used for management of thestorage) that this new array will join, or if this is the first array in a new group, type the name of the new group you want to create.14.When prompted for the Group IP address [ ]: type the IP address of the new group on the SAN, orthe existing group that the array will join (for example, 10.10.0.100, this is not the out-of-band management IP address).15.If prompted with do you want to create a new group (yes|no)[yes]: Press [Enter].16.A summary will display ending with the question, do you want to use the group settings shownabove (yes|no)[yes]: Press [Enter] if the information is correct.17.Enter your password for managing group membership and press [Enter].18.Retype the password for confirmation.19.Enter your password for the default group administration (grpadmin) account and press [Enter].20.Retype the password for confirmation.2Configure the dedicated management port1.The following steps require static IP addresses for management of the array – these must be IPaddresses on a management network (LAN) - not on the SAN. One IP address is required forGroup Management and an additional IP address is required for each array in the group. (Refer tothe Prerequisites table used to collect these IP addresses).2.Activate controller management ports using the following instructions:a.>member select member-name(array1)>eth select X(array1 eth_X)>ipaddress mgmt-port-ip netmask mask(array1 eth_X)>upThis port is for group management only. Make sure it is connected to a dedicated managementnetwork.Do you want to enable the management interface? (y/n) [n]: Y(array1 eth_X)>exit(array1)>exitb.>grpparams( grpparams))>management-network ipaddress mgmt-group-ipThe default management gateway is not configured. You may not be able tomanage this group until you add the default management gateway.Dedicated management network is enabled. You must use the new managementIP address to manage the group.( grpparams))>def-mgmt-gateway ipaddress mymanagementgatewayipaddress( grpparams))>exit3Array configuration: Group Manager1.From the management system (or Windows host), open a web browser and connect to the groupIP address.2.The web browser must have Java Runtime Environment installed and must allow ActiveX controlsto proceed.3.Login as grpadmin and provide the password that was selected during the initial setup.3.1Set required RAID policyComplete the following steps for each member.1.Click on the member in Group Manager that has not been configured to select it.2.When prompted, select Yes to configure RAID for that member then click Next.3.Set the desired RAID policy and accept the default Immediately expand group capacity setting.Click Next to view the summary.4.Click Finish to begin a background initialization of the disks with the selected RAID setting.Continue with the array setup while the initialization completes in the background.3.2Upgrade array controller firmware1.Download the latest array firmware from https:///secure/login.aspx (loginrequired).2.To update array firmware on the member, go to the Maintenance tab and click Update firmware.3.When prompted for a password, supply the grpadmin password.4.Navigate to the downloaded *.tgz file and click Upgrade (or Update) in the Action column.5.Once the update is complete, click Restart in the Action column.6.Group Manager will be temporarily disconnected as the array completes the controller update andrestarts.7.After a few minutes, Group Manager re-connects automatically and reports the Member is up todate.Once the array has restarted, close the web browser to disconnect any Group Manager session and thenopen a new browser session and login again before proceeding.3.3Configure array controller ports1.Select the array.2.Open the Network tab for the member array.3.Double click eth1 and enter the appropriate IP address (documented in the Prerequisites sectionof the preparation document from the Rapid EqualLogic Configuration Portal) and subnet mask,then click the checkbox next to Enable this interface and click OK.4.Repeat for all remaining interfaces. Only select restrict to management access if this port isconnected to a separate management network (not the SAN).3.4Enable SNMP read-only access1.From Group Manager, select Group configuration and click on the SNMP tab.2.Click Add and provide an SNMP community name to be used for read-only access.3.Click OK.4.Click the icon that looks like a diskette to save the configuration.3.5Create volumes1.In the Equallogic PS Series Group Manager, click Volumes on the left toolbar.2.Click create volume.3.Enter volume name and description, and then click Next.4.Enter the Volume size, choose thin or non-thin provision, enter the Snapshot reserve size, andthen click Next.5.Select None (do not allow access), click Skip to end, and then click Finish.。
Dell Lifecycle Controller 2版本 1.3 用户指南注、小心和警告注: “注”表示可以帮助您更好地使用计算机的重要信息。
小心: “小心”表示可能会损坏硬件或导致数据丢失,并说明如何避免此类问题。
警告: “警告”表示可能会造成财产损失、人身伤害甚至死亡。
Copyright © 2014 Dell Inc. All rights reserved. This product is protected by U.S. and international copyright and intellectual property laws. Dell™ and the Dell logo are trademarks of Dell Inc. in the United States and/or other jurisdictions. All other marks and names mentioned herein may be trademarks of their respective companies.12 - 2013Rev. A00目录1 简介 (7)为何使用生命周期控制器 (7)iDRAC7 配合 Lifecycle Controller 一起使用的优点 (7)此版本中的新功能 (8)主要功能 (9)Lifecycle Controller 中的可授权功能 (9)查看 iDRAC 许可证信息 (10)您可能需要的其他说明文件 (10)社交媒体参考 (11)从 Dell 支持站点访问说明文件 (11)联系 Dell (12)2 使用生命周期控制器 (13)启动 Lifecycle Controller (13)自动恢复系统 (13)启动消息、原因,和解决方案 (14)启用 Lifecycle Controller (15)禁用生命周期控制器 (15)取消 Lifecycle Controller 操作 (15)首次使用生命周期控制器 (16)设置 Lifecycle Controller (16)Lifecycle Controller 功能 (17)3 操作系统部署 (19)安装操作系统 (19)使用可选 RAID 配置 (20)使用操作系统部署向导配置 RAID (20)选择操作系统 (20)在列表中选择可用的操作系统 (20)选择自定义操作系统 (21)选择列表中未提供的操作系统 (21)驱动程序访问 (21)在无人值守模式下安装操作系统 (21)在 iSCSI LUN 和 FCoE LUN 上安装操作系统 (22)重新引导系统 (22)开机自检-重新引导情况 (22)4 监测 (23)硬件资源清册查看和导出 (23)关于查看和导出当前资源清册 (23)关于查看和导出出厂资源清册 (23)查看硬件资源清册 - 当前或出厂 (24)查看硬件资源清册 - 当前或出厂 (24)USB 驱动器 (25)Network Share(网络共享) (25)在部件更换后查看或导出硬件资源清册 (25)重设生命周期控制器后查看并导出当前资源清册 (26)Lifecycle 日志 (26)查看生命周期日志历史记录 (26)导出生命周期日志 (27)添加工作注释到生命周期日志 (28)5 固件更新 (29)下载方法 (30)版本兼容性 (30)更新固件 (30)选择更新类型和更新源 (31)使用单组件 DUP (35)选择并应用更新 (35)固件回滚 (35)回滚至以前的固件版本 (36)6 配置 (37)系统控制面板访问选项 (37)控制对前面板的访问 (37)配置 iDRAC (38)配置系统时间和日期 (38)配置 vFlash SD 卡 (39)启用或禁用 vFlash (39)初始化 vFlash (39)配置 RAID (39)Foreign Configuration Found(发现外部配置) (40)查看当前的 RAID 配置 (41)选择 RAID 级别 (41)选择物理磁盘 (42)设置虚拟磁盘属性、 (42)查看摘要 (43)使用软件 RAID 配置 RAID (43)在 8 系列控制器上创建加密虚拟磁盘 (44)密钥加密 (45)在 RAID 控制器上应用本地密钥 (45)本地密钥加密模式 (45)加密不安全的虚拟磁盘 (46)使用新本地密钥重新加密控制器 (46)清除加密并删除数据 (47)中断镜像的驱动器 (47)系统设置——高级硬件配置 (47)修改设备设置 (49)Collect System Inventory on Restart(重新启动时收集系统资源清册) (49)更新服务器资源清册信息 (50)配置本地 FTP 服务器 (50)FTP 验证 (50)本地 FTP 服务器要求 (50)将存储库从 Dell Server Updates DVD(Dell 服务器更新 DVD)复制到本地 FTP 服务器 (50)使用 Dell Repository Manager 创建存储库并将其复制到本地 FTP 服务器 (51)访问本地 FTP 服务器上的更新 (51)配置本地 USB 驱动器 (51)将存储库从 Dell Server Updates DVD 复制到本地 USB 驱动器 (52)使用 Dell Repository Manager 创建存储库并将其复制到 USB 驱动器 (52)7 维护 (53)平台恢复 (53)关于服务器配置文件备份映像 (53)支持的组件 (54)备份服务器配置文件 (55)备份服务器配置文件 (55)备份期间系统或功能的行为 (55)导出服务器配置文件 (56)将服务器配置文件导出到 USB 驱动器或网络共享 (56)导入服务器配置文件 (56)从 vFlash SD 卡、网络共享或 USB 驱动器导入服务器配置文件 (57)主板更换后导入服务器配置文件 (59)导入服务器许可证 (59)从网络共享或 USB 驱动器导入服务器许可证 (59)从 USB 驱动器导入 iDRAC 许可证 (60)部件更换配置 (60)应用固件和配置到更换的部件 (61)支持的设备 (61)生命周期控制器修复 (61)修复生命周期控制器 (62)删除配置并重设为默认设置 (62)硬件诊断 (63)执行硬件诊断 (63)8 故障排除和常见问题 (65)错误消息 (65)常见问题 (65)9 生命周期日志架构 (69)10 易用系统组件名称 (71)11 使用系统设置程序和引导管理器 (73)选择系统引导模式 (73)进入系统设置 (74)响应错误信息 (74)使用系统设置程序导航键 (74)系统设置程序选项 (74)系统设置程序主屏幕 (74)System BIOS(系统 BIOS)屏幕 (75)System Information(系统信息)屏幕 (75)Memory Settings(内存设置)屏幕 (76)Processor Settings(处理器设置)屏幕 (77)SATA Settings(SATA 设置)屏幕 (78)Boot Settings(引导设置)屏幕 (78)Integrated Devices(集成设备)屏幕 (79)Serial Communications(串行通信)屏幕 (80)System Profile Settings(系统配置文件设置)屏幕 (80)System Security(系统安全)屏幕 (81)Miscellaneous Settings(其他设置) (83)系统密码和设置密码功能 (83)设定系统密码和/或设置密码 (83)删除或更改现有系统密码和/或设置密码 (84)使用系统密码保护系统安全 (85)在已启用设置密码的情况下进行操作 (85)进入 UEFI 引导管理器 (85)使用引导管理器导航键 (86)Boot Manager(引导管理器)屏幕 (86)UEFI Boot Menu(UEFI 引导菜单) (86)嵌入式系统管理 (87)iDRAC 设置公用程序 (87)进入 iDRAC 设置公用程序 (87)1简介Dell 生命周期控制器提供高级的嵌入式系统管理功能,通过图形用户界面执行系统管理任务,如部署、配置、更新、维护和诊断。
Installing Dell Lasso & SAN HQ Rapid EqualLogic Configuration SeriesImplementation GuideMarch 2013RevisionsDate DescriptionApril 2012 initial releaseAugust 2012 Added enabling Lasso to collect from ESXi5March 2013 Added SAN Assist content© 2013 Dell Inc. All rights reserved. Dell, the Dell logo, and other Dell names and marks are trademarks ofDell Inc. in the US and worldwide. All other trademarks mentioned herein are the property of theirrespective owners.1Dell Lasso1.1InstallationNote: Lasso is available from /toolsCheck the Lasso Release Notes (“readme”) file to view the latest supported components.Complete the following steps to install Lasso on the management systems running supported MicrosoftWindows x86 and x64 operating systems. This step is required to capture the configuration and submit itto Dell Support for audit. The audit is used to ensure the system is configured correctly.1.Run the .msi file to start the installer.2.The Welcome to the Dell Lasso Installation Wizard is displayed.3.Click Next.4.When the license agreement displays, click I Agree to accept the terms of the agreement.5.Click Next to view the readme contents.6.Click Next to select destination folder and install Lasso. In the Choose install Location screen, thedefault install location is set to %SystemDrive%\Program Files\Dell\Lasso.7.Select the security level from the four available security levels.Save Environment, Usernames and Passwords: This is the default security level where all thedevices (IP Address, name), their credentials will be stored in the password vault. For details seePassword Vault.Save Environment, Usernames: Only stores the devices and username in the password vault.Save Environment: Only the devices are stored in the password vault when selected.Do not save any information (more secure): Nothing is stored in the password vault. The user hasto provide all the device and credential before running any collection.8.Click Next.9.At the prerequisites page, click Next.10.Click Next again.11.After completing the installation, the user is given the options to Launch Lasso application andhelp file. Uncheck these boxes if you don't want to launch the application or view the help filesimmediately.12.Click Next to finish.Note: So that Lasso can validate and collect information from an ESXi 5 host, ssh access and passwordauthentication must be enabled in the /etc/ssh.conf file for each host.To configure SSH from vClient/vCenter see the following steps:1.Log in to vClient/vCenter.2.Select your host.3.Click the configuration tab.4.Select Security Profile under Software - You will be shown the services that are available forconfiguration.5.Click Properties.6.Highlight Remote Tech Support (SSH) and click options.7.For the Startup policy, choose Start and Stop with host and click Restart.8.Click Ok on each dialog box to close them.Next open up a SSH session to your host and login as root. Edit the file by using thevi /etc/ssh/sshd_config command.You will need to be familiar with the vi editor to complete the operation.9.Change the value for PasswordAuthentication no to PasswordAuthentication yes.10.Change the value for PermitRootLogin no to PermitRootLogin yes.11.Save the file.1.2Configuration(Launch Help file for detailed information)1.Start with a new configuration.2.Enter company Information and contacts.3.Click Save contact to continue.4.Select the devices to capture by selecting the check boxes next to Storage Arrays, Ethernet &FCoE switches, and Attached Hosts.5.Click Continue.6.Enter device information (ip information, type, and credentials), and then click Save.Continue this for each device type.7.When all the devices are shown as validated, start the collection.8.Select Yes to upload the collection to Dell.2SAN HQ2.1Installation planningSAN HQ enables you to monitor multiple PS Series groups from a single graphical interface. It gathers andformats performance data and other vital group information. Analyzing the data might help you improveperformance and more effectively allocate group resources.SAN HQ runs on Windows and is typically installed on a management system. We recommend that youinstall it on a dedicated management system so that it does not impact performance of productionservers.SAN HQ consists of a Monitor client (the Graphical User Interface) and a monitor service that works in thebackground and uses SNMP to poll the array and collect that information where it can be displayed by theclient.SAN Assist is an optional component of SAN Headquarters that enables you to collect, andoptionally upload, PS Series group configuration diagnostic data to Dell Support for analysis anddiagnosis.2.2InstallationFor more information, refer to the SAN Headquarters Installation and User’s Guide (also available fordownload at ).1.Download SAN HQ from and click Support.Note: This site requires a user name and password. If you do not have one, please register at the site.2.Once logged in, navigate to Downloads > SAN Headquarters and download the latest version.3.Navigate to and double-click the downloaded file to start the installation.4.At the Welcome screen, click Next.5.Read the End-User License Agreement and click I Accept to continue.6.Click Next to accept the default installation directory.7.Click Install SAN HQ Server and Client.8.Click Next to accept the default directory for the log files.9.Check the Enable TCP/IP communication box. It will cause a prompt for server login credentials.10.Click Finish to complete the installation.2.3Set Up1.When SAN HQ is started, provide the SAN HQ Server logging information2.When the Add Group wizard is launched, click Next.3.Provide the Group IP address or DNS name for your SAN.4.Provide an SNMP community name (if you don’t have one, enter public). Click Next.5.Check the box to Enable SAN Assist functionality, and then click Next.6.On the SAN Assist License Agreement screen, accept the license terms, and then click Next.Note: If you decline the license, you can continue to add the group for SAN Headquarters monitoring, but you cannot enable SAN Assist.7. A message dialog shows that SAN Headquarters is polling the group and loading groupinformation. When SAN Headquarters contacts the group, it opens the PS Series Group LoginCredential and Syslog Selection screen (See following figure).Note: If the group configuration is invalid or if there are any problems with the SAN Headquarters server or its network connections to the group, the procedure can fail at this point. If the procedure fails, correct the problem and try again to add the group.8.Enter the group administrator username and password.9.Enter a password for the SAN Assist read-only account.10.Click Test to validate the credentials. Providing valid credentials allows SAN Headquarters toenable the Group Syslog Servers panel. Observe the IP address for the Current SyslogConfiguration.11.Scroll through the list and Select SAN HQ Server IP address for Group Syslog Notificationregistration. Dell recommends a static IP address.12.Click Next and enter the Customer Contact information.Note: Dell Support only contacts you if, when analyzing aggregated data, it discovers an issue relevant to your PS Series groups and the service tag has ProSupport, or if you request support. To make sure that Dell Support contacts the appropriate person, supply the contact information (for example, the SAN administrator).13.Click Next and enter your preferred data collection and upload settings.14.Check the box to enable weekly data collection and then set the day, time, retry interval, andmaximum number of retry attempts (which includes the initial attempt).15.Check the box to collect diagnostics data when critical events are detected in addition toscheduled activity.16.Check the box to allow automatic transmission of diagnostic data to Dell Support for review (Seefollowing figure).Note: Checking the automatic data transmission box enables the benefit of automatically uploading the data to Dell Support for analysis. Dell recommends keeping this setting on unless continuous internet connection is not available and local data storage is preferred.17.At the email-notification screen, enable email alerts or just click Next to continue.18. Accept the default log file sizes and click Next.19.Click Next and review your configuration settings in the Completing the Wizard screen.20.Click Add Group to complete the wizard, or click back to make changes。
Planning and Preparation GuideRapid EqualLogic Configuration SeriesSwitch: Dell Networking or Force10 S4810Array: PS4110, PS6110, PS6210, PS6010, or PS6510Host: VMware ESXi, Windows, FS7610 NAS or Red Hat Enterprise Linux April 2014RevisionsTHIS WHITE PAPER IS FOR INFORMATIONAL PURPOSES ONLY, AND MAY CONTAIN TYPOGRAPHICAL ERRORS AND TECHNICAL INACCURACIES. THE CONTENT IS PROVIDED AS IS, WITHOUT EXPRESS OR IMPLIED WARRANTIES OF ANY KIND.© 2013 Dell Inc. All rights reserved. Reproduction of this material in any manner whatsoever without the express written permission of Dell Inc. is strictly forbidden. For more information, contact Dell.Dell, the DELL logo, the DELL badge, EqualLogic, Dell Networking and Force10 are trademarks of Dell Inc. VMware®, ESXi® and vSphere® are registered trademarks or trademarks of VMware, Inc. in the United States or other countries. Red Hat® and Red Hat® Enterprise Linux® are registered trademarks of Red Hat, Inc. in the United States and/or other countries. Windows® and Windows Server® are registered trademarks of Microsoft Corporation in the United States and/or other countries. Other trademarks and trade names may be used in this document to refer to either the entities claiming the marks and names or their products. Dell disclaims any proprietary interest in the marks and names of others.1Introduction1.1Document useKeyboard keys are shown in brackets with the actual key bolded.Example: [Enter]Commands that are to be typed are bolded and shown after the appropriate prompt.Example:console>enable1.2Intended audienceThis document series has been written for system or storage administrators with experience deployingWindows®, VMware® vSphere ESXi™ or Red Hat Enterprise Linux® servers, storage systems, and Ethernetnetworking. If you are unsure about completing the installation, Dell support is available and ready to assist you.1.3List of references∙TR1050 – Monitoring Your PS Series SAN with SAN HeadQuartershttps:///WorkArea/DownloadAsset.aspx?id=8749∙SAN HQ User Guide, available for download on https:///∙Dell EqualLogic Configuration Guide, available for download at:/dell-groups/dtcmedia/m/mediagallery/19852516/download.aspx ∙Dell EqualLogic Compatibility Matrix, available for download at:/techcenter/storage/w/wiki/2661.equallogic-compatibility-matrix-07262013.aspx2Prerequisites2.1Serial cable∙A null-modem DB9 serial cable (included with the array)∙A switch serial console management cable (included with the switch)2.2Software2.2.1VMware host operating system∙Latest Dell™ EqualLogic™ Multipathing Extension Module for VMware vSphere installation package(https:///).∙Latest SAN HeadQuarters installation package (https:///).∙The VMware vSphere Command-Line Interface (vCLI) environment must be installed on themanagement server (/downloads).∙Latest network device driver update (/downloads).2.2.2Windows host operating system∙Latest network adapter device driver update ()∙Latest Host Integration Tools (HIT) kit installation package (https:///)∙Latest SAN HeadQuarters installation package (https:///)2.2.3Red Hat Enterprise Linux operating system∙Latest network adapter device driver update ()∙Latest Host Integration Tools (HIT) kit installation package (https:///)2.2.4FS7610 – Fluid File System∙Fluid File System (or FluidFS) version 3 or later (https:///)∙Refer to the Dell EqualLogic FS7610 Installation and Setup Guide (on https:///)for information on installing and configuring the FS7610 NAS appliance.2.3Configuration settings2.3.1VMware host operating systemThis document assumes that you have already installed VMware ESXi and have applied the latest criticalpatches available through VMware Update Manager.To properly configure your vSphere ESXi system, you must also have a management system available. This system must be running Windows (2008, Windows 7, etc.)2.3.2Windows host operating systemThis document assumes that you have already installed Windows 2008 R2 with Service Pack 1 or later andhave applied the latest critical security updates available through Windows Update.2.3.3Red Hat Enterprise Linux operating systemThis document assumes that you have already installed RHEL 6.5 or later and have applied the latestcritical security updates available through Linux.2.3.4FS7610 NAS with Fluid File SystemIf you have a FS7610 appliance, you must be running FluidFS version 3 or later. This document assumesthat all BIOS and firmware are up to data as required and that the FS7610 appliance is not configured (orhas been re-initialized if previously configured).Refer to Chapter 7 of the Dell EqualLogic Group Manager Administrator’s Manual for complete details onconfiguring the FS7610 NAS appliance. It can be downloaded from https:///2.3.5SwitchReference the EqualLogic Compatibility Matrix at /dell-groups/dtcmedia/m/mediagallery/19856862/download.aspx to determine the recommended switchfirmware version. To get the latest update, visit . Installation instructions areprovided as part of the download. The switch user manual can also be downloaded for reference.2.3.6ArrayReference the EqualLogic Compatibility Matrix at /dell-groups/dtcmedia/m/mediagallery/19856862/download.aspx to determine the recommended arrayfirmware version. To get the latest update, visit https:///. Update instructions andrelease notes are available with the latest downloads.2.4Configuration informationYour iSCSI SAN configuration requires several static IP addresses. Complete this form and have it availablefor reference during the configuration.Switch admin password: _________________________Array Group admin password: __________________________*Array Group membership password: __________________________**These may be the same password – see the PS Series Group Administration guide for more information.3Connectivity diagramsUse the appropriate diagram and point-to-point table when cabling the SAN.Figure 1Dell Networking S4810 and EqualLogic PS4110 or PS6110 configuration (table on page 14)Figure 5Dell Networking S4810 connections with the EqualLogic FS7610 and PS4110 or PS6110 (table on page 14)3.1Point-to-point connection tables。
手动建立当前时间点的快照
创建自动快照任务(这里演示的是按小时)
使用批处理脚本制作快照
这里我们会使用到的文件
主体程序:
EqlCliExec.pl 批处理需要调用的PERL程序
EqlScript.pm PERL的模块
iscsilogon.bat 批处理主体
p.txt diskpart命令脚本
其他文件(会自动生成):
iscsi.log ISCSI日志
newTarget.txt
oldTargetSession.txt
snap.txt 保存了脚本创建的快照名
主体批处理iscsilogon.bat说明(因涉及到帐号密码所以我假设盘柜的IP为192.168.0.100 帐号为root 密码abc#123 并用红字标出)
@echo off
rem windows iscsi logon tool V0.2 write by Licheng
rem 4 files together ,this file p.txt and eqlscript tools(EqlCliExec.pl \ EqlScript.pm)
remthe bat need perlsupprot ,download it from
(/ASPN/Downloads/ActivePerl/)
:: check iscsi client
if not exist %windir%\system32\iscsiexe.exe goto exit
:startISCSI
net start "Microsoft iSCSI Initiator Service"
::stopmssql server
net stop mssqlserver
:LogoutTarget
iscsicliSessionList|find /i "Session Id" > oldTargetSession.txt
FOR /F "usebackqeol=; tokens=2 delims=:" %%I in (oldTargetSession.txt) do iscsicliLogoutTarget %%I
::----删除快照
:deleteSnapshot
for /f "usebackqeol=; tokens=4 delims= " %%I in (snap.txt) do EqlCliExec.pl -g 192.168.0.100 -a root -p abc#123 volume select isp snapshot delete %%I
::----建立快照
:creatSnapshot
EqlCliExec.pl -g 192.168.0.100 -a root -p abc#123 volume select isp snapshot create-now online | find /i "isp" > snap.txt
rem for /f "usebackqeol=; tokens=4 delims= " %%I in (snap.txt) do echo %%I >
:LogonTarget
::----iscsi建立连接
iscsicliAddTargetPortal192.168.0.100 3260
iscsicliListTargets|find /i "iqn" > newTarget.txt
FOR /F "usebackqeol=; tokens=1 delims=" %%I in (newTarget.txt) do iscsicliLoginTarget %%I T * * * * * * * * * * * * * * * 0
::----出盘(虚拟盘设置盘符),具体信息参考p.txt
:assignLetter
diskpart /s p.txt
echo iscsi.bat is run at %date% %time% >> iscsi.log
::startmssql server
net start mssqlserver
select partition 1
remove all
assign letter f
exit
在这里我修改了部分代码建立了删除用脚本创建快照的批处理
net stop mssqlserver
:LogoutTarget
iscsicliSessionList|find /i "Session Id" > oldTargetSession.txt
FOR /F "usebackqeol=; tokens=2 delims=:" %%I in (oldTargetSession.txt) do iscsicliLogoutTarget %%I
::----删除快照
:deleteSnapshot
for /f "usebackqeol=; tokens=4 delims= " %%I in (snap.txt) do EqlCliExec.pl -g 192.168.0.100 -a root -p abc#123 volume select isp snapshot delete %%I
注:因批处理中含有盘柜的真实IP帐号密码等,所以我们可以通过第3方bat2exe程序(Bat To Exe Converter.exe)将批处理转为可执行文件这样就不会泄露密码了
快照在使用中的注意事项
数据变化量大的卷不要保留过多的快照,因为每份快照最大占用空间将是卷使用空间的100%;
脚本建立的快照是不会被自动删除的,所以要经常检查避免空间溢出,这将会导致VOLUME OFFLINE;
合理的分配快照的可用空间,按现在的需求看快照可用空间为卷容量的40%,已经够用了,如果有必要的话可以设置为卷容量的100%(按以后的需求来动态分配)下图为检查快照使用容量。