《狙击手:幽灵战士3》最高难度支线任务视频
- 格式:pdf
- 大小:46.81 KB
- 文档页数:16


《狙击⼿:幽灵战⼠3》主、⽀线任务视频攻略%{p a g e-b r e a k|序章|p a g e-b r e a k}%%{p a g e-b r e a k|第⼀章-⼀⽯⼆鸟|p a g e-b r e a k}%%{p a g e-b r e a k|第⼀章-掘墓⼈|p a g e-b r e a k}%%{p a g e-b r e a k|第⼀章-暴⼒街区|p a g e-b r e a k}%%{p a g e-b r e a k|第⼀章-⽀线任务雄狮队(1)|p a g e-b r e a k}%%{p a g e-b r e a k|第⼀章-断线|p a g e-b r e a k}%%{p a g e-b r e a k|第⼀章-星⽕飞舞|p a g e-b r e a k}%%{p a g e-b r e a k|第⼀章-⽀线任务雄狮队(2)|p a g e-b r e a k}%%{p a g e-b r e a k|第⼀章-与团队会合|p a g e-b r e a k}%%{p a g e-b r e a k|第⼆章-AWA S的家⼈|p a g e-b r e a k}%%{p a g e-b r e a k|第⼆章-采⽯场政变及燃烧的⼤桥(1)|p a g e-b r e a k}%%{p a g e-b r e a k|第⼆章-⽀线任务燃烧的⼤桥(2)|p a g e-b r e a k}%%{p a g e-b r e a k|第⼆章-后援|p a g e-b r e a k}%%{p a g e-b r e a k|第⼆章-⽼巢|p a g e-b r e a k}%%{p a g e-b r e a k|第⼆章-捕⿏陷阱|p a g e-b r e a k}%%{p a g e-b r e a k|第三章-⽀线任务第⼀次鸦⽚战争|p a g e-b r e a k}%%{p a g e-b r e a k|第⼆章-市长先⽣|p a g e-b r e a k}%%{p a g e-b r e a k|第三章-⽀线任务第⼆次鸦⽚战争|p a g e-b r e a k}%%{p a g e-b r e a k|第三章-⽀线任务第三次鸦⽚战争|p a g e-b r e a k}%%{p a g e-b r e a k|第三章-⽀线任务第四次鸦⽚战争|p a g e-b r e a k}%%{p a g e-b r e a k|第三章-⼯程师|p a g e-b r e a k}%%{p a g e-b r e a k|第三章-迷宫、地底深处|p a g e-b r e a k}%%{p a g e-b r e a k|第三章-屠宰场|p a g e-b r e a k}%%{p a g e-b r e a k|第四章-⽀线任务搭起桥梁|p a g e-b r e a k}%%{p a g e-b r e a k|第四章-营救红发妹|p a g e-b r e a k}%%{p a g e-b r e a k|第四章-⽀线任务未知的结局(1)|p a g e-b r e a k}% 逗游⽹——中国2亿游戏⽤户⼀致选择的”⼀站式“游戏服务平台。

Legal informationCopyright and License© Copyright 2019 HP Development Company, L.P.Reproduction, adaptation, or translation without prior written permission is prohibited, except as allowedunder the copyright laws.The information contained herein is subject to change without notice.The only warranties for HP products and services are set forth in the express warranty statementsaccompanying such products and services. Nothing herein should be construed as constituting anadditional warranty. HP shall not be liable for technical or editorial errors or omissions contained herein.Edition 1, 10/2019Trademark CreditsAdobe®, Adobe Photoshop®, Acrobat®, and PostScript® are trademarks of Adobe Systems Incorporated.Apple and the Apple logo are trademarks of Apple Inc., registered in the U.S. and other countries.macOS is a trademark of Apple Inc., registered in the U.S. and other countries.AirPrint is a trademark of Apple Inc., registered in the U.S. and other countries.Google™ is a trademark of Google Inc.Microsoft®, Windows®, Windows® XP, and Windows Vista® are U.S. registered trademarks of MicrosoftCorporation.UNIX® is a registered trademark of The Open Group.iiiT able of contents1 Printer overview (1)Warning icons (1)Potential shock hazard (2)Printer views (2)Printer front view (2)Printer back view (4)Interface ports (4)Control-panel view (5)How to use the touchscreen control panel (7)Printer specifications (8)T echnical specifications (8)Supported operating systems (11)Mobile printing solutions (12)Printer dimensions (13)Power consumption, electrical specifications, and acoustic emissions (15)Operating-environment range (15)Printer hardware setup and software installation (16)2 Paper trays (17)Introduction (17)Load paper to Tray 1 (multipurpose tray) (17)Load Tray 1 (multipurpose tray) (18)Tray 1 paper orientation (19)Use alternative letterhead mode (24)Enable Alternative Letterhead Mode by using the printer control-panel menus (24)Load paper to Tray 2 (24)Load Tray 2 (24)Tray 2 paper orientation (26)Use alternative letterhead mode (29)Enable Alternative Letterhead Mode by using the printer control-panel menus (29)Load paper to the 550-sheet paper tray (30)Load paper to the 550-sheet paper tray (30)550-sheet paper tray paper orientation (32)Use alternative letterhead mode (35)Enable Alternative Letterhead Mode by using the printer control-panel menus (35)ivLoad paper to the 2 x 550-sheet paper trays (36)Load paper to the 2 x 550-sheet paper trays (36)2 x 550-sheet paper tray paper orientation (38)Use alternative letterhead mode (41)Enable Alternative Letterhead Mode by using the printer control-panel menus (41)Load paper to the 2,700-sheet high-capacity input paper trays (41)Load paper to the 2,700-sheet high-capacity input paper trays (41)2,700-sheet HCI paper tray paper orientation (43)Use alternative letterhead mode (45)Enable Alternative Letterhead Mode by using the printer control-panel menus (45)Load and print envelopes (46)Print envelopes (46)Envelope orientation (46)Load and print labels (47)Manually feed labels (47)Label orientation (48)3 Supplies, accessories, and parts (49)Order supplies, accessories, and parts (49)Ordering (49)Supplies and accessories (50)Maintenance/long-life consumables (51)Customer self-repair parts (51)Dynamic security (52)Configure the HP toner-cartridge-protection supply settings (53)Introduction (53)Enable or disable the Cartridge Policy feature (53)Use the printer control panel to enable the Cartridge Policy feature (54)Use the printer control panel to disable the Cartridge Policy feature (54)Use the HP Embedded Web Server (EWS) to enable the Cartridge Policy feature (54)Use the HP Embedded Web Server (EWS) to disable the Cartridge Policy feature (55)Troubleshoot Cartridge Policy control panel error messages (55)Enable or disable the Cartridge Protection feature (55)Use the printer control panel to enable the Cartridge Protection feature (56)Use the printer control panel to disable the Cartridge Protection feature (56)Use the HP Embedded Web Server (EWS) to enable the Cartridge Protection feature (56)Use the HP Embedded Web Server (EWS) to disable the Cartridge Protection feature (57)Troubleshoot Cartridge Protection control panel error messages (57)Replace the toner cartridges (58)T oner-cartridge information (58)Remove and replace the cartridges (59)Replace the imaging drums (62)Imaging drum information (62)Remove and replace the imaging drums (63)Replace the toner-collection unit (66)T oner-collection unit information (66)vRemove and replace the toner-collection unit (67)Replace the staple cartridge (M776zs model only) (70)Staple cartridge information (70)Remove and replace the staple cartridge (71)4 Print (73)Print tasks (Windows) (73)How to print (Windows) (73)Automatically print on both sides (Windows) (74)Manually print on both sides (Windows) (74)Print multiple pages per sheet (Windows) (75)Select the paper type (Windows) (75)Additional print tasks (76)Print tasks (macOS) (77)How to print (macOS) (77)Automatically print on both sides (macOS) (77)Manually print on both sides (macOS) (77)Print multiple pages per sheet (macOS) (78)Select the paper type (macOS) (78)Additional print tasks (79)Store print jobs on the printer to print later or print privately (79)Introduction (79)Create a stored job (Windows) (79)Create a stored job (macOS) (80)Print a stored job (81)Delete a stored job (81)Delete a job that is stored on the printer (81)Change the job storage limit (82)Information sent to printer for Job Accounting purposes (82)Mobile printing (82)Introduction (82)Wi-Fi, Wi-Fi Direct Print, NFC, and BLE printing (82)Enable wireless printing (83)Change the Wi-Fi Direct name (83)HP ePrint via email (83)AirPrint (84)Android embedded printing (85)Print from a USB flash drive (85)Enable the USB port for printing (85)Method one: Enable the USB port from the printer control panel (85)Method two: Enable the USB port from the HP Embedded Web Server (network-connectedprinters only) (85)Print USB documents (86)Print using high-speed USB 2.0 port (wired) (86)Method one: Enable the high-speed USB 2.0 port from the printer control panel menus (86)Method two: Enable the high-speed USB 2.0 port from the HP Embedded Web Server (network-connected printers only) (87)vi5 Copy (88)Make a copy (88)Copy on both sides (duplex) (90)Additional copy tasks (92)6 Scan (93)Set up Scan to Email (93)Introduction (93)Before you begin (93)Step one: Access the HP Embedded Web Server (EWS) (94)Step two: Configure the Network Identification settings (95)Step three: Configure the Send to Email feature (96)Method one: Basic configuration using the Email Setup Wizard (96)Method two: Advanced configuration using the Email Setup (100)Step four: Configure the Quick Sets (optional) (104)Step five: Set up Send to Email to use Office 365 Outlook (optional) (105)Introduction (105)Configure the outgoing email server (SMTP) to send an email from an Office 365 Outlookaccount (105)Set up Scan to Network Folder (108)Introduction (108)Before you begin (108)Step one: Access the HP Embedded Web Server (EWS) (108)Step two: Set up Scan to Network Folder (109)Method one: Use the Scan to Network Folder Wizard (109)Method two: Use Scan to Network Folder Setup (110)Step one: Begin the configuration (110)Step two: Configure the Scan to Network Folder settings (111)Step three: Complete the configuration (118)Set up Scan to SharePoint (118)Introduction (118)Before you begin (118)Step one: Access the HP Embedded Web Server (EWS) (118)Step two: Enable Scan to SharePoint and create a Scan to SharePoint Quick Set (119)Scan a file directly to a SharePoint site (121)Quick Set scan settings and options for Scan to SharePoint (122)Set up Scan to USB Drive (123)Introduction (124)Step one: Access the HP Embedded Web Server (EWS) (124)Step two: Enable Scan to USB Drive (124)Step three: Configure the Quick Sets (optional) (125)Default scan settings for Scan to USB Drive setup (126)Default file settings for Save to USB setup (126)Scan to email (127)Introduction (127)Scan to email (127)Scan to job storage (129)viiIntroduction (129)Scan to job storage on the printer (130)Print from job storage on the printer (132)Scan to network folder (132)Introduction (132)Scan to network folder (132)Scan to SharePoint (134)Introduction (134)Scan to SharePoint (134)Scan to USB drive (136)Introduction (136)Scan to USB drive (136)Use HP JetAdvantage business solutions (138)Additional scan tasks (138)7 Fax (140)Set up fax (140)Introduction (140)Set up fax by using the printer control panel (140)Change fax configurations (141)Fax dialing settings (141)General fax send settings (142)Fax receive settings (143)Send a fax (144)Additional fax tasks (146)8 Manage the printer (147)Advanced configuration with the HP Embedded Web Server (EWS) (147)Introduction (147)How to access the HP Embedded Web Server (EWS) (148)HP Embedded Web Server features (149)Information tab (149)General tab (149)Copy/Print tab (150)Scan/Digital Send tab (151)Fax tab (152)Supplies tab (153)Troubleshooting tab (153)Security tab (153)HP Web Services tab (154)Networking tab (154)Other Links list (156)Configure IP network settings (157)Printer sharing disclaimer (157)View or change network settings (157)Rename the printer on a network (157)viiiManually configure IPv4 TCP/IP parameters from the control panel (158)Manually configure IPv6 TCP/IP parameters from the control panel (158)Link speed and duplex settings (159)Printer security features (160)Introduction (160)Security statements (160)Assign an administrator password (160)Use the HP Embedded Web Server (EWS) to set the password (160)Provide user access credentials at the printer control panel (161)IP Security (161)Encryption support: HP High Performance Secure Hard Disks (161)Lock the formatter (161)Energy-conservation settings (161)Set the sleep timer and configure the printer to use 1 watt or less of power (161)Set the sleep schedule (162)Set the idle settings (162)HP Web Jetadmin (163)Software and firmware updates (163)9 Solve problems (164)Customer support (164)Control panel help system (165)Reset factory settings (165)Introduction (165)Method one: Reset factory settings from the printer control panel (165)Method two: Reset factory settings from the HP Embedded Web Server (network-connectedprinters only) (166)A “Cartridge is low” or “Cartridge is very low” message displays on the printer control panel (166)Change the “Very Low” settings (166)Change the “Very Low” settings at the control panel (166)For printers with fax capability (167)Order supplies (167)Printer does not pick up paper or misfeeds (167)Introduction (167)The printer does not pick up paper (167)The printer picks up multiple sheets of paper (171)The document feeder jams, skews, or picks up multiple sheets of paper (174)Clear paper jams (174)Introduction (174)Paper jam locations (174)Auto-navigation for clearing paper jams (175)Experiencing frequent or recurring paper jams? (175)Clear paper jams in the document feeder - 31.13.yz (176)Clear paper jams in Tray 1 (13.A1) (177)Clear paper jams in Tray 2 (13.A2) (182)Clear paper jams in the fuser (13.B9, 13.B2, 13.FF) (188)ixClear paper jams in the duplex area (13.D3) (194)Clear paper jams in the 550-sheet trays (13.A3, 13.A4) (199)Clear paper jams in the 2 x 550 paper trays (13.A4, 13.A5) (206)Clear paper jams in the 2,700-sheet high-capacity input paper trays (13.A3, 13.A4, 13.A5, 13.A7) (213)Resolving color print quality problems (220)Introduction (220)Troubleshoot print quality (221)Update the printer firmware (221)Print from a different software program (221)Check the paper-type setting for the print job (221)Check the paper type setting on the printer (221)Check the paper type setting (Windows) (221)Check the paper type setting (macOS) (222)Check toner-cartridge status (222)Step one: Print the Supplies Status Page (222)Step two: Check supplies status (222)Print a cleaning page (222)Visually inspect the toner cartridge or cartridges (223)Check paper and the printing environment (223)Step one: Use paper that meets HP specifications (223)Step two: Check the environment (223)Step three: Set the individual tray alignment (224)Try a different print driver (224)Troubleshoot color quality (225)Calibrate the printer to align the colors (225)Troubleshoot image defects (225)Improve copy image quality (233)Check the scanner glass for dirt and smudges (233)Calibrate the scanner (234)Check the paper settings (235)Check the paper selection options (235)Check the image-adjustment settings (235)Optimize copy quality for text or pictures (236)Edge-to-edge copying (236)Improve scan image quality (236)Check the scanner glass for dirt and smudges (237)Check the resolution settings (238)Check the color settings (238)Check the image-adjustment settings (239)Optimize scan quality for text or pictures (239)Check the output-quality settings (240)Improve fax image quality (240)Check the scanner glass for dirt and smudges (240)Check the send-fax resolution settings (242)Check the image-adjustment settings (242)Optimize fax quality for text or pictures (242)Check the error-correction setting (243)xSend to a different fax machine (243)Check the sender's fax machine (243)Solve wired network problems (244)Introduction (244)Poor physical connection (244)The computer is unable to communicate with the printer (244)The printer is using incorrect link and duplex settings for the network (245)New software programs might be causing compatibility problems (245)The computer or workstation might be set up incorrectly (245)The printer is disabled, or other network settings are incorrect (245)Solve wireless network problems (245)Introduction (245)Wireless connectivity checklist (245)The printer does not print after the wireless configuration completes (246)The printer does not print, and the computer has a third-party firewall installed (246)The wireless connection does not work after moving the wireless router or printer (247)Cannot connect more computers to the wireless printer (247)The wireless printer loses communication when connected to a VPN (247)The network does not appear in the wireless networks list (247)The wireless network is not functioning (247)Reduce interference on a wireless network (248)Solve fax problems (248)Checklist for solving fax problems (248)What type of phone line are you using? (249)Are you using a surge-protection device? (249)Are you using a phone company voice-messaging service or an answering machine? (249)Does your phone line have a call-waiting feature? (249)Check fax accessory status (249)General fax problems (250)The fax failed to send (250)No fax address book button displays (250)Not able to locate the Fax settings in HP Web Jetadmin (250)The header is appended to the top of the page when the overlay option is enabled (251)A mix of names and numbers is in the recipients box (251)A one-page fax prints as two pages (251)A document stops in the document feeder in the middle of faxing (251)The volume for sounds coming from the fax accessory is too high or too low (251)Index (252)xiPrinter overview1Review the location of features on the printer, the physical and technical specifications of the printer,and where to locate setup information.For video assistance, see /videos/LaserJet.The following information is correct at the time of publication. For current information, see /support/colorljM776MFP.For more information:HP's all-inclusive help for the printer includes the following information:●Install and configure●Learn and use●Solve problems●Download software and firmware updates●Join support forums●Find warranty and regulatory informationWarning iconsUse caution if you see a warning icon on your HP printer, as indicated in the icon definitions.●Caution: Electric shock●Caution: Hot surface●Caution: Keep body parts away from moving partsPrinter overview1●Caution: Sharp edge in close proximity●WarningPotential shock hazardReview this important safety information.●Read and understand these safety statements to avoid an electrical shock hazard.●Always follow basic safety precautions when using this product to reduce risk of injury from fire orelectric shock.●Read and understand all instructions in the user guide.●Observe all warnings and instructions marked on the product.●Use only a grounded electrical outlet when connecting the product to a power source. If you do notknow whether the outlet is grounded, check with a qualified electrician.●Do not touch the contacts on any of the sockets on the product. Replace damaged cordsimmediately.●Unplug this product from wall outlets before cleaning.●Do not install or use this product near water or when you are wet.●Install the product securely on a stable surface.●Install the product in a protected location where no one can step on or trip over the power cord.Printer viewsIdentify certain parts of the printer and the control panel.Printer front viewLocate features on the front of the printer.2Chapter 1 Printer overviewPrinter front view3Printer back viewLocate features on the back of the printer.Interface portsLocate the interface ports on the printer formatter. 4Chapter 1 Printer overviewControl-panel viewThe control panel provides access to the printer features and indicates the current status of the printer.NOTE:Tilt the control panel for easier viewing.The Home screen provides access to the printer features and indicates the current status of the printer.screens.NOTE:The features that appear on the Home screen can vary, depending on the printerconfiguration.Control-panel view5Figure 1-1Control-panel view?i 12:42 PM6Chapter 1 Printer overviewHow to use the touchscreen control panelPerform the following actions to use the printer touchscreen control panel.T ouchT ouch an item on the screen to select that item or open that menu. Also, when scrolling T ouch the Settings icon to open the Settings app.How to use the touchscreen control panel 7SwipeT ouch the screen and then move your finger horizontally to scroll the screen sideways.Swipe until the Settings app displays.Printer specificationsDetermine the specifications for your printer model.IMPORTANT:The following specifications are correct at the time of publication, but they are subject to change. For current information, see /support/colorljM776MFP .T echnical specificationsReview the printer technical specifications.Product numbers for each model ●M776dn - #T3U55A ●Flow M776z - #3WT91A ●Flow M776zs - #T3U56APaper handling specificationsPaper handling features Tray 1 (100-sheet capacity)Included Included Included Tray 2 (550-sheet capacity)IncludedIncludedIncluded8Chapter 1 Printer overview550-sheet paper trayOptional Included Not included NOTE:The M776dn models accept one optional550-sheet tray.Optional Included Included2 x 550-sheet paper tray and standNOTE:The M776dn models accept one optional550-sheet tray that may be installed on top of thestand.Optional Not included Not included2,700-sheet high-capacity input (HCI) paper trayand standNOTE:The M776dn models accept one optional550-sheet tray that may be installed on top of theoptional printer stand.Printer standOptional Not included Not included NOTE:The M776dn models accept one optional550-sheet tray that may be installed on top of theoptional printer stand.Inner finisher accessory Not included Not included Included Automatic duplex printing Included IncludedIncludedIncluded Included Included10/100/1000 Ethernet LAN connection with IPv4and IPv6Hi-Speed USB 2.0Included Included IncludedIncluded Included IncludedEasy-access USB port for printing from a USBflash drive or upgrading the firmwareIncluded Included Included Hardware Integration Pocket for connectingaccessory and third-party devicesHP Internal USB Ports Optional Optional OptionalOptional Optional OptionalHP Jetdirect 2900nw Print Server accessory forWi-Fi connectivity and an additional Ethernet portOptional IncludedIncludedHP Jetdirect 3100w accessory for Wi-Fi, BLE, NFC,and proximity badge readingPrints 45 pages per minute (ppm) on Letter-sizepaper and 46 ppm on A4-size paperEasy-access USB printing for printing from a USBIncluded Included Includedflash driveT echnical specifications9Included Included Included Store jobs in the printer memory to print later orprint privatelyScans 100 pages per minute (ppm) on A4 andIncluded Included Included letter-size paper one-sidedIncluded Included Included 200-page document feeder with dual-headscanning for single-pass duplex copying andscanningNot included Included Included HP EveryPage T echnologies including ultrasonicmulti-feed detectionNot included Included Included Embedded optical character recognition (OCR)provides the ability to convert printed pages intotext that can be edited or searched using acomputerIncluded Included Included SMART Label feature provides paper-edgedetection for automatic page croppingIncluded Included Included Automatic page orientation for pages that haveat least 100 characters of textIncluded Automatic tone adjustment sets contrast,Included Includedbrightness, and background removal for eachpageIncluded Included Includedfolders on a networkIncludedSend documents to SharePoint®Included IncludedIncluded Included Included NOTE:Memory reported on the configurationpage will change from 2.5 GB to 3 GB with theoptional 1 GB SODIMM installed.Mass storage: 500 GB hard disk drive Included Included IncludedSecurity: HP Trusted Platform Module (TPM)Included Included IncludedT ouchscreen control panel Included Included IncludedRetractable keyboard Not included Included Included 10Chapter 1 Printer overviewFax Optional Included IncludedSupported operating systemsUse the following information to ensure printer compatibility with your computer operating system.Linux: For information and print drivers for Linux, go to /go/linuxprinting.UNIX: For information and print drivers for UNIX®, go to /go/unixmodelscripts.The following information applies to the printer-specific Windows HP PCL 6 print drivers, HP print driversfor macOS, and to the software installer.Windows: Download HP Easy Start from /LaserJet to install the HP print driver. Or, go tothe printer-support website for this printer: /support/colorljM776MFP to download the printdriver or the software installer to install the HP print driver.macOS: Mac computers are supported with this printer. Download HP Easy Start either from /LaserJet or from the Printer Support page, and then use HP Easy Start to install the HP print driver.1.Go to /LaserJet.2.Follow the steps provided to download the printer software.Windows 7, 32-bit and 64-bit The “HP PCL 6” printer-specific print driver is installed for this operating system aspart of the software installation.Windows 8.1, 32-bit and 64-bit The “HP PCL-6” V4 printer-specific print driver is installed for this operating systemas part of the software installation.Windows 10, 32-bit and 64-bit The “HP PCL-6” V4 printer-specific print driver is installed for this operating systemas part of the software installation.Windows Server 2008 R2, SP 1, 64-bit The PCL 6 printer-specific print driver is available for download from the printer-support website. Download the driver, and then use the Microsoft Add Printer tool toinstall it.Windows Server 2012, 64-bit The PCL 6 printer-specific print driver is available for download from the printer-support website. Download the driver, and then use the Microsoft Add Printer tool toinstall it.Windows Server 2012 R2, 64-bit The PCL 6 printer-specific print driver is available for download from the printer-support website. Download the driver, and then use the Microsoft Add Printer tool toinstall it.Windows Server 2016, 64-bit The PCL 6 printer-specific print driver is available for download from the printer-support website. Download the driver, and then use the Microsoft Add Printer tool toinstall it.Windows Server 2019, 64-bit The PCL 6 printer-specific print driver is available for download from the printer-support website. Download the driver, and then use the Microsoft Add Printer tool toinstall it.Supported operating systems11macOS 10.13 High Sierra, macOS 10.14 MojaveDownload HP Easy Start from /LaserJet , and then use it to install the print driver.NOTE:Supported operating systems can change.NOTE:For a current list of supported operating systems and HP’s all-inclusive help for the printer, go to /support/colorljM776MFP .NOTE:For details on client and server operating systems and for HP UPD driver support for this printer, go to /go/upd . Under Additional information , click Specifications .●Internet connection●Dedicated USB 1.1 or 2.0 connection or a network connection● 2 GB of available hard-disk space ●1 GB RAM (32-bit) or2 GB RAM (64-bit)●Internet connection●Dedicated USB 1.1 or 2.0 connection or a network connection●1.5 GB of available hard-disk spaceNOTE:The Windows software installer installs the HP Smart Device Agent Base service. The file size is less than 100 kb. Its only function is to check for printers connected via USB hourly. No data is collected. If a USB printer is found, it then tries to locate a JetAdvantage Management Connector (JAMc) instance on the network. If a JAMc is found, the HP Smart Device Agent Base is securelyupgraded to a full Smart Device Agent from JAMc, which will then allow printed pages to be accounted for in a Managed Print Services (MPS) account. The driver-only web packs downloaded from for the printer and installed through the Add Printer wizard do not install this service.T o uninstall the service, open the Control Panel , select Programs or Programs and Features , and then select Add/Remove Programs or Uninstall a Programto remove the service. The file name isHPSmartDeviceAgentBase.Mobile printing solutionsHP offers multiple mobile printing solutions to enable easy printing to an HP printer from a laptop, tablet, smartphone, or other mobile device.T o see the full list and to determine the best choice, go to /go/MobilePrinting .NOTE:Update the printer firmware to ensure all mobile printing capabilities are supported.●Wi-Fi Direct (wireless models only, with HP Jetdirect 3100w BLE/NFC/Wireless accessory installed)●HP ePrint via email (Requires HP Web Services to be enabled and the printer to be registered with HP Connected)●HP Smart app ●Google Cloud Print12Chapter 1 Printer overview。
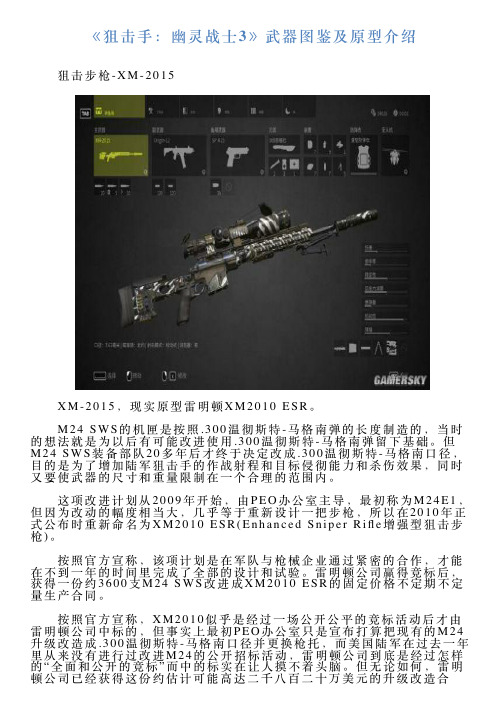
《狙击⼿:幽灵战⼠3》武器图鉴及原型介绍 狙击步枪-X M-2015 X M-2015,现实原型雷明顿X M2010E S R。
M24S W S的机匣是按照.300温彻斯特-马格南弹的长度制造的,当时的想法就是为以后有可能改进使⽤.300温彻斯特-马格南弹留下基础。
但M24S W S装备部队20多年后才终于决定改成.300温彻斯特-马格南⼜径,⽬的是为了增加陆军狙击⼿的作战射程和⽬标侵彻能⼒和杀伤效果,同时又要使武器的尺⼨和重量限制在⼀个合理的范围内。
这项改进计划从2009年开始,由P E O办公室主导,最初称为M24E1,但因为改动的幅度相当⼤,⼏乎等于重新设计⼀把步枪,所以在2010年正式公布时重新命名为X M2010E S R(E n h a n c e d S n i p e r R ifle增强型狙击步枪)。
按照官⽅宣称,该项计划是在军队与枪械企业通过紧密的合作,才能在不到⼀年的时间⾥完成了全部的设计和试验。
雷明顿公司赢得竞标后,获得⼀份约3600⽀M24S W S改进成X M2010E S R的固定价格不定期不定量⽣产合同。
按照官⽅宣称,X M2010似乎是经过⼀场公开公平的竞标活动后才由雷明顿公司中标的,但事实上最初P E O办公室只是宣布打算把现有的M24升级改造成.300温彻斯特-马格南⼜径并更换枪托,⽽美国陆军在过去⼀年⾥从来没有进⾏过改进M24的公开招标活动,雷明顿公司到底是经过怎样的“全⾯和公开的竞标”⽽中的标实在让⼈摸不着头脑。
但⽆论如何,雷明顿公司已经获得这份约估计可能⾼达⼆千⼋百⼆⼗万美元的升级改造合同,⽽且已经获得192,000美元的⾸期款项,⽤于在2010年12⽉底前改造出其中的250⽀并装备部队,以便于2011年1⽉在阿富汗投⼊实战试验。
经过试⽤后,在2012年9⽉,X M2010正式定型为M2010。
美国陆军计划把M2010E S R取代现有的M24S W S,整个改造和换装计划预计持续⾄少10年。


狙击手_幽灵战士通关图文攻略【攻略简介】游戏一开始有练习模式机枪、狙击以及芭乐可以练习练习打鸟...影子(跳起来的时候拍的小李他妈的飞刀火旁边的空气没有因为温度而造成视觉变化有点不真实~ 钩子可以爬树但是只有指定的地方才可以某关的过场暗杀敌人将军相当帅气利用爆炸引人耳目男主角看起来就很冷血...游戏里头的水水草是不错但是水很糟..爆炸的画面穿墙有点模糊~不过那是鳄鱼.. 爆炸的画面穿墙有点模糊~不过那是鳄鱼..相当老梗的破门而入慢动作下雨场景感觉还不错bug= = 从主角视点转换时到另一个人物上的时候变成这样了[pagesplitxx这关不错玩我们扮演助攻者用望远镜替队友勘查点一下后锁定目标再来队友就会把他暴头拉~有BFBC2的FU= =游戏贴图没贴好= = 最后一关先从几个方面来说好了从游戏的系统、画面、配乐、剧情游戏需求应该不高单卡3850等级的就可以全开了吧这款游戏较特别的就是那个狙击了除了考虑风向还要考虑弹道等虽然有SHIFT可以停止呼吸但是当你在逃跑或者跑步的时候心跳太高呼吸太过紧凑想要按SHIFT我跟你说简直根本射不到人所以至始至终就是暗杀其实每个场景的敌人不一定要清完像有些关卡会响哨的可以不屌敌人直接就跑了反而还比较轻松写意游戏后半段大部分为两视点一个就是狙击手一个就是冲锋陷阵的当你扮演狙击手的时候你就必须躲起来掩护对有前进反之当你扮演另一位的时候冲就对了不过我觉得他的枪很难瞄准不知道枪的型号暂且以步枪代替步枪拿在手上不管你是站是蹲是趴他的十字准心依旧很大觇孔也是他*的大...敌人的AI也算满厉害的会趴在地上偷射... 找掩护(虽然常常露出半颗头跑步的时候感觉很不赖不会太晃也没有没再跑动的感觉而任务分为几种暗杀偷狙击、潜行(被发现就挂了、掩护队友等诸如此类另外就是玩家的血量低于30休息可以自动补到30而关卡中有药可以拿按Q可以补血没记错应该是50滴画面的话除了水很LOW以外这款游戏的确造就了一个非常棒场景场景大多为遗迹、晚上/白天的丛林、军队的基地以及小港口枪口的烟以及草、叶脉等都让人眼睛为之一亮而光影的部分也很棒~除了主角有影子以外所有场景几乎都是动态阴影让玩家有身处于丛林中的感觉在音乐的方面我觉得还不错有刺激的感觉而快死的时候老梗的心脏跳动声也很OK剧情就不用说了完全看不懂过场动画完全没剧情= =讲话也讲没几句破完就出现一句THE END 就没了..整体来说游戏算是还不错如果真的要耐玩度的话调最难应该可以让你玩很久不过BUG真的多倒数不清除了基本的没动就响哨帮队友看望远镜的时候也有无法锁定的问题AI 不管是队友还是敌人都会不动还有装死的勒....AI不动解决方法开启APPLOC然后调成土耳其文可以解决但是还是有少数BUG 必须关卡重新而且"建议不要玩到一半离开除非换关卡了"另外按F5可以快速记录总而言之如果你碰到BUG会让你想砸电脑那我劝你不要玩这款或者等更新档出了再考虑.............BUG多了点(你确定是多了点吗不然其实还算是不错的作品吧~。

《狙击⼿幽灵战⼠3》村庄地图收集攻略 《狙击⼿幽灵战⼠3》村庄的收集品⼀共有10个,那么每个收集品的位置都在哪呢?下⾯⼩编就为⼤家带来《狙击⼿幽灵战⼠3》村庄收集攻略,希望⼤家喜欢。
村庄地图的收集物位置 ⽯榴⽯⼿镯 这件收集物在⽼采⽯场⾥,这⾥是中⽴区域。
前往如图的集装箱改制的建筑物。
沿着外部的⼏道楼梯来到顶层的房间。
在顶部的简易房⾥,门⼜的⾓落⾥有只⽊椅,从上⾯拾取收集物-⽯榴⽯⼿镯。
%{p a g e-b r e a k|⽯榴⽯⼿镯|p a g e-b r e a k}% 祈祷图三联画 要取得此收集物,建议给⽆⼈机配置⼊侵模块。
前往⽬标地附近,沿着⼭边的雪径前⾏,往前过⼀道独⽊桥。
往前找到⼀座⼭洞,蹲到洞⼜⽤⽆⼈机侦察洞⾥的情形。
在洞⼜附近有⼀道铁栅门,铁栅门外⾯的⽔⾥通电,经过的话会使主⾓损⾎。
越过铁栅门,在右侧的墙壁上找到⼀个控制箱,⼊侵后关掉摄像头。
洞⾥边有两三名敌兵,标记他们。
然后飞到⾥端分析扫描⼀座发电机,关闭它。
如此,不但铁栅门外⾯的电流消失,铁栅门也可以打开了。
消灭掉洞⾥的敌兵,调查⿊暗中桌⼦上⾯的东西,拾取收集物-祈祷图三联画。
%{p a g e-b r e a k|祈祷图三联画|p a g e-b r e a k}% 狮纹碗 这件收集物在湖边的⼩村据点⾥,⾥⾯有六七名敌⼈,⽤⽆⼈机扫描标记⼀下,进⾏简单的清理。
进⼊⼤屋,从柜⼦上拾取收集物-狮纹碗。
%{p a g e-b r e a k|狮纹碗|p a g e-b r e a k}% 格鲁吉亚古代钱币 这件收集物在村庄边缘的⼀间尖顶⼩屋⾥边。
进到⼩屋⾥,从柜⼦上的⼀本收藏册上⾯拾取收集物-格鲁吉亚古代钱币。
%{p a g e-b r e a k|格鲁吉亚古代钱币|p a g e-b r e a k}% 伊梅列季的⼔⾸ 这件收集物在⼭区。
⾸先沿着⼭脚的⽯阶跑上去,途中需要攀爬岩⽯。
前⽅找到⼀座遗迹,⾥⾯有⼀个供案祭坛,在上⾯拾得收集物-伊梅列季的⼔⾸。


《狙击⼿幽灵战⼠3》全狙击步枪古物收集图⽂攻略 全部狙击枪和古物的收集 本作的收集物分为狙击步枪和古代⽂物两类。
它们都藏在兴趣点中,兴趣点只有主⾓接近时才能显⽰在地图上。
某些收集物藏在雷区或是据点附近,需要清理敌兵、调查线索才能找到。
本作中的收集物总共有31个,其中狙击步枪有8⽀,古物有23个。
它们分布在3幅地图中。
矿区⼩镇地图的收集 收集品:11个 矿区⼩镇的收集物分布位置图。
#01收集物-青铜⾓状杯 这件收集物在村庄边缘⼀座⽼旧塔楼中,攀爬竖梯到塔顶即可收集到。
这件古物在围墙上⾯,拾得⼀只青铜⾓状杯。
#02收集物-圣灵降临 这件收集物在村庄靠近码头的船坞⾥。
它在靠在⽊墙边的⽊箱和油桶之间,是⼀件画作。
%{p a g e-b r e a k|矿区⼩镇收集物(1)|p a g e-b r e a k}% #03收集物-细⼿镯 这件收集物在主线任务“暴⼒街区”(B l o c k o u t)的地点,在如图这幢蒙有⼤幅红布的⼤楼⾥。
你可以从正门或楼后的窗户潜⼊,在⾥⾯会遭遇到⼏名敌兵。
收集物在3楼的房间⾥,在2楼的楼梯是断掉的,需要纵⾝攀爬到3楼。
收集物在房间的⼀只倒掉的柜⼦上⾯,获得细⼿镯。
#04收集物-M21S W S狙击步枪 这件收集物在⼀座⼯⼚中,来到外围⽤⽆⼈机侦察⼀下,标记⾥⾯的敌兵。
然后⽤狙击步枪清理,炮台⽤⾼爆弹轰掉。
进到⼯⼚⾥,在正门左边的⼚房找到⼀道下⾏的楼梯。
在地下室的⼀只长条桌上拾取M21S W S狙击步枪。
%{p a g e-b r e a k|矿区⼩镇收集物(2)|p a g e-b r e a k}% #05收集物-熊神⼩雕像 这件收集物在野外营地的⼀间⼩屋⾥。
进到屋⼦⾥,在墙边的⼀只货架上有⼀本书藉,从上⾯取得熊神⼩雕像。
#06收集物-L115A3远距离步枪 这件收集物在⼭区,找到如图的峡⾕⾛进去,沿着⽼旧的⽯阶上⾏。
穿过峡⾕后,右转,找到可以攀爬的地⽅,⼀路往⼭顶爬。


入门指南Hewlett-Packard 产品和服务的所有保修限于这些产品与服务所附带的明确声明。
本文的任何条款都不应视作构成保修声明的附加条款。
HP不对本文的技术性错误、编印错误或冗长负任何责任。
对于在非HP 提供的设备上 HP 软件的使用和可靠性,HP 概不负责。
本文档包含的所有权信息均受版权保护。
未经 HP 事先书面许可,不得将本文档的任何部分影印、复制或翻译成其他语言。
Hewlett-Packard CompanyP.O. Box 4010Cupertino, CA 95015-4010USACopyright © 2000-2006 Hewlett-Packard Development Company, L.P.截至 2008 年 8 月 28 日之前,在美国可能获得美国专利号 4,930,158 与4,930,160 中一种或两种的许可。
Microsoft 和 Windows 是 Microsoft Corporation 在美国的注册商标。
HP 支持科技产品在法律允许范围内的使用,我们不认可、也不鼓励我们的产品被用于著作权法所不允许的目的。
本文档中的内容可随时更改,恕不另行通知。
目录安装电脑 (1)组装电脑 (1)将电脑放置到适当的位置 (1)使用电涌保护设备 (1)连接到电脑 (2)存放文档和复原光盘 (4)首次启动您的电脑 (4)设置和连接 Internet (5)配置和注册 Norton Internet Security 软件 (6)安全舒适地使用电脑 (7)注册软件更新 (7)在新电脑上设置帐户 (8)创建用户帐户 (8)创建密码 (9)安装软件和硬件设备的指导 (9)使用 HP 和 Compaq 产品 (10)将文件和设置从旧电脑转移到新电脑 (10)使用 HP Organize 或 Compaq Organize 软件 (10)使用键盘 (11)自定义键盘按钮 (13)使用电脑机箱顶部 (15)使用支撑架 (15)iii配置扬声器和声音选项 (19)步骤 1:连接扬声器 (19)音频接口类型 (19)扬声器配置 (22)扬声器类型 (23)连接 2.1(2个扬声器和一个低音炮)音频扬声器 (23)连接 4.1(4个扬声器和一个低音炮)音频扬声器 (24)连接 5.1(5个扬声器和一个低音炮)音频扬声器 (25)连接 7.1(7个扬声器和一个低音炮)音频扬声器 (27)将家用音频系统连接到电脑 (29)2 或 2.1 家用立体声系统的安装 (30)5.1(5 个扬声器和一个低音炮)家用音频系统的安装 (31)5.1(5 个扬声器和一个低音炮)家用音频系统的安装过程 (32)连接数字音频 (33)步骤 2:配置音频软件 (34)使用 Multi-channel Sound Manager 配置音频输出 (35)使用 Sound Effect Manager 配置音频输出 (37)使用 Realtek HD Sound Effect Manager 配置音频输出 (39)配置多音源音频 (41)步骤 3:为媒体软件程序配置声音 (43)选择录音设备 (44)解决关于声音的问题 (44)配置 Creative Sound Blaster X-Fi 声卡(仅适用于部分型号) (45)连接扬声器 (45)配置声卡软件 (46)配置 FlexiJack 接口 (46)使用声卡进行录音 (47)Sound Blaster X-Fi 配置模式 (47)详细信息 (48)使用读卡器 (49)使用读卡器 (50)媒体插入指南 (51)使用 HP Personal Media Drive (53)连接硬盘驱动器 (54)插入硬盘驱动器 (55)定位硬盘驱动器并为之分配一个盘符 (56)使用硬盘驱动器 (57)断开硬盘驱动器的连接 (58)iv入门指南处理数码图像 (59)使用 HP Photosmart Premier (60)播放 CD 和 DVD (63)播放音乐 CD (63)播放 DVD (63)使用国家/地区编码 (64)使用 Windows Media Player 播放 CD 和 DVD (64)播放视频 CD(VCD) (65)使用 Windows Media Player 播放视频 CD(VCD) (65)制作音频和数据光盘 (67)刻录前请擦除光盘上的内容 (68)制作音频 CD (68)验证音频文件刻录是否无误 (69)音频 CD 提示 (69)制作音频 CD (70)制作 jukebox 光盘 (70)制作数据 DVD 和 CD (71)验证数据光盘刻录是否无误 (71)数据光盘提示 (71)制作数据光盘 (72)复制 DVD 或 CD (73)将文件归档至 CD 或 DVD (73)处理映像文件 (74)制作映像文件 (74)从映像文件进行烧录 (74)使用 LightScribe 制作光盘标签 (75)Lightscribe 需求 (75)使用 Sonic Express Labeler 烧录 LightScribe 标签 (75)使用胶粘光盘标签 (76)兼容性信息 (76)光盘特性及兼容性图表 (77)光驱快速参考图表 (78)软件快速参考图表 (79)v制作视频光盘和影片 (81)开始捕获影片之前 (81)Sonic MyDVD Video 项目 (82)制作视频项目 (82)将文件添加到视频项目 (83)为视频项目捕获视频 (83)将幻灯片添加到视频项目 (84)将子菜单添加到视频项目 (84)编辑视频项目的样式 (85)编辑影像文件 (85)将视频项目刻录到光盘 (86)使用 Direct-to-Disc 向导制作视频项目 (87)视频质量和光盘尺寸 (88)DVD 刻录时间 (89)使用 muvee autoProducer 制作影像 (91)制作影像的基本步骤 (91)查找 muvee autoProducer (92)使用 muvee autoProducer (93)入门 (93)从数码视频摄像机截取影像 (94)加入影像 (95)加入图片 (97)加入音乐 (97)选择风格 (98)更改设置 (98)加入开场标题和结束署名 (99)制作影像 (100)预览影像 (100)修改影像 (101)保存影像项目 (102)将影像项目刻录到光碟 (103)获取帮助 (105)查找屏幕指南 (105)从网络上查找指南 (105)使用屏幕上的“帮助和支持中心” (106)使用 PC 帮助和工具 (106)使用 HP(或 Compaq 连接)更新信息 (106)获取消息 (107)关闭消息 (107)重新激活消息 (108)索引 (109)vi入门指南安装电脑警告:您所购买的电脑,已经根据其销往的国家/地区预先设好了电源。

供应商开放平台操作说明此文档详细说明京东VC平台商品信息管理的操作目的、方法和注意事项。
2.文档目的本文档的目的在于指导供应商如何维护产品信息,提高审核通过率,缩短产品采购及上线时间。
3.阅读对象本文档的阅读对象为:供应商4.登陆地址供应商登录VC系统,地址为:目录1新品提报....................................................................................................... 错误!未指定书签。
1 .1新品上传.......................................................................................... 错误!未指定书签。
1 .2商品介绍的制作............................................................................. 错误!未指定书签。
1 .3克隆.................................................................................................. 错误!未指定书签。
1 .4视频介绍.......................................................................................... 错误!未指定书签。
2咨询回复....................................................................................................... 错误!未指定书签。
2 .1回复路径.......................................................................................... 错误!未指定书签。


