软件配置管理工具FireFly介绍
- 格式:ppt
- 大小:302.00 KB
- 文档页数:13

中国光大银行信息科技部配置管理平台常见问题FAQ版本V1.0文档编号保密等级作者最后修改日期审核人最后审批日期批准人最后批准日期修改记录目录1 导言 (1)2 Firefly Clien常见问题 (1)2.1 安装常见问题 (1)1)安装firelfy 客户端,需要先安装java1.4+ (1)2)在windows下安装完firefly客户端后,打不开firefly客户端 (1)3)安装完firefly客户端后,运行程序时报:“The type initializer for‘com.hansky.apps.firefly.gui.fe.FileExplorer’threw an exception.”; (1)并且在配置Firefly Client Setting后保存时,报“Save license configuration file failed” (1)4)安装完firefly客户端后,运行程序时报:“Unable to load DLL(vjsnativ)” (2)5)英文Windows 2003 SP1无法打开Firefly客户端安装文件,无法进行客户端安装 (2)2.2 客户端连接服务器常见问题 (2)1)Firefly 客户端连接不到Firefly 服务器 (2)2.3 使用常见问题 (3)2.3.1 WINDOWS (3)1)本地工作区变更集丢失,变更集锁定,或网页变更集中显示的内容与工作区不符 (3)2)如何永久删除本地工作区 (3)3)如何找回丢失的文件 (4)4)打开工作区时出现“不能打开工作区,另一进程正在使用”错误 (5)5)不能初始化本地工作区,出现权限限制提示 (5)6)修改目录名称 (5)7)如果不想提交隐藏文件,如何操作? (5)8)出现error:找不到存储库 (6)9)用客户端解决冲突时选择手工解决,需要手动复制黏贴代码,会带来错误隐患 (6)10)打开工作区报“An unhandled exception has occurred in your application....” (6)11)在解决合并冲突后用户没法checkin新的变更状态 (9)12)执行bringover过程中报错:“gidif:reach EOF in original,expect more data.” (9)并且日志的最后几行显示:“Error 65687: File type error . Bringover cancelled” (9)13)bringover对话框中,文件图标显示为: (10)确定后出现提示:“An unhandled exception has occurred in your application....”. (10)14)用户提交的文件不存在或“类型错误” (11)15)“添加到版本控制”中不能直接检入 (11)16)如果一次提交三万个以上文件,系统会产生错误 (11)17)提交文件时,提示“输入注释” (11)18)使用firefly的windows客户端查看文件历史版本 (11)19)使用firefly的windows客户端进行文件版本之间的比较 (12)20)删除文件、添加同名该文件,重复多次,无法提交到服务器也无法撤销操作 (13)21)设定Firefly client超时门限 (13)22)文件名大小写 (13)23)命名避免使用的字符:~ # & ( ) ; , * : " < > \ ? . / (13)24)关于文件过滤 (13)25)打开客户端时报初始化错误,报q9,配置服务器license报“保存配置错误” 1426)如果不小心做了撤销编辑操作,如何找回之前修改的文件? (14)2.3.2 UNIX / LINUX (14)1)初始化工作区失败,报错:”Can't create workspace under an existing one” (14)2)使用firefly的unix客户端查看文件历史版本 (14)3)使用firefly的unix客户端获取文件历史版本 (15)4)使用firefly的unix客户端进行文件版本之间的比较 (15)5)提交后查看历史时,显示乱码,如下所示,查看该文件的注释也是乱码 (15)6)关键字转换 (15)7)在工作区中执行bringover报错,报“ng.NullPointerException” (15)3 Firefly Server Explorer常见问题 (15)1)查看某项目配置库中已检出的文件 (15)2)在启用文件级访问控制的情况下,更换服务器后,用户更新文件的权限失效 (16)3)添加或编辑文件时出错,Error 65748:ACL Denied (16)4)无法下载标记 (17)5)手工查找文件建立标记容易出错 (17)6)使用命令下载标记 (17)4 集成Eclipse操作常见问题 (17)1)如果不小心删除了文件,如何找回? (17)2)在Eclipse中安装Firefly插件之后,"Firefly"菜单不出现,如何解决? (17)3)安装Firefly插件,绑定Firefly后,文件没有显示文件控制图标和版本号 (17)4)在Eclipse中文件冲突,解决冲突时选择手动解决,报错:merge tools not found。
Firefly安装及操作简易手册1.firefly访问方式1.1.用户名及密码总公司及黑分同事,用户名为ig_邮箱名,口令123456,例如张芳,为ig_zhangfang5。
山分同事,用户名同sdcncsi前缀名,例如裴宏祥为peihx,初始口令为123456,如在公司修改过口令,则为修改后的口令。
1.2.配置库分支结构北六BSS项目配置库共分为四个分支:1.2.1.BSS4.2源代码管理分支存放BSS4.2源代码,初始文件自亚联CVS工具中下载。
1.2.2.Firefly安装文件存放firefly安装文件及相应配置文件。
1.2.3.文档管理分支工具中下载。
SAW所有培训文档,初始文件自淮安BSS存放北六1.2.4.项目管理分支存放项目管理计划、配置管理计划、项目周报、考勤等文档。
1.3.访问方式1.3.1.Web访问适用:只需要查看配置项,或者单独下载少量文件,不进行配置项变更工作。
不需要安装客户端。
web访问地址:1.3.2.客户端访问适用:下载大量文件,或进行配置项增删改工作。
客户端访问方式,将所有文件下载到本地。
需安装firefly client,登录后选择北六BSS项目。
2.firefly安装步骤1.顺次安装.net1.1目录下dotnetfx、vjredist。
2.执行firefly4.1\win下setup文件,安装fireflyclient。
3.根据提示,默认安装即可。
(修改安装目录等不赘述)4.安装后,打开firefly client setting,进行license设置。
点击语言,可设置为中文。
.3.firefly操作基本步骤3.1.web方式3.1.1.web登录使用浏览器,输入,输入用户名及口令,登录,进入后界面如下:点击“北六BSS项目”,查看分支结构。
点击左侧,则在左侧展开分支树,点击右侧,则在右侧罗列分支。
3.1.2.目录及文件列表查看如点击左侧分支树中要访问的分支,则可以看到分支情况,点击最右侧工具栏---“目录”,可以查看分支下的文件目录。
Firefly客户端使用说明1、安装说明Firefly是一款国内使用较为简单的配置管理工具。
安装文件路径:\\192.100.89.1\软件\开发工具\Hansky\Firefly client2、使用说明访问方式:1)客户端方式,通常开发人员只需使用firefly client,可不必关心其他部件的使用。
2)web方式,还有一种方式可访问项目,这种方式只可查看项目相关信息,分支情况以及文档情况,不可编辑。
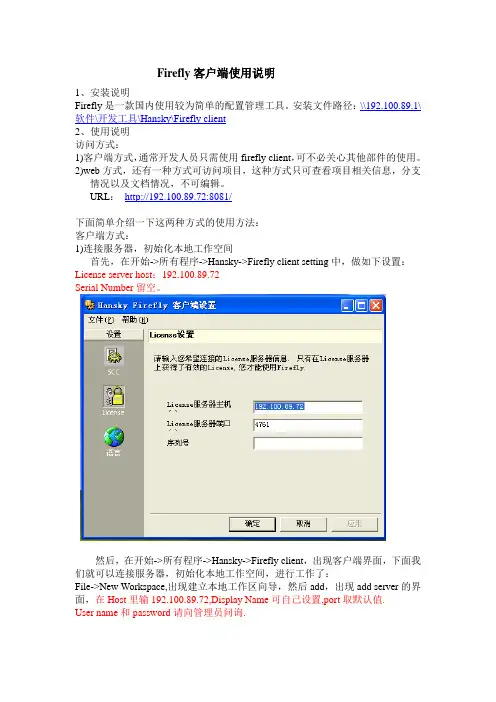
URL:http://192.100.89.72:8081/下面简单介绍一下这两种方式的使用方法:客户端方式:1)连接服务器,初始化本地工作空间首先,在开始->所有程序->Hansky->Firefly client setting中,做如下设置:License server host:192.100.89.72Serial Number留空。
然后,在开始->所有程序->Hansky->Firefly client,出现客户端界面,下面我们就可以连接服务器,初始化本地工作空间,进行工作了:File->New Workspace,出现建立本地工作区向导,然后add,出现add server的界面,在Host里输192.100.89.72,Display Name可自己设置,port取默认值.User name和password请向管理员问询.接着,建立工作空间,选取自己所在的项目,然后选择分支(一般,开发人员工作在DEV分支).这里,我们建议最好在本地专门建一个目录,专门存放firefly的工作空间,不同项目选用子目录存放.如(workspace目录下包含子目录:用户名_项目名1_DEV, 用户名_项目名2_DEV).这样方便管理本地工作空间.2)将项目文件/数据加入到工具中初始化好工作空间后,下次就可以直接open workspace来继续自己的工作.初次工作需要将自己的文件加入到firefly中去.方法如下:将需要加入的文件目录拷贝到本地工作区相应的workspace下或者直接拖到firefly中。
Firefly – 面向项目的新一代配置管理工具配置管理工具是每一个软件开发团队必备的工具之一。
正确地使用好配置管理工具可 以在很大程度上提高团队的工作效率, 促进成员之间的沟通; 避免因为版本混乱而为客户和 公司造成的损失。
汉星天公司(Hansky Ltd.)最新的配置管理工具 Firefly 是在总结了过去 20 多年中配置管理工具发展的趋势与技术之后,开发出的一套全新的面向项目的配置管理 工具。
相对于传统的版本控制工具(CVS、VSS、PVCS、ClearCase 等) ,Firefly 具有无可 比拟的优势,下面就对这一问题进行简单的阐述。
1. 早期基于文件的版本控制工具的不足之处 早期的配置管理工具(例如 RCS、SCCS,包括其后的 CVS)主要是以文件为单位 进行一系列的版本控制操作。
所有的文件均存储在一个中央的存贮库(Repository)中, 一般用户的工作模式是:checkout->modify->checkin。
使用以文件为基础的配置管理工 具可以满足一般的文件级的版本控制功能,但是不能很好的满足高级的功能需求,并造 成宏观管理上的混乱。
为了快速适应市场的变化和不同客户的需求, 软件开发团队需要 越来越多的使用并行开发模式。
同时,并且为了确保软件质量,公司需要在整个项目的 级别上来有效的跟踪变化的发生和对变更进行控制。
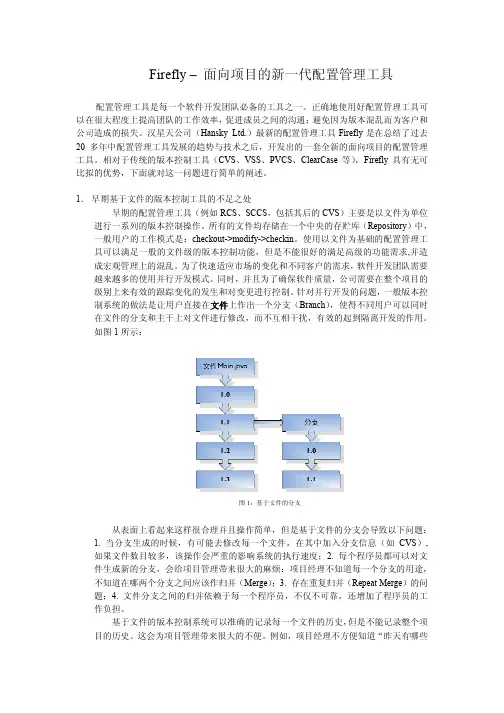
针对并行开发的问题, 一般版本控 制系统的做法是让用户直接在文件上作出一个分支(Branch) ,使得不同用户可以同时 在文件的分支和主干上对文件进行修改,而不互相干扰,有效的起到隔离开发的作用。
如图 1 所示:图 1:基于文件的分支从表面上看起来这样很合理并且操作简单,但是基于文件的分支会导致以下问题: 1. 当分支生成的时候,有可能去修改每一个文件,在其中加入分支信息(如 CVS), 如果文件数目较多,该操作会严重的影响系统的执行速度;2. 每个程序员都可以对文 件生成新的分支,会给项目管理带来很大的麻烦:项目经理不知道每一个分支的用途, 不知道在哪两个分支之间应该作归并(Merge) ;3. 存在重复归并(Repeat Merge)的问 题;4. 文件分支之间的归并依赖于每一个程序员,不仅不可靠,还增加了程序员的工 作负担。

1 概述随着现代软件技术的发展,对于软件项目的需求日益复杂而且变更频繁,项目的开发模式已经由昔日的手工作坊式的开发转变为规模化、团队式的开发,当开发团队发展到一定规模时,会越来越强调开发过程规范化和成熟度。
软件项目的成败在很大程度上取决于对其开发过程的控制,这包括对质量、源代码、进度、资金、人员等的控制。
要进行有效的过程控制,仅仅依靠人的力量是不够的,还需要有相应的管理工具。
"软件配置管理"是一套规范、高效的软件开发管理方法,同时也是提高软件质量的重要手段。
软件配置管理可以帮助开发团队对软件开发过程进行有效的变更控制,高效地开发高质量的软件。
在质量体系的诸多支持活动中,配置管理处在支持活动的中心位置,它有机地把其它支持活动结合起来,形成一个整体,相互促进,相互影响,有力地保证了质量体系的实施。
软件配置管理并不是一个新的概念,早在二十世纪70 年代,加州大学圣巴巴拉分校(University of California at Santa Barbara)的Leon Presser 授就已经提出变更和配置控制的理论,并随着软件产业的逐渐壮大,在国外成熟的软件企业中逐渐得到重视和普及,在一些国外的大中型软件企业中,不仅设置专职的配置管理人员,而且有些公司还设有公司级的变更控制委员会(CCB:Change Control Board)对公司的软件配置管理工作进行统一的管理,配置管理对于软件开发的重要性由此可见一斑。
国内的企业真正认识到配置管理的重要性,却是近几年的事情,随着CMM(Capability Maturity Model)的概念和理论的普及,配置管理作为CMM 2 级的一个关键过程域,其重要性逐渐为人们认同。
"进行管理和控制"意味着在给定时间(过去或现在)使用的工作产品的版本是已知的(即版本控制),而且以受控的方式引进变更(即变更控制)。
如果希望有比"进行管理和控制"所蕴含的更高程度的控制,则工作产品可置于配置管理的完备的纪律之下。
中国光大银行信息科技部配置管理平台常见问题FAQ版本V1.0文档编号保密等级作者最后修改日期审核人最后审批日期批准人最后批准日期修改记录目录1 导言 (1)2 Firefly Clien常见问题 (1)2.1 安装常见问题 (1)1)安装firelfy 客户端,需要先安装java1.4+ (1)2)在windows下安装完firefly客户端后,打不开firefly客户端 (1)3)安装完firefly客户端后,运行程序时报:“The type initializer for‘com.hansky.apps.firefly.gui.fe.FileExplorer’threw an exception.”; (1)并且在配置Firefly Client Setting后保存时,报“Save license configuration file failed” (1)4)安装完firefly客户端后,运行程序时报:“Unable to load DLL(vjsnativ)” (2)5)英文Windows 2003 SP1无法打开Firefly客户端安装文件,无法进行客户端安装 (2)2.2 客户端连接服务器常见问题 (2)1)Firefly 客户端连接不到Firefly 服务器 (2)2.3 使用常见问题 (3)2.3.1 WINDOWS (3)1)本地工作区变更集丢失,变更集锁定,或网页变更集中显示的内容与工作区不符 (3)2)如何永久删除本地工作区 (3)3)如何找回丢失的文件 (4)4)打开工作区时出现“不能打开工作区,另一进程正在使用”错误 (5)5)不能初始化本地工作区,出现权限限制提示 (5)6)修改目录名称 (5)7)如果不想提交隐藏文件,如何操作? (5)8)出现error:找不到存储库 (6)9)用客户端解决冲突时选择手工解决,需要手动复制黏贴代码,会带来错误隐患 (6)10)打开工作区报“An unhandled exception has occurred in your application....” (6)11)在解决合并冲突后用户没法checkin新的变更状态 (9)12)执行bringover过程中报错:“gidif:reach EOF in original,expect more data.” (9)并且日志的最后几行显示:“Error 65687: File type error . Bringover cancelled” (9)13)bringover对话框中,文件图标显示为: (10)确定后出现提示:“An unhandled exception has occurred in your application....”. (10)14)用户提交的文件不存在或“类型错误” (11)15)“添加到版本控制”中不能直接检入 (11)16)如果一次提交三万个以上文件,系统会产生错误 (11)17)提交文件时,提示“输入注释” (11)18)使用firefly的windows客户端查看文件历史版本 (11)19)使用firefly的windows客户端进行文件版本之间的比较 (12)20)删除文件、添加同名该文件,重复多次,无法提交到服务器也无法撤销操作 (13)21)设定Firefly client超时门限 (13)22)文件名大小写 (13)23)命名避免使用的字符:~ # & ( ) ; , * : " < > \ ? . / (13)24)关于文件过滤 (13)25)打开客户端时报初始化错误,报q9,配置服务器license报“保存配置错误” 1426)如果不小心做了撤销编辑操作,如何找回之前修改的文件? (14)2.3.2 UNIX / LINUX (14)1)初始化工作区失败,报错:”Can't create workspace under an existing one” (14)2)使用firefly的unix客户端查看文件历史版本 (14)3)使用firefly的unix客户端获取文件历史版本 (15)4)使用firefly的unix客户端进行文件版本之间的比较 (15)5)提交后查看历史时,显示乱码,如下所示,查看该文件的注释也是乱码 (15)6)关键字转换 (15)7)在工作区中执行bringover报错,报“ng.NullPointerException” (15)3 Firefly Server Explorer常见问题 (15)1)查看某项目配置库中已检出的文件 (15)2)在启用文件级访问控制的情况下,更换服务器后,用户更新文件的权限失效 (16)3)添加或编辑文件时出错,Error 65748:ACL Denied (16)4)无法下载标记 (17)5)手工查找文件建立标记容易出错 (17)6)使用命令下载标记 (17)4 集成Eclipse操作常见问题 (17)1)如果不小心删除了文件,如何找回? (17)2)在Eclipse中安装Firefly插件之后,"Firefly"菜单不出现,如何解决? (17)3)安装Firefly插件,绑定Firefly后,文件没有显示文件控制图标和版本号 (17)4)在Eclipse中文件冲突,解决冲突时选择手动解决,报错:merge tools not found。

北方民族大学学生实验报告系(部、中心)计算机科学与工程学院姓名紫恋漪晨学号 2012**** 专业软件工程班级四班同组人员课程名称软件工程实验名称实验七软件配置管理工具VSS基本应用实验日期 2013.11.21 批改日期成绩教师签名丁红胜北方民族大学教务处制一、实验目的a)理解软件配置管理的目的、用途和意义b)了解现有软件配置管理工具的主要特点和功能c)掌握VSS工具的基本使用二、实验内容a)软件配置管理基本原理和功能要求基本原理:(1)在整个软件的生命周期中提供标识和控制文档、源代码、接口定义和数据库等工件的机制。
(2)提供满足需求,符合标准,适合项目管理及其他组织策略的软件开发和维护的方法学。
(3)为管理和产品发布提供支持信息,如基线的状态、变更控制、测试、发布、审计等等。
功能要求:1、版本控制:对软件开发进程中文件或目录的发展过程提供有效的追踪手段,保证在需要时可回到旧的版本,避免文件的丢失、修改的丢失和相互覆盖,通过对版本库的访问控制避免未经授权的访问和修改,达到有效保护企业软件资产和知识产权的目的。
2、工作空间管理:提供一种便捷的访问正确版本的机制。
工作空间管理包括工作空间的创建、维护与更新、删除等,工作空间应具备稳定性、一致性、透明性等特点。
缺少有效的工作空间管理会造成由于文件版本不匹配而出错和降低开发效率,更长的集成时间等问题。
3、并行开发支持:同一软件的多个版本会同时进行开发,从而有效缩短软件的上市周期。
为实行并行开发模式,需要一种机制将前一个版本中后期开发的功能合并到后一个版本中。
4、过程控制:配置管理系统应该能够支持灵活的配置管理流程,并实现过程自动化以提高配置管理效率。
5、构建和发布管理:构建和发布管理的目的地确保软件构建是可重现的、高效的和可维护的。
6、异地开发支持:配置管理系统能够有效支持地理上分布的团队之间的远程协作。
典型异地开发模式具有以下特点:(1)支持跨多个地点的分布式开发。

Firefly unix常用命令操作指南All rights reserved 版权所有,侵权必究文档修订记录*变化状态:A——增加,M——修改,D——删除目录1 综述 (3)2 Firefly Client的参数设置 (3)3 项目初始化 (3)4 Firefly工具基本命令的使用 (4)4.1 Bringover命令(更新本地工作区文件) (4)4.2 编辑命令(检出文件) (5)4.3 添加到版本控制命令(将新建的文件添加到本地工作区中) (6)4.4 删除、移动和重命名命令 (7)4.5 提交Default变更集命令(检入文件) (8)5 Firefly工具高级命令的使用 (9)5.1 显示文件历史命令 (9)5.2 版本比较命令 (9)5.3 下载标记命令(项目配置管理员使用) (10)5.4 建立标记命令(项目配置管理员使用) (10)1综述开发人员具有项目组开发库中相应配置项的权限;日常开发过程或由于变更需要进行配置项修改时,应从开发库中检出配置项到本地工作区进行修改;配置项的命名要按照项目《软件配置管理计划》中制定的配置项命名规范来进行;修改期间要每日将修改的配置项检入到配置库中,以保证工作成果。
本文描述了项目成员在开发工作中常用Firefly unix命令的使用方法。
2Firefly Client的参数设置hff set license.server=10.1.16.33项目初始化开发人员在工作前需要将配置项从Firefly的存储库中下载到本地工作区,然后在本地工作区中进行修改。
操作命令:hff init -h <服务器地址> -proj <项目名称> -p <开发库> -u <用户名> -pwd<密码> -d <指定本地工作区的目录,默认为当前目录>例:服务器地址为“10.1.100.62”,准备在d:\test目录下建立一个本地工作区,项目名称为“ECAS_test”、开发库为“develop”,操作如下:hff init -h 10.1.100.62 -proj ECAS_test -p develop -u <用户名> -pwd<密码> -d d:\test如下所示:是否使用SSL?[y/N] 选择N;端口号:[4759] 按回车默认即可;描述:填写注释并按回车;本地工作区建立成功;确实要从父分支执行bringover操作吗?[Y/n]◆填写Y,则执行bringover操作,从父分支上把该分支下的全部内容下载到本地工作区,完成创建本地工作区的操作。
Galleria/Crossfit/Beyond V4Revision 2 \The information contained in this manual is a general overview of the Firefly system and is subject to change at any time.2 Table of Contents3 Lyra Screen Overview4 Home7 Lights8 Auto Gen Start (AGS)9 Climate Control10 Settings11 Settings/Mobile App12 Vegatouch Mira Setup16 Wireless Switch Pairing17 Settings/Network Diagnostics18 Settings/Manufacturer Options19 G8 DC Panel20 Networking21 Network Status Indicators22 Mira NET LED Status Key23 System DiagramsTap any icon from the vertical navigation menu to select the desired page. The currently selected page will always be listed in the top corner of the screen.HomeAuto GenLightsClimateSettingsNavigation MenuThe Light Master controls all interior lights at once. When Light Master Off is pressed, it will remember which lights were on. Then, when Light Master On is pressed, it will only turn on the lights that are in memory. To turn on all lights again, press and hold Light Master On for at least one second.*Troubleshooting – Memory is rewritten each time Light Master Off is pressed. In the case that it is pressed twice in a row, it will remember that no lights were on and just touching Light Master On won’t turn on any lights. Press and hold Light Master On to turn the lights back on. Awning – Press and hold EXT or RET to operate the awning (ignition must be off).Set Temp – Tap the arrows to set your desired temperature.Current temperature and current HVAC mode icons with fan speed indicator – A Blue Snowflake will display for Air Conditioning and a White Fan graphic will display for Fan Only mode. H or L will indicator the fan speed (High or Low). 22114334Water Tank Readings:•9% and below will read “Empty ” and the tank level will show Empty.• From 10% to 90%, the tank level andpercentage will show as normal. • 91% and above will read “FULL .” andthe tank shows accurate level.LP Tank Readings:•Below 25% will read “Low” and the tank level will show as normal.• From 25% to 75%, the tank level andpercentage will show as normal.• From 75% to 96%, will read “Full” andthe tank level will show as normal. • 97% and above will read “Disc.” andthe tank level will be empty.These graphics represent the holding tanks filledstatus.Propane % remaining.Water Pump – Tap to toggle On/Off.If the tanks are disconnected the readings will display as shown.FULLAGS WARNING – to ensure safety, AGS will not be activated until you hold the Enable button (from the Warning screen) for at least 3 seconds.Press and Hold the gen hours display to enter the Set Gen Hours screen. Tap the buttons to enter your desired hours then tap Yes to save and exit.House Voltage – the voltage coming from your housebatteries. Note: Battery graphics will display Red if below 12V.Chassis Voltage – the voltage coming from your engine battery. Generator Start - hold Start to start the generator (1 second delay). Generator Stop – Hold Stop to stop the generator.Tap to Enable/Disable AGS.5If AGS is enabled before the coach is connected to shore power, the Shore Override status message will bedisplayed and AGS will be disabled. AGS willautomatically re-enable once shore power has been disconnected.566This screen will control the lighting for the entire coach, including the exterior. Tap any button to turn the desired light On/Off.Lights with up/down arrows are dimmable. Press and hold these buttons to ramp the brightness up or down. Tap the buttons to toggle On/Off.Tap to Enable/Disable AGS. A Warning screen will require action to enable. Trigger Options – Automatically start the generator using specified voltage settings (Low Volts) or when A/C or Heat Pump start (HVAC). Select one or both triggers. If no triggers are selected, AGS will not run.Gen Hours Display - The number of hours that the generator system has been used. These hours are saved to the system, not the generator itself. Press and hold to enter the Set Gen Hours screen.Quiet Time Start and Stop – Tap the +/- buttons to select the hours that your generator will not run.Start at Volts - The generator will start when the voltage drops to this set point depending on “Time a t Volts” setting below. (Range 10.5v – 12.5v)Time at Start Volts - The generator will start when the voltage drops to the “Start at Voltage” for this specific amount of time. (Range 5 seconds – 1 min) Stop at Volts - The generator will shut off when the voltage reaches this set point depending on “Time at Stop Volts” setting below. (Range 13.2v – 14.5v)Time at Stop Volts - The amount of time required for the voltage to remain at “Stop at Volts” level before the generator shuts off. (Range 5min – 120 min) Minimum Gen Run Time - Use the + and – keys to set the minimum amount of time that your generator will run once it has started. (Range 10min – 30min)Maximum Gen Run Time - Use the + and – keys to set the maximum amount of time that your generator will run once it has started.(Range 120min – 240min)Gen Start Retries – select the number of times that the generator will retry to start if it fails to start on the first attempt.Default OptionTap the arrows to select your desired temperature (Set Temp). A Snowflake graphic with fan speed indicator (H or L) will display during Cool mode.Cool – Tap to operate the air conditioning. The A/C will run until the current temp reaches your desired temp and then shut off.ProAir OptionIn this option, tap Auto to have the system automatically control the fan speed, or drag the slider to select a fan speed percentage. There will be no H or L fan speed graphic in this mode.Fan Mode – The fan will operate by choosing High or Low. Auto will turn the fan off. If Cool has not been selected, the fan speeds will enable Fan Only mode.1112 34657 89Tap to navigate to the Vegatouch Mira connection screen.Tap to navigate to the Network Diagnostics screen. 1 2 3 Tap to navigate to the Manufacturer Options screen. 4 Wireless switch panel display status5 Tap to select between Fahrenheit and Celsius. Drag the Slider to adjust screen brightness.6 When Auto Dimming is enabled, the screen will enter sleep mode after 60 seconds of inactivity. Tap anywhereon the screen to wake it up. Please note that even if Auto Dimming has been disabled, the screen will still enter sleep mode after 4 hours of inactivity during daytime hours (5am – 10:59pm) and after 15 minutes of inactivityduring night time hours (11pm-4:59am) as the result of a built in screen saver that cannot be disabled.7Tap to disable the touchscreen for 15 seconds for the purpose of cleaning. Tap the buttons to set the time or select 24-hour time mode. 8 9Please note the GUI and Logic Controller Versions and have these numbers available before contacting Tech Support.Vegatouch Mira is a wireless control module that easily connects to any Android or iOS device to give total control to many electrical, electronic and mechanical systems in your coach. Pair any device with the coach’s built -in interface to monitor and control many coach components.Notice: Make sure that Bluetooth is turned ON in your smart device settings before proceeding.Locate the Login Information:The login information can be found byclicking on the Mobile App button onthe settings page of the touchscreenor from the Mira module’s label.Download:Download Vegatouch Mira from the Google Play store or the App Store.Once the download has finished, install the app and open it.Setup:Tap SCAN to find the Mira Module’s signal. After scanning, any Mira Module in your area will appear on the screen. Tap the ID # that matches the one on your Mira label. Enter the PIN number from the Mira label and press AUTHENTICATE to connect to the system.Notice: iOS Setup TipsTurn on Bluetooth to allow Vegatouch Mira toconnect to Accessories.If you do not have Bluetooth turned ON in your iOS settingsyou will see this screen. Do not click OK, you must clickSETTINGS. Your Bluetooth Settings page will now appear andyou should turn Bluetooth ON.Notice: Android Setup TipsAllow Vegatouch Mira to access this device’s location.Mira will need to be allowed access to your location. Click ALLOW when you see this screen.App Settings:Access the App Settings page by tapping the triangle (at the bottom of the screen) to expose theSettings button. Tap the gear to visit the settings page.Tap to Temperature Units selection tochoose between Fahrenheit and Celsius.System Information and Mira Name.Tap to disconnect your device from Mira.Tapping Update Config will force adownload of the config from the cloud.Tap to enter the Diagnostic Tools screen.Diagnostic Tools:Tap to display a list of currentlyconnected devices.Remote Help is available by calling FireflyIntegrations. Do not enable remote helpwithout consultation.The switch Battery Graphic will identify the status of the wireless switch panel. Green battery switch indicator – the switch is currently conencted to the screen.Red battery switch indicator - The switch is currently disconnected from the screen. It is likely that the battery inside your switch panel needs replaced. The wireless switch panel in your coach will illuminate a green LED whenever a button is pressed. If the LED on your switch panel does not illuminate when you press a button on your switch, you will need to replace the 2032 coin cell battery. If a new battery will not fix the issue, you might need to pair the switch panel to the screen.Press and Hold the battery graphic for 3 seconds until the pairing screen appears.Tap Start Pairing. You’ll have 30 seconds to press any 2 buttons on the switch panel at the same time. Tap Done once the pairing successful message appears. It may take up to 10 minutes for the wireless switch indicator to turn Green, but the switch should work instantly once paired.1 2 322 Time Remaining13Devices/InputsThe Network Diagnostics screen will display the status of the touchscreens, the G8 panel and the Aircon. It will also identify any currently active faults.Green = OnlineG8 OutputsThis screen will identify which individual G8 outputs are currently active.Green = ActiveTap the squares to enable or disable the options required for your specific vehicle.The G8 control DC Panel receives the signals sent from your switch panels and performs the actions that have been requested by activating and deactivating the required circuits.Every circuit controlled by the G8 is numbered and listed on a black label (load list) which is usually mounted next to the G8 panel. A corresponding numbered LED will illuminategreen whenever a particular circuit is on. For instance, if you press the Bath Light button on your switch panel, the green LED for output 11 will illuminate and the Bath Light will turn on (Fig 3).Testing output voltage using a Multi-meter.Ensure that the G8 circuit is on and that the corresponding green LED is illuminated.To test the output voltage for the Ceiling Lights example, touch the positive lead to the output pin for output 11 (Connector J9 – Pin 1) and the negative lead to the ground stud (as pictured below).Fig 3Fig 4ANET LEDGROUND Test Positive Output Channels as shown:Multi-meterYour distribution panel and touchscreens are connected via your coach’s RV-C network. Each component will have a NET LED that is used to show network status. If a NET LED is displaying anything other than solid green and some of the panel’s functions are not working, please contact your manufacturer for Technical Support.Net LED Locations:Back ofG8TouchscreensEvery component of the Firefly system uses an LED to communicate network status. Use the key below to determine the network status of your hardware. *Panel Network Status Indicator – Applies to any device with a network indicator:/ Fast flashing Green Light (4 times/sec) – Device is attempting to make initial connection./ Slow flashing Green Light (1 time/sec) – Device was online but has been offline for at least 5 sec. Solid Green – Device is connected to network and is communicating properly.Solid Red – Device has gone offline and is not connected to a network./ Alternating Red & Orange – Device has gone offline and is trying to re-connect (within 30 sec). / Alternating Green & Orange – Device is currently online but has gone offline 2 or more times*Note: Mira modules use a different networking key. Please see the next page.The NET LED on your Mira module can change color in different situations. Use the following key to determine the operational status of your Mira module.Off Device has no power or has completely failedFast flashing green (4 times/sec) Device is attempting to make initial connection tothe CAN network and good filesSolid green Device is operating correctly and has seen a CANmessage in the past 5 seconds and good files Slow flashing green (1 time/sec) Device was active on the CAN bus but has not seen avalid message in 5 seconds and good files Alternating red and yellow Device has not seen CAN messages in 30 secondsand good filesAlternating yellow and green Device is currently active on the CAN bus but has notseen a CAN message within a 30s interval 2 for moretimes since the last power cycle and good files Solid red Device has not seen a CAN message in the past 60seconds and good filesFast alternating green and blue (4 times/sec) Device is attempting to make initial connection to the CAN network and corrupted filesSolid blue Device is operating correctly and has seen a CANmessage in the past 5 seconds and corrupted filesSlow alternating green and blue (1 time/sec) Device was active on the CAN bus but has not seen a valid message in 5 seconds and corrupted filesAlternating red and blue Device has not seen CAN messages in 30 secondsand corrupted filesAlternating yellow and blue Device is currently active on the CAN bus but has notseen a CAN message within a 30s interval 2 or moretimes during a power cycle and corrupted filesSolid purple Device has not seen a CAN message in the past 60seconds and corrupted filesFlashing white Device pin is being resetSolid yellow Device pin has been resetFlashing blue Device does not have a valid applicationFlashing red (2 seconds) Factory test: Red LEDFlashing green (2 seconds) Factory test: Green LEDFlashing blue (2 seconds) Factory test: Blue LED。
数字监控系统使用手册目录服务器篇 (5)引言 (6)编写目的 (6)定义 (6)软件概述 (7)目标 (7)功能 (7)性能 (8)时间特性 (8)灵活性 (8)运行说明 (9)环境支持 (9)相关硬件 (9)主机端 (9)客户端 (9)支持软件 (9)运行过程 (9)注意事项 (9)过程文件 (10)使用说明 (10)安装和初始化 (10)驱动程序安装 (10)应用软件安装 (11)初始化 (11)操作详述 (11)主界面 (11)系统设置 (13)当前设置通道选择 (13)自动登录 (13)自动关机 (14)预览参数 (14)录像参数 (15)报警 (17)自动录像工作表设置与应用 (20)云台 (21)网络 (22)预览图像的缩放 (24)图像抓取 (24)启动和关闭录像 (24)云台操作 (24)启动和关闭报警 (25)报警区域设置 (25)用户管理 (26)主机用户 (26)网络用户 (27)回放资料选择 (27)回放 (29)日志 (31)磁盘 (31)其他功能 (32)语音对讲 (32)聊天室主机 (32)聊天室客户端 (34)网络信息: (35)多语种支持 (35)部分区域遮挡功能 (36)矩阵 (36)快球预置点设置 (37)出错及恢复 (37)找不到视频卡 (37)不能启动正常预览 (38)软件启动立即报告错误 (38)录像产生大尺寸文件 (38)主机录像文件回放时有马赛克 (38)程序文件和数据文件一览表 (39)服务器端 (39)用户操作举例 (40)网络篇 (41)引言 (42)编写目的 (42)定义 (42)软件概述 (43)目标 (43)功能 (43)性能 (43)时间特性 (43)灵活性 (44)重要说明 (44)界面风格及操作方式 (44)网络系统分级结构 (44)服务器主机 (44)客户端 (45)典型网络应用 (45)一般应用 (45)复杂应用 (45)运行说明 (46)环境支持 (46)相关硬件 (46)客户端 (46)支持软件 (46)运行过程 (46)注意事项 (46)过程文件 (46)使用说明 (47)安装和初始化 (47)应用软件安装 (47)初始化 (47)操作界面概述 (47)主界面 (47)系统设置 (48)通道设置 (48)用户密码 (50)客户认证 (50)其他 (51)控制主机 (52)启动和关闭预览 (53)预览图像的缩放 (53)图像抓取 (53)启动和关闭录像 (54)云台操作 (54)观察服务器报警 (54)回放资料选择 (55)日志 (55)磁盘 (55)自动切换 (55)其他功能 (56)出错及恢复 (56)不能启动正常预览 (56)软件启动立即报告错误 (57)录像产生大尺寸文件 (57)客户端预览画面及录像文件回放时有马赛克 (57)客户端预览有动画感 (57)程序文件和数据文件一览表 (58)用户操作举例 (58)服务器篇用户名:super、密码:无;引言编写目的本手册征对最终用户,详细说明数字监控系统的使用及维护方法。
配置管理工具常见问题FAQ版本 V1.0修改记录目录1 导言 (1)2 配置管理工具的常见问题 (1)2.1 客户端安装 (1)2.2 firefly 客户端与firefly 服务器连接 (2)2.3 本地工作区常见问题 (2)2.4 提交文件 (5)2.5 firefly服务器IP地址发生变更 (5)2.6 启用文件级权限控制 (6)2.7 建立标记及设置标记权限 (6)2.8 文件历史版本及版本之间的比较 (6)2.9 配置库操作历史 (9)2.10 集成Eclipse操作 (11)2.11 其它 (11)3 配置管理服务器的常见问题 (13)4 Firefly在连接服务器时候的问题 (14)1导言本文档描述了在Hansky Firefly使用过程中,可能遇到的一些问题以及解决方法,作为使用Firefly的参考资料和指南。
本文档要时时维护,新遇到的问题随时添加,以便起到真正的指导作用。
其中红色字体为:项目组成员在使用过程中经常出现的问题。
2配置管理工具的常见问题2.1客户端安装1)在unix下安装firelfy 客户端,需要先安装java1.4+2)在windows下安装完firefly客户端后,打不开firefly客户端原因:有可能是因为电脑里存在多个Framework 版本(要检查是否存在多个版本,在“控制面板”中的“添加/删除程序”里查看)解决:方案一:把“多个版本.Net Framework配置文件”文件夹下的4 个config文件复制Firefly 安装目录下的\Client\bin目录中即可。
补充:在给的安装包里面有一个叫:多个版本.Net Framework配置文件的文件夹,里面有安装程序的四个配置文件client_setting.exefirefly_admin.exefirefly_client.exeserver_explorer.exe 以上是四个文件的名称!把这个四个文件拷贝到firefly安装目录下的\client\bin文件夹下方案二:在“控制面板”中的“添加/删除程序”,删除掉以前安装过的 .Net Framework,,然后再安装.Net Framework 1.1版本2.2firefly 客户端与firefly 服务器连接1)Firefly 客户端连接不到Firefly 服务器原因:a)网络连接;b)firefly client setting问题c)License Server 设置d)本机系统时间,客户机操作系统时间应与Firefly服务器时间偏差不能超过24小时。
Firefly与其它配置管理工具的比较_HanskyFirefly与其它配置管理工具的比较_Hansky Firefly与同类产品的比较一、现状简述现在流行的软件配置管理工具(SCM Tools)大致有如下几个品种:, IBM—ClearCase (CC);, SVN;, Hansky—Firefly;该份可行性报告即为以上配置管理工具的评估报告,其侧重点针对本中心的实际情况,结合各个开发部门的操作系统,开发流程,项目规模,易用性,价格,与其他管理系统的良好的结合性等等方面来进行考虑。
二、进行软件配置管理的目的1、权限控制(Access Control)权限控制对SCM工具来说至关重要。
一方面,既然是团队开发,就可能需要限制某些成员的权限;特别是大项目往往牵扯到子项目外包,到最后联调阶段会涉及到很多不同的单位,更需要权限管理。
另一方面,权限控制也减小了误操作的可能性,间接提高了SCM工具的可用性(Usability)。
现有的SCM工具,在权限控制方面差异很大,也说明了大家都在探索更有效的权限控制的方法。
透过不同权限控制方法的差异,我们不难看到其共性:其核心概念是行为(Action)、行为主体、行为客体。
行为主体:即用户(User)。
用户组(User Group)并不是行为主体,但它的引入大大方便了权限管理。
行为客体:即项目和项目成员(Member)。
不管从SCM工具的开发者还是使用者的角度,项目和项目成员都是不同的行为客体。
行为:即由主体施加在客体之上的特定操作,签入和签出是再典型不过的例子。
三个核心概念搞清之后,就可以讨论权限的概念了。
权限是这样一个四元向量:(主体,客体,行为,布尔值)。
即,“主体在客体上施加某种行为是否被获准”。
由此看来,权限控制的基本工作就是负责维护主体集合、客体集合、行为集合、权限向量集合。
其中,行为集合是固定不变的(在SCM 工具开发之时已确定),其它三种集合都是动态变化的。