奥太乐油烟机使用说明书
- 格式:docx
- 大小:11.89 KB
- 文档页数:3
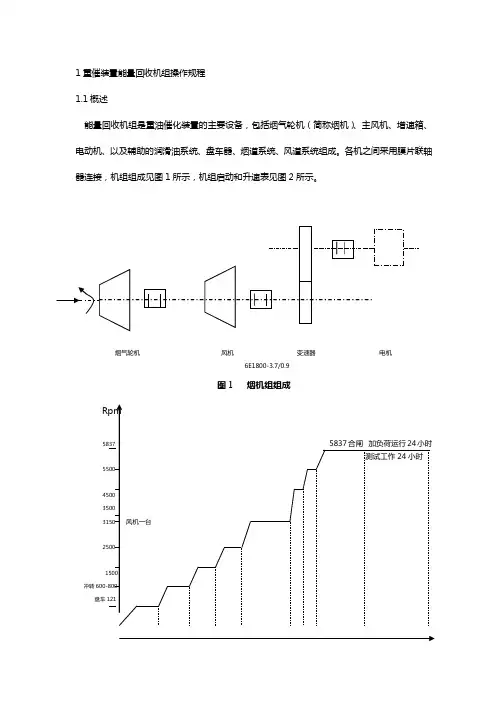
1重催装臵能量回收机组操作规程1.1概述能量回收机组是重油催化装臵的主要设备,包括烟气轮机(简称烟机)、主风机、增速箱、电动机、以及辅助的润滑油系统、盘车器、烟道系统、风道系统组成。
各机之间采用膜片联轴器连接,机组组成见图1所示,机组启动和升速表见图2所示。
烟气轮机风机变速器电机6E1800-3.7/0.9冲转盘车20分 30分 30分 30分 1小时 0.5 0.5 24小时 72小时时间(小时)图2 机组启动和升降表烟机将再生烟气中的热能和压力能膨胀作功,转变为机械能。
烟机输出的功率用来驱动主风机,从而达到能量回收的目的。
主风机负责供给再生器、外取热器烧焦需要的氧气,保证催化剂流化的动力空气,并维持再生器压力,它能否正常运转直接关系到整个装臵的正常生产,因此,必须坚持以下原则:----------- 在任何情况下,必须确保设备的安全,必与反应岗位紧密配合,克服一切困难,保证热平衡所需要的氧气,保证再生器流化需要的风量和压力;----------- 机组的仪表自控系统必须灵敏、准确,自保系统确实可靠;----------- 对机组的微小变化都要及时发现,找清原因,及时处理。
在再生器压力波动时,严防主风机飞动,更不允许催化剂倒流入机体内。
1.2 机组性能参数2机组性能参数2.1主风机型号: D800-330工艺编号: M-101轴功率: 2880KW最大流量: 800Nm3/min设计流量: 720 Nm3/min最小流量:进口温度(年平均): 30℃进口压力:0.098MPa(A)排出压力: 0.32 MPa(A)工作转速: 6899r/min第一临界转速: 3513 r/min第二临界转速:8512 r/min出口温度:170℃生产厂家:沈阳鼓风机(集团)有限公司2.2电动机型号: YKS710-4额定功率: 3200KW电压: 10000V频率: 50Hz工作转速: 1486 r/min额定电流: 221.2A满载效率:满载功率因数: 0.87临界转速:绝缘等级: F级转向:从烟机端顺时针生产厂家:佳木斯电机股份有限公司2.3变速箱型号: GYR-660-3200/4.64传动比: 6899/1486传动型式:渐开线齿形传动功率: 3200KW高速轴临界转速:低速轴临界转速:工作转速:生产厂家:沈阳鼓风机(集团)有限公司2.4烟气轮机型号: YL-3000型烟气轮机进气温度: 680℃进气压力P1: 0.23 MPa(A)排气温度: 563℃排气压力P2: 0.108 MPa(A)进口流量: 700 Nm3/min一级临界转速转向:从烟机端看逆时针效率: 81%工作转速: 6899 r/min输出功率: 2150KW生产厂家:兰州石化机械厂2.5电动盘车器型号: DRC-16-900-R-D1/7F-PS-P-PK 盘车转速: 46 r/min电机型号: Y2-90L-4功率: 1.5KW电压: 380V转速: 1390 r/min工作力矩最大力矩生产厂家:江苏大中电机股份有限公司2.6主要辅助设备2.6.1高温平板闸阀型号: DN800设计温度: 700℃公称压力: 0.4 MPa(A)气源压力: 0.4 MPa(A)控制方式:风关风动全开(全关)时间:2.6.2 高温电液蝶阀型号:公称直径: DN800油源方式介质压力: 0.35 MPa(A)介质温度: 720℃2.6.3 风机入口蝶阀型号: LSHN-63控制方式:风关气源压力: 0.49 MPa(A)开∕关时间最大输出力矩最大开度灵敏度准确度介质温度:常温介质压力: 0.096 MPa(A)2.6.4 机组润滑油系统a) 油泵型号: HSA660-51流量: 570L/min 44 m3/h输出压力: 1.0 MPa轴功率: 18.5KW电机型号: Y2-180-M-4功率: 18.5KW转速: 1470电压: 380Vb) 冷油器型号: 721.253TV545冷却油量: 44.22m3/h冷却面积: 59.72m2耗水量: 41 m3/h设计入口水温:32℃设计出口水温:≰40℃c) 滤油器型号: 112.227TV424过滤油量: 96 m3/h过滤面积:过滤精度: 10umd) 油箱规格: 731.269TV506e) 高位油箱(2000L)规格: 741.171TG257f)N46防锈汽轮机油质量指标运动粘度(40℃):41.4mm2/s–50.6 mm2/s闪点(开口):≮180℃酸值:≯0.3mgKOH/g凝点:≯-7℃机械杂质:无水份:无破乳化时间(54℃):≯15min氧化后酸值达2.0mgKOH∕g时间:≮1500h3开机前的准备工作3.1润滑油系统3.1.1主油箱内装入合格的N46防锈汽轮机油,并使其处于正常油位。
烟机-主风机-电动/发电机组操作规程一)、概述宁缘泰石油化工有限公司 60 万吨/年催化裂化装置三机组为烟气轮机、离心式风机、异步电动机和齿轮箱组成的同轴三机组。
其中离心风机 MCL904 鞍山风机集团生产,该系列离心式鼓风机均为单级悬臂结构。
用齿轮变速器增压、增速、烟机、电动机共同传动,轴承的润滑采用螺杆泵强力供油。
其主要结构包括机壳、转子、变速机、轴封和润滑系统。
配套的烟气轮机CFT82- 1型烟气轮机由生产,该系列烟机为单级烟气透平,采用轴向进气径向排气,单级悬臂结构转子,其主要结构包括进气机壳、过渡机壳、排气机壳、转子组件、轴承箱、封气管路轮盘冷却系统、与风机共用的润滑系统、轴系检测系统、底座等组成。
电机 YKS710-4 由南阳电机厂生产,电动机与变速器以膜片联轴器联接。
变速器通过膜片联轴器带动鼓风机。
另一台离心式风机作备用机组。
主风流程:空气经主风机入口过滤器及入口消声器进入主风机,经压缩至0.34MPa 后,分两部分:一部分经辅助燃烧室内主风分布管进入再生器,为再生烧焦供压缩空气。
另一部分去增压机,进一步升压后,送至外取热器,作为外取热器的提升风和流化风。
烟气流程:再生器烧焦产生的高温烟气由再生器顶引出,经三旋分离出大部分催化剂,经烟机入口高温闸阀、进入烟机,膨胀做功,与电动/发电机一起驱动主风机外,还能使电动/发电机进入发电状态,回收压力能和部分热能后,送入余热锅炉进一步回收。
后排入烟囱。
从三旋分离出的大部分催化剂细粉进入催化剂储罐,平衡气相进入四级旋分器进一步分离,分离出的细粉定期用车送出装置,从四旋出来的烟气经过临界喷嘴直接排入烟囱。
1、机组设备主要参数1)离心风机序号项目型号单位数值1 2 3 4 5 7AV56-12 型式轴流式工作介质转子旋转方向额定转速轴功率空气从压缩机进气端看为顺时针RPMKW58138530临界转速第一阶垂直 第二阶垂直 第一阶水平 第二阶水平 第三阶水平RPM RPM RPMRPM 2500 7900 1450 3550 70508RPM入口压力 出口压力 设计点流量 入口温度 出口温度Mpa (A ) 9 0. 099 0.36 2600 12.9 200Mpa (A ) 10 11 12 133Nm /min ℃ ℃2)烟机 序 号项 目 型号 单 位 数 值 1 2 YL11000F 介质含有催化剂的高温烟气烟机入口压力 Mpa (A 烟机出口压力 Mpa (A 0.29 3 0.106 4 烟机入口温度 烟机出口温度 入口流量 ℃ ℃ 5 670 518 6 3Nm /min7 2728 29.266 5813 11000烟气分子量 工作转速 8 9 RPM KW 输出功率10一阶转速 绝热效率11 12RPM %13000 ≥793)电机/发电机 序 号 项 目单 位 数 值型号 1 YFKS900-4 9000 10000 594.8 50 功率 2 KW V 电压 3 额定电流 4 A 频率 5 Hz 相数 相 6 3 转速 7 RPM K1485 115额定负载温升 8 旋转方向 逆时针(电机非联轴端看)9 防护等级 10 IP54 接法 11 Y 功率因数0.91124)齿轮箱按驱动) 序 号项 目 单 位数 值 型号 1 2 3 4TA570-SFC 9000 额定功率 输入转速 输出转速KW RPM RPM 1485 5813传动比 3.914 5 6 7润滑油型号 润滑油流量 ISO VG46 260L/min5)辅助设备序号 名 称 项 目 单位 数 值 螺杆泵型式 型号 SNH1300R460U12 1W23流量L/min MPa KW 1254 1.0 油泵 压力 (2 台)功率 25 转速 RPM1450 型式 交流电机 型号Y2-200L-430 1功率 KW RPM V 原动机 转速 1470 (2 台)电压 380 电流 A58 型号 SGLL6-15冷却面积介质m 2150 水冷油器管2设计压力(2 台) 程MPa 1.0设计温 ℃50 度 介质 润滑油设计压 MPa 1.6壳 力程 设计温度 ℃100 型号TYPEHLG-2800滤油器(2 工作压力 过滤精度MPa µm 1.6 10台)34HRY3 型护套式电加热 器型式油箱电加 热器输入电压 输出功率V 380 4KW2、 机组控制保护及监测系统 控制保护系统为了保证机组能够安全、可靠的启动、运行及事故停机等,本机组设置了如下 一 些控制保护系统:主风流量控制系统 主风机防喘振控制系统 机组转速控制及超速保 护系统 烟气轮机密封、冷却控制系统 机组其它逻辑控制系统 声光报警系统 机组监测系统操作指标及报警停车值 序 项 目操作值 报警限 报警值 停车值备注号 L LL H L H H L 0.15MPa0.10MPa 0.15MPa ≤20℃ ≥35℃≥55℃ 1432mm 800Kg/h 700℃启动备泵 润滑油总管压力10.25MPa 0.1MPa 联锁停车 2 润滑油过滤器差压 <0.15MPa 开加热器停加热器 润滑油箱油温60℃ 34 润滑油冷后温度5 润滑油箱液位11 烟机轮盘冷却蒸汽 12 烟机入口温度40~45℃ 0.8~3.0t/h 680℃L HL H H HH H 320℃350℃80℃90℃90℃烟机轮盘操作温度烟机径向轴承温度烟机止推轴承温度烟气轮机轴振动烟气轮机轴位移320℃1314151617188090 HHH100℃80μm100μm0.35mm0.4mm105℃115℃<50μmHHHHHHHHH0.4mm 联锁停车<0.25mm风机径向轴承温度<105℃19 风机止推轴承温度<75℃75℃HHH HH H HH H HH H HH H HH H HH H 80℃ 60μm 80μm 0.5mm 0.7mm 105℃ 115℃ 60μm 80μm 85℃ 风机轴振动 <35μm <0.5mm <105℃<60μm<80℃ 2021 22 23 2425 26风机轴位移 0.7mm 联锁停车 齿轮箱轴承温度 齿轮箱轴振动(高 速)电机轴承温度95℃ 140℃ 150℃ 80μm 120μm ≥6515rpm电机定子温度 电机轴振动<140℃ <60μmHH H 机组转速 <6340rpm6831rp m≥6831rpm 联锁停车27 28HH 烟机密封蒸汽差压0.007L< 0.01MPa3 、三机组用电机直接启动操作法 1、机组启动前的准备 1)开机前的准备(1)机组安装或检修完毕,验收合格。
1 引言1.1 液压传动的发展液压传动是根据 17 世纪帕斯卡提出的液体静压力传动原理而发展起来的一门新兴技术,是工农业生产中广为应用的一门技术。
如今,流体传动技术水平的高低已成为一个国家工业发展水平的重要标志。
1795 年英国约瑟夫·布拉曼 (Joseph Braman,1749 -- 1814) ,在伦敦用水作为工作介质 , 以水压机的形式将其应用于工业上 ,诞生了世界上第一台水压机。
1905 年将工作介质水改为油 ,又进一步得到改善。
第一次世界大战 (1914 -- 1918) 后液压传动广泛应用 ,特别是 1920 年以后 ,发展更为迅速。
液压元件大约在19世纪末20世纪初的20 年间 ,才开始进入正规的工业生产阶段。
1925年维克斯(F.Vikers)发明了压力平衡式叶片泵 ,为近代液压元件工业或液压传动的逐步建立奠定了基础。
20世纪初康斯坦丁·尼斯克(G · Constantimsco)对能量波动传递所进行的理论及实际研究 ;1910 年对液力传动( 液力联轴节、液力变矩器等 )方面的贡献,使这两方面领域得到了发展。
第二次世界大战 (1941 -- 1945) 期间 ,在美国机床中有 30% 应用了液压传动。
应该指出 ,日本液压传动的发展较欧美等国家晚了近 20 多年。
在1955年前后 ,日本迅速发展液压传动 ,1956年成立了“ 液压工业会”。
近 20~30 年间日本液压传动发展之快,届世界领先地位。
液压传动有许多突出的优点,因此它的应用非常广泛,如一般工。
业用的塑料加工机械、压力机械、机床等;行走机械中的工程机械、建筑机械、农业机械、汽车等;钢铁工业用的冶金机械、提升装置、轧辊调整装置等;土木水利工程用的防洪闸门及堤坝装置、河床升降装置、桥梁操纵机构等;发电厂涡轮机调速装置、核发电厂等国;船舶用的甲板起重机械(绞车)、船头门、舱壁阀、船尾推进器等;特殊技术用的巨型天线控制装置、测量浮标、升降旋转舞台等;军事工业用的火炮操纵装置、船舶减摇装置、飞行器仿真、飞机起落架的收放装置和方向舵控制装置等。

厨房电器操作手册一、概述厨房电器的运用已经成为现代生活中不可或缺的一部分。
为了确保您能够正确、安全地操作和使用厨房电器,本操作手册将为您提供详细的使用指南和注意事项。
二、烤箱1. 烤箱的使用方法:a. 选择合适的温度和烘烤模式。
b. 预热烤箱,确保温度均匀。
c. 将食物放置在烤盘或烤网上。
d. 设置时间,并在烘烤完成后及时取出食物。
2. 注意事项:a. 使用防烫手套或烤箱手套进行操作,以免烫伤。
b. 避免使用金属餐具刮擦烤箱内壁,以免造成划痕。
c. 清洁烤箱时,务必先断电,并等待其冷却后再进行清洁。
三、微波炉1. 微波炉的使用方法:a. 将食物放置在微波炉专用容器中。
b. 设置适当的加热时间和功率。
c. 关闭门,启动微波炉。
d. 加热完成后,小心取出容器。
2. 注意事项:a. 不要将金属容器或银箔纸等金属物品放入微波炉内。
b. 不要在微波炉内加热密封的容器,以免产生蒸汽压力导致爆炸。
c. 清洁微波炉时,使用专用清洁剂,并遵循清洁剂的使用说明。
四、饮水机1. 饮水机的使用方法:a. 将净水瓶装满水后放入饮水机。
b. 打开电源,选择合适的水温和出水方式。
c. 出水完成后,关闭电源,取出净水瓶。
2. 注意事项:a. 定期更换净水瓶和滤芯,保证饮水质量。
b. 清洁饮水机时,先断电,并遵循清洁剂的使用说明。
c. 不要将饮水机安装在易受潮湿的区域,以免影响使用寿命。
五、搅拌机1. 搅拌机的使用方法:a. 将需要搅拌的食材放入搅拌杯中。
b. 将搅拌杯盖好,将搅拌杯固定在搅拌机底座上。
c. 设置合适的搅拌速度,启动搅拌机。
d. 搅拌完成后,关闭搅拌机,取出搅拌杯。
2. 注意事项:a. 避免将手指或其他物品伸入搅拌杯内,以免造成伤害。
b. 清洁搅拌机时,务必切断电源,并等待其停止运转后再进行清洁。
六、咖啡机1. 咖啡机的使用方法:a. 将咖啡豆或咖啡粉放入滤网中。
b. 加入适量的水。
c. 设置合适的咖啡浓度和杯数。
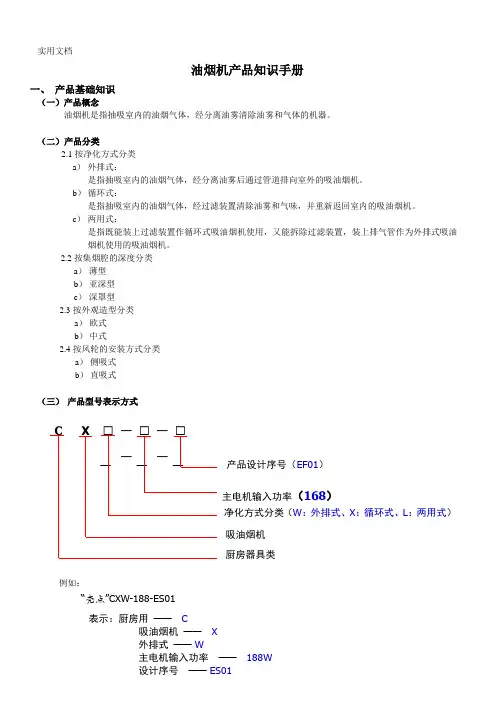
油烟机产品知识手册一、 产品基础知识(一)产品概念油烟机是指抽吸室内的油烟气体,经分离油雾清除油雾和气体的机器。
(二) 产品分类2.1按净化方式分类 a ) 外排式:是指抽吸室内的油烟气体,经分离油雾后通过管道排向室外的吸油烟机。
b ) 循环式:是指抽吸室内的油烟气体,经过滤装置清除油雾和气味,并重新返回室内的吸油烟机。
c ) 两用式:是指既能装上过滤装置作循环式吸油烟机使用,又能拆除过滤装置,装上排气管作为外排式吸油烟机使用的吸油烟机。
2.2按集烟腔的深度分类 a ) 薄型 b ) 亚深型 c ) 深罩型2.3按外观造型分类a ) 欧式b ) 中式2.4按风轮的安装方式分类a ) 侧吸式b ) 直吸式(三) 产品型号表示方式例如:C X • _ • _ ——• _—— 产品设计序号(EF01) 主电机输入功率(168)净化方式分类(W :外排式、X :循环式、L :两用式) 吸油烟机 厨房器具类“亮点”CXW-188-ES01表示:厨房用 —— C吸油烟机 —— X 外排式 —— W主电机输入功率 —— 188W 设计序号 —— ES01(四)油烟机工作原理通过电机的工作来带动风轮的运转,风轮运转时所产生的吸力能将油烟、废气抽吸到风道,再通过烟管排出到室外。
(五)主要部件组件及作用5.1外壳5.1.1外壳的材质A、单一材质,如:冷扎钢板——绝大多数中式烟机均如此不锈钢板——欧式塔型机、个别中式烟机B、多种材质,如:冷扎钢板+工程塑料(方太“日后”系列)不锈钢板+玻璃(伊莱克斯的ER01)5.1.2外壳的表面处理外壳的表面处理分成以下情况:A、表面不处理,如采用不锈钢材料的欧式烟机B、表面喷粉处理,这样的处理多用于冷扎钢板,其作用是防止冷扎钢板腐蚀和实现油烟机的色彩C、表面喷金属漆,这样的处理的作用与喷粉处理相同,但防腐蚀效果更好,表面也更加光滑、明亮、美观。
5.1.3外壳的作用有两个:A、实现吸油烟机的造型B、安装及固定其它零部件5.2集烟罩集烟罩的作用主要有两点:A、拢烟,使油烟在吸入油烟机之前不会四处逃逸。

1、概述.....................................................................(3)2、设计参数.................................................................(3)3、主要结构和系统...........................................................(4)4、安装说明.................................................................(7)5、烟气轮机的安装...........................................................(13)6、控制要求.................................................................(14)7、启动.....................................................................(14)8、运行.....................................................................(15)9、停机.....................................................................(16)A11、概述克拉玛依石化公司催化从50万吨/年处理量改造成80万吨/年,由于主风量从50000Nm3/h扩容改造至75000Nm3/h,而原有烟机(入口流量为975Nm3/min)未作相应改造,已不能满足全部烟气能量回收的要求,大量能量被浪费,而且原有烟机由于受材料使用温度的限制,只能在660℃以下温度运行,故本次烟机系统改造更新一台与80万吨/年催化装置相配套的烟气轮机,烟气轮机型号为YL-4000D(轮盘直径为Ф820mm),更新后的烟机利用原有基础并保证机组整体标高不变。
1重催装臵能量回收机组操作规程1.1概述能量回收机组是重油催化装臵的主要设备,包括烟气轮机(简称烟机)、主风机、增速箱、电动机、以及辅助的润滑油系统、盘车器、烟道系统、风道系统组成。
各机之间采用膜片联轴器连接,机组组成见图1所示,机组启动和升速表见图2所示。
烟气轮机风机变速器电机6E1800-3.7/0.9冲转盘车20分 30分 30分 30分 1小时 0.5 0.5 24小时 72小时时间(小时)图2 机组启动和升降表烟机将再生烟气中的热能和压力能膨胀作功,转变为机械能。
烟机输出的功率用来驱动主风机,从而达到能量回收的目的。
主风机负责供给再生器、外取热器烧焦需要的氧气,保证催化剂流化的动力空气,并维持再生器压力,它能否正常运转直接关系到整个装臵的正常生产,因此,必须坚持以下原则:----------- 在任何情况下,必须确保设备的安全,必与反应岗位紧密配合,克服一切困难,保证热平衡所需要的氧气,保证再生器流化需要的风量和压力;----------- 机组的仪表自控系统必须灵敏、准确,自保系统确实可靠;----------- 对机组的微小变化都要及时发现,找清原因,及时处理。
在再生器压力波动时,严防主风机飞动,更不允许催化剂倒流入机体内。
1.2 机组性能参数2机组性能参数2.1主风机型号: D800-330工艺编号: M-101轴功率: 2880KW最大流量: 800Nm3/min设计流量: 720 Nm3/min最小流量:进口温度(年平均): 30℃进口压力:0.098MPa(A)排出压力: 0.32 MPa(A)工作转速: 6899r/min第一临界转速: 3513 r/min第二临界转速:8512 r/min出口温度:170℃生产厂家:沈阳鼓风机(集团)有限公司2.2电动机型号: YKS710-4额定功率: 3200KW电压: 10000V频率: 50Hz工作转速: 1486 r/min额定电流: 221.2A满载效率:满载功率因数: 0.87临界转速:绝缘等级: F级转向:从烟机端顺时针生产厂家:佳木斯电机股份有限公司2.3变速箱型号: GYR-660-3200/4.64传动比: 6899/1486传动型式:渐开线齿形传动功率: 3200KW高速轴临界转速:低速轴临界转速:工作转速:生产厂家:沈阳鼓风机(集团)有限公司2.4烟气轮机型号: YL-3000型烟气轮机进气温度: 680℃进气压力P1: 0.23 MPa(A)排气温度: 563℃排气压力P2: 0.108 MPa(A)进口流量: 700 Nm3/min一级临界转速转向:从烟机端看逆时针效率: 81%工作转速: 6899 r/min输出功率: 2150KW生产厂家:兰州石化机械厂2.5电动盘车器型号: DRC-16-900-R-D1/7F-PS-P-PK 盘车转速: 46 r/min电机型号: Y2-90L-4功率: 1.5KW电压: 380V转速: 1390 r/min工作力矩最大力矩生产厂家:江苏大中电机股份有限公司2.6主要辅助设备2.6.1高温平板闸阀型号: DN800设计温度: 700℃公称压力: 0.4 MPa(A)气源压力: 0.4 MPa(A)控制方式:风关风动全开(全关)时间:2.6.2 高温电液蝶阀型号:公称直径: DN800油源方式介质压力: 0.35 MPa(A)介质温度: 720℃2.6.3 风机入口蝶阀型号: LSHN-63控制方式:风关气源压力: 0.49 MPa(A)开∕关时间最大输出力矩最大开度灵敏度准确度介质温度:常温介质压力: 0.096 MPa(A)2.6.4 机组润滑油系统a) 油泵型号: HSA660-51流量: 570L/min 44 m3/h输出压力: 1.0 MPa轴功率: 18.5KW电机型号: Y2-180-M-4功率: 18.5KW转速: 1470电压: 380Vb) 冷油器型号: 721.253TV545冷却油量: 44.22m3/h冷却面积: 59.72m2耗水量: 41 m3/h设计入口水温:32℃设计出口水温:≰40℃c) 滤油器型号: 112.227TV424过滤油量: 96 m3/h过滤面积:过滤精度: 10umd) 油箱规格: 731.269TV506e) 高位油箱(2000L)规格: 741.171TG257f)N46防锈汽轮机油质量指标运动粘度(40℃):41.4mm2/s–50.6 mm2/s闪点(开口):≮180℃酸值:≯0.3mgKOH/g凝点:≯-7℃机械杂质:无水份:无破乳化时间(54℃):≯15min氧化后酸值达2.0mgKOH∕g时间:≮1500h3开机前的准备工作3.1润滑油系统3.1.1主油箱内装入合格的N46防锈汽轮机油,并使其处于正常油位。
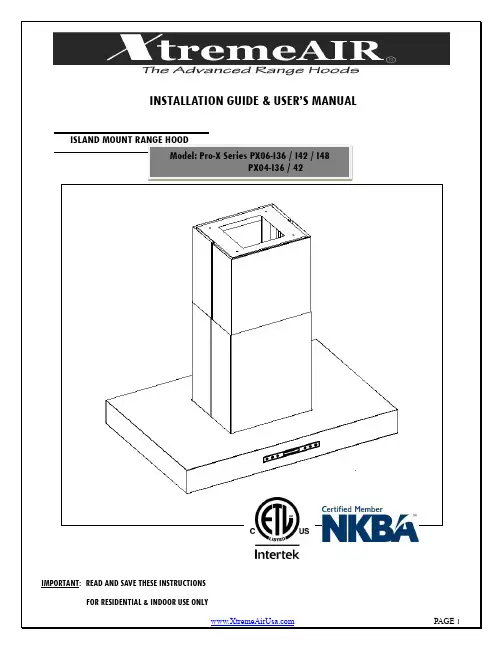
INSTALLATION GUIDE & USER’S MANUAL ISLAND MOUNT RANGE HOODPRODUCT WARRANTYMPORTANT N OTICE: The Important Safety Instructions and warnings in this manual are not meant to cover all possible problems and/or situations that can occur upon installation of this unit. Use extreme caution when installing, maintaining or operating this or any other appliance. Contact the XtremeAir USA, LLC, Support Teamin this manual.To avoid the possibility of an explosion or fire,Min 26” Max 30” 36” BaseCabinet Jack OPTIONALPencil or MarkerPhillip ScrewdriverLevelAluminum TapeWall/Keyhole SawTape MeasurePowered ScrewdriverGUPPER “HOOK”CHIMNEYLOWER “SLOT”CHIMNEYLOWER “HOOK”CHIMNEY MANUAL BOOKIMPORTANT: DUE TO THE WEIGHT AND SIZE OF THIS UNIT, CEILINGBRACKET MUST BE MOUNTED TO A WEIGHT-BEARING CEILING(SUPPORT SYSTEM OR FRAMEWORK BEING USED IS STABLE ANDD1 D2 D3 D4 D5 D6 D7 D9 10.5inch3.8inch12 5/8inch23.0inch19.0inch23.6inch35.4/41.3/ 47.2inch5.75inch CeilingmountbracketdepthCeiling mountbracketperimeterheightCeilingmountbracketwidthUpperchimneylengthLowerchimneylengthBodydepthBody width (I36,I42 , I48)Bodyheight DIMENSION TABLED8: Total bracket length. See formula belowD8= CEILING HEIGHT FROM FLOOR –D11–D10–D9D10:Clearance from bottom of hood to cook top (26” to 30” as per your design)D11:Cook top height from floor (36”)STEP #4: ATTACHING HOOD BODYSTEP #5: INSTALLING CHIMNEYSSet the lower “HOOK”chimney piece into place so it drops into the top of the hood.HINT: Due to the heavy weight of this range hood, use of a vertical jack to lift and support the hood in place is highly recommended.Attach the multi-hole brackets (P2) to the outside 4 corners of the ceiling brackets (P1) IMPORTANTBefore moving to STEP5, do the following:Slide upper “hook” chimney (UHC) in, leave about 1” from the ceiling. tape to hold it up from falling down if you don’t have any helper to hold it.(USC) into place 31TYPE 1 (PX06 Models): SCREEN TOUCH CONTROLImportance Notice:INCORRECTEntire button covered and lightly touched.CORRECTOPEN: While holding a bafflefilter, pull baffle filter lock down.: While a baffle filter is open, use both hand to hold both end of it then useyour index finger (either left or right) to push baffle filter hinge pin toward to middle of baffle filter to release it.: Please reverse the process.Button is NOT completely coveredActivating Smoke Detector Function:Remote Control Sensor:TYPE 2 (PX04 Models): TOUCH BUTTONImportance Notice:4.2 ½ HOUR AUTOMATIC SHUT OFF: this range hood will be shut off for every approx. 2 ½ hour. You can re-startoperation as usual after it was shut off.5.30 HOUR REMINDER: after 30 hours of use, the timer (8) will be flashing. T o clear it, please refer to “G-To ClearCleaning Reminder” on page 7.TYPE 2: TOUCH BUTTON1.(1) To power ON/OFF, and to activate power-off delay timer.9.(9) Indicates the length of time left for delay off function.10.(10) Lights up when auto-shutdown delay timer function is on.A. ACTIVATING BLOWER FUNCTION:∙Option 1: Touch and hold down (+) for 1-2 seconds.∙Option 2: Touch and hold down power sign (1) for 1-2 seconds. (The blower will be running at the same speed as last used).Note: The system saves user configurations, settings such as timer and blower (motor) speed will remain the same the next time it is turned on.B. ADJUSTING BLOWER SPEED:∙Touch and hold down (+) for increase.∙Touch and hold down (-) for decrease.C. TURNING OFF THE BLOWER:∙Touch and hold down power sign (1) for 1-2 seconds.D. TO TURN THE LIGHT ON/OFF:∙Touch Light button (6) once to turn on the lights, and once again to turn off the lights.E. ADJUSTING THE TIMER FUNCTION:∙While the blower (motor) is not running, touch and hold Decrease Value button (2) over 3 seconds (until it’s flashin g) to enter timer mode.∙Adjust to desired period of delay off timer by touching Increase Value or Decrease Value button (minimum 1 minute to maximum 15 minutes).This setting will be saved immediately.F. ACTIVATING THE TIMER FUNCTION:∙While the blow er (motor) is running, touch and hold “Power” button (1) for over 3 seconds to activate delay off timer. Power-Off Delay Timer Indicator(10) will light up and Power-Off Delay Digital Timer (9) will begin to countdown. When it reaches zero, the blower (motor) will shut down.G. TO CLEAR CLEANING REMINDER:∙When blower (motor) starts to rotate, cumulative running time will be shown in Power-On Elapsed Digital Timer (8). This timer icon flashes when 30 hours is up and reminds user to clean the baffle filters.∙After cleaning the filters and when the motor is not in use, touch and hold (+) Increase Value button (7) over 3 seconds to reset the timer. Please note that turning off the system will not reset the Power-On Elapsed Digital Timer (8).12. SPECIFICATIONBody Design Non-Magnetic 1.0 mm Stainless Steel, Satin FinishPower Rating 120V/60Hz (USA & Canada standard)General Input Power 158W (150W + 4x2W)Motor Input Power 150 W eachAmpere 1.3 ALevels Of Speed Control 4 LevelsMaximum Airflow 900CFMNoise Level Approximately 1.5 – 6.0 sones or 33 – 54 dBNumber Of Motors Single MotorMotor Type Single Chamber Ultra QuietFan Type Squirrel Cage blowerFiltration Type Heavy Duty Stainless Steel Baffle FilterIllumination 4 LED lights, 2W Maximum/eachVenting Size Top 6 inches RoundInterference Protection Radio Frequency Interference ProtectedNote Specification subject to change without notice.1. If the range hood or lights does not operate after installation:∙ Check if the range hood has been plugged in. Make sure that all power has been turned back ON. Check if the fuse is not blown and all electrical wiring is properly connected.∙ Swap out light assembly to working ones to deter mine whether it is caused by defective bulbs. See replacing the light bulbs on Page 13. 2. The range hood vibrates when the blower is on:∙ The range hood might not have been secured properly on to the ceiling or wall.∙ Check if the motor is secured in place. If not, then tighten the motor in place. Check if the blower wheel is damaged. 3. The blower or fan seems weak:∙ Check that the duct sized used is at least 6”. Range hood WILL NOT function efficiently with insufficient duct size & loosel y secured.∙ Check if duct is clogged or if damper unit (half-circular flapper) is not installed correctly or opening properly. A tight mesh on a side wall cap unit mightalso cause restriction to the air flow.4. The lights work but the blower is not spinning at all, is stuck or is rattling.∙ The blower might be jammed or scraping the bottom due to shipping damage. Please contact us immediately. ∙The motor is defective, possibly seized - change the motor. 5. The hood is not venting out properly :∙ Make sure the distance between the stove top and the botto m of the hood is within 26” and 30” in distance. Due to different ceiling height configura-tions, recommended height may not be applicable.∙ Reduce the number of elbows and length of ductwork. Check if all joints are properly connected, sealed, and taped. ∙ Make sure the power is on high speed for heavy cooking. 6. The hood is noisier than normal∙ The duct is not secure and causes vibration. ∙ The smaller duct size than required is being used. 7. Control panel is not active∙ Check to make sure the auto function is not on.Operations:∙ Read and understand all instructions and warnings in this manual before operating the appliance. Save these instructions for future reference. ∙ Always leave safety grills and filters in place. Without these components, operating blowers could catch on to hair, fingers and loose clothing. ∙ NEVER dispose cigarette ashes, ignitable substances, or any foreign objects into blowers.∙ NEVER leave cooking unattended. When frying, oil in the pan can easily overheat and catch fire. The risk of self combustion is higher when the oil hasbeen used several times.∙ NEVER cook on “open” flames under the range hood. Check deep -fryers during use: Superheated oil may be flammable. Cleaning:∙ The saturation of greasy residue in the blower and filters may cause increased inflammability. Keep unit clean and free of grease and residue build-up at all times to prevent possible fires.∙ FILTERS MUST BE CLEANED PERIODICALLY AND FREE FROM ACCUMULATION OF COOKING RESIDUE.∙ DO NOT operate blowers when filters are removed. Never disassemble parts to clean without proper instructions. Disassembly is recommended tobe performed by qualified personnel only. Read and understand all instructions and warnings in this manual before proceeding.13. TROUBLESHOOTING14. USE & CARE INFORMATION15. MAINTENANCESAFETY WARNING: Never put your hand into area housing the fan while the fan is operating! For optimal operation, clean range hood and all baffle/spacer /filter/grease tunnel/oil container regularly. Regular care will help preserve the appearance of the range hood.Cleaning Exterior surfaces:∙Clean periodically with stainless steel cleaner or hot soapy water and clean cotton cloth. Do not use corrosive or abrasive detergent (e.g.Comet Power Scrub®, EZ-Off® oven cleaner), or steel wool/scoring pads, which will scratch and damage the stainless steel surface.For heavier soil use liquid degrease such as “Formula 409®” or “Fantastic®” brand cleaner.∙If hood looks splotchy (stainless steel hood), use a stainless steel cleaner to clean the surface of the hood. Avoid getting cleaning solution on or into the control panel. Follow directions of the stainless steel cleaner. CAUTION: Do not leave on too long as this may cause damage to hood finish. Use soft towel to wipe off the cleaning solution, gently rub off any stubborn spots. Use dry soft towel to dry the hood.∙After cleaning, you may use non abrasive stainless steel polish such as 3M ® or ZEP®, to polish and buff out the stainless luster and grain. Always scrub lightly, with clean cotton cloth, and with the grain.∙DO NOT allow deposits to accumulate or remain on the hood.∙DO NOT use ordinary steel wool or steel brushes. Small bits of steel may adhere to the surface and cause rusting.∙DO NOT allow salt solutions, disinfectants, bleaches, or cleaning compounds to remain in contact with stainless steel for extended periods. Many of these compounds contain chemicals, which may be harmful. Rinse with water after exposure and wipe dry with a clean cloth.Cleaning Grease Filter / Stainless Steel Filter less Grill:IMPORTANT: Drain oil from oil containers before oil and residue overflow!∙The metal filters fitted by the factory are intended to filter out residue and grease from cooking. It needs not be replaced on a regular basis but are required to be kept clean.∙Filters should be cleaned after every 30 hours of use. Remove and clean by hand or dishwasher. Use proper degreasing detergent for stainless steel and leave to soak if heavily soiled. Dry filters and re-install before using hood.16. LIMITED WARRANTY。
排烟系统操作方法
排烟系统是用于排出室内污浊空气,并引入新鲜空气的设备。
操作方法如下:
1. 打开排烟系统:通常排烟系统有一个开关或按钮,将其打开以启动排烟系统。
2. 调节排烟量:如果排烟系统有多档调节功能,可以根据需要进行选择。
通常有低、中、高档。
3. 调节排烟方向:有些排烟系统可以调节排烟的方向,通常通过手动转动排烟口的角度来实现。
4. 确保通风口畅通:排烟系统的通风口需要保持畅通,确保排烟效果良好。
同样,要定期清洁和更换风口过滤网,以防止灰尘和污垢堵塞通风口。
5. 关闭排烟系统:当不需要排烟时,可以将排烟系统关闭。
此时室内空气可以通过其他通风设备来流通。
请注意,以上操作方法仅供参考,具体的操作步骤可能因排烟系统的不同而有所差异。
务必遵循相关的使用说明和安全操作规程来操作排烟系统,以确保安全运行和有效排烟。
烟机操作规程一、机组开车前准备工作1、机组运行条件①机组安装或检修后检验确认合格。
②烟气轮机入口高温平板闸阀、高温调节蝶阀经检验灵活好用。
③风机出口Dg1000止回阀,Dg1000经检验灵活好用。
④各有关电动、气动、电液阀门及仪表控制系统动作准确。
⑤润滑油系统有关试验合格。
⑥烟气轮机进口烟气应符合如下条件。
(a)含尘浓度<200mg/Hm3。
(b)烟气中催化剂颗粒≯10μ的应<3%。
⑦主风机入口空气含尘量应<10mg/m3。
2、一般性准备工作:①机组安装检修完毕后,卫生进行彻底清扫。
②各部位进行全面检查,确认一切正常。
③机组各阀门进行调整,使其处于应开启或关闭位置。
④各系统压力表、温度计安装齐全并灵活好用。
⑤表盘仪表投用使其处于应在的手动或自控位置,各监测系统调效后投用。
⑥油箱内装入合格的30#透平油,并使其处于正常油位。
⑦与调度取得联系通知机、电、仪等有关人员到机房等待开机。
3、润滑油系统:①检查润滑油管路联接是否正确,润滑油加热冷却,过滤等系统是否好用。
②检查油箱液位应在正常位置。
③打通润滑油流程。
④启动主油泵进行油路循环,检查油系统有无泄漏调整油压、油温,使其在正常指标之内。
a、油泵出口油压≥0.6MPa。
b、润滑油总管油压≥0.25MPa。
c、烟机、风机、电机增速箱,联轴器油压 0.2 MPa。
d、油温30-50℃。
⑤检查各轴承油压及回油情况。
⑥调整高位油箱液位,使其处于溢流状态。
⑦检查总管油压下降是否报警、油压下降辅助油泵是否连锁自启。
4、启用电动盘车装置进行盘车。
5、机组控制系统冷态调校。
①关闭烟机入口Dg1000蝶阀,调试烟机入口高温平板闸阀:要求气源压力0.49MPa条件下进行两位试验,确保灵活好用达到技术要求。
②关闭烟机入口Dg高温平板闸阀,•调试烟机入口高温蝶阀,要求在气源压力0.49MPa条件下信号风压在0.0196-0.098MPa之间进行调校达到技术要求并进行手动操作试验是否灵活好用。
厨房电器使用操作规程一、引言厨房电器使用操作规程的目的是为了保证厨房电器的正常、安全和高效使用。
本规程适用于厨房中常见的电器设备,包括但不限于电饭煲、微波炉、电烤箱、电磁炉等。
通过遵守本规程,可以有效地减少用户在使用电器的过程中发生意外事故的风险。
二、通用原则1. 在使用任何厨房电器之前,务必仔细阅读并理解相关使用说明书,并按照说明进行正确使用。
2. 在使用厨房电器之前,应检查电器的电源线、插头和设备本身是否存在明显损坏,如有损坏应及时报修或更换。
3. 在使用厨房电器时,应保持厨房的干燥和通风,并确保电器稳定放置于水平、平稳的工作台面上。
三、电饭煲使用操作规程1. 加水:a. 使用干净的自来水或过滤水,保持水质洁净。
b. 根据不同米种选择合适的水米比例。
c. 加水时注意不要超过电饭煲的水尺标志线。
2. 加米:a. 使用清洁的米勺加入所需米粒。
b. 根据个人口味选择是否需要提前浸泡米粒。
3. 放置内胆:a. 确保内胆干燥整洁,没有明显刮花或裂痕。
b. 将内胆放置至电饭煲主体上,确保扣紧。
4. 电源连接:a. 将电饭煲的电源线插头插入标准插座,并确保电源正常供电。
5. 启动电饭煲:a. 根据个人需求选择合适的煮饭模式并启动电饭煲。
b. 在煮饭过程中,不要频繁开盖,以免破坏内部温度控制。
6. 饭煮熟:a. 当电饭煲的指示灯提示饭煮熟后,可以断开电源,并等待几分钟使其自动保温。
7. 清洁维护:a. 饭煲使用完毕后,应及时清洁内胆、取出内胆晾干。
b. 注意不要将电饭煲沾湿或浸泡于水中,防止电器损坏。
四、微波炉使用操作规程1. 清洁内部:a. 使用干净、湿润的布将微波炉内部彻底擦拭干净。
b. 避免使用腐蚀性或磨蚀性清洁剂。
2. 加热食物:a. 使用微波炉专用盖盖好食物,以防食物弹溅。
b. 在加热食物时,应根据食物的性质和数量适当调整加热时间。
c. 加热液体时应在容器中放置搅拌棒或勺子,以避免液体爆溅。
3. 循环加热:a. 循环加热时,应在食物或盛放食物的盘子下面放置旋转托盘,以保证加热均匀。
正确使用油烟机的方法
正确使用油烟机的方法
正确使用油烟机的方法
1.好多人使用时只注意抽油烟,而忽视补充新鲜空气,在排油烟的同时,应用换气扇补充新鲜空气,这样才能保持燃气具有充足的氧气维持燃烧
2.安装时距离灶具不小于1750px且禁止把吸油烟机安装在固体燃料的灶具上。
吸油烟机与灶具间的距离不足70厘米,或将吸油烟机安装于使用固体燃料(如煤、木材等)的`灶具上等,这些做法均藏有火灾隐患。
3.不要用酒精以及金属类溶液擦洗吸油烟机。
用酒精溶液擦洗塑料件,用金属擦洗吸油烟机表面,这会使塑料件、吸油烟机表面失去光泽。
4.要经常清洗吸油烟机过滤网。
很多人经常半年才清洗一次过滤网,这样是不对的,在每天使用的情况下,应每半个月或1个月将过滤网清洗一次,否则会影响滤油效果。
5.正确使用油烟机方法:只要烹调一开始就打开抽油烟机。
不论是煎、炒,还是煮、蒸、炖,即使烹调结束了也不要马上关掉抽油烟机,应该再让它运转几分钟,以便将厨房内残留的有害气体最大限度地排出去,这时再关机,厨房环境就比较健康安全了。
PPS6031PPS8031Range Hood Instruction ManualCONTENT 2……………………………………….…. Notice and Technical data 3………………………………………….. Installation4-5……………………………………… Notice of installation5-6……………………………………….. Safety Warning 7………………………………………… Use7-9……………………………………… Maintenance 10………………………………………… Trouble shooting(1) NOTICE∙Thank you for choosing an Award range hood. Please read the instruction manual carefully before use.∙The installation work must be undertaken by a qualified and competent person.∙The manufacturer disclaims all liability for any damage or injury caused as a result of not following instructions for installationcontained in the following text.∙The range hood operates on 220-240V ~, 50Hz.(2) TECHNICAL DATAModel No. PPS6031Rated voltage 220 - 240 V~ 50HzTotal power 194WMotor power 190WLamp max. 2 x 2WModel No. PPS8031Rated voltage 220 - 240 V~ 50HzTotal power 384WMotor power 380WLamp max. 2 x 2W(3) INSTALLATION∙When the range hood is located above a gasappliance, this distance shall be at least 65 cmbetween the supporting surface for the cookingvessels on the hob and the lowest part of therange hood.∙Make a cut-out in the joinery as follows: wide 490*265(mm) for 52CM and 665*265(mm) for model 70CM. Pic 1. Make sure youhave at least 35mm clearance from the edge of the cut-out to thejoinery.∙Remove the filter and remove the screws holding the panel∙Use the fixing screw supplied to attach range hood to joinery∙Reinstate panel to body and fit filter∙Connect ducting to hood outlet∙The air must not be discharged into a flue that is used for exhausting fumes from appliances burning gas or other fuels;∙Regulations concerning the discharge of air have to be fulfilled.∙The range hoods are intended to be installed over a hob having not more than 4 hob elements.The size of cavity:(4) NOTICE OF INSTALLATIONThe following rules must be strictly followed to obtain optimal air extraction:∙Do not install above a cooker with a high level grill.∙Important! Always switch off the electricity supply at the mains during installation and maintenance.∙The range hood must be installed in accordance with the installation instructions and all measurements followed.∙Please dispose of the packing material carefully. It may be a risk to children.∙Pay attention to the sharp edges inside the range hood especially during installation and cleaning.∙When the range hood is located above a gas appliance, the minimum distance between the supporting surface for the cookingvessels on the hob and the lowest part of the range hood thatdistance must be:Gas cookers: 75cmElectric cookers: 65 cmCoal or oil cookers: 75 cm∙Make sure the ducting has no bends less than 120º as this will reduce the efficiency of the range hood.∙Warning: Failure to install the screws or fixing device in accordance with these instructions may result in electrical hazards ∙If the supply cord is damaged, it must be replaced by the manufacturer, its service agent or similarly qualified persons inorder to avoid a hazard.∙Warning: Before obtaining access to terminals, all supply circuits must be disconnected.∙For safety reason, please use only the same size of fixing or mounting screw which are recommended in this instruction manual.∙When the range hood and appliances supplied with energy other than electricity are simultaneously in operation, the negativepressure in the room must not exceed 4 Pa (4 x 10⁻⁵ bar).∙Keep ducting pipe short and straight.∙Do not reduce the size or restrict ducting pipe.∙When using ducting pipe always install the pipe pulled taut to minimize pressure loss.∙Failure to observe these basic instructions will reduce the performance and increase noise levels of the range hood.∙Any installation work must be carried out by a qualified electrician or competent person.∙Do not connect the ducting system of the range hood to any existing ventilation system which is being used for any otherappliance, such as warmer tube, gas tube , hot wind tube.∙The angle of the bend of the expansion pipe should not be less than 120º; you must direct the pipe horizontally, or, alternatively, the pipe should go up from the initial point and should be led to anouter wall.∙After the installation, make sure that the range hood is level to avoid grease collection at an end.∙Ensure the ducting pipe selected for installation complies with relevant standards and is fire retardant.(5) SAFETY WARNING∙The range hood is not to be used by persons (including children) with reduced physical, sensory or mental capabilities, or lack of experience and knowledge, unless they have been givensupervision or instruction.∙Children should be supervised not to play with the range hood.∙The range hood is for home use only, not suitable for barbecue or commercial application.∙Please ask a technical person to do the assembling.∙The range hood and its filter mesh should be clean regularly in order to keep in good working order.∙Before cleaning, please switch the power off at the main supply.∙Clean the range hood according to the instruction manual to keep the range hood safe from fats that may cause ignition.∙If there is any fault with the range hood, please call an authorised Award service company to arrange a service.∙Do not try to use the range hood without the grease filters or if the filters are excessively greasy!∙Do not leave frying pans unattended during use because overheated fats or oils might catch fire.∙Never leave naked flames under the range hood.∙If the range hood is damaged, do not attempt to use.∙Do not flambé under the range hood.∙Always put lids on pots and pans when cooking.∙When in extraction mode, air in the room is being removed by the Range hood. Please make sure that proper ventilation measures are being observed. The range hood removes odours from room but not steam.∙There shall be adequate ventilation of the room when the range hood is used at the same time as appliances burning gas or other fuels.∙Caution: The range hood and its accessible parts can become hot during operation. Children younger than 8 years old should stay away unless they are under permanent supervision.∙There is a fire risk if cleaning is not carried out in accordance with the instructions∙Regulations concerning the discharge of air have to be fulfilled.∙Clean your range hood periodically by following the method given in the chapter MAINTENANCE.∙Regarding the details about the method and frequency of cleaning, please refer to maintenance and cleaning section in the instruction manual.∙Cleaning and user maintenance shall not be made by children without supervision.(6) USEPush buttona. Press the button “Stop”, the motor is stopped then.b. Press the button “Low”, the motor is running at low speed.c. Press the button “Mid”, the motor is running at medium speed.d. Press the button “High”, the motor is running at high speed.e. Press the button “Lamp”, both lamps start shining .Press the buttonagain; the lamps are switched off then.(7) MAINTENANCEClean the filters as below:∙The filter mesh is made of metal. Do not use corrosive detergent on it.∙Keeping this filter clean will keep the appliance running correctly.Strictly follow the guidelines below.∙Method 1: Put the mesh into 40-50 c clean water, pour on detergent, and soak for 2-3 mins. Wear gloves and clean with a soft brush. Do not apply too much pressure, as the mesh is delicate and willdamage easy.∙Method 2: If instructed to do so, it can be put into a dishwasher, set the temperature at around 60 degrees.Clean the range hood as below:∙To protect the main body from corrosion over a long period of time, the range hood should be cleaned with hot water plus non corrosive detergent every two months.∙Do not use abrasive detergent as they will damage the body.∙Keep the motor and other electrical parts free from water, as this will cause damage to the appliance.∙Before cleaning the appliance remember to turn off power∙If the supply cord is damaged, it must be replaced by the manufacturer, its service agent or similarly qualified persons inorder to avoid a hazard.Disassembly and assembly the filter:∙Activated carbon filter can be used to trap odors. In order to install the activated carbon filter, unscrew and take down the front panel.Then plug the activated carbon filter into the unit and turn it inanti-clockwise. Repeat the same on the other side.NOTE:∙Make sure the filter is securely locked. Otherwise, it could loosen and cause damage to the unit. When activated carbon filter attached, the suction power will be lowered.BULB REPLACEMENTImportant :✧ The bulb must be replaced by themanufacturer, its service agent or similarly qualified persons.✧ Always switch off the electricity supply beforecarrying out any operations on the appliance. When handling bulb, make sure it is completely cool down before any direct contact to hands.✧ When handling globes hold with a cloth orgloves to ensure perspiration does not come in contact with the globe as this can reducethe life of the globe.• Switch the unit off and pull out the plug first.• Wait until the light bulb is cooled down before replacement. • Remove the front part with the aid of screwdriver.• Pull out the LED light carefully and replace with the same type and rated LED light (2*2W LED light)• Reinstate the front part to the unit with screwdriver. • ILCOS D code for this lamp is: DBR-2/65-H-64 – LED modules, self- ballasted – round lamp – Lamp: 2 x 2 W max.– Voltage range: AC 220-240V – Dimensions:(8) TROUBLE SHOOTINGFault Cause SolutionLight does not work, but motor works The bulb damaged Change bulb Bad contact between bulb andcapFix or change Light panel switch damage Fix or changeLight works, but motor does not work Motor bearings damage Change motor Motor burn out Change motor Motor control switch damage Fix or change Bad plug contact outlet Fix or changeLight does not work, motor does not work Power cord damaged Change power cord Switch damage Fix or change Wind leaves damage Change leavesShake of the body Motor screw loosen Tighten screw Combination screw loosen Tighten screw The body fixing to joinery isloseTightenInsufficient suction Cross-ventilation too strong orkitchen too closed inReduce cross-ventilation or open thewindowExhaust pipe too longAdjust the length ofpipeAir outlet valve not open Check the valveThe outside wind is too strongNo the technicalproblem。
烟气轮机组操作手册中国蓝星大庆工业园催化裂解联合装置一、概述烟气能量回收机组是催化裂解装置中关键设备,它是由烟气透平机、轴流压缩机、变速器、同步电动/发电机及其辅助系统组成。
辅助系统包括:润滑油调节系统、蒸汽干空气密封系统、水冷却系统、FSC自控系统、电控系统及消声器、空气过滤器等设备组成。
再生烟气具有一定压力能和热能通过烟气轮机膨胀作功,转变成机械能,烟机输出的功率用来驱动轴流风机,若有多余,送至电机向电网送电,从而达到能量回收的目的。
该系统采用同轴三机组匹配形式。
图1烟气能量回收系统工艺(原则)流程图二、该系统机组设备规格及主要参数(一)烟气轮机:YL---4000H 单机悬臂式由洋浦华奥特机械工程有限公司承制⒈介质:催化再生烟气⒉进入烟机中的烟气催化剂粉尘浓度、粒度要求⑴烟气中催化剂粉尘浓度: ≤0.2g/ Nm 3,烟气中催化剂颗粒大于10µm应小于3%⑵烟气中催化剂粒度分布:⒊设计参数旋转方向:面对进气端看为逆时针(二)AV45—13轴流式压缩机1、操作条件⒉性能参数⑴级数:13级⑵静叶可调级数:全部静叶可调⑶静叶调节方式:电动调节⑷静叶工作角度:最小工作角22°;最大工作角79o⑸启动时静叶角度:22°⑹启动时功率:1749 kW(-25.1℃)⑺临界转速第一阶临界转速:3300r/min第二阶临界转速:8750r/min⑻转子飞轮力矩:GD2=268kg.㎡⑼润滑油量:170 l/min⑽轴流风机总质量:40570kg 其中转子质量:2993 kg ⑾联合底座质量:4702 kg(与齿轮箱联合)⑿径向轴承型号:R4K125/0.6E型式:椭圆瓦润滑油量:34×2=68 l/min轴承功耗:13×2=26 kW⒀止推轴承型号:A10KM110E型式:KINGSBURY润滑油量:102 l/min轴承功耗:43 kW(14)进、排气口进气口排气口方向:向下向下连接形式:法兰法兰压力等级:Pg2.5 Pg10口径:DN1100 DN750(15)电动执行机构(引进)数量:1台型号:电机功率:1.5kw输出力距:电机电压:380v输入信号:4-20mA全行程时间:20~160s(三)齿轮箱与电动盘车器1、齿轮箱:型号:NGGS485齿轮形式:平行轴,双斜齿齿形:渐开线,硬齿面传递功率:正/反向5000kW传递效率:≥98%转速:高速轴6748.69r/min低速轴1487r/min速比:4.538小齿轮齿数:26大齿轮齿数:118飞轮力距GD2 :小齿轮:4.7Nm大齿轮:745Nm转向:高速轴逆时针低速轴顺时针(从高速轴与风机联接端看)2、电动盘车器:型式:手动结合、自动脱开安装位置:齿轮箱高速轴自由端盘车转速:73 r/min盘车电机:功率:11 kW电压:380 V转速:1500 r/min(四)鼠笼式异步电动/发电机1、设备规格及技术数据型号:YCH710-4额定功率:5000kW额定电压:6000V额定频率:50HZ相数:3相同步转速:1500r/min满载时定子电流:547A满载时工作转速:1487 r/min满载时效率:97.17 %满载时功率因数:90.5%最大转矩/额定转矩: 1.91堵转转矩/额定转矩:0.71堵转电流/额定电流: 4.73绝缘等级:F级2、冷却器冷却方式:全封闭水━风冷却,安装在电机顶部冷却能力:160kW冷却水量:30/60 t/Hr (串联/并联)外壳防护要求:TEWAC(IP44)转向:顺时针(从电机轴伸端看)(五)联轴器机组三套联轴器都采用膜片联轴器1、烟机和风机联轴器(备齿保安型)型号:HBD6-1500-00T4(Z) 轴端距:600 mm 轴伸端直径:烟机φ105主风机φ115传递功率:5000 kw转速:6750 r/min公称扭矩:14000 Nm峰值扭矩:24500 Nm临界转速:77599.7 r/min最大许用转速:16000 r/min三、机组附属设备规格及参数(一)润滑油站1、主要技术数据(二)轴流机进口空气过滤器四、机组配套特殊阀门1、烟机入口高温蝶阀(DN1000)安装在烟机入口管道上的高温蝶阀是配置电液执行机构的调节蝶阀。
Installation guideCongratulations on your new smart appliance with Home Connect, designed to simplify your life and make it more enjoyable.*Home Connect helps you to manage your home appliances with ease and comfort, providing a variety of functions beyond simple remote control.The Home Connect app gives you important and useful information about your home appliance, allowing you to customize and trigger certain functionalities and actions. Furthermore, the app offers support on how to properly maintain your home appliance and also inspires with a variety of recipes. Explore our ecosystem of partners and gain even more functionalities and services.Home Connect opens up a world of possibilities exceeding your expectations of a home appliance.* The availability of the Home Connect function depends on the availability of Home Connect services in your country.Home Connect services are not available in every country. You can find more information on this at Welcome to the connected home!Explore: With the Home Connect app you can...Manage your applianceIn the app’s appliance section you have an overview ofyour connected home appliances, offering a variety offunctions beyond simple remote control. Monitor the home appliance’s progress, change or pause programs, change settings, trigger actions, and receive notifications.Be inspiredThe recipe section provides a variety of inspiring recipes,tips and videos, that will make cooking and baking evenmore enjoyable.Get supportThe service section gives helpful information on how to maintain and operate your home appliance properly.Discover even more benefitsWe are constantly expanding our ecosystems of partners. Please refer to for an overview ofall partners.Let's get started!What you need1 | Your extractor hood that is connected to the power supplyand switched on.2 | A smartphone or tablet with the latest version of the iOS orAndroid operating system.3 | Your extractor hood within range of your home network'sWi-Fi signal.4 | The name (SSID) and password (key) of your Wi-Fi homenetwork.5 | These installation instructions.Important information:3ENEN4Step 2: Connect your extractor hood to your home network1 | Your extractor hood must be installed properly and turned on.2 | Open your Home Connect app to add your extractor hood.Select "Add appliance".3 | Please follow the directions in the app and refer to this guideonly when prompted to by the app.Step 1: Download the Home Connect app and create a user account1 | Open the App Store (Apple devices) or Google Play Store(Android devices) on your smartphone or tablet.2 | Search for the "Home Connect (America) app in the store’ssearch and install it.Home Connect app:3 | Open the app and register to create a Home Connect useraccount.4 | Write down your Home Connect account credentials (useraccount and password), you will need them later.D D The app will guide you through the steps of adding yourappliance to Home Connect. It will refer to this guide onlywhen needed.EN5Step 2.1: Connect your extractor hood to your WLAN home network (Wi-Fi) with WPSPlease enter step 2.1 only when prompted to by the app. The following steps describe operations at the home appliance itself.1 |D D "1" and "CONNECT" will flash.3 | Activate the WPS function on your home network routerto the home network.4 | Follow the instructions in the app.EN 6Step 2.2: Connect your extractor hood to your WLAN home network (Wi-Fi) step by stepPlease enter step 2.2 only when prompted to by the app. The following steps describe operations at the home appliance itself.Note:"2" and "CONNECT" will flash.3 | Follow the instructions in the app.DD The appliance will open a temporary Wi-Fi networkcalled "HomeConnect" for 2 minutes with the passwordEN7Step 3: Connect your extractor hood to the Home Connect app verbindenPlease enter step 3 only when prompted to by the app. The following steps describe operations at the home appliance itself.1 | Follow the instructions in the app.D D The registration process is complete once "CONNECT"stops flashing on the hood.Change the connected home networkIf you want to change the wireless home network that is connected to the hood, reset the connection to your hood.1 | Press and hold the "CONNECT" and "on/off" buttons onyour hood for at least 3 seconds.D D The "CONNECT" button will turn off.2 | Repeat the connection to your home network.。
奥太乐油烟机使用说明书
摘要:
1.奥太乐油烟机的安装与使用
2.奥太乐油烟机的功能与特点
3.奥太乐油烟机的清洁与维护
4.奥太乐油烟机的安全注意事项
正文:
一、奥太乐油烟机的安装与使用
1.安装前的准备工作
在安装奥太乐油烟机之前,请确保您已经准备好所有需要的工具,并已经阅读了使用说明书。
为了确保油烟机的安全和稳定运行,请确保安装位置符合以下要求:
- 确保油烟机安装在稳固的墙面上,以避免因震动或摇晃导致的意外损坏。
- 确保油烟机安装位置距离火源足够远,以防止火灾事故的发生。
- 确保油烟机安装位置附近有足够的空间,以便于操作和维护。
2.安装步骤
- 根据说明书中的安装图纸,确定油烟机的安装位置,并在墙面上打好安装孔。
- 将油烟机挂在安装孔上,并确保油烟机的位置水平。
- 连接油烟机的电源线,并确保电源线牢固无松动。
- 启动油烟机,检查是否正常运行。
二、奥太乐油烟机的功能与特点
1.强大的抽吸能力
奥太乐油烟机采用高性能马达,具有强大的抽吸能力,能够快速、准确地抽吸厨房中的油烟,保证厨房空气清新。
2.多重安全保护
奥太乐油烟机内置多重安全保护功能,如过热保护、漏电保护等,确保使用过程中的安全。
3.节能环保
奥太乐油烟机采用先进的节能技术,运行过程中能耗低,同时符合我国的环保要求。
三、奥太乐油烟机的清洁与维护
1.清洁方法
- 用湿布擦拭油烟机表面,避免使用有腐蚀性的清洁剂。
- 使用专用清洁剂清洗油烟机内部,避免使用强碱性清洁剂。
2.维护方法
- 定期检查油烟机的运行状况,如有异常声音、震动等情况,请及时联系售后服务。
- 定期清洗油烟机,确保其抽吸能力不受影响。
四、奥太乐油烟机的安全注意事项
1.使用过程中,请勿将油烟机放在易燃、易爆物品附近,以防止火灾事故的发生。
2.请勿用湿手触摸油烟机电源开关,以免触电。
3.请勿让儿童单独操作油烟机,以免发生意外。
4.如遇停电,请关闭油烟机的电源开关,以防止来电时自动启动。
通过以上内容,我们可以了解到奥太乐油烟机的安装与使用、功能与特点、清洁与维护以及安全注意事项。