唯赛思通摩托车行车记录仪X1F使用说明书
- 格式:pdf
- 大小:418.30 KB
- 文档页数:7
行车记录仪产品使用说明书按键功能描述1、电源键/摄像头补光灯功能一:开关机功能在关机状态下,长按【电源键】并保持3秒钟,可开启本机电源,机器开始工作。
在开机状态下,长按【电源键】并保持3秒钟,本机自动保存录像文件及用户设置并关机。
功能二:摄像头补光灯功能在待机状态下,短按【电源键】,可进行补光灯打开/关闭/自动三种模式的切换。
自动模式下,补光灯由摄像头感应光的亮度来控制。
2、模式键/菜单键/紧急录像锁定键功能一:模式切换功能在待机状态下,短按【模式键】,可在不同模式(录像/拍照/回放)之间进行切换。
功能二:菜单功能在待机状态下,长按【菜单键】进行主菜单功能设置表,短按【上翻键】或【下翻键】,选择需要设置的选项,短按【确认键】确认。
设置完成后,短按【菜单键】直至退出菜单设置功能。
(菜单设置方法在录像模式、拍照模式、回放模式中均相同)功能三:紧急锁定功能在录像模式中,如果想保护当前视频不会被覆盖,短按【菜单键】启动紧急锁定功能,此时,屏幕上方出现锁文件图标,则将事故发生时的当前正在录制的影像保存为一个特殊影像,这个影像不会被覆盖。
3、上翻键/移动测速/快退功能一:上翻页功能在菜单设置和回放模式中为上翻页功能。
功能二:移动侦测功能三:快退在回放模式上,短按【上翻键】可以快退。
4、下翻键/静音键/快进/停车模式功能一:下翻页功能在菜单设置和回放模式中为下翻页功能。
功能二:关闭录音功能在录像模式中,短按【下翻键】可关闭录音功能,此时屏幕右下方话筒变为禁止图标,表示已经关闭录音功能。
再次短按可开启录音,图标显示为开启录音。
功能三:快进在回放模式下,短按【下翻键】可以快进。
功能四:停车监控在待机模式下,长按【下翻键】可以打开或关闭停车模式功能,左下角图标会有相应的变化。
5、录像键/拍照键/确认键/屏幕背光灯开关键功能一:启动/关闭录像功能在录像模式下,短按【确认键】开始录像,再次短按【确认键】可停止录像。
功能二:拍照键在拍照模式下,短按【确认键】一下可拍摄一张照片。
行车记录仪产品使用说明书
一、产品概述
行车记录仪是一种用于记录车辆行驶过程中的视频、音频以及车辆信息的设备。
本产品采用高清晰度摄像头和智能控制系统,能够自动记录车辆前方的画面,并可通过存储设备保存下来。
二、产品组成
1. 主机:行车记录仪主体,包括摄像头、存储卡插槽和显示屏。
2. 电源线:连接主机与车辆电源的电源线。
3. 吸盘支架:用于固定主机在车辆前挡风玻璃上。
4. 存储卡:用于存储录制的视频和音频文件。
三、使用方法
1. 安装:将吸盘支架固定在车辆前挡风玻璃上,将主机安装在吸盘支架上,并连接电源线到车辆电源。
2. 开机:通过按下电源按钮,启动行车记录仪,主机显示屏亮起并开始录制画面。
3. 调整设置:可根据需要在主机菜单中设置录制视频的分辨率、循环录制时间等参数。
4. 存储文件:录制的视频文件将保存在存储卡中,可以通过电脑或者其他设备查看和管理这些文件。
四、使用注意事项
1. 请勿在驾驶过程中操作行车记录仪,以免影响驾驶安全。
2. 定期清洁摄像头镜头和显示屏,保持清晰录制效果。
3. 存储卡容量不足时,应及时清理或更换存储卡,以免影响录制
功能。
4. 行车记录仪应安装在视线不受阻碍的位置,避免影响行驶视野。
以上是本行车记录仪产品的使用说明书,希望用户在使用过程中仔
细阅读并按照说明进行操作,以保证产品的正常使用效果。
如有任何
问题,请咨询售后服务。
祝您驾驶愉快,行车安全!。
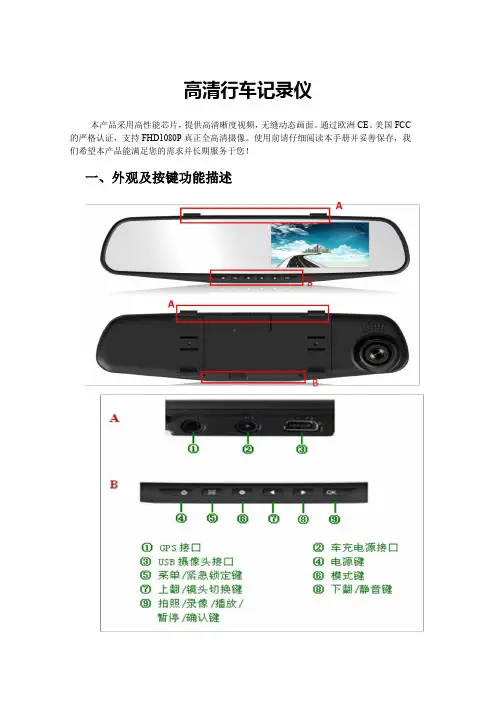
高清行车记录仪本产品采用高性能芯片,提供高清晰度视频,无缝动态画面。
通过欧洲CE、美国FCC 的严格认证,支持FHD1080P真正全高清摄像。
使用前请仔细阅读本手册并妥善保存,我们希望本产品能满足您的需求并长期服务于您!一、外观及按键功能描述1. 电源键/屏幕背光开关键功能一:开关机功能在关机状态下,长按【电源键】并保持3秒钟可开启本机电源,机器自动开始工作。
在开机状态下长按【电源键】并保持3秒钟本机自动保存录像文件及用户设置并关机。
功能二:屏幕背光开关键在录像/拍照/文件浏览模式下,短按【电源键】可以操作对屏幕背光的开启和关闭。
2. 菜单键/紧急录像锁定键功能一:菜单功能在待机状态下,短按【菜单键】进入主菜单功能设置表,短按【上翻键】或【下翻键】,选择需要设置的选项,短按【确定键】确认。
设置完成后短按【菜单键】直至退出菜单设置功能。
(菜单设置方法在录像模式、拍照模式、回放模式中均相同)功能二:紧急锁定功能在录像模式中,如果想保护当前视频不会被覆盖,短按【菜单键】启动紧急锁定功能,此时屏幕右下方出现锁文件图标,则将事故发生时的前10秒和后20秒保存为一个特殊影像,这个影像不会被覆盖。
3. 模式键功能:模式功能在待机状态下,短按【模式键】可在不同模式(录像/拍照/回放)之间进行切换。
4. 上翻键/镜头画面切换/移动侦测/快退功能一:上翻页功能在菜单设置和回放模式中为上翻页功能。
功能二:摄像头切换功能在接入外置后摄像头后,会自动显示双摄像头。
录像模式下,短按【上翻键】可以在前摄像头、后摄像头、画中画、分屏显示四种显示方式之间切换;拍照模式下,短按【上翻键】可以切换前摄像头、后摄像头。
功能三:移动侦测在待机模式中,长按【上翻键】可切换至移动侦测模式。
长按【上翻键】即可退出移动侦测模式。
功能四:快退在回放模式下,短按【上翻键】可以快退。
5. 下翻键/静音键/快进/停车监控功能一:下翻页功能在菜单设置和回放模式中为下翻页功能。
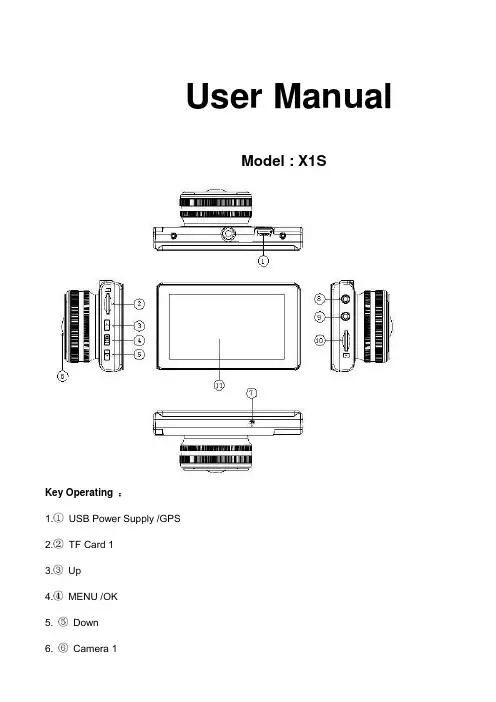
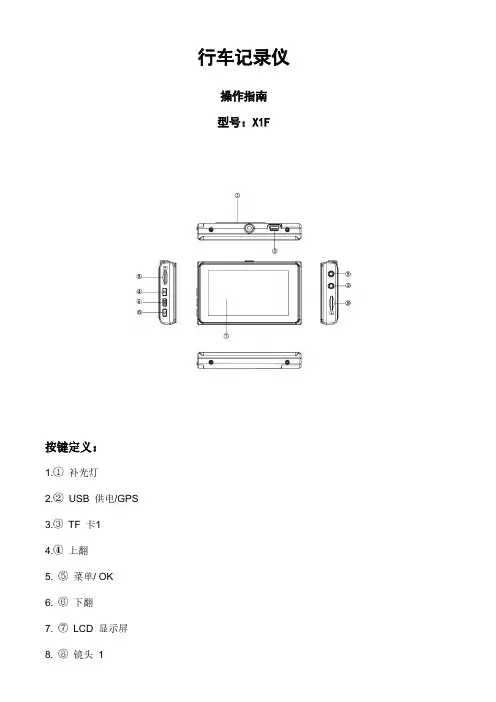
User ManualModel : X1SKey Operating :B Power Supply /GPS2.TF Card 13.Up4.MENU /OK5. Down6. Camera 17. Microphone8. Camera 29. Camera 310. TF Card 211. LCD ScreenMenu main interface and settingHow to Video recording and Menu settingVideo recordingWhen engine is started the Camera is turn on automatically, and then start to Video recording, Press “ OK ” button to stop recording ,the video file save to TF CardCamera built-in super capacitor When the Car suddenly flameout will auto save last video file to TF CardMenu Setting OptionPress Up/Down button to select setting icon Press “OK” enter Menu setting option ,and Press Up/Down button to select specific parameters Press “ OK ” button to confirm ,long Press Menu button to Exit1. Front Camera1080P 1920*1080P720P 1280*720480P 720*480VGA 640*4802. Side CameraVGA 640*480HD 1280*7203. Time StampOff No display date and timeDate Only Only display dateDate and Time Display date and Time4. Loop Recording1Min Video file 1 minute When the Card full will delete front file3Min Video file 3 minute When the Card full will delete front file5Min Video file 5 minute When the Card full will delete front fileOff Until the Card FullSystem Setting1. BeepOn Turn On operation button soundOff Turn off operation button sound2. Screen OffOff Camera LCD keep on1 Min No any operating the Camera after 1min enter screensaver3 Min No any operating the Camera after 3min enter screensaver5 Min No any operating the Camera after 5min enter screensaver(In the Screensaver status ,Press any button Can be restore)3. G-sensorSetting G-sensor sensitivity, Off/ High/Normal/LowWhen happen emergency, will auto Protect the file, and When Card full only delete Normal recording file4. Date FormatYY/MM/DDMM/DD/YYDD/MM/YY5. Date Input1)Press “Up”/Down button to setting number2)Press “OK ” button jump next setting3)Press “OK ” button confirm and Exit set6. Time Input1)Press “Up/Down ”button to setting number2)Press “OK ” button jump ne xt setting3)Press “OK ” button confirm and Exit set7. Time ZoneCancelSet Setting GPS Time zone8. Sys. ResetWhen Setup Error, Can setting this option restore factory setting9. Fw VersionCheck software version informationFormat TF Card 1 / Card 2In the Video recording Mode , long Press “Menu “ button enter Menu main interface ,Press Up/Downbutton to select format TF Card 1/ Card 2 Press “OK ” button enter setting interface Press “OK “ button finishLanguage SettingIn the Video recording Mode , long Press “Menu “ button enter Menu main interface ,Press Up/Downbutton to select Language iconEnglish/ French/ Deutsch/Italian/Spanish/Portuguese / T-Chinese/ S-Chinese/ Russian/Turkish/Korean/JapanPlayback ModeIn the Video recording Mode ,long Press “Menu “ button enter Menu main interface ,Press Up/Down button to select Playback icon Card 1 or Card 21. Press Up/Down button to select previous/next video file2. Press “OK” Play/Stop3. long Press “Menu” button Exit playback modeGPS FunctionConnect the GPS module to the GPS slot , then start to recording ,Camera start Search GPS Signal the GPS icon flashing after received GPS Signal the GPS icon light up and the date time will auto updatePlayback GPS fileOpen GPS Player ( Drplayer )Open iconClick button to select GPS file then Click “Play” button to playing as followCamera Change1) Front Camera In the other mode ,Press “ Up “ button Can be change the Front Camera to SideCamera2) Side Camera In the other mode ,Press “ Down “ button Can be change to Camera 2 or Camera 3 Parking ModeWhen the Car in the Park status, After 3 minute the Camera will auto change to parking mode, the LCD display” Parking Mode “ in the parking mode the video file is 1FPSPower Supply Mode1) OBD Cable Compatible with all the standard OBD interface in you Car the Camera willworking 24/7 days ,once your choose this power supply ( Low voltageprotection system is built in )2) Car charger Used Car charger connect to Car cigarette lighter socket, When engine isstarted the Camera is turn on automatically, and then start to Videorecording,TF Card Installment :1. Insert the TF Card in the TF Card slot according to the indicative direction ,until it softly clicks2. When removing the TF Card push in the TF Card and gently release to eject it.Notes:1. Make sure the TF Card are facing the right way ,if it is in the wrong direction ,it may damage theCamera and TF Card2. If the TF Card is incompatible with the Camera, please try to insert again ,change other TF Card3. Please use the high- speed TF Card.(The Card have CLAS S⑩icon)Technical SpecificationsNotice: Due the camera software update camera function has change, without prior notice。

Road Safety GuardOperation InstructionKey Operation :1. Power on/off2. Reset3. Camera 14. Camera 25. USB6. Menu7. Mode8. OK9. TF Card10. LCD Display screen11. MUTE/UP12. REC/DOWN13. FlashlightMenu operating instructionsVideo recording ModeIn the Video recording Mode,Press “Menu” button enter Setup interface.Press UP/Down button to select specific parameters, Press “OK” to confirm and Press “Menu”to Exit.1. Video ResolutionHD 1280*720D1 720*480VGA 640*4802. CameraSelect camera to recording, camera 1/camera 2/ camera 1+23. Time StampOff No display date and timeDate Only Only display dateDate and Time Display date and time4. Voice setupOn Turn on Voice PromptOff Turn off Voice Prompt5. REC SoundOff Video recording turn off the soundOn Video recording sound and image sync4. G-sensitivitySetting G-sensor sensitivity, Off/ high/Medium/LowWhen happen impact the video file will protect and the file name is (EVE.XXXXX) ,the card is full only delete normal recording file (REC.XXXXX).7. BrightnessSet camera 1/camera 2 brightnessSetting ModeIn the other Mode, Press “Menu” button twice enter Setup interface.Press UP/Down button to select specific parameters, Press “OK” to confirm and Press “Menu”to Exit.1. FormatFormat TF Card (S elect “Execute “format TF Card )2. ScreensaverOff Camera LCD keep on1 Min If no any operating the camera after 1min enter screensaver3 Min If no any operating the camera after 3min enter screensaver5 Min If no any operating the camera after 5min enter screensaver(Screensaver status ,Press any button to restore)3. BeepOn Turn On operation button soundOff Turn off operation button sound4. LanguageEnglish/ French/ Deutsch/Italian/Spanish/Portuguese / T-Chinese/ S-Chinese/ Russian/ Turkish/Korean5. Auto offOff Camera not auto power off1 Min If no any operating the camera after 1min auto power off3 Min If no any operating the camera after 3min auto power off5 Min If no any operating the camera after 5min auto power off6. Sys. ResetWhen Setup Error, can setting this option restore factory setting7. Light Frequency50HZ60HZ8. Date Input1)Press “Up”/Down button to setting number2)Press “Mode” button jump next setting3)Press “REC” button Exit set9. VersionCheck software version informationPlayback ModeP ress “Mode” button change to Playback mode (Press “OK” button to playback the video file)1. Press Up/Down button to select previous/next video /photo file2. Press “OK” Play/Stop1. DeleteSingle Delete single fileAll Delete all the file2. ProtectSingle Delete single fileAll Delete all the file3. Thumbnail /Execute4. File List /Execute5. VolumeAdjust volume 1~8Loop RecordingWhen TF Card is full ,the Camera will auto delete in front of the old files, When happen impact the video file will protect(EVE.XXXXX) ,the card is full only delete normal recording file (REC.XXXXX).Flashlight functionCamera in the power off or other mode, short Press power button to turn on flashlight, press again turn off .Parking ModeWhen the car in the stop status, after 3 minute will auto change to parking mode, in the parking mode the video file is 1FPSNote:1) According the need of customers, this function is options.2) In order to avoid the improper operation to install damage the camera , Please to auto service center to find a professional maintenance technicians to install, and use package accessory special cable (DC Input:12-24 V Output :5V-1.5A)Wired Controller FunctionCamera in the Video recording Standby mode or recording mode, Press any key on the wired Controller ,Camera will auto saved Video file name is (KEY-XXXX.AVI ) the same is (EVE.XXXX.AVI) When TF Card is full only delete Normal Video recording file (REC.XXXX.AVI)Connect Computer1. Connect the camcorder with computer by USB cable, [My computer] will occur removable disk, the file id stored at Removable Disk/DCIM/100DSCIM which can be downloaded to the computer.2. System support of the Computer: Windows 2000/XP/Vista/Windows 7Power on test1)First time use camera ,please use package accessory USB cable connect to charger(DC-5V 1A), then connect to USB slot, power on test normal recording and other function2)After power on test normal, can install and useCharging the battery1. Directly connect car cigarettes with the USB interface, to charge battery2. Use a USB cable to connect the computer with the USB interface, to charge battery3. Use the USB cable to connect charger the USB interface, to charge battery.4. The battery level display shows the remaining power of the battery as below:Low power Not fully charged fully chargedTF card installment :1. insert the TF card in the TF Card slot according to the indicative direction ,until it softly clicks2. When removing the TF card push in the TF card and gently release to eject it.Notes:1. Make sure the TF card are facing the right way ,if it is in the wrong direction ,it may damage thecamera and TF card2. If the TF card is incompatible with the camera, please try to insert again ,change other TF card3. Please use the high- speed TF card.(The card have CLAS S⑩icon)Notice:Suppose the camera is in dead halt due to the improper operation, you can press reset button to restore the camera will return to normalTechnical specificationsLCD screen 2.0 TFTCamera lens 120 degrees A+ level high resolution lensLanguage English/French/ German /Italian/Spanish/Portuguese / T-Chinese/S-Chinese/ Russian/ TurkishVideo format AVI (MJPG)Memory card TF Up to 32GBMicrophone Built–inFrequency 50Hz/60HzUSB interface USB2.0Battery Built-inG-SENSOR SupportNotice: Due the camera software update camera function has change, without prior notice。
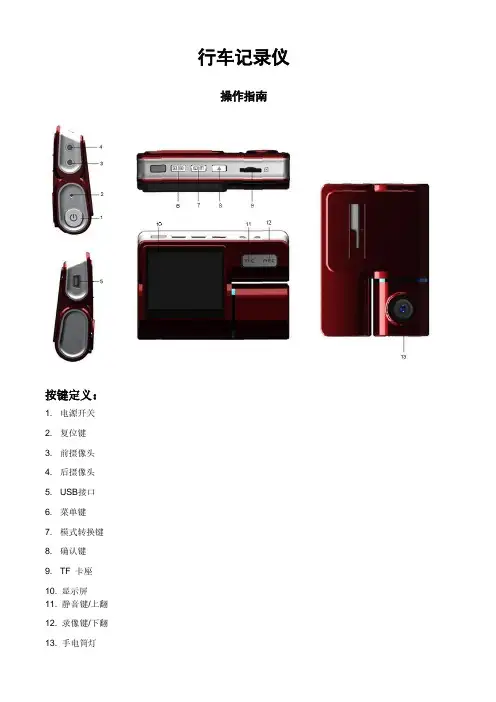
行车记录仪产品使用说明书.功能键(五键)说明一(1)电源键/屏幕背光开关键(2)菜单键/模式键(3)UP键(4)DOWN键(5)OK键(6)摄像头(7)TF槽(8)AVIN接口(9)USB电源接口(10)LCD显示屏(11)复位孔一、功能简介1、使用行车录像功能启动汽车发动机,记录仪自动启动并开启录像功能,录像指示灯闪烁。
当图标显示为红色且时间走动时,按“OK键”暂停/开始录像功能。
关闭汽车发动机,记录仪自动保存录像内容并关机,录像的视频分段保存于TF卡上。
当TF卡存储满后记录仪将覆盖较早前录制的视频。
【注意】a.记录的时间段可自行在菜单中设置为1/2/3/5档,如果选择为“1/2/3/5”分钟这四个档中的任意一档时,当TF卡存储满后记录仪将覆盖较早前录制的影像。
b.前、后摄像头的录像文件和拍照文件分别保存于TF卡中的前录“VIDEOA”、后录“VIDEOB”。
2、使用拍照功能在录像界面按“M键”可进入拍照模式,点击0K键可拍摄一张照片。
如需返回主录像界面,短按“M键”两次返回。
在录像界面长按“M键”可进入“拍照设置”菜单,按“上下键”选择,按“0K 键”确认,可进行拍照功能设置。
3、视频回放在录像界面按“M键两次”进入回放模式。
按上/下键找到需要回放的视频和照片,按“0k”键进行视频回放。
4、一键锁定功能在录像中,短按M键加锁当前视频,已加锁的文件,加锁图标为“”,文件锁定后将不会被覆盖。
5、键静音功能在录像模式,按“下键”开启或关闭录音。
【提示】设置会自动保存,再次开机后无需设置静音功能。
6、摄像头画面切换功能在录像界面或拍照界面。
按“上键”进行前/后拉界面以及画中画进行切换。
7、时间/日期设定在记录仪界面长按“M键”进入功能设置界面,短按“M键”一次后按“下键”选择“日期/时间”,按“OK键”确认,“上下键”选择年月日后,按“M键”退出设置。
【注意】为了有效记录行车安全事故的取证的日期和时间,在使用本机前请先设置正确的时间。
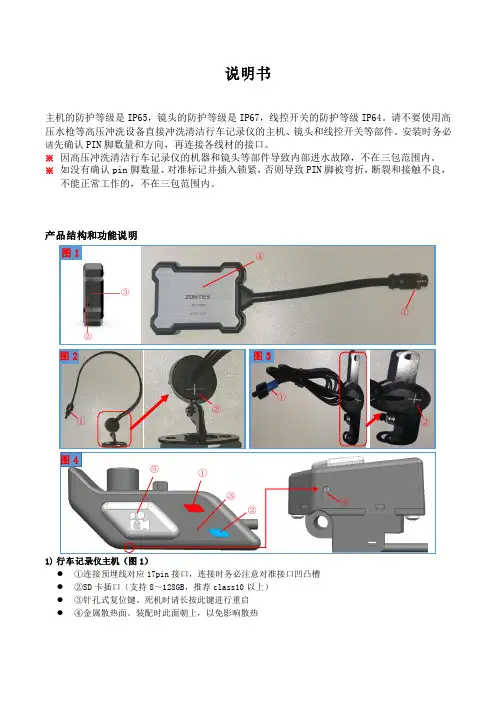
说明书主机的防护等级是IP65,镜头的防护等级是IP67,线控开关的防护等级IP64。
请不要使用高压水枪等高压冲洗设备直接冲洗清洁行车记录仪的主机、镜头和线控开关等部件。
安装时务必请先确认PIN 脚数量和方向,再连接各线材的接口。
※ 因高压冲洗清洁行车记录仪的机器和镜头等部件导致内部进水故障,不在三包范围内。
※ 如没有确认pin 脚数量、对准标记并插入锁紧,否则导致PIN 脚被弯折,断裂和接触不良,不能正常工作的,不在三包范围内。
产品结构和功能说明1) 行车记录仪主机(图1) ● ①连接预埋线对应17pin 接口,连接时务必注意对准接口凹凸槽 ● ②SD 卡插口(支持8~128GB ,推荐class10以上) ● ③针孔式复位键。
死机时请长按此键进行重启 ●④金属散热面。
装配时此面朝上,以免影响散热①②③④图1①②图2 ①②图3①②③④⑤图42)前摄像头(图2)●①连接预埋线前摄像头接口(黑色)●②安装时注意箭头方向,箭头处于正上方时为标准画面方向。
如图所示3)后摄像头(图3)●①连接预埋线前摄像头接口(蓝色)●②注意检查箭头方向,如图所示4)线控开关(图4)●①红色LED灯表示工作状态●②蓝色LED灯表示WIFI状态●③录音降噪孔录音和降噪●④排水孔排水●※不接线控开关的时候,不能录音※严禁洗车时将高压水枪对准线控开关的录音降噪孔和排水孔直接冲洗,以免进水失效存储卡请不要使用支持以外的存储卡。
可能会导致数据破损和记录错误。
※请使用容量8~128GB的存储卡。
※请使用“Class10/UHS-1”以上速度的卡。
使用Class10以下的卡,可能会不能正常录像。
※行车记录仪要求储存卡格式为FAT32,如果新购买的128GB/64GB等存储卡不能使用,请在电脑上格式化为FAT32格式或通过手机APP格式化储存卡※一旦格式化卡,会删除掉所有记录文件,请提前备份。
※以防万一,发生事故后,为了防止记录了事故瞬间的文件被覆盖,请切断电源。

行车记录仪按键功能行车记录仪是一款能够记录行车过程的设备,具有多种按键功能,通过按键操作可以实现一系列的功能设置和操作。
首先,行车记录仪的主要按键功能是启动和关闭。
用户只需按下相应的开关键,就能快速启动或关闭行车记录仪。
开关键通常会设置在仪器的侧面,以方便用户的操作。
其次,行车记录仪还可以通过按键进行录像功能的启动和关闭。
用户只需按下录像键,就能轻松开启录像功能,记录行车过程;而再按一下相同的按键,就能停止录像。
这样方便的录像功能,使得用户能够在出现意外事件时,迅速记录下来,为事故调查提供有力证据。
行车记录仪的按键功能还包括手动拍照。
用户可以按下拍照键,在需要的时候随时进行拍照操作,记录下车辆碰撞、交通违法等情况。
这些照片将被保存在记录仪的内存卡中,用户可以通过电脑或手机进行查看和下载。
在实际使用中,为了减少用户的操作负担,行车记录仪通常还会设置一些自动功能的按键。
例如,自动循环录像功能,用户只需按下该按键,系统就会自动开启循环录像,当内存卡存储空间不足时,会自动覆盖最早的录像文件,确保行车记录仪始终能够正常工作;另外,还有疲劳驾驶预警功能的按键,当驾驶员连续驾驶时间过长,系统会通过按键发出警示声音,提醒驾驶员需要休息。
除此之外,行车记录仪还可以设置按键功能进行视频分享。
用户只需按下分享键,就能将记录仪中的录像文件通过WiFi无线传输到手机或电脑上,并进行分享到社交平台,让更多人了解到自己所经历的行车情况。
总的来说,行车记录仪的按键功能丰富多样,能够满足用户的不同需求。
除了基本的开启和关闭功能外,还包括录像、拍照、循环录像、疲劳驾驶预警、视频分享等功能。
这些按键功能的设计,使得行车记录仪成为了一种非常实用的行车安全设备。
无论是为了记录行车过程,还是为了提供证据,行车记录仪的按键功能都能够很好地帮助用户实现这些目的。
因此,在选择行车记录仪时,我们也可以根据按键功能的丰富程度来进行选择,以满足自身的需求。
车载行车记录仪使用指南在如今的道路交通中,车载行车记录仪已经成为了许多车主不可或缺的装备。
它不仅能够在发生交通事故时提供有力的证据,还能记录旅途中的美好瞬间。
但要充分发挥行车记录仪的作用,正确的使用方法至关重要。
接下来,就为您详细介绍一下车载行车记录仪的使用指南。
一、了解行车记录仪的基本组成车载行车记录仪通常由以下几个部分组成:1、摄像头:这是行车记录仪的核心部件,负责拍摄车辆前方或前后方的画面。
2、显示屏:部分行车记录仪配备了显示屏,可实时查看拍摄画面。
3、存储设备:一般为 SD 卡或 TF 卡,用于存储拍摄的视频。
4、控制按钮:用于操作行车记录仪,如开始/停止录制、设置参数等。
5、电源接口:连接车辆电源,为行车记录仪供电。
二、安装行车记录仪正确的安装位置和方法能确保行车记录仪拍摄到清晰、全面的画面。
1、安装位置前挡风玻璃后视镜附近:这是最常见的安装位置,不会遮挡驾驶员视线,且能较好地拍摄前方道路。
后挡风玻璃:如果您选择的是前后双录的行车记录仪,后挡风玻璃也是一个安装摄像头的好位置。
2、安装方法清洁安装位置:确保安装区域干净、干燥,以免影响粘贴效果。
粘贴或固定支架:根据行车记录仪的安装方式,使用吸盘、3M 胶等将支架固定在挡风玻璃上。
连接电源:将行车记录仪的电源线连接到车辆的点烟器插座或保险盒内的常电接口。
三、设置行车记录仪参数在使用行车记录仪之前,需要根据个人需求和实际情况设置相关参数。
1、分辨率选择较高的分辨率可以获得更清晰的画面,但同时也会占用更多的存储空间。
一般来说,1080P 或更高分辨率是比较理想的选择。
2、帧率常见的帧率有 30 帧/秒和 60 帧/秒。
较高的帧率可以使视频更加流畅,但同样会增加存储压力。
3、循环录制开启循环录制功能,当存储卡空间不足时,新录制的视频会自动覆盖最早的视频,确保始终有足够的存储空间。
4、停车监控如果您希望在车辆停放时也能监控周围情况,可以开启停车监控功能。
功能操作说明1.录影模式按下电源开关键ON/OFF或连接充电器后,记录仪会自动进入录影模式并开始录影,此时蓝色指示灯闪烁。
录影时按REC/SNAP键停止录影,此时指示灯常亮。
按MENU 键进入主菜单。
使用充电器工作时,当充电器电源断开后记录仪会延迟5秒自动关机(注:本机为循环录影,当记忆卡已满时旧的文件将被逐个覆盖。
请根据记忆卡容量选择合适的录影片段长度。
关机最后的片段为一小段。
)2.拍照模式开机后按MODE键选择进入拍照模式,按REC/SNAP进行拍照。
按MENU键进入子菜单。
3.预览模式开机后按MODE键选择进入预览模式,按UP、DOWN选择视频文件或照片文件,按REC/SNAP播放或暂停,按MODE退出预览。
4.日期时间设置在录影界面(停止录影)按MENU(菜单)键,再按MODE(模式)键,在系统菜单界面选择<输入日期>项,按MENU(菜单)或REC(录影)键进入下一级菜单,按MENU(菜单)或REC(录影)键选择设置项。
在日期时间设置界面按REC(录影)键或MENU(菜单)键进入下一个设置,使用上翻/下翻对年/月/日、时间进行调整,设定好后按MENU(菜单)或REC(录影)键确定退出。
5.显示设置短按一次旋转屏幕,短按两次进入屏保,在短按恢复正常状态。
6.移动侦测功能将视频模式菜单(移动侦测项)设置为开启启动移动侦测功能。
当有物体在记录仪前面移动时,记录仪会自动启动录像,当物体停止时,记录仪自动停止录像,进入侦测待机状态。
退出移动侦测时关闭移动侦测功能。
7.删除功能在播放模式下按菜单键MENU进入删除界面,再按录影键REC进入选择删除“单张/全部/选定”界面,用上翻/下翻键选择所列设置,按REC键删除。
8.供电及充电本机锂电池电量不足时,屏幕上会显示“电量不足”,20秒后自动关机。
A.使用内置电池充电方式:1.连接车充;2.用USB连接电脑B.连接车充汽车启动后记录仪会自动开始录影,断电后停止工作,并自动保存录制的视频。
1.概述在使用记录仪之前,仔细阅读本手册有关安装、操作、维护等说明。
1.1关于microjet 记录仪(1)本记录仪为记录幅面宽180mm的多范围输入记录仪,通过DC电压输入信号和温色/电阻元件最多可记录12路。
(2)它可实现高速记录,用6种颜色显示清晰的模拟曲线和数字输出。
(3)模拟记录曲线可以是连续的或间断的(参见1.3 格式特性)。
(4)标准打印单元除了提供测量数值记录外,还提供包括日期、记录纸速、测量范围、标记符号、日报告和总计等。
(5)操作简单,显示区易于查看,可键入各种设定数值。
1.2产品检查检查附件本单元随机附带图1.1所示附件,请检查是否齐全。
(1)面板装配附件2件(2)记录头(带吸水包装)1件(3)记录纸1包(4)手册1本(5)熔断器(250V/1A AC)1只1.3检查型号说明标签说明了型号名称等,请检查是否为你所订购的规格型号(在包装箱的顶部和主单元里有标签)。
PHA 45674-E123V/Y4记录数 1 1路连续记录 2 2路连续记录 3 3路连续记录 6 6路连续记录7 6路点记录8 12路点记录9 12路连续记录5输入信号数(温/色元件)0 无1 1路 2 2路 3 3路 6 6路8 12路Z 其它规范6 输入信号数(电阻元件)0 无1 1路 2 2路 3 3路 6 6路8 12路Z 其它规范7 输入信号数(DC电压)0 无1 1路 2 2路 3 3路 6 6路8 12路Z 其它规范5、6、7数值之和必须等于4的数值。
1记录纸照明A无B有2报警输出/外部控制0 无 1 6路报警输出加3路外部控制2 12路报警输出加3路外部控制3通讯Y 无R RS-485 T T-link输入信号工作值:温色:K 0-1200℃电阻元件:PT100 0-500℃ DC电压:-5-5VDC输入信号规范和记录通道的关系:例如:如果为3路温色信号,6路电阻信号和3路DC电压信号,则1-3路为温色,4-9为电阻,10-12为DC电压。
尊敬的用户:您好!首先非常感谢您使用我们公司的系列产品,能够为您服务是我们的荣幸!为确保您正确使用本公司产品,请仔细阅读本手册。
手册采用图文并茂的方式,配合文字的插图详细直观地阐述产品的操作,由于产品生产日期、批次不同,说明可能会与实际使用的产品有差异,请以实物为准。
最后再次感谢您的惠顾与支持,同时也希望您在使用过程中反馈一些宝贵意见。
因为这些意见,能够使我们不断地去完善产品。
因为我们都呼吁安全第一,生命无价!也希望每一位驾驶员都遵守好交通规则,快快乐乐地出门,平平安安地回家! 祝各位:万事如意,事事顺心!使用说明书RA22安装指南服务(一)预览界面行车录像仪说明书所提供信息仅供参考,用户在使用过程中请以实物为准。
本产品为行车辅助工具,对用户行车过程中的违章罚款或交通意外不担保,我公司不承担任何责任。
行车录像仪视频循环录制功能,请用户及时保存重要视频;本产品不排除在使用过程中出现意外中断记录情况的可能,若因此而没有记录视频或图像资料,我公司不承担任何责任。
购买此产品,视同已遵守此声明;有条件完整保修服务正常使用状态下产生的损坏,购买后享有一年质保服务,但不包外壳更新服务,如需外壳更新服务需收费;非自然损害之人为自行破坏机身或机身上有易碎禁止拆卸贴纸损坏者,公司有权拒绝维修服务,自然损坏及故障应送回原厂维修,否则原厂享有不维修服务权利,但若更换零件者,仍应灼收零件材料费用;保修期限内维修在保修期限内维修,有自然损坏需维修时看直接送交经销商或邮寄公司维修;而在本公司与归还时,会依你的保固条件寄至府上,但您未附上保修书或保修期已过,均酌收维修费用,所以务必经销商为您填妥保修书并盖上经销商章及购买日期,才不会造成日后保固上的困扰;(运送费均由客户支付)保修期限外维修缺少保修凭证者,视同已经超过保修期限。
如果您仍然此项服务而维修费用在人民币100元以上的,我们的工程师会通知您,你可以选择修理或不修理退还您的设备;邮件送修需知,应注明故障原因,并附保修书的复印件,并写清楚您联络方式;邮寄送修费用邮寄送修费用支付方式,由所有人送或送修人支付;邮寄送修前检查项目,使用结实纸盒包装,交由可靠的运货公司,加值保险直接寄达公司;必须填明您的姓名、住址、固定电话或移动电话,详细说明故障事由或发生的问题。
Road Safety GuardOperation InstructionKey Operation :1. Power on/off2. Reset3. Camera 14. Camera 25. USB6. Menu7. Mode8. OK9. TF Card10. LCD Display screen11. MUTE/UP12. REC/DOWN13. FlashlightMenu operating instructionsVideo recording ModeIn the Video recording Mode,Press “Menu” button enter Setup interface.Press UP/Down button to select specific parameters, Press “OK” to confirm and Press “Menu”to Exit.1. Video ResolutionHD 1280*720D1 720*480VGA 640*4802. CameraSelect camera to recording, camera 1/camera 2/ camera 1+23. Time StampOff No display date and timeDate Only Only display dateDate and Time Display date and time4. Voice setupOn Turn on Voice PromptOff Turn off Voice Prompt5. REC SoundOff Video recording turn off the soundOn Video recording sound and image sync4. G-sensitivitySetting G-sensor sensitivity, Off/ high/Medium/LowWhen happen impact the video file will protect and the file name is (EVE.XXXXX) ,the card is full only delete normal recording file (REC.XXXXX).7. BrightnessSet camera 1/camera 2 brightnessSetting ModeIn the other Mode, Press “Menu” button twice enter Setup interface.Press UP/Down button to select specific parameters, Press “OK” to confirm and Press “Menu”to Exit.1. FormatFormat TF Card (S elect “Execute “format TF Card )2. ScreensaverOff Camera LCD keep on1 Min If no any operating the camera after 1min enter screensaver3 Min If no any operating the camera after 3min enter screensaver5 Min If no any operating the camera after 5min enter screensaver(Screensaver status ,Press any button to restore)3. BeepOn Turn On operation button soundOff Turn off operation button sound4. LanguageEnglish/ French/ Deutsch/Italian/Spanish/Portuguese / T-Chinese/ S-Chinese/ Russian/ Turkish/Korean5. Auto offOff Camera not auto power off1 Min If no any operating the camera after 1min auto power off3 Min If no any operating the camera after 3min auto power off5 Min If no any operating the camera after 5min auto power off6. Sys. ResetWhen Setup Error, can setting this option restore factory setting7. Light Frequency50HZ60HZ8. Date Input1)Press “Up”/Down button to setting number2)Press “Mode” button jump next setting3)Press “REC” button Exit set9. VersionCheck software version informationPlayback ModeP ress “Mode” button change to Playback mode (Press “OK” button to playback the video file)1. Press Up/Down button to select previous/next video /photo file2. Press “OK” Play/Stop1. DeleteSingle Delete single fileAll Delete all the file2. ProtectSingle Delete single fileAll Delete all the file3. Thumbnail /Execute4. File List /Execute5. VolumeAdjust volume 1~8Loop RecordingWhen TF Card is full ,the Camera will auto delete in front of the old files, When happen impact the video file will protect(EVE.XXXXX) ,the card is full only delete normal recording file (REC.XXXXX).Flashlight functionCamera in the power off or other mode, short Press power button to turn on flashlight, press again turn off .Parking ModeWhen the car in the stop status, after 3 minute will auto change to parking mode, in the parking mode the video file is 1FPSNote:1) According the need of customers, this function is options.2) In order to avoid the improper operation to install damage the camera , Please to auto service center to find a professional maintenance technicians to install, and use package accessory special cable (DC Input:12-24 V Output :5V-1.5A)Wired Controller FunctionCamera in the Video recording Standby mode or recording mode, Press any key on the wired Controller ,Camera will auto saved Video file name is (KEY-XXXX.AVI ) the same is (EVE.XXXX.AVI) When TF Card is full only delete Normal Video recording file (REC.XXXX.AVI)Connect Computer1. Connect the camcorder with computer by USB cable, [My computer] will occur removable disk, the file id stored at Removable Disk/DCIM/100DSCIM which can be downloaded to the computer.2. System support of the Computer: Windows 2000/XP/Vista/Windows 7Power on test1)First time use camera ,please use package accessory USB cable connect to charger(DC-5V 1A), then connect to USB slot, power on test normal recording and other function2)After power on test normal, can install and useCharging the battery1. Directly connect car cigarettes with the USB interface, to charge battery2. Use a USB cable to connect the computer with the USB interface, to charge battery3. Use the USB cable to connect charger the USB interface, to charge battery.4. The battery level display shows the remaining power of the battery as below:Low power Not fully charged fully chargedTF card installment :1. insert the TF card in the TF Card slot according to the indicative direction ,until it softly clicks2. When removing the TF card push in the TF card and gently release to eject it.Notes:1. Make sure the TF card are facing the right way ,if it is in the wrong direction ,it may damage thecamera and TF card2. If the TF card is incompatible with the camera, please try to insert again ,change other TF card3. Please use the high- speed TF card.(The card have CLAS S⑩icon)Notice:Suppose the camera is in dead halt due to the improper operation, you can press reset button to restore the camera will return to normalTechnical specificationsLCD screen 2.0 TFTCamera lens 120 degrees A+ level high resolution lensLanguage English/French/ German /Italian/Spanish/Portuguese / T-Chinese/S-Chinese/ Russian/ TurkishVideo format AVI (MJPG)Memory card TF Up to 32GBMicrophone Built–inFrequency 50Hz/60HzUSB interface USB2.0Battery Built-inG-SENSOR SupportNotice: Due the camera software update camera function has change, without prior notice。
高清行车记载仪应用解释书产品构造示意图○1指导灯○2 USB接口○3支架接口○4显示屏○5菜单键○6录像/摄影键○7模式键○8复位键○9HDMI接口○10TF卡槽11镜头○12喇叭○13麦克风○14电源开症结○15上翻键○16下翻键○菜单功效设置开机按菜单键进入设置界面.应用下翻/上翻键选择项目.按REC键进入下一级菜单选择具体功效项,然后按REC键确认.确认后按菜单键退出.进入体系菜单设置界面时,需中断按两次菜单键.留意:DVR关机时会保存最后一次的设置操纵解释DVR具有录像.摄影.预览.HDMI.G-sensor.屏保.收集摄像优等功效,应用时依据须要自行选择,应用前请先拔出TF卡(请选用CLASS6以上原装正品卡).【1】录像模式1.衔接充电器工作时,DVR主动开机并开端录像,此时蓝色指导灯闪耀.在录像进程中可经由过程上翻/下翻键进行数字变焦调剂,按REC键停滞录像,此时蓝色指导灯长亮.当充电器电源断开时,DVR延迟5秒后主动关机.2.内置电池供电时,短按电源开症结开机进入待机状况,按REC键开端录像.【2】摄影模式开机后按模式键选择进入摄影模式,可经由过程上翻/下翻键进行数字变焦调剂,按REC键进行摄影.【3】预览模式开机后按模式键选择进入预览模式,按上翻/下翻键选择视频文件或照片文件,按REC键播放或暂停,按模式键退出预览模式.【4】 HDMI 功效经由过程HDMI衔接线,将本装备与电视输出终端相衔接,音视频旌旗灯号可以在电视输出终端显示.【5】活动检测功效在视频设置菜单<活动检测>项,选择<开>,启动活动检测功效.当有物体在DVR前面活动时,DVR会主动启动录像,当物体停滞移动时,主动停滞录像,进入侦测待机状况.退出活动检测时,需将视频设置菜单<活动检测>项,设置为<关>的状况.【6】G_SENSOR功效在录像进程中,当重力加快度达到设定值(2g/4g/6g)时,DVR 会主动强迫保管当段视频文件,此文件本机不成删除,不会被轮回笼罩失落.G-sensor功效启动时,显示屏有图标显示.【7】屏保功效在体系设置菜单“屏保”选项里,设置屏保时光,设定成功后在按键无任何操纵时到达设准时光主动屏保.在屏保状况,按随意率性键,撤消屏保.【8】充电DVR衔接上充电器即可充电,充电时红色指导灯长亮,充满电后,红色指导灯熄灭.【9】衔接电脑用USB数据线衔接电脑,DVR屏幕上显示:(1)存储器(2)摄像头(1.)存储器:选择存储器,装备进入U盘模式.在U盘模式下,可将所录的文件复制或剪切到电脑里播放,也可将TF卡掏出,应用读卡器读取卡中的数据.(2)摄像头:选择摄像头,在电脑上会消失一个尺度的视频装备,此时即可当PC摄像头应用.【10】日期时光设置在体系菜单设置界面选择<日期时光>项,按REC键进入日期/时光设置界面.在日期时光设置界面,按REC键选择年.月.日.时.分,应用上翻/下翻键对年.月.日.时.分秒进行调剂,全体设定好后,按菜单键退出.【11】体系复位若装备在应用进程中消失平常情形,请用直径1MM小棒按一下复位键,体系会主动复位.技巧参数配件解释书车载充电器 USB线 HDMI线吸盘支架。