DATACOLOR_测色使用说明
- 格式:doc
- 大小:8.46 MB
- 文档页数:8
Datacolor600超高精度台式分光光度测色仪
Datacolor600-出众的反射率测量设备
这部广为推荐的高精度,低允差的测色仪器,对处理萤光物质有独到之处:
自动变焦镜头与镜面光泽板;
自动UV控制;
出色的仪器间交换性;
多孔径测色与自动检测孔径尺寸;
自动光泽度补偿。
Datacolor测色仪的共同特点:
一、完全的交换性
Datacolor全系列积分球式分光测色仪提供完全的信息兼容性。
二、出色的稳定性
极低的线性漂移意味著出色的稳定性,因此您可以减低校正的频率,提高效率。
三、友好的界面
全新的设计易於了解状态栏,减少仪器设置和操作错误的机会。
四、易于维护
Datacolor仪器几乎不用维修,由于零组件的精简和完全的数据兼容,使得必要的维修也变得更快而容易,我们先进的科技,确保您可重现维修前的相同测色结果。
整个光学部分的核心SP2000分析器,已是第二代微型化及模块化的产品,加上20年以上的光纤技术,使整个架构都易于现场维护而不失精确。
五、软件兼容性
Datacolor分光测色仪是为Datacolor多次获奖的软件而设计,基本上与所有颜色管理系统兼容,因此您可以获得各种灵活性,准确度和高效能的组合
六、卓越的性能
1、优越的分析器科技,可输出5nm或10nm间隔的数据
2、Datacolor分光测色仪提供高分辨率的颜色测量和绝佳的短期/长期重现性
3、3.0mm孔径可准确测量极小色样
4、30mm超大孔径可让您测量最大的色样面积,对含有组织纹理的色样最为理想。
datacolor600分光测色仪使用方法一、引言d a ta co lo r600分光测色仪是一种用于测量物体颜色的仪器,它能够通过光的分光和反射原理来精确测量物体的颜色数值。
本文将为您介绍d a ta co lo r600分光测色仪的使用方法,让您能够快速上手并正确地使用该仪器。
二、准备工作在正式使用d at ac ol o r600分光测色仪之前,我们需要进行一些准备工作:2.1仪器检查确保da ta co lo r600分光测色仪的外部没有损坏,并检查仪器屏幕是否正常显示。
同时,检查电源适配器是否连接正常并插入电源。
2.2标准校准在使用之前,建议进行标准校准,以确保测量结果的准确性。
校准的具体步骤请参考d ata c ol or600分光测色仪的用户手册。
2.3准备测量样品选择您需要测量的样品,并确保样品表面干净无污染。
有些特殊样品可能需要进行预处理,如去除颗粒物等。
三、测量步骤以下是使用d at ac ol o r600分光测色仪进行颜色测量的基本步骤:3.1打开仪器将d at ac ol or600分光测色仪接通电源,并按下电源按钮打开仪器。
3.2选择测量模式根据您的需要,选择适当的测量模式。
da t ac ol or600分光测色仪提供了多种测量模式,如单次测量、连续测量、平均测量等。
3.3放置样品将要测量的样品放置在d at ac ol or600分光测色仪的测量面板上。
确保样品与测量面板充分接触,并尽量避免手指接触样品表面。
3.4开始测量点击da ta co lo r600分光测色仪的开始测量按钮,仪器将开始对样品进行颜色测量。
测量时间根据样品的特性和选择的测量模式而定。
3.5等待测量结果d a ta co lo r600分光测色仪将在测量完成后显示测量结果。
您可以通过仪器的显示屏查看颜色数值和色彩参数。
3.6记录和分析数据根据需要,您可以将测量结果记录下来并分析数据。
d at ac olo r600分光测色仪通常提供数据导出功能,您可以将数据导出到计算机或其他设备进行分析。
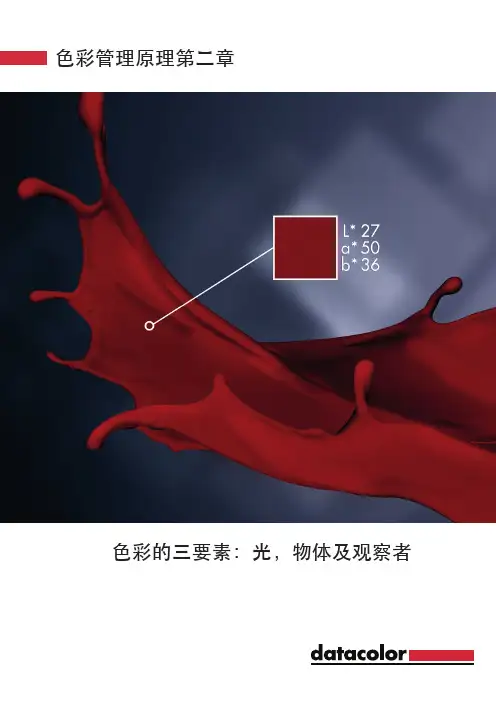
色彩管理原理第二章色彩的三要素:光,物体及观察者01三要素三要素构成我们周围充满色彩。
无论看哪,各种色泽和强度的色彩映入眼帘。
但究竟什么是色彩?色彩不是物体的物理属性。
物体与辐射能相互作用,而我们的眼睛则可察觉这种相互作用。
这种身体感觉传到大脑,经过大脑解读,我们就有了色彩体验。
感觉具有主观性,每个人的色觉各不相同。
物理、生理和心理因素都对感觉产生影响。
因此,由于心态等条件的不同,人可能对同一种色彩产生不同的感觉。
由此提出一个问题,能否以客观的数值表示人类观察者的视觉评估?色彩是主观体验,无法以数字完整表述引起体验的色彩。
但色度学为测量和鉴定色彩的物理组成部分提供有用的工具。
其中包括: 光源 物体 观察者缺少任一要素,都不可能产生色彩印象 。
Datacolor | 色彩与色彩测量第 5 章一个光源,一个物体,两位观察者! 解读意味着,每一位观察者都在其大脑中以其特有方式观察[...物体有什么色彩?三要素: 光源、物体和观察者02对于三要素,色度学均已制定出量化方法。
下文详细介绍如何以数字表示三要素各组成部分。
第 5 章 | 三要素三要素构成:光源、物体和观察者03光 – 光源光与物质相互作用1666 年,物理学家艾萨克·牛顿正在进行日光实验。
在晴朗的一天,通过百叶窗上的一个小孔,他让一束光线射进来。
这束光穿过棱镜,然后牛顿将光投射在屏幕上。
他发现,光分成与彩虹完全相同的各种色彩实际上,光是色彩的本质。
牛顿从理论上正确阐明,各种色彩都是日光的组成部分。
经过无数次实验,牛顿最终基本色相定为红、橙、黄、绿、靛、蓝、紫。
1666 年,物理学家艾萨克·牛顿将白色日光穿过棱镜。
光线分解成各部分,进而得出 色谱。
参照乐谱音符,艾萨克·牛顿辨别出七种基本 色相。
Datacolor | 色彩与色彩测量第 6 章04第 6 章 | 光 – 光源以牛顿的研究成果为基础,近代物理学家已确定,光由电磁波组成。
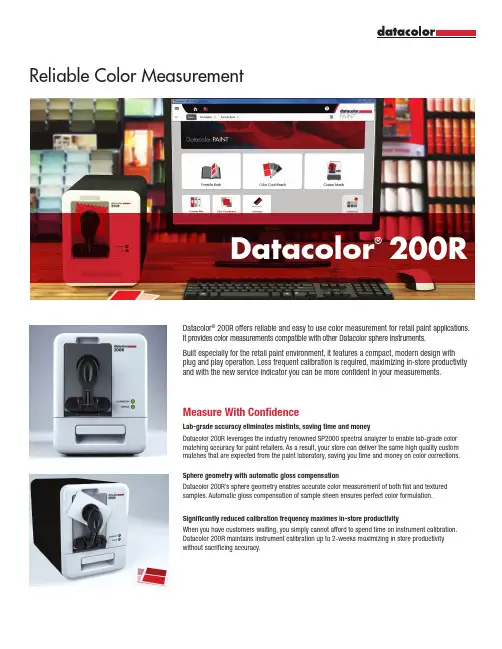
Reliable Color MeasurementDatacolor® 200RDatacolor® 200R offers reliable and easy to use color measurement for retail paint applications. Array It provides color measurements compatible with other Datacolor sphere instruments.Built especially for the retail paint environment, it features a compact, modern design withplug and play operation. Less frequent calibration is required, maximizing in-store productivityand with the new service indicator you can be more confident in your measurements.Measure With ConfidenceLab-grade accuracy eliminates mistints, saving time and moneyDatacolor 200R leverages the industry renowned SP2000 spectral analyzer to enable lab-grade colormatching accuracy for paint retailers. As a result, your store can deliver the same high quality custommatches that are expected from the paint laboratory, saving you time and money on color corrections.Sphere geometry with automatic gloss compensationDatacolor 200R’s sphere geometry enables accurate color measurement of both flat and texturedsamples. Automatic gloss compensation of sample sheen ensures perfect color formulation.Significantly reduced calibration frequency maximes in-store productivityWhen you have customers waiting, you simply cannot afford to spend time on instrument calibration.Datacolor 200R maintains instrument calibration up to 2-weeks maximizing in store productivitywithout sacrificing accuracy.Easy to Use, Easy to MaintainPlug and play installationInitial instrument installation is simplified with all required set-up data loaded at the factory. Just connect it to your computer and you are ready to go.Increased measurement confidence with new Service Indicator LED The new Service Indicator LED alerts you to deviations in your calibration results indicating that your instrument may require pact design for retail environmentDatacolor 200R has a sleek new modern design for the retail countertop, including a compact footprint and an integrated drawer that holds the black trap, calibration tiles, and the USB memory stick.Secure USB CablePower CableDatacolor®200R For more information, please visit /200STANDALONE SYSTEM REQUIREMENTSDual Core Processor @ 2GHz or faster; 4GB or more RAM; 500 GB HDD; Video 512 MB with 1280x768 Resolution or higher; DVD Drive; USB/Serial Port; Windows 7 / Windows 8.x / Windows 10Weight 15 lbs. (6.8 Kg)Dimensions 6.8” Wide X 8.8” Tall X 12.9” Deep 17.2 cm x 22.3 cm x 32.7 cmComes Complete withSpectrophotometer with certificate of instrument performance, Declaration of conformity, Quick start guide, secure USB cable, 6-ft power cable, Accessory drawer (with black trap, white calibration tile, green tile, USB memory stick with user guide)PHYSICAL SPECIFICATIONSDESCRIPTIONMeasuring Geometry Dual Beam d/8° spectrophotometer Specular Port SCI/SCE for automatic gloss compensation Illumination Source Pulsed Xenon filtered to approximate D65 Wavelength Range 400 nm – 700 nm Reporting Interval 10 nm Photometric Range 0 to 200%Spectral Analyzer Proprietary SP2000 analyzer with dual 256 element diode arra y Color Repeatability 0.05 CIELAB ΔE* max on white ceramic tile Inter-Instrument Agreement 0.2 CIELAB ΔE* avg. of 12 BCRA tiles Single Aperture Models LAV (22 mm), SAV (9 mm), USAV (6.5 mm)Data Interface Secure USB or RS232 (optional)Operating Environment5° to 40°C up to 85% RH, non-condensingTECHNICAL SPECIFICATIONSDESCRIPTION1030-1633 Datacolor 200R USAV 1030-1634 Datacolor 200R SAV 1030-1635Datacolor 200R LAVPART NUMBERPRODUCT VERSION©Copyright 2017 Datacolor. All rights reserved. Datacolor is a registered trademark of Datacolor.RELIABLE COLOR MEASUREMENT。
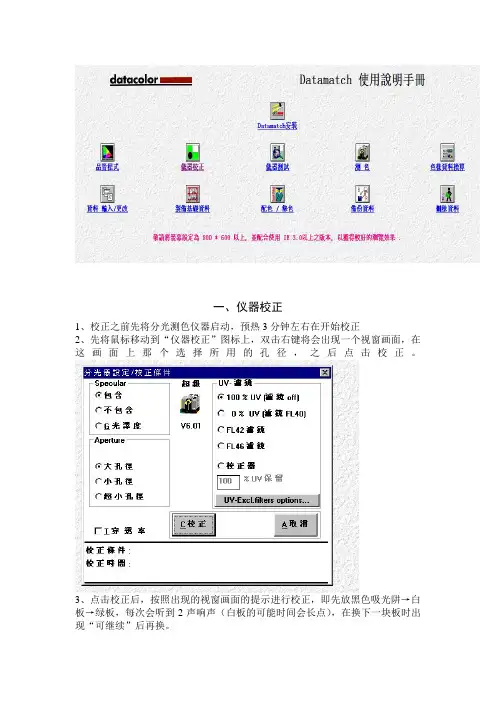
一、仪器校正1、校正之前先将分光测色仪器启动,预热3分钟左右在开始校正2、先将鼠标移动到“仪器校正”图标上,双击右键将会出现一个视窗画面,在这画面上那个选择所用的孔径,之后点击校正。
3、点击校正后,按照出现的视窗画面的提示进行校正,即先放黑色吸光阱→白板→绿板,每次会听到2声响声(白板的可能时间会长点),在换下一块板时出现“可继续”后再换。
4、三块板相继放完后,校正完毕,这时会出现一个视窗画面,显示绿色的“合格”,出现“不合格”时需要再开始校正。
注意:使用8小时后需要重新校正一次二、测色1、在“测色”图标上双击左键,会出现一个视窗画面,在左下角有个代码,在这个里面输入需要测试的编码(这个随便,只要自己明白就好了),在代码下面有个“永久资料”,也就是说你做的这些东西需要保存多长时间,一半是3个月或者半年(建议不要点击这个,做完拷走就好了)。
2、确定代码设置好了以后,点击“M测色”即可。
3、测色时会听到响声(好像是2声),响声结束后即测色结束,完毕之后会出现另外一个视图,在最左下角有个“S存档”按钮,点击即可存档,在“S存档”右边还有“R重来一次”和“C取消”两个按钮,视情况而定是否要选择重来和取消。
三、品管程式色彩品管程式视图窗,上面列表有以下功:(从上到下的顺序)列示反射率反射率[K/S]曲线图色坐标XY色度图CIELab 坐标图CIELab 色差坐标图CIELab 色差值ANLab 色差值ANLab/Hunter 色坐标Hunter 色差值Pass-Fail 允拒收判定Pass-Fail 口述及坐标图光源色变通用性报表1/1标准深度变褪色牢度级数污染牢度级数色差报表/扣除基材色彩力度其他白度CIE 白度Ganze/Griesser 白度值明度/力度分色555 分色咱们常用的是红色字体部分。
1、出现这个界面后,选择所需要测定的选项,点击一下,会自动出现一个“输入”界面,在这个界面上,有“S标准样”和“B批次样”在每个标题下都有一个“X”样的按钮,点击这个按钮后会出现一个小的画面,上面有浏览、范围、输入、测色、找色等字样,选择其中的一项,比如找标准样,点击“S标准样”的“X”按钮,选择“浏览”会出现一个“选择代码”的下拉表,在选择代码最上面有空着的长方形,在这个里面可以输入刚才测色时标准样的代码,在“选择代码”的下拉表就可以找到对应的标准样品的代码,鼠标双击改代码,标准样的代码就会出现在右边的大方框内。
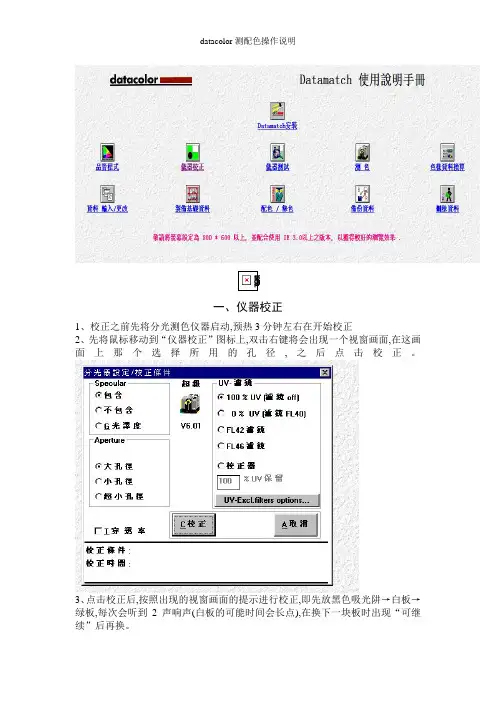
一、仪器校正1、校正之前先将分光测色仪器启动,预热3分钟左右在开始校正2、先将鼠标移动到“仪器校正”图标上,双击右键将会出现一个视窗画面,在这画面上那个选择所用的孔径,之后点击校正。
3、点击校正后,按照出现的视窗画面的提示进行校正,即先放黑色吸光阱→白板→绿板,每次会听到2声响声(白板的可能时间会长点),在换下一块板时出现“可继续”后再换。
4、三块板相继放完后,校正完毕,这时会出现一个视窗画面,显示绿色的“合格”,出现“不合格”时需要再开始校正。
注意:使用8小时后需要重新校正一次二、测色1、在“测色”图标上双击左键,会出现一个视窗画面,在左下角有个代码,在这个里面输入需要测试的编码(这个随便,只要自己明白就好了),在代码下面有个“永久资料”,也就就是说您做的这些东西需要保存多长时间,一半就是3个月或者半年(建议不要点击这个,做完拷走就好了)。
2、确定代码设置好了以后,点击“M测色”即可。
3、测色时会听到响声(好像就是2声),响声结束后即测色结束,完毕之后会出现另外一个视图,在最左下角有个“S存档”按钮,点击即可存档,在“S存档”右边还有“R重来一次”与“C取消”两个按钮,视情况而定就是否要选择重来与取消。
三、品管程式色彩品管程式视图窗,上面列表有以下功:(从上到下的顺序) 列示反射率反射率[K/S]曲线图色坐标XY色度图CIELab 坐标图CIELab 色差坐标图CIELab 色差值ANLab 色差值ANLab/Hunter 色坐标Hunter 色差值Pass-Fail 允拒收判定Pass-Fail 口述及坐标图光源色变通用性报表1/1标准深度变褪色牢度级数污染牢度级数色差报表/扣除基材色彩力度其她白度CIE 白度Ganze/Griesser 白度值明度/力度分色555 分色咱们常用的就是红色字体部分。
1、出现这个界面后,选择所需要测定的选项,点击一下,会自动出现一个“输入”界面,在这个界面上,有“S标准样”与“B批次样”在每个标题下都有一个“X”样的按钮,点击这个按钮后会出现一个小的画面,上面有浏览、范围、输入、测色、找色等字样,选择其中的一项,比如找标准样,点击“S标准样”的“X”按钮,选择“浏览”会出现一个“选择代码”的下拉表,在选择代码最上面有空着的长方形,在这个里面可以输入刚才测色时标准样的代码,在“选择代码”的下拉表就可以找到对应的标准样品的代码,鼠标双击改代码,标准样的代码就会出现在右边的大方框内。
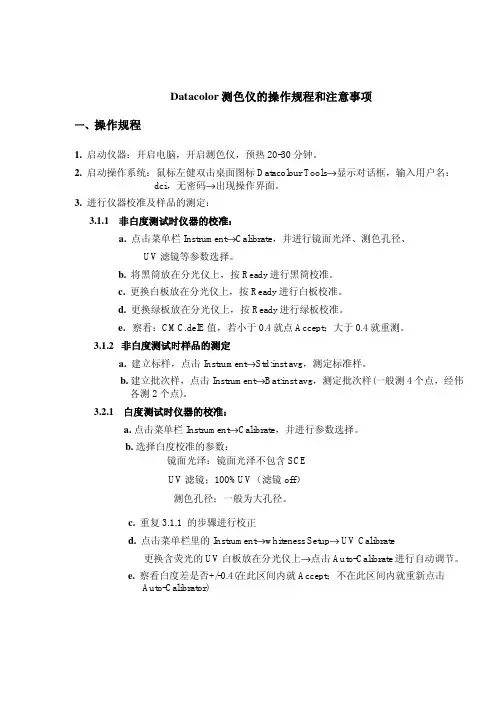
Datacolor测色仪的操作规程和注意事项一、操作规程1. 启动仪器:开启电脑,开启测色仪,预热20-30分钟。
2. 启动操作系统:鼠标左健双击桌面图标Datacolour Tools→显示对话框,输入用户名:dci,无密码→出现操作界面。
3.进行仪器校准及样品的测定:3.1.1 非白度测试时仪器的校准:a. 点击菜单栏Instrument→Calibrate,并进行镜面光泽、测色孔径、UV滤镜等参数选择。
b. 将黑筒放在分光仪上,按Ready进行黑筒校准。
c. 更换白板放在分光仪上,按Ready进行白板校准。
d. 更换绿板放在分光仪上,按Ready进行绿板校准。
e.察看:CMC.delE值,若小于0.4就点Accept;大于0.4就重测。
3.1.2 非白度测试时样品的测定a. 建立标样,点击Instrument→Std:inst avg,测定标准样。
b. 建立批次样,点击Instrument→Bat:inst avg,测定批次样(一般测4个点,经伟各测2 个点)。
3.2.1 白度测试时仪器的校准:a. 点击菜单栏Instrument→Calibrate,并进行参数选择。
b. 选择白度校准的参数:镜面光泽:镜面光泽不包含SCEUV滤镜;100%UV(滤镜off)测色孔径;一般为大孔径。
c. 重复3.1.1 的步骤进行校正d. 点击菜单栏里的Instrument→whiteness Setup→ UV Calibrate更换含荧光的UV白板放在分光仪上→点击Auto-Calibrate进行自动调节。
e.察看白度差是否+/-0.4(在此区间内就Accept;不在此区间内就重新点击Auto-Calibrator)3.2.2 白度测试时样品的测定:a. 点击菜单栏里的Instrument→Calibrate,此时可以发现原本设定为100%UV,经UV校正后电脑自动设定为UV校正。
b.根据客户的要求、样品的特性、样品的大小选择参数镜面光泽和测色孔径后。

DatacolorMatchTextile测色配色软件Datacolor Match Textile测色配色软件(中文版)Datacolor公司Match Textile测色配色软件,是Datacolor公司新版本,所以能地同时执行多个窗口的工作,可运行于Windows中文平台上。
基本功能图形窗口式的用户接口,以工具提示及小格对话框来作简单与快速的操作。
以'拖曳及拉下’动作来进行拷贝、移动及删除等功能。
以用户自订浏览功能去显示多或少的资料。
先进的数据筛选功能以处理各种数据自订数据夹结构,以便容易存取数据使用Datacolor公司的Colorite颜色显示枝术,使屏幕显示出更为准确的标准样辨配方颜色各相关数据的连结,比以往所使用的更为容易。
配方可以公制或非公制、百份比及用量作显示。
用户可自订使用者及密码。
可与DataMatch软件作数据转换。
包括在基本模块中的特殊功能:直接以电子邮件传送数据到任何电邮地址,快速及免除人手错误,增加与客户或生意伙伴间的关系。
由配方计算所得的配方颜色理论反射率值,可作为与客户作颜色沟通之用,同时亦支持Datacolor Colorite彩屏颜色彷真系统,以显示高效的颜色。
配方计算计算及修正所有浸染、连染及冷轧堆染色的配方。
计算及修正所有染色材料及混纺材料。
在色库中寻找接近颜色之配方。
先进的化验室配方历史档案可跟进差异。
配方可按标准样的反射率、L a b、L C H及x y Z值计算。
配方方案的选择可以以不同的条件比重、条件组合来考虑,包括色相差异值dH。
配方列表式的显示,用于化验室的打色样。
每一个化验室色样的试色,可储存5个试样配方。
支持不同生产阶段的标准样颜色,例如:后整理前与后的配方修正对混纺织物的整体配方作出修正,或只修正其中一种成份的配方。
对储存配方作出修正对修改修色决定作出快捷的色差数据显示。
容许以百份比方式或以量值作加料单位。
从色库找色修色。
容许人手加料及改变染料组合作修色。
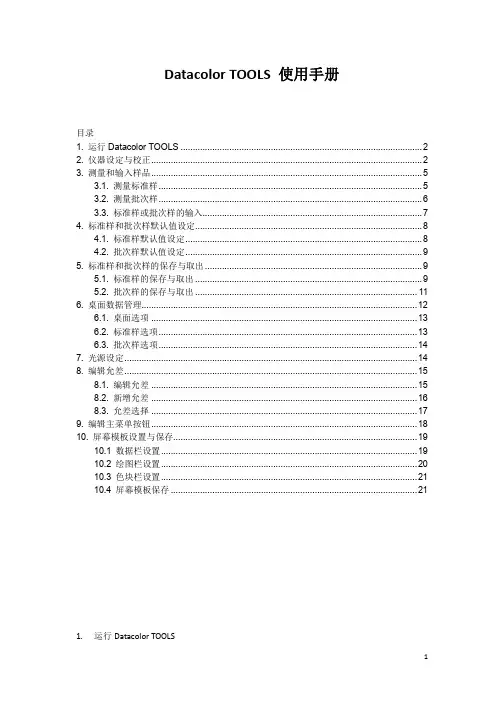
Datacolor TOOLS 使用手册目录1. 运行Datacolor TOOLS (2)2. 仪器设定与校正 (2)3. 测量和输入样品 (5)3.1. 测量标准样 (5)3.2. 测量批次样 (6)3.3. 标准样或批次样的输入 (7)4. 标准样和批次样默认值设定 (8)4.1. 标准样默认值设定 (8)4.2. 批次样默认值设定 (9)5. 标准样和批次样的保存与取出 (9)5.1. 标准样的保存与取出 (9)5.2. 批次样的保存与取出 (11)6. 桌面数据管理 (12)6.1. 桌面选项 (13)6.2. 标准样选项 (13)6.3. 批次样选项 (14)7. 光源设定 (14)8. 编辑允差 (15)8.1. 编辑允差 (15)8.2. 新增允差 (16)8.3. 允差选择 (17)9. 编辑主菜单按钮 (18)10. 屏幕模板设置与保存 (19)10.1 数据栏设置 (19)10.2 绘图栏设置 (20)10.3 色块栏设置 (21)10.4 屏幕模板保存 (21)1.运行Datacolor TOOLS1.1.双击桌面Datacolor TOOLS/Datacolor TOOLS Plus图标1.2.出现如下登录界面1.3.键入用户名纺织版本用户:dci颜料版本用户:user原始密码为空白1.4.点击‘确定’,运行TOOLS程序2.仪器设定与校正2.1.在工具栏中点选仪器-> 校正2.2.弹出测色主视窗窗口,点选‘校正’,在校正条件窗口选择所需要的仪器设定镜面光泽:测色时镜面光泽的设定测色孔径:选择测色孔径自动调整:勾选自动调整选项,仪器可自动判别当前孔径UV滤镜:测色时UV含量的选定100%UV:包含UV,即不使用UV滤镜0%UV:不包含UV,即使用UV滤镜滤去400nm以下的发射光谱FL42滤镜:滤去420nm以下的发射光谱FL46滤镜:滤去460nm以下的发射光谱UV Ganz-Griesser Calibration:通过Ganz-Griesser校正后用其指定位置的UV滤镜,用于测量Ganz-Griesser白度UV CIE Whiteness D65/10:通过ISO11475校正后用其指定位置的UV滤镜,用于测量CIE白度UV CIE Whiteness C/2:通过ISO2470校正后用其指定位置的UV滤镜,用于测量CIE白度校正器:使用自定义的UV滤镜位置测量标准白板:输入仪器的标准白板值校正间隔时间:同一设定条件下的校正间隔时间2.3.设定完成后,点击‘校正’,即开始仪器校正程序2.4.弹出放置黑筒的提示,正确放置黑筒(字体向上)并点击‘继续’2.5.黑筒校正完后,弹出放置白色校正板的提示,将黑筒取下,放置白色校正板,点击‘继续’2.6.白板校正完后,弹出放置绿色诊断板的提示,将白板取下更换绿色诊断板,点击‘继续’2.7.绿板校正完后,出现下列窗口,点击‘确定’,完成校正程序3.测量和输入样品3.1.测量标准样3.1.1.在主菜单下点击‘标准样’图标3.1.2.进入测色主视窗,根据需要选择单次测色或多次测色以多次测色为例,点击‘测色’,即开始测量动作,如需要再次测量色样,按需要移动色样位置后,再点击‘测色’,如不需要再测量,则点击‘接受目前资料’结束测量。
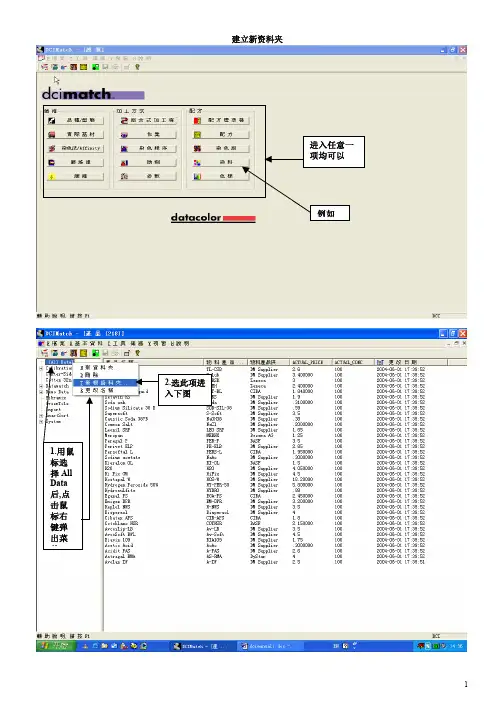
建立新资料夹色样测色(包括客户来样,基材(布类)单色色谱)进入后如下图所示 只需重复1,2,3步骤,此界面可以将您手头的所有色样测色存入电脑将客户提供的颜色反射率数据输入,进入制备染色组数据库进入第一步。
纤维名称复制下来后,以后就不用再输入名称,粘贴即可1.变绿2.贴上名称。
(前面复制下来的内容)3.鼠标点一下。
5.按插入6.下一步工作。
1.变绿2.粘贴。
3.点一下6.点击存档7.进入1.2.!3.4.浸染选此处,轧染选下面的。
8. 9.接上面工作继续10.11.12.选择制作单色色谱的基材15.16.关闭此窗口。
17.关闭回到总菜单处进入第二步,染色程序(第一步完成后请回到启动画面,即图标画面)4.第三步,染色组,新建立一个染色组。
(如果需要的染色组已存在,而是需要在此染色组中加入染料,则双击此染色组将进入,第六点为此工作起点)5.储存。
第十九步后有类似下面的界面!请将每种单一纤维的染色组建立好,然后才能建立混纺的品种/型态资料,这样才可用电脑配色系统计算混纺的材料建立Cotton65% 60C/Polyester35% 130C 的品种/型态资料。
先将Cotton 32s/1 60C 染色组建好,再将Polyester 130C的染色组建好,方法相同进入1.在空白处双击进入2.点绿3.输入名称4.5.从左边选到右边6.插入储存7.进入染色法1.点成绿2.输入混纺名称 比例3.点击4.浏览取出相应资料5.输入混纺比例7.点击6.1.2.3.8.10.11.12.找出混纺的底色色样13.15.至此,建立一个混纺的 品种/型态 资料已经完成。
配方计算上面工作结果将如下图所示全选或不选选好染料组合后,可将此组合储存,以后仅需将此名称取回,染料将自动选好(点成绿色,输入染料组合名称,存档)某个染料单色色谱最高浓度要高于配方中此支染料的浓度量,否则可能配方计算不成功!染料用量设限(可该动)选取光源.要改变光源时,请将原来已选的光源删除,再从左边光源表中选取可改变一般用此条件不能计算出配方则用此条件最后配方计算配方储存,为往后色样染出后修色提供资料结束退出修色1.选择待修色的配方资料2.进行化验室/现场修色混纺配色1.此处选混纺的资料请关注此处,每种成分有对应的染色组其它的与单一材料配色相同第一个图标代表配方计算第二个图标代表化验室配方修色,化验室配方已经存档在配方列表中第三个图标代表现场大货配方修色,配方已经存档在配方列表中第四个图标代表快速修色(利用已有确定配方的色样资料来调整出标准样配方),另有快速储存已有确定配方的色样成为一个找色修色的资料点第五个图标代表找色修色,寻找储存的配方资料来进行修色以给出标准样的配方快速修色整合了第一个和第二个图标(或第三个图标)的功能,以下为快速修色的操作解说:一.用已知配方修色1.选好染料(批次样配方的),点上方’Lab 图形’,再点回’染色组’,染料将排在一起,输入批次样配方3.选择光源等资料二.已知配方存入配方库中(此功能需在进行至第五步后,接着进入第六步退出;如果还有色样配方需要储存,请再次进入快速修色界面,从第一步开始)3.选择染料及输入配方.此标准样作为批次样再次测量,电脑将显示很小的色差5.按存档将提供配方名称及编码等,直接击Yes 存档.找色修色可能是如果没有符合条件的配方资料将提示此如果有符合条件的配方资料,则显示以下:套色(改色,在有底色的基材上加染料染成较深的颜色)先进入“配方”程式,按配方计算进入下图2.输入标准样名称测色或取回新增布底(染色基材)6.按插入以便保存。
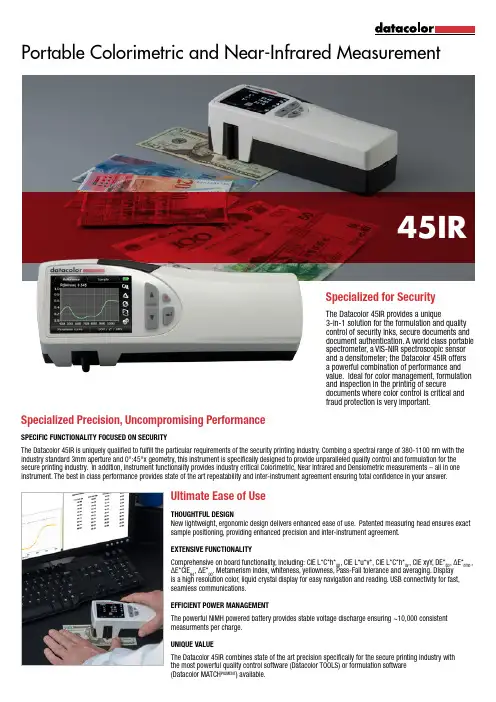
Portable Colorimetric and Near-Infrared MeasurementSpecialized for SecurityThe Datacolor 45IR provides a unique3-in-1 solution for the formulation and quality control of security inks, secure documents and document authentication. A world class portable spectrometer, a VIS-NIR spectroscopic sensor and a densitometer; the Datacolor 45IR offers a powerful combination of performance and value. Ideal for color management, formulation and inspection in the printing of securedocuments where color control is critical and fraud protection is very important.Specialized Precision, Uncompromising PerformanceSPECIFIC FUNCTIONALITY FOCUSED ON SECURITYThe Datacolor 45IR is uniquely qualified to fulfill the particular requirements of the security printing industry. Combing a spectral range of 380-1100 nm with the industry standard 3mm aperture and 0°:45°x geometry, this instrument is specifically designed to provide unparalleled quality control and formulation for the secure printing industry. In addition, instrument functionality provides industry critical Colorimetric, Near Infrared and Densiometric measurements – all in one instrument. The best in class performance provides state of the art repeatability and inter-instrument agreement ensuring total confidence in your answer.Ultimate Ease of UseTHOUGHTFUL DESIGNNew lightweight, ergonomic design delivers enhanced ease of use. Patented measuring head ensures exact sample positioning, providing enhanced precision and inter-instrument agreement.EXTENSIVE FUNCTIONALITYComprehensive on board functionality, including: CIE L*C*h*ab , CIE L*u*v*, CIE L*C*h*uv , CIE xyY, DE*ab , ΔE*cmc , ΔE*CIE 94, ΔE*00. Metamerism index, whiteness, yellowness, Pass-Fail tolerance and averaging. Display is a high resolution color, liquid crystal display for easy navigation and reading. USB connectivity for fast, seamless communications.EFFICIENT POWER MANAGEMENTThe powerful NiMH powered battery provides stable voltage discharge ensuring ~10,000 consistent measurments per charge.UNIQUE VALUEThe Datacolor 45IR combines state of the art precision specifically for the secure printing industry with the most powerful quality control software (Datacolor TOOLS) or formulation software (Datacolor MATCH PIGMENT) available.QUALITY CONTROL AND FORMULATION FOR SECURE DOCUMENTS45IRFor more information, please visit /45IRCommitted to Excellence. Dedicated to Quality. Certified to ISO 9001:2000 in Manufacturing Centers Worldwide. ©2014 Datacolor Inc. Datacolor and other Datacolor product trademarks are the property of Datacolor Inc.STANDALONE SYSTEM REQUIREMENTSSystem Requirements: Intel I3 processor or higher; 4 GB RAM; 500 GB HDD; 17“ Monitor at 1280x720 resolution; 128 MB true graphics card; CD drive; USB/Serial Port Windows 7, Windows 8 and Windows Server 2008Color Systems CIELAB, CIEXYZ, CIELCh ab , CIELUV, CIELCh uv , CIEYxy Color Difference CIELAB ΔE*ab , ΔE*cmc , ΔE* CIE 94, ΔE*00Data Plots Remission Curve, CIE Color Circle Metamerism Indices M A , M C , MD 50, M F2, M F7, M F11Indices CIE Whiteness / ASTM D-1925 Yellowness Densities Densities CMYK, Density Graph Calibration AbsoluteIlluminant A, C, D50, D65, F02, F07, F11Data Storage 100 standards and 1000 batches Observer 2° & 10°PASS/FAIL Tolerance 0.1 to 20.0 units Density Filter DIN, DIN NB, ISO I, ISO T, ISO E.Delta ModeOn-OffFUNCTIONAL DATADESCRIPTIONDimensions 2.6 x 2.2 x 7.5 inches (65 x 55 x 190 mm)Weight 1.0 lbs (480 g)DisplayColor LC backlight display, 320 x 240 pixelsComes Complete With Datacolor 45IR Spectrophotometer – NIR – Densitometer Calibration CertificateDatacolor TOOLS Plus or MATCH Pigment Plus software USB Mini to USB CableCharging console with white standard Datacolor Users GuideUSB Drive with software servicePHYSICAL SPECIFICATIONSDESCRIPTIONMeasuring Geometry 0°:45°x to DIN 5033Light Source Tungsten Spectral Range 380 to 1100 nm Effective Bandwidth 10nm Wavelength Resolution 3.3nmSpectrometer Principle Monolitical compact spectrometer with imaging grating Detector 256 pixel diode arrayRepeatability Density 0.01 DColorimetric 0.03 CIELAB ΔE*ab Near IR0.3 %R (700 to 1000 nm)Inter-Instrument Agreement Density 0.01 D Colorimetric 0.3 CIELAB ΔE*ab Near IR +/- 0.5 %R (700 to 1000nm)Aperture 3mm measuringBatteryRechargeable NiMH > 10,000 measurements/charge Instrument Interface USB 2.0Storage0 to 40°CTECHNICAL SPECIFICATIONSDESCRIPTION。
User GuideRev A, August 2020All efforts have been made to ensure the accuracy of the information presented in this format. However, should any errors be detected, Datacolor appreciates your efforts to notify us of these oversights.Changes are periodically made to this information and are incorporated into forthcoming versions. Datacolor reserves the right to make improvements and/or changes in the product(s) and/or program(s) described in this material at any time.Copyright © Datacolor. All rights reserved. This material may not be reproduced or duplicated, in whole or in part, with the express written permission of Datacolor.To obtain information on local agents visit our website at Contact UsPlease contact our service department by email for questions or issues./colorreadersupportIn urgent cases you can contact us by phone.Europe: 00800 700 800 70 USA: 800-438-2585ContentsIntroduction 4 Requirements 4 Included 4 Getting Started 5 Install the Mobile Application 5 Calibration 6 Take Readings 7 Mobile Application 8 Device Menu 8 History Menu11 Read Menu13 Colors Menu18 Palettes Menu19 Device21 Controls & Indicators21 General Information22 Appendix24IntroductionDatacolor ColorReader EZ Model DC10-3 is an accurate color reader designed to measure an inspiration color and report the nearest reference color from a proprietary color system.You can use Datacolor ColorReader EZ to quickly and accurately measure samples, and find the closest color match in a fan deck collection stored on the mobile application.Bluetooth connectivity works with the Datacolor ColorReader mobile application when installed on portable devices including cell phones and tablets. Using this mobile application you can easily store, recall, and examine project color information in real time. RequirementsThe requirements to run the Datacolor ColorReader mobile application include:Mobile Device Operating SystemiPhone® iOS® v. 9.3 or higheriPad® iOS® v. 9.3 or higheriPod Touch® iOS® v. 9.3 or higherAndroid® v. 6.0 or higherBluetooth® v. 4.0 or higher IncludedThe packaging includes:•the Datacolor ColorReader EZ measuring device•two installed CR2032 lithium batteries•welcome card with product information and link to /getcrezGetting StartedInstall the Mobile Application1. Go to your mobile device’s settings menu and turn on Bluetooth.2. Ensure your Datacolor ColorReader EZ contains two working CR2032 lithiumbatteries.3. Install and open the Datacolor ColorReader mobile application from the AppleApp Store or Google Play Store.4. Follow the on-screen instructions to turn on and connect your ColorReader EZunit, select your region, then complete the registration screen.CalibrationCalibrate the unit every 8 hours to account for any changes over time. This ensures that the readings remain consistent. The Datacolor ColorReader mobile application will remind you when calibration is required.1. Tap the yellow notification, or tap ‘Device’ and navigate to the ‘Calibration’ tab.2. Follow the on-screen instructions to position the calibration tile.3. Tap ‘Calibrate’ on the screen. The application will confirm calibration success.Take ReadingsWhen you find a color you want to capture, use the ColorReader EZ to take a reading and find the color data or closest matches from popular color collections on the mobile application.1. Ensure the calibration tile is flipped back to expose the aperture.2. Place the aperture over the area you want to read. The area should be flat andthe solid color completely fills the aperture area.3. Tap ‘Read’ on the screen or press the ColorReader EZ button. The mobileapplication will show the results.On the left you will see the reading color.On the right you will see the three closest matches to the reading within the color collections available on your mobile application.Mobile ApplicationFrom any menu, tap ‘Done’ to return to the main screen.Device MenuThis menu allows you to manage your device.RegistrationUse this tab if you are given an exclusive access code to change your available color collections to find matches for your readings1. Enter the access code you were provided.2. Tap ‘Register’. The mobile application will ask you to confirm then automaticallyupdate your color collection list.If you already entered an access code, this tab will have your access code information.Device InfoUse this tab to disconnect your ColorReader EZ and confirm technical information about your unit.CalibrationUse this tab to see the current calibration status or run a new calibration.Calibrate the unit every 8 hours to account for any changes over time. This ensures that the readings remain consistent. The Datacolor ColorReader mobile application will remind you when calibration is required.1. Follow the on-screen instructions to position the calibration tile.2. Tap ‘Calibrate’ on the screen. The application will confirm calibration success.SupportUse this tab to be sent directly to the online support site where you can submit a ticket or call our representatives for any issues you may be experiencing.History MenuAll your measured readings are saved to be viewed at any time.Reading InfoTap one of your previous readings in ‘History’ to see the color data in CIE L*a*b, RGB, and HEX values. (Note: The L*a*b* values are valid for D65/10* Illuminant/Observer)Get MatchAfter selecting a previous reading from ‘History’, tap ‘Get Match’ to find the 3 closest matches within your color collections.Save ReadingAfter selecting a previous reading from ‘History’, tap ‘Save Reading’ to save to a palette.Read MenuWhen you find a color you want to capture, use the ColorReader EZ to take a reading and find the color data or closest matches from popular color collections on the mobile application.1. Ensure the calibration tile is flipped back to expose the aperture.2. Place the aperture over the area you want to read. The area should be flat andthe solid color completely fills the aperture area.3. Tap ‘Read’ on the screen or press the ColorReader EZ button. The mobileapplication will show the results.Reading InfoAfter taking a new reading, tap ‘Info’ to see the color data in CIE L*a*b, RGB, and HEX values. (Note: The L*a*b* values are valid for D65/10* Illuminant/Observer)Save ReadingAfter taking a new reading, tap ‘Save Reading’ to save to a palette.Change Match FromAfter taking a new reading or tapping ‘Get Match’ on a previous reading, you can change the color collections used to find the three closest matches.1. Tap ‘Change’ to view the full list of color collections available on your mobileapplication.2. Tap on each color collection to activate or deactivate from the search. The colorcollection name will be red if it is activated or gray if deactivated.3. Tap ‘Match’ and the three closest matches will change to options from youractivated color collections.Closest MatchesAfter taking a new reading or tapping ‘Get Match’, you will see the three closest matches to the reading within the color collections available on your mobile application. Tap on a swatch to see more information.View Fan DeckAfter selecting a swatch, tap ‘View Fan Deck’ and the selected swatch will be highlighted in a visual atlas of the colors in the full collection.Coordinate ColorsAfter selecting a swatch, tap ‘Coordinate Colors’ to view four colors that combined with your selected swatch create Complimentary, Triad, Analogous, and Monochromatic color schemes.For more information on color schemes, tap ‘About Color Schemes’.You can tap any of the recommended colors to find their three closest color matches or reading info.You also have the option to tap ‘Save as Palette’ to automatically create a new palette. The original swatch will be saved in the ‘Swatches’ tab, and the four additional recommended colors will be saved in the ‘Readings’ tab.Save SwatchAfter selecting a swatch, tap ‘Save Swatch’ to save to a new or existing palette.Color DataAfter selecting a swatch, tap ‘Color Data’ to see the color data in CIE L*a*b, RGB, and HEX values. You may also see notes the manufactures has added. (Note: The L*a*b* values are valid for D65/10* Illuminant/Observer)Color CollectionsAll your color collections available on your mobile application are listed here.View Fan DeckAfter selecting a color collection, you will see a visual atlas of the colors in the full collection. You can then tap any color to view the swatch.SearchAfter selecting a color collection, you can type in a specific color name or color number in the search bar to quickly find a specific color. You can then tap any color to view the swatch.When you save a reading or swatch they are stored in a palette. (Note: You can only create a new palette when saving a reading or swatch)To view the colors saved in a palette, tap the palette you want to review.You can label a palette by tapping the palette label and typing a new label.To delete a palette and the colors saved within, tap ‘Delete’ and confirm. SwatchesThis tab shows your saved swatches in the selected palette. Tap the color to view the swatch.You can tap the pencil icon next to the color to assign a label.To delete a color, tap the pencil icon next to the color you want to delete a tap ‘Delete’ and confirm.ReadingsThis tab shows your saved readings in the selected palette. Tap the color to view the reading info.You can tap the pencil icon next to the color to assign a label.To delete a color, tap the pencil icon next to the color you want to delete a tap ‘Delete’ and confirm.NotesYou can add additional notes to your palette by tapping ‘Notes’.Share PaletteAfter you have completed creating a palette, tap ‘Share Palette’ to create a unique link that will display the selected palette’s swatches and readings with your labels and notes. Then choose the application that you want to share/send the link with.DeviceControls & IndicatorsOn Button/Read Button Aperture & Calibration Flip TileOn ButtonPress the button on the device to activate.Battery InformationDatacolor ColorReader EZ is equipped with two replaceable CR2032 lithium batteries. With fresh batteries, the device is good for 300 measurements.To replace:•Pull out the battery tray inserted in the back end of the device.•Remove the old batteries and replace with two new CR2032 lithium batteries.•Push the battery tray back into the device until it is locked in place.LED IndicatorAn LED indicator identifies the current state of the unit:LED Color Instrument StateOff Device is not poweredGreen Device is onSleep ModeDatacolor ColorReader EZ will power off to sleep mode when it is inactive for more than 5 minutes.When the device is in sleep mode and you try to access to it through the mobile application, it will ask you to wake the unit. Press the button on the unit.General InformationPower SourceDatacolor ColorReader EZ Model DC10-3 has two replaceable CR2032 lithium batteries. The batteries are inserted in the back end of the device.OperationThis product is to be used only as specified by the manufacturer, and according to the instructions for operation and maintenance provided herein.Wireless Communication CapabilityDatacolor ColorReader EZ is Bluetooth®-capable (4.0 or higher)Optical Configuration45*/0* typeColorimetric Data1976 CIE L*a*b* coordinates; Illuminant D65; 10* Standard ObserverDevice MarkingsSeveral markings on the bottom of the unit include the following information: •Instrument Model•Ratings•Compliance and certification informationSerial NumberThe serial number is programmed into the Datacolor ColorReader EZ and is displayed on the back of the packaging and in the mobile application under the device tab. Instrument MaintenanceThere are no user-serviceable parts for this equipment.Safety WarningsCautionIf any of the following conditions exist, turn off the device:•The device is exposed to water or other excess moisture.•The device is dropped or damaged.•The device needs service.The protection of the device may be impaired if used in a manner not specified by the manufacturer.To insure operational safety:•Keep the device away from sources of liquids such as sinks, tubs, showers, etc.•Protect the device from excess moisture.•Follow all instructions and warnings provided with the unit.•Read all instructions carefully before turning on the device. ManufacturedAt Datacolor location DS001Datacolor Suzhou288 Shengpu RoadSuzhou, JiangsaP.R. China 215201AppendixInstrument SpecificationsMeasuring Geometry ProprietaryWarm-Up Time NoneMeasurement Time <3 secondsInterface Bluetooth LEAperture Size 4mmNumber of Sensors 1Battery Two replaceable CR2032 lithiumbatteries.300 measurements per batteryreplacement.Power Requirements 6V DC, 235mADimensions Width: 44.3mmLength: 83.4mmHeight:14.5mmWeight (batteries included): 45.6g Environmental Requirements Operating Temperature: +5* +40* CRelative Humidity (Non-condensing): 85%Maximum Altitude: 2,000mAgency Compliance SGS, cSGS, C-Tick, CECompliance StatementsFCC Compliance StatementWARNINGChanges or modifications to this unit not expressly approved by the party responsible for compliance could void the user’s authority to operate the equipment.This equipment has been tested and found to comply with the limits for a Class B digital device, pursuant to Part 15 of the FCC Rules. These limits are designed to provide reasonable protection against harmful interference when the equipment is operated in a residential environment. This equipment generates, uses and can radiate radio frequency energy and, if not installed and used in accordance with these instructions, may cause harmful interference to radio communications. However, there is no guarantee that interference will not occur in a particular installation. If this equipment does cause harmful interference to radio or television reception, which can be determined by turning equipment off and on, the user is encouraged to try and correct the interferences by one or more of the following measures:•Re-orient or relocate the receiving antenna.•Increase the separation between the equipment and the receiver.•Connect the equipment into an outlet on a circuit different from that to which the receiver is connected.•Consult the dealer or an experienced radio/TV technician for help. Pursuant to Part 15.21 of the FCC rules, any changes or modifications to this equipment not expressly approved by Datacolor may cause harmful interference and void the FCC authorization to operate this equipment.See also the following Federal Communications Commission publication, available from the U.S. Government Printing Office, Washington, D.C., 20402:How to Identify and Resolve Radio/TV Interference ProblemsStock No: 004-000-00345-4.Japan Radio Law Compliance StatementCertification has been granted to this product for compliance with the technical standards specified in Article 38 Clause 24 Paragraph 1 of the Japan Radio Law.Anatel Homologation Compliance Statement00248-18-10688DC10-2 (ColorReader) Contains ANATEL approved module # 00248-18-10688 Specifications are subject to change without notice.。
户外⾯料Datacolor电脑测⾊标准的使⽤和缺陷!2010年,全球最⼤的户外品牌Columbia公司对其合作的北中国(指福建以北)⼗⼀家合作质量稳定的⾯料供应商进⾏专业培训,我们是其中之⼀,我作为公司的专业户外⾯料技术去接受培训和学习;另外Columbia邀请Datacolor公司和德⼠达染料公司进⾏现场咨询和讲解,Datacolor公司为Columbia专业开发了对⾊软件,与其他的电脑测⾊软件有区别;并在现场培训操作并如何使⽤哥伦⽐亚公司的电脑对⾊标准;德⼠达染料公司是Columbia合作的染料商,对⼀些产品颜⾊对⾊度及⾊牢度⽆法克服的缺陷,Columbia公司建议⾯料商选⽤德⼠达染料来做,如果连德⼠达染料都达不到,可让德⼠达公司出报告,哥伦⽐亚公司认可(此章节放在户外⾯料常见的⾊牢度问题及解决⽅案⾥讲);现在介绍下Datacolor电脑测⾊标准的使⽤(涉及到商业机密,有些详细具体数据内容不⽅便透露)。
⼀、Columbia测⾊对⾊软件安装指导、设置;⼆、Datacolor上海公司⼯程师TONY现场电脑上简单指导安装、校正、测⾊等演⽰,并建议使⽤Datacolor 600电⼦眼测试仪器(此仪器测⾊数据⽐较稳定,在长三⾓⼯⼚使⽤⽐较⼴泛);1、 Datacolor要求电脑测⾊室温度控制在20±5℃,湿度65±5%(这是⼯⼚实验室普遍设置的温度和湿度);2、测⾊准备及校准时间次数;3、测⾊⼝径;4、测⾊⽅法;5、测⾊光源;6、电脑读数次数7、⽑类测试⽅法;三、Digital CMC DE值接受范围接受标准及超出电脑值的解决⽅案(此处内容较多,省略);这些电脑对⾊内容及德⼠达染料培训完了后,我在想:以我之前的专业经验来判断,户外⾯料从染⼚出来到后整理涂层复合,涉及流程长,在这些加⼯过程中,上防⽔、压光、打底胶、涂层、贴膜复合、定型等这些流程,变⾊⾮常⼤,如果染⾊布仅仅以电脑值来判断是否合格,就会造成很⼤的颜⾊问题,我⾃⼰制定的标准都以⽬视美标灰卡4级以上为主,电脑值仅仅作为参考⽽已,不做决定作⽤,为此很多染⼚跟我有争执,我就耐⼼跟⼯⼚解释:你们只考虑到了⾃⼰染⼚颜⾊,有没有考虑到后整理加⼯颜⾊的变化,⽽我要综合考虑这些颜⾊的变化;有了此想法,我问哥伦⽐亚公司品质主管Neao,户外⾯料涉及到后整理流程多,作为你们是最终客户只管颜⾊电脑测⾊结果,中间环节不管的,在半成品染⾊这块电脑值设定⽅⾯有没有更好的建议?他答说:这些颜⾊⽅⾯控制可能需要你们⾃⼰定了!培训完后,有其他公司的⼈提问的这电脑测⾊安装⽅法及DE值同⼀像线的问题。
一、仪器校正1、校正之前先将分光测色仪器启动,预热3分钟左右在开始校正2、先将鼠标移动到“仪器校正”图标上,双击右键将会出现一个视窗画面,在这画面上那个选择所用的孔径,之后点击校正。
3、点击校正后,按照出现的视窗画面的提示进行校正,即先放黑色吸光阱→白板→绿板,每次会听到2声响声(白板的可能时间会长点),在换下一块板时出现“可继续”后再换。
4、三块板相继放完后,校正完毕,这时会出现一个视窗画面,显示绿色的“合格”,出现“不合格”时需要再开始校正。
注意:使用8小时后需要重新校正一次二、测色1、在“测色”图标上双击左键,会出现一个视窗画面,在左下角有个代码,在这个里面输入需要测试的编码(这个随便,只要自己明白就好了),在代码下面有个“永久资料”,也就是说你做的这些东西需要保存多长时间,一半是3个月或者半年(建议不要点击这个,做完拷走就好了)。
2、确定代码设置好了以后,点击“M测色”即可。
3、测色时会听到响声(好像是2声),响声结束后即测色结束,完毕之后会出现另外一个视图,在最左下角有个“S存档”按钮,点击即可存档,在“S存档”右边还有“R重来一次”和“C取消”两个按钮,视情况而定是否要选择重来和取消。
三、品管程式色彩品管程式视图窗,上面列表有以下功:(从上到下的顺序)列示反射率反射率[K/S]曲线图色坐标XY色度图CIELab 坐标图CIELab 色差坐标图CIELab 色差值ANLab 色差值ANLab/Hunter 色坐标Hunter 色差值Pass-Fail 允拒收判定Pass-Fail 口述及坐标图光源色变通用性报表1/1标准深度变褪色牢度级数污染牢度级数色差报表/扣除基材色彩力度其他白度CIE 白度Ganze/Griesser 白度值明度/力度分色555 分色咱们常用的是红色字体部分。
1、出现这个界面后,选择所需要测定的选项,点击一下,会自动出现一个“输入”界面,在这个界面上,有“S标准样”和“B批次样”在每个标题下都有一个“X”样的按钮,点击这个按钮后会出现一个小的画面,上面有浏览、范围、输入、测色、找色等字样,选择其中的一项,比如找标准样,点击“S标准样”的“X”按钮,选择“浏览”会出现一个“选择代码”的下拉表,在选择代码最上面有空着的长方形,在这个里面可以输入刚才测色时标准样的代码,在“选择代码”的下拉表就可以找到对应的标准样品的代码,鼠标双击改代码,标准样的代码就会出现在右边的大方框内。
datacolor测色仪打印窗体模板(实用版)目录1.测色仪的概述2.datacolor 测色仪的特点3.datacolor 测色仪的使用方法4.测色仪数据的分析5.结论正文一、测色仪的概述测色仪,又称为分光测色计,是一种用于测量物体表面颜色的仪器。
它可以通过测量物体表面反射的光线,得出物体的颜色数值,从而帮助我们精确地掌握物体的颜色信息。
在众多测色仪品牌中,datacolor 系列测色仪以其优良的性能和便捷的操作备受用户青睐。
二、datacolor 测色仪的特点datacolor 测色仪具有以下特点:1.高精度:datacolor 测色仪采用先进的光电传感器,测量精度高,可以准确地测量物体表面的颜色。
2.便携式设计:datacolor 测色仪体积小巧,便于携带和使用,特别适合在室外或现场进行测量。
3.操作简便:datacolor 测色仪的操作界面简洁明了,用户只需按照提示进行操作,即可轻松完成测量。
4.数据存储和传输:datacolor 测色仪可以存储大量的测量数据,并支持将数据传输到电脑或其他设备,便于用户进行分析和管理。
三、datacolor 测色仪的使用方法1.开机:按 ups 开/关机键,打开 ups 电源,电源开启后电源指示灯为:2 绿色灯点亮,1 绿色灯闪亮。
按电脑主机电源(开机键位于机箱上方),待电脑开机后,再打开仪器电源,约 6-7 秒后听到嘀”的一声,证明分光测色仪已经开启。
2.打印窗体模板:在电脑桌面上双击 datacolor 测色仪软件图标,打开软件。
在软件界面中,选择“打印窗体模板”,根据提示设置好打印参数,点击“确定”按钮进行打印。
3.测量:将待测物体放在测色仪的测量窗口上,确保物体表面平整,无明显凹凸。
点击软件界面上的“测量”按钮,测色仪开始测量,约 1-2 分钟后,测量结果会自动显示在软件界面上。
4.数据分析:在软件界面上,用户可以对测量结果进行查看和分析。
可以根据需要将数据导出到 Excel 或其他表格处理软件中,进行进一步的分析和管理。
Datacolor TOOLS 使用手册目录1. 运行Datacolor TOOLS (2)2. 仪器设定与校正 (2)3. 测量和输入样品 (5)3.1. 测量标准样 (5)3.2. 测量批次样 (6)3.3. 标准样或批次样的输入 (7)4. 标准样和批次样默认值设定 (8)4.1. 标准样默认值设定 (8)4.2. 批次样默认值设定 (9)5. 标准样和批次样的保存与取出 (9)5.1. 标准样的保存与取出 (9)5.2. 批次样的保存与取出 (11)6. 桌面数据管理 (12)6.1. 桌面选项 (13)6.2. 标准样选项 (13)6.3. 批次样选项 (14)7. 光源设定 (14)8. 编辑允差 (15)8.1. 编辑允差 (15)8.2. 新增允差 (16)8.3. 允差选择 (17)9. 编辑主菜单按钮 (18)10. 屏幕模板设置与保存 (19)10.1 数据栏设置 (19)10.2 绘图栏设置 (20)10.3 色块栏设置 (21)10.4 屏幕模板保存 (21)1.运行Datacolor TOOLS1.1.双击桌面Datacolor TOOLS/Datacolor TOOLS Plus图标1.2.出现如下登录界面1.3.键入用户名纺织版本用户:dci颜料版本用户:user原始密码为空白1.4.点击‘确定’,运行TOOLS程序2.仪器设定与校正2.1.在工具栏中点选仪器-> 校正2.2.弹出测色主视窗窗口,点选‘校正’,在校正条件窗口选择所需要的仪器设定镜面光泽:测色时镜面光泽的设定测色孔径:选择测色孔径自动调整:勾选自动调整选项,仪器可自动判别当前孔径UV滤镜:测色时UV含量的选定100%UV:包含UV,即不使用UV滤镜0%UV:不包含UV,即使用UV滤镜滤去400nm以下的发射光谱FL42滤镜:滤去420nm以下的发射光谱FL46滤镜:滤去460nm以下的发射光谱UV Ganz-Griesser Calibration:通过Ganz-Griesser校正后用其指定位置的UV滤镜,用于测量Ganz-Griesser白度UV CIE Whiteness D65/10:通过ISO11475校正后用其指定位置的UV滤镜,用于测量CIE白度UV CIE Whiteness C/2:通过ISO2470校正后用其指定位置的UV滤镜,用于测量CIE白度校正器:使用自定义的UV滤镜位置测量标准白板:输入仪器的标准白板值校正间隔时间:同一设定条件下的校正间隔时间2.3.设定完成后,点击‘校正’,即开始仪器校正程序2.4.弹出放置黑筒的提示,正确放置黑筒(字体向上)并点击‘继续’2.5.黑筒校正完后,弹出放置白色校正板的提示,将黑筒取下,放置白色校正板,点击‘继续’2.6.白板校正完后,弹出放置绿色诊断板的提示,将白板取下更换绿色诊断板,点击‘继续’2.7.绿板校正完后,出现下列窗口,点击‘确定’,完成校正程序3.测量和输入样品3.1.测量标准样3.1.1.在主菜单下点击‘标准样’图标3.1.2.进入测色主视窗,根据需要选择单次测色或多次测色以多次测色为例,点击‘测色’,即开始测量动作,如需要再次测量色样,按需要移动色样位置后,再点击‘测色’,如不需要再测量,则点击‘接受目前资料’结束测量。
1、目的:规范成品检验过程操作,确保QA成品检验顺利进行。
2、范围:适用于本公司QA部门成品检验。
3、相关文件:
《DATACOLOR 使用说明》
4、职责:QA部门负责公司所有的出厂成品质量检验
5、作业程序
5.1准备工作所需要的,笔、剪刀、记号笔等工具。
5.2开启电脑,打开测色程序。
5.3核查物料控制人员送来的工单信息,核实采样要求,包括测试样、留样、客户样。
5.4把物料控制人员送来的小块样布,如果不能机器测色的,用目测。
如果可以机器测色,用DATACOLOR测色,再用目测复核。
5.5校正分光测色仪
4.5.1点击测色仪程序jbtshade,输入密码:password1.
5.5.2启动分光测色仪最好在20到30分钟再做分光仪校正。
在连续4-8个小时后,需要重新校正。
5.5.3校正前,测色孔镜必须一致,校正黑筒时,黑筒上的字要朝上且向前。
5.5.4使用的白板时要小心,不能用手触摸正面,更不能刮伤。
5.5.5点击Calibrate,出现下面界面。
5.5.6开始校正,放上黑筒于分光仪上,按下Ready按钮。
然后依次白板、绿板。
5.5.7校正完成
5.6测量与输入储存标准样
5.6.1点击Std:inst按钮,选择Instrument Average(多点测色)。
5.6.2输入标准样名称后,点Std:inst按钮,出现一个视窗,把标样放入孔镜中,点击Measure按钮。
一般点击四次,并每点击一次移动小孔中的标样,直到按钮转换成Accept,并点击。
5.6.3点击Store:Std,保存标准样测色信息。
5.7测量与输入储存批次样。
5.7.1点击Bat:inst旁的下箭头按钮,选择Instrument Average(多点测色)。
5.7.2在Batch name 框中输入批次样的名称。
5.7.3输入样批次名称后,点Bat:inst按钮,出现一个视窗,把标样放入孔镜中,点击Measure按钮。
一般点击四次,并每点击一次移动小孔中的标样,直到按钮转换成Accept,并点击。
(同标准样)
5.7.4点击Store:,保存标准样测色信息。
5.7.5测出的批次样与标准样进行对比。
5.8把对色结果填写到物料控制人员已经填写MO#号的对色信息单中。
打印测色结果,如果测色不通过的,及时填写品质不良处理单。
5.9及时送样测试,追踪实验室的测试结果,并收集实验检测报告单,交给主管。
5.10对检验员检验完毕的批条进行核对与分LOT色。
6、相关记录
QR-QA-12《成品入库单》
QR-QA-18《不合格品控制单》。