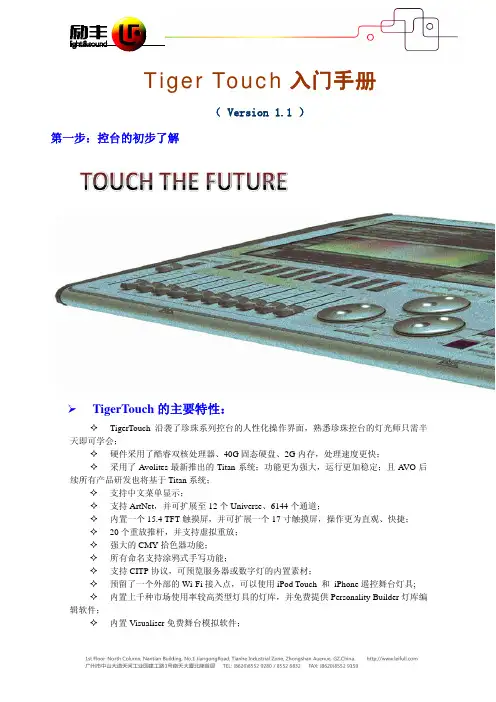
Avolites_TITAN_V7版本说明
- 格式:pdf
- 大小:4.51 MB
- 文档页数:19
ARTIX-7 FPGA核心板用户手册AC7A200REV 1.0版芯驿电子科技(上海)有限公司黑金动力社区目录(一)简介 (3)(二)FPGA (4)(三)有源差分晶振 (6)(四)DDR3 (8)(五)QSPI Flash (12)(六)LED灯 (13)(七)JTAG接口 (15)(八)电源接口 (15)(九)扩展接口 (16)(十)电源 (24)(十一)结构图 (27)(一)简介AC7A200(核心板型号,下同)核心板,是基于XILINX公司的ARTIX-7系列200T 的XC7A200T-2FBG484I这款芯片开发的高性能核心板,具有高速,高带宽,高容量等特点,适合高速数据通信,视频图像处理,高速数据采集等方面使用。
这款核心板使用了2片MICRON公司的MT41J256M16HA-125这款DDR3芯片,每片DDR的容量为4Gbit;2片DDR芯片组合成32bit的数据总线宽度,FPGA和DDR3之间的读写数据带宽高达25Gb;这样的配置,可以满足高带宽的数据处理的需求。
这款核心板扩展出180个3.3V电平标准普通IO口,15个1.5V电平标准的普通IO口,还有4对GTP高速RX/TX差分信号。
对于需要大量IO的用户,此核心板将是不错的选择。
而且,FPGA芯片到接口之间走线做了等长和差分处理,并且核心板尺寸仅为60*60(mm),对于二次开发来说非常适合。
AC7A200核心板正面图AC7A200核心板背面图(二)FPGA前面已经介绍过了,我们所使用的FPGA型号为XC7A200T-2FBG484I,属于Xilinx公司Artix-7系列的产品,速度等级为2,温度等级为工业级。
此型号为FBG484封装,484个引脚。
Xilinx ARTIX-7 FPGA的芯片命名规则如下:图2-2-1为开发板所用的FPGA芯片实物图。
图2-2-1 FPGA芯片实物FPGA供电系统Artix-7 FPGA电源有V CCINT, V CCBRAM, V CCAUX, V CCO, V MGTAVCC和V MGTAVTT。
VS7视频拼接处理器V2.2.0 NS160000528诺瓦多画面拼接处理器嵌入式软件V3.0规格书简介VS7是由诺瓦科技自主研发的一款集视频处理,画面拼接,特效切换和多画面显示的高性能拼接处理器。
VS7具备强大的视频信号接收和处理能力,最大支持4K×2K@30Hz视频输入,并最大可同时支持7路输入和5个独立窗口。
最大支持4路DVI拼接输出,单机最大带载可达8KK。
基于强大的FPGA处理平台,支持输入输出EDID管理和画质调整,多种输入源的无缝切换和淡入淡出等切换特效,可以为您带来更加灵活的画面构造体验。
另外,VS7配套全新的智能管理软件V-Can,用户可以通过V-Can或VS7前面板完成丰富的画面拼接效果。
VS7凭借其优异的画质和超大分辨率带载,以及灵活多样的操控方式,可被广泛应用于会议报告,展览展示中心等场景中。
特性●支持市面常见的视频输入接口−DVI接口,支持1920×1080@60Hz输入−HDMI 1.3接口,支持1920×1080@60Hz输入−3G-SDI接口,支持1920×1080@60Hz输入−DP 1.1接口,支持3840×2160@30Hz输入−HDMI 1.4接口,支持3840×2160@30Hz输入−VGA接口,支持1920×1080@60Hz源输入●单机4个DVI接口拼接输出最大支持4接口拼接输出,支持水平拼接、垂直拼接和田字拼接,且最大带载高达920万像素,单个DVI输出最宽或最高可支持3840像素,四路拼接最宽或最高可支持到15360像素。
●多窗口显示支持添加5个窗口任意布局,且每个窗口支持跨接口输出●HDMI预监输出−支持单一输入源预监或输出画面预监−支持所有输入源和输出画面预监−支持叠加显示输入分辨率和帧频等信息●画面控制功能支持画面一键黑屏,冻结●EDID管理支持DVI、HDMI和DP接口的输入分辨率管理●画面特效切换支持窗口切源特效,并支持特效切换持续时长设置●BKG抓取支持输入源画面抓取,并将抓取的图片用于BKG ●BKG配置支持选择图片或者配置纯色作为BKG,最大支持保存6张BKG图片●支持输入源画质,窗口画质和输出画质调整●多场景管理支持创建32个用户自定义场景,可一键调用●窗口模板管理内置7个窗口模板,直接调用窗口模板进行快速窗口布局●多种操控方式支持使用智能控制软件V-Can或VS7前面板操控设备●直观的前面板彩色LCD显示界面,清晰的按键灯提示,简化了系统的控制操作外观前面板开关键窗口键输入源LCD旋钮返回键FREEZE功能键后面板应用场景VS7支持最大4路输出拼接,其场景连接如下所示。
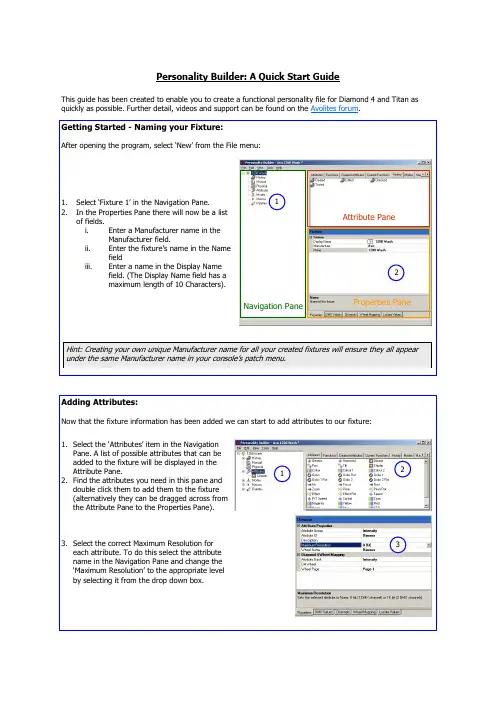
Adding Attributes:Now that the fixture information has been added we can start to add attributes to our fixture: 12Hint: Creating your own unique Manufacturer name for all your created fixtures will ensure they all appear under the same Manufacturer name in your console’s patch menu.1. Select the ‘Attributes’ item in the NavigationPane. A list of possible attributes that can be added to the fixture will be displayed in the Attribute Pane.2. Find the attributes you need in this pane anddouble click them to add them to the fixture (alternatively they can be dragged across from the Attribute Pane to the Properties Pane).3. Select the correct Maximum Resolution foreach attribute. To do this select the attribute name in the Navigation Pane and change the ‘Maximum Resolution’ to the appropriate level by selecting it from the drop down box.213Personality Builder: A Quick Start GuideThis guide has been created to enable you to create a functional personality file for Diamond 4 and Titan as quickly as possible. Further detail, videos and support can be found on the Avolites forum . Navigation PaneAttribute PaneProperties Pane12 34Setting Locate Values:Expand an attribute from the Properties Pane so that all the functions it containsare visible. Right click on the function that you wish set as the locate value,select ‘Locate’, then (in the case of an attribute range, such as ‘Speed’) select alocate value.1 2Adding to your console’s Fixture Library:If you haven’t done so already, save your personality file. It is a good idea to name your file using the following format: Manufacturer Name_Fixture Name.d4.The completed personality now needs to be copied to your console via USB memory stick.Insert the USB stick in to your console.Copy the personality to C:\Program Files\Avolites\Titan\FixtureLibraryRestart the console software for the changes to take effect.If any previous versions of your file are patched, your show will have to be updated via the ‘Update Personality’ function new to Titan V3.Hint: To put an attribute on the second page of a wheel, drag it into the ‘Unassigned’ box, select the desired Hint: When you have both 16 bit and 8 bit channels performing the same functions on two different modes (most commonly Pan and Tilt) you should the set the attribute resolution to 16 bit and add it to both modes. Then for the 8 bit mode, you then select the attribute inside that mode and change the Resolution from ‘16 Select the appropriate mode in the Navigation Pane.Click on the ‘Channels’ tab at the bottom of theProperties Pane.While this page is filled in automatically, you mayneed to edit the order of DMX channel assignmentslisted in the ‘Channel Offs’ column.123Once the channels for all modes have been assigned you mustSelect the ‘Wheel Mapping’ tab from the Properties Pane. Inthis tab click on the Filter by Mode box. This ensures thatonly the channels used by this mode are displayed. Wheretwo modes use the same attributes, changing the attributeposition in one will change the attribute position in the sec-Move the attributes to whichever wheel you want them toappear on by clicking on the attribute name, and dragging24。
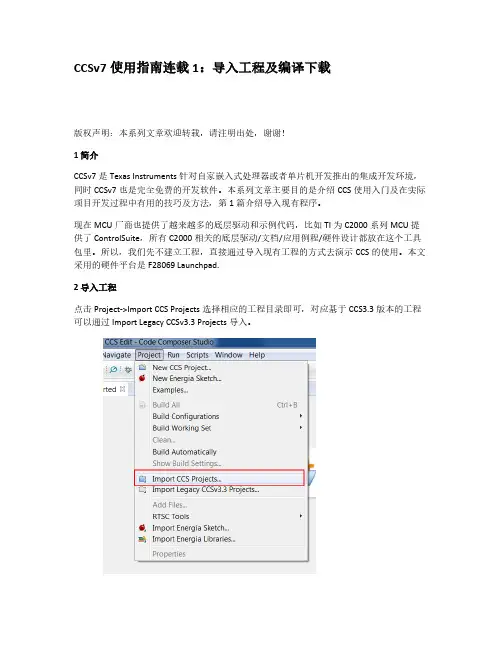
CCSv7使用指南连载1:导入工程及编译下载版权声明:本系列文章欢迎转载,请注明出处,谢谢!1 简介CCSv7是Texas Instruments针对自家嵌入式处理器或者单片机开发推出的集成开发环境,同时CCSv7也是完全免费的开发软件。
本系列文章主要目的是介绍CCS使用入门及在实际项目开发过程中有用的技巧及方法,第1篇介绍导入现有程序。
现在MCU厂商也提供了越来越多的底层驱动和示例代码,比如TI为C2000系列MCU提供了ControlSuite,所有C2000相关的底层驱动/文档/应用例程/硬件设计都放在这个工具包里。
所以,我们先不建立工程,直接通过导入现有工程的方式去演示CCS的使用。
本文采用的硬件平台是F28069 Launchpad.2 导入工程点击Project->Import CCS Projects选择相应的工程目录即可,对应基于CCS3.3版本的工程可以通过Import Legacy CCSv3.3 Projects导入。
可以根据您的具体需要,选择是否复制到当前工作区(workspace)去,然后点击Finish即可完成。
我们导入的是F2806x的一个示例代码Example_2806xSci_Echoback。
导入以后,在我这个工程出现了一个红色错误标志,当编译的时候会出现下面的错误提示。
Buildfile generation error occurred..Product 'XDAIS' v0.0 is not currently installed and no compatible version is available. Please install this product or a compatible version.Build stopped..主要原因:这次我们打开的工程有可能引用了XDAIS,而CCS没有安装XDAIS,所以会出现下面的错误。
YOUR VISION – OUR SOLUTION7B | EN | Rev.052APOS OPTIC – KEY HIGHLIGHTSRELIABLE POSITIONING SYSTEMDual integrated cameras ensure high reliability in critical functions. Instant and accurate positioning is available after system interruptions or restarts.COMPLETE SOLUTIONSAPOS Optic offers simple and easy assembly and integration with other VAHLE systems to provide compact and efficient solutions in one pack -age.SAFE POSITIONFor safety-related applications a security function referred to as “Safe Position” with Performance Level d, Cat. 3, in accordance with DIN EN ISO 13849-1, can be realised in conjunction with TÜV-certified TIA sys -tem modules.QUICK COMMISSIONING AND MAINTENANCEWith the help of the APOS Optic Diagnosis Kit and the APOS ServiceTool software the data of the reading heads can be read, updates can be carried out, the code strip inspected and errors of the reading head canbe analysed.Fail-safe SPSPROFINETAPOS OPTIC PROFINET APOS OPTIC PROFINETET200SP-F CPU1510SP-FVAHLE TIA FBfor safe positioning3 APOS OPTIC – FUNCTIONModern material handling applications such as automobile production, assembly lines and storage and retrieval systems require gapless and exact positioning of the mobile equipment throughout the entire processing cycle. APOS Optic - of the product range vPOS - achieves this task by providing optical reading of the DataMatrix code strip.OPERATIONVAHLE APOS Optic reading heads come equipped with dual cameras and integrated LED lighting. The dual cameras allow the reading head to detect up to six DataMatrix code fields at one time. Only one code field is required to determine positioning. This redundancy allows the reading head to bride small gaps or damages to the codetape without error. The integrated LED lighting is another factor that ensures process reliable detection.The positioning systems operates with the simple and efficient Data Matrix code strip. This permits absolute position detection up to a maximum trav-4*More protocol types are available on request. Please contact our Techsales in case of need.APOS OPTIC – SERIAL READING HEADSTECHNICAL DATAELECTRICAL DATAVoltage ....................................24 VDC (20 … 30 VDC)Power consumption ...............Max. 130 mA Power input .............................<3 W Start-up time ..........................<2 secMEASUREMENT ELECTRONICSAccuracy ..................................±1 mmReading rate ...........................≤3 m/s (180 m/min)Lighting ...................................Integrated LED code strip lightingM-12 CONNECTIONSPlug coding ............................. 4-pole A-coded (RS485)8-pole A-coded (SSI)AMBIENT CONDITIONSOperating temperature ..........0°C ... 60°CStorage temperature ..............−15°C ... 60°CMECHANICAL DATAProtection Type .......................IP54Depth of field ..........................±14 mm Inclination ...............................±1.5°Dimensions .............................155 x 64 x 27 mm Weight .....................................approx. 200 g Tolerances height ...................4 mm / 6 mmReading distance ...................29 or 36 mm (see below)DIMENSIONSRANGE OF PRODUCTS64 m m27 m m 155 mmDescriptionProtocol*Data Rate [kBit/s]Order No.Reading distance O3: 29 mm LK-O3-RS485-D-576-D1-54DETO57.610011578Reading distance O2: 36 mm LK-O2-RS485-D-576-D1-54DETO57.610004140LK-O2-RS485-S-625-D1-54Binary protocol type 262.510005457LK-O2-RS485-S-576-D1-54Binary protocol type 257.610005456LK-O2-SSI-4-D1-54SSI GRAY PST (SEW)-10014882LK-02-RS485-D-576-DX-54DETO57.610013786LK-O2-SSI-2-D1-54Binary protocol-10013467LK-O2-SSI-3-D1-54SSI GRAY PRE (Siemens)-100220065APOS OPTIC – PROFINET READING HEADSTECHNICAL DATAELECTRICAL DATAVoltage ....................................24 VDC (20 … 30 VDC)Power consumption ...............Max. 600 mA Power input .............................<13 W Start-up time ..........................<2 secMEASUREMENT ELECTRONICSAccuracy ..................................±1 mmReading rate ...........................≤3 m/s (180 m/min)Lighting ...................................Integrated LED code strip lightingM-12 CONNECTIONSPlug coding .............................4-pole A-coded4-pole D-codedAMBIENT CONDITIONSOperating temperature ..........0°C ... 60°CStorage temperature ..............−15°C ... 60°CMECHANICAL DATAProtection Type .......................IP54Depth of field ..........................±14 mm Inclination ...............................±1.5°Dimensions .............................155 x 64 x 50 mm Weight .....................................approx. 260 g Tolerances height ...................4 mm / 6 mm Reading distance ...................36 mmDIMENSIONSRANGE OF PRODUCTSStandard versionPROFISAFE version6*More code strip lengths are available on request. Please contact our Techsales in case of need.APOS OPTIC – DIAGNOSISAPOS OPTIC – DATA MATRIX CODE STRIPAPOS OPTIC DIAGNOSIS KITThe APOS Optic Diagnosis Kit enables a complete diagnosis and trouble shooting.The APOS optic ServiceTool allows for:• Firmware updates and restarting the reading heads• Display of the current position values of each camera• Graphic presentation of the position progression• Display of camera imagesWith the help of the APOS Code Generator, defective code strip segments can quickly be reprinted and replaced.Please contact our Techsales in case of need.RANGE OF PRODUCTSRANGE OF PRODUCTSDescription Order No. APOS Optic Diagnosis Kit Diagnosis interface, PC APOS optic Service Tool-Lite, APOS optic Code Generator USB/RS485 adapter, USB/RS422 adapter, power adapter and case10014747Description Coding Order No. Code strip : 100 m drum*Code Strip CB250 – 100.00010004169 Code Strip CB25100.001 – 200.00010005781 Code Strip CB25200.001 – 300.00010005782 Code Strip CB25300.001 – 400.00010005784 Code Strip CB25400.001 – 500.00010005786 Code strip : 50 m drum*Code Strip CB250 – 50.00010010849 Code Strip CB25100.001 – 150.00010012051 Code Strip CB25200.001 – 250.000100126107APOS OPTIC – FIXING MATERIALAPOS OPTIC – SYSTEM INTEGRATIONRANGE OF PRODUCTSDescriptionDimensions Order No.Support profile for data matrix code strip VTS-TP-28 x 2 x 6000-S 28 x 2 x 6000 mm P9999996(1)Universal bracket for reading headVTS-HLK-SHE-SB71.5 x 3 x 120 mm0144509EXAMPLE: EMS APPLICATION (2)1 T he APOS Optic code strip is mounted in the EMS profilePAUL VAHLE GmbH & Co. KGWesticker Str. 5259174 Kamen Germany Phone: +49 2307 704-0*************VAHLE Incorporated 407 Cane Island Pkwy Katy, TX, 77494, USA Phone: +1 713-465-9796 ******************connect with us! @vahleincW 2516631/00/e n | 0 | R e v .05 | 06/20 | E r r o r s a n d t e c h n i c a l m o d i f i c a t i o n s s u b j e c t t o c h a n g e .。
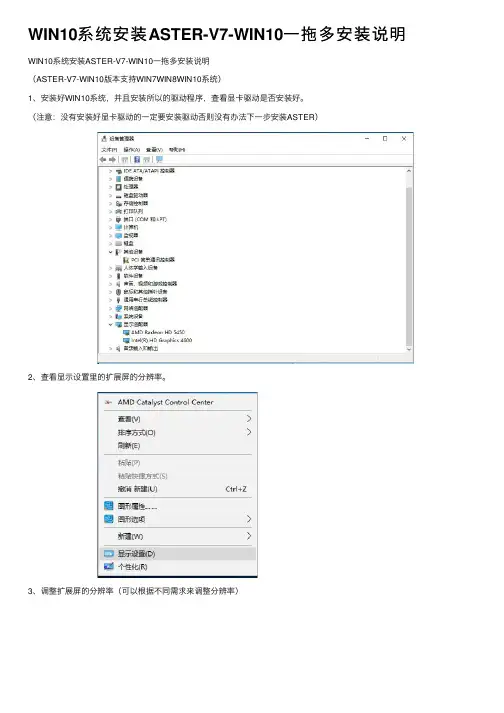
WIN10系统安装ASTER-V7-WIN10⼀拖多安装说明WIN10系统安装ASTER-V7-WIN10⼀拖多安装说明(ASTER-V7-WIN10版本⽀持WIN7WIN8WIN10系统)1、安装好WIN10系统,并且安装所以的驱动程序,查看显卡驱动是否安装好。
(注意:没有安装好显卡驱动的⼀定要安装驱动否则没有办法下⼀步安装ASTER)2、查看显⽰设置⾥的扩展屏的分辨率。
3、调整扩展屏的分辨率(可以根据不同需求来调整分辨率)4、这⾥我是将分辨率调整成⼀样⼤⼩的。
5、将分辨率调整好过后点应⽤。
6、应⽤好后在点保存更改。
那我们可以添加⽤户账户数。
8、选择添加⼀个没有Microsoft帐户的⽤户,点击下⼀步。
9、创建帐户。
10、输⼊账户的名称。
11、帐户就已经创建好了,下⾯将安装ASTER程序。
12、选择安装ASTER-V7-WIN10-SETUP程序13、ASTER-V7-WIN10这是语⾔选择这⾥我选English,点击OK。
14、选择Next。
15、在选择Next。
16、选择I agree to these terms and conditions打勾,在选择Next。
17、选择O打勾在点击Install下⼀步。
18、选择NO,I will restart Windows later不重启电脑,在点击Finish完成19、打开ASTER控制⾯板程序。
20、选择⼀拖多的⼯作的⽤户数,如⼀拖四的那下在要打开四个⽤户数,1-4打开。
21、选择打开。
22、4个⽤户数都打开了。
23、添加每个ASTER⼀拖多⼯作站,⽤不同的WIN账户登录。
24、这⾥我们选择(⼯作站1)⽤U1帐户登录。
24、选择好帐户点击OK应⽤。
25、以上的步骤省略不在说明了,每个⼯作站现在都对应不同的WIN账户登录,选择Automatically run ASTER workplacse on system startup每次开机启动ASTER程序。
Titan2 FPGA开发平台用户手册P390核心板2 / 24芯驿电子科技(上海)有限公司文档版本控制目录文档版本控制 (2)目录 (3)(一) 简介 (4)(二) FPGA芯片 (5)(三) DDR4 (6)(四) QSPI Flash (11)(五) 时钟配置 (12)(六) LED灯 (14)(七) 电源 (15)(八) 结构图 (16)(九) 连接器管脚定义 (16)3 / 244 / 24芯驿电子科技(上海)有限公司(一) 简介P390(核心板型号,下同)核心板,FPGA 芯片是基于紫光同创FPGA Titan2的主芯片PG2T390HFFBG900设计。
核心板在FPGA 的HP 端口上连接了4片DDR4存储芯片组成64位的数据带宽,每片DDR4容量高达2GB 。
HP 端的内存带宽高达100Gb/s (1600M*64bit)。
另外核心板上也集成了1片128MBit 大小的QSPI FLASH ,用于启动存储配置和系统文件。
这款核心板的4个板对板连接器扩展出了276个IO ,其中BANK L1和BANK L2的92个IO 的电平可以通过更换核心板上的LDO 芯片来修改,满足用户不用电平接口的要求;另外核心板也扩展出了16对高速收发器接口。
对于需要大量IO 的用户,此核心板将是不错的选择。
而且IO 连接部分,FPGA芯片到接口之间走线做了等长和差分处理,并且核心板尺寸仅为80*60(mm ),对于二次开发来说,非常适合。
P390核心板正面图5 / 24(二) FPGA 芯片前面已经介绍过了,我们所使用的FPGA 型号为PG2T390HFFBG900,属于紫光同创公司Titan2系列的产品,速度等级为6,温度等级为工业级。
此型号为FFBG900封装,900个引脚。
紫光同创 Titan2 FPGA 的芯片命名规则如下:图2-1-1为开发板所用的FPGA 芯片实物图。
图2-2-1 FPGA 芯片实物6 / 24芯驿电子科技(上海)有限公司Titan2 FPGA 电源有V CC , V CCA, V CC_DRM ,V CCB, V CCIO, V VCC_HP ,V HSSTAVCC 、V HSSTAVCCPLL 、V HSSTVCCA 。
Reinventing a legend.DESIGNED TO PIONEER THE NE X T GENER ATION OF SHOWS HOW IT WORKS Created in consultation with leading visual designers, and alongside expert industrial designers, D9 is ready for the next generation of ultimate shows and beyond. With vast screen real-estate, all-new controls, and unique media integration, it intuitively combines control of all visual aspects of the show. Hand-crafted in London, built upon Avolites’ heritage of quality and reliability.This powerful, integrated system unleashes the creativity of lighting and video designers, providing ultimate control of the next generations of shows.Ultimate performance control.THE FINES T TACTILE CONTROL S IN INDEPENDENT BANKS OF 15Motorised and touch-sensitive Penny and Giles faders: Optical high-res rotary faders: Short-travel flash buttons with positive haptics for perfect timing.INDICATOR COLOURS FOR FL AWLES S PERFORMANCE Fader and Encoder level indicator colours can be defined to make it even easier to group and quickly recognise controls when it counts.11-SEGMENT LE VEL INDICATOR ON E VERY FADERRGB level indicator on every fader which follows the halo colour of the playback. Especially useful on rotary faders when swapping pages.E VERY THING IN IT S RIGHT PL ACEAdditional Macro buttons with a dedicated screen, right in the playback section. Flash buttons under the faders. Perfectly aligned labelling. Page banks for every section. Ultimatesequencecontrol.T-BAR FOR SUPER SMOOTH TR ANSITIONS The T-Bar delivers more refined control with even smoother manual fades. Paired with our unique Scene Master functionality it brings total professionalism to live creativity.With its non-contact design, the fader remains as accurate as ever, even after years of use. The scene master function is complimented by a double-width Commit button and four further control buttons, plus a dedicated LCD screen for continuous status data.Ultimate programming surface.THREE PRE VIE W SCREENS4.3” preview screens ideal for media, ensuring that the main screens remain uncluttered for maximum information density.FIVE OP TICAL AT TRIBU TE WHEEL SNewly designed wheels with optical encoders and RGB led indicators, plus a vertical level-wheel puts more parameters than ever at your fingertips.72 PROGR AM KE YSCarefully selected Cherry MX Low Profile keys with RGB illumination provide optimal tactility with low fatigue for programming sessions.OPTICAL TRACKBALL AND ARROW KEYSManipulate data and navigate interfaces moreeffortlessly than ever to optimise accuracy and creativity.Born out of over 40 years’ experience in control, designed with eyes fixed firmly on the future, theD9’s programming surface features: 3 media preview touchscreens, 5 + 1 attribute wheels, ergonomically designed controls, a T-Bar and illuminated programming keys. All are integrated with Avolites long serving Titan proprietary software.Ultimate11 screenexperience.3 L ARGE MAIN WORKSPACE SCREENSWith brightness adjustable up to1000 nits, these high definition,high contrast, flush-mountedtouchscreens ensure thatdata, visualisation and creativeprogramming tools are alwaysright where you need them.The most demanding shows require the mostharmonious visual control experience. Up to 11internal screens, with the option of 2 additionalexternal screens, all powered by Avolites software,provides unrivalled focus and vision.3 X 4.3” PRE VIE W SCREENSVideo previews right where youneed them.MACRO / E XECU TER SCREENElectronic labelling withoutoccupying main screen space.DEDICATED T-BAR SCREENNo guesswork with permanentScene Master status.SOF TKE Y MENU SCREENMoving the softkey menu systemand prompt to this dedicatedscreen frees up workspace andunifies the layout of all mainscreens.VERTICAL EDITOR TOUCHSCREENLocated in the programmingpanel, simplifying control ofcomplex fixtures and mediaservers, as well as showing themain cue list status in an all-newdisplay.DEDICATED LE VEL WHEEL SCREENInstant live intensity data, nomatter the selected attributegroup.Say helloto our new keyboard. Ultimate video control with Synergy.CUS TOM INTEGR ATED KE YBOARDYou told us you wanted it – an integrated keyboard.With backlit Cherry MX Low Profile keys identicalto those on the program panel, the keyboard isbeautifully concealed, yet right where you need it.A P OWERFUL FUSION OF SOF T WARE AND HARDWAREThe Avolites D9 console goes far beyond theaesthetics. It provides more intuitive media controlintegration for visual designers. Building on theground-breaking Synergy software, released inOctober 2019, allowing seamless integration betweenmedia server and lighting control, the D9 brings thisto your fingertips with intuitive design and layouts,ideal for media playback and integrated control.Pioneer ProDJ LinkMIDI/SMPTEReal-Time Generative ControlVideo PreviewsContent TransferDynamic Effect ControlsOutput ConfigurationVideo Pixel DataTimecodeTempoBeat EdgesSynergyAi GenerativeMedia ServerAi Media ServerTitan NetProcessorLightsLasersSpecial EffectsLED ProcessorsProjectionsTitan NetDMXTHE HE ART OF AVOLITES INTEGR ATED SYS TEM SOLU TIONAvolites powerful, integrated system enables yourcontrol set up from lighting and video to networkingand power distribution. All designed to work inperfect harmony with the D9 at the heart of thesystem. Unleashing the creativity of lighting andvideo designers, it provides ultimate control for thenext generations of shows.CONTROL SURFACE CONS TRUCTION CPUSYS TEM R AMGPUUNIT DIMENSIONS(W X D X H)WEIGHT161340 X 452456P OWER CONSUMP TIONVOLTAGEOPER ATING ENVIRONMENTHE AT OU TPU TINTERNAL UP SDMX 512NE T WORKDATA / PERIPHER AL SE X TERNAL DISPL AYSMP TETRIGGER INPU T SMIDIAUDIO OU TMAINS P OWER1080DMX CHANNEL S PER DE VICEDMX CHANNEL S PER SYS TEMMA X FIX T URESKE YFR AME EFFECT ENGINEPIXEL MAPPING848TERNAL CONTROLTSE X TERNAL CONTROLETITAN NE TOU TPU T FORMAT SBASE O SVOLTAGEATING ENVIRONMENTTSCONTROL SURFACE CONS TRUCTION CPUSYS TEM R AMGPUUNIT DIMENSIONS(W X D X H)WEIGHT16940 X 45245P OWER CONSUMP TIONVOLTAGEOPER ATING ENVIRONMENTHE AT OU TPU TINTERNAL UP SDMX 512NE T WORKDATA / PERIPHER AL SE X TERNAL DISPL AYSMP TETRIGGER INPU T SMIDIAUDIO OU TMAINS P OWER1080DMX CHANNEL S PER DE VICEDMX CHANNEL S PER SYS TEMMA X FIX T URESKE YFR AME EFFECT ENGINEPIXEL MAPPING848 TERNAL CONTROLTSE X TERNAL CONTROLETITAN NE TOU TPU T FORMAT SBASE O SVOLTAGEATING ENVIRONMENTTA Diamond history.AVOLITES QM 8100Since the birth of the company under a railway arch in 1976 in London, Avolites has believed intechnology innovation, reliable components, quality finish and inspired design. A pioneer in the lighting industry, Avolites has paved the way to ever bigger, more demanding, and more immersive shows. The diamond console heritage goes back to1977 with the arrival of the 8100 console series. They were custom built and designed for the demands of touring. They used blue stamped fader panels, indented white lettering and wavy brushed aluminium side panels. Three styles were designed: a 72 way, 84-way and a 96-way model, all with a sloped frontage and separate inner panel construction. A classic Avolites design, this was much admired and established Avolites’ flagship consoles as aspiring leaders in the industry.Next, Avolites began to develop what became a true legend of its time and part of ‘Rock & Roll’ history: the QM series now with microprocessor technology for storing cues and sequences. In production from 1983 with various models it kept the fast Swap and Add of operation from the analogue 8100 series with the computerisation enabling speed of recording scenes to multiple playbacks each with a highlyreadable programmable electronic legend, hence the name QM (Cue Master). This modern digital console put Avolites firmly on the worldwide map of lighting control manufactures.Strictly speaking, there was no Diamond I, it was called QM-Diamond, and launched in 1991, just after Avolites returned to private ownership from Carlton Television. The QM-Diamond was to become the most versatile lighting console of its time; its flexible design made it an LD’s favourite for both theatre or installs and major Rock & Roll tours. The advanced digital design allowed for precise, accurate and repeatable control, as well as a new creative freedom for LDs to programme or control the most demanding shows of the time.The Diamond II debuted at PLASA in 1993, followed soon after by the Diamond III. They were designed to meet the need to control large lighting rigs with multi-parameter instruments. They offered 1024 HTP or LTP channels, 100 pages of submaster playbacks (30/20 of which were submasters), 180 Penny & Giles motorised faders, 3,071 control channels, 6 full speed isolated DMX outputs, as well as ultra-smooth optical encoders, shape generator, fan mode and highlight functions, colour VGA outputs and ‘Add’ and “Swap” buttons on Masters and Channels. Both came with full size Qwerty keyboards and compatible with Avolites Graphics Tablet and riggers remote control. The Diamonds quickly became renowned for being the ultimate live performance consoles. The Diamond IV (D4) Vision and Classic launched in October 2001, followed in 2002 with the Elite version. These were designed after intensive user research to address Lighting Designers requirements for fast, accurate and immediate control of intelligent and conventional fixtures, as well as DMX devices. To perform equally as well in live as well as pre-programmed shows or install environments where power and functionality in the minimum physical space was paramount. The Diamond 4's were stylish and had an aesthetically pleasing profile, intuitive to operate, with minimal operator fatigue and the ability to create the fastest, most cost efficient range of live or programmed shows with cutting edge technology built-in. The NEW Diamond 9, flagship console of the new Diamond Collection, is the latest to join the legendary lineage of Avolites consoles bearing the Diamond name. Designed to power the next generation of shows, it is set to become the class leading console of its time. Yet again.RE AD MORE & BOOK A DEMO • W W 。
ARTIX-7 FPGA 开发平台用户手册1.0目录1、开发板简介: (3)2、开发板功能描述 (6)2.1 Artix-7 FPGA 引脚分配 (6)2.2 扩展接口 (6)2.3 电源 (10)2.3.1 电源变换 (10)2.3.2电源分配功能 (10)2.3.3电源启动顺序 (10)2.4 有源晶振 (10)2.5 FPGA启动 (11)2.6 LED和按键 (12)2.6.1 LED (12)2.6.2 按键 (15)2.7 XADC (17)2.8 DDR3 (18)2.9 SPI FLASH (19)2.9.1 FLASH (19)2.9.2 USER FLASH (19)2.10 / JTAG接口 (20)2.10.1 JTAG (20)2.10.2 USER JTAG (20)2.11 蜂鸟与FPGA连接 (21)1、开发板简介:正面背面此款开发板使用的是 Xilinx 公司的 Artix-7 系列 FPGA ,型号XC7A35T-1FTG256C ,256个引脚的 FBGA 封装。
此款 FPGA 的资源如下图所示:其中,主要的参数:逻辑单元 Logic Cells :33280; 乘法器 DSP48:90;可配置逻辑块 CLBs :400Kb ; Block RAM :1800Kb ; 时钟单元 CMTs :5; 可用 IO 数量:210 个; 内核电压:1.0V ;工作温度:0——﹢85℃;图为整个系统的结构示意图:FPGAXC7A35T晶振+5V电源接口 JTAG 口USER_JTAG 口PMOD口FLASHUSER_ FLASH256MByte DDR33.3V 电源1.0V电源1.8V电源DDR 电源 用户按键拨动开关配置指示灯用户LED 灯用户RGB 灯高速接插件电源指示灯电源开关Arduino兼容接口1.5V 电源Arduino 兼容接口2、开发板功能描述2.1 Artix-7 FPGA 引脚分配XC7A35T-1FTG256C共有5个I/0 Bank,其中U2E是FPGA专用的配置Bank,其2.2 扩展接口开发板有P1、P2、JP1三个用户接口。
CYL-6602 USB-DMX512电脑灯光控制器技术参数:1. DMX512信号输出,输出通道数512通道。
2. DMX512信号输入,输入通道数512通道。
3. 信号光电隔离输出,保护设备不被意外高压烧毁。
4. USB连接电脑,无需外接供电,兼容USB 1.1和2.0端口。
5. 兼容windows 98se/2000/ Vista /XP/windows 7(32bit和64bit)操作系统。
可使用的软件:1. Avolites Pearl20042. Avolites Titan Mobile and Simulator v4.23. Avolites Diamond 44. Martin Lightjockey5. Daslight Virtual Controller26. SunLite Suite 27. LumiDMX8. FreeStyler9. PCDimmer10. MasterPeace11. Abuelites12. LEDMatrix13. grandMA onPC14. grandMA2 onPC15. LumiDesk规格和配件:1. 外形尺寸:L90 ΧW70 ΧH42mm2. 包装尺寸:L180 ΧW150 ΧH60mm3. 净重量:300g4. 总重量:350g5. 输出卡龙座3芯和5芯可选择6. USB连接线7. 灯光控制软件和说明(CD光盘)操作使用:CYL-6602 USB-DMX512电脑灯光控制器可以支持20余套DMX512控制软件。
请注意:使用以前,插上控制器到电脑,必须先安装驱动程序,驱动文件在光盘里。
正确安装好驱动程序以后,在电脑设备管理器里,可以查看如下图所示:-------------------------------------------------- ----------------------------------------------所有灯光控制软件,都在光盘里各自的文件包里,具体使用请仔细查看光盘内控制软件包的说明文本。
ARTIX-7 FPGA核心板用户手册AX7A035BREV 1.1版芯驿电子科技(上海)有限公司目录一、开发板简介 (5)二、FPGA核心板 (8)(一)简介 (8)(二)FPGA (9)(三)有源差分晶振 (11)(四)DDR3 (12)(五)QSPI Flash (15)(六)LED灯 (17)(七)JTAG接口 (17)(八)电源接口 (18)(九)扩展接口 (18)(十)电源 (25)(十一)结构图 (28)三、扩展板 (29)(一)简介 (29)(二)千兆以太网接口 (30)(三)光纤接口 (31)(四)PCIe x4接口 (33)(五)HDMI输出接口 (34)(六)HDMI输入接口 (35)(七)SD卡槽 (37)(八)USB转串口 (38)(九)EEPROM 24LC04 (39)(十)温度传感器 (40)(十一)扩展口 (41)(十二)JTAG接口 (44)(十三)按键 (45)(十四)LED灯 (46)(十五)供电电源 (47)黑金ARTIX-7系列的高端FPGA开发平台(型号:AX7A035B)正式发布了,为了让您对此开发平台可以快速了解,我们编写了此用户手册。
这款ARTIX-7 FPGA开发平台采用核心板加扩展板的模式,方便用户对核心板的二次开发利用。
在底板设计上我们设计了丰富的外围接口,比如一路PCIex2接口,两路光纤模块接口,一路HDMI输出接口,一路HDMI输入接口,一路千兆以太网接口,Uart接口,SD卡接口等等。
满足用户各种PCIe高速数据传输,视频图像处理和工业控制的要求,是一款"全能级“的FPGA开发平台。
为高速视频传输,网络、光纤和PCIe 通信及数据处理的前期验证和后期应用提供了可能。
相信这样的一款产品非常适合从事FPGA开发的学生、工程师等群体。
一、开发板简介在这里,对这款AX7A035B FPGA 开发平台进行简单的功能介绍。
开发板的整个结构,继承了我们一贯的核心板+扩展板的模式来设计的。
Avolites Titan V7.0 版本说明版本升级1.目前控台是V5.0及之前的版本如果控台现在是V5.0及之前的版本,首先需要要先升级到V6.0版本,然后再升级的7.0版本。
您可以在爱富丽官方网站下载V6.0的版本然后根据提示安装。
下载时需要登陆会员账号。
如有需要可以登陆我们的公用账号gust2014,密码同样是gust20142.目前控台是V6.0或V6.1或V6.2版本在升级前请确保您的show文件和灯库都已经做好备份。
首先下载V7.0的升级程序和恢复盘程序。
以Tiger touch Pro为例,升级程序的名字叫做XXX Upgrade Installer恢复盘的名字叫做XXX Recovery Creator把升级程序直接放到U盘里,然后接到控台的USB接口上。
在控台触摸屏左上方,选择Tool工具栏,然后选择“Shutdown Software”。
依然在Tool工具栏的下拉菜单中,选择黄色的“Folder”文件夹选项,找到你的U盘,然后双击运行里面的升级程序。
根据提示进行升级,升级完成后把U盘拔出,然后把控台重启。
重启进入TITAN系统后,进入系统档:长按Avolite键+Disk键,即可看到当前系统的版本3.在电脑上安装TITAN模拟器4.请注意,V7.0版本不再支持window XP系统,因此请在Win7或者Win8或者Vista 系统的电脑上安装。
Titan模拟器内包含了Titan Mobile,Titan One和Personality Builder等软件,请在安装前把show文件和灯库先备份好。
安装模拟器后,首次运行需要激活。
如有需要可以登陆我们的公用账号gust2014,密码同样是gust2014进行激活。
新功能1.远程控制现在通过安卓系统和苹果ios系统可以对控台进行远程控制。
您的手机可以连接到同一个网络中的任意的Avolites控台。
通过镜像,就能实现手机和控台能同时控制同一个系统。
您可以在手机上选择“灯具,素材,分组,cue”等控台的功能。
素材窗口里可以切换“位置,颜色,图案和光束”等分类窗口。
所有窗口都能够分页。
如果在控台中已经进行了命名,那么手机上也会同样显示。
灯具窗口里同样会显示DMX地址码,方便用于核对和修改。
同样,这个软件也有locate,clear,high light,next,prev,all,undo,record 按键等按键。
2.网络备份现在,所有的Avolites TITAN系列控台都能通过网络系统实现备份功能。
首先把两个控台的IP地址改为同一段,例如2.0.0.X,X为不同的数,范围是1-255 在备份的控台上按【Disk】键,然后按【Titan net Sessions(back up)】成为备份控台。
所有的主控台都会在菜单里显示。
只要选择任意的一个,备份控台就会自动切换到主控台的当前show并且成为备份控台。
在备份模式下,备份控台会显示一个窗口,里面有当前连接信息和连接的状态显示。
如果显示是一条绿色的连接线,表示连接稳定。
如果是红线,则表示断开了连接。
如果显示是蓝色的线,则表示在同步操作中。
Show会自动同步到备份控台(无论是保存show或者是自动保存)。
当然你也可以按【sync now】键随时进行同步。
按【exit】键就会退出备份模式,按【Take over】键会断开与主控台的连接,可以操作备份控台,同时主控台的DMX输出会被关闭。
这时候在主控台右上方会有一个提示跳出,告知你DMX输出已经被关闭。
在主控台触摸这个红色区域,会自动打开“Exit Safe mode”(退出安全模式)菜单,在它里面可以选择“Re-enable output”(开启DMX)恢复DMX输出。
如果是在珍珠专家控台,你需要长按Avo键,并在菜单里选择恢复DMX输出。
3.导入show现在能把其它的show的项目导入到当前的show里面。
在Disk菜单里有一个新的选项【Import show】(导入演出),当你选择它时,它就会列出当前控台内所有可以导入的show。
选择你需要的show,你可以同时导入多个show。
当选择了需要导入的show后,就会跳出一个show library的窗口。
您可以查看show的所有项目,然后把它们分配到当前show的对应位置上。
为了确保导入的项目能正常使用,被导入的show的灯库首先需要和当前show的灯库进行映射通过mapper via。
一个或多个灯库可以通过箭头进行映射,在子菜单选项“Clear fixture Mapping”可以移除映射的灯具。
例:当前show的灯具及地址:之前已经做好的show(名为test1)的灯具及地址:两个show的灯具是不同的,而且地址码有重叠。
按【Disk】键,【导入演出】,选择之前的show(test1),出现这个窗口,这个就是灯具mapper(映射)窗口。
选择右边的灯具,然后分配到mapper fixture格子里完成以后,如下图:切换菜单,到【show library】选项把需要导入灯具选中,分配到相应推杆或者灯具配接窗口内分配完成后可以发现,用户编码是顺序跟踪下来的,而相冲突的地址码的灯具会被parked,需要重新分配地址码如果两张控台不相同,例如在TITAN mobiel内导入TT Pro的show,那么TT pro右上角固定重放推杆的程序也可以重新分配:4.在编程时可以修改通道时间或整体时间在保存cue,chase之前,能添加,修改和查看时间现在有一个新的【TIME】键,在Titan mobile,Tiger touch Pro,Sapphire touch 上这个键是在Clear键上面的(旧老版的控台显示为【Set】键)在珍珠专家控台和Tiger touch控台上,这个键是在Rec Step和Snap back之间的【Next Time】键 按下这个键时,会出现一个修改时间的窗口。
在这里您能设置默认时间,属性时间等。
假如时间被修改了,它就会变高亮状态,被修改的数值可以记录保存,或者合并到cue或者素材当中。
快捷键如下图提示:5.Time Palettes(时间素材)现在时间也能作为其中一种素材被保存下来了。
可以是单独素材或者共享素材。
所谓时间素材,即是包含了延时,渐入等时间信息的素材。
时间素材的信息不会显示在素材格子里,你可以使用手写涂鸦功能进行自定义命名。
按【Time】,在菜单中设置好需要的时间,然后按灰色的Palette 键,然后 选择【录制素材】,然后保存在任意的素材窗口中。
如果一个cue是用应用了时间素材,那么update素材的时候,cue的时间也会update。
如果一个素材包含属性时间,那么应用素材时也能直接应用所包含的属性时间。
第一种方法,选择Plaette键,然后有Master时间选项,输入时间后,所有的应用的素材都会根据master时间运作。
如果需要为特定素材制作时间属性。
需要使用另一种方法。
进入系统档,键设置,新建一个关于Palette的按键,出现这个菜单:把第三项的忽略设定的素材时间设置为【应用设定的素材时间】回到编程档,然后主菜单选择【回放选项】,【键设置】,选择需要设定的素材按键,然后应用刚才新建的键即可。
这样就能实现个别素材应用整体或属性时间。
6.@菜单现在按【@】功能键会打开一个调整属性值的窗口。
此功能针对Tiger touch Pro和Sapphire touch和Titan Mobile(@键位于下图所示)●选择功能:按@键可以为属性打开二级菜单。
例如在Dimmer属性下,会有0%,25%,50%,75%,100%等选项。
●选择/清除功能:选择当前属性或者清楚当前属性。
●Locate功能:locate当前选择的属性●Release功能:release当前选择的属性●OFF功能:关闭属性控制●On功能:开启属性控制●Freeze/un Freeze功能:冻结或解冻当前属性值7.属性启用/关闭在cue view窗口中所有属性能够直接修改开启或关闭。
当一个或多个格子里的属性都被设置成“OFF”状态,选择它们并按菜单键“A”(On),那么它们就会变回被禁用前的数值。
8.设置列表现在新增了一个的工作窗口名为“Set list” (节目单)一个Set list(节目单)由‘Track’组成,除了珍珠专家控台外的所有控台,,添加一个track,它就会连接到当前页面。
如果按下track旁边的播放键,那么就会马上跳到关联的页面。
9.分组亮度总控现在分组可以存在推杆上推杆控制的就是该分组的亮度。
蓝色swop键则是用作选择全部灯。
长按蓝色swop 键 会出现可以选择的菜单。
如果按【playback Option】,再选择这推杆,会有以下选项:●Scale Master(比例主控):比例控制(默认)●HTP:如果数值更高,则进行覆盖●Hard Limit:硬限制●Take Over:取缔编程器内的灯具的亮度●Disable:禁用如果推杆位置为0,LED灯就会进行脉冲闪动,11. 灯具映射功能图层亮度总控现在灯具映射功能的四个图层都新增了亮度总控推杆。
在Effect editor中,每个图层都能选择是否启用总控。
操作方法是:系统档 > 分配总控 > 像素映射矩阵。
12. 设定通道属性上下限制现在能为灯具的各个属性设置上限和下线值。
你可以在patch菜单中,然后Edit Fixture(编辑灯具)菜单里设置和查看各属性的限制值。
操作方法:> >12.设定灯具属性的调节曲线现在能修改每个灯具/每个属性的曲线在patch菜单中选择Edit Fixture,然后就可以设置。
13. 修改灯具属性在view patch菜单中新增一项【attribute behavior】,它提供了一种查看和修改灯具属性习惯,例如曲线,限制,反转,冻结的途径。
14.增加ACN协议现在控台支持ACN协议了.在系统档的DMX nodes选项中,新增一项【Streaming ACN】可以直接分配到输出端口15.RDM功能(远程控制)TITAN系统控台现在支持RDM功能。
在View Patch菜单中新增一项RDM选项。
所有连接中的设备,只要支持RDM功能的,都会在列表当中排列。
厂家,型号,模式,地址码等信息都会显示。
16.灯具查找功能查找灯具功能可以识别灯具的起始地址,当您不清楚灯具的DMX地址或者灯具没有预期的反应的时候,这个功能非常有用。
进入Patch菜单,然后选择【option】,默认状态下查找灯具是禁用的。
如果启用,被选择的地址或者灯具就会被locate。
你可以使用转轮选择地址码和线路,转轮C(DMX slot)是快捷向前或向后选择的捷径。