PowerPoint2013 快速入门指南
- 格式:pdf
- 大小:1.21 MB
- 文档页数:9
PPT基础课程——Microsoft Office 2013版1.文件(1)保存路径:文件——另存为a)PPT常用格式:PowerPoint 演示文稿(S)PowerPoint 97-2003演示文稿(xm)PowerPoint放映PowerPoint 97-2003放映b)加密保存:另存为——工具——常规选项(2)PPT选项a)保存选项:文件——选项——保存自动保存时间:默认每10分钟自动保存一次优点:防止意外情况(如:突然断电)导致文件丢失。
可以通过“自动恢复文件位置”显示的路径找回文件。
缺点:每隔一定时间自动保存一次,会影响工作效率。
可以修改参数,如:将自动保存时间设置为20分钟。
字体嵌入:文件——选项——保存——勾选“将字体嵌入文件”优点:防止PPT在他人电脑上放映时,艺术字体丢失。
b)高级选项:文件——选项——高级撤销次数:最多可取消操作数默认为20次,可以提高撤销次数的上限,如:设置为150次。
c)自定义功能区:文件——选项——自定义功能区新建选项卡,添加2.对象2.1对象——文形图(1)文本插入文本框:方法一:方法二:字体基本设置段落设置:行距:多倍行距:1.2/1.3(常用设置)对齐方式(2)形状插入形状后,单击右键,选择“设置形状格式”a)填充:i.纯色填充——色值ii.渐变填充——光圈(最多设置10种光圈),角度(0°从左至右;90°从上至下;180°从右至左),透明度光圈设置如下图:渐变类型如下图:透明度设置如下图:iii.图片填充b)线条:粗细、类型、前后端(3)图片图片效果:阴影、映像、发光、柔化边缘、三维格式、三维旋转2.2对象——多媒体(1)音乐音乐跨页播放设置方法一:设置方法二:常见音频格式:MP3、wav(与PPT兼容性最好)(2)视频视频裁剪常见视频文件格式:wmv(与PPT兼容性最好)、avi、MP4、mpeg2.3对象——图表(1)表格如果表格比较复杂,导入数据时“选择性粘贴”-“粘贴链接”-“Microsoft Office Excel 工作表对象”,从Excel导入制作完成的图表。

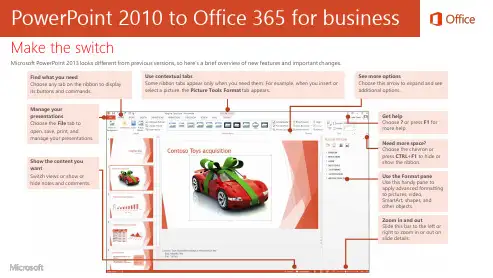
PowerPoint 2010 to Office 365 for businessMake the switchMicrosoft PowerPoint 2013 looks different from previous versions, so here’s a brief overview of new features and important ch anges.See more optionsChoose this arrow to expand and see additional options.Get helpChoose ?or press F1 for more help.Need more space?Choose the chevron or press CTRL+F1to hide or show the ribbon.Zoom in and outSlide this bar to the left or right to zoom in or out on slide details.Use the Format pane Use this handy pane to apply advanced formatting to pictures, video, SmartArt, shapes, and other objects.Use contextual tabsSome ribbon tabs appear only when you need them. For example, when you insert or select a picture, the Picture Tools Format tab appears.Show the content you wantSwitch views or show or hide notes and comments.Manage your presentationsChoose the File tab to open, save, print, andmanage your presentations.Find what you needChoose any tab on the ribbon to display its buttons and commands.What is Office 365 for business?Just as Office 2010 was a suite of desktop apps, your Office 365 for businesssubscription gives you a suite of powerful online services —including the latest version of Office desktop apps. Office 365 lets you:•Install Office desktop apps on as many as five computers.•Create, view and edit documents from anywhere using Office Online.•Work offline and your changes automatically sync when you’re back online.•Use mobile Office apps on your Windows Phone, Android, iPad, or iPhone.Find your way aroundFrom anywhere in Office 365, click the app launcher for quick access to all services, including all the Office Online apps:How do I sign in to Office 365?1.From your web browser, go to https:// .2.Enter your work or school account and password, and thenchoose Sign in . For example:********************************************.comSites Access team sites.YammerConnect with co-workers.OneDrive for Business Store your business documents.CalendarSchedule meetings and appointments.Outlook Read and send email.PeopleGet contact information.Office OnlineCreate and collaborate on documents from your browser.How do I use PowerPoint in Office 365?You can use the PowerPoint 2013 desktop app, PowerPoint Online, or device-specific PowerPoint apps. So how do you decide which to use? If you’re using a computer, PowerPoint 2013 has the most features. On a device, the PowerPoint mobile app has the most features. However, for many tasks, the web-based PowerPoint Online may meet your needs.PowerPoint 2013*PowerPoint Online PowerPoint mobile appUse it if•Your Office 365 plan includes it.•You want offline access.You need a quick way to read and make simple edits.You want the most editing features available on your device.Runs on Laptop and desktop computersYour browser Specific devicesHow to get itComes with some, but not all Office 365 plans (*Word 2011 for Mac)Browse from OneDrive or SitesWindows Phone iPad iPhoneAndroid phone and tabletWhat’s new on the PowerPoint 2013 ribbon?You can apply and see changes to the theme of your entire presentation with the Design tab. And you have more control of the color scheme with the Variants group.Some tabs are contextual and appear only when you need them. For example, when you insert or select an audio file, you’ll see the Audio Tools Format and Playback tabs. You now have specific options for audio files. Other contextual tabs appear when working with video, charts, and pictures.It’s a whole new perspective with PowerPoint as your presentations now use the new widescreen size by default. If you need to display on an older projector or monitor, you can change the size.Widescreen The new default slide size.VariantsChange theme colors.Install Office 2013 desktop appsIf Office is not already on your computer, you can install it from Office 365. 1.Sign in to Office 365, and then choose Install now .2.Choose Run , and then follow the rest of the installation instructions.For more information, see Install Office using Office 365 for business (/fwlink/p/?LinkId=272460).Install apps on your PC Install apps on your deviceUse Office Online Create and edit documents from your browser.Things you might be looking for in PowerPoint 2013 Use the list below to find some of the more common tools and commands in PowerPoint 2013.Task In PowerPoint 2010In PowerPoint 2013Create, open, save, print, export, convert, or protect presentations Click Fileand then the option.Choose Fileand then the option.Add slides, apply a layout, change fonts, align shapes, or apply Quick Styles ClickHome.ChooseHome.Insert tables,pictures, shapes, SmartArt, charts, comments, header and footer, WordArt, video, and audio ClickInsert.ChooseInsert.Apply a theme,change the color of a theme, change the slide size, or change the background of a slide ClickDesign.ChooseDesign.Apply or adjust the timing of a transition ClickAnimations.ChooseTransitions.Things you might be looking for in PowerPoint 2013 (continued) Use the list below to find some of the more common tools and commands in PowerPoint 2013.Task In PowerPoint 2010In PowerPoint 2013Apply or adjust the timing of an animation ClickAnimations.ChooseAnimations.Start a slide show, set up a slide show, specify monitors for use with Presenter view ClickSlideShow.ChooseSlideShow.Check spelling, enterand review comments, or compare presentations ClickReview.ChooseReview.Change views, edit a master view, showgrids, guides, and rulers, zoom in, switch between PowerPoint windows, and use macros ClickView.ChooseView.Creating and saving presentations No matter if you start from your PowerPoint desktop app or from Office 365, you can create a presentation and then store it in your OneDrive for Business or SharePoint document library.OneDrive for Business is your online filestorage. Presentations saved here areprivate unless you share them with others.Plus, you can access them from almostanywhere on almost any device. Save to a SharePoint document libraryCreate a presentation using PowerPoint 2013 PowerPoint 2013 provides templatesyou can use to create newpresentations or you can start with ablank presentation. You can alsolearn more from the PowerPoint2013 Quick Start Guide(/fwlink/p/?LinkId=272047).Save to OneDrive for Business Create a new presentation from Office 365You don’t need the PowerPoint desktop app to create a new presentation. If you’ve got OneDrive for Business or a SharePoint document library, you can create a new presentation from there. PowerPoint Online provides the basic tasks and automatically saves your presentation to that location.By default, SharePoint sites include adocument library. You can save yourpresentation here. Anyone with access tothat site can see and work with you onpresentations and other Office documents.1.Choose the app launcher ,and then choose OneDriveor Sites.2. Choose New.3. Choose PowerPointpresentation.Open a presentation from PowerPoint 2013Choose the location of your presentation, and then open it.Opening and deleting presentationsOpen a presentation from Office 365Quickly open a presentation from OneDrive for Business or a SharePoint team site.You’ll notice differences when you first open PowerPoint 2013. You can choose from the list of available templates, your Recent presentations with their location, or Open Other Presentations to get to your OneDrive for Business and team site document libraries.Delete a presentation from Office 365Deleting presentations from OneDrive for Business or a SharePoint is just as simple.OneDrive for Business Use this location to get to your online storage.Recent Presentations Get quick access to presentations in their default locations.SharePointOpen a presentation from a SharePoint team site.PowerPoint OnlineChoose the presentation name to automatically open it for basic editing in PowerPoint Online.PowerPoint 2013Select a presentation and then choose Edit to open in PowerPoint 2013.1. Select thepresentation you want to delete.Sign in with a Microsoft account to accesspersonal presentations.3. Choose Delete .2. Choose Manage.1.Choose the app launcher , and then choose OneDrive or Sites .Working offline with PowerPointNeed to work somewhere without an Internet connection? You can sync documents or entire folders to your computer before you go. When you’re back online, your changes will automatically sync.Sync a libraryYou can sync the entire library of your OneDrive for Business and SharePoint team site.How does sync work?The first time sync, it takes a little longer to download your documents on your desktop or other device. You can now work offline without losing your changes or juggling multiple copies.Anytime you make a change, those changes are automatically uploaded.After you sync OneDrive for Business or a team SharePoint site, you get an associated folder on your device Favorites with the documents you have synced.2. Choose Sync .OneDrive for BusinessLists the documents in your OneDrive for Business library.Your desktopShows the location containing copies of the documents you synced from your OneDrive for Business library.Sync a document or folderYou can sync only the presentations or folders you’re working on.2. Select a document or folder.3. Choose Sync .1.Choose the app launcher , andthen chooseOneDrive or Sites .Working with othersShare presentationsPowerPoint OnlineDoes a coworker not have PowerPoint on their computer? Or do they use a Mac? Not a problem! With PowerPoint Online, you can do basic co-edits in the same presentation at the same time.PowerPoint Online shows who is editing and what changes they have made.Wherever your presentation is stored, you can share it with others —whether they're part of or outside of your organization. When you share, the people who need to review or edit get an email with a link to the presentation. With just a quick click, reviewers can open it from nearly anywhere and on practically any device.ShareWork on the same presentation with otherssimultaneously.Need more options?Open in PowerPoint 2013 to get advanced options such as more transitions, more animations, and Presenter View.No Save button?Don’t worry, PowerPoint Online automatically saves your presentation.1. Select a presentation.2. Choose Share .4. Choose Share .3. Enter reviewer’s name or email address.Who’s editing See if others are editing the same presentation.ChangesSee what slidesothers are editing in your presentation.Working from mobile devicesWhether you use a Windows Phone, Android device, iPhone, tablet, or iPad, you can view and edit Word documents stored on a SharePoint site or OneDrive for Business.All you need is the Office Mobile app to get to your presentations. Now you can view and make last minute changes to a presentation right on your phone or tablet. Need more info?•Check out the Office 365 for business learning center(/fwlink/p/?LinkId=392570)for additional quick start guides and how-to videos.•Find more tips for switching to Office 365(/fwlink/p/?LinkId=398049).Set up your deviceFor mobile, it’s all about the apps and adding the work or school account you use for Office 365 for business to your device. Find and install the right app for your device from your device’s app store. For step-by-step instructions, see:•Set up a mobile device using Office 365 for business(/fwlink/p/?LinkId=396709)•Set up Office 365 for business on your:•Windows Phone (/fwlink/p/?LinkId=396654)•iPhone(/fwlink/p/?LinkId=396655)•iPad (/fwlink/p/?LinkId=524315)•Android phone and tablet(/fwlink/p/?LinkId=525632)。
0ffice2013 powerpoint教程Powerpoint2013是具有技术先进、功能强大制作电子演示文稿的办公软件,能轻松创建各类直观而专业的各类演示用的电子文稿,常用于演讲、汇报、报告及产品展示和多媒体课件制作等。
一、学习容:1、幻灯片的基本操作2、演示文稿的视图模式3、在幻灯片中输入文字4、设置文本框5、使用置主题6、使用幻灯片母版7、使用艺术字二、具体操作方法:1、幻灯片的基本操作进行演示文稿的制作前,需要先掌握演示文稿的基本操作,如创建、打开、保存和关闭等。
其中,演示文稿的打开和窗口的关闭等操作与word基本相同。
一个演示文稿是由多幻灯片构成,对演示文稿的编辑实际上就是对幻灯片的编辑操作。
对幻灯片的基本操作包括幻灯片的选择、添加、复制移动和删除等。
(1)、选择幻灯片:单击左侧窗格中的幻灯片表示选中,选中两或两以上的幻灯片用ctrl(不连续)或shift(连续)结合鼠标进行选择。
(2)、插入幻灯片:方法一:在“开始”选项卡下新建幻灯片方法二:在幻灯片窗格单击鼠标右键新建幻灯片(3)、复制移动幻灯片在幻灯片中,幻灯片的排列顺序表示它的播放顺序,要想播放顺序发生改变,需要对幻灯片的位置进行移动。
方法一:可直接用鼠标拖拽的方式进行移动方法二:通过复制、剪切/粘贴的方法来完成幻灯片的复制和粘贴(4)、删除幻灯片选中需要删除的幻灯片,右键单击删除或直接按delete键进行删除。
2、演示文稿的视图模式Powerpoint2013为用户提供了多种视图模式,以便用户在编辑时根据不同的任务要求选择使用。
有普通视图、大纲视图、幻灯片浏览视图、备注页视图和幻灯片放映视图5种视图模式。
(1)、普通视图:powerpoint2013默认视图模式,在该视图模式下可以方便地编辑和查看幻灯片的容、调整幻灯片的结构以及添加备注容。
(2)、大纲视图:大纲视图能够在左侧的幻灯片窗格中显示幻灯片容的主要标题及大纲,以便于用户更好更快的编辑幻灯片容。
江西省南昌市2015-2016学年度第一学期期末试卷(江西师大附中使用)高三理科数学分析一、整体解读试卷紧扣教材和考试说明,从考生熟悉的基础知识入手,多角度、多层次地考查了学生的数学理性思维能力及对数学本质的理解能力,立足基础,先易后难,难易适中,强调应用,不偏不怪,达到了“考基础、考能力、考素质”的目标。
试卷所涉及的知识内容都在考试大纲的范围内,几乎覆盖了高中所学知识的全部重要内容,体现了“重点知识重点考查”的原则。
1.回归教材,注重基础试卷遵循了考查基础知识为主体的原则,尤其是考试说明中的大部分知识点均有涉及,其中应用题与抗战胜利70周年为背景,把爱国主义教育渗透到试题当中,使学生感受到了数学的育才价值,所有这些题目的设计都回归教材和中学教学实际,操作性强。
2.适当设置题目难度与区分度选择题第12题和填空题第16题以及解答题的第21题,都是综合性问题,难度较大,学生不仅要有较强的分析问题和解决问题的能力,以及扎实深厚的数学基本功,而且还要掌握必须的数学思想与方法,否则在有限的时间内,很难完成。
3.布局合理,考查全面,着重数学方法和数学思想的考察在选择题,填空题,解答题和三选一问题中,试卷均对高中数学中的重点内容进行了反复考查。
包括函数,三角函数,数列、立体几何、概率统计、解析几何、导数等几大版块问题。
这些问题都是以知识为载体,立意于能力,让数学思想方法和数学思维方式贯穿于整个试题的解答过程之中。
二、亮点试题分析1.【试卷原题】11.已知,,A B C 是单位圆上互不相同的三点,且满足AB AC →→=,则AB AC →→⋅的最小值为( )A .14-B .12-C .34-D .1-【考查方向】本题主要考查了平面向量的线性运算及向量的数量积等知识,是向量与三角的典型综合题。
解法较多,属于较难题,得分率较低。
【易错点】1.不能正确用OA ,OB ,OC 表示其它向量。
2.找不出OB 与OA 的夹角和OB 与OC 的夹角的倍数关系。


PPT精典基础教程(一)一、认识窗口启动PowerPoint,点开始-所有程序-Microsoft Offic-Microsoft Office PowerPoint 2003,就可以打开一个窗口;窗口分成三栏,中间宽大的是工作区,左边是幻灯片的序号,右边是任务属性窗格,幻灯片主要在中间的工作区中进行;1、空白幻灯片1)在工作区中间有两个虚线框,里面写着“单击此处...”,这个就是文本框,文本框是用来输入文字的;2)把鼠标移到第一个文本框的虚线上,这是鼠标指针变成一个花的形状,点一下左键选中文本框;选中以后,文本框的边框加粗,变成粗虚线,然后按一下键盘上的删除键Delete,这样就删除了这个文本框;3)同样再选中下边的第二个文本框,按删除键删除它,这样就得到一张空白的幻灯片;2、插入文本框1)点菜单“插入-文本框-水平”命令,鼠标的指针变成一个竖线|;2)在工作区中拖动鼠标,画一个方框,松开鼠标,这时出现一个文本框,光标插入点在里头一闪一闪;3)选一个汉字输入法,输入“美丽的校园”4)拖动文本框的边框到中间位置,然后在空白处点一下鼠标左键,取消文本框的选择,边框消失;3、放映幻灯片1)在左边窗格的下边,有一排按钮,点右边的小酒杯按钮,就可以播放这一张幻灯片,可以看到在白色的幻灯片当中,有一行文字“美丽的校园”,后面我们会逐渐往里面添加其他对象;2)在空白处点一下鼠标左键,出来一个黑色屏幕,上面写着“放映结束,单击退出”,再点一下左键退出放映,回到工作区中。
点菜单“文件-保存”命令,以“美丽”为文件名,保存文件到自己的文件夹;二、练习我们来做一些练习,巩固上一课所学的基础知识,每个文件都单独保存到自己的文件夹;做完一题保存后,点“文件-关闭”,然后再点“文件-新建”,然后在右边找到第一行“空白演示文稿”,点击即可;练习要求:删除自动添加的两个文本框,插入一个水平文本框,输入文字后把文本框拖到中间;1)插入一个文本框,输入自己的班级,以“班级”为文件名,保存到自己的文件夹;2)插入一个文本框,输入自己的学校,以“学校”为文件名,保存到自己的文件夹;3)插入一个文本框,输入三个你熟悉的花草的名称,以“花草”为文件名,保存到自己的文件夹;4)插入一个文本框,输入三个你熟悉的树木的名称,以“树木”为文件名,保存到自己的文件夹;5)插入一个文本框,输入三个你熟悉的城市的名称,以“城市”为文件名,保存到自己的文件夹;6)插入一个文本框,输入三个你熟悉的国家的名称,以“国家”为文件名,保存到自己的文件夹;7)插入一个文本框,输入三个你熟悉的体育项目,以“体育运动”为文件名,保存到自己的文件夹;8)插入一个文本框,输入三个你喜欢的电视剧名称,以“电视剧”为文件名,保存到自己的文件夹;9)插入一个文本框,输入三个你喜欢的歌曲的名称,以“歌曲”为文件名,保存到自己的文件夹;PPT基础教程(二)一、插入新幻灯片前面我们学习了一张幻灯片的基础操作,演示文稿是由许多张幻灯片组成的,下面我们通过一个练习来学习如何插入一张新的幻灯片;1、输入文字1)启动PowerPoint,自动打开一个空白文档,删除里面的两个空白文本框;2)点菜单“插入-文本框-水平”命令,插入一个水平文本框,输入一段文字“这是第一张幻灯片”;点击选中文本框边框,把文本框拖到幻灯片的中间摆好;3)点菜单“文件-保存”命令,以“插入新幻灯片”为文件名保存文件到自己的文件夹;2、插入新幻灯片1)点菜单“插入-新幻灯片”命令,添加一张新幻灯片,里面自动有两个文本框;2)在右边的窗格中,找到中间的内容版式,选择第一个“空白”,去掉里面自动产生的文本框;3)点菜单“插入-文本框-水平”命令,插入一个水平文本框,输入文字“这是第二张幻灯片”;点击选中文本框边框,把文本框拖到幻灯片的中间摆好,保存一下文件;4)这时左边的窗格中出现两张幻灯片,其中第二张就是我们新插入的幻灯片;5)点菜单“幻灯片放映-观看放映”,整个放映一下演示文稿,点一下鼠标左键就可以到第二张幻灯片;二、文本格式为了更好地修饰内容,我们还可以设置文字的格式,包括字体、字号、颜色等等,下面我们通过一个练习来学习操作;1、字体和字号1)启动PowerPoint,自动打开一个空白文档,先删除里面的两个空白文本框;2)点菜单“插入-文本框-水平”命令,插入一个水平文本框,输入文字“第二课文本格式”;3)把文本框拖到上方正中间,然后拖黑选中里面的文字;4)在上边的工具栏中点击字体旁边的下拉按钮,在出来的下拉列表中选择“黑体”,再点击旁边字号旁边的下拉按钮,选择“36”;2、文字颜色1)颜色在下边的工具栏里头,图标是一个大写字母A,旁边有个下拉按钮;2)点击A旁边的下拉按钮,在出来的面板中点击“其他颜色..”;3)在出来的颜色面板中选择一个蓝色,点“确定”;在空白处点一下,这时文字的颜色就设成了蓝色,一般投影上文字多用深色,背景用浅色;4)再插入一个文本框,输入两行内容“1、字体和字号↙2、文字颜色”(↙表示按一下回车键);把字体设为“楷体_GB2312”字号为24,颜色设为深绿色,拖动文本框对齐摆好,仔细移动可以按键盘上的方向键;点菜单“幻灯片放映-观看放映”,放映一下幻灯片,然后关闭退出,以“文本格式”为文件名,保存文件到自己的文件夹;PPT基础教程(三)动画可以让幻灯片达到动态的效果,同时也可以完成一些填空练习等要求,下面我们通过一个练习来学习操作;1、自定义动画1、输入文字1)启动PowerPoint,自动打开一个空白文档,先删除里面的两个空白文本框;2)点菜单“插入-文本框-水平”命令,插入一个水平文本框,输入文字“第三课自定义动画”,设置文字格式,黑体、32号、蓝色;3)再添加三个文本框,里头分别输入“百叶窗”、“飞入”、“音效”,文字格式为,楷体、24好、绿色,排好位置;4)以“自定义动画”为文件名,保存文件到自己的文件夹;2、设置动画1)选中第一个文本框,瞄准边框敲右键,在出来的菜单里头选“自定义动画”命令,注意瞄准、看清楚了再点;2)然后右边的窗格中上边,出来一个“添加效果”按钮,点击后出来下拉列表;3)把鼠标指针移到第一行“进入-⒈百叶窗”,点击选中;4)然后工作区中的文本框闪一下,左边出来一个小方块1,表示是第一个动画;5)保存一下文件,然后点左下角的小酒杯,放映一下幻灯片,可以发现百叶窗没有出来,那个位置是空白;点击一下鼠标左键,然后文字就按照百叶窗的样式出来了,点击鼠标退出放映,回到工作区;6)再选中第二个文本框,在右边设置自定义动画:“添加效果-进入-⒉飞入”再选中第三个文本框,也设置为:“添加效果-进入-⒉飞入”;保存一下,放映一下,看看动画的效果;2、设置效果1)看一下右边的窗格,现在有三个动画效果,现在选中的是第3个(外边有个框),效果后面都有一排下拉按钮,点击后可以换别的效果;2)点“3 形状4:音效”旁边的下拉按钮,也就是上图最下边的按钮;在出来的下拉菜单中,选择中间的“效果选项”,最下面的“删除”可以删除这个效果;3)在出来的效果面板中,把中间的声音选择“风铃”,点确定然后就可以听到清脆的声音;保存一下文件,点左下角的小酒杯,放映一下幻灯片,点击鼠标看一下动画效果2、练习自定义动画是一个经常使用的操作,这一节我们来做一些练习,以便熟练掌握设置自定义动画的方法;要求:插入5张幻灯片,每张一个文本框和一个动画效果,以“练习四”为文件名,保存文件到自己的文件夹;改变文本框大小的方法是,点边框选中后,拖动边框中的小圆圈控制手柄,注意鼠标指针变成双箭头的时候拖动;1、第一张输入文字:“盒状非常快”,在效果选项中把“内”改成“外”,并设置上字体、颜色、字号;2、第二张输入文字:“菱形外中速”,在效果选项中把内改成外,速度设为中速,设置好文本格式;3、第三张输入文字:“棋盘之前慢速”,在效果选项中把“单击鼠标”改为“之前”,速度慢速,设置文本格式;4、第四张输入文字:“出现效果”,在“添加效果-进入-其他效果..”里头找到“出现”,设置好文本格式;5、第五张输入文字:“颜色打字机”,同样在“其他效果”中找到,并设置好文本格式;选择一张幻灯片的方法是,在左边的窗格中点击一个方块,中间就出来这一张幻灯片;6、给第一张中的文本框加上“风声”的音效,点右边的“下拉按钮-效果选项”,选择风声;7、给第二张的文本框加上“电压”的音效,选中文本框后,在右边的效果选项中设置;8、给第三张的文本框加上“推动”的音效;9、给第四张的文本框加上“疾驰”的音效;10、给第五张的文本框加上“打字机”的音效,把速度设为“非常快”;最后保存,放映。
更改主题当您应用内置主题并想要更改颜色和字体时,您可以从启动屏幕或“设计”选项卡上的供设计人员选择的主题变体中选择。
新的默认幻灯片大小世界上的许多电视和视频都采用了宽屏和高清格式,PowerPoint 也是如此。
在以前版本中,幻灯片比率是 4:3。
在 PowerPoint 2013 中,新的默认比率是 16:9,但您可以在“设计”选项卡更改此设置。
如果您正在使用较旧版本的 PowerPoint,或者使用较老的监视器或投影仪,建议您将幻灯片比率调回到 4:3。
若要执行此操作,单击“设计”>“幻灯片大小”然后选择 4:3,或者您可以设置自定义大小。
如果您未看到任何符合您要求的组合,您可以在“幻灯片母版视图”中自定义主题颜色、字体和效果。
单击“视图”>“幻灯片母版”,您将会在“背景”组看到“颜色”、“字体”以及“效果”选项。
“演示者视图”设置是自动的如果您在 PowerPoint 的较旧版本中使用“演示者视图”,对其进行设置可能有困难。
PowerPoint 2013 解决了该难题,并使其应用更简单。
您所需要做的只是连接一台投影仪以及监视器,这样 PowerPoint 就会自动为您应用正确的设置了。
当然,如果需要的话,您也可以手动控制(在投影仪和监视器间切换)。
请注意,“演示者视图”不再需要多个监视器。
现在,您可以在一台监视器上的“演示者视图”中进行排练并使用所有工具,而无需与其他任何对象关联。
触控设备上的 PowerPoint 您现在可以在运行 Windows 8 的触控设备上与PowerPoint 2013 交互。
您可以使用典型的触控手势在演示文稿上轻扫、点击、滚动、缩放和平移。
将演示文稿保存到云中云就像空中文件存储。
您可以在联机的任何时候获取它。
如果您经常旅行或经常搬迁,且需要访问您的文件,您可以考虑将文件存储到云中。
SkyDrive 是一种免费的在线云服务,您可以安全访问并与他人共享文件。