64位服务器版FreeWAF安装手册
- 格式:doc
- 大小:950.00 KB
- 文档页数:12
FreeWAF安装手册ubuntu-12.04.2-server-i386版目录前言 (3)文档范围 (3)预期读者 (3)获得帮助 (3)格式&单位约定 (3)1.产品介绍 (4)1.1.产品概述 (4)1.2.产品特性 (5)1.2.1.硬件规格 (5)1.2.2.软件规格 (5)1.3.产品许可证 (7)2.产品安装准备 (9)2.1.硬件准备 (9)2.2.软件准备 (10)3.产品安装 (13)3.1.第一步:开机 (13)3.2.第二步:安装主界面 (13)3.3.第三步:选择环境配置 (13)3.4.第四步:分区 (22)3.5.第五步:开始安装 (24)3.6.第六步:结束安装 (26)3.7.第七步:首次登录 (27)4.基本配置 (28)4.1.CLI基础配置 (28)4.1.1.管理口IP地址配置 (28)4.1.2.CLI配置简单介绍 (28)4.2.Web网管配置 (30)5.初始化信息 (32)5.1.管理口IP地址初始值 (32)5.2.系统账号 (32)前言文档范围本文将覆盖Free Web应用防火墙(Free Web Application Firewall,以下简称FreeWAF)的安装,详细介绍安装过程。
本文档可以作为FreeWAF系统的管理员进行运维管理的指导性手册。
其他可用文档:l《FreeWAF命令参考》l《FreeWAF使用指南》l《FreeWAF开发指南》预期读者期望了解本产品主要技术特性和使用方法的用户。
本文假设您对下面的知识有一定的了解:l Web服务器和Web应用,比如:Nginx、Apache、IIS、Tomcat等。
l Linux操作系统。
l网络基础知识,包括:桥、路由、TCP/IP、HTTP和HTTPS等。
获得帮助获得下载、安装、使用、开发和支持等帮助,可以访问FreeWAF的开源网站:和https:///p/wafw/wiki/Home/,从那可以下载到最新FreeWAF的资料,寻找常见问题答案,或在相应论坛中提交您的问题,FreeWAF将会尽快予以回答。

目录一.安装准备 (3)1. 1变量安装目录 (3)1. 2服务器服务端口 (3)1. 3修改hosts文件 (3)二.安装websphere (3)2. 1 将websphere 安装包解压 (3)2. 2 创建概要文件 (8)2. 3 IHS的安装 (8)2. 4启动IHS (13)2. 5添加webserver (13)2. 6优化主配置文件 (14)三. 增加并启动节点: (14)3. 1 向管理端添加节点 (14)3. 2 启动节点 (14)四. 创建集群 (15)4. 1 创建集群 (15)4. 2 在一个集群上部署两个server, (17)4. 3 虚拟主机 (18)五.创建jdbc和数据源 (19)5. 1 创建JDBC (19)5. 2 创建数据源 (22)六. Was参数优化 (25)6. 1 java虚拟机 (25)6. 2 JDBC连接池 (25)6. 3 WebSphereApplicationServer数据源属性 (26)6. 4 Web容器线程池 (27)七. 部署应用 (27)7. 1 部署应用 (27)7. 2 生成plugin (28)一.安装准备1. 1变量安装目录应用服务器:wyapp01 63.1.1.101wyapp02 63.1.1.102<W AS_ND_HOME> /usr/IBM/WebSphere/AppServer//usr/IBM/WebSphere/AppServer/profiles/AppSrv01 WebSphere 应用服务器/usr/IBM/WebSphere/AppServer/profiles/Dmgr WebSpheer应用服务器网络部署Web服务器:<WEB_HOME>/usr/IBM/WebSphere<Plugin_HOME> /usr/IBM/WebSphere/Plugin Web插件路径启动程序路径:/usr/IBM/WebSphere/bin/apchectl主配置文件:/usr/IBM/WebSphere/config/httpd.conf1. 2服务器服务端口管理控制台端口:9060应用服务端口:Pweb 9081Eweb 9083Mweb 90841. 3修改hosts文件分别修改两台应用服务器的hosts文件Vi /etc/hosts添加如下内容:63.1.1.101 wyapp0163.1.1.102 wyapp0261.1.1.101 wyweb0161.1.1.102 wyweb0261.1.1.103 raserver63.1.1.103 wydb_src1.4安装浏览器,Was 在aix 上安装需要浏览器支持,建议去IBM官方下载火狐浏览器二.安装websphere2. 1 将websphere安装包解压进到解压目录下的W AS目录,运行安装程序install.sh如下图:单击“下一步”接受本软件的安装协议,点击“下一步”,进入系统条件检查点击“下一步”点击“下一步”把“应用程序服务器样本“去掉点击”下一步“选择安装的目录” /usr/IBM/WebSphere/AppServe”点击“下一步”选择安装产品出现was nd 安装摘要。

WampServer安装与环境配置对于初做PHP网站的朋友来说,第一步肯定是希望在自己电脑是搭建PHP环境,省去空间和上传的麻烦!但搭建环境也不是件容易的事情,特别是对于新手同学来说!因此在这里跟大家介绍我作为一名新手在使用的方便好用的PHP服务器架设软件,那就是WampServer,这款软件在安装的过程中就已经把Apache、MySQL、PHP继承好了,而且也做好了相应的配置,除此之外,还加上了SQLitemanager和Phpmyadmin,省去了很多复杂的配置过程,让我们能把更多的时间放在程序开发上。
更值得高兴地是这款软件也是完全免费的。
重要提示:基本上每一步更改配置文件的操作结束之后,均在重启了相应服务之后才会生效,也就是说如果想要修改立即生效的话,必须在修改完毕保存之后重新启动一下相应的服务!一、安装WampServer安装WampServer的过程很简单,只要一直点击next就可以完成安装了:依次按图操作了上图为选择默认浏览工具:安装过程中会提示要选择默认浏览工具,如上图所示,不过要注意哦,这个浏览工具指的可不是浏览器哦,它指的是windows的浏览器,也就是explorer.exe,默认的就是这个,直接点击“打开”就可以了。
如上图所示,会提示一个输入管理员邮箱以及邮箱SMTP服务器的窗口,这个如果大家愿意填写,可以填一下,不过一般情况下直接点击next就可以了,不会影响安装。
OK,安装顺利结束!很简单吧!二、语言设置右键单击图标,依次选择Language->Chinese;三、Apache端口配置WampServer安装时默认的端口是80,由于80端口被其他服务占用(如IIS),需要修改端口号。
在“D\wamp\bin\apache\apache2.4.9\conf”里打开httpd.conf,查找到“#Listen 12.34.56.78:80Listen 0.0.0.0:80Listen [::0]:80”,可以改成其他端口,我选用8080,再找到ServerName localhost: 80,将80也改为8080。
WAMP的安装和配置WAMP 是指在 Windows 平台下使用Apache、MySQL 和PHP。
Windows是目前世界是使用最多的操作系统,Apache 自1996年4月起就一直是世界上最爱欢迎的Web 服务器,最新Netcraft Web 服务器问卷调查的结果显示,全世界的 Web 站点中有超过50%都在使用 Apache Web服务器。
而 MySQL 则是世界是最受欢迎的开放源代码数据库管理系统,它提供了大型数据库的大多数特性,现在许多大型Web 站点使用的数据库都是 MySQL,包括 Yahoo!、Google、Cisco、HP 和 NASA 等。
PHP 是一种使用非常广泛的脚本语言,尤其适合 Web 开发,并且能够像ASP 和JSP一样嵌入到 HTML 中。
一般说来,大家都习惯于将 Apache、MySQL、PHP 架设在Linux系统下,因为它们都是开放源代码软件系统,采用这种组合可以使运营 Web 站点的成本大大降低,所以这是搭建 Web 站点的理想方式,而且世界是越来越多的站点采用这种方式。
但是,不可否认的是 Windows 也有其优点,就是易用,界面友好,操作起来非常方面,因此对新手来说在 Windows 平台下学习 PHP 确实是一个不错的选择。
而且,鉴于 Windows 平台的易用性,我们还可以采用另外一种方式来开发 Web 站点,即在 Windows 平台下使用 Apache、MySQL 和 PHP 开发站点,然后等开发完成之后再将开发好的站点移值到 Linux 平台下。
下面我将介绍如何在 Windows 下安装和配置这几种软件。
第一步是取得这三个软件的安装文件,前面已经提到过,Apache、MySQL 和 PHP 都是开放源代码软件,因此可以从互联网上免费得到。
目前 Apache 的最新版本是Apache 2.2,可以从这里下载。
MySQL 目前的最新版本是MySQL 5.0,可以从这里下载。
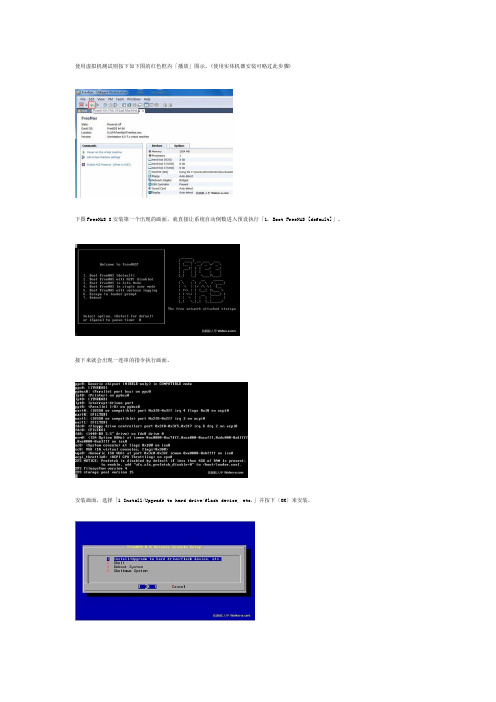
使用虚拟机测试则按下如下图的红色框内「播放」图示。
(使用实体机器安装可略过此步骤)下图FreeNAS 8安装第一个出现的画面,就直接让系统自动倒数进入预设执行「1. Boot FreeNAS [default]」。
接下来就会出现一连串的指令执行画面。
安装画面,选择「1 Install/Upgrade to hard drive/flash device, etc.」并按下〔OK〕来安装。
出现目的安装选择的画面,可以看到仿真2颗8G硬盘与1颗2G开机碟,选择2G来安装系统,接着按下〔OK〕来继续(使用实体机器安装的请略过此步骤)。
开始安装FreeNAS的讯息,当然是按下〔Yes〕继续。
按下〔Yes〕后,画面下方就开始出现指令运作了。
安装完成后提示为要求移除光驱上的光盘片与重新开机,按下〔Yes〕继续。
回到主画面选择「3 Reboot System」来重新开机。
进入系统后出现第一个画面如下图,「Console setup」内有9大选项,首先要设定网络环境,FreeNAS是属网络储存服务器,没有网络大概什么都不用谈吧!所以输入「1」后按下〔Enter〕注意:有些版本可能有更多Consolesetup 选项,但设置过程都是IP、网关、DNS。
15. 网络的设定主要是指定IP的地址,说明如下图。
之后回到主界面选择4网关设置完成后再选择6 DNS设置方法同上设定成功后会回到主画面选单上,选择「8 Rboot」后可以很清楚看到设定的IP地址,你成功1了吗?FreeNAS服务器启动后,接下来测试由远程联机进入管理,打开浏览器输入安装时设定的IP地址。
此时会出现登入的画面,账号是「admin」,密码为「freenas」注意:最好用火狐浏览器,IE有些加载项禁用了,显示不出登陆提示。
▼当你看到此画面表示成功进入管理画面,下图中可以清楚看到OS的版本是FreeBSD 8.2,而FreNAS的版本是FreeNAS 8.0.1-RC1。

一、系统环境调整(使用root用户)1、调整用户资源环境2、关闭selinux3、卸载冲突软件包4、确认防火墙开放9060、9080端口9060为控制台端口9080为应用访问端口5、配置JAVA环境变量二、软件安装上传安装盘,并执行./ncsetup.sh安装。
若提示没有权限,可以执行Chmod u+x 安装盘目录对nc安装盘内所有文件赋执行权限。
三、WAS调整客户方为我们安装的为一个管理服务器一个受管,因为实际要搭建单机环境,该架构对后期维护不方便,所以需要改成单服务的概要文件。
删除原来的概要文件cd /opt/IBM/WebSphere/AppServer/bin/./manageprofiles.sh -delete -profileName AppSrv01 #删除AppSrv01./manageprofiles.sh -delete -profileName Dmgr01 #删除Dmgr01创建新的概要文件./manageprofiles.sh -create -profileName AppSrv01 -templatePath/opt/IBM/WebSphere/AppServer/profileTemplates/default/ -profilePath/opt/IBM/WebSphere/AppServer/profiles/AppSrv01/创建成功后,启动下server,验证服务没问题cd /opt/IBM/WebSphere/AppServer/profiles/AppSrv01/bin./startServer.sh server四、代码部署1、Was概要路径配置进入nchome打开sysConfig.sh配置界面,按照如下标示配置,保存过程中可能提示请输入有效的profile路径,可以忽略。
2、服务器信息配置关闭窗口,重新打开sysConfig.sh,进行服务器信息配置3、数据源配置切换到数据源页签,配置数据源,测试通过后保存4、应用部署进入部署页签进行应用部署5、部署成功后,重启应用。
linux 5.4 版本64位安装1.进入下图敲回车2.选择skip3.选择NEXT3.选择语言English,然后点击NEXT4.选择us.English,点击NEXT5.序列号输入,选择跳过,点击skip,然后选择ok,此步选择Yes,然后点击NEXT6.磁盘分区,选择自定义分区分区的时候选择New,然后进行对/、boot、swap等进行给予硬盘空间指定的大小。
SWAP 分区大于内存大小的2倍。
7.分区完之后进入下一步,见下图,选择NEXT8.网口选择,在所有网口前打上“√”9.时区选择,关闭UTC,去掉“√”10.输入登陆密码11.进入依赖包选择,在Software Development前打上√。
选择Customize now,点击next见下图所选内用按以下图片选择,在Applications 当中只需留上Graphical Internet在Development 选项当中保持默认选项,见下图在Server|选项当中选择FTP server 和windows file server,见下图在语言选项中,勾上Chinese Support完成以上操作后点击NEXT见下图点击NEXT,开始linux系统安装,完成之后选择reboot此时会进行重启,完了之后见下图,选择forward选择forward关闭防火墙,选择disabled关闭selinux,点击forward进入下一步Kdump。
选择forward,进入下一步日期修改,修改为当前日期,完成之后选择forward选择forward进入下一步选择forward进入下一步选择finish,完成linux5.4 64位系统的安装。
WampServer2.5 64位安装配置多个网站详解(图文教程) Win2008 64位系统布曙wampserv2.5 64 apache+mysql+php环境,以安装配置和布曙www_hncltx_cn和www_kestv_tv两个网站为例,用图文教程全面讲解wampserv2.5 64位环境安装和配置多个网站和多个域名。
并解决wampserver访问权限的错误,和网站的301重定向问题,导入多个网站的源码和数据库让其成功在wampserv2.5环境上运行。
说明:一、WampServer2.5安装:1.下载Wampserver (64 bits & PHP 5.5)2.5相关安装程序2.安装vcredist_x64.exe 和wampserver2.5-Apache-2.4.9-Mysql-5.6.17-php5.5.12-64b.exe 二、用phpMyAdmin 和cmd命令行配置mysql1.在url中录入:localhost/phpmyadmin/输入user:root 密码:空,并在相关图文下修改密码和增删改查数据库2.在cmd命令行中改Wampserver中mysql数据库默认密码空为hncctv3.安装配置navicat 数据库图形化管理工具三、Wampserver迁入配置多个网站和多域名1.准备湖南成龙特训网站数据库和网站源码2.用navicat导入或迁入网站数据库(实例图文讲解)3.Wampserver迁入配置多个网站和域名(实例图文讲解)4.配置不带www的域名使用301重定向到带www的域名一、WampServer2安装:1.下载WampServer2相关安装1.VC10SP1vcredist_x64.exe 64bits/en-us/download/details.aspx?id=306792.Wampserver2.4-x86.exeApache : 2.4.9 MySQL : 5.6.17 PHP : 5.5.12 PHPMyAdmin : 4.1.14 SqlBuddy :1.3.3 XDebug :2.2.52.安装vcredist_x86.exe和Wampserver2.4-x86.exe点击vcredist_x64.exe,再点安装,提按示装完即可!点击Wampserver2.4-x86.exe进行下图安装:安装完成!!测试wampserver有没有安装成功,如下:打开ie,在url中输入:http://localhost/如出现如下画面,表示安装成功!!!!二、用phpMyAdmin 和cmd命令行配置mysql:1.在url中录入:localhost/phpmyadmin/输入user:root 密码:空配置phpmyadmin :在ie的url中输入http://localhost/phpmyadmin可修改数据库密码和相关配置。
服务器证书安装配置指南(Websphere6)一、确认证书安装Websphere通常只作为应用服务器,它可以方便的与其他Web服务器做应用集成。
如果您的Websphere集成了Apache、IBM Http Server、IIS 等Web服务器,则您的服务器证书需要配置在您的Web服务器上。
如果您的Webspere不仅作为应用服务器,也做为Web服务器提供直接的Web 访问方式,您才需要将证书安装配置在Webspere中。
二、生成证书请求1. 安装JDK(可选)Websphere安装后自带JDK安装。
如果您直接在服务器上生成证书请求,请进入Weblogic安装目录下JDK所在路径的bin目录,运行keytool命令。
如果您需要在其他环境下生成证书请求文件,则您可以选择安装JDK,并稍后上传生成的密钥库文件keystore.jks到服务器上进行配置。
Java SE Development Kit (JDK) 下载。
下载地址:/javase/downloads/index.jsp2. 生成keystore文件生成密钥库文件keystore.jks需要使用JDK的keytool工具。
命令行进入JDK下的bin目录,运行keytool命令。
(示例中粗体部分为可自定义部分,请根据实际配置情况作相应调整)keytool -genkey -alias server-keyalg RSA -keysize 2048 -keystore keystore.jks -storepass password -keypass password以上命令中,server为私钥别名(-alias),上图“输入<server>的主密码”提示输入密钥对密码,在这里不要输入,而是直接回车,会保持与密钥库文件密码一致(java不支持密钥库密码与密钥对密码不一致),生成的keystore.jks文件默认放在命令行当前路径下。
V1.0V64Quick Installation GuideFanvil Technology Co.,LtdScreen iconKeysfeaturesDSS Keys,It canbesetaslinekey/functionkey/speed dialkey,etc.SoftkeysMessagewaitingindicatorLeft andright navigation keysUp navigation key,Shortcut to call logDown navigation key,Shortcut to StatusOK key,Shortcut to MenuHome key,go back to HomepageReturn key,go back to the previousdirectoryPhonebook keyVoice message keyIn idle mode or during ringing:increase ordecrease ringer volumeIn communication:increase or decreasehandset,headset or hands-free volumeHeadset key,activate/deactivate headsetIn idle mode:activate/deactivate silentmodeIn communication mode:mute/un-mute acallRedial key,access to redial the last recordHand-free key,activate/deactivate handsfreeHandset Cord Ethernet Cable Quick Installation Guide IP Phone Handset StandPower Adapter(Optional)Wall Stand(Buy separately)In hands-free mode Call forward activated New SMS Dialed call(s)In headset modeDisable do not disturb(Beige)New VM messages Internet connected In handset modeDo not disturbactivated(Red)Voice quality level ofcallInternet isdisconnected Mute activated SIP hotspot activated Keypad locked No IP addressSilent mode VLAN activated Forward call(s)Wireless networkconnected Call is on hold VPN activated Missed call(s)Wireless networkdisconnected Auto-answeringactivatedBluetooth devicepaired connectionReceived call(s)Wireless networkfailurePackaging listPlease follow the instructions in below picture to install the device.●Bracket desktopinstallation●Wall mounting (wall stand need buyseparately)Connecting to the devicePlease connect power adapter,network,PC,handset,and headset to the corresponding ports as described in below picture.①USB port:connect USB device (USB flash drive)②Power port:connect the power adapter.③Network port:connecting local area network or internet.④PC port:the network port connect to the computer.⑤Headset port:connect headset.⑥Handset port:connect IP Phonehandset..Using Ethernet1.The power on the device and connect the WAN port of the phone to the RJ45socket of a hub/switch or a router (LAN side of the router)using the Ethernet cable.2.The default is DHCP ing WiFi1.The power on the device and make sure the phone is idle.2.Press Menu >Basic >WLAN,Enabled the WiFi Feature.3.Press scan to search for currently available wireless network.4.Enter the available network and select the WiFi you want to connect.5.Press connect soft key and enter the appropriate password to connect to the WiFi.The default is DHCP mode.ConfigurationConfiguration via LCD menu of phone1.Press Menu >Advanced (default password 123)2.Select Network:To configure the Network Settings (IPv4/IPv6/IPv4&IPv6,DHCP/Static/PPPoE).3.Select Accounts:To configure enable the account,fill the SIP server address,port,user name,password etc.4.Save the configuration.Configuration via web1.Get the IP address from the phone:Press down navigation key,or Menu >Status >IPv4/IPv6.2.Login:Input the IP address in the web browser.The PC and phone should be in the same IP address segment (The default username and password are both ‘admin’.)3.Configure:Select network/account etc,and fill the relevant content.4.Save the configuration.Language setting1.Press Menu key >Basic >Language.2.Select the desired language and press OK soft key.Making a call1.Pre-dialing:enter the phone number and pick up the handset.2.Direct dialing:lift the handset and enter the phone number.3.Handsfree:enter phone number and press or vice versa.4.Headset:enter phone number and press or vice versa.5.Designated line:press line key,enter phone number and press dial key.Accepting a call1.Using the handset:pick up the handset.2.Using the headset:press .3.Using the handsfree:press .1.Press key,redial a call number.1.Press to Mute the microphone during the call.2.Press again to un-mute the conversation.1.Press Hold soft key,caller is put on hold.2.To retrieve the call press Resume soft key.Note:with more than one active call,select desired call with the navigator key and use the corresponding soft key to hold or resume. Attended transfer:1.Press Xfer soft key during the active conversation,the call is put on hold.2.Dial the second telephone number.3.When the call is answered,then press Xfer soft key to complete the operation.Blind transfer:1.Press Xfer soft key during the active conversation,the call will be on hold.2.Then enter the2nd telephone number and press Xfer soft key. 1.Press Menu>Features>Call Forward.2.Select the line,the type of forward,enter the destination number and status,and press OK soft key.1.Once in line with1st caller,press Conf soft key,1st caller is put on hold.2.Then call the2nd number.3.After,2nd call is established,press Conf soft key to set up the conference.1.You can configure shortcuts for the programmable keys. 2.Press Menu>Basic>Keyboard,select among the configurable items,and select your desired type and value,press OK key. 1.Press DND soft key,and enable the device do not disturb mode. 2.Or press Menu>Features>DND,and select the Mode and Type, and press OK key.1.To access your voice mailbox,press or Menu>Message> Voice Message,number of messages will be indicated if provided by your server or pbx.2.Select the line and press Play to call.1.Press Menu>Basic>Bluetooth.2.Press OK soft key to enter the bluetooth open interface.After opening,press Scan soft key to display the list of bluetooth scanned. Select any device and press connect.1.Press Menu>Basic>WLAN.2.Press OK soft key to enter the WLAN open interface.After opening,press Scan soft key to display the list of Wi-Fi scanned. 3.Press Enter soft key to enter the available Network,select the wireless network,press the Connect soft key and enter the password to connect.1.Press up navigator key or Menu>CallLog>Local Call Logs 2.Scroll through the list using navigator key.3.To dial an entry,press Dial soft key or pickup handset or press or.Access Phonebook:1.Press or Contact soft key or Menu>PhoneBook>Local Contacts.2.Select All Contacts or other group.3.To dial an entry,press Dial soft key or pickup handset or press or.Add new entry:1.Press Contact soft key,Press All Contacts or other group>Press Add.2.Enter name and number and press OK soft key.Regulatory ComplianceFederal Communication Commission(FCC)—USAThis device complies with Part15of FCC Rules.Operation is subject to the following two conditions:(1)this device may not cause harmful interference,and(2)this device must accept any interference received;including interference that may cause undesired operation.This equipment has been tested and found to comply with the limits for a Class B digital device,pursuant to Part15of the FCC Rules.These limits are designed to provide reasonable protection against harmful interference in residential installation.This equipmentgenerates,uses,and can radiate radio frequency energy,and if it is not installed and used in accordance with the instruction manual,itmay cause harmful interference to radio communications.However,there is no guarantee that interference will not occur in a particular installation.If this equipment does cause harmful interference to radio or television reception,which can be determined by turning theequipment off and on,the user is encouraged to try to correct the interference by one or more of the following measures:•Reorient or relocate the receiving antenna.•Increase the separation between the equipment and receiver.•Connect the equipment into an outlet on a circuit different from that to which the receiver is connected.•Consult the dealer or an experienced radio/TV technician for help.Warning:Any changes or modifications to this unit not expressly approved by the party responsible for compliance could void theuser’s authority to operate the equipment.This equipment complies with FCC radiation exposure limits set forth for an uncontrolled environment.This equipment should be installed and operated with minimum distance of20cm between the radiator and your body.This transmitter must not be co-located or operating in conjunction with any other antenna or transmitter.This equipment complies with Part68of the FCC rules and the requirements adopted by the ACTA.On the bottom of thisequipment is a label that contains,among other information,a product identifier in the format US:3I1IPNANV64.If requested,this number must be provided to the telephone company.Industry Canada Equipment Standard for Digital Equip-ment(ICES)—CanadaThis Class B digital apparatus complies with Canadian ICES-003.Cet appareil numérique de la classe B est conformeàla norme NMB-003du Canada.Innovation,Science and Economic Development(ISED)—CanadaThis device contains licence-exempt transmitter(s)/receiver(s)that comply with Innovation,Science and Economic Development Canada’s licence-exempt RSS(s) .Operation is subject to the following two conditions:(1)This device may not cause interference.(2)This device must accept any interference,including interference that may cause undesired operation of the device.L’émetteur/récepteur exempt de licence contenu dans le présent appareil est conforme aux CNR d’Innovation,Sciences et Développementéconomique Canada applicables aux appareils radio exempts de licence.L’exploitation est autorisée aux deux conditions suivantes:(1)L’appareil ne doit pas produire de brouillage;(2)L’appareil doit accepter tout brouillage radioélectrique subi,même si le brouillage est susceptible d’en compromettre le fonctionnement.This equipment complies with ISED radiation exposure limits set forth for an uncontrolled environment.This equipment should be installed and operated with minimum distance of20cm between the radiator and your body.Cetéquipement est conforme aux limites d’exposition aux rayonnements ISEDétablies pour un environnement non contrôlé.Cetéquipement doitêtre installéet utiliséavec un minimum de20cm de distance entre la source de rayonnement et votre corps.This device and it’s antennas(s)must not be co-located or operating in conjunction with any other antenna or transmitter except in accordance with IC multi-tra nsmitter product procedures.Cet appareil et son antenne(s)ne doit pasêtre co-localisés ou fonctionnement en association avec une autre antenne ou transmetteur.This product meets the applicable Innovation,Science and Economic Development Canada technical specifications.Le présent produit est conforme aux spécifications techniques applicables d’Innovation,Sciences et Développementéconomique Canada.Fanvil Technology Co.,LtdWebsite:EMail:**********************************Tel:+86-755-2640-2199Fax:+86-755-2640-2618Add:10/F Block A,Dualshine Global Science Innovation Center,Honglang North2nd Road,Bao'an District,Shenzhen,China。
产品安装
至此,FreeWAF硬件和软件系统安装盘(USB启动盘)都已经准备好了,下面就开始使用上面已经做好的USB安装盘安装FreeWAF软件系统。
第一步:开机
首先,安装系统的第一步是将U盘插入到主机的USB接口,然后,再开机设置BIOS,选择从USB启动。
第二步:安装主界面由于已经从BIOS中设定了从USB启动系统,则再次重启系统时,则会从USB启动到安装界面,启动后显示如下安装界面。
图1 选择安装语言
图2 安装启动界面
第三步:开始安装(1) 在语言栏中点选择“English”,即设置系统语言为英文,然后显示如下界面。
图3 设置系统语言
(2) 下方的选项框中选择中国时区(一定要设置为中国,否则报表显示时候时间会出错)。
图4 选择系统时区一
图5 选择系统时区二
图6 选择系统时区三
图7 选择系统时区四
(3) 进入键盘布局的选择。
这里选择默认的美式键盘布局,如下图所示。
图8 设置键盘习惯一
图9 设置键盘习惯二
图10 设置键盘习惯三
(4) 开始配置的检测过程
图11 自动安装
(5) 自动对网卡和网络情况进行检测,建议不要连上网络离线安装会比较快,如下图所示:
图12 配置网卡一
图13 配置网卡二
图14 配置网卡三
(6) 这里需要设置管理员的姓名、主机的名称、登录名、登录密码等。
图15 配置用户名
图16 配置密码
图17 配置home目录安全性
另外在图片下方还可以选择是否加密home目录。
第四步:分区
(1) 进入分区步骤,最先出现的是如下界面。
建议在安装前将硬盘中的内容进行备份,并在这步选择“Manual”,即手动分区。
图18 选择手动分区
图19 确认开始分区
图20 设置分区
(2) 由于对于FreeWAF来说,需要用户划分出一个20G的逻辑分区,该分区专为防篡改使用。
图21 设置分区和挂载点
图22 确认分区信息
~注意事项:
用户需要划分出一个20G的逻辑分区,该分区专为防篡改使用,挂载在
/var/tamper目录。
第五步:开始安装
当硬盘划分完毕之后,则可以正式开始将FreeWAF安装到硬盘上的步骤了。
(1) 当上一步中点击“Yes”之后,显示格式化并安装系统的信息,如下图所示。
图23 安装系统
(2)当出现设置proxy时候,跳过不用设置,如下图所示。
图24 不需要配置proxy
图25 安装相关apt包
(3)光盘已经有相关程序,取消自动升级。
图26 取消自动升级
(4)Freewaf光盘默认已经安装好需要的软件包,这里不需要选择安装其他软件包。
图27 不需要选择安装其他软件包
(5) 当设置完相关信息后,点击“Continue”,就开始了正式的安装过程,这个安装过程所需的时间依赖于具体的PC的性能。
图28 安装软件
(6)按默认的配置安装引导程序即可。
图29 安装引导程序
第六步:结束安装
当安装完成之后,会弹出如下对话框。
图30 重启界面
此时只需要点击按钮“Continue”,重启机器即可。
~注意事项:
当再次重启系统时,切记要将系统从U盘启动改为从硬盘启动。