Nikon F70 说明书
- 格式:doc
- 大小:4.67 MB
- 文档页数:78
尼康照相机1、照片效果=像素+解像力2、1024*768分辨率=每条水平线上都有1024个像素,共768条水平线+76.8万像素3、对焦点是数码单反摄影中最为重要的技术之一,对焦点多,覆盖的取景区域就更为密集。
拍摄运用的景物有优势。
4、点测联动,测光点可以跟随对焦点移动,对焦位置既是测光位置5、尼康出众的感光度适合拍摄夜景6、佳能相机拍出的照片色彩更为浓烟,尼康则是清新、淡雅。
7、尼康数码单反相机分三个系列(1)高性价比的入门机型D3000、D3100、D5000、D5100、D90、D7000等。
相机机身多采用强化塑料的材质,重量相对较轻,各项功能的最高品质不足,例如入门级单反相机的ISO感光度最高可扩展为12800,而当前最高的ISO感光度已经达到20万以上。
机身塑料耐用度不够,手感稍差。
连拍速度、最多可连拍张数、最高像素数、画质、画面视角等都不够完美。
(2)强大的准专业机型D300S(告诉连拍功能,适合拍摄运动及体育类器材)、D700(全画幅机型的典范)。
一般为金属机身,较比顶级机型缩减了某些功能或降低了某些成本。
(3)顶级的专业机型D3X(高达2450万像素)、D3S(超过10万的感光度)顶级机型属于超前产品,一般情况下在若干年内不会被低端机型超越。
8、镜头上A与M为自从对焦和手动对焦的调节按钮。
A为自动。
有些机身配有马达,需将机身上的马达开关也设定到“自动”(开)的状态,才能实现自动对焦(机身上的AF、M)9、尼康的三中对焦模式(1)AF-C(连续对焦)适用于拍摄运动对象。
(2)AF-S(单次对焦)适用于拍摄静止对象。
(3)AF-A(自动伺服)自动调节对焦模式。
运动时自动调节至AF-C,静止时自动调节至AF-S。
对焦模式调节方式:按住相机身上的“AF模式”按钮,然后转动主拨轮,即可在这3种模式间转换。
10、超焦距(泛焦)技法:在拍摄大场面的风光画面时,大多数情况下要求画面有更大一些的景深,使远处与最近处拉进附近的景物都能清晰地表现出来。
单反相机各个功能按键的作用单反相机正面按键介绍首先我们来看单反相机正面的按键,尼康D700作为专业单反,在按键功能上要比入门单反丰富很多,比如景深预览键就在入门机型中是没有的,可见主要还是针对专业用户的操作使用。
在镜头卡口左边上下分别有2个按键,它们别分为:景深预览按键、Fn自定义功能按键。
景深预览:按动此键,镜头光圈会收缩到你设定的光圈值大小,在取景器里会发现瞬间变暗。
这是因为正常取景时,相机会自动把镜头光圈扩展到最大,以获得更多的通光量,使取景器里很明亮便于对焦。
这个功能在日常拍摄中用处不大,只有在使用微距镜头时,通按动景深预览来观察被摄物体是否完全清晰在景深范围内,比便于相应调整光圈值。
Fn自定义功能键:这是尼康特有的功能键之一,主要是让用户在菜单里为Fn该键设置一个指定功能,方便在拍摄中快速调整。
在镜头卡口的右边也有两个按键,分别是:镜头卡口锁、对焦驱动模式切换键。
镜头卡口锁:顾名思义是卸镜头时要用到的,当你在卸镜头时需要按住此键,然后旋转镜头既可把镜头卸下。
对焦驱动模式切换键:用于切换三种对焦模式,分别是:C“连续对焦”用于拍摄移动物体,系统会连续对焦工作并且快门可以随时按下;S“单次对焦”用于拍摄静止物体,每半按一次快门系统对焦一次,与连续对焦不同的是,如果相机对不上焦,快门是无法按下拍摄的;M“手动对焦”用于要求对焦精确度高的拍摄场景使用,如微距摄影,需要手动转动镜头对焦环来对焦拍摄。
单反相机背面按键介绍(一)在单反相机背面是功能按键的主要分布区,专业机型和入门机型按键的数量会有很大的区别,但是厂家为了提高相机的通用性,使用操作上基本没有区别,所以会用专业级,那入门机器肯定也不在话下。
作为专业单反的尼康D700,你在机身背面会发现它的按键非常多,我们以从左到右的顺序分别介绍。
机身背面左边按键照片回放:用于拍摄后回放照片时使用。
在尼康入门级到高端专业机型里,此功能均使用右箭头图标显示。

尼康镜头说明if和ed是两个特性指标,具体介绍见下面尼康(nikon)镜头标识的含义ai: automatic indexing自动最大光圈传递技术发布于1977年,是nikon f卡口的第一次大变动。
ai是指将镜头的最大光圈值传递给测光系统以便进行正常曝光测量的过程和方法。
当一个ai镜头被装在兼容ai技术的机身上时,该镜头的最大光圈值在机械连动拨杆的自动接合和驱动下传递给机身的测光系统,以实现全开光圈测光。
nikon f2a、f2as、nikkormat el2、ft3和fm是第一批获益于这项技术的机身。
代表镜头:nikkor ai 50/1.4 ai-s:automatic indexing shutter自动快门指数传递技术在1981年,nikon对全线ai镜头卡口进行了修改,以便使它能够与即将投入使用的fa高速程序曝光方式完全兼容,这些修改后的新镜头就是ai-s卡口nikkor镜头。
根据镜头光圈环和光圈直读环上的橙色最小光圈数字以及插刀卡口上的打磨凹槽,非常容易识别。
当ai-s镜头用于nikon fa机身时,它能够根据自身的焦距向机身提供信息以选择正常程序或高速程序,在快门速度优先自动曝光方式时,它们能够在非常宽的光照范围内提供一致的曝光控制。
(因为ai-s镜头是为fa上的曝光“自动化”而定制的,因此机身的自动曝光连动拨杆能够非常流畅地控制ai-s镜头的光圈,以达到更为快速而精确的曝光控制)。
代表镜头:nikkor ais 50/1.4 af-s: silent wave motor静音马达代表该镜头的装载了静音马达(silent wave motor,s),这种马达等同于佳能的超音波马达(ultrasonic motor),可以由“行波”(traveling waves)提供能量进行光学聚焦,可高精确和宁静地快速聚焦,可全时手动对焦。
可支持af-s 镜头自动对焦的相机有 f5 ; f4; f100;f90x;f90;f80;f70;f65;d1;d1x;d1h;d100,其余的机身可以接用,也可以测光,但不能自动对焦。
nikon pro 04.1107che garantisce la sicurezza delle gallerie, segnalando la presenza di eventuali incrinature o altri danneggiamenti strutturali. L’azione congiunta dei due sistemi facilita l’ispezione e l’analisi non solo delle gallerie, ma anche di ponti, sottopassaggi, pali, pareti, rami e vari altri ostacoli che potrebbero impedire il passaggio del treno.Il sistema viene montato sulla testa di un particolare treno diagnostico e utilizza cinque fotocamere speciali ad alta velocità e dieci obiettivi NIKKOR non modificati (cinque AF DX Fisheye-NIKKOR 10,5 mm f/2.8G ED e cinque AF NIKKOR 28 mm f/2.8D), che acquisiscono immagini mentre il treno è in corsa. Mermec ha scelto specificamente gli obiettivi NIKKOR per la loro qualità ottica estremamente elevata e la loro capacità di rispondere bene ai requisiti ottici necessari, decisamente particolari. Il T-Sight 5000 genera grandi quantità di dati: vengono infatti misurati 4 milioni di punti al secondo e le fotocamere sono in grado di acquisire immagini dati da 80 megapixel. Grazie a un sistema a infrarossi (per non interferire con la visuale del conducente), le riprese delle fotocamere vengono riflesse Non c’è da sorprendersi che, data la conformazione rocciosa del terreno svizzero, il sistema ferroviario nazionale comprenda numerose gallerie. La rete, lunga 3.011 km, ne conta 307, per un totale di 259 km. In passato, ispezionare lo stato interno di queste gallerie era un lavoro lungo e faticoso. I dati venivano raccolti mediante strumenti di misurazione manuali a ritmi lentissimi, tenendo occupate tratte che avrebbero potuto essere utilizzate dai convogli passeggeri. Sulle linee occupate con alti picchi di traffico, effettuare queste ispezioni in sicurezza e senza interruzioni era una continua sfida. Oggi, invece, in parte grazie agli obiettivi NIKKOR, questo è diventato di gran lunga più facile.Mermec, azienda italiana specializzata in soluzioni tecnologiche per la manutenzione delle reti ferroviarie, ha sviluppato il T-Sight 5000 High Performance Clearance Gauge and Tunnel Walls Inspection System, attualmente utilizzato, tra gli altri, dalle Ferrovie Federali Svizzere. Il sistema utilizza la tecnologia laser e ha due funzioni: la misurazione della sagoma limite, per assicurare il libero passaggio dei treni nelle gallerie, e l’ispezione delle pareti, GALLERIA CON VISTA MENTRE I PRODOTTI NIKON CONquISTANO uNA POSIzIONE DI SEMPRE MAGGIOR RILIEvO NELLE APPLICAzIONI INDuSTRIALI, GLI ObIETTIvI NIKKOR FuNGONO DA APRIPISTA PER LE FERROvIE SvIzzERE Sinistra: il sistema T-Sight5000, con funzioni dimisurazione della sagomalimite ad alte prestazionie di ispezione delle paretidelle gallerie, montato sullatesta dello speciale trenodiagnostico. Si riesconoa vedere gli obiettivi AFDX Fisheye-NIKKOR 10,5mm f/2.8G ED, mentregli AF Nikkor 28 mmf/2.8D sono nascosti.Destra: il sistema èin grado di catturareun’immagine ogni 7 cmquando il treno viaggia a200 km/h, generando unmodello reticolare in 3D.Prima foto a destra: ilT-Sight 5000 in azioneper la rete delle FerrovieFederali Svizzere. articoli di attualitålateralmente di 90° tramite cinque specchi montati sul rovescio della calotta frontale. Le immagini di tutte e cinque le fotocamere vengono quindi montate insieme per formare una vista a 360° della struttura circostante. In aggiunta a ciò, l’altro gruppo di obiettivi genera un modello reticolare in 3D che viene registrato insieme alle immagini. Fotocamere e obiettivi lavorano a velocità incredibili e sono in grado di catturare un’immagine ogni 7 cm quando il treno viaggia a 200 km/h. Ciò significa che il fastidio per i passeggeri è minimo e che la società ferroviaria non perde profitti con la sostituzione di treni che generano ricavi. Si prevede che questo sistema rivoluzionerà la diagnostica dei trasporti su rotaia, a vantaggio soprattutto dei sistemi metropolitani urbani e sotterranei. Per saperne di più sul sistema T-Sight 5000, visitare il sito Per ulteriori informazioni sugli obiettivi NIKKOR, visitare il sito 。
尼康照相机1、照片效果=像素+解像力2、1024768分辨率=每条水平线上都有1024个像素,共768条水平线+76.8万像素3、对焦点是数码单反摄影中最为重要的技术之一,对焦点多,覆盖的取景区域就更为密集;拍摄运用的景物有优势;4、点测联动,测光点可以跟随对焦点移动,对焦位置既是测光位置5、尼康出众的感光度适合拍摄夜景6、佳能相机拍出的照片色彩更为浓烟,尼康则是清新、淡雅;7、尼康数码单反相机分三个系列1高性价比的入门机型D3000、D3100、D5000、D5100、D90、D7000等;相机机身多采用强化塑料的材质,重量相对较轻,各项功能的最高品质不足,例如入门级单反相机的ISO感光度最高可扩展为12800,而当前最高的ISO感光度已经达到20万以上;机身塑料耐用度不够,手感稍差;连拍速度、最多可连拍张数、最高像素数、画质、画面视角等都不够完美;2强大的准专业机型 D300S告诉连拍功能,适合拍摄运动及体育类器材、D700全画幅机型的典范;一般为金属机身,较比顶级机型缩减了某些功能或降低了某些成本;3顶级的专业机型D3X高达2450万像素、D3S超过10万的感光度顶级机型属于超前产品,一般情况下在若干年内不会被低端机型超越;8、镜头上A与M为自从对焦和手动对焦的调节按钮;A为自动;有些机身配有马达,需将机身上的马达开关也设定到“自动”开的状态,才能实现自动对焦机身上的AF、M9、尼康的三中对焦模式1AF-C连续对焦适用于拍摄运动对象;2AF-S单次对焦适用于拍摄静止对象;3AF-A自动伺服自动调节对焦模式;运动时自动调节至AF-C,静止时自动调节至AF-S;对焦模式调节方式:按住相机身上的“AF模式”按钮,然后转动主拨轮,即可在这3种模式间转换;10、超焦距泛焦技法:在拍摄大场面的风光画面时,大多数情况下要求画面有更大一些的景深,使远处与最近处拉进附近的景物都能清晰地表现出来;这种情况下,只能设定很小的光圈,才有可能实现则个要求,但有时却无法实现,因为再小的光圈也不可能保证所有距离内的景物都非常清晰;例如,假设用24-70mm这款镜头,以一篇草丛或岩石为前景,拍摄大场面的风光,对焦点在无限远处或较远处的某个景物上,因为要获得最大景深,我们设定这款镜头的最小光圈F22,但这时会发现前景的草丛或岩石仍然是模糊的,超出了景深范围;这段模糊的距离范围,就是“超焦距”,如果将对焦位置放在超焦距距离处,则可以发现画面中所有的景物都变得非常清晰,这便是“泛焦”,也成为“超焦距法”;正常来说我们在拍摄时没有必要严格执行超焦距法,如果发现超焦距内的模糊前景影响到画面的效果,那么可以稍微往近一点的位置对焦,只要能够保证所拍摄的画面内景物都非常清晰即可;11、追踪对焦技法:要表现主体运动的效果,可以使用追踪对焦法进行拍摄;拍摄时,要使运动的主体时刻保持在取景范围内,并且对主体连续对焦,相机视角就必须追随着主体转动,这时运动的主题对相机来说如同静止一般,而实际上静止的背景对于相机来说则变为运动状态;根据主体运动的速度而设定中慢快门,则最终拍摄的画面中,运动主体是清晰的,但背景却因为相机的转动而变为运动模糊状态;12、光圈的两个作用:1通过进光量的多少来控制摄影时的曝光程度;2通过改变光圈大小来调节拍摄照片的清晰与虚化效果;13、光圈大小的选择:一般情况下风光题材的照片要求画面中远处与近处的景物都非常清晰,需要景深较深,应使用F7.1以上的中小光圈;对于人像、微距等题材,要求人物非常清晰,而背景要虚化,因此可使用F5.6以下的大光圈拍摄,获得较浅景深的效果;此外,夜晚或光线微弱时,可使用较大光圈使更多的光进入相机;14、最佳光圈:最大光圈与最小光圈都无法表现出最好的画面效果,而使用最佳光圈却能够将镜头的性能发挥到极致,表现出细腻、出色的画质;最佳光圈是针对镜头而言的,是指使用某只镜头时能够表现出最佳的光圈;一般情况下,对于变焦镜头来说,最佳光圈范围是F8.0~F11.0,要注意,所谓的画质最佳,是针对焦点周围的画面区域而言;由最佳光圈的数值可以看到,使用最佳光圈时,既无法表现出足够大的虚化效果,也无法获得很大的景深效果,所以使用最佳光圈要选对时机,不能仅仅因为对焦点周围画质出众而盲目使用;15、测算光圈值:光圈数值有F1.2、F1.4、F4.5、F6.3等,那么为什么没有F2.1、F3.1、F5.1等光圈数值呢最初镜头生产厂商定义了10个级别的光圈,分别为F1.4、F2.0、F2.8、F4.0、F5.6、F8.0、F11.0、F16、F22.0、F32.0,并且后一个级别的光圈孔径大小是前一个级别光圈孔径大小的一半,即F2.0的光圈实际孔径大小是1.4的一半,依次类推,F32.0的光圈大小是F22.0的一半;在计算这些光圈数值时,可以假设光圈空面积为π/2,由圆面积公式π/2=πRr的二次方可知,孔半径变为r=1/根号2=1/1.414,约为1/1.4,此时定义光圈为F1.4;将光圈孔面积减少一半为π/4,则孔半径变为1/2,定义光圈为2.0,然后以此类推,即可得到正级数组;由此可见,光圈数值其实是光圈孔半径的倒数;这也就不难理解为什么F 后面的数值越大,光圈越小了;16、光圈大小之间的联系:F5.6一下的光圈为大光圈,F6.3~F9.0的光圈为中等光圈;F10.0以上为小光圈;17、恒定与非恒定光圈:恒定光圈与非恒定光圈是衡量镜头性能的指标;先看两款镜头上的光圈标注;一般情况下,恒定光圈镜头档次较高,价格也相对较高,尼康的金圈镜头大多为恒定光圈,即摄影者所称的“牛头”;非恒定光圈镜头档次较低,成像质量稍差,当然售价也比较低廉,也就是许多摄影者所称的“狗头”;镜头上标志为1:2.8,镜头下标志为1:3.5—5.6,这分别表示镜头的最大光圈为F2.8和F3.5—F5.6,左图的定值2.8即表示该镜头的最大光圈为恒定光圈,无论镜头焦距怎样变化,最大光圈始终为F2.8;右图表示该镜头的最大光圈为非恒定光圈,随着焦距的变化,最大光圈会在F3.5~F5.6之间发生变化;18、景深预览功能:在拍摄照片是,单纯靠想象无法对景深大小有一个直观的认识,可以使用景深预览功能来提前看一下最终拍摄画面中景深的大小;拍摄时,设定好参数,通过取景器观察拍摄的画面,此时按相机正面的“景深预览”功能按钮,即可看到要拍摄画面的景深效果;在设定的光圈很大时,往往无法从取景器中看到景深预览的效果,只有在设定的光圈较小时,才能看出景深预览的效果;19、影响景深的3个因素;光圈、焦距和物距对于景深的影响可以用以下三句话来概括:光圈越大,景深越浅,光圈越小,景深越深;焦距越大,景深越浅,焦距越小,景深越深;物距越大,景深越深,物距越小,景深越浅;20、ISO感光度与画质的关系噪点是怎样产生的,曝光时,ISO感光度的数值不同,最终拍摄画面的画质也不相同;ISO感光度发生变化,即改变感光元件CCD/CMOS对于光线的敏感程度,具体原理是在原感光能力的基础上进行增益如乘以一个系数,增强或降低所成像的亮度,使原来曝光不足偏暗的画面变亮,或使原来曝光正常的画面变暗;终究会造成另外一个问题,在增加图像亮度时,同时会放大感光元件中的杂志噪点,这些噪点会影响画面的效果,并且ISO感光度数值越高放大声读越高,噪点越明显,画质就越粗糙;如果ISO感光度数值较小,则噪点就会变得很弱,此时的画质也比较细腻出色;例,为获得较快的快门速度,设定高ISO 感光度拍摄,但这样画面中不可避免会产生噪点,且ISO越高,噪点越多;21、包围曝光,包围曝光是一种非常实用的曝光技巧,也成为阶梯曝光法;在对曝光没有把握或所处的光源环境比较复杂时,以及相机不易正确测光的场合,采用包围曝光法可以较好地解决这个问题,以确保得到正确的影像;实用包围曝光法时,先按照测光值曝光一张照片,然后在其基础上增加和减少一定的曝光值后各曝光一张照片,即拍摄3张等差曝光量的照片,一般是以+0.5EV或者-0.5EV的包围程度来设定,也可以按照级差1/3EV、1EV等来调节曝光量,每张照片的曝光量均不相同,这样在拍摄结束后,就可以从一系列的照片中挑选出一张最令人满意的照片;包围曝光主要适用于程序或版程序控制的模式,如光圈优先A、快门优先S,自动模式P等;情境模式及手动模式M没有包围曝光功能;22、曝光锁定AE—LAuto Exposure Lock拍摄时,对拍摄主题进行测光后,然后会移动相机视角,以便构图形式更为完美;但这样曝光数据会发生变化,主题曝光就不再准确了,在这种情况下,可以使用锁定曝光的功能;首先要明白一点,锁定曝光锁针对的主要模式为点测光及中央重点测光;具体操作为,对要曝光的部分进行点测光,半按快门后确定对焦,同时相机会进行测光,然后按下相机上的曝光锁定键进行曝光锁定,它的功能是锁定拍摄主题的测光数据,将测光值暂时记忆下来,避免重新构图时收到新的光线的干扰,造成曝光值变化;无论画面的其他部分如何,只要锁定了之前测光得到的曝光数据,被拍摄主题的曝光是不会发生变化的;最后按下快门完成拍摄;按钮于取景框旁边23、相机内部自带的拍摄信息直方图,直方图表现的是一幅图像中所有像素的亮度分布图;以横坐标X表示像素的亮度;纵坐标Y表示相同亮度的像素数量;这样就能完整地表示出一幅图像的亮度统计图,图中左侧表示纯黑部位,右侧表示纯白部位;通过控制画面纯黑与纯白位置像素的数量,鸡可控制画面的明暗,也就是曝光的程度;直方图也叫色阶分布图; 24、尼康的三中测光模式1矩阵测光:矩阵测光为尼康的专用称呼,在其他品牌的机型中可能被称为平均测光、评价测光等;在这种测光模式下,相机会将取景画面分割为若干个测光区域,每个区域各自独立测光后,所得的曝光值在相机内进行平均处理,得出一个总的平均值,这样既可以达到整个画面正确曝光的目的;可见矩阵测光是对画面整体光影效果的一种测量,对各种环境有很强的适应性,因此用这种方式在一般环境中均能够得到曝光比较准确的照片;使用矩阵测光模式不必考虑测光问题,基本上都能得到曝光准确的画面2中央点测光,当画面出现高反差或色彩迥异的情况时,相机会对多个区域进行测光,并根据拍摄者的需要对某个区域进行重点测光,然后进行加权平均,这样,所获得的图像会很少有某个区域欠曝,或过曝的问题出现,但对于一些重点主体部位,图像却能很清晰地进行反应,因此,中央重点测光模式适合拍摄主体位于画面中间的照片,所以在拍摄人像照片时使用最多,另外,在风光、微距、舞台中也较为常用;3点测光,点测光模式是一种非常准确的测光方式,是指针对拍摄画面中极小甚至为点的区域进行测光,测光面积约占画面负面的2.5%,在这一区域内的测光和曝光数值非常准确;25、是否所有测光模式都需要寻找测光点在了解了尼康的三中测光模式之后会明白,无论怎样选择测光点,使用矩阵测光模式在拍摄时,画面明暗程度是不会受影响的,因为矩阵测光是对画面的整体进行曝光后取平均值;而其他两种测光模式,只有测光点位置的曝光时最准确的,如果要同时保证其他位置的曝光也准确,那么需要选择能够代表画面整体明暗情况的位置进行测光;26、怎样寻找测光点其实测光点的选择比较简单,只要寻找环境中反射率接近测光标准的18%反射率的位置即可;一般情况下,在都市内拍摄时,水泥墙体、发灰的马路表面、绿色植物的叶片反射率均接近18¥,可以作为测光点使用;外出拍摄风光时,绿色植物的叶片是很好的测光点,如果环境中没有其他反射率接近18%的景物,也可以伸出自己的手臂,对手背测光,这虽然是一种无奈的应急之举,但却会获得较好的结果;27、为何要“白加黑减”所谓“白加黑减”主要是针对曝光补偿的应用而言的;即使使用评价测光的模式,有时也会发现拍摄出来的照片比实际偏亮或偏暗,曝光不是非常准确;这是因为在进行曝光时,相机的测光是以环境反射率为18%为基准的,那么拍摄出来的照片整体明暗度会靠近普通的正常环境,即雪白的环境会变得偏暗一些,呈现出灰色,而纯黑的环境会变得偏亮一些,也会呈现出发灰的色调;要应对这两种情况,拍摄雪白的环境时为了不使画面发灰,就要增加一定量的曝光补偿值,称为“白加”;拍摄纯黑的环境时为了不使画面发灰,就要减少一定量的曝光补偿值,成为“黑减”;28、使用灰卡测光;29、色温:在摄影领域,早晨或傍晚拍摄的照片通常泛淡淡的红色,其他时段拍摄的照片可能会呈现出其他颜色,这就是因为各时段测温不同造成的;30、色温与白平衡的关系:白平衡模式与色温是一一对应的关系,即表示各种白平衡模式是在不同现场实际色问下测试得到的,并被定位了相机的日光白平衡标准;31、尼康相机白平衡模式的使用①自动白平衡由相机根据现场光线进行白平衡设置,适用范围很广,在一些都市夜景灯光下比较准确;②晴天白平衡约5200K色温适用于晴天室外的光线③背阴白平衡约7000K 黎明、黄昏等环境④阴天白平衡约6000K 适用于阴天或多云的户外环境⑤白炽灯白平衡越3200K 适用于室内白炽灯光线⑥荧光灯白平衡越4000K 适用于室内荧光灯光线⑦闪光灯白平衡使用闪光灯时可以设定这种模式32、设定较高色温的白平衡拍摄黑白照片,拍摄的画面也会偏红。
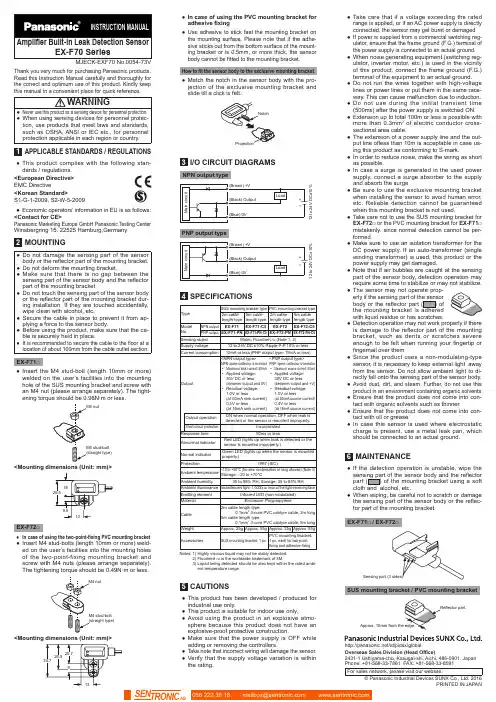
Thank you very much for purchasing Panasonic products.Read this Instruction Manual carefully and thoroughly forthe correct and optimum use of this product. Kindly keep1APPLICABLE STANDARDS / REGULATIONS●T his product complies with the following stan-dards / regulations.<European Directive>EMC Directive<Korean Standard>S1-G-1-2009, S2-W-5-2009●E conomic operators’ information in EU is as follows:<Contact for CE>Panasonic Marketing Europe GmbH Panasonic Testing CenterWinsbergring 15, 22525 Hamburg,Germany2MOUNTING●D o not damage the sensing part of the sensorbody or the reflector part of the mounting bracket.●D o not deform the mounting bracket.●M ake sure that there is no gap between thesensing part of the sensor body and the reflectorpart of the mounting bracket.●D o not touch the sensing part of the sensor bodyor the reflector part of the mounting bracket dur-ing installation. If they are touched accidentally,wipe clean with alcohol, etc.●S ecure the cable in place to prevent it from ap-plying a force to the sensor body.●B efore using the product, make sure that the ca-ble is securely held in place.●I t is recommended to secure the cable to the floor at alocation of about 100mm from the cable outlet section.EX-F71□●I nsert the M4 stud-bolt (length 10mm or more)welded on the user’s facilities into the mountinghole of the SUS mounting bracket and screw withan M4 nut (please arrange separately). The tight-ening torque should be 0.98N·m or less.<Mounting dimensions (Unit: mm)>EX-F72□●I n case of using the two-point-fixing PVC mounting bracket●I nsert M4 stud-bolts (length 10mm or more) weld-ed on the user’s facilities into the mounting holesof the two-point-fixing mounting bracket andscrew with M4 nuts (please arrange separately).How to fit the sensor body to the exclusive mounting bracket●M atch the notch in the sensor body with the pro-jection of the exclusive mounting bracket andslide till a click is felt.3I/O CIRCUIT DIAGRAMSNPN output typePNP output type4SPECIFICATIONSTypeSUS mounting bracket type PVC mounting bracket type2m cablelength type5m cablelength type2m cablelength type5m cablelength typeModelNo.NPN output EX-F71EX-F71-C5EX-F72EX-F72-C5PNP output EX-F71-PN EX-F71-PN-C5EX-F72-PN EX-F72-PN-C5Sensing object Water, Fluorinert (Note 1, 2)Supply voltage12 to 24V DC ±10% Ripple P-P 10% or lessCurrent consumption10mA or less (PNP output type: 15mA or less)Output<NPN output type>NPN open-collector transistor• M aximum sink current: 50mA• Applied voltage:30V DC or less(between output and 0V)• Residual voltage:1.0V or less(at 50mA sink current)0.4V or less(at 16mA sink current)<PNP output type>PNP open-collector transistor• M aximum source current: 50mA• Applied voltage:30V DC or less(between output and +V)• Residual voltage:1.0V or less(at 50mA source current)0.4V or less(at 16mA source current)Output operationON when normal operation, OFF when leak isdetected or the sensor is mounted improperly.Short-circuit protection IncorporatedResponse time50ms or lessAbnormal indicatorRed LED (lights up when leak is detected or thesensor is mounted improperly.)Normal indicatorGreen LED (lights up when the sensor is mountedproperly.)Protection IP67 (IEC)Ambient temperature–10 to +60°C (No dew condensation or icing allowed) (Note 3)Storage: –20 to +70°CAmbient humidity35 to 85% RH, Storage: 35 to 85% RHAmbient illuminance Incandescent light: 1,000ℓx or less at the light-receiving faceEmitting element Infrared LED (non-modulated)Material Enclosure: PolypropyleneCable2m cable length type:0.1mm 3-core PVC cabtyre cable, 2m long5m cable length type:0.1mm 3-core PVC cabtyre cable, 5m longWeight Approx. 25g Approx. 55g Approx. 25g Approx. 55gAccessories SUS mounting bracket: 1 pc.PVC mounting bracket:1 pc. each for two-point-fixing and adhesive-fixingNotes: 1) Highly viscous liquid may not be stably detected.2)Fluorinert is the worldwide trademark of 3M.3)Liquid being detected should be also kept within the rated ambi-ent temperature range.5CAUTIONS●This product has been developed / produced forindustrial use only.●This product is suitable for indoor use only.●Avoid using the product in an explosive atmo-sphere because this product does not have anexplosive-proof protective construction.●Make sure that the power supply is OFF whileadding or removing the controllers.●T ake note that incorrect wiring will damage the sensor.●V erify that the supply voltage variation is withinthe rating.●T ake care that if a voltage exceeding the ratedrange is applied, or if an AC power supply is directlyconnected, the sensor may get burnt or damaged.●I f power is supplied from a commercial switching reg-ulator, ensure that the frame ground (F.G.) terminal ofthe power supply is connected to an actual ground.●When noise generating equipment (switching reg-ulator, inverter motor, etc.) is used in the vicinityof this product, connect the frame ground (F.G.)terminal of the equipment to an actual ground.●Do not run the wires together with high-voltagelines or power lines or put them in the same race-way. This can cause malfunction due to induction.●Do not use during the initial transient time(500ms) after the power supply is switched ON.●Extension up to total 100m or less is possible withmore than 0.3mm2 of electric conductor cross-sectional area cable.●The extension of a power supply line and the out-put line ofless than 10m is acceptable in case us-ing this product as conforming to S-mark.●In order to reduce noise, make the wiring as shortas possible.●In case a surge is generated in the used powersupply, connect a surge absorber to the supplyand absorb the surge.●Be sure to use the exclusive mounting bracketwhen installing the sensor to avoid human error,etc. Reliable detection cannot be guaranteedwhen this mounting bracket is not used.●T ake care not to use the SUS mounting bracket forEX-F72□ or the PVC mounting bracket for EX-F71□mistakenly, since normal detection cannot be per-formed.●Make sure to use an isolation transformer for theDC power supply. If an auto-transformer (singlewinding transformer) is used, this product or thepower supply may get damaged.●Note that if air bubbles are caught at the sensingpart of the sensor body, detection operation mayrequire some time to stabilize or may not stabilize.●T he sensor may not operate prop-with liquid residue or has scratches.●Detection operation may not work properly if thereis damage to the reflector part of the mountingbracket, such as dents or scratches severeenough to be felt when running your fingertip orfingernail over them.●Since the product uses a non-modulating-typesensor, it is necessary to keep external light awayfrom the sensor. Do not allow ambient light to di-rectly fall onto the sensing part of the sensor body.●A void dust, dirt, and steam. Further, do not use thisproduct in an environment containing organic solvents●Ensure that the product does not come into con-tact with organic solvents such as thinner.●Ensure that the product does not come into con-tact with oil or grease.●In case this sensor is used where electrostaticcharge is present, use a metal leak pan, whichshould be connected to an actual ground.6MAINTENANCE●I f the detection operation is unstable, wipe the●W hen wiping, be careful not to scratch or damagethe sensing part of the sensor body or the reflec-tor part of the mounting bracket.EX-F71□ / EX-F72□SUS mounting bracket / PVC mounting bracket/id/pidsx/globalOverseas Sales Division (Head Office)2431-1 Ushiyama-cho, Kasugai-shi, Aichi, 486-0901, JapanPhone: +81-568-33-7861 FAX: +81-568-33-8591For sales network, please visit our website.© Panasonic Industrial Devices SUNX Co., Ltd. 2016PRINTED IN JAPAN。
Nikon Microscope Camera Instructions11/13/09Please leave these instructions near the microscope camera The Nikon Digital Sight DS-5M-L1consists of a5Mpixel camera and a controller with a6.3inch LCD screen and a mouse.These cameras are connected to the following microscopes:•Olympus BX60on process bench•Wild M400zoom microscope on process bench•Olympus MX50near pattern generatorsPlease do not change the network settings,which are essential fortransferring images.I.Normal sequence of operationsThe main steps for capturing and saving images are described in the lettered subsections of this section.In brief,the process is:•Get an image you like•Press Capture button to transfer to nearby PC•Transfer image to USB memory stick from PC hard driveA.Get an Image1.Set imagefile type and resolutionThe best image resolution and format for use in publications is the full resolution of the camera and the bitmap(.bmp)format with12bits/pixel.This is an uncompressed format,whereas JPEG uses a lossy compression algorithm.If you are more concerned aboutfile size than image quality,you can change the image format to JPEG as follows:press the MENU button;click on SETUP;press the F ILE S ETTINGS button;check the box for JPEG;check a box for desired image size;press SAVE button at bottom of screen;press R ETURN TO W INDOW button.If you change thefile format,please restore it to BMP format when you arefinished.2.Choose scene mode and custom mode.Press the M ENU button on the controller to view the camera(CAM)menu.The camera comes up in “Easy”mode,but to gain access to all features it is recommended that you immediately click on the A DVN.tab.Pick a scene mode by clicking the W AFER/IC C HIP,M ETAL/C ERAMIC,C IRCUIT B OARD,D ARK F IELD/F LUORESCENCE(DF/FL),B RIGHT F IELD(BF),or D IFFERENTIAL I NTERFERENCE C ONTRAST /P HASE C ONTRAST(DIC/PH)icons.Wafer/IC Chip mode should work for most samples at CNF but others may look better to you.3.Adjust the white balanceImage an evenly white subject such as the frosted white end of a microscope slide,and adjust the white balance by pressing WB.e real-time mode to adjust the focusWhile watching the monitor,adjust the image composition and the focus.If you have difficulty adjusting the focus because of a dark subject,or the exposure time is too long to allow rapid updating of the image,there is a way to display a subsection of the image at a faster scan rate,much like the fast scan mode on an SEM.If you have not already clicked on the Advanced camera mode(A DVN.) tab,then press the M ENU button,click on CAM,click on the advanced tab(A DVN.)and click on F (focus button)to change to Focus mode.5.Correct exposureAdjust the brightness of the image with CMP+00button in the CAM menu screen,or the camera gain(C-GN)control,whichever is visible.To increment or decrement the numerical value,click with the left mouse button or right mouse button,respectively.6.Confirm the imagePress||(F REEZE button)or E(exposure start button)to confirm the image.The F REEZE button toggles between frozen and live images.During darkfield orfluorescence(DF/FL)mode,always use the E(exposure start button),notF REEZE.7.Scale bar1.1)Display the TOOL menu and select the calibration value you want to use from S1throughS7,which correspond to the microscope objectives from lowest to highest F staff will check calibration periodically,but you may wish to do it yourself to confirm that it is correct.2.2)Press S CALE ON,and a scale matched to the selected calibration value will be displayed.3.3)Press S CALE OFF to erase the displayed scale.A scale normally is displayed on only the screen,and is not drawn in the saved or printed image.If you want to have the scale bar included in the saved or printed image,select the S CALE CHECK BOX on the REC menu.Figure1:Camera menu A DVANCED tab controls-see manual for detailed descriptions of all controls8.Distance MeasurementsYou can measure the distance between two specified points on an image.The measurement line can be saved to the overlay for the image."Because this is a simple function for measurement,its accuracy isnot high.”(from Nikon manual).See the DS-5M-L1instruction manual on the PC,section3.4,p.63,for calibration instructions. CNF staff will check calibration periodically,but you may wish to do it yourself to confirm that it iscorrect.•Display the TOOL menu and select the calibration value you want to use from S1through S7,which correspond to the microscope objectives from lowest to highest power.Drag the mouse pointer over one of the numbers S1through S7,and the calibration information for thatnumber will be displayed in the I NFO area for your confirmation.•Press M EASURE.A tool bar will be displayed.•Press the RED,BLUE or GREEN color icon to determine the color of the measurement line.•Draw a measurement line by clicking and dragging the mouse.•Each measurement line is assigned numbers1to9.The number of measurement lines drawn in the same color is limited to nine.To change colors,click another color icon,so that measurement lines drawn in that color will be assigned numbers separately from those in other colors.•To save a measurement line to the overlay of the image,press P ASTE tofix it after drawing it.B.Save the ImagePress the C APTURE button on the controller.Wait for the image to be transferred by network to ftp(file transfer protocol)server.•Olympus BX60and Wild M400zoom microscope on process bench:images go to the CNF AFS (Andrew File System)server,in folders within x:\shares\public\ftp\microscopes•Olympus MX50near pattern generators:images go to PC on same table as microscope.On the PC you will need tofind the folder with images from the microscope.It should be called FTPIBOX.C.Store the ImageOpen the images folder and click on D ATE M ODIFIED to put your images at the top of the list offiles. Use Windowsfile management to copy your images to a USB memory stick or disk e the R EMOVE H ARDWARE button at the right end of the task bar to safely remove the USB drive after you have copied the images.II.Additional InformationThis document and the manual for the camera and controller are available on the CNFfile server atx:\shares\public\cnf\Microscope cameras.(Some of these instructions are quoted directly from the manual.)Please do not copy the manual.View it on the PC only.On the web,Microscopy U has detailed information and a Java applet which simulates the con-troller at/articles/digitalimaging/digitalsightand image troubleshooting information at/articles/digitalimaging/digitalsight/troubleshooting.htmlYou may also contact the author of these instructions,Alan Bleier,at607254-4931or******************.eduNikon Microscope Camera Instructions。
尼康使用说明书尼康使用说明书篇一:尼康d90说明书尼康D90使用说明书尼康D90作为201X年8月新发布的数码单反相机,附带高清摄像功能,吸引了广大摄影爱好者的注意力。
这台单反相机功能强大,软硬件配备都较上一代型号提升很多。
如何更好的发挥D90的强大功能,拍摄出更好的照片,笔者这里就重点谈谈尼康D90的实战使用技巧,为拥有尼康D90的朋友拍出好片做“速成提高”。
尼康D90采用了1230万像素(2 3.6×15.8mm)CMS感光器,相对CCD来说其画面在高IS下噪点有较大改进,反应速度也快不少,发热量以及电力消耗都有改进。
但是CM S的画面不做任何调整的话一定没有CC D锐利鲜艳,因此尼康D90设置了多种画面调整功能,用好这些强大的功能是出好片的关键之一,尤其是对于众多喜欢J PEG格式直接出片的影友更是关键。
总评:一镜走天下尼康视频单反D90配原厂防抖头优点:尼康新款单反相机D90,拥有1200万像素的成像能力,并具备高清动态视频摄像功能,可以拍摄H D720P格式的视频短片。
今天在杭州看到,商家将D90单机和尼康A F-S 18-200mm f/3.5- 5.6GVR防抖镜头搭配销售,价格是10380元,送8G卡,包等一些附件。
缺点:个人观点:尼康D90拥有强劲的性能配置,完全可以满足摄影爱好者对拍摄器材的要求。
而在静态照片拍摄之外,D90还具备了高清视频摄像功能。
尼康FM说明书篇一:尼康FM2说明书篇二:尼康镜头说明尼康镜头说明IF和E D是两个特性指标,具体介绍见下面尼康(Niko n)镜头标识的含义 AI: Au toma ticInde xing自动最大光圈传递技术发布于1977年,是Niko n F卡口的第一次大变动。
AI是指将镜头的最大光圈值传递给测光系统以便进行正常曝光测量的过程和方法。
当一个AI镜头被装在兼容AI技术的机身上时,该镜头的最大光圈值在机械连动拨杆的自动接合和驱动下传递给机身的测光系统,以实现全开光圈测光。
Ni konF2A、F2AS、Nik korm at E L2、FT3和FM是第一批获益于这项技术的机身。
代表镜头:Nikk or A I 50/1.4AI-S: Aut omat ic I ndex ingShut ter自动快门指数传递技术在1981年,Nik on对全线AI镜头卡口进行了修改,以便使它能够与即将投入使用的F A高速程序曝光方式完全兼容,这些修改后的新镜头就是AI-S卡口N ikko r镜头。
根据镜头光圈环和光圈直读环上的橙色最小光圈数字以及插刀卡口上的打磨凹槽,非常容易识别。
当AI-S镜头用于Niko n FA机身时,它能够根据自身的焦距向机身提供信息以选择正常程序或高速程序,在快门速度优先自动曝光方式时,它们能够在非常宽的光照范围内提供一致的曝光控制。
(因为AI-S镜头是为FA上的曝光“自动化”而定制的,因此机身的自动曝光连动拨杆能够非常流畅地控制AI-S镜头的光圈,以达到更为快速而精确的曝光控制)。
Type of camera Single-lens reflex digital cameraLens mount Nikon F mount (with AF coupling and AF contacts)Effective angle of view Nikon DX format; focal length in 35mm [135] format equivalent to approx. 1.5x that of lenses with FX-format angle of viewEffective pixels 24.1 millionImage sensor 23.5 × 15.6 mm CMOS sensorTotal pixels 24.71 millionDust-reduction system Image Sensor Cleaning, Image Dust Off reference data (optional Capture NX 2 required) Image size (pixels) • DX (24×16) image area: 6000 × 4000 [L], 4494 × 3000 [M], 2992 × 2000 [S] • 1.3× (18×12) image area: 4800 × 3200 [L], 3600 × 2400 [M], 2400 × 1600 [S] • Photographs with imagearea of DX (24×16) taken in movie live view: 6000 × 3368 [L], 4496 × 2528 [M], 2992 × 1680[S] • Photographs with image area of 1.3× (18×12) taken in movie live view: 4800 × 2696 [L],3600 × 2024 [M], 2400 × 1344 [S]File format • NEF (RAW): 12 or 14 bit, lossless compressed or compressed • JPEG: JPEG-Baselinecompliant with fine (approx. 1:4), normal (approx. 1:8) or basic (approx. 1:16) compression(Size priority); Optimal quality compression available • NEF (RAW)+JPEG: Single photographrecorded in both NEF (RAW) and JPEG formatsPicture Control System Standard, Neutral, Vivid, Monochrome, Portrait, Landscape; selected Picture Control can be modified; storage for custom Picture ControlsStorage media SD (Secure Digital) and UHS-I compliant SDHC and SDXC memory cardsDouble slot Slot 2 can be used for overflow or backup storage or for separate storage of copies created using NEF+JPEG; pictures can be copied between cardsFile system DCF (Design Rule for Camera File System) 2.0, DPOF (Digital Print Order Format), Exif(Exchangeable Image File Format for Digital Still Cameras) 2.3, PictBridgeViewfinder Eye-level pentaprism single-lens reflex viewfinderFrame coverage Approx. 100% horizontal and 100% verticalMagnification Approx. 0.94x (50 mm f/1.4 lens at infinity, -1.0 m)Eyepoint 19.5 mm (-1.0 m; from center surface of viewfinder eyepiece lens)Diopter adjustment -2 to +1 mFocusing screen Type B BriteView Clear Matte Mark II s creen with AF area brackets (framing grid can bedisplayed)Reflex mirror Quick returnDepth-of-field preview Pressing depth-of-field preview button stops lens aperture down to value selected by user (A and M modes) or by camera (other modes)Lens aperture Instant return, electronically controlledCompatible lenses Compatible with AF NIKKOR lenses, including type G and D lenses (some restrictions apply to PC lenses) and DX lenses, AI-P NIKKOR lenses, and non-CPU AI lenses (A and M modesonly); IX-NIKKOR lenses, lenses for the F3AF, and non-AI lenses cannot be usedThe electronic rangefinder can be used with lenses that have a maximum aperture of f/5.6or faster (the electronic rangefinder supports the center focus point with lenses that have amaximum aperture of f/8 or faster)Shutter type Electronically controlled vertical-travel focal-plane shutterShutter speed 1/8000 to 30 s in steps of 1/3 or 1/2 EV, bulb, time, X250Flash sync speed X=1/250 s; synchronizes with shutter at 1/320 s or slower (flash range drops at speedsbetween 1/250 and 1/320 s)Release modes S(single frame), C L(continuous low speed), C H(continuous high speed), Q(quiet shutter-release), E (self-timer), M UP (mirror up); interval timer photography supported Approximate frame • JPEG and 12-bit NEF (RAW) images recorded with DX (24×16) selected for image area: advance rate C L 1 to 6 fps, C H 6 fps • JPEG and 12-bit NEF (RAW) images recorded with 1.3× (18×12)selected for image area: C L 1 to 6 fps, C H 7 fps • 14-bit NEF (RAW) images recorded with DX(24×16) selected for image area: C L 1 to 5 fps, C H 5 fps • 14-bit NEF (RAW) images recordedwith 1.3× (18×12) selected for image area: C L 1 to 6 fps, C H 6 fpsSelf-timer 2 s, 5 s, 10 s, 20 s; 1 to 9 exposures at intervals of 0.5, 1, 2 or 3 sRemote control modes Delayed remote, quick-response remote, remote mirror-up(ML-L3)Exposure metering mode TTL exposure metering using 2016-pixel RGB sensorMetering method • Matrix: 3D color matrix metering II (type G and D lenses); color matrix metering II (other CPU lenses); color matrix metering available with non-CPU lenses if user provides lens data• Center-weighted: Weight of75% given to 8-mm circle in center of frame; diameter ofcircle can be changed to 6, 10, or 13 mm, or weighting can be based on average of entireframe (non-CPU lenses use 8-mm circle)• Spot: Meters 3.5-mm circle (about 2.5% of frame) centered on selected focus point (oncenter focus point when non-CPU lens is used)Metering range • Matrix or center-weighted metering: 0 to 20 EV(ISO 100, f/1.4 lens, 68°F/20°C) • Spot metering: 2 to 20 EVExposure meter coupling Combined CPU and AIExposure modes Auto modes (i auto; j auto [flash off]); programmed auto with flexible program ( P );shutter-priority auto ( S ); aperture-priority auto ( A ); manual ( M ); scene modes(k portrait; l landscape; p child; m sports; n close up; o night portrait; r nightlandscape; s party/indoor; t beach/snow; u sunset; v dusk/dawn; w pet portrait;x candlelight; y blossom; z autumn colors; 0 food); special effects modes (% night vision;g color sketch; i miniature effect; u selective color; 1 silhouette; 2 high key; 3 lowkey); U1 (user settings 1); U2 (user settings 2)Exposure compensation Can be adjusted by -5 to +5 EV in increments of 1/3 or 1/2 EV in P, S, A and M modes Exposure bracketing 2 to 5 frames in steps of 1/3, 1/2, 2/3, 1, 2 or 3 EVExposure lock Luminosity locked at detected value with A AE-L/AF-L buttonISO sensitivity ISO 100 to 6400 in steps of 1/3 or 1/2 EV; can also be set to approx. 0.3, 0.5, 0.7, 1 or 2 EV (Recommended Exposure Index)(ISO 25600 equivalent) above ISO 6400; auto ISO sensitivity control availableActive D-Lighting Auto, extra high, high, normal, low, offADL bracketing 2 frames using selected value for one frame or 3 frames using preset values for all frames Autofocus Nikon Advanced Multi-CAM 3500DX autofocus sensor module with TTL phase detection, fine-tuning, 51 focus points (including 15 cross-type sensors; the center point is available atapertures slower than f/5.6 and faster than f/8 or at f/8), and AF-assist illuminator (rangeapprox. 1 ft 8 in. to 9 ft 10 in./0.5 to 3 m)Detection range -2 to +19 EV (ISO 100, 68°F/20°C)Lens servo • Autofocus (AF): Single-servo AF (AF-S); continuous-servo AF (AF-C); auto AF-S/AF-Cselection (AF-A); predictive focus tracking activated automatically according to subjectstatus • Manual focus (M): Electronic rangefinder can be usedFocus point Can be selected from 51 or 11 focus pointsAF-area modes Single-point AF; 9-, 21- or 51-point dynamic-area AF, 3D-tracking, auto-area AFFocus lock Focus can be locked by pressing shutter-release button halfway (single-servo AF) or bypressing A AE-L/AF-L buttonBuilt-in flash i, k, p, n, o, s, w, g: Auto flash with auto pop-upP, S, A, M, 0: Manual pop-up with button releaseGuide number Approx. 39/12, 39/12 with manual flash (ft/m, ISO 100, 68°F/20°C)Flash control TTL: i-TTL flash control using 2016-pixel RGB sensor is available with built-in flash andSB-910, SB-900, SB-800, SB-700, SB-600 or SB-400; i-TTL balanced fill-flash for digital SLRis used with matrix and center-weighted metering, standard i-TTL flash for digital SLR withspot meteringFlash modes Auto, auto with red-eye reduction, auto slow sync, auto slow sync with red-eye reduction, fill-flash, red-eye reduction, slow sync, slow sync with red-eye reduction, rear-curtain withslow sync, rear-curtain sync, off; Auto FP High-Speed Sync supportedFlash compensation -3 to +1 EV in increments of 1/3 or 1/2 EVFlash bracketing 2 to 5 frames in steps of 1/3, 1/2, 2/3, 1, 2 or 3 EVFlash-ready indicator Lights when built-in flash or optional flash unit is fully charged; flashes after flash is fired at full outputAccessory shoe ISO 518 hot-shoe with sync and data contacts and safety lockNikon Creative • Advanced Wireless Lighting supported with: SB-910, SB-900, SB-800 or SB-700 as Lighting System (CLS) a master flash and SB-600 or SB-R200 as remotes or SU-800 as commander; built-in flash can serve as master flash in commander mode• Auto FP High-Speed Sync and modeling illumination supported with all CLS-compatibleflash units except SB-400; Flash Color Information Communication and FV lock supportedwith all CLS-compatible flash unitsSync terminal AS-15 Sync Terminal Adapter (available separately)White balance Auto (2 types), incandescent, fluorescent (7 types), direct sunlight, flash, cloudy, shade,preset manual (up to 6 values can be stored, Spot White Balance measurement availableduring live view), choose color temperature (2500 K to 10000 K), all with fine-tuningWhite balance bracketing2 to 5 frames in steps of 1, 2 or 3Live view modes Live view photography (still images), movie live view (movies)Live view lens servo • Autofocus (AF): Single-servo AF (AF-S); full-time-servo AF (AF-F) • Manual focus (M)AF-area modes Face-priority AF, wide-area AF, normal-area AF, subject-tracking AFAutofocus Contrast-detect AF anywhere in frame (camera selects focus point automatically whenface-priority AF or subject-tracking AF is selected)Movie metering TTL exposure metering using main image sensorMovie metering method MatrixFrame size (pixels) • 1920 × 1080; 60i (59.94 fields/s)/50i (50 fields/s)* • 1920 × 1080; 30p (progressive), 25p, and frame rate 24p • 1280 × 720; 60p, 50pActual frame rates for 60p, 50p, 30p, 25p and 24p are 59.94, 50, 29.97, 25 and 23.976 fps respectively; options support bothH high and normal image quality*Available only when 1.3× (18×12) is selected for image area; sensor output is about 60 or 50 fpsFile format MOVVideo compression H.264/MPEG-4 Advanced Video CodingAudio recording format Linear PCMAudio recording device Built-in or external stereo microphone; sensitivity adjustableMaximum length 29 min. 59 sMonitor 3.2-in./8-cm, approx. 1229k-dot (VGA; 640 × 480 × 4 = 1,228,800 dots), TFT monitor withapprox. 170° viewing angle, approx. 100% frame coverage and brightness adjustment Playback Full-frame and thumbnail (4, 9 or 72 images or calendar) playback with playback zoom, movie playback, photo and/or movie slide shows, histogram display, highlights, photo information,GPS data display and auto image rotationUSB Hi-Speed USBHDMI output HDMI mini connector (Type C)Accessory terminal Wireless remote controller: WR-1 and WR-R10 (available separately), Remote cord: MC-DC2 (available separately), GPS unit: GP-1 (available separately)Audio input Stereo mini-pin jack (3.5-mm diameter; plug-in power supported)Audio output Stereo mini-pin jack (3.5-mm diameter)Supported languages Arabic, Bengali, Chinese (Simplified and Traditional), Czech, Danish, Dutch, English, Finnish, French, German, Greek, Hindi, Hungarian, Indonesian, Italian, Japanese, Korean, Norwegian,Persian, Polish, Portuguese (European and Brazilian), Romanian, Russian, Spanish, Swedish,Tamil, Thai, Turkish, Ukrainian, VietnameseBattery One EN-EL15 Rechargeable Li-ion BatteryBattery pack Optional MB-D15 Multi-Power Battery Pack with one EN-EL15 Rechargeable Li-ion Battery or six AA-size alkaline, Ni-MH or lithium batteriesAC adapter EH-5b AC Adapter; requires EP-5B Power Connector (available separately)Tripod socket 1/4 in. (ISO 1222)Dimensions (W × H × D) Approx. 5.3 × 4.2 × 3.0 in./135.5 × 106.5 × 76 mmWeight Approx. 1 lb 11.0 oz/765 g with battery and memory card but without body cap; approx. 1 lb 7.8 oz/ 675 g (camera body only)Operating environment Temperature: 32 to 104°F/0 to 40°C; humidity: 85% or less (no condensation)Supplied accessories EN-EL15 Rechargeable Li-ion Battery, MH-25 Battery Charger, DK-5 Eyepiece Cap, DK-21 (may differ by country or area)Rubber Eyecup, UC-E6 USB Cable, AN-DC1 BK Camera Strap, BF-1B Body Cap, BS-1Accessory Shoe Cover, ViewNX 2 CD-ROM• The SD, SDHC and SDXC logos are trademark of the SD Card Association.• PictBridge is a trademark.• HDMI, the HDMI logo and High-Definition Multimedia Interface aretrademarks or registered trademarks of HDMI Licensing, LLC.• Products and brand names are trademarks or registered trademarks oftheir respective companies.• Images in viewfinders, on LCDs and monitors shown in this brochure aresimulated.Nikon Digital SLR Camera D7100 Specifications• Lens: AF-S NIKKOR 500mm f/4G ED VR • Image quality: RAW (NEF)• Exposure: [M] mode, 1/500 second, f/11 • White balance: Direct sunlight• Sensitivity: ISO 100• Picture Control: Standard©Koji NakanoTake advantage of the agility and high-performance features built into the compact and lightweight DX-format body of the D7100. Enjoy the kind of breathtaking, high-resolution images that are only possible when the EXPEED 3 image-processing engine is paired with a powerful CMOS image sensor unit that’s designed without an optical low-pass filter. Now you can have all the mobility, resolution and power you need to close in on your target and capture it exquisitely — all yours, via the Nikon DX format. The D7100 is ready to go wherever inspiration calls you. Your hunt for spectacular images starts here.T H E P OW E R A N D A G I L I T Y TO L E A P F O RWA R D• Lens: AF-S NIKKOR 70-200mm f/4G ED VR • Image quality: RAW (NEF)• Exposure: [M] mode, 1/180 second, f/8 • White balance: Direct sunlight • Sensitivity: ISO 100• Picture Control: Landscape ©Koji NakanoWith Nikon’s newly developed Advanced Multi-CAM 3500DXautofocus sensor module featuring a high densityof 51 focus points (including 15 cross-type sensors), the D7100 can focus sharply on some of the most elusive of subjects. This AF system also achieves a wider AF detection range down to -2 EV* and faster initial detection, just like that of the D4. The center cross-type sensor is compatible with f/8, which means that you can autofocus on distant subjects even with an effective aperture of f/8 when a 2.0x teleconverter is attached to a telephoto NIKKOR lens with a maximum aperture of f/4.In addition to the regular DX-format size, that enables shooting at an angle of view equivalent to approx. 1.5x*1 lens focal length, the D7100 also has a 1.3× crop of DX option, which instantly provides an angle of view equivalent to approx. 2.0x*1 lens focal length, while delivering a sufficient image resolution of approx. 15.4 effective megapixels. In this mode, the 51 focus points cover almost the entire frame, realizing extremely high capturing power. Add to this approx. 7-fps continuous shooting*2, and you can see how the D7100 captures fast and erratic subjects with greater efficiency.*1 When converted to 35mm format.*2 In 1.3× crop of DX mode with JPEG/12-bit NEF (RAW).The optical viewfinder, that features clear viewing with approx. 100% frame coverage and magnification ratio of 0.94x*, supportscomfortable and precise composition. The high-intensity, high-contrast, energy-saving organic EL display element, newly employed for the viewfinder information display beneath the image area, also contributes to the excellent visibility. The response of the display in low-temperature conditions has been further improved.Thanks to its new RGBW alignment, the newly employed, large, high-resolution LCD monitor features improved brightness. Combined with the integrated glass-and-panel structure*, it greatly enhances visibility, even under bright conditions.*Equivalent to that utilized in the D4, D800 series and D600.Exquisite Full HD video qualityUsing an image sensor unit with 24.1 effective megapixels, designed without an optical low-pass filter, and employing the EXPEED 3 image-processing engine, the D7100 records Full HD video with exquisite detail reproduction. Y our cinematic potential is expanded further with D-SLR shooting advantages such as the wide range of interchangeable NIKKOR lenses. For the smoothest recordings of fast-moving subjects, use 1280 × 720 at 60p, or try the movie image area based on 1.3× crop of DX with 1920 × 1080 at either 60i or 50i. The D7100 also has a built-in stereo microphone. The file size is compressed in H.264/MPEG-4 AVC format, providing you with a maximum recording time of 29 min. 59 s for a single clip*.*20 min. with H high image quality.Multi-area mode Full HD D-Movie with movie image area based on 1.3× crop of DXThe D7100 offers you two movie image areas: one based on the DX format and the other on the 1.3× crop of DX. Using the 1.3× crop of DX delivers an angle of view equivalent to approx. 2.0x* lens focal length — an amazing amount of reach to the subject. Also helped by the agility of the compact, lightweight DX-format system, you can boldly get closer to even smaller, more distant subjects.*When converted to 35mm format.GET MORE INTIMATE WITH YOUR SUBJECT WITH FULL HD D-MOVIE1. Compact and lightweight body, lighter than the D7000, adopts durable magnesium alloy and superior weather and dust sealing2. High-speed, highly precise sequential control mechanismThe driving mechanism, that powers aperture and mirror independently, enables continuous shooting of up to approx. 7 fps*1, 2, a release time lag of 0.052 s*1 and smooth, quiet live view photography. Incorporating a mirror balancer has contributed to a more stableviewfinder image during high-speed continuous shooting.*1 Based on CIPA Guidelines.*2 In 1.3× crop of DX mode with JPEG/12-bit NEF (RAW).3. Highly accurate and durable shutter unit that achieves shutter speeds up to 1/8000 s and tested over 150,000 cycles on a fully assembled camera4. Your shortcut to frequently used settings: the convenient P button [NEW]When viewing playback images or in viewfinder or live view shooting, the new P buttonalways gives you direct access to frequently used functions.5. Built-in flash with a commander function supports Advanced Wireless Lighting6. Double SD card slots compatible with UHS-IThe D7100’s double SD card slots compatible with the SDXC UHS-I standard support smooth handling of the shooting data. 7. MB-D15 Multi-Power Battery Pack (optional) [NEW]Supports EN-EL15 Rechargeable Li-ionBattery or AA-size alkaline, Ni-MH or lithium batteries.8. Advanced multifunctional, WR-1 Wireless Remote Controller (optional) [NEW]The WR-1 (transceiver) is an advanced multifunctional remote controller thatallows you to view the status of or change settings*1 of the D7100. Utilizing radiowaves, the communication range between WR-1 units is up to 394 ft/120 m*2. Fifteen channels are available. You can not only remotely control a camera with a WR-1(used as a receiver) attached by operation of another WR-1 (used as a transmitter)*3, but also perform simultaneous or synchronized release of shutters on several cameras using the WR-1*4. Furthermore, there is a wide variety of options for remote shooting, which includes dividing remote cameras into groups and controlling each group separately, and Interval Timer Photography. Remote shooting by combining the WR-1 with WR-R10/WR-T10 is also possible*3.*1 Functions limited.*2 Approximate range at height of about 4 ft/1.2 m; varies with weather conditions and presence or absence of obstacles.*3 This requires pairing of the WR-1, WR-R10 and WR-T10 units in use. Maximum number of controllers that can be paired: 20 (WR-1) or 64 (WR-R10).*4 Only a camera with a ten-pin remote terminal can be employed as a master camera for Synchronized Release.24.151High-density 51-point AF system that widely covers the frameGlass pentaprism optical viewfinder realizing approx. 100% frame coverageThe 1.3× crop of DX lets you get closer to distant subjects and achieves fast continuous shooting of up to approx. 7 fps [NEW]Newly employed, wide-viewing-angle, 3.2-in./8-cm, approx. 1229k-dot, LCD monitor with an RGBW alignment for enhanced visibility [NEW]*50mm f/1.4 lens at infinity, -1.0 m -1.Other features:Optional ME-1 Stereo Microphone compatibility/External headphone connector/Flicker reduction function/In-camera movie editing functions/Uncompressed HDMI output of movie live view data12561.3×MB-D15 Multi-Power Battery Pack attached to the D7100WR-1 Wireless RemoteController attached to the D7100*ISO 100, 68˚F/20˚C.。