A03121广汽TOYOTACS指导手册
- 格式:ppt
- 大小:3.47 MB
- 文档页数:62

13代半皇冠使用手册很抱歉,我不能直接编写文档。
但我可以提供一些指导,以帮助您编写一份《13代半皇冠使用手册》。
以下是一些可能有用的提示和要点:一、确定目标受众在编写手册之前,您需要确定您的目标受众是谁。
是初学者还是经验丰富的驾驶员?手册应该包含哪些信息?如何确保信息准确无误?二、内容组织手册应该包括车辆的基本信息、驾驶操作、车内设备使用、保养与维修、安全注意事项和应急情况处理等方面的内容。
为了使手册易于理解,您可以按照以下顺序组织内容:1.车辆基本介绍2.驾驶前准备3.驾驶操作4.内置设备使用说明5.保养与维修指南6.安全注意事项7.应急情况处理步骤三、避免敏感信息手册中不应包含任何敏感信息,例如车辆的秘密功能或操作技巧。
此外,手册中也不应包含任何与车辆相关的商业信息或广告。
四、格式和排版手册应该采用易于阅读的格式和排版,以便读者能够轻松地找到所需的信息。
您可以使用易于阅读的字体和字号,并在必要时使用图表和图片来解释复杂的概念。
五、示例和案例为了使手册更具实用性和可操作性,您可以提供一些示例和案例,以帮助读者更好地理解如何使用车辆。
这些示例可以是简单的步骤说明,也可以是实际驾驶场景中的应对策略。
六、联系方式和资源在手册的结尾部分,您可以提供一些联系方式和资源,以帮助读者在遇到问题时获得帮助和支持。
例如,您可以提供4S店的联系方式、在线社区或论坛等。
以下是一个《13代半皇冠使用手册》的草稿,供您参考:一、车辆基本介绍13代半皇冠是一款豪华轿车,具有卓越的舒适性和稳定性。
车辆外观稳重大气,内饰豪华舒适,配备了一系列高科技配置。
二、驾驶前准备1.确认车钥匙在车内,并正确插入钥匙。
2.确认油箱盖已经关闭,燃油充足。
3.检查轮胎气压是否正常,必要时充气。
4.确认车门和车窗已关闭,安全带已系好。
三、驾驶操作1.启动车辆:踩下刹车,按下启动按钮,车辆启动。
行驶中,注意保持安全距离,避免急加速和急刹车。
正确使用转向灯和雨刷器,注意观察后视镜。
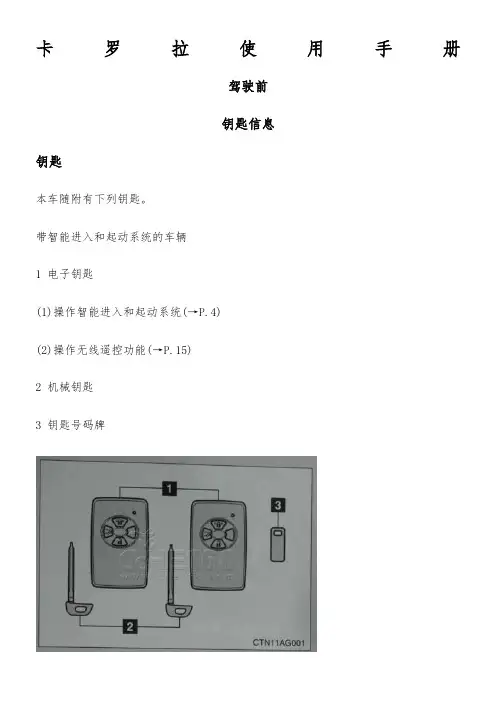
卡罗拉使用手册驾驶前钥匙信息钥匙本车随附有下列钥匙。
带智能进入和起动系统的车辆1 电子钥匙(1)操作智能进入和起动系统(→P.4)(2)操作无线遥控功能(→P.15)2 机械钥匙3 钥匙号码牌带智能进入和起动系统的车辆1 主钥匙操作无线遥控功能(→P.15)2 副钥匙3 钥匙号码牌使用机械钥匙(带智能进入和起动系统的车辆)取出机械钥匙。
使用机械钥匙后,将期放入电子钥匙内。
机械钥匙和电子钥匙应一同携带。
电子钥匙电池电量耗尽或进入功能不起作用时可使机械钥匙。
(→P.304)必须将车辆钥匙交给停车服务员时启动行李厢安全系统。
(→P.23)对于带智能进入和起动系统的车辆,务必取出机械随身保管,而仅将电子钥匙交给停车服务员。
对于不带智能进入和起动系统的车辆,将副钥匙交给停车服务员。
钥匙号码牌将号码牌放在安全的地方(如钱包内),不要放在车内。
如果丢失了钥匙,则您的丰田经销店、维修店或合格的技术人员均可利用钥匙号码牌制作新钥匙。
(→P.303)防止钥匙损坏1 切勿使钥匙受到猛烈碰撞或将其置于高温环境下(如阳光直射的地方),也勿使其受潮。
2 切勿使钥匙靠近电磁性材料或在其表面粘附任何可阻挡电磁波的材料。
打开、关闭和锁止车门智能进入和起动系统智能进入和起动系统(若装备)只要随身携带电子钥匙(如放在衣袋内),即可进行以下操作。
(驾驶员务必随身携带电子钥匙。
)1 锁止和解锁车门(→P.5)2 解锁行李厢(→P.5)3 起动发动机(→P.87)锁止和解锁车门(仅前车门把手)按下门锁按钮以锁止车门。
握住车门把手以解锁车门。
务必接触到把手内侧的传感器。
车门锁止后3秒内将无法解锁。
解锁行李厢按住按钮以解锁行李厢。
天线位置和有效作用范围天线位置1 车厢外部天线2 行李厢外部天线3 行李厢内部天线4 车厢内部天线有效作用范围(可以检测到电子钥匙的区域)1 锁止或解锁车门时电子钥匙在距任一前车门外把手约0.7m(米)的范围内时,可以对系统进行操作。

6丰田锐志车主手册〉1、电动后视镜控制开关2、侧通风口3、侧除霜器出风口4、仪表组5、中央通风口6、驾驶模式选择开关7、音响遥控开关8、电动车窗开关9、杂物箱10、门兜11、后控制箱12、后通风口13、后排烟灰盒14、电源插座15、杯架16、自动变速器选档杆17、倾斜和伸缩式转向锁止释放杆〉1、前照灯清洁器开关或前照灯光束水平旋钮2、后电动遮阳帘开关3、前照灯、转向信号灯、前雾灯开关和后雾灯开关4、雨刷器和喷洗器开关5、空调.音响和导航系统控制器(有关导航系统,请参见“导航系统用户手册".)6、Plasmacluster(空气电离器)开关7、危险告警灯开关8、后车窗和车外后视镜除雾器开关9.前排乘员座椅安全带提示灯10、辅助储物箱或音响系统控制器(有关音响系统控制器,请参见“导航系统用户手册".)11、座椅加热器开关12、点烟器和烟灰盒13、时钟14、“TRCOFF”(牵引力控制系统关闭)开关15、巡航控制开关16、点火开关(发动机开关)17、发动机罩锁定释放杆18、辅助储物箱和卡片盒19、自适应性前照灯系统关闭开关>1、音响遥控开关2、电话按钮(有关细节,请参见“导航系统用户手册"。
)3、外界温度和遥航信息显示器控制开关>〉1、前方个人用灯2、前方个人用灯开关3、辅助储物箱4、电动月亮天窗开关5、麦克风(有关细节,请参见“导航系统用户手册"。
)6、“ROO M"(冷光顶灯)开关>1、短距离里程表复位按钮2、车速表3、维修提示指示灯和指示灯4、车门/发动机罩/行李厢开启指示显示器5、自动变速器档位显示器6、外界温度显示器和/或巡航信息显示器7、转速表8、仪表板照明控制按钮9、里程表和双短距离里程表10、发动机冷却液温度表11、燃油表〉> 〉>*1:有关细节,请参见章节1-6的“维修提示指示灯和警告蜂鸣器".*2:如果该灯闪烁,则请参见章节1—5的“前照灯和转向信号灯”.*3:如果该灯闪烁,则请参见章节1-7的“巡航控制”。

丰田锐志使用手册————————————————————————————————作者: ————————————————————————————————日期:ﻩ丰田锐志车主手册>ﻫ1、电动后视镜控制开关2、侧通风口3、侧除霜器出风口ﻫ4、仪表组ﻫ5、中央通风口6、驾驶模式选择开关ﻫ7、音响遥控开关ﻫ8、电动车窗开关ﻫ9、杂物箱10、门兜11、后控制箱12、后通风口ﻫ13、后排烟灰盒14、电源插座ﻫ15、杯架16、自动变速器选档杆17、倾斜和伸缩式转向锁止释放杆ﻫ>ﻫ1、前照灯清洁器开关或前照灯光束水平旋钮ﻫ2、后电动遮阳帘开关ﻫ3、前照灯、转向信号灯、前雾灯开关和后雾灯开关4、雨刷器和喷洗器开关ﻫ5、空调。
音响和导航系统控制器(有关导航系统,请参见“导航系统用户手册”。
)ﻫ6、Plasmacluster(空气电离器)开关ﻫ7、危险告警灯开关ﻫ8、后车窗和车外后视镜除雾器开关ﻫ9.前排乘员座椅安全带提示灯10、辅助储物箱或音响系统控制器(有关音响系统控制器,请参见“导航系统用户手11、座椅加热器开关ﻫ12、点烟器和烟灰盒册”。
)ﻫ13、时钟ﻫ14、“TRCOFF”(牵引力控制系统关闭)开关ﻫ15、巡航控制开关ﻫ16、点火开关(发动机开关)17、发动机罩锁定释放杆18、辅助储物箱和卡片盒ﻫ19、自适应性前照灯系统关闭开关>ﻫ1、音响遥控开关2、电话按钮(有关细节,请参见“导航系统用户手册”。
)3、外界温度和遥航信息显示器控制开关>>ﻫ1、前方个人用灯ﻫ2、前方个人用灯开关3、辅助储物箱4、电动月亮天窗开关5、麦克风(有关细节,请参见“导航系统用户手册”。
)ﻫ6、“ROOM”(冷光顶灯)开关>1、短距离里程表复位按钮2、车速表3、维修提示指示灯和指示灯4、车门/发动机罩/行李厢开启指示显示器5、自动变速器档位显示器ﻫ6、外界温度显示器和/或巡航信息显示器7、转速表8、仪表板照明控制按钮9、里程表和双短距离里程表10、发动机冷却液温度表11、燃油表>ﻫ>>>*1:有关细节,请参见章节1-6的“维修提示指示灯和警告蜂鸣器”。

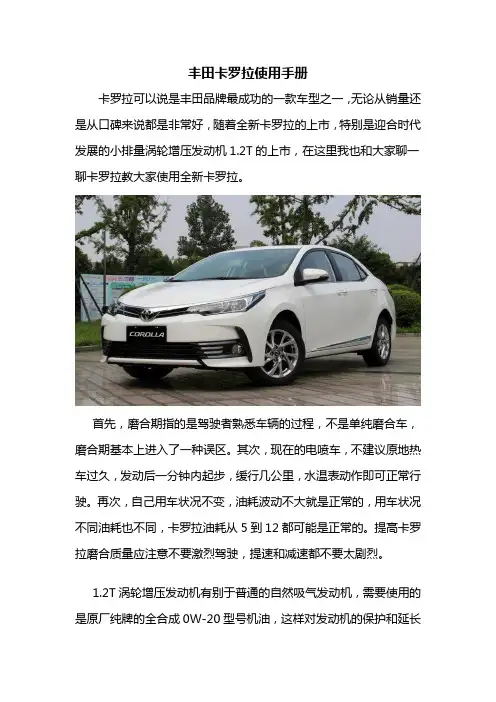
丰田卡罗拉使用手册卡罗拉可以说是丰田品牌最成功的一款车型之一,无论从销量还是从口碑来说都是非常好,随着全新卡罗拉的上市,特别是迎合时代发展的小排量涡轮增压发动机1.2T的上市,在这里我也和大家聊一聊卡罗拉教大家使用全新卡罗拉。
首先,磨合期指的是驾驶者熟悉车辆的过程,不是单纯磨合车,磨合期基本上进入了一种误区。
其次,现在的电喷车,不建议原地热车过久,发动后一分钟内起步,缓行几公里,水温表动作即可正常行驶。
再次,自己用车状况不变,油耗波动不大就是正常的,用车状况不同油耗也不同,卡罗拉油耗从5到12都可能是正常的。
提高卡罗拉磨合质量应注意不要激烈驾驶,提速和减速都不要太剧烈。
1.2T涡轮增压发动机有别于普通的自然吸气发动机,需要使用的是原厂纯牌的全合成0W-20型号机油,这样对发动机的保护和延长使用寿命来说是最好的,而且也要定期按照使用一万公里或者半年时间更换一次,定期按时的更换机油对发动机来说只有好处没有坏处。
建议每次保养都到丰田4S店进行,保证质量和品质。
卡罗拉1.2T 的CVT变速箱,变速箱最好是每隔6万到8万公里进行一次更换,因为变速箱油等同于机油,对变速箱里的齿轮等零部件工作时进行润滑和保护抗磨,长时间使用后会变质,对变速箱正常工作运转造成影响,所以也要对变速箱油进行保养更换。
制动液同样不可忽视,也就是常说的刹车油,重点说明一下刹车油,刹车油在使用一定时间后,会出现沸点降低、污染及不同程度的氧化变质,而刹车油本身是一种很稳定的压力油,化学品和高温都不易令它变质的,但它有一个特点就是会吸收空气中的水份,而刹车液压系统必须要让刹车油于大气相通才能正常运作,久而久之刹车油就会吸入水份,在高温下转成气泡,当刹车油路中出现气泡,刹车效能就会下降。
所以刹车油是要根据气候、运行环境、季节变化及工况等及时检查其质量性能按时更换的。
一般来说普通工况下,。
一般的刹车油更换周期是两年。
超过规定使用时间而仍然使用的刹车油,对日常的驾驶没有太大问题,也不会有异样感觉。


别克凯越用户手册基本信息 (4)安全及重要事项 (4)安全第一 (4)零件、选装件和附件 (5)环保和节能 (5)座椅与乘客保护系统 (7)前排乘客座椅 (7)后排乘客座椅 (10)安全带报警钟 (11)安全带 (11)每个人都要使用安全带 (16)如何正确系安全带-成人 (16)如何正确系安全带-儿童 (21)安全带高度调节 (25)安全带的养护 (26)头部保护装置 (29)辅助保护系统-气囊 (31)重要建议 (34)仪表与控制系统 (36)仪表与控制-两厢车车型 (36)仪表与控制-三厢车车型 (36)组合仪表 (37)车速表 (38)转速表 (39)燃油表 (39)温度表 (40)指示灯和警告灯 (40)开关和控制 (50)钥匙 (59)遥控门锁系统(如装备) (60)门锁 (63)电动车窗 (65)尾门(两厢车) (68)发动机舱盖 (69)车内门控制 (71)电动天窗(如装备) (73)点烟器和辅助电源接头 (75)烟灰盒 (76)雨伞烘干槽 (81)储币箱 (81)前座中央储物箱 (82)椅背挂物钩 (82)太阳镜托架(如装备) (83)遮阳板 (84)带有衣帽钩的辅助扶手(如装备) (84)后风窗玻璃遮阳帘(如装备) (85)驾驶汽车 (85)新车 (85)驾驶注意事项 (85)燃油 (86)调整车镜 (88)调整方向盘 (90)点火开关 (91)启动发动机 (92)驾驶车辆 (94)制动 (99)驾驶小提醒 (102)发动机排气(一氧化碳) (104)温度控制和音响系统 (104)出风口 (104)空调 (109)冷却 (110)加热 (111)通风 (111)除霜和除雾 (112)自动温度控制(如装备) (113)自动温度控制 (116)手动控制 (117)带6碟cd碟片放音机的立体声收音机(如装备) (122)带单碟cd碟片放音机的立体声收音机(如装备) (125)Dvd影音系统(如装备)的维护和保养 (125)维护和保养 (125)紧急情况处置 (126)备用轮胎、千斤顶以及车辆工具 (126)如何更换漏气轮胎 (126)用跨接电缆启动发动机 (130)牵引车辆 (132)“摇摆”汽车使它解困 (132)过热 (133)维修与车辆养护 (134)安全预防措施 (134)驾驶员检查清单 (135)发动机润滑油 (137)冷却液 (140)制动器和润滑油 (142)自动变速器油(如装备)(1.8dohc车型) (144)动力转向液 (145)风窗玻璃清洗液 (147)风窗玻璃刮水器 (147)空气滤清器 (148)火花塞 (149)传动皮带 (149)蓄电池 (151)制动踏板 (152)离合器踏板 (152)驻车制动 (152)催化转化器 (152)车轮和轮胎 (153)空调滤清器(如装备) (157)保险丝 (157)车灯 (159)车辆养护 (166)保修维护计划 (169)总体说明 (169)工作条件 (169)定期技术维护 (169)技术信息 (172)标识码 (172)油液表 (174)发动机机油 (174)灯泡规格(两厢车) (175)灯泡规格(三厢车) (175)汽车规格 (176)基本信息安全及重要事项本手册中所有说明对您这辆车的安全操作和使用寿命都很重要。

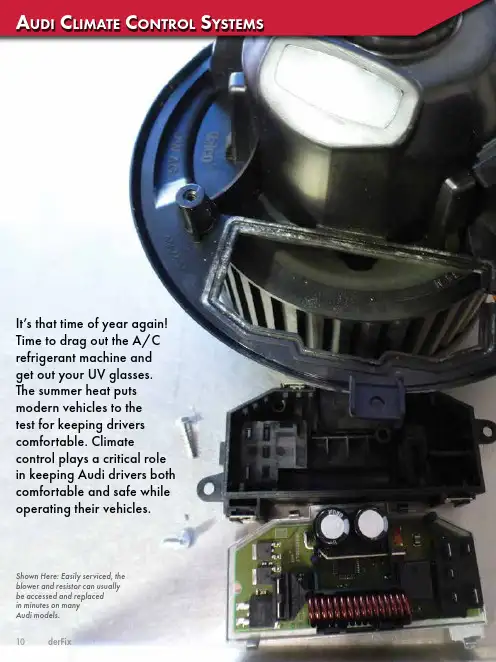
Article Title10derFixA udi c LiMAte c ontroL S ySteMSIt’s that time of year again! Time to drag out the A/C refrigerant machine and get out your UV glasses. The summer heat puts modern vehicles to the test for keeping drivers comfortable. Climatecontrol plays a critical role in keeping Audi drivers both comfortable and safe while operating their vehicles.Shown Here: Easily serviced, the blower and resistor can usually be accessed and replaced in minutes on many Audi models.11June 2018During colder months, the air conditioning may not be used for extended periods of time, either masking problems with the system or creating issues from lack of use. A vehicle without a proper air conditioning system can become a safety issue if left unchecked. Without a properly operating climate control system, driving in extremely humid or cold environments can fog up windows to the point of impairing visibility.c LiMAtronicIn most modern Audis, much of the climate control system is automatic and requires minimal input from occupants. And all Climatronic systems offer dual zone control for occupants. The functions are controlled from the Climatronic contol unit (J255), which is also the control head on Audi vehicles. The control unit is connected via CAN bus network to the rest of the vehicle via the gateway module (J533).Most Climatronic sensors are also connected through asecondary LIN bus network. This is a single wire network that aids in communication and diagnosis of every connected vehicle component. Most modern vehicles have adapted to LIN bus networking for certain systems as it is simpler and less expensive than a fully connected CAN network.LIN networks drawbacks include limited speed. This is why vehicle safety systems still rely on a CAN network connection. When a problem arises within a specific vehicle component connected to the LIN bus, the network can broadcastinformation to its master module. It will generally store faults to aid in diagnosis. For the climate control system, LIN bus is used primarily for blend door motors and the fresh air blower motor. Through scan software the module can by accessed via address 08.Compressor: The A/C compressor plays a critical role in the climate control system. Its job is to pump the refrigerant at high pressure through the A/C system. Modern Audi vehicles employ a variable orifice compressor. Available on most every newer Audi model, the updated compressor increases efficiency and comfort and replaces the old school compressor clutch with a magnetic on/off design. The variable orifice compressor offers many advantages such as cooler temperatures, reduced compressor load on the engine, and improved fuel economy.Instead of using a clutched pulley, modern Audi A/Ccompressors have a standard pulley with a built-in breakaway design. This is used to keep the compressor from completelyDont forget the basics! Thermometers for the dash vents, and UV for the leaks!Audi has streamlined and simplified the climate control in this dual zone interface, integrating heated seats as well in the control surface.This compressor was exhibiting a clunking noise.12derFixlocking up if it becomes damaged. This pulley design also dampens the compressor from engine forces. Often, a low or empty refrigerant level can cause pulley failure. The refrigerant and oil normally act as lubricants, keeping the inside of the compressor spinning smoothly. Without them, overheating of the internals may occur, causing extreme drag and eventual pulley failure.If the compressor exhibits strange noises or customers complain of drive belt noise, it is wise to inspect the compressor pulley. Using a stethoscope is a good way to localize these strange noises and isolate them from accessories. Visual inspection is also possible but may be difficult without removing the dust cap on the front of the compressor. When the pulley has separated, bits of material may remain on the bearing surface, creating loud noise as it spins.The n280 compressor regulator valve controls the internal pressure of the A/C compressor by regulating a solenoid valveinternally and controlling flow. It is activated by the Climatronic control unit to meet cooling needs. The regulator valve is a key component of the compressor, acting similarly to the clutch in an old style A/C system by varying the flow of refrigerant into the system. It is constantly energized and gets lots of use. When failures happen at the compressor, it can usually be traced back to the regulator solenoid valve. This solenoid is very similar to a variable valve timing solenoid used to rapidly modulate oil pressure.When testing the compressor regulator valve, keep in mind that it receives a PWM (Pulse Width Modulated) signal. It operates on a lower voltage (0–5 volts) than battery voltage. Do not test the compressor by power probing these units. Damage most likely will occur.The safest diagnosis is to back probe the connector at the compressor and check for proper incoming signal voltage.Again, the most common failure point on these units is the valveThis image shows an inactive system with refrigerant pressure evenon both low and high sides.This is a great pressure drop reading from a properly operatingA/C system.Audi Climate Control SystemsThe G395 high-pressure sensor has become a common failure item on Audi models. This sensor often leaks refrigerant into the sender body, destroying the internal components. In extreme cases, refrigerant leaks externally through the sensor itself, depleting the refrigerant charge.e Lectric c ooLingf AnSThe electric cooling fan is a necessary component of the climate control system. When the refrigerant is forced through the condenser at the front of the vehicle, the vapor is condensed into a liquid. This thermal reaction creates a lot of heat. When the vehicle is moving, air is naturally forced through the condenser where the refrigerant is cooled. In stop and go traffic, the electric fan is especially needed to pull air across the condenser. The electric fan helps dissipate the heat, which can otherwise increase engine coolant temperatures to unsafe levels if left unchecked.itself in the compressor. The control valve is not serviceable and a new compressor assembly must be fitted if found to be faulty.g395 S enSor f AiLureThe A/C pressure switch plays a critical role in the climate control system. Its job is to monitor the refrigerant pressure going into the evaporator assembly from the compressor. If this sensor detects a dangerously high refrigerant pressure or an implausible reading, it will disable the A/C compressor operation. The pressure sensor uses a pulse width modulated signal to the Climatronic control unit.Even when diagnosing climate control performance, a scan of the vehicle is a mandatory step on Audi vehicles. The Climatronic stores faults, aiding in diagnosis of the system. The most common fault stored for the G395 sensor is 00819 high-pressure sensor (G395) lower limit exceeded, or implausible signal.Both fans must work properly for effective A/C operation!This vehicle was low on refrigerant charge, setting the lower limit exceeded fault.This sensor is readily visible through the front grille of most late model Audi vehicles. Always check this area if leaks are suspected.14derFixAs part of programming, if failure of the electric cooling fan or fan control module occurs or if refrigerantpressure is too high, the A/C system will be disabled. This ensures that the engine coolant level does not reach unsafe levels. It usually triggers a fault code to store in the control unit, aiding diagnosis. The fans report to the engine control unit, not the climate control unit, so faults are stored there. It is also possible to run activations on the electric fan to test for proper function. If the fan is bad, this limits the A/C system’s operation. The Climatronic control unit stores shut-off condition information that can directly identify faulty components.B LoWer M otorWhen diagnosing a complaint of poor HVAC systemperformance, always start with a scan of the vehicle’s systems after connecting a power supply. Faults are often stored in the climate control unit, leading to a quicker diagnosis of issues. If the blower motor is suspected of being faulty, the vehicle will store DTCs, such as 1273-fresh air blower, mechanical fault, static/sporadic. B10BE07-fresh air blower front-mechanical fault, may also be stored in the climate control unitDuring blower motor diagnosis, it is important to physically inspect the motor itself for damage. Audi has taken great care to protect the blower motor; however damage does occur occasionally. If it is difficult to spin, noisy, or hitting the support cage surrounding the motor, it should be replaced.If the car has ingested water through the fresh air intake, the blower motor takes the brunt of the damage. The water can quickly damage the electrical components as well as thebearing surface on which the motor rides, rendering the motor inoperable or increasing noise from the blower motor. This water damage can appear as a green corrosion buildup on connectors and the motor windings. If you must replace the blower motor due to water ingress, it is wise to replace the blower resistor at the same time, as both reside in the same area and may have been damaged/corroded as well.Resistors: The blower motor requires a set of resistors to properly modulate speed and air output. It rarely fails, but, when it does, the symptoms are apparent. In vehicles with manual or automatic fan settings, one or more of the fan speeds may be inoperable. In certain cases, the blower may notoperate at any speed at all. This is when a power probe comes in handy. It is possible to bypass the resistor and test the blower motor directly for operation.If the blower only operates at the high-speed setting, it is likely the resistor has failed, requiring replacement. When the resistor has failed, the blower motor receives full 12 volt power. This is generally the high-speed setting on the control head. This allows limited blower function, aiding in safety for the driver. Replacing the resistor is normally a straightforward operation. After removal of the passenger side lower cover, the blower motor and resistor pack are visible and accessible for replacement and testing. Thanks to the work of Audi design engineers, few tools and little time are needed to get to this piece of the HVAC system.c ABin f iLterTo ensure the best interior comfort, Audi vehicles offer a cabin air filter on all vehicles. In addition to providing filtered air, they protect the blower motor and climate control system from outside contaminnts that can potentially damage components. Activated charcoal filters are also recommended, as theymake a significant improvement in vehicle air quality as well as limiting noxious odors from entering the cabin.Audi recommends replacement of the cabin filter at 20K mile intervals. This may decrease, depending on where the vehicle is parked. Cabin filters can become completely clogged withmaterial if left unchecked for too long.These shutoff criteria can be extremely valuable when tracing climate control issues.Audi Climate Control SystemsThe cabin filter on most Audi models is located under the passenger side knee bar. Replacement can be done in minutes with only a lower cover to remove and a slide lock cover to access the filter. Be sure to clean up after replacing the filter; excess leaves and plant material usually fall out of the blower casing when the filter is removed.Heater Core: When driving in cooler temperatures, it becomes necessary to heat the cabin air to more comfortable levels. This is done by using a heater core. The heater core transfers heat from engine coolant to the cabin of the vehicle. The climate control system utilizes the heater core to direct air across the core, warming it for the cabin.Heater core problems are rare but do occur from time to time. The primary cause of clogged heater cores is lack of coolant changes. It may be difficult to find a factory interval for flushing coolant. Every two years is a wise recommendation, just like brake fluid. Always use an Audi approved coolant with a 50/50 mix with distilled water. This ensures proper pH level and protection.The distilled water is also necessary to eliminate any minerals or sediment that may be in standard supplies. If neglected or topped up from leaks, the coolant may begin to accumulate a sandy sludgy texture in the cooling system if not changed frequently enough.If the core becomes internally clogged with material or sediment, it cannot efficiently transfer heat to the outside of the core. This results in poor heat output, particularly at idle speeds when coolant flow is at its lowest. With poor heat output, particularly in colder climates, this can become a safety issue, creating ice buildup on windows and a cold driver! In dual zone climate systems, a clogged heater core sometimes affects only one side of the vehicle. This is due to the position and airflow across the core itself.Using an infrared thermometer, it ispossible to determine if the heatercore is properly transferring heat. Theinlet side should be approximately 20degrees F warmer than the outlet. Ifboth sides are the same temperature,the core is definitely clogged.If a clogged heater core is suspected,it may be possible to back flush itto increase flow through the core,bringing back sufficient heaterperformance. It can increase coolantflow enough to increase heateroutput and allow for more thoroughdiagnosis of the HVAC system.A heater core back flush is a relatively straightforward operation, needing just basic tools. Heater cores generally have one inlet and outlet for the coolant to flow through. The first step is to remove both hoses going to the core and re-attach two short sections of rubber hose or old coolant hose. This is used to feed and drain the core as it is flushed.The primary tool for the flush is a standard blow gun with a pressure regulator inline. The regulator is necessary to lower air pressure to safe levels. If too much pressure is used, damage to the heater core can occur. Safe pressure is between 15–20 psi, no higher. Using a mild detergent may help break up deposits in the heater core, but be careful not to use anything too strong. Standard dish detergent works fine.After soaking the core for 15 minutes, use the blow gun on the outlet side of the heater core. Rapid short bursts of air will force the remaining liquid through the core and out via the inlet of the core. The bursts of air pressure help break up deposits and increase flow. Do not use full shop air pressure. This will cause damage! Repeat these steps if a lot of debris is seen exiting the core. Flow will be increased through the heater core after this procedure. This is not a sure fix and is usually only used to confirm a suspected clogged core, which must then be replaced. Vehicle climate control systems are always changing to increase efficiency and comfort. This is why it’s important to stay up to date. These systems may seem quite complicated, but they still rely on basic principles. With a good general understanding of these systems, most issues that arise can be quickly diagnosed and repaired, keeping customers comfortable and happy. n Quick access to thecabin filter makesreplacement a breeze.。
别克凯越用户手册基本信息 (4)安全及重要事项 (4)安全第一 (5)零件、选装件和附件 (5)环保和节能 (5)座椅与乘客保护系统 (7)前排乘客座椅 (7)后排乘客座椅 (10)安全带报警钟 (11)安全带 (11)每个人都要使用安全带 (16)如何正确系安全带-成人 (16)如何正确系安全带-儿童 (21)安全带高度调节 (25)安全带的养护 (26)头部保护装置 (29)辅助保护系统-气囊 (31)重要建议 (34)仪表与控制系统 (36)仪表与控制-两厢车车型 (36)仪表与控制-三厢车车型 (36)组合仪表 (37)车速表 (38)转速表 (39)燃油表 (39)温度表 (40)指示灯和警告灯 (40)开关和控制 (50)钥匙 (59)遥控门锁系统(如装备) (60)门锁 (63)电动车窗 (65)尾门(两厢车) (68)发动机舱盖 (69)车内门控制 (71)电动天窗(如装备) (73)点烟器和辅助电源接头 (75)烟灰盒 (76)雨伞烘干槽 (81)储币箱 (81)前座中央储物箱 (82)椅背挂物钩 (82)前排乘客椅下鞋盒(如装备) (83)太阳镜托架(如装备) (83)遮阳板 (84)带有衣帽钩的辅助扶手(如装备) (84)后风窗玻璃遮阳帘(如装备) (85)驾驶汽车 (85)新车 (85)驾驶注意事项 (85)燃油 (86)调整车镜 (88)调整方向盘 (90)点火开关 (91)启动发动机 (92)驾驶车辆 (94)制动 (99)驾驶小提醒 (102)发动机排气(一氧化碳) (104)温度控制和音响系统 (104)出风口 (104)空调 (109)冷却 (110)加热 (111)通风 (111)除霜和除雾 (112)自动温度控制(如装备) (113)自动温度控制 (116)手动控制 (117)带6碟cd碟片放音机的立体声收音机(如装备) (122)带单碟cd碟片放音机的立体声收音机(如装备) (125)Dvd影音系统(如装备)的维护和保养 (125)维护和保养 (125)紧急情况处置 (126)备用轮胎、千斤顶以及车辆工具 (126)如何更换漏气轮胎 (126)用跨接电缆启动发动机 (130)牵引车辆 (132)“摇摆”汽车使它解困 (132)过热 (133)维修与车辆养护 (134)安全预防措施 (134)驾驶员检查清单 (135)发动机润滑油 (137)冷却液 (140)制动器和润滑油 (142)手动变速器油(如装备) (144)自动变速器油(如装备)(1.8dohc车型) (144)动力转向液 (145)风窗玻璃清洗液 (147)风窗玻璃刮水器 (147)空气滤清器 (148)火花塞 (149)传动皮带 (149)蓄电池 (151)制动踏板 (152)离合器踏板 (152)驻车制动 (152)催化转化器 (152)车轮和轮胎 (153)空调滤清器(如装备) (157)保险丝 (157)车灯 (159)车辆养护 (166)保修维护计划 (169)总体说明 (169)工作条件 (169)定期技术维护 (169)技术信息 (172)标识码 (172)油液表 (174)发动机机油 (174)灯泡规格(两厢车) (175)灯泡规格(三厢车) (175)汽车规格 (176)基本信息安全及重要事项本手册中所有说明对您这辆车的安全操作和使用寿命都很重要。
These advantages come at some cost.Because your vehicle is taller and rides higher off the ground,it has a high center of gravity.This means that your vehicle can tip or roll over if you make abrupt turns.Utility vehicles have a significantly higher rollover rate than other types of vehicles.To prevent the risk of rollover or loss of control:Take corners at slower speeds than you would with a passenger vehicle.Your Pilot has higher groundclearance than a passenger vehicle designed for use only on pavement.Higher ground clearance has many advantages for off-highway driving.It allows you to travel over bumps,obstacles,and rough terrain.It also provides good visibility so you can anticipate problems earlier.Driving Guidelines230You should do the following checks and adjustments every day before you drive your vehicle.Make sure all windows,mirrors,and outside lights are clean and unobstructed.Remove frost,snow,or ice.Check the adjustment of the seat (see page ).Check the adjustment of the inside and outside mirrors (see page ).Check the adjustment of the steering wheel (see page ).Fasten your seat belt.Check that your passengers have fastened their seat belts (see page ).Turn the ignition switch ON (II).Check the indicator lights in the instrument panel.Start the engine (see page ).Check the gauges and indicator lights in the instrument panel (see page ).Check that any items you may be carrying with you inside are stored properly or fastened down securely.Visually check the tires.If a tire looks low,use a gauge to check its pressure.Check that the hood and tailgate are fully closed.Make sure the doors and tailgate are securely closed and locked.3.2.1.4. 5.6.7.8.9.11.12.10.15786110223289Preparing to Drive231Apply the parking brake.In cold weather,turn off all electrical accessories to reduce the drain on the battery.Make sure the shift lever is in Park.Press on the brake pedal.Without touching the accelerator pedal,turn the ignition key to the START (III)position.If the engine does not start right away,do not hold the key in START (III)for more than 15seconds at a time.Pause for at least 10seconds before trying again.If the engine does not start within 15seconds,or starts but stalls right away,repeat step 4with the accelerator pedal pressed half-way down.If the engine starts,release pressure on the accelerator pedal so the engine does not race.If the engine still does not start,press the accelerator pedal all the way down and hold it there while starting in order to clear flooding.As before,keep the ignition key in the START (III)position for no more than 15seconds.Return to step 5if the engine does not start.If it starts,lift your foot off the accelerator pedal so the engine does not race.An engine is harder to start in cold weather.The thinner air found at high altitude above 8,000feet (2,400meters)adds to the e the following procedure:Turn off all electrical accessories to reduce the drain on the battery.Push the accelerator pedal half-way to the floor and hold it there while starting the engine.Do not hold the ignition key in START (III)for more than 15seconds.When the engine starts,release the accelerator pedal gradually as the engine speeds up and smooths out.If the engine fails to start in step 2,push the accelerator pedal to the floor and hold it there while you try to start the engine for no more than 15seconds.If the engine does not start,return to step 2.1. 2.3.5. 6.1.2.3.4.Starting in Cold Weather at High Altitude (Above 8,000feet/2,400meters)Starting the Engine232Your Honda’s transmission has five forward speeds,and is electronically controlled for smoother shifting.It also has a ‘‘lock-up’’torque converter for better fuel economy.You may feel what seems like another shift when the converter locks.The ‘‘D’’indicator comes on for a few seconds when you turn the ignition switch ON (II).If it flashes while driving (in any shift position),it indicates a possible problem in the transmission.Avoid rapid acceler-ation and have the transmission checked by an authorized Honda dealer as soon as possible.The malfunction indicator lamp may come on along with the ‘‘D’’indicator if there is a problem in the automatic transmission control system.Automatic Transmission233The shift lever has seven positions.It must be in Park or Neutral to start the engine.When you are stopped in D,D ,2,1,N or R,press firmly on the brake pedal,and keep your foot off the accelerator pedal.This position mechani-cally locks the e Park whenever you are turning off or starting the engine.To shift out of Park,you must press on the brake pedal and have your foot off theaccelerator pedal.Pull the shift lever towards you,then move it out of Park.If you have done all of the above and still cannot move the lever out of Park,see Shift Lock Release on page .You must also pull the shift lever towards you to shift into Park.To avoid transmission damage,come to a complete stop before shifting into Park.The shift lever must be in Park before you can remove the key from the ignition switch.You cannot shift out of Park with the brake pedal depressed when the ignition switch is in LOCK (0)or ACCESSORY (I).2363To shift from:P to RR to P N to R D to 22to 11to 22to D D to D D to N D to D N to D R to NDo this:Press the brake pedal and pull the shift lever towards you.Pull the shift lever towards you.Move the lever.3333Shift Lever PositionsPark (P)Automatic Transmission234Use Neutral if you need to restart a stalled engine,or if it is necessary to stop briefly with the engine idling.Shift to Park posi-tion if you need to leave the vehicle for any reason.Press on the brake pe-dal when you are moving the shift lever from Neutral to another gear.To shift to Reverse from Park,see the explanation under Park.To shift to Reverse fromNeutral,come to a complete stop and then shift.Pull the shift lever towards you before shifting into Reverse from Neutral.Use this position for your normal driving.The transmis-sion automatically selects a suitable gear for your speed and acceleration.You may notice the transmission shifting up at higher speeds when the engine is cold.This helps the engine warm up faster.This position is similar to D,except only the first three gears are e D when towing a trailer in hilly terrain,or to provide engine braking when going down a steep hill.D can also keep the transmission from cycling between third and fourth gears in stop-and-go driving.For faster acceleration when in D or D,you can get the transmission to automatically downshift by pushing the accelerator pedal to the floor.The transmission will shift down one or two gears,depending on your speed.333Automatic TransmissionNeutral (N)Reverse (R)Drive (D)Drive (D )3235If you exceed the maximum speed for the gear you are in,the engine speed will enter into the tachometer’s red zone.If this occurs,you may feel the engine cut in and out.This is caused by a limiter in the engine’s computer controls.The engine will run normally when you reduce the RPM below the red zone.When driving down hill with a trailer,use the Second position.To shift from Second to First,pull the shift lever towards you,then shift to the lower gear.With the lever in this position,the transmission locks in First gear.By upshifting anddownshifting through 1,2,D and D,you can operate thistransmission much like a manual transmission without a clutch pedal.This allows you to move the shift lever out of Park if the normal method of pushing on the brake pedal and pulling the shift lever does not work.Set the Parking brake.Make sure the key is in theignition switch LOCK (0)position.To shift to Second,pull the shift lever towards you,then shift to the lower gear.This position locks the transmission in second gear.It does not downshift to first gear when you come to a stop.Second gives you more power when climbing,and increased enginebraking when going down steep e second gear when starting out on a slippery surface or in deep snow.It will help reduce wheelspin.1.2.3Engine Speed LimiterShift Lock ReleaseFirst (1)Second (2)Automatic Transmission236If you need to use the Shift LockRelease,it means your vehicle isdeveloping a problem.Have thevehicle checked by your Hondadealer.Put a cloth on the edge of the ShiftLock Release slot cover.Use a small flat-tipped screwdriver or small metal plate(neitherare included in the tool kit)toremove the cover.Carefully pry onthe edge of the cover.Remove the screwdriver from theshift lock release slot,then installthe cover.Depress the brake pedal andrestart the engine.3.6.Automatic Transmission237The Variable Torque Management 4WD System (VTM-4)automatically transfers varying amounts of engine torque to the rear wheels under low traction conditions.Variable Torque Management 4WD System238Do not use the VTM-4Lock button on dry,paved roads.Driving on dry,paved roads with VTM-4Lock ON may damage the rear dif f erential when making a turn.Strange noises and vibration can alsoresult.To engage the VTM-4Lock:To disengage the VTM-4Lock,doone of the following:The vehicle must be stopped withthe engine running.Move the shift lever to first(1), second(2)or reverse(R)gear. Press the VTM-4Lock button. The light in the button will come on.To get unstuck,apply light pressure to the accelerator pedal.Do not spin the front tires for more than a few seconds.Because of the amount of torque applied to the rear tires,they should not spin.This is normal.If you are not able to get the vehicle to move,apply the brakes to stop the wheels,then reverse direction.Press the VTM-4Lock button. Move the shift lever to D,or D. Turn the ignition to OFF(0). When you restart your Pilot,the VTM-4Lock feature will be off.1. 2.3.3 Variable Torque Management4WD System239Always use the parking brake when you park your vehicle.The indicator on the instrument panel shows that the parking brake is not fully released;it does not indicate that the parking brake is firmly set.Make sure the parking brake is set firmly or your vehicle may roll if it is parked on an incline.Set the parking brake before you put the transmission in Park.This keeps the vehicle from moving and putting pressure on the parking mechanism in the transmission making it easier to move the shift lever out of Park when you want to drive away.If the vehicle is facing uphill,turn the front wheels away from the curb.If the vehicle is facing downhill,turn the front wheels toward the curb.Make sure the parking brake is fully released before driving away.Driving with the parking brake partially set can overheat or damage the rear brakes.Make sure the windows are closed.Turn off the lights.Place any packages,valuables,etc.,in the cargo area or take them with you.Lock the doors with the key or the remote transmitter.Never park over dry leaves,tall grass,or other flammable materials.The three way catalytic converter gets very hot,and could cause these materials to catch on fire.Parking Tips Parking240。
丰田锐志车主手册>1、电动后视镜控制开关2、侧通风口3、侧除霜器出风口4、仪表组5、中央通风口6、驾驶模式选择开关7、音响遥控开关8、电动车窗开关9、杂物箱10、门兜11、后控制箱12、后通风口13、后排烟灰盒14、电源插座15、杯架16、自动变速器选档杆17、倾斜和伸缩式转向锁止释放杆>1、前照灯清洁器开关或前照灯光束水平旋钮2、后电动遮阳帘开关3、前照灯、转向信号灯、前雾灯开关和后雾灯开关4、雨刷器和喷洗器开关5、空调。
音响和导航系统控制器(有关导航系统,请参见“导航系统用户手册”。
)6、plasmacluster(空气电离器)开关7、危险告警灯开关8、后车窗和车外后视镜除雾器开关9.前排乘员座椅安全带提示灯10、辅助储物箱或音响系统控制器(有关音响系统控制器,请参见“导航系统用户手册”。
)11、座椅加热器开关12、点烟器和烟灰盒13、时钟14、“trcoff”(牵引力控制系统关闭)开关15、巡航控制开关16、点火开关(发动机开关)17、发动机罩锁定释放杆18、辅助储物箱和卡片盒19、自适应性前照灯系统关闭开关>1、音响遥控开关2、电话按钮(有关细节,请参见“导航系统用户手册”。
)3、外界温度和遥航信息显示器控制开关>>1、前方个人用灯2、前方个人用灯开关3、辅助储物箱4、电动月亮天窗开关5、麦克风(有关细节,请参见“导航系统用户手册”。
)6、“room”(冷光顶灯)开关>1、短距离里程表复位按钮2、车速表3、维修提示指示灯和指示灯4、车门/发动机罩/行李厢开启指示显示器5、自动变速器档位显示器6、外界温度显示器和/或巡航信息显示器7、转速表8、仪表板照明控制按钮9、里程表和双短距离里程表10、发动机冷却液温度表11、燃油表>篇二:丰田汽车-职位说明书全套上海xx丰田汽车销售服务有限公司zs-gx-zwsm--0409 上海xx丰田汽车——服务部员工职位说明书中升集團(上海)投资管理公司二○○四年九月1.服务部部长2.客户服务经理(维修接待主管)篇三:丰田5a说明书丰田5a发动机电控系统总体概况4-1 丰田8a发动机参数4-2-1 丰田电控系统的组成,如下图所示1 计算机 9 蓄电池 17 喷油器 25 火花塞2 发动机转速传感器 10汽油喷射继电器 18 碳罐 26防盗代码键盘3 进气压力传感器 11 点火线圈 19碳罐电磁阀 27 转速表4 节气门位置传感器 12 燃油箱 20 油气收集盒 28空调继电器5 冷却液温度传感器 13 汽油泵 21 节气门体缓冲器 29 燃油表6 进气温度传感器 14 汽油滤清器 22 怠速控制阀7车速传感器 15 进气管总成 23 发动机故障警报灯8 氧传感器 16 燃油压力调节器 24 自诊断座4-2-2 丰田8a电控系统的控制功能,如下表所示4-3 丰田8a电控的控制原理4-3-1 燃油喷射控制燃油喷射控制框架图(1) 基本喷油量控制基本喷油量是保证发动机在正常的工作温度下运行时有最佳的空燃比. 计算机根据发动机的发动机的转速信号和进气压力传感器的信号确定基本喷油量,并通过喷油器驱动电路控制喷油器每个工作循环的通电(喷油)时间.(2) 喷油量修正控制喷油量修正控制是根据需要对基本喷油时间进行适当的调整,以保证发动机在基本喷油量不能满足要求的各种工况、状态下仍有理想的喷油量;电控系统喷油修正控制项目有:1)进气温度修正.进气温度修正是为了在进气温度不同(空气密度不同)时,仍然保持理想的空燃比.计算机通过进气温度传感器送来的进气温度信号对喷油时间作出适当的修正.在发动机的各个工况下都会进行这种进气温度的改变而作出的喷油量修正.因此,进气温度传感器信号异常,将影响发动机各个工况、状态下的工作性能.2)起动喷油量修正.起动时,发动机转速很低,这种基本喷油量少.起动喷油修正是通过适当增加喷油量来改善其起动性能.计算机根据点火开关(提供起动信号) 、冷却液温度传感器和进气温度传感器信号作出起动喷油量控制.3)起动后的喷油量修正.发动机起动后,计算机在基本喷油量的基础上增加起动后补充喷油量,以保证发动机在温度较低,汽油雾化不良的情况下能稳定运转.计算机根据点火开关(提供起动后信号) 、冷却液温度传感器和发动机转速传感器信号作出起动后喷油量修正控制.4)加速时喷油量修正.为保证发动机有良好的加速性能,计算机使喷油器在加速时额外地喷射部分汽油.计算机根据节气门位置传感器、车速传感器、冷却液温度传感器的信号作出加速喷油量修正控制.5)减速时喷油量修正.减速时计算机控制喷油量减少或停止喷油,以降低燃油油耗和排气污染.计算机根据节气门位置传感器、车速传感器、冷却液温度传感器和发动机转速传感器信号作出减速时喷油量修正控制.6)蓄电池电压喷油时间修正.当蓄电池的电压变化时,由于喷油器电磁线圈的电流也会随之改变,使喷油器阀的开启速率发生变化.为消除这种喷油器阀开启速率变化而引起的喷油量偏差,计算机根据蓄电池的变化对喷油器通电时间(喷油脉冲宽度)进行修正.当蓄电池电压较低时,计算机适当延长喷油时间,以补偿因开启速率下降而减少的喷油量.7)混合气浓度反馈修正.为使发动机排放的有害物质降至最低的水平,在发动机的排气通道上安装三元催化反应器来净化废气中的nox、hc和co.当混合气浓度在理论空燃比附近时,三元催化反应器的净化效果最佳.混合气反馈喷油修正是将混合气浓度控制在理论空燃比附近,以保证三元催化反应器良好的排气净化效果.计算机则根据氧传感器输入的信号对喷油量进行修正.如下图示: 1 有效控制范围 2 理论空燃比8)自适应修正.当一些不可监测的参数(如发动机磨损等)改变时,计算机通过自适应修正,以使喷油量和发动机的运行工况相适应. 4-3-2 点火控制点火控制系统可实现发动机在各种工况、状态下都处于最佳的点火时刻和具有恒定的点火能量,使发动机的燃烧及时、完全,以降低发动机的燃油油耗、减少排气污染.点火控制系统的组成如下图所示: (1)基本点火提前角控制基本点火提前角是满足发动机在正常的工况变化范围内始终处于最佳的点火时刻,它随发动机转速和发动机负荷的变化而改变,各工况下的最佳点火提前角作为标准参数储存在计算机中.工作时,计算机根据发动机转速传感器信号和进气压力传感器信号确定最佳的点火提前角,当时的点火提前角若与最佳的点火提前角不一致时,就对点火提前角进行调整.(2)修正点火提前角控制修正点火提前角控制是指计算机根据有关传感器的信号对基本提前角进行修正,以保证发动机在各种工况下始终处于最佳的燃烧状态和稳定地工作.修正点火提前角控制的项目有:1)发动机温度修正.当发动机的温度不在其正常的工作温度状态时,计算机根据冷却液温度信号对其点火提前角进行修正,以使发动机的温度降低,点火至迅速燃烧的速度下降时仍然保持最佳的燃烧状态.2)起动后暖机修正.发动机冷机起动后,其温度还很低,因此需适当增大点火提前角,以改善燃油的消耗,并加快暖机过程和增强其驱动性能.暖机修正点火提前角随发动机的温度上升而减少.计算机根据点火开关(提供起动后信号)、冷却液温度传感器等信号作出起动后暖机修正控制.3)怠速稳定修正.发动机在怠速运行期间,由于发动机在负荷变化而使发动机的转速改变.通过点火提前角的调节作用比怠速电磁阀稳定怠速的作用快,因此,在怠速波动频率高时,通过适当地增大或减少点火提前角来稳定怠速.计算机根据发动机转速传感器、节气门位置传感器等信号作出怠速稳定修正控制.4)动力转向修正.在动力转向打到底时,会使发动机的负荷增大,动力转向修正是计算机在一个很短的时间内适当加大点火提前角,以稳定发动机的转速.5)自动变速器换档修正.自动变速器换档时,计算机根据档位开关及转速和负荷的变化情况对点火提前角作出适当的修正,以缓和发动机转矩的波动和换档的冲击.6)车辆减速修正.在车辆减速停止喷油时,计算机使点火系统在特设的点火提前角下工作.7)防止抖动修正.计算机根据发动机转速的变化及变化比的情况适当修正点火提前角,以避免车辆抖动.(3) 起动时点火提前角控制为使发动机起动容易,计算机对起动时的点火提前角进行不同的控制.起动时的点火提前角控制主要根据点火开关(提供起动信号)、冷却温度传感器的信号和发动机转速传感器的信号作出不同的起动点火提前角控制.1)正常起动转速下的点火提前角控制.在正常的转速(起动转速在1000r/min以上)下起动时,考虑温度因素对发动机燃烧的影响.在温度低于零度以下时,由于从点火到迅速燃烧需较篇四:丰田显示设计说明书丰田合成显示箱设计要求说明书1. 显示箱与操作盒平面示意图如图1所示。
S4.1 CarProg TOYOTA immobiliser manualToyota Model Year Transponder type Instruction 4 RUNNER 1999-2003 TEX S4.1.12003- TEX/CRARISTO 1998- TEX S4.1.1 AURIS TEXAVALON 1998-2003 TEX S4.1.12003- TEX/CRAVENSIS 1998-1999 TEX 68HC05E62000-2003 TEX/CR 68HC05E62003- TEX/CRAYGO 2005- TEX/CRCAMRY 1997-2003 TEX S4.1.12003- TEX/CR IC601 93C56 CARINA 1996- PHIPHITEXCELICA 1996-1999 PHI2000- TEXCELSIOR 1998- TEX S4.1.1 COLORADA 1997- TEX S4.1.1 COROLLA 1996-1999 TEX S4.1.11999-2002 TEX S4.1.21999-2002 TEX 24C02 ECU1999-2002 TEX 95080 ECU2002- TEX/CR 95080 ECU2002- TEX/CR 24C02 ECU ECHO 1999- TEX S4.1.1 ESTIMA (J) 1997- PHIGAIA (J) 1999- TEX S4.1.1 HIACE 1997- TEX S4.1.1 HIGHLANDER 2001-2003 TEX S4.1.12004- TEX/CRHILUX (J) 1999- TEX S4.1.1 IPSUM (J) 1999- TEX S4.1.1 LANDCRUISER, 100 1996-2000 TEX S4.1.1 LANDCRUISER, 100 2000-2003 TEX S4.1.22003- TEX/CR IC601 93C56 MATRIX 2004- TEX/CR S4.1.3MR2 1997- TEX S4.1.1 PASEO 1997- PHI 24C04 PICNIC 1996- TEX S4.1.1 PLAZ (J) 1999- TEX S4.1.1 PRADO 1996- TEX S4.1.1 PREVIA 1997- PHI 24C042003- TEX/CR S4.1.3 PRIUS 2001-2003 TEX2003- TEX/CRPROGRESS NC300 1998- TEX S4.1.1RAV 4 1996-2004 TEX S4.1.12005- TEX/CR 25080 ECU SEQUOIA 2001-2003 TEX S4.1.12003- TEX/CR S4.1.3 SIENNA 1999-2003 TEX S4.1.12004- TEX/CR S4.1.3SCION 2004- TEX/CR S4.1.3 SOLARA 1999-2003 TEX S4.1.12004- TEX/CR S4.1.3 STARLET 1997- PHITACOMA TEX S4.1.1 TARAGO 2003- TEX/CRTUNDRA TEX S4.1.1YARIS 1999-2002 TEX 25020 ECU1999-2002 TEX 25080 ECU2003- TEX/CR 95080 ECUS4.1.1 Older Toyota immobiliser system with separated immo box and Texas transponder (4D by Silca). Immobiliser box are located near to ignition key. Usually this is black or brown box marked “immobilizer” or “134.2 kHz”.Remove immobiliser ECU from the car and open it. Find 93CL66 EEPROM in DIP package. Use A5 or A4 adapter and follow CarProg instruction to program transponder key. Short quartz resonator for in-circuit EEPROM programming or remove 93C66 from immobiliser board.S4.1.2 Toyota immobiliser system with transponder antenna and AMP unit on the ignition key and motor ECU. Used in 1999 – 2003 Toyota/Lexus cars.Transponder information is stored in motor ECU. Remove motor ECU from the car, open it and find 93C56 EEPROM marked IC900.Use A6 or A4 adapter and follow CarProg instruction to program transponder key. Remove 93C56 from ECU board, in-circuit programming is not stable.S4.1.3 Toyota cars with Texas Crypto transponder (4D by Silca). Transponder key is stored in separated immobiliser unit marked “ECU IMMOBILIZER”. Remove immobiliser ECU from the car, open it and find 93LC66 SMD EEPROM.Use only original factory key. With Silca 4D transponder car will not start.Use A6 or A4 adapter and follow CarProg instruction to program transponder key.Short quartz resonator for in-circuit EEPROM programming or remove 93C66 from immobiliser board.S4.1.4. European Toyota immobiliser system used in small engines ECU like Yaris or Corolla. Remove motor ECU (made by Bosch) from car and open it. Find 25040 or 25020 EEPROM in SMD package.Use A6 or A4 adapter and follow CarProg instruction to program transponder key. Short quartz resonator for in-circuit EEPROM programming or remove EEPROM from ECU board.S4.1.5. European Toyota immobiliser system used from 2003 in small engines ECU like Yaris or Corolla. Used key is Texas 4C transponder.Remove motor ECU (made by Bosch) from car and open it. Find 95080 or 25080 EEPROM in SMD package.Use A6 or A4 adapter and follow CarProg instruction to program transponder key. Short quartz resonator for in-circuit EEPROM programming or remove EEPROM from ECU board.S4.1.6. European Toyota immobiliser system used in small engines ECU like 1.4 VVT Corolla. Remove motor ECU (made by Bosch) from car and open it. Find 24C02 EEPROM in SMD package.Use A6 or A4 adapter and follow CarProg instruction to program transponder key.S4.1.7 Older Toyota immobiliser system with separated immo box and Philips PCF7931 transponder. Immobiliser box are located under dash panel. Usually this is brown box marked “immobilizer” or “125 kHz”.Remove immobiliser ECU from the car and open it. Find 24C04 EEPROM in DIP package. Use A5 or A4 adapter and follow CarProg instruction to program transponder key. Short quartz resonator for in-circuit EEPROM programming or remove 24C04 from immobiliser board.S4.1.8 Toyota immobiliser system with transponder antenna and AMP unit on the ignition key and motor ECU. Used in 2001 – 2003 Toyota/Lexus cars.Transponder information is stored in motor ECU. Remove motor ECU from the car, open it and find 93C56 EEPROM marked IC601Use A6 or A4 adapter and follow CarProg instruction to program transponder key. Remove 93C56 from immobiliser board.S4.1.9 Toyota Avensis or Corolla immobiliser system with transponder antenna and AMP unit (on the ignition key lock) and motor ECU. Transponder 4C. Are two very similar immobiliser types – with Texas transponder and with Texas Crypto transponder. Different is only processor inside immobiliser:•Texas 4C: (immobiliser unit: 89730-05010) – works only this system!•Texas Crypto with “Valeo” mark on the blade (immobiliser unit: 89780-02010; Key blank: 89785-02050, key with remote: 89070-05020)Use A9 adapter, connect like in picture ( pull up pins 1, 2 and 15 and connect white, blue, green, yellow, orange, black and red wires) and follow CarProg instruction to program transponder key.。
Article 3 (Terms of License)1.I n assigning this product, User may not retain the original copy of the embedded Licensed Software (including associated literature, updates and upgrades) and any duplicates and associated literature with regard tothe license to use Licensed Software. User may transfer Licensed Software only to the condition of binding the assignee to abide by the terms of this Software License Agreement.2.U ser may not reverse-engineer, disassemble, decompile or otherwise analyze the source code of Licensed Software.Article 4 (Rights to Licensed Software)All rights to Licensed Software and the associated literature, including copyrights, shall reside with Licensor orthe original right holder who has granted the Right of Use and right to sublicense to Licensor (hereinafter referred to as “Original Right Holder”), and User does not have any rights other than Right of Use granted hereunder with regard to Licensed Software and the associated literature. Article 5 (Exemption Granted to Licensor)1.L icensor and Original Right Holder do not assume any responsibility for damages caused to User or third parties resulting from the exercise by User of the license granted hereunder, unless otherwise provided by any law to the contrary.2.L icensor does not warrant Licensed Software to be merchantable, compatible and fit for specific purposes.Article 6 (Responsibility for Third Parties)If disputes over the infringement of third parties’intellectual property rights, such as copyrights and patent rights, arise out of the use of Licensed Software by User, User shall resolve these disputes at User’s own expenses while keep Licensor and Original Right Holder harmless.Article 7 (Secrecy Obligation)User shall keep confidential Licensed Software provided hereunder, information contained in the associated literature or the like and those provisions of this agreement not yet in public knowledge and may not disclose or leak these to third parties without prior written consent from Licensor.Article 8 (Cancellation of the Agreement) Licensor reserves the right to cancel thisagreement forthwith and claim compensation from User for the damages caused by such cancellation when User:(1)B reaches any of the provisions of thisagreement, or(2)H as received a petition for seizure, provisionalseizure, provisional disposition or any otherkind of compulsory execution.Article 9 (Destruction of Licensed Software)If this agreement is terminated under the provision of the foregoing paragraph, User shall destroy Licensed Software, along with all associated literature and its duplicates, within two (2) weeks from the date of termination. Article 10 (Copyright Protection)1.C opyrights and all other intellectual property rights relating to Licensed Software shall reside with Licensor and Original Right Holder and in no circumstances with User.2.U ser shall abide by the laws relating to copyrights and intellectual property rights in using Licensed Software.Article 11 (Export Control)1.L icensed Software and the associated literature or the like may not be exportedto places outside the Country (including transmission outside the Country over the Internet or the like).2.U ser agrees that Licensed Software is subjectto export controls imposed by the Country and the United States of America.3.U ser agrees to comply with all the international and domestic laws that applyto this software (U.S. Export Administration Regulations and regulations established bythe U.S., the Country and their governmental agencies regarding usage by end users and export destinations).Article 12 (Miscellaneous)1.E ven if this agreement is invalidated in part by law, all other provisions shall remain in effect.2. L icensor and User shall consult each other in good faith to resolve any matters not provided for in this agreement or questions arising from the interpretation of this agreement.3.L icensor and User agree that this agreementis governed by the law of Japan and that all disputes involving claims and obligations that may arise out of this agreement will be settled by arbitration at the Tokyo District Court asthe court of first instance.ii基本操作6基本操作前面板按鈕功能57 12346右手驅動機型1237 564左手驅動機型注意• 本指南中的面板是用作清晰說明操作的範例。