Micro-Hite测高仪+POWER PANEL操作手册
- 格式:pdf
- 大小:3.49 MB
- 文档页数:41
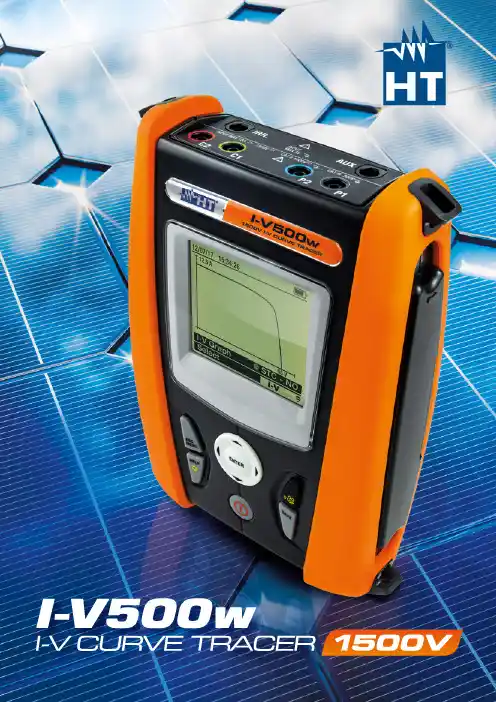
FREE Download App HTANALYSIS ™ for iOS & Android devicesavailable on the available on theModules Database,More than 30,000.Troubleshooting Assistant.Manage the modules in your instrumenttrough your mobile device.Add new , Delete or check what is insideyour I-V Curve Tracer.The only App that helps you with online FAQ.Depending on the outline of the I-V Curve you havemeasured, the app will suggest you the possiblecauses of the problem that you have faced.Download the FREE App HTANALYSIS ™ to use HTCloud ™database and share measures with your colleaguesanytime and from any place on the planet .Upload your measures onto HTCloud ™ to find them on your PC software TOPVIEW real-time.HT Cloud ™Share. Whenever,whatever and wherever.I-V Curve and much more.Expected degradation.What is the truth? Jump Function ™Data Analysis. OK or NOT OK?With your mobile device, HTANALYSIS ™helps you to understand the problemsyou may have in the PV Installations.Enter the installation date of the PV systemand the app will tell you the truthabout the real performance drop.Select your I-V Curve and analyze it.You can add a photo , an audio note ,a text note and a video .Yes, all can be completed on the field .HTANALYSIS.I-V Curve and much more.1500V MULTISTRINGIrradiance sensor HT304N.Solar02 remote unit.Only one person needed to measure.› I -V Curve measurement up to 1500V and 15A*› Power measurement of modules and strings › Open-circuit voltage (Voc) up to 1500V › Short-circuit current (Isc) up to 15A ›I rradiance measurement with HT304N remote sensor › Ambient and Panel temperature with PT300N probe**›W ireless environmental measurements with Solar 02 remote unit **› N o distance limits for environmental measurements with Solar 02 remote unit I-V Curve Measurement* 1000V/15A or 1500V/10A ** Check standard and optional accessories › 1500V & 15A: Suitable also for new PV plants with 1500VDC string voltage.›C ompact, lightweight and On-board screen: I-V500w needs only one person thanks to the on-board screen and returns immediate test results with OK or NOT OK outcome.› Multi-String Autosequence ™: Just few seconds to measure, save data and move to next string.› Wi-Fi Connection: Connect your smartphone or tablet to download and analyze in details your measures with exclusive features like Troubleshooting Assistant, Jump function and others available only on the APP HTANALYSIS ™.Why I-V500w?All that you need is KITKELVIN Test Leads Accessory.Multi-String Auto Sequence ™Dramatically decrease your PV String testing time with the NEW KITKELVIN.KITKELVIN provides an Auto Sequence function to HT Curve Tracersto reduce testing time up to 75%! KITKELVIN provides 2 leads for a singleoperator to move from string to string in a combiner box for fast testing. TheAuto-sequence is Start, Acquire, Manual store, Rearm. The Start command isautomatically initiated when the operator connects the probes across a stringor panel, with Voc triggering the next acquisition sequence.Memory and Module Database No need for external storage . The Internal Memory can store up to 249 I-V Curves (128 test points) and up to 999 Quick Checks of Voc & Isc . The intuitive User Interface (UI) provides easy access to all of your stored data including I-V Curves, power curves and numerical values in the table while in use. To ease measurement set up, HT Solar instruments store up to 30 modules to ensure you have all panels in the field being tested . Whenyou get to the field, you are ready to go for the entire day!Measurement Results (OPC & STC)The acquired I-V data or the operating conditions (OPC) is the true data acquired during I-V curve test . Taking the panel characteristics, the environmental measures (Irradiance & Temp) the instrument transforms these data points (OPC) to create the equivalent STC (Standard Test Condition) curve to evaluate if the panel or string is operating to specification .Report creation with TopView ™ SoftwareMeasuring Solar Field is often only the beginning of your project.Customers want to see proof their fields are working as promised.HT’s Copyrighted Software, TopView makes the business ofreport generation a breeze . Easy download, customized naming ofdata fields, File storing and sharing trough HT Cloud ™, analyzingcapabilities and display options to your preference . You cancompare Strings, Combiner boxes even Farms year over year to makedescribing the state of the field intuitive and obvious. I n addition,TopView incorporates standard templates for professional-lookingreports customizable with your logo and company information.CROSS TABLE FUNCTIONSM A D E I T A L Y I N b s h _I V 500w _e n 1-00Electrical specifications General specifications VDC Voltage @ OPCRange (V) (*): 15.0 ÷ 1499.9Resolution (V): 0.1÷ 0.3Accuracy: ±(0.5%rdg+2dgt)(*) The I-V curve and Rs measurements start for VDC > 15V and the accuracy is defined for VDC > 20V IDC Current @ OPCRange (A): 0.10 ÷ 15.00Resolution (A): 0.01Accuracy: ±(1.0%rdg+2dgt)Max Power @ OPC (Vmpp >30V, Impp >2A)Range (W) (*): 50 ÷ 99999Resolution (W): 1Accuracy: ±(1.0%rdg+6dgt)Vmpp = Maximum power voltage, Impp = Maximum Power Current(*) Max measurable value of Power must include FF value (~ 0.7) > Pmax = 1000V x 15A x 0.7 = 10500W Pmax = 1500V x 10A x 0.7 = 10500WVDC Voltage (@ STC ), I-V, IVCKRange (V): 5.0 ÷ 999.9Resolution (V): 0.1Accuracy (*,**): ±(4.0%rdg+2dgt)IDC Current (@ STC), I-V, IVCKRange (A): 0.10 ÷ 99.00Resolution (A): 0.01Accuracy (**): ±(4.0%rdg+2dgt)Max Power @ STC (Vmpp >30V, Impp >2A)Range (W) (*, **): 50 ÷ 99999Resolution (W): 1Global accuracy (**): ±(5.0%rdg+1dgt)Vmpp = Maximum power voltage, Impp = Maximum Power Current(*) Measurements start for VDC > 15V and the accuracy is defined for VDC > 20V (**) Test conditions:• Test cond.: Steady Irrad.≥700W/m 2, spectrum AM 1.5,solar incidence vs perpendicular. ≤ ± 25°, Cells Temp. [15..65°C] • Global accuracy include contribute of solar sensor and its measuring circuit Irradiance (with reference cell)Range (mV): 1.0 ÷ 100.0Resolution (mV): 0.1Accuracy: ±(1.0%rdg+5dgt)Temperature of module (with auxiliary PT1000 probe)Range (°C): -20.0 ÷ 100.0Resolution (°C): 0.1Accuracy: ±(1.0%rdg+1°C)Display and memory Features: 128x128pxl custom LCD with backlight Memory capacity: 256kbytes Saved data: 249 curves (I-V curve test), 999 IVCK Power supply I-V500w internal power supply: 6x1.5V alkaline batteries type LR6, AA, AM3, MN 1500Autonomy of I-V500w: > 249 curve (I-V curve test), 999 IVCK test SOLAR-02 power supply: 4x1.5V alkaline batteries type AAA LR03SOLAR-02 max recording time (@ IP=5s): approx 1.5h Output interface PC communication port: optical/USB and WiFi Interface with SOLAR-02: wireless RF comunication (max distance 1m)Mechanical features Dimensions (L x W x H): 235x165x75mm Weight (batteries included): 1.2kg Environmental conditions:Reference temperature: 23°C ± 5°C Working temperature: 0° ÷ 40°C Working humidity: <80%HR Storage temperature (batt. not included): -10 ÷ 60°C Storage humidity: <80%HR General reference standards:Safety: IEC/EN61010-1EMC: IEC/EN61326-1Safety of measurement accessories: IEC/EN61010-031I-V curve measurement: IEC/EN60891 (I-V curve test) IEC/EN60904-5 (Temperature measurement)Insulation: double insulation Pollution degree: 2Overvoltage category: CAT II 1000V DC, CAT III 300V AC to ground Max 1500V among inputs P1, P2, C1, c2Max altitude of use: 2000m Accessories provided • KITGSC4 Set of 4 cables banana 4mm, 2m + 4 alligator clips • KITPVMC3 Set of 2 adapters with connector compliance MC3 • KITPVMC4 Set of 2 adapters with connector compliance MC4 • HT304N Reference cell for irradiance measurement with set of fixed screws • M304 Mechanical inclinometer for detection of sun incidence angle • VA500 Hard carrying case• SP-5100 Hands-free kit• TOPVIEW2006 P C Windows software + optical/USB connection cable • User’s manual on CD-ROM• Quick start guide• Calibration certificate ISO9000 for I-V500w•C alibration certificate ISO9000 for HT304NOptional Accessories •S OL AR-02 Remote unit •P T300N PT1000 probe for cell temperature measurement •K ITPVEXT25M Set of 2 cables banana 4mm, Green/Black, 25m •M PP300Accessory to check on PV plants with multi MPPT up to 3•K ITKEL VIN Autosequence ™ test leads kit HT ITALIA S.R.L.Via della Boaria, 4048018 Faenza (RA) Italia T +39 0546 621002F +39 0546 621144E-mail *******************ht-instruments.it HT INSTRUMENTS SL C/ Legalitat, 89 08024 Barcelona, España Tel. +34 93 4081777 Fax +34 93 4083630 E-mail:*********************ht-instruments.es HT INSTRUMENTS GMBH Am Waldfriedhof, 1b D-41352 Korschenbroich, Deutschland Tel. + 49 (0)2161 564 581 Fax + 49 (0)2161 564 583 E-mail: **********************ht-instruments.de HT INSTRUMENTS AMERICAS LLC 2804 Patricia Lane Billings, MT 59102USATel. 171****9323E-mail: **************************。
爱测易高度规数显使用说明书
1、目的
指导使用人员正确使用及维护保养数显高度仪及大理石平台,预防因不按正确操作流程使用,而影响测量数据的准确性及损坏数显高度仪和大理石平台,提升测量精度及使用寿命。
特制定本规程。
2、适用范围
适用于技术部模具品质控制科TESAMICRO-HITE600型数显高度仪和大理石。
平台的正确使用及维护保养。
3、使用责任
1、第一次使用人员必须认真阅读完此使用规程方可进行测量操作。
2、任何使用人员都必须严格根据规程的要求进行使用和保养。
英士测高仪说明书一、功能键说明R阅读键:依次读取所测第一至第六根导线的读数。
M测量键:按一下即完成全部测量功能。
Auto/Off电源开关:按一下打开电源,不按任何键三分钟后,电源自动关闭。
R和M键:同时按这两个键,消除所有数据。
TOP/BTM开关:在TOP位置,测离地最高第六至第一根导线。
在BTM位置,测离地最低第一至第六根导线。
Mea/Cal开关:在Mea位置,仪器测架空导线;在Cal位置,仪器测室内距离或其他大物体的距离,也可以测标准物体的距离,作为检验仪器精度的依据。
二、操作步骤1.打开ON键。
2.站在导线下方与导线平行位置。
3.等显示屏温度值与大气温度一致。
4.如果测导线高度,把Mea/Cal开关定到Mea位置,如果测离地最低第一至第六根导线,把TOP/BTM开关定到下档,如果测离地最高至第一根导线,把该开关定到上档。
5.两手水平握稳测高仪(也可置于水平地面),按下M键,约2-3秒后松开。
6.按R即显示测量值。
如TOP/BTM开关在下档,显示屏按顺序显示离地最近的导线与仪器底部的距离,第一根线与第二根线的距离,第三根线与第二根线的距离……如所测的导线数量不够六根,显示值为------。
如TOP/BTM开关在上档,显示屏按顺序显示离地最高的导线与仪器底部的距离,第六根导线与第五根导线的距离,第五根导线与第四根导线的距离(注:该值前面有“-”符号,表示负值),其余依次类推。
7.同时按R和M键,清除所有数据。
三、电池低电压报警和更换电池1.电池电压低于6V,仪器会自动报警,并在显示屏中间上方有显示。
用户应及时更换电池,否则测量值不准,电池漏液会严重损坏仪器。
2.电池盒在仪器左下方,滑开盖后,取出9V旧电池,注意极性,换上新电池,再盖上盖子。
四、其他注意事项1.CHM6000系列测高仪显示单位为公制,不需要英制/公制转换。
2.理论上讲,CHM6000仪器在大气温度摄氏20度时,测量范围3-30米。

一、面板说明
1.POWER 开关
电源开关,I为开启电源(ON),0为关闭电源(OFF)。
2.RESET 开关
重置、停止测试及停止警报声音之开关,内含红色指示灯,DUT测试异常时,红色指示灯会亮3.TEST 开关
执行测试之开关,内含绿色指示灯,当DUT通过测试时,绿色指示灯会亮。
4.MEMORY键
记忆组选择键,可以从50组记忆组中任意选择一组执行测试。
5.LOCK/LOCAL键
键盘安全锁定键,若有RS-232界面连线时,此键可当‘LOCAL’功能。
6.‘‘▲’’‘‘▼’’键
选择各种参数之选择键。
7.SETUP键
操作和环境条件设定之选择键,如显示器反光亮度、蜂鸣器音量、遥控或手动模式之选择设定。
8.EXIT/RPINTER键
清除参数设定或退出设定状态之功能键,若装配为列表机界面,则成品为列表机执行键。
9.LCD DISPLAY
点矩阵式液晶显示器。
10.数字键
0-9各种参数数字之输入键。
11.ENTER/REVIEW键
输入确认和功能设定以及检视测试记录表功能。
核准审核制作日期。
TESA MICRO-HITE 2D手动电子高度规操作手册一、机台外部功能说明:机台上盖防尘皮带测臂固定钮IG13连接线接孔测臂1D控制面板测针2D控制面板电子测头以及测圆功能电源开关手轮固定钮上下位移手轮气源开关平移支撑点二、符号功能说明:1D量测、测针不经过校正规来执行补偿。
2D量测、测针必须经过校正规来执行补偿。
连续显示模式功能。
显示直径数值、显示两碰点之间的距离。
两显示数值相减。
重新归零、重设参考基准点。
两碰点、触碰两次所得平均值。
单碰点、碰触单次所得到的数值。
程序集、各项设定参数更改。
预设功能键。
更改设定规尺寸。
显示垂直度误差值。
显示垂直度误差上限值。
显示垂直度误差下限值。
显示真直度误差值。
使用IG13时,显示角度之按键。
连续显示模式下归零之按键。
退出模式三(连续显示)功能。
自动输出量测数值数据。
表头打印时,语言选择设定键。
确定输入ENTER键。
游标向上。
游标向下。
数字向左切换。
数字向右切换。
三、单向量测功能之操作:开机后,按F1键(测针不经过校正规补偿)1.开机之后出现此画面2.测头移动向下通过补偿点3.按F1进入此画面4.选择规零点后转动手轮碰触完成以上步骤便可开始执行单项量测四、双向量测功能之操作:1.开启机台电源后,2.测头移动向下通过补偿点3.将测针放入校正规中,上下上下碰触后进入,此时已经完成测针补偿。
注:测针于补偿过程中,如果上下两次碰触的误差值为1~5um时,小数点位数为0.01mm。
如果误差值为10~50um时,小数点位数会自动变更为0.1mm。
如果误差值大于50um时,小数点位数会自动变更为1mm。
※校正规校正方式:不可以上上下下来碰触 4. 选择规零点后,连续碰触两次归零五、归零设定:按F2键1.向下归零:转动手轮向下碰触两次即可。
2.向上归零:转动手轮向上碰触两次即可。
3.沟槽中心归零:转动手轮在沟槽上下各碰触一次即可。
4.圆孔中心归零:转动手轮在圆孔内尚下各碰触一次即可。

TESA MICRO-HITE 2D手動電子高度規操作手冊一、機台外部功能說明:機台上蓋防塵皮帶測臂固定鈕IG13連接線接孔測臂1D控制面板測針2D控制面板電子測頭以及測圓功能電源開關手輪固定鈕上下位移手輪氣源開關平移支撐點二、單向量測功能之操作:開機後,按+++鍵(測針不經過校正規補償)完成上述設定後即可進入SET 1 單向量測模式。
三、雙向量測功能之操作:1.開啟機台電源後轉動手輪通過補償點,螢幕出現C20.000。
2.將測針放入校正規中,上下上下碰觸後進入,此時已經完成測針補償。
註:測針於補償過程中,如果上下兩次碰觸的誤差值為1~5um時,小數點位數會自動變更為0.001mm。
如果誤差值為5~10um時,小數點位數會自動變更為0.01mm。
如果誤差值為10~50um時,小數點位數會自動變更為0.1mm。
如果誤差值大於50um時,小數點位數會自動變更為1mm。
※校正規校正方式:不可以上上下下來碰觸3. 選擇規零點後,連續碰觸兩次歸零四、歸零設定:按+鍵1.向下歸零:轉動手輪向下碰觸兩次即可。
2.向上歸零:轉動手輪向上碰觸兩次即可。
3.溝槽中心歸零:轉動手輪在溝槽上下各碰觸一次即可。
4.圓孔中心歸零:轉動手輪在圓孔內尚下各碰觸一次即可。
五、自動量圓模式:1.測針碰觸工件後,繼續旋轉手輪直到LED的綠燈亮為止。
2.將手輪固定鈕向右旋緊。
(此時出現上下兩個橘燈、中間一個綠燈)3.調整旋轉手輪使綠燈位於兩個橘色燈的中間。
4.將工件平推,使得測針通過圓弧的極點後,機台會記憶此點位置。
5.相反的方向再將上述的步驟執行一次,取得另一方向的極點位置。
6.鬆開手輪,按+鍵,便可量測出圓孔的直徑數值。
、手動量圓模式:1. 測針碰觸工件後,繼續旋轉手輪直到LED的綠燈亮為止。
2. 將手輪固定鈕向右旋緊。
(此時出現上下兩個橘燈、中間一個綠燈)3. 調整旋轉手輪使綠燈位於兩個橘色燈的中間。
4. 量圓按鍵按兩下。
5. 將工件左右移動兩次。
测高仪操作说明范文测高仪是一种用于测量高度的仪器,广泛应用于建筑、工程和地质测量等领域。
正确的操作测高仪可以确保测量结果的准确性和可靠性。
下面是测高仪的操作说明:1.准备工作a.检查测高仪的各部件是否完好,并确保电池电量充足。
b.将测高仪放在水平稳定的地面上,并开启电源。
2.设置测量单位a.根据需要选择合适的测量单位,例如米、英尺或百分比。
这一步骤可以根据具体仪器的型号和厂家说明进行设置。
3.校准仪器a.在使用之前,需要进行仪器的校准。
校准可以通过使用参考物体(如已知高度的建筑物或测量棒)进行。
在使用参考物体进行校准时,将测高仪指向参考物体顶部,并按下“校准”按钮进行校准操作。
4.进行测量a.将测高仪指向所需测量位置的顶部,确保仪器在稳定的状态下进行测量。
b.按下“测量”按钮进行测量,仪器会显示测量结果。
5.记录和处理测量结果a.将测量结果记录下来,可以使用纸笔或者直接将结果输入到计算机等设备中。
b.如果需要对测量结果进行进一步的处理和分析,可以使用专业的数据处理软件进行操作。
6.定期维护和保养a.清洁仪器的外表面和镜头,确保仪器的正常运行。
b.更换电池并注意电池的使用寿命,及时更换以保证仪器的正常使用。
c.定期检查仪器的各个部件是否正常,如有损坏或故障应及时修复或更换。
在操作测高仪时,还应注意以下几点:-对于精确的测量,应尽量避免在强风或恶劣天气条件下使用测高仪。
-在进行测量时,要保持仪器的稳定,并避免晃动和震动。
-在仪器的使用过程中,要注意避免遮挡物体和反光物体,以防影响测量结果的准确性。
-当测量不同高度时,应及时校准测高仪。
-如果测量结果出现异常,应检查仪器是否正常,如有必要可以重新进行校准。
总之,正确的操作测高仪对于获得准确的测量结果至关重要。
遵循上述操作说明,并注意维护和保养测高仪,可以确保仪器的长期稳定和准确性。
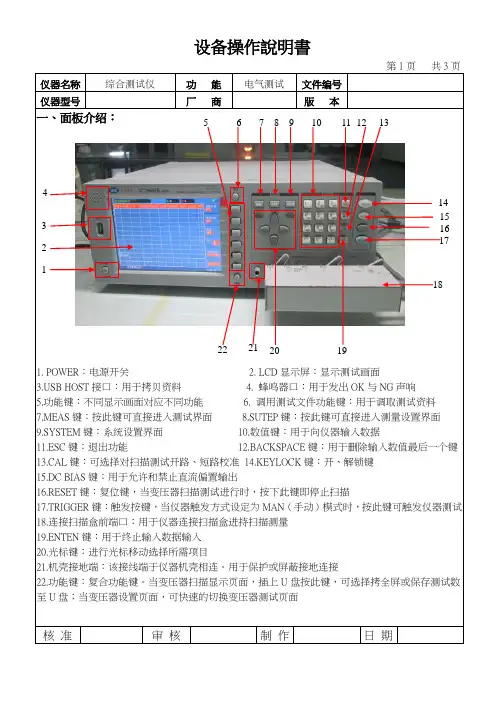
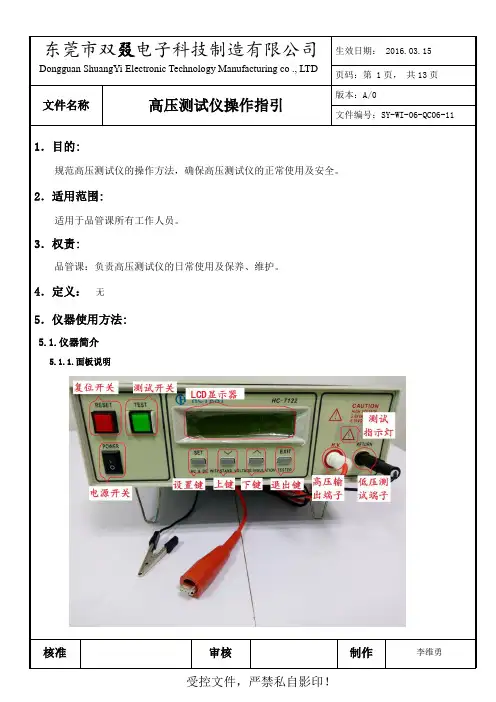
仪器名称 综合测试仪功 能 电气测试文件编号仪器型号厂 商版 本 一、面板介绍:1. POWER :电源开关2. LCD 显示屏:显示测试画面B HOST 接口:用于拷贝资料4. 蜂鸣器口:用于发出OK 与NG 声响5.功能键:不同显示画面对应不同功能6. 调用测试文件功能键:用于调取测试资料7.MEAS 键:按此键可直接进入测试界面8.SUTEP 键:按此键可直接进入测量设置界面9.SYSTEM 键:系统设置界面 10.数值键:用于向仪器输入数据11.ESC 键:退出功能 12.BACKSPACE 键:用于删除输入数值最后一个键 13.CAL 键:可选择对扫描测试开路、短路校准 14.KEYLOCK 键:开、解锁键 15.DC BIAS 键:用于允许和禁止直流偏置输出16.RESET 键:复位键,当变压器扫描测试进行时,按下此键即停止扫描17.TRIGGER 键:触发按键,当仪器触发方式设定为MAN (手动)模式时,按此键可触发仪器测试 18.连接扫描盒前端口:用于仪器连接扫描盒进持扫描测量 19.ENTEN 键:用于终止输入数据输入 20.光标键:进行光标移动选择所需项目21.机壳接地端:该接线端于仪器机壳相连。
用于保护或屏蔽接地连接22.功能键:复合功能键。
当变压器扫描显示页面,插上U 盘按此键,可选择拷全屏或保存测试数至U 盘;当变压器设置页面,可快速的切换变压器测试页面核 准 审 核 制 作 日 期4321567 8 910110 120130140 150 160 170 18192021 22仪器名称 综合测试仪功 能 电气测试文件编号 仪器型号厂 商版 本二、操作说明:1.仪器、扫描盒、治具的连接如下图:23.连接扫描盒前端口:用于扫描盒连接仪器 24.扫描盒:由仪器控制其扫描测量 25.脚踏板开关: 26.综合测试治具27.SCANNER :控制端口,用专用电缆线将扫描盒SCANNER 接口与仪器SCANNER 接口相连接 28.专用电缆线:用于仪器与扫描盒的连接 29.电源线:用于接通220V/50HZ 的电压 30.SCANNER 接口:通过SCANNER 接口控制变压器扫描盒2.仪器的开机:接通220V/50HZ 电源后,按下如图“1”电源开关按键后再按MEAS 键进入变压器测试界面。
TESA二维测高仪简介【产品规格】:TESA测高仪,TESA二维测高仪,00730033瑞士TESA高度测量仪二维测高仪仪300,600,900mm【详细内容】TESA测高仪快速完成复杂测量任务的选择可以用来进行平面、平行面和圆柱面几何体的内尺寸、外尺寸、高度、深度或距离尺寸测量。
同时可以进行一维或二维的测量。
自动搜索孔或轴的顶点,在动态探测中记录最大、最小值以及最大最小值之间的差值计算。
TESA IG-13 数字式测头可以测量垂直度、直线度、平行度等偏差和跳动误差,并以ISO1101 标准输出数据。
在电子测高仪上20 年的制造经验造就了高品质的设计,代表了当今的技术水平的发展。
生产现场检测的理想工具,在工作区没有任何电缆。
快速简单可靠测量,尤其是工件孔类。
365、615 和920 mm 三种量程供您选择。
显示的分辨率为0.0005, 0.001, 0.01 和0.1mm 或转换为相等的英制单位通过计算机辅助精度(CAA) 自动修正偏移误差可以极准确测量长度、直线度和垂直度具有和钢一样的膨胀系数(11.5×10⁻⁶k-1)控制面板"ID" 和"power panel" 通过交互式的数据处理和输出,可以引导操作者的操作无须人工计算可以通过编写程序循环测量99 个工件,每个测量循环包含相关尺寸极限值的64 个指标内置打印机用于数据输出或利用外部打印机以A4 纸打印,RS 232 数据输出每台测高仪带有SCS 校准证明1、主机型号及规格00730033 TESA MICRO-HITE系统35000730034 TESA MICRO-HITE系统60000730035 TESA MICRO-HITE系统900每一个系统包含以下组件,不含控制面板00730021 TESA MICRO-HITE主体●00730022TESA MICRO-HITE 主体●00730023TESA MICRO-HITE 主体●00760143标准测杆夹持器●●●00760062 5 mm球形测头的标准测杆●●●。
南京贝谷特高频局部放电检测仪器使用说明书xx谷特高频局部放电检测仪器它主要适用于在电气实验中电气设备它在产生局部放电时,与此同时会产生相应的电磁波,而这个产生的电磁波它也会像外传播的时候形成暂时型状态的电压信号。
至于关于这个电压信号它的大小主要与实验中产生的局部电流的大小以及放电点离实验装置远近有直接的联系。
而我们进行检测局部放电的时候就是主要靠这种电压信号来进行判定检测的,我们试验的时候可以根据这些限制条件进行操作。
这种局部放检测仪它不仅灵敏度高,只要将它放在你所要检测的装置或者是元件旁边,它就可以迅速地准确的检测出相应的电压信号大小,并且立即反应到显示屏上显示,让操作者可以立马知道相关信息。
这种机器它检测的覆盖率十分大,可以用于我们所有的电气方面的实验,它可以检测的阻抗十分齐全完善。
这种试验仪器它一旦经过适当的输入标定的值,那么它就能够直读出放出电脉冲它的放电量,它的指针式表头和数字式表头可以进行同时显示,这样的指针式表头能按需要非常方便地选择对应的数刻度和线性的刻度进行指示,这也是针对于不同人的不同需求来进行设计的,可以更加全面的满足大多数人的需求。
局部放电测试仪它是电力部门、制造厂商和科技研究院所等单位广泛进行使用的非常实用的局部放电的检测仪器。
xx谷特高频xx谷特高频局部放电检测仪器器使用说明书如下:1、xx谷特高频局部放电检测仪器局部放电测试仪开机准备将“时基频率”选择7置于“50(内)”、“时基工作方式”5置于“椭圆”。
对数线性选择开关2置于线性。
电源插座33接上220V工频电源,将电源开关12按到“ON”位置,开机预热5分钟。
2、仪器校准参照图4接好线后,在未加试验电压前用JZF型校正脉冲发生器予以校准。
注意:校正脉冲发生器红端子上的导线尽量短且接在试品的高压端,黑端子导线接在试品的低压端。
调节“放大器增益细调”13与“放大器增益粗调”15使注入脉冲高度适当(示波屏上显示高度2cm以下);电压、放电量数字表(3)的示数和线性、对数指针表(1)的示数与注入已知电量相符。
及2D控制面板操作手册2D操作手册TESA MICRO-HITE PLUS M 一、外观说明13.二、按键功能说明功能键送纸键两触点中间值或两数值平均值取消参考点A 和B 并回到ST1/2画面,同电源开/关短按:单一打印 长按:整栏打印计数器重新归零取消上一个动作或数值测量厚度及显示测量平行度及端面跳动时你可以重新再设定零点或是重新开始程序执行。
最后两测量值相减 测量外弧高点显示圆孔直径或两触点的差值测量孔中心线高度或槽宽度测量圆孔直径测量轴直径短按:向上测量 长按:快速向上测量内弧高点短按:向下测量 长按:快速向下测量内弧低点2D操作手册TESA MICRO-HITE PLUS MENTER输入键或是执行键RS232数据传输出键盘输入转换键暂停键角度测量模式垂直度及直线度测量模式2D测量模式学习程序储存键统计分析键系统设置键执行程序键光标向上移动键数据文件(包括程序及测量值)光标左移键光标下移键光标右移三、开机1. 按下键测头会自动上下找寻通过参考点,完成开机状态。
2. 一旦测头通过补偿点后,测头会自动 停在校验规中间位置。
四、测针校验有两种1. 沟槽测针校验A. 将测头置于校验规的沟槽内。
B. 按下 或 或F3键,执 行测针校验。
2. 厚度测针校验A. 将测头置于校验规的下方。
B. 按下 或F4 键,测针会先向上测一点,再将测头移至校验规上方按 测头会自动向下测两点后在江测头移至校验规下方后,再按 即完成测针校验。
五、测头反弹距离设定1. 在模式1 或模式2的状态下2. 按F3 键r=? 。
3. 输入反弹高度数值。
(1mm,2mm…..)4. 按 ENTER 键即可。
注: 反弹高度如果设为低于1mm (如0) 的值,重新开机后又还原到默认值1mm六、归零设定1. 在 或 的状态下你可以选择:2. 向上归零按 。
3. 向下归零按 。
4. 孔或槽中心线归零按 。
5. 依此类推七、预设功能1. 在模式1或模式2的状态选择预设功能:2. 按F2键并输入想要预设的数值。