(2015.1重大更新文档完善)QT_C++_cardplay.h开发文档
- 格式:doc
- 大小:677.00 KB
- 文档页数:20

Package‘qtlc’October13,2022Type PackageTitle Densitometric Analysis of Thin-Layer Chromatography PlatesVersion1.0Date2016-01-03Author Ivan D.PavicevicMaintainer Ivan D.Pavicevic<*****************>Description Densitometric evaluation of the photo-archived quantitative thin-layer chromatography(TLC)plates.Depends tiff,rgl,plot3D,graphics,grDevices,stats,utilsLicense GPL-2RoxygenNote5.0.1NeedsCompilation noRepository CRANDate/Publication2016-01-0417:46:53R topics documented:areadens2D (2)areadensnoisecompare2D (3)createTLC (4)matrices2D (5)matrixtoimage (6)noisepoly2D (7)normalize2D (8)picmatrixTIFF (8)print.qtlc (9)print.summary.qtlc (10)Rf (11)rotatev (12)s3D (12)select2D (13)showRf (14)12areadens2D showtlc2D (15)showtlc2D.qtlc (15)showtlc3D (16)spot2D (17)summary.qtlc (18)summat2D (19)Index21 areadens2D Area vs.x-axisDescriptionFunction charts density plot of a single spot following x-axis.Usageareadens2D(object,spot=NULL,plot=TRUE,returndf=TRUE,ptype="o",...)Argumentsobject S3object of working TLCspot Number of the spot(counted left to right).plot Boolean,TRUE default and displays densitometric distribution.returndf Boolean,TRUE by default,returns data.frame with x and Area values.ptype Point type for the plot.Default"o"(Uses same values as type variable from plot function)...Additional parameters(for plot type function).ValueReturns data.frame with x and Area values.Author(s)Ivan D.Pavicevic,<*****************>Examples#A test examplefname01<-system.file("extdata","test025to100sp.tiff",package="qtlc")testTLC<-createTLC(fname01,RGB=FALSE)print(testTLC)#now we ll imitate interactive spot2D function,areadensnoisecompare2D3 #and create spots coordinates automatically,#for interactive version run testTLC<-spot2D(testTLC)testTLC$spots$x<-c(40.93354,83.18687,121.59899,160.01111,203.54485,239.39616,280.36909,320.06161,362.31494,399.44666,439.13919,480.11211,518.52423,559.49716,599.18969) testTLC$spots$y<-c(198.3160,198.3160,199.2833,198.3160,198.3160,198.3160,198.3160,198.3160,197.3487,198.3160,199.2833,198.3160,199.2833,199.2833,199.2833) testTLC<-select2D(testTLC,30,30)testTLC<-matrices2D(testTLC)testTLC<-summat2D(testTLC)#and now test the areadens2D for each spotpar(mfrow=c(3,3))for(i in1:15){areadens2D(testTLC,spot=i,ptype="l")}areadensnoisecompare2DShows areadens2D plus background noise as segmented lineDescriptionPlots area-denses of the spot and background.Usageareadensnoisecompare2D(object,spot=NULL,plot=TRUE,returndf=TRUE,ptype="o",...)Argumentsobject S3object of working TLCspot Number of the spot(counted left to right).plot Boolean,TRUE default and displays densitometric distribution.returndf Boolean,TRUE by default,returns data.frame with x and Area values.ptype Point type for the plot.Default"o"(Uses same values as type variable from plot function)...Additional parameters(for plot type function).ValueReturns data.frame with x and Area values.4createTLC Author(s)Ivan D.Pavicevic,<*****************>Examples##Not run:#see areadens2D firstareadensnoisecompare2D(object,spot=3,ptype="l")##End(Not run)createTLC Creates TLC S3objectDescriptionCreate matrix from TLC imageUsagecreateTLC(ttiff,turnv=TRUE,...)Argumentsttiff File name of the TIFF image with scanned TLC plate.turnv Boolean value determines to turn vertically data in the matrix.TRUE generates turned image which is useful for Cartesian coordinates,because without turningthe coordinate system begins in the left corner of the monithor and rises left anddown....Additional parameters for TIFF image manipulation.ValueAn object of class qtlc,that contains TLC matrix and descriptions.The object contains:file_name File name of of the TIFF image from which the TLC matrix was created.mat TLC matrix(or matrices if intensities Red,Green and Blue channels are not combined.)spots Coordinates of marked spots(using function spot2D).Author(s)Ivan D.Pavicevic,<*****************>matrices2D5Examples#Creates test matrix.#RGB channels stay separated,or#intensities are combined.fname01<-system.file("extdata","testTIFF.tiff",package="qtlc")testTLC<-createTLC(fname01,RGB=TRUE)print(testTLC)matrices2D Creates spots matricesDescriptionUsing spots locations and areas this function creates a matrix for each spot.Usagematrices2D(object,...)Argumentsobject S3object of working TLC...Additional graphical parameters.(At this time just experimental)ValueReturns S3object with new variable object$spot_matrices which is a three dimensional matrix (width,height,and pixel intensity values).Author(s)Ivan D.Pavicevic,<*****************>Examples##Not run:#just makes spot matrices for selected spots of the objectobject<-matrices2D(object)##End(Not run)6matrixtoimage matrixtoimage Converts matrix back to imageDescriptionUsing S3qtlc object,extracts the matrix and converts to image plot.Usagematrixtoimage(object,show=TRUE,bkg="thistle",axes=FALSE,xlab="",ylab="",...)Argumentsobject S3object of working TLC.show Boolean,default TRUE.Shows the plot of the image.bkg If show is TRUE,then defines background color.Default is"thistle".axes Boolean,default FALSE.Shows x,y axes if TRUE.xlab Label of the x-axis.ylab Label of the y-axis....Additional graphical parameters.ValueReturns image as matrix suitable for plot,or other graphics functinos.Author(s)Ivan D.Pavicevic,<*****************>Examples#Converts test image to matrix,#then matrix back to image.fname01<-system.file("extdata","testTIFF.tiff",package="qtlc")testTLC<-createTLC(fname01,RGB=FALSE)print(testTLC)matrixtoimage(testTLC,bkg="white")noisepoly2D7 noisepoly2D Polynomial estimation of the image noise.DescriptionEstimation,and noise removal using polynomial model.Usagenoisepoly2D(object,gd=20,power=5,col="green")Argumentsobject S3object of the working TLCgd Defines position of the center of the rectangular samples of the image back-ground(above or bellow located spots).power Order of the polynome.col Color of the borders of the rectangles for bkg samples.ValueReturns S3object with new variables.object$noise_matThe3D matrix(width,height,number of spots)object$noise_fitLinear model for the polynomialfitobject$noisefit_spot_sumsSums of the noise samples areasAuthor(s)Ivan D.Pavicevic,<*****************>Examples##Not run:#object is a tlc with14spots,and selection50x80(wxh)object<-noisepoly2D(object,gd=80,power=13)##End(Not run)8picmatrixTIFF normalize2D Normalization of the matrix valuesDescriptionExperimental function.Normalize matrix data.Usagenormalize2D(mat)Argumentsmat Matrix of the TLC plate.ValueNormalized matrix.Author(s)Ivan D.Pavicevic,<*****************>Examples##Not run:new_mat<-normalize2D(mat)##End(Not run)picmatrixTIFF Converting TIFF to matrix.DescriptionMostly internal function used by createTLC function.Additional parameters from createTLC goes there(RGB,comb).UsagepicmatrixTIFF(ff,RGB=TRUE,comb=c(0.3,0.59,0.11))print.qtlc9Argumentsff TIFFfileRGB Boolean,TRUE-keeps Red,Green and Blue intensities as three matrices.FALSE-using comb to combine intensities.comb Vector,combines intensities according to luma.A vector containing three values for R,G and B conversion.ValueReturns combined intensities matrix,or separated R,G,B matrices.Author(s)Ivan D.Pavicevic,<*****************>Examples##Not run:#Internal function used by createTLC(...)##End(Not run)print.qtlc Print Method for qtlc objectDescriptionRedefined print method.Usage##S3method for class qtlcprint(x,...)Argumentsx S3object of the working TLC....Additional parameters for the print methodValuePrints qtlc S3object detailsAuthor(s)Ivan D.Pavicevic,<*****************>10print.summary.qtlc Examples##Not run:print(object)##End(Not run)print.summary.qtlc Summary method for qtlc S3objectDescriptionSummary method for qtlc S3objectUsage##S3method for class summary.qtlcprint(x,...)Argumentsx S3object of the working TLC....Additional parameters.ValueSummary.Author(s)Ivan D.Pavicevic,<*****************>Examples##Not run:summary(object)##End(Not run)Rf11 Rf Retention factor(Rf)DescriptionCalculates Rf values of the spots based on the marked start and stop of the solvent path.UsageRf(object,sf=F)Argumentsobject S3object of the working TLCsf Boolean,default FALSE-Start and Front should be marked.If TRUE,Start and Front were defined.ValueReturns S3object with new variables.object$Rf_startLocation of the solvent start on the TLC plateobject$Rf_frontLocation of the solvent end on the TLC plateobject$Rf Rf values of the spotsAuthor(s)Ivan D.Pavicevic,<*****************>Examples##Not run:#for more interactive variant;locate using mouseobject<-Rf(object,sf=TRUE)##End(Not run)12s3D rotatev Rotate verticallyDescriptionRotate entire matrix vertically.Mostly internal function.Usagerotatev(mat)Argumentsmat The matrix.ValueRotated matrix.Author(s)Ivan D.Pavicevic,<*****************>Examples##Not run:new_mat<-rotatev(mat)##End(Not run)s3D Internal function used by showtlc3DDescriptionInternal function used by showtlc3DUsages3D(mat,ogl,grey,...)select2D13Argumentsmat Matrix with x,y,Intensity dimensionsogl If TLC3D plot use OpenGL library for fast and interactive3D plot.(This func-tionality is based on the rgl package.)Otherwise the function is based on theplot3D package.grey Boolean,if TRUE,then tlc is greyscaled.Default value is FALSE....Additional graphics parameters.ValueNone.Author(s)Ivan D.Pavicevic,<*****************>Examples##Not run:#Internal function.##End(Not run)select2D Selects spots areasDescriptionBased on the located spots centers(manualy with mouse and function spot2D)this function defines spots areas.Usageselect2D(object,w,h,col="white")Argumentsobject S3object of the working TLC.w Width of the spot area.h Height of the spot area.col Color of the border(default white)ValueReturn S3object with new variable object$mat_cell which is list with"w"and"h"values.14showRfAuthor(s)Ivan D.Pavicevic,<*****************>Examples##Not run:select2D(object,80,50)##End(Not run)showRf Shows Rf on the plotDescriptionShows prior analysed Rf on the new plot of the2D matrix.UsageshowRf(object,col="green",adjust=NULL,cex=0.6)Argumentsobject S3object of the working TLCcol Color of the lines.adjust Adjustment for the space of the text.Default value is usualy just OK.cex A zoom factor for the text.ValueNone.Author(s)Ivan D.Pavicevic,<*****************>Examples##Not run:showRf(object)##End(Not run)showtlc2D Show TLC matrix as2D plotDescriptionUsing TLC matrix width,height,and intensity parameters this function plot2D heatmap of the TLC matrix.Usageshowtlc2D(object,...)Argumentsobject S3object of the working TLC...Additional parametersValueNoneAuthor(s)Ivan D.Pavicevic,<*****************>Examples##Not run:showtlc2D(object)##End(Not run)showtlc2D.qtlc Show TLC matrix as2D plotDescriptionUsing TLC matrix width,height,and intensity parameters this function plot2D heatmap of the TLC matrix.Usage##S3method for class qtlcshowtlc2D(object,specific=NULL,RGB="",main="",correction=TRUE,grey=FALSE,...)Argumentsobject S3object of the working TLCspecific Matrix of the specific spot(from object$spot_matrices)RGB RGB matrices(if they are present in the object)are separated on the plot.Values of the RGB="R",or"G",or"B".main Main title of the plot.correction Experimental option,currently not in use.grey Boolean,if TRUE,then TLC plate is greyscaled.Default value is FALSE....Additional graphical parametersValueNoneAuthor(s)Ivan D.Pavicevic,<*****************>Examples##Not run:showtlc2D(object,specific=object$spot_matrices[3],grey=TRUE)##End(Not run)showtlc3D Shows3D plot of the TLC matrix.DescriptionThe function uses TLC matrix width,height and intensity values to make3D plot.Usageshowtlc3D(object,spot=NULL,ogl=FALSE,RGB=NULL,grey=FALSE,...)Argumentsobject S3object of the working TLC.spot If the specific spot should be represented in3D,but not entire TLC matrix.(Spot number is given as value,and spots are counted from left to right.) ogl If TLC3D plot use OpenGL library for fast and interactive3D plot.(This func-tionality is based on the rgl package.)Otherwise the function is based on theplot3D package.spot2D17RGB If RGB matrices are present in the object,choose between R,G,or B.grey Boolean,if TRUE,then tlc is greyscaled.Default value is FALSE....Additional graphics parameters.ValueNone.Author(s)Ivan D.Pavicevic,<*****************>Examples#Tests3D plot of the entire matrixfname01<-system.file("extdata","test025to100sp.tiff",package="qtlc")testTLC<-createTLC(fname01,RGB=FALSE)#now we ll imitate interactive spot2D function,#and create spots coordinates automatically,#for interactive version run testTLC<-spot2D(testTLC)testTLC$spots$x<-c(40.93354,83.18687,121.59899,160.01111,203.54485,239.39616,280.36909,320.06161,362.31494,399.44666,439.13919,480.11211,518.52423,559.49716,599.18969) testTLC$spots$y<-c(198.3160,198.3160,199.2833,198.3160,198.3160,198.3160,198.3160,198.3160,197.3487,198.3160,199.2833,198.3160,199.2833,199.2833,199.2833)testTLC<-select2D(testTLC,30,30)testTLC<-matrices2D(testTLC)testTLC<-summat2D(testTLC)#3D without OpenGL,shows only spot13showtlc3D(testTLC,spot=13,ogl=FALSE,grey=FALSE)#without openGL and greyscaledshowtlc3D(testTLC,spot=13,ogl=FALSE,grey=TRUE)#openGL showtimeshowtlc3D(testTLC,spot=13,ogl=TRUE)spot2D Locate spots manually.DescriptionThe function should be used after2D TLC matrix was plotted.After function call,the user should manually locate centers of the spots using mouse.(Left click for locate,right for the end of the process.)18summary.qtlcUsagespot2D(object,col="white",...)Argumentsobject S3object of the working TLC.col Color of the spot locator(default is white)...Additional parameters.ValueS3object with’object$spots’added.Author(s)Ivan D.Pavicevic,<*****************>Examples##Not run:print(object)object<-spot2D(object)##End(Not run)summary.qtlc Summary method for qtlc S3objectDescriptionSummary method for qtlc S3objectUsage##S3method for class qtlcsummary(object,...)Argumentsobject S3object of the working TLC....Additional parameters for the summary methodValueSummary.Author(s)Ivan D.Pavicevic,<*****************>Examples##Not run:summary(object)##End(Not run)summat2D Summarize matricesDescriptionThe function summarize matrices areas of the located spot matrices.Usagesummat2D(object)Argumentsobject S3object of working TLCValueReturns S3object with new values object$spot_sums.Author(s)Ivan D.Pavicevic,<*****************>Examples#This interactive example shows the most#common usage of the qtlc library.fname01<-system.file("extdata","test025to100sp.tiff",package="qtlc") testTLC<-createTLC(fname01,RGB=FALSE)print(testTLC)#now using mouse select the spots with testTLC<-spot2D(testTLC)#but,for automatic tests,we ll imitate that step...testTLC$spots$x<-c(40.93354,83.18687,121.59899,160.01111,203.54485,239.39616,280.36909,320.06161,362.31494,399.44666,439.13919,480.11211,518.52423,559.49716,599.18969) testTLC$spots$y<-c(198.3160,198.3160,199.2833,198.3160,198.3160,198.3160,198.3160,198.3160,197.3487,198.3160,199.2833,198.3160,199.2833,199.2833,199.2833)#and now the select2D selects30x30pixels areas around spots testTLC<-select2D(testTLC,30,30)#forming spots matricestestTLC<-matrices2D(testTLC)#and finaly sumarizing spots areastestTLC<-summat2D(testTLC)#eventually we ll examine the linear modelC<-rep(c(0.25,1,6.25,25,100),each=3)#imaginative concentrations #now creates data frame with valuestestTLC.df<-data.frame(C,testTLC$spot_sums)names(testTLC.df)<-c("Concentration","Signal")#now the linear modeltestTLC.lm<-with(testTLC.df,lm(Signal~Concentration))#and finaly the plotplot(testTLC.df)abline(testTLC.lm)summary(testTLC.lm)Index∗arraycreateTLC,4∗devicecreateTLC,4areadens2D,2areadensnoisecompare2D,3createTLC,4matrices2D,5matrixtoimage,6noisepoly2D,7normalize2D,8picmatrixTIFF,8print.qtlc,9print.summary.qtlc,10Rf,11rotatev,12s3D,12select2D,13showRf,14showtlc2D,15showtlc2D.qtlc,15showtlc3D,16spot2D,17summary.qtlc,18summat2D,1921。

qt 信号与槽通信原理QT是一款功能强大而灵活的跨平台图形用户界面框架。
它允许开发人员使用C++和QML来构建跨平台应用程序,它具有一系列的模块,如核心、GUI、网络、数据库、多媒体等。
在QT中,信号和槽是两个非常重要的概念,用于实现对象之间的通信。
信号(Signal)是对象内的一个特殊成员函数,用于通知监听该对象的其他对象发生的特定事件。
信号是一个没有返回值的函数,可以有任意数量和类型的参数,在对象内部被调用。
通常情况下,信号会在一个特定的事件发生时被触发,例如当用户点击一个按钮、鼠标移动到一个特定的区域、一个外部设备连接或断开连接等事件发生时。
槽(Slot)是另一个对象内的成员函数,它用于响应信号并执行特定的操作。
槽可以有任意数量和类型的参数,但是必须和信号的参数类型和数量匹配。
当信号被触发时,与之相关联的槽则会被调用。
信号和槽的通信原理是通过QT的元对象系统实现的。
在QT中,每个对象都有一个元对象,用于描述该对象的特性和属性。
在元对象中,每个信号都被表示为一个字符串,其参数类型和数量也被记录在其中。
在运行时,当信号被触发时,元对象系统会查找所有与之相关联的槽,并将信号的参数传递给它们。
通过信号和槽的机制,我们可以实现对象之间的松耦合,将不同的对象分离开来,使得它们可以独立地进行开发和维护。
我们可以将一个对象的行为分为两个部分:信号和槽。
因此,在实现一些复杂的功能时,我们可以将不同的对象之间的关系分别处理,并通过信号和槽进行连接和处理。
例如,在一个界面中,我们需要根据用户输入动态更新一个表格的数据。
如果我们将表格和用户输入的部分进行耦合,则会使代码变得复杂和难以维护。
但是,如果我们将输入部分的行为(信号)与表格部分(槽)的行为进行分离,则可以实现松耦合并且易于维护的代码。
总之,QT的信号和槽机制是一种强大而灵活的对象通信机制,通过它,我们可以实现对象之间的松耦合、分离关注点,并使代码更易于维护和设计。

qt开发例程全文共四篇示例,供读者参考第一篇示例:Qt是一个跨平台的C++应用程序框架,是由挪威的Trolltech公司开发的。
Qt具有一套完善的类库和工具,可以轻松地实现图形用户界面、数据库操作、网络通信等功能。
Qt的特点是跨平台、易用性高、扩展性强、灵活性大,因此备受开发者的青睐。
本文将介绍一些Qt的开发例程,帮助读者更快速、更简单地掌握Qt的开发方法。
一、简单的Hello World程序我们来看一个简单的Hello World程序,这是最基础的Qt开发示例。
创建一个新的Qt项目,选择Qt Widgets Application模板,命名为HelloQt。
```cpp#include <QApplication>#include <QLabel>QLabel label("Hello, Qt!");label.show();return app.exec();}```在这个程序中,我们首先包含了QApplication和QLabel两个类的头文件,分别是Qt应用程序的主类和一个用于显示文本的类。
然后,我们创建了一个QLabel对象,并将其内容设置为"Hello, Qt!",最后调用show()方法显示出来。
我们调用app.exec()方法让程序开始运行。
二、使用信号与槽实现按钮点击事件class MyWidget : public QWidget{public:MyWidget(QWidget *parent = 0) : QWidget(parent){QPushButton *button = new QPushButton("Click me", this);connect(button, &QPushButton::clicked, this,&MyWidget::showMessage);}MyWidget widget;widget.show();在这个程序中,我们从QWidget类派生出了一个自定义的MyWidget类,在构造函数中创建了一个按钮,并通过connect()方法将按钮的clicked信号与自定义的showMessage槽函数连接起来。

qt信号与槽实现原理概述及解释说明1. 引言1.1 概述这篇文章旨在介绍QT框架中的信号与槽实现原理。
QT是一种流行的跨平台应用程序开发框架,其提供了强大而灵活的信号与槽机制,用于实现对象之间的通信和交互。
本文将深入探讨信号与槽的定义、作用以及语法用法,同时解析其背后的实现原理。
1.2 文章结构本文主要分为五个部分进行讲解。
首先,在引言部分简要介绍文章内容和目录结构。
然后,将详细讲解QT信号与槽的定义、作用和优势,并通过示例代码演示其使用方法。
接下来,着重解析QT信号与槽的实现原理,包括事件驱动机制、信号与槽连接过程和消息传递方式等。
最后,在应用场景和实例分析中展示QT 信号与槽在GUI界面交互、线程间通信以及自定义类中使用的实际应用。
1.3 目的本文旨在帮助读者全面了解和掌握QT框架中信号与槽的实现原理,并能根据不同场景使用其功能进行快速开发。
通过阅读本文,读者将对信号与槽的定义、使用方法以及背后的实现机制有一个清晰的认识,并能够灵活应用于自己的项目中。
以上是“1. 引言”部分的内容。
2. QT信号与槽实现原理:2.1 什么是信号与槽:QT中的信号和槽是一种用于对象间通信的机制。
信号是对象发出的特定事件,而槽是响应这些事件并执行相应操作的函数。
通过连接信号和槽可以实现对象之间的解耦和高效通信。
2.2 信号与槽的作用和优势:信号与槽机制提供了一种灵活且可扩展的方式,在不同对象之间实现通信和交互。
相比于传统的回调函数或者直接调用函数,使用信号与槽机制具有以下优势:- 松耦合:发送信号和接收槽函数之间没有直接依赖关系,对象只需关注自己要发送或接收的信息,不需要知道具体接收方是谁。
- 可扩展:可以在任何时候动态添加或移除连接,方便地改变消息传递方式。
- 线程安全:可以跨线程发送和接收信号,方便进行多线程并发编程。
2.3 QT中信号与槽的语法和用法:在QT中使用信号与槽需要以下几个步骤:1. 在类定义中声明需要使用的信号和槽函数。
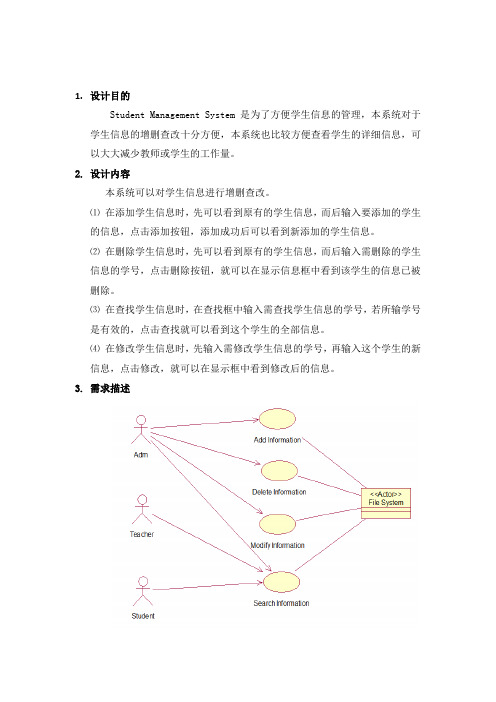
1.设计目的Student Management System是为了方便学生信息的管理,本系统对于学生信息的增删查改十分方便,本系统也比较方便查看学生的详细信息,可以大大减少教师或学生的工作量。
2.设计内容本系统可以对学生信息进行增删查改。
⑴在添加学生信息时,先可以看到原有的学生信息,而后输入要添加的学生的信息,点击添加按钮,添加成功后可以看到新添加的学生信息。
⑵在删除学生信息时,先可以看到原有的学生信息,而后输入需删除的学生信息的学号,点击删除按钮,就可以在显示信息框中看到该学生的信息已被删除。
⑶在查找学生信息时,在查找框中输入需查找学生信息的学号,若所输学号是有效的,点击查找就可以看到这个学生的全部信息。
⑷在修改学生信息时,先输入需修改学生信息的学号,再输入这个学生的新信息,点击修改,就可以在显示框中看到修改后的信息。
3.需求描述图1 用例图4.系统详细设计4.1顺序图图2 学生信息添加的顺序图图3 学生信息删除的顺序图图4 学生信息查找的顺序图图5 学生信息修改的顺序图4.2活动图图6 活动图4.3构件图图7 构件图4.4文件内容图8 文件内容5.系统实现5.1 运行环境运行环境:Linux5.2 系统实现图9 主页面图10 功能菜单页面核心代码:f2=new Form2(this); f2->close();f3=new Form3(this); f3->close();f4=new Form4(this); f4->close();f5=new Form5(this); f5->close();void Form6::Add() {f2->show();}void Form6::Delete() {f3->show();}void Form6::Search() {f5->show();}void Form6::Modify() {f4->show();}①添加学生信息,先在文本框中输入信息,点击按钮,添加成功。

QT编译C语言一、概述编写C语言程序是开发软件的基础,而QT是一个跨平台的应用程序开发框架,它提供了丰富的工具和功能,可以帮助开发者轻松地编写和编译C语言程序。
本文将介绍如何使用QT进行C语言的编译,并提供一些实用的技巧和注意事项。
二、QT的安装和配置在开始编译C语言之前,我们需要先安装和配置QT开发环境。
以下是安装和配置QT的步骤:1.下载QT:首先,我们需要从QT官方网站上下载适用于您的操作系统的QT安装包。
在下载过程中,请确保选择与您的操作系统和版本相匹配的安装包。
2.安装QT:下载完成后,双击安装包并按照提示进行安装。
在安装过程中,您可以选择安装的组件和目标文件夹。
建议选择默认选项,以确保安装的完整性。
3.配置QT:安装完成后,打开QT Creator(QT的集成开发环境)并进行一些必要的配置。
首先,选择“工具”菜单下的“选项”选项。
在“构建和运行”选项中,选择您想要使用的编译器(如GCC)并配置相应的路径。
三、创建C语言项目在QT中创建C语言项目非常简单。
按照以下步骤操作:1.打开QT Creator:双击桌面上的QT Creator图标或通过开始菜单打开。
2.创建新项目:选择“文件”菜单下的“新建文件或项目”。
在弹出的对话框中,选择“非QT项目”并选择“C++项目”。
3.配置项目:在配置项目的对话框中,选择“纯C项目”并输入项目的名称和路径。
点击“下一步”并按照提示完成项目的配置。
4.编写C代码:在项目创建完成后,可以在QT Creator中编写C语言代码。
右键单击项目文件夹,并选择“新建文件”。
选择“C源文件”并输入文件名。
然后,您可以在新建的文件中编写C语言代码。
四、编译C语言项目编写完C语言代码后,我们需要将其编译成可执行文件。
在QT中,编译C语言项目也非常简单。
按照以下步骤进行操作:1.打开QT Creator:如果您尚未打开QT Creator,请按照第三节中的步骤打开。
2.打开项目:选择“文件”菜单下的“打开文件或项目”。
Qt⾃定义信号槽的使⽤浅析+实例1. Qt中⾃定义信号槽的使⽤Qt框架提供的信号槽在某些特定场景下是⽆法满⾜我们的项⽬需求的,因此我们还设计⾃⼰需要的的信号和槽,使⽤connect()对⾃定义的信号槽进⾏连接。
如果想要使⽤⾃定义的信号槽, ⾸先要编写新的类并且让其继承Qt的某些标准类,我们⾃⼰编写的类想要在Qt中使⽤使⽤信号槽机制,那么必须要满⾜的如下条件:这个类必须从QObject类或者是其⼦类进⾏派⽣在定义类的头⽂件中加⼊ Q_OBJECT 宏1.1 ⾃定义信号要求:1. 信号是类的成员函数2. 返回值是 void 类型3. 信号的名字可以根据实际情况进⾏指定4. 参数可以随意指定, 信号也⽀持重载5. 信号需要使⽤ signals 关键字进⾏声明, 使⽤⽅法类似于public等关键字6. 信号函数只需要声明, 不需要定义(没有函数体实现)7. 在程序中发送⾃定义信号: 发送信号的本质就是调⽤信号函数习惯性在信号函数前加关键字: emitemit只是显⽰的声明⼀下信号要被发送, 没有特殊含义底层 emit == #define emit⽰例class Test : public QObject{Q_OBJECTsignals:void testsignal();// 参数的作⽤是数据传递, 谁调⽤信号函数谁就指定实参// 实参最终会被传递给槽函数void testsignal(int a);};1.2 ⾃定义槽槽函数就是信号的处理动作,⾃定义槽函数和⾃定义的普通函数写法是⼀样的。
要求:返回值是 void 类型槽也是函数, 因此也⽀持重载槽函数需要指定多少个参数, 需要看连接的信号的参数个数槽函数的参数是⽤来接收信号发送的数据的, 信号发送的数据就是信号的参数举例:信号函数: void testsig(int a, double b);槽函数: void testslot(int a, double b);总结:槽函数的参数应该和对应的信号的参数个数, 类型⼀⼀对应信号的参数可以⼤于等于槽函数的参数个数 == 信号传递的数据被忽略了信号函数: void testsig(int a, double b);槽函数: void testslot(int a);这⾥槽函数只接受信号函数中的第⼀个参数Qt中槽函数的类型:- 类的成员函数- 全局函数- 静态函数- lambda表达式(匿名函数)槽函数可以使⽤关键字进⾏声明: slots (Qt5中slots可以省略不写)- public slots:- private slots:- protected slots:// 举例// 类中的这三个函数都可以作为槽函数来使⽤class Test : public QObject{public:void testSlot();static void testFunc();public slots:void testSlot(int id);};1.3 ⾃定义信号槽实例现在有⼀个场景,⼥朋友饿了,我请她吃饭,那么实现这个功能应该怎么做呢⾸先明确发送者,接收者,信号和槽分别是哪些发送者:⼥朋友接收者:我信号:饿了槽:请她吃饭ok,明确了这些,接下来我们就可以开始写代码了⾸先创建两个类,GirlFriend 和 MeQt Creator中会⾃动为我们添加头⽂件和CPP⽂件,⽬录结构如下图在GirlFriend类中,添加信号hungry,代码如下#ifndef GIRLFRIEND_H#define GIRLFRIEND_H#include <QObject>class GirlFriend : public QObject{Q_OBJECTpublic:explicit GirlFriend(QObject *parent = nullptr);signals:void hungry();};#endif // GIRLFRIEND_H注意图中的 signals关键字,这个就是⽤来定义信号的地⽅,信号函数只需要定义,不需要实现!在Me这个类中添加槽函数eat();#ifndef ME_H#define ME_H#include <QObject>class Me : public QObject{Q_OBJECTpublic:explicit Me(QObject *parent = nullptr);// 槽函数public slots:// 槽函数void eat();};#endif // ME_H注意!这⾥⽤public slots主要是为了提醒开发者,这是⼀个槽函数,事实上,可以不⽤单独⽤public slots,可以直接将这个槽函数放到public中,与普通函数⼀样,槽函数不仅需要定义,也需要实现。
QT浏览器插件开发入门1 简介主流的浏览器插件开发主要分为两种:●ActiveX控件,适合IE核的浏览器●NPAPI插件,适合Netscape浏览器的开发NPAPI全称为 Netscape Plugin Application Programming Interface在QT4.7.2下有这两种模式的开发支持,相关资料可在Qt文档上找到,ActiveX 开发有QT提供ActiveQT server library支持库(QT4.7.2),NPAPI开发QT4.7.2本身无此支持,需要下载相关的API,下载qt-solutions-qt-solutions-master.tar.gz,解压后qtbrowserplugin目录就是。
下面是完成的一个测试,首先做了一个功能库imagedemo,主要完成一个图片的显示功能,现在将它分别封装为ActiveX控件和NPAPI插件,供不同浏览器调用。
2 ActiveX2.1 创建QT Application工程工程名称:npgraphapp,创建时注意必须选择ActiveQT server library,如下图2.2 创建资源文件文件npgraphapp.rc中就一句话:1 TYPELIB "npgraphapp.rc"2.3 修改类npgraphapp.h在文件中增加Q_CLASSINFO信息,代码如下:#ifndef NPGRAPHAPP_H#define NPGRAPHAPP_H#include <QtGui/QtGui>class npgraphapp : public QWidget{Q_OBJECTQ_CLASSINFO("ClassID", "{4CFCDEDD-F2F6-42E9-8671-D63D7B15AA2C}");Q_CLASSINFO("InterfaceID", "{615B202B-C4F2-4C9F-B9F5-2F9D52ECF0BC}");Q_CLASSINFO("EventsID", "{C9C4EB5F-F926-4770-AA7F-50702B53DB3E}");public:npgraphapp(QWidget *parent = 0);~npgraphapp();…};#endif // NPGRAPHAPP_H2.4 修改main.cpp在文件中增加QAXFACTORY_BEGIN宏,代码如下:#include "npgraphapp.h"#include <QtGui/QApplication>#include <ActiveQt/QAxFactory>QAXFACTORY_BEGIN("{5E2C9F73-03E9-4351-9ECC-C46697D1A8D5}","{443A7F7F-FFE1-498A-AECB-D3EBCD5810CB}")QAXCLASS(npgraphapp)QAXFACTORY_END()int main(int argc, char *argv[]){QApplication a(argc, argv);if ( !QAxFactory::isServer() ){npgraphapp* w = new npgraphapp();w->show();}return a.exec();}2.5 修改工程属性增加生成事件,如下图:在命令行中编辑(注册ActiveX控件)C:\Qt\4.7.2\bin\idc.exe $(TargetPath) /idl $(IntDir)\npgraphapp.idl -version 1.0if errorlevel 1 goto VCReportErrormidl $(IntDir)\npgraphapp.idl /nologo /tlb $(IntDir)\npgraphapp.tlbif errorlevel 1 goto VCReportErrorC:\Qt\4.7.2\bin\idc.exe $(TargetPath) /tlb $(IntDir)\npgraphapp.tlbif errorlevel 1 goto VCReportErrorC:\Qt\4.7.2\bin\idc.exe $(TargetPath) /regserver2.6 注册和调用工程编译后自动生成事件会注册组件,注意看编译信息是否注册成功测试组件<OBJECT ID="npgraphdemo" CLASSID="CLSID:4CFCDEDD-F2F6-42E9-8671-D63D7B15AA2C"HEIGHT="80%" WIDTH="80%" ALIGN="LEFT" ></OBJECT>问题:如果仅仅在界面上绘制可创建QT Active库,如果界面上需调用其它QT控件或自定义的QT控件,需创建为可执行文件才可以3 NPAPI3.1 创建QT Library工程名称:npgraphdemo下载qt-solutions-qt-solutions-master.tar.gz,解压后qtbrowserplugin目录就是NPAPI 的封装支持,使用src中的文件,将下列的五个文件拷贝到工程目录下,在工程中加入qtnpapi.hqtbrowserplugin.hqtbrowserplugin_p.hqtbrowserplugin.cppqtbrowserplugin_win.cpp(windows操作系统)3.2 增加资源文件文件名称是npgraphdemo.rc,容如下1 VERSIONINFOFILEVERSION 1,0,0,1PRODUCTVERSION 1,0,0,1FILEFLAGSMASK 0x3fL#ifdef _DEBUGFILEFLAGS 0x1L#elseFILEFLAGS 0x0L#endifFILEOS 0x4LFILETYPE 0x2LFILESUBTYPE 0x0LBEGINBLOCK "StringFileInfo"BEGINBLOCK "040904e4"BEGINVALUE "Comments", "\0"VALUE "CompanyName", "Nokia\0"VALUE "FileDescription", "grapher\0"VALUE "FileExtents", "g1n\0"VALUE "FileOpenName", "Graphable data (*.g1n)\0"VALUE "FileVersion", "1, 0, 0, 1\0"VALUE "InternalName", "npgraphdemo\0"VALUE "LegalTrademarks", "\0"VALUE "MIMEType", "application/grapher"VALUE "OriginalFilename", "npgraphdemo.dll\0"VALUE "PrivateBuild", "\0"VALUE "ProductName", "grapher npapi example\0"VALUE "ProductVersion", "1, 0, 0, 1\0"VALUE "SpecialBuild", "\0"ENDENDBLOCK "VarFileInfo"BEGINVALUE "Translation", 0x409, 1252ENDEND注意VALUE "MIMEType", "application/grapher"这句,其中的MIMEType后面字符串为自定义类型3.3 新建模块定义文件在工程选择“新建项”,创建npgraphdemo.def,如下图文件容:LIBRARY "npgraphdemo"EXPORTSNP_GetEntryPoints 1NP_Initialize 2NP_Shutdown 33.4 修改npgraphdemo.h在文件增加Q_CLASSINFO定义,注意Q_CLASSINFO("MIME", "application/grapher:g1n:Graphable ASCII numeric data"),此处的定义要和资源文件的MIMEType定义的一致#ifndef GRAPHFROM_H#define GRAPHFROM_H#include <QtGui/QtGui>#include <qtbrowserplugin.h>QT_BEGIN_NAMESPACEclass QVBoxLayout;QT_END_NAMESPACEclass npgraphdemo : public QWidget, public QtNPBindable{Q_OBJECTQ_CLASSINFO("ClassID", "{2e5b2715-46b2-4831-ba9b-6a3b195d5ec8}")Q_CLASSINFO("InterfaceID", "{94581136-3c0c-46cc-97a1-066061356d43}")Q_CLASSINFO("EventsID", "{8c191b77-1894-45c7-9d6b-201dede95410}")Q_CLASSINFO("MIME", "application/grapher:g1n:Graphable ASCII numeric data")Q_CLASSINFO("ToSuperClass", "npgraphdemo")public:npgraphdemo(QWidget *parent = 0);~npgraphdemo();…};#endif // GRAPHFROM_H3.5 修改npgraphdemo.cpp在文件中增加QTNPFACTORY_BEGIN宏#include "npgraphdemo.h"#include "imagedemo.h"npgraphdemo::npgraphdemo(QWidget *parent) : QWidget(parent){…}npgraphdemo::~npgraphdemo(){}QTNPFACTORY_BEGIN("Qt-based Graph Plugin", "A Qt-based NSAPI plug-in that graphs numeric data"); QTNPCLASS(npgraphdemo)QTNPFACTORY_END()3.6 修改工程属性在“C/C++”下“预处理器”选项,增加”_X86_”,如下图编译即可3.7 注册和调用注册方法如下1、在命令行中输入regedit,打开注册表编辑2、在HKEYLOCALMACHIN\SOFTWARE\MozillaPlugins下新建子项/demo3、新建字符串数据”Path”设置为动态库所在路径“D:\VictorySoft\SeisDataServer\01Develop\TestCode\npdemo\Debug\ npgraphdemo.dll”在网页中加入如下语句,可测试调用<object type="application/grapher" width=80% height="80%" >Plugin not installed!</object>问题:1、与网页的交互模式2、自动的打包和注册。
qt开发例程全文共四篇示例,供读者参考第一篇示例:QT(被称为Cute)是一种跨平台的C++应用程序框架。
它被用于开发GUI程序,但也可以用于开发非图形用户界面程序,如控制台工具和服务器。
QT是由挪威的Trolltech公司开发的,现在由Qt公司开发和维护。
QT具有丰富的类库,包括网络、数据库、OpenGL等模块。
它支持多种操作系统,包括Windows、Linux、macOS和移动平台。
QT也被用于开发嵌入式系统。
QT的开发例程非常丰富,开发人员可以利用这些例程快速入门并学习QT的开发技巧。
本文将介绍一些常见的QT开发例程,帮助开发者快速入门QT开发。
一、QT开发环境搭建在学习QT开发之前,首先需要搭建好QT的开发环境。
QT支持多个平台,包括Windows、Linux和macOS。
在Windows上,开发者可以下载QT的开发工具包QT Creator,并安装好相应的编译器,如MinGW、Visual Studio等。
在Linux上,可以使用包管理工具安装QT Creator和相应的编译器。
在macOS上,可以从QT官方网站下载QT Creator,并安装Xcode作为编译器。
搭建好QT的开发环境后,就可以开始学习QT的开发了。
二、QT基础知识在学习QT开发之前,需要了解一些基础知识,比如信号和槽机制、布局管理等。
信号和槽是QT中非常重要的概念,用于对象之间的通信。
当一个对象发出信号时,其他对象可以通过连接这个信号来执行相应的槽函数。
布局管理用于管理窗口中的控件布局,可以确保窗口在不同大小和分辨率下正确显示。
三、QT控件使用QT提供了丰富的控件用于创建GUI界面,比如按钮、标签、文本框、表格等。
开发者可以使用这些控件来构建用户界面,实现各种功能。
控件的信号和槽机制使得不同控件之间可以方便地交互。
四、QT网络编程QT提供了网络模块,可以实现网络编程。
开发者可以使用QT的网络类来创建TCP、UDP客户端和服务器。
如何编译:1、把如下(5个文件代码)代码保存到同一个文件夹2、搭配QT环境3、打开终端进入代码目录4、输入qmake -project 回车5、输入qmake ****.pro 回车(***.上一个命令生成的pro 工程文件)6、输入make7、输入 ./*** (make 生成的pro工程同名文件)就会看见如下图代码共5个文件(widget.h widget.cpp cardplay.h cardclass.cpp widget.ui )://name:widget.cpp//author:_a_qian//update:2015/1/11//edition:0.11//statement:// 1、个人所写公开的代码基于GNU// 2、本程序基于windows vs 2013编译通过,但是其他系统包括//(微软的视窗系列、红帽系列、苹果系列 系统通过 QT 环境的重新编译,即可在当前系统运行,如果产生任何细节变化,恕不进行通知,自行修改代码)#include "widget.h"#include "ui_widget.h"#include <QApplication>#include <QtGui>QString getChinese(char *other){return QTextCodec::codecForName("GBK")->toUnicode(other);}Widget::Widget(QWidget *parent) :QWidget(parent),ui(new Ui::Widget){ui->setupUi(this);this->a = new card;this->own = new card(54,false);this->classmate_A = new card(54,false);this->classmate_B = new card(54,false);this->table =new card(54,false);connect(ui->pushButton,SIGNAL(clicked()),this,SLOT(close()));connect(ui->pushButton_5,SIGNAL(clicked()),this,SLOT(fenpai()));connect(ui->pushButton_2,SIGNAL(clicked()),this,SLOT(clamat_A()));connect(ui->pushButton_3,SIGNAL(clicked()),this,SLOT(own_clicked()));connect(ui->pushButton_4,SIGNAL(clicked()),this,SLOT(clamat_B()));ui->pushButton_5->setText(getChinese("发牌"));ui->label_4->setText(getChinese("扑克牌已经准备好,等待发牌"));}void Widget::clamat_A(){chupai(ui->listWidget,classmate_A);}void Widget::own_clicked(){chupai(ui->listWidget_2,own);}void Widget::clamat_B(){chupai(ui->listWidget_3,classmate_B);}void Widget::clear_table(){for(int temp = 0;ui->listWidget_4->item(temp)!= 0;temp++){if(!a->add_one(table->cut_one(temp))){qDebug()<<"a 回收牌错误";}}a->compositor();a->showcard();}void Widget::refenpai(){a->refash();classmate_A->refash();classmate_B->refash();own->refash();table->refash();this->fenpai();this->refash();}void Widget::chupai(QListWidget *slect_what, card *slect_context){clear_table();for(int temp=0;temp < slect_context->Max_num();temp++){if(slect_what->item(temp) != 0 && slect_what->item(temp)->isSelected()){ if(!table->add_one(slect_context->cut_one(temp))){qDebug()<<getChinese("table添加错误");}}}refash();}void Widget::refash(){int tmpe = 0;ui->listWidget->clear();ui->listWidget_2->clear();ui->listWidget_3->clear();ui->listWidget_4->clear();classmate_A->compositor();classmate_B->compositor();own->compositor();table->compositor();while(tmpe < classmate_A->Max_num()){if(classmate_A->whatcard(tmpe) != 0){ui->listWidget->insertItem(tmpe,getChinese(card_describe[classmate_A->whatcard(tmpe)-1]));}tmpe++;}tmpe=0;while(tmpe < own->Max_num()){if(own->whatcard(tmpe) != 0){ui->listWidget_2->insertItem(tmpe,getChinese(card_describe[own->whatcard(tmpe)-1]));}tmpe++;}tmpe=0;while(tmpe < classmate_B->Max_num()){if(classmate_B->whatcard(tmpe) != 0){ui->listWidget_3->insertItem(tmpe,getChinese(card_describe[classmate_B->whatcard(tmpe)-1]));}tmpe++;}tmpe=0;while(tmpe<table->Max_num()){if(table->whatcard(tmpe) != 0){ui->listWidget_4->insertItem(tmpe,getChinese(card_describe[table->whatcard(tmpe)-1]));}tmpe++;}}void Widget::fenpai(){int tmpe = 0;for(tmpe = 0;tmpe < this->a->Max_num()/3-1;tmpe++){if(!classmate_A->add_one(a->cut_one(tmpe))){qDebug()<<getChinese("分发中出现错误检查");}}for(;tmpe < (this->a->Max_num()/3-1)*2;tmpe++){if(!own->add_one(a->cut_one(tmpe))){qDebug()<<getChinese("分发中出现错误检查");}}for(;tmpe < this->a->Max_num()-3;tmpe++){if(!classmate_B->add_one(a->cut_one(tmpe))){qDebug()<<getChinese("分发中出现错误检查");}}for(;tmpe < this->a->Max_num();tmpe++){if(!table->add_one(a->cut_one(tmpe))){qDebug()<<getChinese("分发中出现错误检查");}}ui->label_4->setText(getChinese("扑克牌已经分发完毕,祝您玩的愉快"));ui->pushButton_5->setText(getChinese("重新发牌"));connect(ui->pushButton_5,SIGNAL(clicked()),this,SLOT(refenpai()));this->refash();}Widget::~Widget(){delete ui;}int main(int argc, char *argv[]){QApplication a(argc, argv);Widget w;w.show();return a.exec();}_____________________________________分页线______________________________//name:widget.h//author:_a_qian//update:2015/1/11//edition:0.11//statement://应用优化#ifndef WIDGET_H#define WIDGET_H#include <QWidget>#include "cardplay.h"#include <QListWidget>namespace Ui {class Widget;}class Widget : public QWidget{Q_OBJECTpublic:explicit Widget(QWidget *parent = 0);void chupai(QListWidget *, card *);void clear_table();~Widget();public slots:void refash();void fenpai();void refenpai();void clamat_A();void clamat_B();void own_clicked();private:Ui::Widget *ui;card *a,*own,*classmate_A,*classmate_B,*table; };#endif // WIDGET_H____________________________________分页线_________________________________ //name:cardplay.h//author:_a_qian//update:2015/1/11//edition:2.5.9.2//commentate for this edition :// 帮助注释完善//#ifndef CARDPLAY_H_#define CARDPLAY_H_static char card_describe[54][10]={"红桃_3","方板_3","黑桃_3","草花_3","红桃_4","方板_4","黑桃_4","草花_4","红桃_5","方板_5","黑桃_5","草花_5","红桃_6","方板_6","黑桃_6","草花_6","红桃_7","方板_7","黑桃_7","草花_7","红桃_8","方板_8","黑桃_8","草花_8","红桃_9","方板_9","黑桃_9","草花_9","红桃_10","方板_10","黑桃_10","草花_10","红桃_J","方板_J","黑桃_J","草花_J","红桃_Q","方板_Q","黑桃_Q","草花_Q","红桃_K","方板_K","黑桃_K","草花_K","红桃_A","方板_A","黑桃_A","草花_A","红桃_2","方板_2","黑桃_2","草花_2","小王","大王"};class card{public:card(int = 54,bool=true);//参数一:多少牌;参数二:是否写入分配所有牌初始化为最大数值(例:card(12,true)或card(12),里面的牌序为0位置为int:1,1位置为int:2,~,11位置int:12,card(<任意数字>,false)内容全部为空)~card();void initialize_zero();//清理所有值为0bool add_one(int);//增加一个牌;参数一:一个牌int cut_one(int);//减去一个牌;参数一:那个牌的位置,从0起;返回值:那个牌bool exchange(int,int);//交换牌;参数一:前一个牌的位置,从0起;参数二:后一个牌的位置,从0起void compositor();//排序void MIX();//打乱int max()const;//返回最大牌位置int min()const;//返回最小牌位置int whatcard(int const)const;//察看那个牌;参数一:那个牌的位置(牌的编号从1起,往后按序初始化数字,例子:牌1,牌2......,注意是从1起,所以有需要按数字引用card_describe 变量的话-1进行寻址,如果超出card_describe变量长度的牌值请按求余(例:变量a%45)的方法进行引用,以免错误)virtual void showcard(int=-1);//显示所有有效牌,参数一:那个牌位置int Max_num()const {return Max;}//返回此类所能接受的最大值void refash();//重新发牌如果在最初构建时没有写入默认值,那重新刷新时,就不会写入默认值protected:void writecard();//写默认值//////////////////////////////////////////////////////////////////////////正常pai return explore//// 是!0 0<= ~ <Max 说明该牌没有可以进行添加,返回值是可以添加的位置//// 是=0 0<= ~ <Max 正常;返回空余位置信息//// 否!0 =this->Max 说明该牌已经存在不能重复添加//// 否=0 =this->Max 没有空余位置//////////////////////////////////////////////////////////////////////////int findzero(int=0);private:int *cards;const int Max;const bool overwrite;};#endif_______________________________________分页线____________________________//name:cardclass.cpp//author:_a_qian//update:2015/1/11//edition:2.5.9.2//statement://#include<iostream>#include<ctime>#include<cstdlib>using namespace std;#include"cardplay.h"void card::refash(){if(this->overwrite){this->initialize_zero();this->writecard();this->MIX();}else{this->initialize_zero();}}card::card(int many, bool overwrite1):Max(many),overwrite(overwrite1){cards=new int[Max];initialize_zero();if(overwrite){writecard();MIX();}}card::~card(){delete cards;cards=NULL;}void card::initialize_zero(){for(int temp=0;temp<this->Max;temp++){*(cards+temp)=0;}}bool card::add_one(int pai){int location=findzero(pai);if(location>=this->Max){return false;}*(cards+location)=pai;return true;}int card::cut_one(int location){int temp=0;if(location>Max||location<0){return temp;}//失败的时候并返回0值;temp=*(this->cards+location);*(cards+location)=0;return temp;}bool card::exchange(int one, int two){if(one<0 || one>=Max||two<0 || two>=Max){return false;}//超出寻址范围swap(*(cards+one),*(cards+two));return true;}void card::compositor(){int Maxx=0;for(int temp=0;temp<Max;temp++){Maxx=temp;for(int Ma=temp+1;Ma<Max;Ma++){if(*(cards+Maxx)<*(cards+Ma)){Maxx=Ma;}}exchange(temp,Maxx);}}void card::MIX(){srand((unsigned)time(NULL));for(int temp=0;temp<Max;temp++){exchange(temp,rand()%Max);}}int card::max() const{int Maxx=0;for(int Ma=0;Ma<Max;Ma++){if((*(cards+Ma)!=0)&&(*(cards+Maxx)<*(cards+Ma))){Maxx=Ma;}}return Maxx;}int card::min() const{int Min=0;for(;Min<this->Max&&*(cards+Min)==0;Min++);for(int Ma=0;Ma<Max;Ma++){if(*(cards+Ma)!=0&&(*(cards+Min)>*(cards+Ma))){Min=Ma;}}return Min;}int card::whatcard(const int location) const{if(location>=Max||location<0){return 0;}//如果寻址超界返回值为0return *(this->cards+location);}void card::showcard(int one){cout<<endl;int temp=0;if(one>=0){temp=one;}for(;temp<Max;temp++){if(*(cards+temp)!=0){cout<<temp<<":";}if(*(cards+temp)==0){/*cout<<"这个是个0值:"<<temp<<endl;*/}else if((*(cards+temp)>54)||(*(cards+temp)<0)){cout<<"\n~! 1errer\n";}else {cout<<*(card_describe+*(cards+temp)-1);cout<<endl;}if(one>=0){break;}}cout<<endl;}void card::writecard(){for(int temp=0;temp<Max;temp++){*(cards+temp)=temp+1;}}int card::findzero(int pai){int location=this->Max,temp=this->Max,locate=this->Max;for(int tem=0;tem<this->Max;tem++){if(this->whatcard(tem)==0&&temp==this->Max){temp=tem;}if(this->whatcard(tem)==pai&&pai!=0){locate=tem;}}if(pai==0){location=temp;}else if(pai!=0&&locate==this->Max){location=temp;}else{return this->Max;}return location;}___________________________________________分页线______________________________//文件名:widget.ui(本行不要复制)<?xml version="1.0" encoding="UTF-8"?><ui version="4.0"><class>Widget</class><widget class="QWidget" name="Widget"><property name="windowModality"><enum>Qt::NonModal</enum></property><property name="geometry"><rect><x>0</x><y>0</y><width>819</width><height>488</height></rect></property><property name="minimumSize"><size><width>819</width><height>488</height></size></property><property name="maximumSize"><size><width>819</width><height>488</height></size></property><property name="contextMenuPolicy"><enum>Qt::DefaultContextMenu</enum></property><property name="windowTitle"><string>斗地主</string></property><property name="windowIcon"><iconset><normaloff> </normaloff> </iconset></property><widget class="QPushButton" name="pushButton"> <property name="geometry"><rect><x>10</x><y>10</y><width>97</width><height>31</height></rect></property><property name="text"><string>关闭</string></property></widget><widget class="QListWidget" name="listWidget"><property name="geometry"><rect><x>10</x><y>50</y><width>161</width><height>431</height></rect></property><property name="selectionMode"><enum>QAbstractItemView::MultiSelection</enum> </property><property name="viewMode"><enum>QListView::ListMode</enum></property><property name="sortingEnabled"><bool>false</bool></property></widget><widget class="QPushButton" name="pushButton_2"> <property name="geometry"><rect><x>200</x><y>80</y><width>41</width><height>41</height></rect></property><property name="text"><string>>></string></property></widget><widget class="QListWidget" name="listWidget_3"> <property name="geometry"><rect><x>640</x><y>40</y><width>171</width><height>441</height></rect></property><property name="selectionMode"><enum>QAbstractItemView::MultiSelection</enum> </property><property name="viewMode"><enum>QListView::ListMode</enum></property><property name="sortingEnabled"><bool>false</bool></property></widget><widget class="QListWidget" name="listWidget_4"> <property name="geometry"><rect><x>270</x><y>40</y><width>281</width><height>171</height></rect></property><property name="viewMode"><enum>QListView::IconMode</enum></property></widget><widget class="QPushButton" name="pushButton_3"> <property name="geometry"><rect><x>360</x><y>220</y><width>97</width><height>31</height></rect></property><property name="text"><string>出牌</string></property></widget><widget class="QLabel" name="label"><property name="geometry"><rect><x>180</x><y>50</y><width>41</width><height>21</height></rect></property><property name="text"><string>A同学</string></property></widget><widget class="QLabel" name="label_2"><property name="geometry"><rect><x>190</x><y>230</y><width>31</width><height>21</height></rect></property><property name="text"><string>自己</string></property></widget><widget class="QLabel" name="label_3"><property name="geometry"><rect><x>590</x><y>40</y><width>41</width><height>21</height></rect></property><property name="text"><string>B同学</string></property></widget><widget class="QLabel" name="label_4"><property name="geometry"><rect><x>240</x><y>0</y><width>351</width><height>21</height></rect></property><property name="layoutDirection"><enum>Qt::LeftToRight</enum></property><property name="locale"><locale language="Chinese" country="China"/></property><property name="text"><string>TextLabel</string></property><property name="alignment"><set>Qt::AlignCenter</set></property></widget><widget class="QPushButton" name="pushButton_4"> <property name="geometry"><rect><x>580</x><y>80</y><width>41</width><height>41</height></rect></property><property name="text"><string><<</string></property></widget><widget class="QPushButton" name="pushButton_5"> <property name="geometry"><rect><x>680</x><y>0</y><width>97</width><height>31</height></rect></property><property name="text"><string>重新发牌</string></property></widget><widget class="QListWidget" name="listWidget_2"> <property name="geometry"><rect><x>180</x><y>260</y><width>451</width><height>221</height></rect></property><property name="selectionMode"><enum>QAbstractItemView::MultiSelection</enum> </property><property name="movement"><enum>QListView::Static</enum></property><property name="resizeMode"><enum>QListView::Fixed</enum></property><property name="viewMode"><enum>QListView::IconMode</enum></property><property name="modelColumn"><number>0</number></property></widget></widget><layoutdefault spacing="6" margin="11"/><resources/><connections/></ui>————————————————in the end————————————————。