飞利浦philips FCS145_ MCS145 installation manual说明书
- 格式:pdf
- 大小:542.45 KB
- 文档页数:3
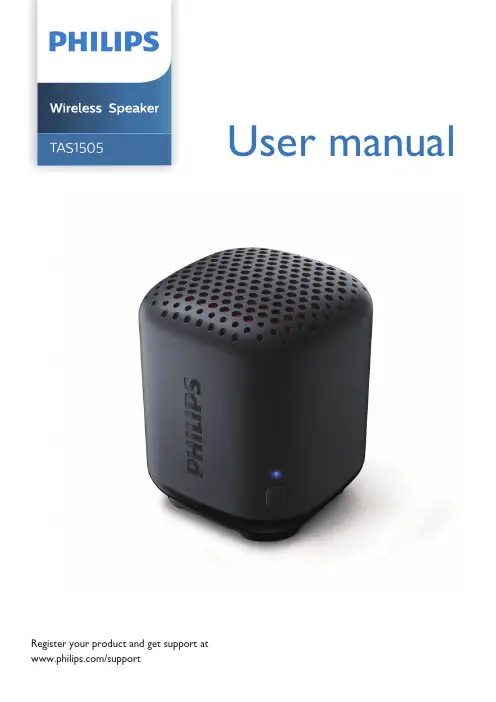
User manual TAS1505Register your product and get support at/supportContents1 Important 2Safety 22 Y our wireless speaker 3Introduction 3What's in the box 3Overview of the speaker 33 Get started 4Charge the built-in battery 444 Play from Bluetooth devices 5Play from Bluetooth devices 5Control playback 55 Product information 66 Troubleshooting 7General 7Bluetooth 77 Notice 8Compliance 8Care of the environment 8FCC Statement 8Trademark notice 9EN12EN1 ImportantSafetyImportant safety instructions•Make sure that the power supply voltageCCcorresponds to the voltage on the back or the underside of the unit.•The speaker shall not be exposed todripping or splashing.•Do not place any source of danger on thespeaker (e.g. liquid filled objects, lit candles). •Make sure that there is enough free spacearound the speaker for ventilation. •Please use the speaker safely in anenvironment with temperature between•Only use attachments and accessories specified by the manufacturer.Battery safety precautions•Danger of explosion if a battery isincorrectly replaced. Replace only with the same or equivalent type.• A battery (battery pack or battery installed)shall not be exposed to excessive heat such as sunshine, fire or the like.• A battery in extreme high or lowtemperatures during use, storage ortransportation, and low air pressure at high altitude can pose safety hazards.•Do not replace a battery with an incorrecttype that can defeat a safeguard (for example, some lithium battery types).•Disposing a battery into fire or a hot oven,mechanically crushing or cutting a battery can result in an explosion.•Leaving a battery in an extremely high temperature surrounding, or an extremely low air pressure environment may result in an explosion or leakage of flammable liquid or gas.2Y our portablespeakerCongratulations on your purchase, and welcome to Philips!To fully benefit from the support that Philips offers, register your product at /welcome.What's in the boxCheck and identify the contents of your package:Overview of the speaker Indicate battery or Bluetooth connection status.SpeakerUSB cableQuick start guide Safety sheet Worldwide warrantyLanyard3LED indicatorDC IN••Charge the built-in battery.Turn the speaker on or o .3EN3 Get startedAlways follow the instructions in this chapter insequence.Turn on/offTo turn the speaker on, press and hold" " for two seconds. You will hear theprompt sound and Blue LED indicatorblinks.Auto off in 15 minutes if no Bluetoothconnection.To turn the speaker off, press and hold" " for two seconds. You will hear theprompt sound and Blue LED indicatorturn off.Charge the built-in batteryThe speaker is powered by a built-inrechargeable battery.Connect the USB-C socket on the speaker toan outlet (5V 0.5A) by using the provided USBcable.When the speaker is being charged,Power onLED is solid Red.When the speaker is fully charged,LED is solid Blue.When the speaker is being charged,Power oLED is solid Red.When the speaker is fully charged,LED is o .4EN5EN4 Play from Bluetooth devicesWith this speaker,you can listen to audio from Bluetooth-enabled devices.1 »The LED indicator blinks blue.2 On your Bluetooth device, enableBluetooth and search for Bluetooth devices that can be paired.3 Select [Philips S1505] displayed on yourdevice for pairing and connection. If necessary, input “0000” as the pairing password.»After successful pairing and connection,you'll hear the prompt sound, and the LED indicator turns solid blue.If you cannot find [Philips S1505] on your device, hold down the Power button for 2 seconds to power off before rebooting, and long press it for 2 seconds to enter into pairing mode. 4Play audio on your Bluetooth device to start streaming music.LED indicator (blue)Solid blue ConnectedDisconnect a deviceDisable Bluetooth on your device; orMove the device beyond the communication range.»The speaker beeps twice, and the LEDindicator blinks blue.Reconnect a deviceWhen you turn on the speaker, it will reconnect the last connected device automatically; If not, select [Philips S1505] on your Bluetooth device to start connection.Press for 2 seconds to turn the speakeron.2.5W RMS 6EN5150Hz-18kHz1.5"80V5.0A2DP V1.3, AVRCP V1.6Bluetooth Profile20*The IPX7 rating means the speaker driver can be submerged for up to 30 minutes at a depth of up to 1 m.Philips S1505If you cannot find [Philips S1505] on your device, hold the for 2 seconds to power off, and then long press the button for 6 seconds to clear the pairing information / enter pairing mode.Hereby, TP Vision Europe B.V. declares that this product is in compliance with the essential requirements and other relevantprovisions of Directive 1999/5/EC. You can find the Declaration of Conformity on/support.Disposal of a battery into fire or a hot oven, or mechanically crushing or cutting of a battery, that can result in an explosion.MMD Hong Kong Holding Limited may void theuser's authority to operate the equipment.FCC StatementThis device complies with Part 15 of the FCC Rules. Operation is subject to the following two conditions: (1) This device may not cause harmful interference, and (2) This device must accept any interference received, including interference that may cause undesired operation.Warning: Changes or modifications not expressly approved by the party responsible for compliance could void the user’s authority to operate the equipment.Note: This equipment has been tested and found to comply with the limits for a Class B digital device, pursuant to Part 15 of the FCC Rules.These limits are designed to provide reasonable protection against harmful interference in a residential installation.This equipment generates, uses and can radiate radio frequency energy and, if not installed and used in accordance with the instructions, may cause harmful interferenceto radio communications. However, there isno guarantee that interference will not occurin a particular installation. If this equipment does cause harmful interference to radio or television reception, which can be determined encouraged to try to correct the interference by one or more of the following measures: (1) Reorient or relocate the receiving antenna. (2) Increase the separation between the equipment and receiver. (3) Connect the equipment into an the receiver is connected. (4) Consult the dealer or an experienced radio/TV technician for help.RF Warning StatementThe device has been evaluated to meet general RF exposure requirements. The device can be used in portable exposure conditions without restriction.Trademark noticeMMD Hong Kong Holding Limited is under license. Other trademarks and trade names are those of their respective owners.The Bluetooth® word mark and logos are registered trademarks owned by the Bluetooth SIG, Inc. and any use of such marks byEN9Specifications are subject to change without notice.Philips and the Philips Shield Emblem are registered trademarks ofKoninklijke Philips N.V. and are used under license.This product has been manufactured by and is sold under theresponsibility of MMD Hong Kong Holding Limited or one of its a liates,and MMD Hong Kong Holding Limited is the warrantor in relation to this product.TAS1505_00_UM_V1.0。
显示器用户指南©2010Hewlett-Packard Development Company,L.P.Microsoft、Windows 和 Windows Vista 是Microsoft Corporation 在美国和/或其他国家的商标或注册商标。
HP 产品和服务的所有保修限于这些产品与服务所附带的明确保修声明。
本文的任何条款都不应视作构成保修声明的附加条款。
HP 不对本文的技术性错误、编印错误或疏漏承担任何责任。
本文档包含的所有权信息受版权保护。
未经Hewlett-Packard Company 事先书面许可,不得将本文档的任何部分影印、复制或翻译成其他语言。
第二版(2010 年 1 月)文档部件号:594300-AA2关于本指南本指南提供与安装显示器、安装驱动程序、使用屏幕显示菜单、故障排除和技术规范有关的信息。
警告!此格式的文字表示:如果不按照指示操作可能导致人身伤害,甚至死亡。
注意:此格式的文字表示:如果不按照指示操作可能致使设备损坏或信息丢失。
注:此格式的文字提供重要的附加信息。
iiiiv 关于本指南目录1 产品特性 (1)HP LCD 显示器 (1)2 安全和维护准则 (3)重要安全信息 (3)安全预防措施 (4)维护准则 (5)清洁显示器 (5)装运显示器 (5)3 安装显示器 (6)打开显示器包装 (6)安装显示器 (6)连接显示器电缆 (10)高带宽数字内容保护 (HDCP) (11)连接音频电缆 (12)连接电源线 (13)调整显示器的倾斜角度 (13)调整扭转角度 (14)键盘存放 (15)4 操作显示器 (16)CD 软件和实用程序 (16)安装驱动程序 (16)使用自动调整功能 (17)前面板控制按钮 (18)使用屏幕显示 (OSD) (19)选择视频输入接口 (23)识别显示器状况 (23)调整屏幕质量 (24)省电功能 (24)v附录 A 故障排除 (26)解决常见问题 (26)从 获取支持 (27)准备致电技术支持 (27)查找额定值标签 (28)附录 B 技术规格 (29)HP LCD 显示器 (29)预设视频模式 (33)LCD 显示器质量和像素策略 (35)附录 C 机构规定注意事项 (36)(美国)联邦通信委员会注意事项 (36)修改 (36)电缆 (36)标有 FCC 徽标的产品的一致性声明(仅适用于美国) (36)适用于加拿大的注意事项 (37)Avis Canadien (37)欧盟规程通告 (37)德国人机工程学通告 (38)适用于日本的注意事项 (38)适用于韩国的注意事项 (38)电源线配件要求 (38)适用于日本的电源线要求 (38)产品环境注意事项 (39)废弃物品的处理 (39)日常处理废旧器件的注意事项(适用于欧盟) (39)化学物质 (39)HP 回收办法 (39)有害物质的限制 (RoHS) (39)土耳其 EEE 法规 (40)vi1产品特性HP LCD 显示器HP LCD(液晶显示)显示器采用具备有源矩阵和下列特性的薄膜晶体管 (TFT) 屏幕:●大尺寸屏幕●最大图像分辨率:◦1910m:1366x768@60 赫兹◦2010f:1600x900@60 赫兹◦2010i:1600x900@60 赫兹◦2010m1600x900@60 赫兹◦2210i:1920x1080@60 赫兹◦2210m:1920x1080@60 赫兹◦2310i:1920x1080@60 赫兹◦2310m:1920x1080@60 赫兹◦2510i:1920x1080@60 赫兹◦2710m:1920x1080@60 赫兹◦且支持较低分辨率的全屏显示●VGA 模拟信号●DVI 数字信号●高清晰度多媒体接口 (HDMI)(适用于部分型号)●反应迅捷,玩核心游戏和图形制作时可获得更佳效果●视角宽广,无论是坐着、站着还是从显示器的两侧,均易于观看●动态对比度,提供更深的黑度和更亮的白度以实现出众的色差效果,令玩游戏和观看电影更具特色●倾斜度调整●扭转角度调整HP LCD 显示器1●可拆卸式的底座和符合视频电子标准协会 (Video Electronics Standards Association,VESA) 标准的安装孔,便于进行灵活的安装(包括墙上安装)●安全锁定插槽,用于连接安全锁定电缆(需要单独购买安全电缆)●即插即用功能(如果您的计算机系统支持此功能)●屏幕显示 (OSD) 可调,便于设置和优化屏幕(可选择英文、简体中文、繁体中文、法文、德文、意大利文、西班牙文、荷兰文、日文或巴西葡萄牙文)●内置立体声低音炮扬声器●键盘存放装置●节能装置,有助于减少能源消耗●“快速查看”设置显示●DVI 和 HDMI 输入具有 HDCP(高带宽数字内容保护)(适用于部分型号)●软件和实用程序 CD,其中包含以下内容:◦驱动程序◦自动调整软件◦相关文档2第 1 章 产品特性2安全和维护准则重要安全信息本显示器已附带电源线。
/welcome SC用户手册 1客户服务与保修26故障排除和常见问题解答31240V5目录1. 重要 (1)1.1 安全措施与维修 (1)1.2 标志说明 (2)1.3 产品和包装材料的废弃 (3)2. 设置显示器 (4)2.1 安装 (4)2.2 操作显示器 (6)2.3 卸下底座支撑臂 (8)3. 图像优化 (9)3.1 SmartContrast (9)3.2 Philips SmartControl Lite (9)4. 技术规格 (15)4.1 分辨率和预设模式 (18)5. 电源管理 (19)6. 有关规定 (20)7. 客户服务与保修 (26)7.1 飞利浦平面显示器像素残缺规定267.2 客户服务与保修 (28)8. 故障排除和常见问题解答 (31)8.1 故障检修 (31)8.2 一般常见问题解答 (32)1. 重要此电子版用户指南适合使用 Philips 显示器的所有用户。
请在使用您的显示器之前花点时间阅读本用户手册。
它包含与使用显示器相关的重要信息和注意事项。
产品享受飞利浦保修须符合下列条件:产品适当用于其设计目的、符合操作说明、返修时提供原始帐单或付款收据,帐单或收据应载明购货日期、销售商名称、产品型号及生产号。
1.1 安全措施与维修警告使用本文档中未介绍的控制、调整或过程可能导致碰撞、电气危险和/或机械危险。
连接和使用电脑显示器时,请阅读并遵循以下说明。
操作:• 请使显示器远离阳光直接照射、明亮强光线、以及任何其他热源。
长期暴露于此类环境可能导致显示器褪色和损坏。
• 移开任何可能掉入通风孔的物品或者会妨碍显示器电子器件正常冷却的物品。
• 不要堵塞机壳上的通风孔。
• 放置显示器时,确保电源插头和插座便于插拔。
• 如果通过拔掉电源线或直流电源线关闭显示器电源,则在重新连接电源线或直流电源线以进行正常操作之前,必须等待 6 秒钟。
• 请务必使用由 Philips 提供的经过认可的电源线。
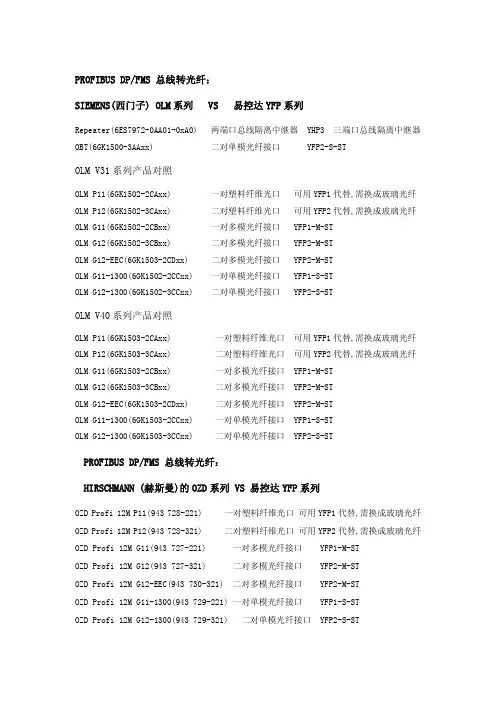
PROFIBUS DP/FMS 总线转光纤:SIEMENS(西门子) OLM系列 VS 易控达YFP系列Repeater(6ES7972-0AA01-0xA0) 两端口总线隔离中继器 YHP3 三端口总线隔离中继器 OBT(6GK1500-3AAxx) 二对单模光纤接口 YFP2-S-STOLM V31系列产品对照OLM P11(6GK1502-2CAxx) 一对塑料纤维光口 可用YFP1代替,需换成玻璃光纤 OLM P12(6GK1502-3CAxx) 二对塑料纤维光口 可用YFP2代替,需换成玻璃光纤 OLM G11(6GK1502-2CBxx) 一对多模光纤接口 YFP1-M-STOLM G12(6GK1502-3CBxx) 二对多模光纤接口 YFP2-M-STOLM G12-EEC(6GK1503-2CDxx) 二对多模光纤接口 YFP2-M-STOLM G11-1300(6GK1502-2CCxx) 一对单模光纤接口 YFP1-S-STOLM G12-1300(6GK1502-3CCxx) 二对单模光纤接口 YFP2-S-STOLM V40系列产品对照OLM P11(6GK1503-2CAxx) 一对塑料纤维光口 可用YFP1代替,需换成玻璃光纤 OLM P12(6GK1503-3CAxx) 二对塑料纤维光口 可用YFP2代替,需换成玻璃光纤 OLM G11(6GK1503-2CBxx) 一对多模光纤接口 YFP1-M-STOLM G12(6GK1503-3CBxx) 二对多模光纤接口 YFP2-M-STOLM G12-EEC(6GK1503-2CDxx) 二对多模光纤接口 YFP2-M-STOLM G11-1300(6GK1503-2CCxx) 一对单模光纤接口 YFP1-S-STOLM G12-1300(6GK1503-3CCxx) 二对单模光纤接口 YFP2-S-STPROFIBUS DP/FMS 总线转光纤:HIRSCHMANN (赫斯曼)的OZD系列 VS 易控达YFP系列OZD Profi 12M P11(943 728-221) 一对塑料纤维光口 可用YFP1代替,需换成玻璃光纤 OZD Profi 12M P12(943 728-321) 二对塑料纤维光口 可用YFP2代替,需换成玻璃光纤 OZD Profi 12M G11(943 727-221) 一对多模光纤接口 YFP1-M-STOZD Profi 12M G12(943 727-321) 二对多模光纤接口 YFP2-M-STOZD Profi 12M G12-EEC(943 730-321) 二对多模光纤接口 YFP2-M-STOZD Profi 12M G11-1300(943 729-221) 一对单模光纤接口 YFP1-S-STOZD Profi 12M G12-1300(943 729-321) 二对单模光纤接口 YFP2-S-STOZD Modbus PLUS G12(943 740-021) 二对多模光纤接口 YFB2-M-ST OZD Modbus PLUS G12-1300(943 821-021) 二对单模光纤接口 YFB2-S-ST OZD Genius G12(933 989-021) 二对多模光纤接 YFG2-M-ST OZD Genius G12-1300(934 233-021) 二对单模光纤接 YFG2-S-ST CONTROLNET总线转光纤:ROCKWELL(罗克韦尔),AB的1786系列 VS 易控达YFN系列YFN产品型号 1786-产品组合 功 能 描 述YFN1-M-ST 1786-RPA :11786-RPFS:1单光口短距离光纤链路模块,不同的是光纤介质不同,YFN1使用多模光纤YFN1-M-ST 1786-RPA :11786-RPFM:1单光口中距离光纤链路模块,多模光纤,3KMYFN1-S-ST -- 单光口长距离光纤链路模块,单模光纤,20KMYFN2-M-ST -- 具有环环冗余功能的多模光纤链路模块双光口,有自愈保护功能AB的产品中具有环网功能的仅有单模产品YFN2-S-ST 1786-RPA :11786-RPFRL:1具有环环冗余功能的单模光纤链路模块双光口,有自愈保护功能AB的产品传10KM,YFN2传20KMYFN2-S-ST1786-RPA :11786-RPFRXL:1具有环环冗余功能的单模光纤链路模块双光口,有自愈保护功能,传20KMYHN31786-RPT或1786-RPTD两端口协议型隔离中继器YHN31786-RPA:11786-RPCD:1+n多端口协议型隔离中继器YFN1-M-ST +YHN31786-RPA:11786-RPFM:1+n可组成多端口星型结构的光纤链路模块MODBUS PLUS总线转光纤/S908 RIO总线转光纤:Schneider(施耐德),Modicon(莫迪康)的490系列 VS 易控达YFB/YFS系列YFB/YFS产品型号 Modicon产品 功 能 描 述 YFB1-M-ST 490NRP25300单光口Modbus PLUS(MB+)光纤链路模块,多模光纤,传输3公里YFB1-S-ST --单光口长距离Modbus PLUS(MB+)光纤链路模块,单模光纤,20KMYFB2-M-ST490NRP25400NWFR85D200 具有环环冗余功能的多模光纤链路模块 双光口,有自愈保护功能YFB2-S-ST --具有环环冗余功能的单模光纤链路模块双光口,有自愈保护功能,20KMYFS1-M-ST --单光口S908 TIO总线光纤链路模块,多模光纤,传输3公里YFS1-S-ST --单光口长距离S908 Remote IO光纤链路模块,单模光纤,20KMYFS2-M-ST490NRP95400NWFR89D200 具有环环冗余功能的S908 Remote IO光纤链路模块 多模双光口,有自愈保护功能YFS2-S-ST --具有环环冗余功能的单模光纤链路模块双光口,有自愈保护功能,传20KMYHB3/YHS3NWRR85001(RR85 Repeater)两端口协议型隔离中继器PROFIBUS DP/FMS总线转光纤Phinex(菲尼克斯)的PSI系列 VS 易控达YFP系列YFP产品型号 Modicon产品 功 能 描 述 YFP2-M-ST PSI-MOS-PROFIBUS/FO 850 T 双光口冗余,多模光纤 YFP2-S-ST PSI-MOS-PROFIBUS/FO 1300 T 双光口冗余,单模光纤 YFP1-M-ST PSI-MOS-PROFIBUS/FO 850 E 单光口,多模光纤YFP1-S-ST PSI-MOS-PROFIBUS/FO 1300 E 单光口,单模光纤 YHP3PSI-MOS-DNET CAN/FO 850/BM:27 08 08 3PSI-MOS-DNET CAN/FO 850/EM:27 08 096电缆中继隔离器CC-LINK总线转光纤:Mitsubishi(三菱)的AJ65BT系列 VS 易控达YFK系列NS24产品型号Mitsubishi产品 功 能 描 述 及 备 注YFK1-M-ST AJ65SBT-RPS单光口CC-Link光纤链路模块,多模光纤,传输2公里YFK1-S-ST AJ65SBT-RPG单光口长距离CC-Link光纤链路模块,单模光纤,20KMYFK2-M-ST--具有环环冗余功能的多模光纤链路模块,有自愈保护功能YFK2-S-ST--具有环环冗余功能的单模光纤链路模块双光口,有自愈保护功能,20KMYHK3AJ65BT-RPT两端口协议型隔离中继器。
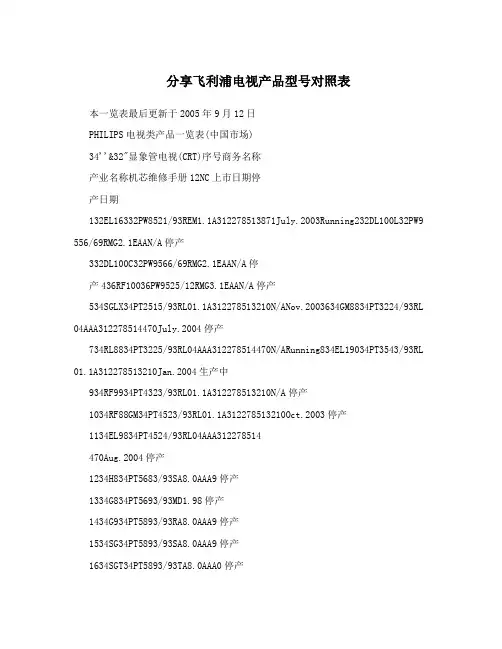
分享飞利浦电视产品型号对照表本一览表最后更新于2005年9月12日PHILIPS电视类产品一览表(中国市场)34''&32"显象管电视(CRT)序号商务名称产业名称机芯维修手册12NC上市日期停产日期132EL16332PW8521/93REM1.1A312278513871July.2003Running232DL100L32PW9 556/69RMG2.1EAAN/A停产332DL100C32PW9566/69RMG2.1EAAN/A停产436RF10036PW9525/12RMG3.1EAAN/A停产534SGLX34PT2515/93RL01.1A312278513210N/ANov.2003634GM8834PT3224/93RL 04AAA312278514470July.2004停产734RL8834PT3225/93RL04AAA312278514470N/ARunning834EL19034PT3543/93RL 01.1A312278513210Jan.2004生产中934RF9934PT4323/93RL01.1A312278513210N/A停产1034RF88GM34PT4523/93RL01.1A312278513210Oct.2003停产1134EL9834PT4524/93RL04AAA312278514470Aug.2004停产1234H834PT5683/93SA8.0AAA9停产1334G834PT5693/93MD1.98停产1434G934PT5893/93RA8.0AAA9停产1534SG34PT5893/93SA8.0AAA9停产1634SGT34PT5893/93TA8.0AAA0停产1734SGTLX34PT6131/93RA10AAA0停产1834RF68GM34PT6231/93RA10A312278510581N/ASept.20031934RF9034PT6251/9 3RA10AAA0停产2034RF90LX34PT6251/93SA10A312278510581N/AAug.20032134AL18034PT7005/9 3L04AAB312278514771/312278514772Oct.2005N/A2234RL18034PT7015/93L04AAB312 278514771/312278514772Oct.2005N/A2334SL18034PT7025/93L04AAB31227851477 1/312278514772Oct.2005N/A2434EF199GM34PT7321/93GEM1.1A312278513870Oc t.2003停产2534EL12234PT7321/93REM1.1A312278513870July.2003停产2634RL18834PT7322/93RL04AAB312278514771/312278514772N/ARunning2734AL 18834PT7333/93RL04AAB312278514771/312278514772N/ARunning2834EF188GM34PT8 319/93GEM1A312278510850N/A停产2934EL12034PT8320/93SEM1A312278510850N/A停产3034EL16334PT8321/93REM1.1AAA312278513870N/A停产3134TA16534PT8322/93REM1.1AAA312278513870N/ARunning3234EF10034PT8419 /93REM1A312278510850N/A停产3334SL28034PT9025/93L05ADec.20053434TS20034PT9420/93REM5A31227851261 0N/A停产3734TS30034PT9421/93REM5.2AAA312278512610Aug.2004生产中29''显象管电视(CRT)序号商务名称产业名称机芯维修手册12NC上市日期停产日期129E1829PT2525/93RL01.1AAA312278513210N/A停产229F1829PT2535/93RL01.1AAA312278513210N/A停产329RF68FX29PT2565/93RL01.1AAA312278513210N/A停产429RF68GMFX29PT2565/93SL01.1AAA312278513210N/A停产526RF6829PT2566/93RL01.1AAA312278513210N/A停产629SL3329PT3123/93RL01.1AACN/A停产729C2829PT3143/93RTC3.2AAAN/ARunning829GM8829PT3224/93RL04AAA3122785 14470N/A停产929RL8829PT3225/93RL04AAA312278514470N/ARunning1029SN8829PT3324/93RL 04AAA312278514470N/A停产1129RF9929PT3523/93RL01.1AACN/A停产1229RF88GM29PT3533/93RL01.1AACN/A停产1329AL8829PT4324/93RL04AAA312278514470N/A停产1429RF9929PT4420/93RL01.1AAA312278513210N/A停产1529RF95LX29PT6211/93TA8.0ABA0停产1629RF9029PT6221/93SA8.0ABA9停产1729RF75GM29PT6221/93TA8.0ABA0停产1829AL18029PT7005/93L04AAB514772Oct.2005N/A1929RL18029PT7015/93L04AA B514772Oct.2005N/A2029SL13329PT7021/93REM1.1A312278513870Sept.2003停产2129SL18029PT7025/93L04AAB514772Oct.2005N/A2229EF199GM29PT7321/93GEM 1.2A312278513880Sept.2003停产2329EL12229PT7321/93REM1.1A312278513870N/A停产2429RL18829PT7322/93GEM1.1A312278513870N/ARunning2529AL18829PT7333/9 3RL04AAB312278514771/312278514772N/ARunning2629EF188GM29PT8319/93GEM1A31 2278510850N/A停产2729EF100LX29PT8319/93REM1A312278510850N/A停产2829EL12029PT8320/93SEM1A312278510850N/A停产2929EL16329PT8321/93REM1.1A312278513870N/A停产3029TA16529PT8322/93REM1.1A312278513870N/A停产3129TA28029PT9025/93L05ADec.20053229TS20029PT9220/93REM5A31227851261 0N/A停产3329TS30029PT9221/93REM5.2AAA312278512610Aug.2004生产中3429RF100HX29PT9418/93GMG3.1A312278510060Apr.2001停产3529RF10029PT9418/93TMG3.1A0停产3629RF100EX29PT9418/93XMG3.1A0停产3729V774KQ4303/93BMD1.97停产25''&21''显象管电视(CRT)序号商务名称产业名称机芯维修手册12NC上市日期停产日期21A921GX1563/93SAnubis-SAA5停产21B921GX1871/93*Anubis-SBB5停产21B921GX1876/93SAnubis-SBB5停产21D921GX3566/93SAnubis-SDD6停产21D821GX3888/93SAnubis-SDD6停产21RF6721PT1324/93RL01.1A312278513210Oct.2003停产21K821PT1381/93SL7.97停产821K8II21PT1582/93RL9.99停产921KG21PT1582/93RL9.99停产1021FC21PT2381/93SL7.98停产1121V721PT238A/93RPV4.97停产1221V821PT238A/93RPV4.96停产1321V8821PT240A/93RPV4.96停产1421V921PT240A/93RPV4.96停产1521S821PT2482/93L7.99停产1621V7II21PT2482/93L7.97停产1721KA21PT2501/93RL01.2AAA484078511160July.2001停产1821KC21PT2502/93RL01.2AAA484078511160N/A停产1921M1821PT2521/93RL01.2AAA484078511160June.2001停产2021RF5021PT2555/93RL01.2A312278512750N/ASept.20032121RF98LX21PT2565 /93RL01.2AAA484078511160July.2001停产2221E821PT3182/93RL9.99停产2321SE21PT3182/93RL9.99停产2421AL8821PT3224/93RL01.1AAC312278513210July.2004July.20052521FCII21 PT3382/93RL9.99停产2621长虹SF21PT3382/93RL9.99停产2721KB21PT3520/93RL9.99停产2821SEm21PT3532/93RL9.99停产2921SEM21PT3532/93RL9.2(2K)0停产3021S8II21PT3888/93RL9.99停产3121RF7021PT3932/93RL9.1(RF)0停产3221RF95LX21PT3932/93SL9.01停产3325B925GX1881/93*Anubis-SBB5停产3425B925GX1886/93SAnubis-SBB5停产3525A1825PT2511/93RL01.1AAA484078511121Sept.2001停产3625M1825PT2521/93RL01.1AAA484078511121July.2001停产3725RF5025PT2565/93RL01.1A312278513210N/ASept.20033825RF6725PT3523/9 3RL01.1A312278513210Sept.2003生产中3925SE25PT3532/93RL9.99停产4025E825PT4182/93RL9.99停产4125A6II25PT4324/93RL9.99停产4225SA25PT4324/93SL9.14840727100081999停产4325V725PT438A/93SPV4.96停产4425H8?25PT4428/93RL7.98停产4525S825PT448A/93L7.98停产4625V7II25PT448A/93L7.98停产4725V825PT448A/93RPV4.96停产4825V8825PT448A/93RPV4.96停产4925B825PT449A/93L7.98停产5025Al8825PT4524/93RL04AAA312278514470July.2004May.20055125A625PT452 8/93RL7.98停产5225H625PT4723/93RL9.99停产5325H8825PT4823/93RL9.99停产5425SHm25PT4823/93SL9.99停产5525S8II25PT4888/93RL9.99停产5625H825PT548A/93SPV4.96停产5721B854KQ4401/93BL7.99停产等离子电视及E-Box(FlatTV&E-Box)序号商务名称产业名称机芯维修手册12NC上市日期停产日期132FD10332FD9944/69SFM23312278512790N/ADec.20032FTV42FD9932/69S42FD9 932/69SFTV1.9AN/A停产342FD3042FD9935/93SFMSept.2003停产442FD10342FD9944/69SFM24312278512770N/ASept.2003542FD10342FD9944/93S FM24312278512770Sept.2003停产642FD5042FD9953/93SFMSept.2003停产730LE16030长虹PF9946/93家电维修家电维修论坛家电维修技术论坛。

45~925MHz二次变频调频接收头从《电子报》上看到有一篇介绍以用普通电视机用高频头为主要元件的二次变频调频接收头,看文章介绍的还可能,遂购得一套.组件完好,元件焊装尚可,高频头采用立式安装,调谐采用一只自带频段开关的100K电位器.于是迫不急待地接上电源和扬声器试机,在调整中才发现,原图中的1K微调电位器在组件中并没有安装,在板子的左下方原预留了一只LED的位置,分析为调谐指示灯.焊上一只LED后发现对接收信号有一定影响,遂去除.初次使用一15V开关电源组件作电源,发现干扰很大,仔细看说明书也发现此组件不能使用开关电源.利用手头一只约30瓦的双15V电源变压器作电源,取其中一组直接输入组件的电源输入端.接入一扬声器试听,总体感觉频率调节不是很精细;究其原因是因为调谐电位器的手柄太细,用一只旧收音机上的手柄套上后感觉好了很多.在调整中也发现了不少的问题:如电源稳压集成块7805和7812发热量较大,为了保证组件工作正常专门加装了一只散热片,工作起来散热片只有微热.组件工作基本正常,可是为组件找一个合适的外壳也着实费了一番脑筋.找来找去也没有找到一个合适的,正好邮购时的外包装还没有丢掉,就用它罢!将变压器装入包装盒内,组件干脆用螺丝固定在盒外面,另设开关和电源指示灯等.扬声器直接安装在外壳上,为了加强散热,采用一只计算机CPU上的小风扇从侧面直吹电路板,供电由变压器的另一组绕组串一只二极管供给.并在外壳上安装一只Q9插座,就可以直接安装1.2米拉杆天线或是上文介绍的八木天线了.最后完成的外观总体评价:接收头的频率接收范围和文章介绍基本一致,就是对于调频收音(88-108MHz)有个别台调不出来.频率调整不是很方便;无频率指示装置,采用文章介绍的用一只表头并在电路上指示大概频率,发现对接收有一定的干扰.个别元件发热量较大,建议安装散热装置.对于接收900M模拟手机时采用拉杆天线比我的八木天线效果要好一些,而且天线的长短对于接收很关键.组件的频率稳定度尚可,此组件作为学习电视机音频接收部分原理或调试发射电路有一定的现实意义.(二)我用45~925MHz二次变频调频接收头(晓晓)暑期,一名调频发烧友送我一个全频接收机的组件,可能他也不知如何安装才送我的。
Portable TV Tuner Monitor Display ScreenPLTV9553 - PLTV1053with Built-in Rechargeable Battery, USB/Micro SD Readers(Analog ATSC/DTV Support)CONTENT1. Safety Precautions (1)2. Accessories (2)3. Instruction for Keys and Interfaces (2)4. Function Keys on Remote Control (3)5. Connection with External Devices (4)6. Description of the Operating Menu (5)(6.1) Select the Input Signal Source (5)(6.2) System Menu Setup (5)(6.2.1) PICTURE (5)(6.2.2) SOUND MENU (5)(6.2.3) TIMEMENU (5)(6.2.4) OPTION MENU (6)(6.2.5) LOCK MENU (6)(6.2.6) CHANNEL (6)7. USB Function Operating Instruction (7)(7.1) PHOTO PLAY (7)(7.2) MUSIC PLAY (7)(7.3) MOVIE PLAY (7)8. Common Troubleshooting (8)9. Technical Speci cations (9)1. Safety Precautions1.1 Storage• This product shall be kept far away from too high or two low temperatures. This product shall be stored at -4 °F-140 °F and its working temperature shall be 23 °F -104 °F.• Do not use this product in wet environment, such as in a bathtub, washbasin, kitchen, sink or basement, swimming pool, etc.• Do not place TV in an environment with high humidity, dust or full of mist.• Do not drop or throw this product.• Avoid strong vibration of the machine to avoid the strong collision withother objects.• Do not squeeze or scratch the product with sharp objects.• The rear recess of the product and the opening in the shell are used forventilation, at the same time, they are used to ensure the reliability ofcomponents and components and avoid overheating. Do not place the TV and power adapter in bed, on sofa, carpet or other similar surface to avoid blocking the radiator opening. Do not place the television and the power adapter near or on heater or heat sources unless it is equipped with acomplete ventilation device; The television and power adapter areprohibited from being placed in an insert-type installation device.• When in use, make sure the TV is at least 3 inches (76 mm) away from walls or other objects.• Please use the specified type of power on the TV label.If you have questions about the type of power source that shall be used, please consult your dealer or local power supply department.• Make sure that the power plug and wire you are using can withstand the sum of the rated current of all the powered products.• Do not place the TV in a place where users can easily touch it.• All the notes and instructions in the guide shall be observed.• Do not overload the power plug or extend the power cord, otherwise itmay cause fire or electric shock.• Do not fix the TV without authorization, because the cabinet is subject to high voltage or other hazards. Qualified service personnel shall be required to repair the TV.• Please unplug the power adapter from the socket and ask qualified service personnel for repair if:1.2 Maintenance • Before cleaning, first, disconnect all the cables of this device.• Wipe the case, screen and keys with a soft cloth soaked with a small amount of mild detergent.• When cleaning the TV, do not use polishing cloths, disinfectants orany kind of fuel or chemical cleaners such as alcohol and gasoline, etc.Attention!• To ensure your own safety and the safety of the people around you, do not watch TV or turn on the TV receiver. It’s dangerous to watch a TV program or use a TV receiver when driving a car.Special Instruction Bright spots and dark spots may appear on the screen. This is normal and related to active matrix screens and is not a symptom of failure. Do not try to conduct technology maintenance yourself. If anything goes wrong, turn the TV receiver o and contact us or your dealer. The device contains a large number of small electronic components. Disassembly or modi cation may cause damage or breakdown to the device.2. Accessories Open the package and check if all the accessories are complete.1. User Guide2. DC / AC Power Adapter3.12V Automotive Adapter4. Remote Control 3. Instruction for Keys and Interfaces3.1 Side Panel1. 12V DC Power Input Port2. Micro SD Memory Card Slot3. Audio-video Input Port4. Headphone Port5. Power Switch6. USB Port7. External Antenna Port5. Audio and Video Combination Cable6. Antenna7. Mounting Bracket8. Battery3.2 Control Keys on the Control Panel1. LCD2. Sound System3. MODE Key: Mode selector switch.4. /CH-Key: Previous / next period / Channel.5. /CH+Key: Previous /period / channel6. OK/MENU Key: Con rm/ Menu7. Remote receiving window8. /VOL - Key: Fast backward / volume decrease button.9. / VOL +: Fast forward / volume increase key.10. Return/LCD/ Key: Turn o the screen/exit menu11. STOP/EXIT Key: Stop watching / recording TVprograms from Menu12. OK Key: Con rm the selected function in the “Settings” menu.13. / Direction Key:Left Key Right Key14. MENU Key: Turn ON/OFF the menu15. RETURN Key: Under TV mode, press this key to return to the recent channel you have watched.16. EPG Key: enter interactive program menu17. VOL+/-Key: Volume up/down key18. Digital Key 0~9: Digital Key0-9 is used for inputting channel number and editing all parameters19. DASH Key: Postfix of program frequency20. CC Key: Turn ON/OFF subtitles21. INFO Key: Look through the information about the current channel22. FAV Key: Turn ON/set the favorite channel23. AUDIO Key: Switch to audio mode or available sound track24. B: MTS Key: NICAM function25-28:Operation key under TV TEXT MODE Control Key under Editing Mode RED Key: Operating according to the information on screenB: PIC Key: Image patternB: SLEEP Key: Sleep function setttingB: ZOOM Key: Narrowing or amplifying images5. Connection with External Devices• Audio - Video input signalAudio-Video Cable Access: Plug the audio-video plug into the audio-video input port and press the INPUT Key. At this point, the input of audio-video signal is complete and the AV symbol is displayed on the screen.• Connecting HeadphonesTo use headphones to listen to music, first volume down, and then insertthe headset, adjustto the right volume. When using headphones, thevolume shall not be too loud, so as not to hurt the hearing.• Connecting the Signal Cable under HDMI ModePlease set the TV to HDMI Mode, then connect the HDMI Cable• Connecting to AC Power SupplyPlug the AC adapter’s AC plug into the power supply (100-240 V, 50-60 Hz AC) socket and the AC adapter’s DC plug into the 12 VDC input port.(12 Volt Car Charger can be used for this device).• USB/SD CARD PlayInsert a USB / SD card into the device and select USB / SD format as theformat of the image / audio / video card included in the card (memorycapacity shall be 32G or less).6. Description of the Operating Menu6.1 Select the Input Signal SourceA. Press “INPUT” key the input signal source details appearB. Press “ / “ key select the signal source press ENTER Key to con rm.C. TV would switch to the mode that you chosen.6.2 System Menu SetupA. Press the Menu Key to enter system setting menu for system setupB. Press direction Key to choose sectionsC. Press / ENTER Key to enter the submenu and choose the option in the menuD. Choose the option and press the Enter Key to con rm and nish the system setupE. Press MENU, return to the main menuF. Press STOP/ EXIT Key, to exit the system setup mode.Attention: If the option is gray, it means the item cannot be set in this mode, please select the options available.6.2.1 PICTURE• Press MENU Key the main menuappears then press key to choosePicture Menu• Picture Menu: Personalized /Dynamic/Standard/Mild.• Color Temperature:Personal/cold/Normal/Warm.• Aspect Ratio:Auto/I6:9/4:3• Noise Reduction:Low/ Middle /High/O .• Screen: Adjust PC picture position6.2.2 SOUND MENU• Press MENU Key the main menuappears then press key to chooseSound Menu• Sound Mode: Standard/Music/Movie/Sports/Personal.• Balance: Adjust the volume of theleft and right loudspeaker• Auto Volume: under this mode,the fast adjustmentwould switch to smooth adjustment• Surround Sound SURROUND /OFF.6.2.3 TIME MENU• Press MENU Key, the main menu appears, then press Key to choose Time Menu• Clock: Adjust the time partDay Month / Year/ Hour / Minute. • Off Time: Setting 60s before off• On Time: Setting to turn off after some minutes(enter the sleeping mode)• Sleep timer:240/180/120/90/60/30/20/10• Choose Time zone6.2.4 OPTION MENU• Press MENU Key, the main menu appears, then press Key to choose Option Menu.• OSD Language: select displayOSD Language• Audio Language: setting theaudio language• Subtitle Language:setting up the subtitle language • Restore Defaultrestore all default settings6.2.5 LOCK MENU• Press MENU Key, the main menu appears, and then press /Key to select Lock Menu.• Before entering settings, please enter the default password (0000) to enter the set value.• Lock System: Enter the password to lock up the critical systemsettings, such as program searches. Before restoring defaults, you shallenter the password and then make the system settings.• Cancel LOCK: Unlock.• Set Password.• Block Channel: Indicates the channel you want to lock.• Parental Guidance: Set the age level of the television program (Age 4-18).6.2.6 CHANNELSearch for TV Programs1. Select DTV / ATV mode.2. Press MENU Key, select Autosearch / ATV Manual Search modeto nd the TV program.3. Select Auto Search and selectSearch Type:DTV + ATV / DTV / ATV.Then select your country, pressEnter to start auto search.4. Press CH + / CH- Key after Auto Scan is completed to select the desired program.• Channel Edit: Set DTV / ATV and channel information.• Signal Information: Check information about the television signal.7. USB Function Operating Instruction: USB Mode (Multimedia).• Press “INPUT or USB” Key to display the input source list, then press Key to select the source, press ENTER Key to confirm and display the multimedia mode. The color of the icon indicates if there is a TV USB DRIVER. Yellow: Yes; Gray: No• Press Key to select the typeof media (Photo/Music/Movie/Text) you want to play.Press ENTER to confirm, and pressKey to move to the directory andselect what you want to play.• Select C and press “ENTER” Keyto enter the submenu.7.1 PHOTO PLAY• Insert the USB DRIVER into theUSB slot.• Press “ / ” Key, select the picture and press “ENTER” Key to enterthe submenu.• Select C and press “ENTER” Keyto enter the submenu.• Select a picture, press Key todisplay the picture, press Key todisplay the last image played,and press Key to display the next image to be played.• Press “STOP / EXIT” Key to exit.7.2 MUSIC PLAY• Insert the USB DRIVER into theUSB slot.• Press “ / ” Key, select MUSICand press “ENTER” Key to enterthe submenu.• Select C and press “ENTER”Key to enter the submenu.• Select music, press Key todisplay, press Key to display thelast song played, and press Keyto show the next song to beplayed.• Press “STOP / EXIT” Key to exit.7.3 MOVIE PLAY• Insert the USB DRIVER into theUSB slot.• Press “ / ” Key, select Movieand press “ENTER” Key to enterthe submenu.• Select C and press “ENTER” Key to enter the submenu.• Select movie, press Key to display, press Key to display the last section played, and press Key to show the next section to be played.• Press “STOP / EXIT” Key to exit.8. Common TroubleshootingThe following phenomenon does not mean that the display has problem. Please check the following items before asking for help from themaintenance department.Notice:• This manual is for reference only.The information in this manual is subject to change without notice.The right to clarify any unknown conditions, errors or omissions is reserved by our company.• No part in this device can be repaired by user.It is forbidden to attempt to open the device housing to remodel the television receiver.Internal components at high voltage can be hazardous to health.Equipment maintenance and adjustment shall be carried out byspecialists.• To avoid personal injury, the product shall be securely fastened to the oor / wall according to the installation instructions.• Do not drip or splash water on this device.Do not place any objects containing liquids such as vases on this device. • Do not place sources of ignition such as lighted candles on the device. • Do not expose this device to extreme heat, such as direct sunlight,flames, etc.PLTV9553 - PLTV1053Portable TV Tuner Monitor Display Screen with Built-in Rechargeable Battery, USB/Micro SD Readers (Analog ATSC/DTV Support)Features:• Digital TV Tuner Television Monitor• Wireless & Portable TV-Tuning Ability• Built-in Rechargeable Battery• User-Friendly Control Interface• Versatile Digital Media File Playback• Digital Picture, Video & Audio Support• Dual Stereo Speakers• Front Panel Button Controls• Image & Audio Configuration Settings• Connection Interface: Audio/Video (AV), USB + Micro SD Readers • Headphone Jack, 3.5mm• Used for Car, Truck & Mobile Vehicle ApplicationsPLTV9553PLTV10539’’ -inch Hi-Res Widescreen Display10’’ -inch Hi-Res Widescreen Display MODEL Display Type:LCD-TFT, 9.0’’ -inchLCD-TFT, 10.1’’ -inch Screen Resolution:800 x 480 Pixels1024 x 600 Pixels Display Monitor Dimensions (L x W x H):9.1’’ x 7.0’’ x 1.3’’ -inches 10.2’’ x 7.4’’ x 1.2’’ -inchesWhat’s in the Box:• Display Monitor• Remote Control• Headphones• TV Antenna• RCA Connection Cable• Cigarette Lighter Plug• Wall Power PlugTechnical Specs:• TV Tuner Support: ATSC-1, Analog / Digital Television (DTV) Receiver• Analog TV Band Range: 55.25-861.25 MHz (TV Channels)• Aspect Ratio: 16:9• Digital Image File Support: JPEG, BMP, PMG• Digital Audio File Support: MP3, WMA• Digital Video File Support: MKV, AVI, DIVX, XVID, MOV, VOB, VOB, FLV, 3GP, DAT, MPEG, MPG, MP4, TS, TRP• USB/Micro SD Support: Up to 32GB• Rechargeable Battery: 3.7V Lithium, 2500mAh• Power Supply: 12V DC (100-240V AC)• Sold as: 1。
外接显示器购买指南如何选择最适合你的外接显示器外接显示器购买指南-如何选择最适合你的外接显示器随着科技的不断进步和电脑应用程序的多元化,外接显示器在我们的生活中变得越来越重要。
无论是用于办公,游戏还是娱乐,选择一款最适合你的外接显示器对于提高工作效率和享受高品质的视觉体验至关重要。
本指南将为你提供选择外接显示器的建议和注意事项。
1. 屏幕尺寸和分辨率外接显示器的屏幕尺寸和分辨率是选择的关键因素之一。
屏幕尺寸通常以英寸为单位(例如24英寸,27英寸等),越大的屏幕可以提供更宽广的视野。
然而,也要考虑你的桌面空间,确保选购的尺寸与你的工作环境相适应。
分辨率指的是屏幕上的像素数量,通常以水平像素和垂直像素表示(例如1920x1080)。
更高的分辨率会提供更清晰和细致的图像,尤其适合图形设计和视频编辑等专业用途。
选择适合你需求的分辨率,同时要考虑你的电脑配置能否支持。
2. 面板类型外接显示器的面板类型影响着图像质量和视角表现。
目前市场上常见的面板类型有TN、IPS和VA。
- TN面板适用于追求更快响应时间和较低价格的用户,但其色彩表现和视角较差。
- IPS面板具有优秀的色彩表现和广阔的视角,适合专业图形设计师和摄影师等对色彩还原要求较高的用户。
- VA面板在色彩还原和视角表现上介于TN和IPS之间,同时提供了更高的对比度,适合欣赏影片和进行游戏等需要良好画质的用户。
3. 刷新率和响应时间刷新率和响应时间是衡量显示器性能的重要指标。
刷新率指的是显示器每秒更新图像的次数,常见的刷新率有60Hz、144Hz等。
较高的刷新率可以提供更流畅和精准的动态图像,适合游戏和观看高画质视频。
响应时间是指液晶显示器在接收到指令后响应的时间,一般以毫秒为单位。
较低的响应时间可以减少图像模糊和残影,对于观看高速运动的视频或进行竞技游戏更为重要。
4. 连接接口和特殊功能在选择外接显示器时,还需要考虑其连接接口和特殊功能。
常见的连接接口包括HDMI、DisplayPort和USB-C等。