MySQL Crash Course 实验指导手册
- 格式:doc
- 大小:1.71 MB
- 文档页数:25

php+mysql活页式实训手册PHP+MySQL是一种常用的Web开发技术组合,能够实现动态网站的设计与开发。
活页式实训手册旨在帮助初学者了解PHP+MySQL的基本原理和使用方法,并通过实际案例进行实训,从而提升学习者的实际操作能力。
以下是关于PHP+MySQL活页式实训手册的详细介绍。
一、PHP简介PHP是一种广泛使用的开源脚本语言,用于Web开发和程序设计。
它可以嵌入HTML中,并通过与MySQL等数据库的交互,实现动态的网页内容生成。
PHP代码在服务器端执行,生成的结果再发送给客户端浏览器。
在实训手册中,我们将介绍PHP的语法、数据类型、运算符、流程控制语句等基本知识,并通过一系列实例来演示如何使用PHP进行数据处理、表单验证、文件操作等常见的Web开发任务。
二、MySQL简介MySQL是一种流行的关系型数据库管理系统,也是开源软件,可以独立使用或与PHP等编程语言结合使用。
MySQL以其高性能、稳定可靠和易于使用而受到广泛的关注和应用。
在实训手册中,我们将介绍MySQL的基本知识,包括数据库的设计、表的创建与管理、数据的插入、查询、更新和删除等操作。
同时,我们还将介绍MySQL的高级特性,如数据库连接池、存储过程、触发器等,以及优化数据库性能的一些建议。
三、实训案例在实训手册中,我们将提供多个实训案例,涵盖从简单到复杂的各种应用场景。
这些案例将帮助学习者逐步掌握PHP+MySQL的使用技巧,并了解如何将二者结合起来进行Web应用的开发。
例如,我们可以从一个简单的用户注册登录系统开始,通过实例介绍如何使用PHP+MySQL来实现用户的注册、登录、密码找回等功能。
然后,我们可以通过一个在线商城的案例来学习如何处理购物车、订单管理等常见的电商功能。
最后,我们还可以通过一个论坛或博客的案例来演示如何实现用户的帖子发布、评论等功能。
通过这些实训案例,学习者可以逐步了解PHP+MySQL的各个方面,从而在实际的Web开发项目中具备一定的技能和经验。

MySQL中文参考手册译者:晏子(clyan@)主页:第一章, 前一章, 下一章, 最后一章,目录.4 安装MySQL本章描述怎样获得并安装MySQL:∙对于你能从其获得MySQL的站点列表,见4.1 怎样获得MySQL。
∙要了解支持哪些平台,见4.2 MySQL支持的操作系统。
∙可获得MySQL的多个版本,以二进制代码和源代码形式分发。
为了确定你应该使用的分发的版本和类型,见4.4 怎样和何时发布更新版本。
∙针对二进制代码和源代码分发的安装指令在 4.6 安装MySQL 二进制代码分发和4.7 安装MySQL 源代码分发讲述。
每套指令均包含一个关于你可能涉及的系统特定问题的部分。
∙为安装后期过程,见4.15 安装后期的设置与测试。
不管你是用一个二进制代码还是源代码分发来安装MySQL,这些过程均适用。
4.1 怎样获得MySQL检查MySQL主页获得当前版本的信息和下载指令。
然而,TcX的因特网链接不是很快的;我们更希望让你从下列镜象站点之一进行真正的下载。
请向webmaster@报告不存在的或过时的镜像站点。
欧洲:∙奥地利[ 维也纳技术大学]WWW ftp∙保加利亚[ Naturella ]ftp∙克罗地亚[ HULK ]WWW ftp∙捷克共和国[ 在Brno的Masaryk大学]WWW ftp∙捷克共和国[ www.sopik.cz ]WWW∙丹麦[ Borsen ]WWW∙丹麦[ SunSITE ]WWW ftp∙爱沙尼亚[ OKinteractive ]WWW∙法国[ minet ]WWW∙芬兰[ EUnet ]WWW∙芬兰[ clinet ]ftp∙德国[ 波恩大学, 波恩]WWW ftp∙德国[ Wolfenbuettel ]WWW ftp∙德国[ Staufen ]WWW∙德国[ Cable & Wireless ]ftp∙希腊[ NTUA , 雅典]WWW ftp∙Island [ GM ]WWW WWW∙意大利[ Teta Srl ]WWW∙爱尔兰[ Ireland On-Line/Dublin ]WWW ftp∙波兰[ Sunsite ]WWW ftp∙葡萄牙[ lerianet ]WWW ftp∙俄国[ DirectNet ]WWW∙俄国[ IZHCOM ]WWW ftp∙俄国[ Scientific Center/Chernogolovka ]ftp∙罗马尼亚[ Timisoara ]WWW ftp∙罗马尼亚[ Bucharest ]WWW ftp∙西班牙[ MasterD ]WWW∙瑞典[ Sunet ]WWW ftp∙瑞士[ Sunsite ]WWW ftp∙英国[ Omnipotent/UK ]WWW ftp∙英国[ PLiG/UK ]WWW ftp∙英国[ SunSITE ]WWW ftp∙乌克兰[ PACO ]WWW ftp北美洲:∙加拿大[ Tryc ]WWW∙加拿大[ Cyberus ]WWW ftp∙美国[ Hurricane Electric/San Jose ]WWW∙美国[ Circle Net/North Carolina ]WWW∙美国[ Gina net/Florida ]WWW∙美国[ pingzero/Los Angeles ]WWW∙美国[ 威斯康星大学/ 威斯康星]WWW ftp∙美国[ DIGEX ]ftp南美洲:∙巴西[ Matrix ]WWW∙智利[ Vision ]WWW亚洲:∙中国[ Freecode ]WWW∙中国[ Netfirm ]WWW∙朝鲜[ KREONet ]WWW∙日本[ Soft Agency ]WWW∙日本[ Nagoya Syouka University ]WWW ftp∙新加坡[ HJC ]WWW ftp∙台湾[ HT ]WWW澳洲:∙澳洲[ AARNet/Queensland ]WWW ftp∙澳洲[ Tas ]WWW ftp∙澳洲[ Blue Planet/Melbourne ]WWW∙澳洲[ ITworks Consulting/Victoria ]WWW非洲:∙南非[ Mweb/ ]WWW∙南非[ The Internet Solution/Johannesburg ]ftp4.2 MySQL 支持的操作系统我们使用 GNU Autoconf,因此将MySQL移植到所有使用 Posix 线程和一个 C++ 编译器的现代系统是可能的。

数据库原理与设计(MySQL版)附录A MySQL实验指导实验一数据库和表的管理一、实验目的1. 了解MySQL数据库的逻辑结构和物理结构的特点。
2. 学会使用SQL语句创建、选择、删除数据库。
3. 学会使用SQL语句创建、修改、删除表。
4. 学会使用SQL语句对表进行插入、修改和删除数据操作。
5. 了解MySQL的常用数据类型。
二、实验内容1. 使用SQL语句创建数据库studentsdb。
2. 使用SQL语句选择studentsdb为当前使用数据库。
3. 使用SQL语句在studentsdb数据库创建数据表student_info、curriculum、grade,三个表的数据结构如表1-表3所示。
表1 student_info表结构表2 curriculum表结构列名数据类型允许NULL值主键课程编号char(4) 否是课程名称varchar(50) 是否学分int 是否表3 grade表结构列名数据类型允许NULL值主键学号char(4) 否是课程编号char(4) 否是分数int 是否4. 使用SQL语句INSERT向studentsdb数据库的student_info、curriculum、grade 表插入数据,各表数据如表4-表6所示。
表4 student_info表的数据表6 grade表的数据学号课程编号分数0001 0001 800001 0002 910001 0003 880001 0004 850001 0005 770002 0001 730002 0002 680002 0003 800002 0004 790002 0005 730003 0001 840003 0002 920003 0003 810003 0004 820003 0005 755.使用SQL语句ALTER TABLE修改curriculum表的“课程名称”列,使之为空。
6. 使用SQL语句ALTER TABLE修改grade表的“分数”列,使其数据类型为decimal(5,2)。

≪MySQ1数据库应用》课程教学大纲课程编号:课程名称:MySQ1数据库应用总学时:64总学分:适用对象:全校各专业先修课程:无一、课程性质、目的和任务MySQ1数据库应用是面向全校各专业学生的选修课程,主要目的是培养学生掌握数据库的基本理论和熟练使用MySQ1数据库软件。
二、教学内容、方法及基本要求掌握数据库的基本理论,熟练使用MySQ1数据库软件完成数据的组织和管理。
1.掌握数据库基础知识数据库管理系统的定义、几种基本的数据库模型、关系数据库、几种常用的关系运算。
2.掌握数据库设计数据库设计步骤、需求分析、概念结构设计、逻辑结构设计。
3.掌握数据定义创建和管理数据库、创建和管理数据表、数据完整性约束。
4.掌握数据操作插入数据、修改数据、删除数据。
5.掌握数据查询数据查询语句、单表查询、聚合函数和数据分组、多表连接查询、子查询、联合查询。
6.掌握视图视图概念、创建和查询视图、操作视图。
7.掌握索引索引的概念和分类、创建索引、查看索引、删除索引。
8.掌握数据库编程技术编程基础知识、存储过程、游标使用、存储函数、触发器、事件。
9.了解事务事务概念、单个事务控制、事务并发控制。
10.了解数据安全用户和数据权限管理、数据备份与数据恢复、日志文件三、实践环节的内容、方法及基本要求1.MySQ1的安装与配置启动和登录MySQ1。
2.数据库设计绘制E-R图,将E-R图中的各个实体集以及实体集之间的联系转换为一组关系模式。
3.数据定义创建数据库并建立表,设置数据完整性约束。
4.数据操作完成插入数据、修改数据、删除数据操作。
5.数据查询使用SQ1语句创建单表、多表查询。
6.使用视图创建视图,使用视图。
7.使用索引针对表中的字段创建不同类型的索引。
8.数据库编程技术使用存储过程、存储函数、游标编写程序,使用触发器。
9.事务在存储过程中实现对数据库操作的事务控制。
10.数据安全实现用户权限管理和数据备份。
四、各教学环节学时分配五、考核方式课程成绩由平时上机实训成绩利期末笔试成绩组成,平时上机实训成绩为30%;期末笔试成绩为70%。
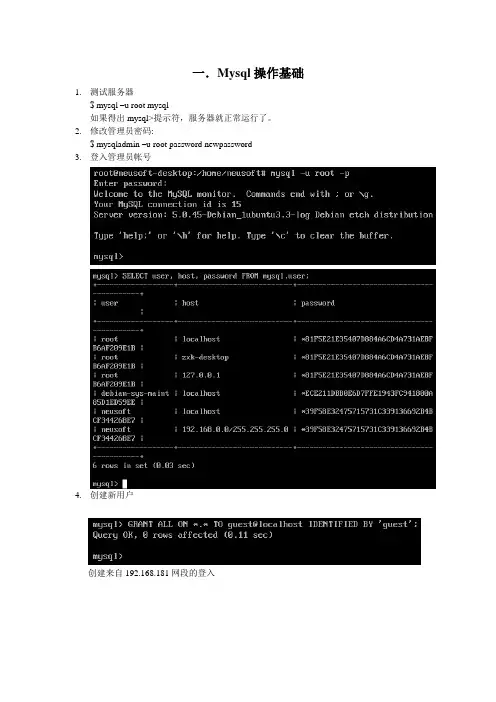
一.Mysql操作基础1.测试服务器$ mysql –u root mysql如果得出mysql>提示符,服务器就正常运行了。
2.修改管理员密码:$ mysqladmin –u root password newpassword3.登入管理员帐号4.创建新用户创建来自192.168.181网段的登入5.创建并使用数据库6.创建表格7. 添加信息到表格里二. c语言访问mysql数据库1.以用户名neusoft和密码neusoft来连接本机服务器上名为neusoftdb的数据库例程1:#include <stdlib.h>#include <stdio.h>#include “mysql.h”int main(int argc, char *argv[]){MYSQL *conn_ptr;conn_ptr = mysql_init(NULL);if (!conn_ptr) {fprintf(stderr, “mysql_init failed\n”);return EXIT_FAILURE;}conn_ptr = mysql_real_connect(conn_ptr, “localhost”, “neusoft”, “neusoft”, “neusoftdb”, 0, NULL, 0);if (conn_ptr){printf(“Connection success\n”);}else{printf(“Connection failed\n”);}mysql_close(conn_ptr);return EXIT_SUCCESS;}编译命令为$gcc –I /usr/include/mysql connect1.c –lmysqlclient –o connect1执行:$ ./connect1Connection success$2. 反馈连接失败错误例程2:#include <stdlib.h>#include <stdio.h>#include “mysql.h”int main(int argc, char *argv[]){MYSQL my_connection;mysql_init(&my_connection);if (mysql_real_connect(&my_connection, “localhost”, “neusoft”, ““, “neusoftdb”, 0, NULL, 0)){printf(“Connection success\n”);mysql_close(&my_connection);}else{fprintf(stderr, “Connection failed\n”);if (mysql_errno(&my_connection)){fprintf(stderr, “Connection error %d: %s\n”, mysql_errno(&my_connection), mysql_error(&my_connection));}}return EXIT_SUCCESS;}执行:$ ./connect2Connection filedConnection error 1045: Access denied for user: …neusoft@localhost‟ (Using password: YES)$3. 插入数据操作#include <stdlib.h>#include <stdio.h>#include “mysql.h”int main(int argc, char *argv[]){MYSQL my_connection;int res;mysql_init(&my_connection);if (mysql_real_connect(&my_connection, “localhost”, “neusoft”, “neusoft”, “neusoftdb”, 0, NULL, 0)){printf(“Connection success\n”);res = mysql_query(&my_connection, “INSERT INTO children(fname, age) V ALUES(…Ann‟, 3)”);if (!res){printf(“Inserted %lu rows\n”, (unsigned long)mysql_affected_rows(&my_connection));}else{fprintf(stderr, “Insert error %d: %s\n”, mysql_errno(&my_connection), mysql_error(&my_connection));}mysql_close(&my_connection);}else{fprintf(stderr, “Connection failed\n”);if (mysql_errno(&my_connection)){fprintf(stderr, “Connection error %d: %s\n”, mysql_errno(&my_connection), mysql_error(&my_connection));}}return EXIT_SUCCESS;}4.查找插入数据内容例程4:#include <stdlib.h>#include <stdio.h>#include “mysql.h”int main(int argc, char *argv[]){MYSQL my_connection;MYSQL_RES *res_ptr;MYSQL_ROW sqlrow;int res;mysql_init(&my_connection);if (mysql_real_connect(&my_connection, “localhost”, “neusoft”, “neusoft”,”neusoftdb”, 0, NULL, 0)){printf(“Connection success\n”);res = mysql_query(&my_connection, “INSERT INTO children(fname, age) V ALUES(…Robert‟, 8)”);if (!res){printf(“Inserted %lu rows\n”, (unsigned long) mysql_affected_rows(&my_connection));}else{fprintf(stderr, “Insert error %d: %s\n”, mysql_errno(&my_connection), mysql_error(&my_connection));}res = mysql_query (&my_connection, “SELECT LAST_INSERT_ID()”);if (res){printf(“SELECT error: %s\n”, mysql_error(&my_connection));}else{res_ptr = mysql_use_result(&my_connection);if (res_ptr){while ((sqlrow = mysql_fetch_row(res_ptr))){printf(“We inserted childNo %s\n”, sqlrow[0]);}mysql_free_result(res_ptr);}}mysql_close(&my_connection);}else{fprintf(stderr, “Connection failed\n”);if (mysql_errno(&my_connecton)){fprintf(stderr, “Connection error %d: %s\n”, mysql_errno(&my_connection), mysql_error(&my_connection));}}return EXIT_SUCCESS;}编译:$ gcc –I/usr/include/mysql insert2.c –lmysqlclient –o insert2$ ./insert2Connection successInserted 1 rowsWe inserted childNo 3$./insert2Connection successInserted 1 rowsWe inserted childNo 45.提取数据例程5:#include <stdlib.h>#include <stdio.h>#include “mysql.h”MYSQL my_connection;MYSQL_RES *res_ptr;MYSQL_ROW sqlrow;int main(int argc, char *argv[]){int res;mysql_init(&my_connection);if (mysql_real_connect(&my_connection, “localhost”, “neusoft”, “neusoft”, “neusoftdb”, 0, NULL, 0)){printf(“Connection success\n”);res = mysql_query(&my_connection, “SELECT childNo, fname, age FROM children WHERE age > 5”);if (res){printf(“SELECT error: %s\n”, mysql_error(&my_connection));}else{res_ptr = mysql_store_result(&my_connection);if (res_ptr){printf(“Retrieved %lu rows\n”, (unsigned long) mysql_num_rows(res_ptr));while ((sqlrow = mysql_fetch_row(res_ptr))){printf(“Fetched data…\n”);}if (mysql_errno(&my_connection)){fprintf(stderr, “Retrive error: %s\n”, mysql_error(&my_connection));}}mysql_free_result(res_ptr);}mysql_close(&my_connection);}else{fprintf(stderr, “Connection failed\n”);if (mysql_errno(&my_connection)){fprintf(stderr, “Connection error %d: %s\n”, mysql_errno(&my_connection), mysql_error(&my_connection));}}retrun EXIT_SUCCESS;}6.显示数据#include <stdlib.h>#include <stdio.h>#include “mysql.h”MYSQL my_connection;MYSQL_RES *res_ptr;MYSQL_ROW sqlrow;void display_header();void display_row();int main(int argc, char *argv[]){int res;int first_row = 1;mysql_init(&my_connection);if (mysql_real_connect(&my_connection, “localhost”, “neusoft”, “neusoft”, “neusoftdb”, 0, NULL, 0)){printf(“Connection success\n”);res = mysql_query(&my_connection, “SELECT childNo, fname, age FROM children WHERE age > 5”);if (res){fprintf(stderr, “SELECT error: %s\n”, mysql_error(&my_connection));}else{res_ptr = mysql_use_result(&my_connection);if (res_ptr){display_header();while ((sqlrow = mysql_fetch_row(res_ptr))){if (first_row){display_header();first_row = 0;}display_row();}if (mysql_errno(&my_connection)){fprintf(stderr, “Retrive error: %s\n”, mysql_error(&my_connection));}}mysql_free_result(res_ptr);}mysql_close(&my_connection);}else{fprintf(stderr, “Connection failed\n”);if (mysql_errno(&my_connection)){fprintf(stderr, “Connection error %d: %s\n”,mysql_errno(&my_connection),mysql_error(&my_connection));}}return EXIT_SUCCESS;}void display_header(){MYSQL_FILED *filed_ptr;printf(“Colum details:\n”);while ((field_ptr = mysql_fetch_field(res_ptr)) != NULL){printf(“\t Name: %s\n”, field_ptr->name);printf(“\t Type: “);if (IS_NUM(field_ptr->type)){printf(“Numeric field\n”);}else{switch (field_ptr->type){。
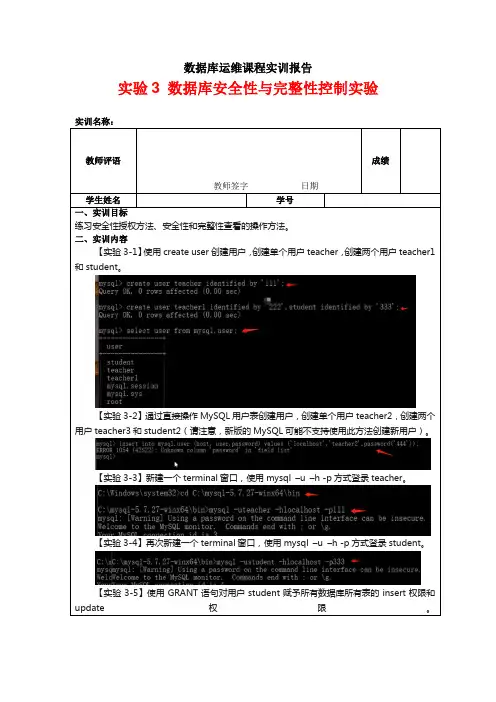
数据库运维课程实训报告实验3 数据库安全性与完整性控制实验实训名称:成绩教师评语教师签字日期学生姓名学号一、实训目标练习安全性授权方法、安全性和完整性查看的操作方法。
二、实训内容【实验3-1】使用create user创建用户,创建单个用户teacher,创建两个用户teacher1和student。
【实验3-2】通过直接操作MySQL用户表创建用户,创建单个用户teacher2,创建两个用户teacher3和student2(请注意,新版的MySQL可能不支持使用此方法创建新用户)。
【实验3-3】新建一个terminal窗口,使用mysql –u –h -p方式登录teacher。
【实验3-4】再次新建一个terminal窗口,使用mysql –u –h -p方式登录student。
【实验3-5】使用GRANT语句对用户student赋予所有数据库所有表的insert权限和update权限。
【实验3-6】使用GRANT语句对用户student赋予school数据库所有表的select权限。
【实验3-7】使用GRANT语句对用户student赋予school数据库stuinfo表的create 访问权限。
【实验3-8】使用GRANT语句对用户student赋予school数据库stuinfo表的stuno 列上的select访问权限。
【实验3-9】使用GRANT语句对用户student赋予s所有数据库所有表的select访问权限,并设定student每小时最多可使用select操作访问数据库的次数。
【实验3-10】查看表INFORMATION_ER_PRIVILEGES中有关student的信息,查看user表中的内容信息。
【实验3-11】查看表INFORMATION_SCHEMA.SCHEMA_PRIVILEGES,找到student在school数据库下拥有的权限。
【实验3-12】查看表INFORMATION_SCHEMA.TABLE_PRIVILEGES,查找school数据库中stuinfo数据表相关的表权限。

MySQL数据库的搭建版本1.0JAVA课程组2009年7月修改记录目录MYSQL数据库的搭建 (1)版本1.0 (1)JAVA课程组 (1)一、MYSQL概述 (4)二、选择MYSQL安装版本 (4)三、MYSQL服务的安装 (4)3.1 解压缩 (4)3.2 配置文件 (4)3.3 安装服务 (5)3.4 启动服务 (5)四、使用命令行客户端连接MYSQL数据库 (6)五、设置密码 (6)六、使用图形化客户端工具 (7)6.1 register database (7)6.2 create database (10)一、MySQL概述Mysql是一个开源的关系数据库管理系统,它体积小,速度快,而且是开源的,目前被广泛应用在中小型网站。
二、选择MySQL安装版本MySQL支持多种操作系统平台,我们以微软Windows版本作为示例,并且为了更好的了解MySQL,我们选择压缩版的安装包,可以从MySQL的官方网站()下载最新版本,在学院的FTP上也有一个我们教学过程中使用的版本,地址是:ftp:///Java/software/tools/。
三、MySQL服务的安装3.1 解压缩将下载的mysql服务器安装包mysql-noinstall-5.0.77-win32.zip解压到你选择的目录(本例中我还是放在E盘的根目录下面)。
3.2 配置文件进入到解压的目录下,看到里面有5个配置文件,分别是:my-small.ini、my-medium.ini、my-large.ini 、my-huge.ini、my-innodb-heavy-4G.ini。
这些都是官方给出的经过优化的配置文件,我们可以根据自己系统的需要选择一个:●my-small.ini 小型负载的配置(内存<=64M)●my-medium.ini 中型负载的配置(内存<=128M)●my-large.ini 负载比较大的配置(内存=512M)●my-huge.ini巨大负载的配置(1G<=内存<=2G)●my-innodb_heavy_4G.ini 高负荷大型事务的配置(内存>=4G)在这里我们选择使用my-small.ini作为我们的配置文件。

MySQL数据库技术与实验指导(第1版)钱雪忠、王燕玲、张平编著清华大学出版社2011.09实验1 数据库系统基础操作进入MySQL的官方下载页面:/downloads/如果想找旧的发布版本,可进入页面:/archives.php例1-1 有一个脚本文件(test.sql),文件内容:Show databases;Create database test;Use test;Create table table_1( I int ) ENGINE = MyISAM;执行之。
解:C:\> mysql -h localhost -u root -p <c:\test.sql或mysql> source c:\test.sql实验2 MySQL数据库基础操作例2-1 创建jxgl数据库。
解:mysql>create database jxgl;例2-2 查看本机服务器上数据库。
解:mysql>show databases;或:mysql>show databases like 'my%';例2-3 进入jxgl数据库。
解:mysql> USE jxgl;例2-4 在命令行环境中,创建和删除数据库jxgl:解:创建数据库:C:\> mysqladmin -h localhost -u root -p create jxgl删除数据库:C:\> mysqladmin -h localhost -u root -p drop jxgl实验3 表、ER图、索引与视图的基础操作CREATE TABLE IF NOT EXISTS `jxgl`.`sc`(`sno` CHAR(7) NOT NULL ,`cno` CHAR(2) NOT NULL ,`grade` INT NULL ,PRIMARY KEY (`sno`,`cno`),INDEX `sc_ibfk_1`(`sno` ASC),INDEX `sc_ibfk_2`(`cno` ASC) , CONSTRAINT `sc_ibfk_1` FOREIGN KEY(`sno`) REFERENCES `jxgl`.`student`(`sno`) ON DELETE RESTRICT ON UPDATE RESTRICT,CONSTRAINT `sc_ibfk_2` FOREIGN KEY(`cno`) REFERENCES `jxgl`.`course` (`cno`) ON DELETE RESTRICT ON UPDATE RESTRICT) ENGINE = InnoDB;例3-1 列出jxgl数据库中所有表。

数据库系统实验指导书《数据库系统原理》实验指导书⽬录实验⼀数据库的定义、建⽴和维护 (3)实验⼆数据库的简单查询和连接查询 (11)实验三数据库的组合查询和统计查询 (14)实验四视图的定义和使⽤ (16)实验五触发器和存储过程的定义和使⽤ (19)实验六嵌⼊式SQL的使⽤ (24)实验七数据库设计 (30)实验⼋数据完整性和安全性 (31)实验⼀数据库的定义、建⽴和维护⼀、实验⽬的1、掌握使⽤SQL Server 企业管理器、SQL 创建数据库、基本表和修改基本表的结构;2、掌握使⽤SQL Server 企业管理器、SQL 向数据库表输⼊数据、修改数据和删除数据的操作。
⼆、实验内容1、创建数据库和查看数据库属性;2、创建学⽣表、课程表和选课表,为主键创建索引;3、查看和修改表结构;4、通过企业管理器,在学⽣选课数据库中的学⽣、课程和选课3 个表中,各输⼊10条以上记录;5、通过企业管理器对学⽣选课数据库的学⽣、课程和选课3 个表中的数据进⾏插⼊、删除和修改操作;三、实验步骤1、创建数据库(1)使⽤企业管理器建⽴数据库的步骤1)从“开始”菜单中依次选取“所有程序”、“Microsoft SQL Server”、“企业管理器”。
2)选中需要在其上创建数据库的服务器,点击前⾯的“+”号,使其展⽰为树形⽬录。
3)选中“数据库”⽂件夹,单击⿏标右键,在弹出菜单上选择“新建数据库”,如图1-1 所⽰:图1-1 创建数据库(1)随后在数据库属性对话框的常规页⾯中,输⼊数据库名“学⽣选课”,如图1-2 所⽰:数据库属性对话框有3 个页⾯:常规页码、数据⽂件页⾯和事务⽇志页码。
分别⽤来义数据库名、数据⽂件属性和⽇志⽂件属性。
请结合帮助⽂档,了解这些页⾯中选项的含义。
4)单击“确定”按钮,关闭对话框。
在企业管理器窗⼝中出现“学⽣选课”数据库标志,表明已经成功创建数据库。
5) SQL Server 企业管理器中,右键单击“学⽣选课”数据库,在弹出菜单中选择“属性”,将弹出⼀个对话框,显⽰“学⽣选课”数据库的属性。

《Mysql实验手册》目录第一章Mysql在Windows上安装 (3)第一节安装环境 (3)第二节Mysql版本和程序包 (3)第三节具体安装步骤 (4)第四节Mysql服务启动 (19)第二章Mysql常用配置 (20)第一节Mysql命令行客户端配置数据库 (20)1.登陆Mysql数据库 (20)第二节Mysql客户端工具 (21)1.MySQL-Front的安装 (22)2.创建用户 (28)3.数据表的基本操作 (30)第三章Mysql实验 (36)第一节实验一创建数据库 (37)第二节实验二创建用户 (38)第三节实验三创建表 (39)第四节实验四增加主键 (40)第五节实验五插入记录 (41)第六节实验六更新记录 (43)第七节实验七删除记录 (44)第八节实验八单表查询 (45)第九节实验九分组查询 (46)第十节实验十联合查询 (47)第十一节实验十一查询平均分 (48)第十二节实验十二联合查询排序 (49)第十三节实验十三联合查询最大值、最小值 (50)第十四节实验十四删除表 (51)第十五节实验十五增加字段 (52)第十六节实验十六修改字段名称 (53)第十七节实验十七修改字段属性 (54)第十八节实验十八删除字段 (55)第十九节实验十九导入导出数据 (55)1.导出数据mysqldump (56)2.mysqlimport命令 (56)3.导入数据 (57)4.将文本数据导入数据库 (57)第一章Mysql在Windows上安装第一节安装环境Windows XP操作系统上安装。
第二节Mysql版本和程序包Mysql版本:Mysql 5.5.27安装程序包:MySql安装包.zip(下载地址:/s/1qXAax68 访问密码1vsy)第三节具体安装步骤将安装程序包拷贝到电脑上,然后解压。
选中mysql-5.5.27-winx64(或mysql-5.5.27-winx32)进行安装。
实验一MySQL基础实验目的和要求:(1)熟练掌握MySQL Admin GUI的基本操作。
(2)熟悉MySQL的数据类型、数据的存储方式及各种类型的函数和表达式。
(3)掌握表结构的创建方法和修改方法。
(4)掌握向表中追加记录的各种方法。
(5)掌握表记录的浏览方法。
(6)掌握表的结构和记录的赋值方法。
(7)掌握记录字段的替换和更新方法。
(8)掌握记录的筛选和字段的筛选方法。
实验内容:(1)完成进入MySQL Admin GUI 系统和退出MySQL Admin GUI 系统操作。
(2)浏览MySQL Admin GUI的主菜单项和子菜单。
(3)完成数据库检查、数据库优化、数据库自动修复等操作。
(4)熟悉MySQL的系统环境和重要的性能参数。
(5)了解数据库的编码机制,掌握如何部署一个适合应用的数据库。
(6)利用SQL计算和输出各种表达式的值。
(7)设计一张二维表。
(8)建立一个数据表。
(9)对已有的表进行数据输入、记录显示和修改、追加记录、记录定位等操作。
(10)对已有的表进行逻辑删除记录和物理删除记录等操作。
(11)在已有表的基础上,使用ALTER TABLE命令实现表结构的更改。
(12)在已有表的基础上。
实现使用INSERT-SELECT命令达到不同的表记录的拷贝结果。
(13)使用CREATE-SELECT命令实现表数据的复制,观察Insert命令后接不同WHERE参数的运行结果。
(14)使用UPDATE命令实现单条记录和多条记录的替换。
实验二MySQL数据库设计及应用实验目的和要求:(1)掌握索引ALTER TABLE ADD KEY命令的创建和使用方法。
(2)掌握MySQL Admin GUI中索引建立的方法。
(3)掌握分析查询内容并优化索引的方法。
(4)掌握SELECT-SQL命令的用法。
(5)掌握创建数据库、数据库中的表间关联关系的建立、字段值的有效性规则等有关数据库操作的内容。
(6)掌握视图的建立、修改、运行。
MySQL for Database AdministratorsStudent Guide - Volume ID61762GC51 | D108205Copyright © 2020, Oracle and/or its affiliates. All rights reserved. DisclaimerThis document contains proprietary information and is protected by copyright and otherintellectual property laws. You may copy and print this document solely for your own use in an Oracle training course. The document may not be modified or altered in any way. Except where your use constitutes "fair use" under copyright law, you may not use, share, download, upload, copy, print, display, perform, reproduce, publish, license, post, transmit, or distribute this document in whole or in part without the express authorization of Oracle. The information contained in this document is subject to change without notice. If you find any problems in the document, please report them in writing to: Oracle University, 500 Oracle Parkway, Redwood Shores, California 94065 USA. This document is not warranted to be error-free. Restricted Rights Notice If this documentation is delivered to the United States Government or anyone using the documentation on behalf of the United States Government, the following notice is applicable: U.S. GOVERNMENT RIGHTS The U.S. Government’s rights to use, modify, reproduce, release, perform, display, or disclose these training materials are restricted by the terms of the applicable Oracle license agreement and/or the applicable U.S. Government contract. Trademark Notice Oracle and Java are registered trademarks of Oracle and/or its affiliates. Other names may be trademarks of their respective owners.AuthorKimSeong Loh Technical ContributorsGuilherme SaraivaJesper Wisborg KroghJonathon CoombesLig Isler-TurmelleMirko OrtensiRyan KuanEditorsMoushmi MukherjeeAju KumarGraphic DesignerKavya BellurPublishersSujatha NagendraPavithran AdkaSyed Ali5102272020Contents1 Introduction to MySQLObjectives 1-2Course Goals 1-3Course Lesson Map 1-5Introductions 1-6Classroom Environment 1-7MySQL Powers the Web 1-8MySQL Market Share: DB-Engines 2019 1-9MySQL Enterprise Edition 1-10Oracle Premier Support for MySQL 1-11MySQL and Oracle Integration 1-12MySQL Websites 1-13Community Resources 1-14Oracle University: MySQL Training 1-15MySQL Certification 1-16Summary 1-17Practices 1-182 Installing and Upgrading MySQLObjectives 2-2Topics 2-3Installation Sequence 2-4Installing MySQL from Downloaded Packages 2-5MySQL RPM Installation Files for Linux 2-6MySQL RPM Installation Process 2-7MySQL DEB Installation 2-8Linux Distribution–Specific Repositories 2-9Installing MySQL by Using a Package Manager 2-10 Adding a Yum Repository 2-11Configuring Yum Repository Versions 2-12Adding an APT Repository 2-13Configuring Repository Versions 2-14Manually Configuring the APT Repositories 2-15Installing MySQL on Windows 2-16Installing on Windows: MySQL Installer 2-17Installing on Windows: Selecting Products and Features 2-18 Installing on Windows: Product Configuration 2-19Installing MySQL as a Windows Service 2-20Installing MySQL from Source 2-21Installing MySQL from Binary Archive 2-22Deploying MySQL Server with Docker 2-25Quiz 2-27Topics 2-28Linux MySQL Server Installation Directories 2-29Windows MySQL Server Installation Directory 2-30MySQL Programs 2-31mysqld: MySQL Server Process 2-32Installation Programs 2-33Utility Programs 2-34mysql_config_editor 2-35f Format 2-36Login Paths 2-37Command-Line Client Programs 2-38Launching Command-Line Client Programs 2-39Topics 2-40Configuring Mandatory Access Control 2-41SELinux Example 2-42AppArmor: Example 2-43Changing the root Password 2-44Using mysqladmin to Change the root Password 2-45Quiz 2-46Topics 2-47Starting and Stopping MySQL 2-48Stopping MySQL with mysqladmin 2-49MySQL Service Files 2-50Starting and Stopping MySQL on Windows 2-51Starting and Stopping MySQL on Windows: MySQL Notifier 2-52 Topics 2-53Upgrading MySQL 2-54Reading Release Notes 2-55MySQL Shell Upgrade Checker Utility 2-56Using In-Place Upgrade Method 2-57Using Logical Upgrade Method 2-58mysql_upgrade 2-59Summary 2-60Practices 2-613 Understanding MySQL ArchitectureObjectives 3-2Topics 3-3Architecture 3-4Client/Server Connectivity 3-5MySQL Server Process 3-6Terminology 3-7Server Process 3-8Topics 3-9Connection Layer 3-10Connection Protocols 3-11Local and Remote Connection Protocol: TCP/IP 3-12Local Connection Protocol in Linux: Socket 3-13MySQL and localhost 3-14Local Connection Protocols in Windows: Shared Memory and Named Pipes 3-15 SSL by Default 3-16Connection Threads 3-17Quiz 3-18Topics 3-19SQL Layer 3-20SQL Layer Components 3-21SQL Statement Processing 3-22Topics 3-23Storage Layer 3-24Storage Engines Provided with MySQL 3-25Storage Engines: Function 3-26SQL and Storage Layer Interactions 3-27Features Dependent on Storage Engine 3-28InnoDB Storage Engine 3-30MyISAM Storage Engine 3-31MEMORY Storage Engine 3-32ARCHIVE Storage Engine 3-33NDBCluster Storage Engine 3-34BLACKHOLE Storage Engine 3-35Storage Engines Feature Summary 3-36How MySQL Uses Disk Space 3-38Data Directory 3-39Topics 3-40What Is a Data Dictionary? 3-41Types of Metadata 3-42Data Dictionary in Earlier Versions of MySQL 3-43Transactional Data Dictionary in MySQL 8 3-44Transactional Data Dictionary: Features 3-45Serialization of the Data Dictionary 3-46Dictionary Object Cache 3-47Topics 3-48InnoDB Tablespaces 3-49InnoDB System Tablespace 3-50File-per-Table Tablespaces 3-51General Tablespaces 3-52Choosing Between File-Per-Table and General Tablespaces 3-53 Locating Tablespaces Outside the Data Directory 3-54Temporary Tablespaces 3-55Topics 3-56Redo Logs 3-57Undo Logs 3-59Undo Tablespaces 3-61Temporary Table Undo Log 3-62Quiz 3-63Topics 3-64How MySQL Uses Memory 3-65Global Memory 3-67Session Memory 3-68Log Files and Buffers 3-69InnoDB Buffer Pool 3-70Configuring the Buffer Pool 3-71Topics 3-72MySQL Plugin Interface 3-73MySQL Component Interface 3-74Summary 3-75Practices 3-764 Configuring MySQLObjectives 4-2Topics 4-3MySQL Configuration Options 4-4Deciding When to Use Options 4-5Displaying Configured Server Options 4-6Option Naming Convention 4-7Using Command-Line Options 4-8Topics 4-9Reasons to Use Option Files 4-10Option File Locations 4-11Option Files That Each Program Reads 4-12Standard Option Files 4-13Option File Groups 4-14Option Groups That Each Program Reads 4-15Option Group Names 4-16Client Options: Examples 4-17Writing Option Files 4-18Option File Contents: Example 4-19Option Precedence in Option Files 4-20Loading or Ignoring Option Files from the Command Line 4-21 Loading Option Files with Directives 4-22Displaying Options from Option Files 4-23Quiz 4-24Topics 4-25Server System Variables 4-26System Variable Scope: GLOBAL and SESSION 4-27Dynamic System Variables 4-28Changing Variable Values 4-29Persisting Global Variables 4-30Displaying System Variables 4-31Viewing Variables with Performance Schema 4-32Topics 4-34Launching Multiple Servers on the Same Host 4-35Settings That Must Be Unique 4-36mysqld_multi 4-37mysqld_multi: Example Configuration File 4-38systemd: Multiple MySQL Servers 4-39Quiz 4-40Summary 4-41Practices 4-425 Monitoring MySQLObjectives 5-2Topics 5-3Monitoring MySQL with Log Files 5-4Log File Characteristics 5-5Error Log 5-6Binary Log 5-7General Query Log 5-8General Query Log: Example 5-9Slow Query Log 5-10Slow Query Log: Logging Administrative and Replicated Statements 5-11 Filtering Slow Query Log Events 5-12Slow Query Log: Example 5-13Viewing the Slow Query Log with mysqldumpslow 5-14 mysqldumpslow: Example 5-15Specifying TABLE or FILE Log Output 5-16Log File Rotation 5-17Flushing Logs 5-18Quiz 5-19Topics 5-20Status Variables 5-21Displaying Status Information 5-22Monitoring Status with mysqladmin 5-23Topics 5-24Performance Schema 5-25Performance Schema Table Groups 5-26Configuring Performance Schema 5-27Performance Schema Setup Tables 5-28Performance Schema Instruments 5-29Top-Level Instrument Components 5-30Accessing Performance Schema Metrics 5-31The sys Schema 5-32Using the sys Schema Example 1 5-33Using the sys Schema: Example 2 5-36Topics 5-37MySQL Enterprise Audit 5-38Installing MySQL Enterprise Audit 5-39Audit Log File Configuration 5-40Audit Log Filtering 5-41Audit Log Filter Definitions 5-42Audit Log File Format 5-43Audit Log File: New-Style XML Format 5-44Audit Log File: JSON Format 5-45Audit Record Values 5-46Quiz 5-47Topics 5-48MySQL Enterprise Monitor 5-49Installing MySQL Enterprise Monitor 5-50Installing the Service Manager 5-51Post-Installation Configuration 5-53Installing Agents 5-54MySQL Enterprise Monitor: Managing Multiple Servers 5-55 MySQL Enterprise Monitor: Timeseries Graphs 5-56MySQL Enterprise Monitor: Advisors 5-57MySQL Enterprise Monitor: Events 5-58Topics 5-59SHOW PROCESSLIST 5-60Performance Schema Threads Table 5-61Killing Processes 5-62Limiting User Activity 5-63Setting Resource Limits 5-64Resetting Limits to Default Values 5-65Summary 5-66Practices 5-676 Managing MySQL UsersObjectives 6-2Topics 6-3Importance of User Management 6-4Authentication and Authorization 6-5User Connection and Query Process 6-6Viewing User Account Settings 6-7Pluggable Authentication 6-8Local Connection 6-9Remote Connection 6-10Topics 6-11Account Names 6-12Host Name Patterns 6-13Creating a User Account 6-14Roles 6-15Creating a Role 6-16Manipulating User Accounts and Roles 6-17Topics 6-18Setting the Account Password 6-19Dual Password Support 6-20Expiring Passwords Manually 6-21Configuring Password Expiration 6-22Changing Expired Passwords 6-23Quiz 6-24Topics 6-25Pluggable Authentication 6-26Cleartext Client-Side Authentication Plugin 6-27 Loadable Authentication Plugins 6-28 Enterprise Authentication Plugins 6-29PAM Authentication Plugin 6-30Configuring the PAM Authentication Plugin 6-31 Creating Users that Authenticate with PAM 6-32 Creating PAM Proxied Users 6-33Logging In with PAM Accounts 6-34Topics 6-35Authorization 6-36Determining Appropriate User Privileges 6-37 Privilege Scope 6-38Granting Administrative Privileges 6-39 Dynamic Privileges 6-40Special Privileges 6-41GRANT Statement 6-42Granting Permissions on Columns 6-43 Granting Roles to Users 6-44Displaying GRANT Privileges 6-45Displaying Privileges for Another User 6-46 Displaying Privileges for a Role 6-47Revoking Account Privileges 6-48REVOKE: Examples 6-49Partial Revoke 6-51User Privilege Restrictions 6-52Quiz 6-53Topics 6-54Using Role Privileges 6-55Activating Roles at Server Level 6-56 Activating Roles at User Level 6-57Activating Roles at Session Level 6-58 Mandatory Roles 6-59Topics 6-60Grant Tables 6-61Grant Table Contents 6-62Use of Grant Tables 6-63Effecting Privilege Changes 6-64Summary 6-65Practices 6-667 Securing MySQLObjectives 7-2Topics 7-3Security Risks 7-4MySQL Installation Security Risks 7-5Topics 7-6Securing MySQL from Public Networks 7-7Preventing Network Security Risks 7-8Securing MySQL in Private Networks 7-9Topics 7-10Secure Connections 7-11Secure Connection: Overview 7-12Generating a Digital Certificate 7-13Server Security Defaults 7-14SSL Is Enabled by Default with MySQL Clients 7-15Disabling SSL on MySQL Server 7-16Setting Client Options for Secure Connections 7-17Client --ssl-mode Option: Example 7-18Setting the Permitted Versions for SSL/TLS for the Server 7-19Setting the Permitted Versions for SSL/TLS for the Client 7-20Setting the Cipher to Use for Secure Connections 7-21Global System Variable and Session Status Variables for Ciphers 7-22 Cipher System and Status Variables: Example 1 7-23Cipher System and Status Variables: Example 2 7-24Setting Client SSL/TLS Options by User Account 7-25Generating a Digital Certificate 7-26SSL Server Variables for Digital Certificates 7-27SSL Client Options for Digital Certificates 7-28Securing a Remote Connection to MySQL 7-29Quiz 7-30Topics 7-31Preventing MySQL Password Security Risks 7-32How Attackers Derive Passwords 7-33Password Validation Component 7-34Validate Password Component Variables 7-35Changing the Default Password Validation Variables 7-36Other Password Considerations 7-37Locking an Account 7-38Pluggable Authentication 7-39Preventing Application Password Security Risks 7-40Connection-Control Plugin 7-41Installing the Connection-Control Plugin 7-42Monitoring Connection Failures 7-43Using the CONNECTION_CONTROL_FAILED_LOGIN_ATTEMPTS Plugin 7-44 Quiz 7-45Topics 7-46Limiting Operating System Usage 7-47Limiting Operating System Accounts 7-48Operating System Security 7-49File System Security 7-50Preventing File System Security Risks 7-51Topics 7-52Keyring 7-53Deploying a Keyring 7-54Key Management Functions 7-55Encrypting InnoDB Tablespaces 7-56Encrypting InnoDB Redo Logs and Undo Logs 7-57InnoDB Encryption Keys 7-58Encrypting Binary Log and Relay Log 7-59Binary Log Encryption Keys 7-60Topics 7-61Protecting Your Data from SQL Injection Attacks 7-62SQL Injection: Example 7-63Detecting Potential SQL Injection Attack Vectors 7-64Preventing SQL Injection Attacks 7-65Topics 7-66MySQL Enterprise Firewall 7-67Enterprise Firewall Plugins 7-68Enterprise Firewall Database Components 7-69Installing MySQL Enterprise Firewall 7-70Registering Accounts with the Firewall 7-71Training the Firewall 7-72Statement Digests 7-73Enabling Firewall Protection 7-74Disabling the Firewall 7-75Monitoring the Firewall 7-76Quiz 7-77Summary 7-78Practices 7-798 Maintaining a Stable SystemObjectives 8-2Topics 8-3Stable Systems 8-4Measuring What You Manage 8-5Establishing a Baseline 8-6Application Profiling 8-7Topics 8-8Asking “What Could Go Wrong?” 8-9Components in a MySQL Server Installation 8-10Server Hardware 8-11Problems with Hardware 8-12Virtualized Environment 8-13Operating System 8-14Coexistent Applications 8-15Network Failures 8-16Application Failures 8-17Force Majeure 8-18Topics 8-19Capacity Planning 8-20Monitoring Table Size 8-21Calculating Logical Size: Data and Indexes 8-22Calculating Physical Size: Querying Information Schema 8-23 Calculating Physical Size: Reading the File System 8-24Scalability 8-25Scaling Up and Scaling Out 8-26Quiz 8-27Topics 8-28Establishing the Nature of a Problem 8-29Identifying the Problem 8-30Common Problems 8-31Resolving Problems 8-32Topics 8-33Identifying the Causes of Server Slowdowns 8-34Investigating Slowdowns 8-35Quiz 8-36Topics 8-37How MySQL Locks Rows 8-38Identifying Lock Contention 8-39InnoDB Table Locks 8-40InnoDB Row Locks 8-41Troubleshooting Locks by Using SHOW PROCESSLIST 8-42Monitoring Data Locks with Information Schema and Performance Schema 8-43 Information Schema INNODB_TRX View 8-44Performance Schema data_locks Table 8-45Performance Schema data_lock_waits Table 8-47sys.innodb_lock_waits View 8-48sys.innodb_lock_waits: Example Query 8-49Performance Schema metadata_locks Table 8-50sys.schema_table_lock_waits View 8-51Topics 8-52InnoDB Recovery 8-53Using --innodb_force_recovery 8-54Summary 8-55Practices 8-569 Optimizing Query PerformanceObjectives 9-2Topics 9-3Identifying Slow Queries 9-4Choosing What to Optimize 9-5Topics 9-6Using EXPLAIN to See Optimizer’s Choice of Index 9-7EXPLAIN: Example 9-8EXPLAIN Output 9-9Common type Values 9-11Displaying Query Rewriting and Optimization Actions 9-12EXPLAIN Example: Table Scan 9-13EXPLAIN Example: Primary Key 9-14EXPLAIN Example: Non-unique Index 9-15EXPLAIN and Complex Queries 9-16EXPLAIN Example: Simple Join 9-17Explanation of Simple Join Output 9-18EXPLAIN FORMAT 9-19EXPLAIN FORMAT: JSON Example 9-20EXPLAIN ANALYZE 9-21Hash Join Optimization 9-22Topics 9-23Index Types 9-24Creating Indexes to Improve Query Performance 9-25Creating Indexes on Existing Tables 9-26Dropping Indexes on Existing Tables 9-27Displaying Indexes Metadata 9-28Invisible Indexes 9-29Topics 9-30Maintaining InnoDB Index Statistics 9-31Automatically Updating Index Statistics 9-32Using ANALYZE TABLE 9-33Rebuilding Indexes 9-34mysqlcheck Client Program 9-35Histograms 9-36Example: The Query 9-37Example: Creating a Histogram 9-38Example: The Query with Histogram Data 9-39 Topics 9-40MySQL Query Analyzer 9-41Query Response Time Index 9-42Query Analyzer User Interface 9-43Quiz 9-44Summary 9-45Practices 9-4610 Choosing a Backup StrategyObjectives 10-2Topics 10-3Reasons to Back Up 10-4Backup Types 10-5Hot Backups 10-6Cold Backups 10-7Warm Backups 10-8Quiz 10-9Topics 10-10Backup Techniques 10-11Logical Backups 10-12Logical Backup Conditions 10-14Logical Backup Performance 10-15Physical Backups 10-16Physical Backup Files 10-17Physical Backup Conditions 10-18Online Disk Copies 10-19Snapshot-Based Backups 10-20Performing a Snapshot 10-21Replication-Based Backups 10-22Binary Log Backups 10-23Binary Logging and Incremental Backups 10-24Quiz 10-25Topics 10-26Comparing Backup Methods 10-27Deciding a Backup Strategy 10-28Backup Strategy: Decision Chart 10-29More Complex Strategies 10-30Summary 10-31Practices 10-3211 Performing BackupsObjectives 11-2Topics 11-3Backup Tools: Overview 11-4Topics 11-5MySQL Enterprise Backup 11-6MySQL Enterprise Backup: Storage Engines 11-7MySQL Enterprise Backup: InnoDB Files 11-8MySQL Enterprise Backup: Non-InnoDB Files 11-9Full Backups 11-10Single-File Backups 11-11Backup Process 11-12Incremental Backups 11-13Differential Backups 11-14Validate Operations 11-15Restore Operations 11-16Restore Commands 11-17Restoring Incremental Backups 11-18Update Operations 11-19Single-File Operations 11-20Basic Privileges Required for MySQL Enterprise Backup 11-21 Granting Required Privileges 11-22Quiz 11-23Topics 11-24mysqldump and mysqlpump 11-25mysqldump 11-26Ensuring Data Consistency with mysqldump 11-27mysqldump Options for Creating Objects 11-28mysqldump Options for Dropping Objects 11-29mysqldump General Options 11-30Restoring mysqldump Backups 11-31Using mysqlimport 11-32Privileges Required for mysqldump 11-33Privileges Required for Reloading Dump Files 11-34mysqlpump 11-35Specifying Objects to Back Up with mysqlpump 11-36Parallel Processing with mysqlpump 11-37Quiz 11-38Topics 11-39Physical InnoDB Backups: Overview 11-40Portability of Physical Backups 11-41Physical InnoDB Backup Procedure 11-42Recovering from Physical InnoDB Backups 11-43Using Transportable Tablespaces for Backup 11-44Transportable Tablespaces: Copying a Table to Another Instance 11-45 Physical MyISAM and ARCHIVE Backups 11-46Physical MyISAM and ARCHIVE Backup Procedure 11-47Recovering from Physical MyISAM or Archive Backups 11-48LVM Snapshots 11-49LVM Backup Procedure 11-50Backing Up Log and Status Files 11-51Topics 11-52Replication as an Aid to Backup 11-53Backing Up from a Replication Slave 11-54Backing Up from Multiple Sources to a Single Server 11-55Topics 11-56Processing Binary Log Contents 11-57Selective Binary Log Processing 11-58Point-in-Time Recovery 11-59Configuring MySQL for Restore Operations 11-60Quiz 11-61Summary 11-62Practices 11-6312 Configuring a Replication TopologyObjectives 12-2Topics 12-3MySQL Replication 12-4Replication Masters and Slaves 12-5Relay Slaves 12-6Complex Topologies 12-7Quiz 12-8Topics 12-9Replication Conflicts 12-10Replication Conflicts: Example Scenario with No Conflict 12-11 Replication Conflicts: Example Scenario with Conflict 12-12Topics 12-13Replication Use Cases 12-14Replication for Horizontal Scale-Out 12-15Replication for Business Intelligence and Analytics 12-16Replication for Geographic Data Distribution 12-17Replicating with the BLACKHOLE Storage Engine 12-18Replication for High Availability 12-19Topics 12-20Configuring Replication 12-21Configuring Replication Masters 12-22Configuring Replication Slaves 12-23CHANGE MASTER TO 12-24Finding Log Coordinates 12-25Global Transaction Identifiers (GTIDs) 12-26Identifying the Source Server 12-27Logging Transactions 12-28Replication with GTIDs 12-29Replication Filtering Rules 12-30Applying Filtering Rules 12-31Quiz 12-32Topics 12-33Binary Log Formats 12-34Row-Based Binary Logging 12-35Statement-Based Binary Logging 12-36Mixed Format Binary Logging 12-37Replication Logs 12-38Crash-Safe Replication 12-39Topics 12-40Asynchronous Replication 12-41Semisynchronous Replication 12-42Advantages and Disadvantages of Semisynchronous Replication 12-43 Enabling Semisynchronous Replication 12-44Multi-Source Replication 12-45Configuring Multi-Source Replication for a GTID-Based Master 12-46 Configuring Multi-Source Replication for a Binary Log Based Master 12-47 Controlling Slaves in a Multi-Source Replication Topology 12-48Topics 12-49MySQL Clone Plugin 12-50Installing the Clone Plugin 12-51Granting Permissions to Users 12-52Cloning Local Data 12-53Cloning Remote Data 12-54Cloning for Replication 12-55Clone Plugin Limitations 12-56Summary 12-57Practices 12-5813 Administering a Replication TopologyObjectives 13-2Topics 13-3Failover with Log Coordinates 13-4Potential Problems When Executing a Failover with Log Coordinates 13-5 Avoiding Problems When Executing a Failover with Log Coordinates 13-6 Failover with GTIDs 13-7Topics 13-8Replication Threads 13-9The Master’s Binlog Dump Thread 13-10Single-Threaded Slaves 13-11Multithreaded Slaves 13-12Controlling Slave Threads 13-13Resetting the Slave 13-14Quiz 13-15Topics 13-16Monitoring Replication 13-17Slave Thread Status 13-18Master Log Coordinates 13-19Relay Log Coordinates 13-20Replication Slave I/O Thread States 13-21Replication Slave SQL Thread States 13-24Monitoring Replication by Using Performance Schema 13-26Replication Tables in Performance Schema 13-27MySQL Enterprise Monitor Replication Dashboard 13-28Topics 13-29Troubleshooting MySQL Replication 13-30Examining the Error Log 13-32SHOW SLAVE STATUS Error Details 13-34Checking I/O Thread States 13-35Monitoring Multi-Source Replication 13-36Summary 13-37Practices 13-3814 Achieving High Availability with MySQL InnoDB ClusterObjectives 14-2Topics 14-3What Is MySQL InnoDB Cluster? 14-4Architecture 14-5MySQL Group Replication Plugin 14-6How Group Replication Works 14-7Single-Primary Mode 14-8Multi-Primary Mode 14-9Conflict Resolution 14-10Consensus and Quorum 14-11Use Cases 14-12Group Replication: Requirements and Limitations 14-13Quiz 14-14Topics 14-15MySQL Shell (mysqlsh) 14-16Using MySQL Shell to Execute a Script 14-17MySQL Router (mysqlrouter) 14-18Topics 14-19Deployment Scenarios 14-20Deploying Sandbox Instances and Creating the Cluster 14-21 Production Deployment 14-22Distributed Recovery 14-23Connecting Clients to the Cluster 14-24Quiz 14-25Topics 14-26Managing Sandbox Instances 14-27Checking the Status of a Cluster 14-28Viewing the Structure of a Cluster 14-29Checking the State of an Instance 14-30Updating a Cluster Metadata 14-31Removing Instances from the Cluster 14-32Rejoining an Instance to the Cluster 14-33Restoring Quorum Loss 14-34Recovering the Cluster from a Major Outage 14-35Dissolving a Cluster 14-36Disabling super_read_only 14-37Customizing a MySQL InnoDB Cluster 14-38Customizing an Instance 14-39Configuring Secure Connection in a Cluster 14-40 Creating a Server Whitelist 14-41Summary 14-42Practices 14-4315 ConclusionCourse Goals 15-2Oracle University: MySQL Training 15-4MySQL Websites 15-5Your Evaluation 15-6Thank You 15-7Q&A Session 15-8xxi。
《MySQL数据库应用》实验指导实验二MySQL数据库和数据表管理一、实验目的1、掌握MySQL数据表的结构及管理等操作;2、掌握使用SQL语句创建数据库和数据表。
二、实验学时2学时三、实验类型验证性四、实验需求1、硬件每位学生配备计算机一台:Pentium III以上处理器,2G或以上内存,2G或以上硬盘空间。
2、软件Windows操作系统,安装MySQL Community Server软件。
3、网络局域网环境。
4、工具无。
五、实验理论与预备知识1、MySQL数据库管理;2、MySQL数据表管理;六、实验内容与结果1、MySQL数据库的管理;(1)使用提供的MySQL数据库的管理权限登录MySQL数据库服务器,并使用SQL语句创建数据库学生成绩管理xscj;(请将实现功能的SQL语句填写到实验报告册。
)(2)打开数据库xscj。
参考命令:mysql>use xscj;2、MySQL数据表的管理;(1)通过SQL语句在xscj数据库中创建如下所示的三个数据表。
(请将实现功能的SQL语句填写到实验报告册。
)表1:学生情况表(表名xs)列名数据类型长度是否允许为空值默认值说明学号char6×无主键姓名char8×无专业名char10√无性别tinyint1×1男1,女0出生日期data系统默认×无总学分tinyint1√无照片blob系统默认√无备注text系统默认√无表2:课程表(表名kc)列名数据类型长度是否允许为空值默认值说明课程号char3×无主键课程名char16×无开学学期tinyint1×1学时tinyint1×无学分tinyint1√无表3:成绩表(表名xs_kc)列名数据类型长度是否允许为空值默认值说明学号char6×无主键课程号char3×无主键成绩tinyint1√无学分tinyint1√无(2)使用SQL语句删除本实验中数据表和数据库;(请将实现功能的SQL语句填写到实验报告册。
数据库系统原理及MySQL 应用教程(第二版)实验指导书2019年9月24日目录实验1:概念模型(E-R图)画法与逻辑模式转换实验 (3)实验2:关系的完整性、规范化理解与应用实验 (7)实验3:利用POWERDESIGNER设计数据库应用系统实验 (10)实验4: MYSQL安装创建和维护数据库实验 (26)实验5:数据表的创建与修改管理实验 (27)实验6:MYSQL数据库表的数据插入、修改、删除操作实验 (30)实验7:MYSQL数据库表数据的查询操作实验 (31)实验8:索引创建与管理操作 (35)实验9:视图创建与管理实验 (37)实验10:存储过程与函数的创建管理实验 (39)实验11:触发器创建与管理实验 (42)实验12:数据库的安全机制管理上机实验 (44)实验13:数据库的备份与还原上机实验 (45)实验14:MYSQL日志管理上机实验 (46)实验15:使用PHP访问MYSQL数据库上机实验 (47)实验1:概念模型(E-R图)画法与逻辑模式转换实验一、实验目的及要求1.了解E-R图构成要素以及各要素图元。
2.掌握概念模型E-R图的绘制方法。
3.掌握概念模型向逻辑模型的转换原则和步骤。
二、验证性实验1.实验内容(1)某同学需要设计开发班级信息管理系统,希望能够管理班级与学生信息的数据库,其中学生信息包括学号,姓名,年龄,性别,班号;班级信息包括班号、年级号、班级人数。
①确定班级实体和学生实体的属性。
学生:学号,姓名,年龄,性别,班号班级:班号、班主任、班级人数②确定班级和学生之间的联系,给联系命名并指出联系的类型。
一个学生只能属于一个班级,一个班级可以有很多学生,所以和学生间是1对多关系,即1:n③确定联系本身的属性。
属于④画出班级与学生关系的E-R图。
⑤将E-R图转化为关系模式,写出各关系模式并标明各自的码。
学生(学号,姓名,年龄,性别,班号),其码为:学号班级(班号、班主任、班级人数),其码为:班号2)请为电冰箱经销商设计一套存储生产厂商和产品信息的数据库,要求生产厂商的信息包括厂商名称、地址、电话;产品的信息包括品牌、型号、价格;生产厂商生产某产品的数量和日期。
《MySQL必知必会》实验指导书广州番禺职业技术学院信息工程学院2012.2实验一MySQL工具的使用和数据库的简单查询一、实验目的1、熟悉MySQL命令行实用程序的使用。
2、学会用命令行工具了解数据库和表的相关信息。
3、掌握简单的SQL语句的使用,学会运用SQL语句进行简单的查询。
二、实验理论基础及教材对应关系1、实验理论基础:(1)MySQL基本命令;(2)SELECT语句;2、本实验内容主要对应于教材第3章和第4章。
三、实验内容与步骤1、检查所用的计算机习题,确认是否已经安装了MySQL数据库管理软件。
如果系统安装了MySQL Server5.0,可以通过“开始”菜单—>程序->MySQL->MySQL Server5.0->MySQL Command Client开启MySQL服务。
如下图:2.连接到MySQL:主机名,端口号,合法的用法名等都已经在在安装设置过程中配置好了,在此只要输入口令:root就能登陆了另外一种途径:使用net start mysql启动myql服务(如果没有启动的话。
提示:使用net stop mysql 关闭服务)然后:使用mysql–uroot–proot进入管理界面。
假设root帐号的密码是root3.查看已经存在的数据库:在mysql>提示符后输入命令Show databases;后,可以看到如下的结果:表明有三个数据库:information_schema,mysql,test等。
4.查看数据库中的表:(1)用“use”命令选择要操作的数据库,如use mysql;回车后可以看到“Database changed”表示选择该数据库成功。
(2)输入命令“Show tables;”回车后可以看到所显示的mysql数据库中的表5.查看表中的列:输入命令“Show columns from host;”查看表host中的列如下所示:使用脚本创建示例数据库:将crashcourse.sql文件复制到c:\crashcourse.sql使用source c:\\crashcourse.sql命令创建数据库以及示例数据。
MySQL数据库技术与实验指导(第1版)钱雪忠、王燕玲、张平编著清华大学出版社2011.09实验1 数据库系统基础操作进入MySQL的官方下载页面:/downloads/如果想找旧的发布版本,可进入页面:/archives.php例1-1 有一个脚本文件(test.sql),文件内容:Show databases;Create database test;Use test;Create table table_1( I int ) ENGINE = MyISAM;执行之。
解:C:\> mysql -h localhost -u root -p <c:\test.sql或mysql> source c:\test.sql实验2 MySQL数据库基础操作例2-1 创建jxgl数据库。
解:mysql>create database jxgl;例2-2 查看本机服务器上数据库。
解:mysql>show databases;或:mysql>show databases like 'my%';例2-3 进入jxgl数据库。
解:mysql> USE jxgl;例2-4 在命令行环境中,创建和删除数据库jxgl:解:创建数据库:C:\> mysqladmin -h localhost -u root -p create jxgl删除数据库:C:\> mysqladmin -h localhost -u root -p drop jxgl实验3 表、ER图、索引与视图的基础操作CREATE TABLE IF NOT EXISTS `jxgl`.`sc`(`sno` CHAR(7) NOT NULL ,`cno` CHAR(2) NOT NULL ,`grade` INT NULL ,PRIMARY KEY (`sno`,`cno`),INDEX `sc_ibfk_1`(`sno` ASC),INDEX `sc_ibfk_2`(`cno` ASC) , CONSTRAINT `sc_ibfk_1` FOREIGN KEY(`sno`) REFERENCES `jxgl`.`student`(`sno`) ON DELETE RESTRICT ON UPDATE RESTRICT,CONSTRAINT `sc_ibfk_2` FOREIGN KEY(`cno`) REFERENCES `jxgl`.`course` (`cno`) ON DELETE RESTRICT ON UPDATE RESTRICT) ENGINE = InnoDB;例3-1 列出jxgl数据库中所有表。
mysql09实训指导书(带答案)MySQL数据库原理与应⽤实训九操作指导书1、实训⽬标:1)使⽤order by⼦句进⾏查询结果排序2)使⽤group by⼦句进⾏查询结果分组计算2、实训任务:1) 掌握order by⼦句进⾏查询结果排序2) 掌握group by⼦句进⾏查询结果分组计算3、实训指导请⼤家上机写出相应SQL语句,复制粘贴到相应题⽬下。
以学号+姓名命名⽅式提交。
1)在数据库D_sample中查询course表中开课学期按照升序排列的课程信息。
use d_sample;select * from courseorder by 开课学期;2)在数据库D_sample中查询sc表中选修了“07003”课程的学⽣成绩,成绩按降序进⾏排序。
use d_sample;select * from scwhere 课程号=’07003’order by 成绩desc;3)在数据库D_sample中统计student表中学⽣的男⼥⼈数。
use d_sample;select 性别,count(性别) as ⼈数from studentgroup by 性别;4)在数据库D_sample中统计student表中每个民族的男⼥⼈数、总⼈数,以及学⽣总⼈数。
Use d_sample;select 民族,性别,count(*) as ⼈数from studentgroup by 民族,性别with rollup;5)在数据库D_sample中查询sc表中平均成绩在85分以上的课程号。
select 课程号, avg(成绩) as 平均成绩from scgroup by 课程号having avg(成绩)>=85;6)在数据库D_sample中查询course表中课程学分为4的课程门数use d_sample;select count(*)from coursewhere 学分=4;7)在数据库D_sample中查询sc表,查询每位学⽣的学号、总成绩。
《MySQL必知必会》实验指导书广州番禺职业技术学院信息工程学院2012.2实验一MySQL工具的使用和数据库的简单查询一、实验目的1、熟悉MySQL命令行实用程序的使用。
2、学会用命令行工具了解数据库和表的相关信息。
3、掌握简单的SQL语句的使用,学会运用SQL语句进行简单的查询。
二、实验理论基础及教材对应关系1、实验理论基础:(1)MySQL基本命令;(2)SELECT语句;2、本实验内容主要对应于教材第3章和第4章。
三、实验内容与步骤1、检查所用的计算机习题,确认是否已经安装了MySQL数据库管理软件。
如果系统安装了MySQL Server 5.0 ,可以通过“开始”菜单—>程序->MySQL-> MySQL Server 5.0-> MySQL Command Client 开启MySQL服务。
如下图:2.连接到MySQL:主机名,端口号,合法的用法名等都已经在在安装设置过程中配置好了,在此只要输入口令:root就能登陆了另外一种途径:使用net start mysql 启动myql服务(如果没有启动的话。
提示:使用net stop mysql 关闭服务)然后:使用mysql –uroot –proot进入管理界面。
假设root帐号的密码是root3.查看已经存在的数据库:在mysql> 提示符后输入命令Show databases ;后,可以看到如下的结果:表明有三个数据库:information_schema,mysql,test等。
4.查看数据库中的表:(1)用“use”命令选择要操作的数据库,如use mysql;回车后可以看到“Database changed”表示选择该数据库成功。
(2)输入命令“Show tables;”回车后可以看到所显示的mysql数据库中的表5.查看表中的列:输入命令“Show columns from host ;”查看表host中的列如下所示:使用脚本创建示例数据库:将crashcourse.sql文件复制到c:\crashcourse.sql使用source c:\\crashcourse.sql命令创建数据库以及示例数据。
6.简单的查询:(1)查询单列数据选择数据库:use crashcourse;输入命令:Select prod_nameFrom products;回车后可看到如下的结果:(2)查询多列数据:输入命令:SELECT prod_id, prod_name, prod_priceFROM products;回车后可看到如下的结果:(3)查找所以列输入命令: SELECT *FROM products; 回车后可看到如下的结果:(4)使用DISTINCT消除重复项输入命令:SELECT DISTINCT vend_id FROM products;回车后可看到如下的结果:(5)限制输出的行数输入命令: SELECT prod_nameFROM productsLIMIT 2,3;回车后可看到如下的结果:四、实验材料的提交与成绩评定1、本实验的实验报告一份(电子版或纸质版一份,具体形式由任课教师确定,格式参考学院统一实验报告)2、实验源程序一份,请表明题号(电子版)备注:做下一次实验之时提交上一次实验的材料,由各班学习委员以班为单位收集并上交任课教师。
3、实验成绩总分为10分,由指导老师根据学生实验表现和实验材料进行评定,本门课程结束后实验平均成绩(实验总成绩/实验次数)按照10%的比例记入期末考试总成绩。
实验二排序检索数据和数据过滤一、实验目的1、进一步掌握查询的方法,对查询的结果根据需要进行排序。
2、掌握使用where子句知道搜索条件的方法。
3、熟练掌握使用and操作符和or操作符进行查询。
二、实验理论基础及教材对应关系1、实验理论基础:(1)select语句中的order by 子句;(2)where子句;(3)and、or、in和not操作符。
2、本实验内容主要对应于教材第5章、第6章和第7章的内容。
三、实验内容与步骤1、对查询的结果进行排序:输入命令:SELECT prod_nameFROM productsORDER BY prod_name;回车后可看到如下的结果:2、指定排序方向从产品表中找出产品的标号、产品价格、产品名,并按产品价格从高到低排序。
输入命令:SELECT prod_id, prod_price, prod_nameFROM productsORDER BY prod_price DESC回车后,看看运行的结果。
3、order by 和limit的组合:找出产品价格最贵的价格。
输入命令:SELECT prod_priceFROM productsORDER BY prod_price DESCLIMIT 1;回车后,看看运行的结果。
4、where子句:(1)找出产品名为“fuses”的产品名和价格输入命令:SELECT prod_name, prod_priceFROM productsWHERE prod_name = 'fuses';注意:由于表中的数据在字符前后有空格,因此应将条件写成‘ fuses ’,即在fuses前后加一个空格,否则将找不到结果。
回车后,看看运行的结果。
(2)找出产品名小于或等于10美元的产品名和价格输入命令:SELECT prod_name, prod_priceFROM productsWHERE prod_price <= 10;回车后,看看运行的结果。
5.and操作符:找出供应商1003制造且价格小于等于10美元的所有产品的名称和价格。
输入命令:SELECT prod_id, prod_price, prod_nameFROM productsWHERE vend_id = 1003 AND prod_price <= 10;回车后,看看运行的结果。
6. or操作符:找出供应商1002或者供应商1003制造所有产品的名称和价格.输入命令:SELECT prod_name, prod_priceFROM productsWHERE vend_id = 1002 OR vend_id = 1003;回车后,看看运行的结果。
7.in操作符:输入命令:SELECT prod_name, prod_priceFROM productsWHERE vend_id IN (1002,1005)回车后,看看运行的结果。
8.not操作符找出不是供应商1002和1003提供的任意产品输入命令:SELECT prod_name, prod_priceFROM productsWHERE vend_id NOT IN (1002,1003)ORDER BY prod_name;回车后,看看运行的结果。
四、实验材料的提交与成绩评定1、本实验的实验报告一份(电子版或纸质版一份,具体形式由任课教师确定,格式参考学院统一实验报告)2、实验源程序一份,请表明题号(电子版)备注:做下一次实验之时提交上一次实验的材料,由各班学习委员以班为单位收集并上交任课教师。
3、实验成绩总分为10分,由指导老师根据学生实验表现和实验材料进行评定,本门课程结束后实验平均成绩(实验总成绩/实验次数)按照10%的比例记入期末考试总成绩。
实验三数据库的建立和表的操作一、实验目的1、掌握创建数据库和表的方法。
2、掌握修改表结构和删除表的方法。
3、熟练掌握给表添加和删除记录的方法。
二、实验理论基础及教材对应关系1、实验理论基础:(1)建立数据库、建立表;(2)修改表结构;(3)删除表。
(4)表中记录的添加和删除。
2、本实验内容主要对应于教材第19、21章的内容。
三、实验内容与步骤1、创建数据库命令格式:create database 数据库名称;以自己的名字的汉语拼音为数据库的名称,创建数据库,并用show命令查看所建立的数据库(show databases )。
2、创建表命令格式:create table 表的名称;注意:在创建表前应使用use 命令选中数据库,在此用 use lisi;(其中lisi 是刚才创建的数据库名)。
(1)创建表products(prod_id char(10), vend_id int,prod_name char(255), prod_price decimal(8,2))(2)创建表customers(cust_id int,cust_name char(50) ,cust_addresschar(50), cust_city char(50), cust_email char(50)) 要求以cust_id为关键字。
(3)创建表orders(order_num ,order_date,cust_id)要求order_num和cust_id 字段为整型 order_date字段为日期型。
(4)使用show命令查看创建的表,并将结果写入实验报告,包括创建表的命令。
3、修改表结构(1)给表添加一个字段命令格式:alter table 表名称 add 字段名字段类型;给products添加一个产品描述字段prod_desc,类型为text。
命令如下:alter table products add prod_desc text;再给表products添加一个字段prod_date ,类型为datetime。
(2)使用show命令查看修改后的表的结构,并将结果写入实验报告,包括修改表的命令。
(3)修改字段名命令格式:alter table 表名称 change 原字段名新字段名字段类型;将products表的prod_desc字段修改为prod_introduction,类型为char(255)。
命令如下:alter table products change prod_desc prod_introduction char(255);再将表products的字段prod_date , 修改为prod_discount,类型为decimal(10,2)。
(4)使用show命令查看修改后的表的结构,并将结果写入实验报告,包括修改表的命令。
(5)删除表的字段命令格式:alter table 表名称 drop column字段名;将orders表的order_date字段删除的命令如下:alter table orders drop column order_date;再将表orders表的cust_id字段删除。
(4)使用show命令查看删除后的表的结构,并将结果写入实验报告,包括删除的命令。