猎鹰9号火箭用户指南falcon9 usersguide rev 2.0
- 格式:pdf
- 大小:2.98 MB
- 文档页数:69

用户手册To download this user manual in a different language, visit /help.Pour télécharger ce manuel de l’utilisateur dans une autre langue, rendez-vous sur /help.Wenn Sie dieses Benutzerhandbuch in einer anderen Sprache herunterladen möchten, besuchen Sie /help.Per scaricare questo manuale utente in un’altra lingua, visita /help. Para descargar este manual de usuario en otro idioma, visite /help.Para descargar este manual de usuario en un idioma diferente, /help.Para baixar este manual do usuário em outro idioma, acesse /help.Om deze gebruikershandleiding in een andere taal te downloaden, ga naar /help.Aby pobrać ten podręcznik użytkownikaw innym języku, odwiedź stronę/help.Ladda ner den här användarhandbokenpå ett annat språk på /help.Чтобы загрузить это руководствопользователя на другом языке, посетите страницу/help.このユーザーマニュアルの他言語版をダウンロードするには、/helpにアクセスしてください。

Page 1Ultra96 Getting Started GuideVersion 1.0Document ControlDocument Version: 1.0Document Date:27 June 2018Page 2Contents1Getting Started with Ultra96 (5)2What’s Inside the Box? (5)2.1Optional add-on items: (5)3What’s on the Web? (6)3.1Official Documentation: (6)3.2Tutorials and Reference Designs: (6)3.3Trainings and Videos: (6)4Ultra96 Key Features (7)5Ultra96 Basic Setup and Operation (9)6Example Design (10)7Hardware Setup (10)8Connect to Webserver (11)9Ultra96 GPIO LEDs Example Project (13)10OpenAMP Matrix Multiplication (14)11Additional Example Projects (14)12Custom Content Tutorial (15)13Smart Tutorial (16)14Using Ultra96 Tutorial (16)15Access Ultra96 Linux Terminal over SSH (17)16INA226 Current Sensor (19)17Power Off (20)18Getting Help and Support (21)18.1Avnet Support (21)18.2Xilinx Support (22)19Installing and Licensing Xilinx Software (23)19.1Install Vivado Design Suite, Design Edition (23)20Certification Disclaimer (27)21Safety Warnings (27)22RF Certification (27)Page 3FiguresFigure 1 – Ultra96 (5)Figure 2 – Ultra96 Block Diagram (8)Figure 3 – Ultra96 Topology (9)Figure 4 – Ultra96 Switch Location (10)Figure 5 – MicroSD Card Boot Mode (11)Figure 6 – Connect to Ultra96 Webserver (12)Figure 7 – Ultra96 GPIO LEDs (13)Figure 8 – OpenAMP Matrix Multiplication (14)Figure 9 – Ultra96 Tutorials/Guides (15)Figure 10 – TeraTerm New Connection (17)Figure 11 – SSH Terminal Settings (18)Figure 12 – SSH Authentication (18)Figure 13 – Ultra96 Terminal (19)Figure 14 – I2Cdetect (19)Figure 15 – Reading INA226 Device (20)Figure 16 – Voucher Confirmation (24)Figure 17 – Generate Node-Locked (24)Figure 18 – Select Host Information (25)Page 4Page 5 1 Getting Started with Ultra96The Avnet Ultra96 enables hardware and software developers to explore the capabilities of the Zynq® UltraScale+™ MPSoC . Designers can create or evaluate designs for both the Zynq Processor Subsystem (PS) and the Programmable Logic (PL) fabric.Figure 1 – Ultra96This Getting Started Guide will outline the steps to setup the Ultra96 hardware. It documents the procedure to run a PetaLinux design running on the Quad-core ARM Cortex-A53 MPCore Processing System (PS).2 What’s Inside the Box?∙Ultra96 development board ∙Pre-programmed 16GB microSD card with SD adapter and jewel case ∙Voucher for SDSoC license from Xilinx ∙Quick Start Instruction card 2.1 Optional add-on items: ∙External 96Boards compliant power supply kit (12V, 2A, US plug) (AES-ACC-U96-PWR) ∙USB-to-JTAG/UART pod for Ultra96 (AES-ACC-U96-JTAG) ∙∙3 What’s on the Web?Ultra96 is a community-oriented kit, with all materials being made available through the community website.3.1 Official Documentation:∙Getting started guide∙Hardware user guide∙Schematics∙Bill of materials∙Layout∙PCB net lengths∙Mechanical drawing∙3D Model∙Board definition files for Vivado integration∙Programmable logic (PL) master user constraints3.2 Tutorials and Reference Designs:∙Ultra96 Bare Metal Hardware Platform Creation∙Ultra96 Bare Metal Microchip USB-UART∙Ultra96 Bare Metal Test Application Development∙Ultra96 Bare Metal Boot Techniques∙Ultra 96 Factory Restore Image∙Ultra96 Accelerated Image Classification3.3 Trainings and Videos:∙Introduction to Ultra96Page 64 Ultra96 Key Features∙Zynq UltraScale+ MPSoC ZU3EG SBVA484∙Memoryo Micron 2 GB (512M x32) LPDDR4 Memoryo MiroSD SocketShips with Delkin Utility MLC 16GB card∙ Wi-Fi / Bluetooth∙ DisplayPort∙ 1x USB 3.0 Type Micro-B upstream port∙ 2x USB 3.0 Type A downstream ports∙ 40-pin Low-speed expansion header∙ 60-pin High speed expansion header∙ Mounted on thermal bracket with fanNote that there is no on-board, wired Ethernet interface. All communications must be done via USB, Wi-Fi, JTAG, or expansion interface.Page 7Page 9 5 Ultra96 Basic Setup and OperationThe functionality of the Ultra96 is determined by the application booted from the non-volatile memory – by default that is the SD Card. This Getting Started Guide allows system developers to exercise and demonstrate multiple circuits through PetaLinux, including:∙SSH Terminal Access ∙GPIO LEDs ∙Wi-Fi ∙ I2C Sensor DetectIn addition to the items included in the kit, you will also need the following to complete the exercises in this tutorial.∙ Wi-Fi connectionAn Ultra96 image in its expected out-of-box configuration is shown below along with various topology components highlighted.Figure 3 –Ultra96 Topology6 Example DesignThe Ultra96 ships with an example image loaded in the 16GB microSD Card. If your microSD Card image has been corrupted or deleted, there is Ultra 96 Factory Restore available at that will go into detail on how to restore your factory image.7 Hardware Setup1. A terminal program is required. TeraTerm was used in this example which can bedownloaded from the TeraTerm project on the SourceForge Japan page:ttssh2.sourceforge.jp Install TeraTerm or another terminal program of your choice.2. Plug in your 12V Barrel Jack power supply into a wall outlet and then connect the barreljack to J5 on your Ultra96. Your Ultra96 should be powered down at this point. Note: DC power supply is not included in the Ultra96 kit but can be purchased separately.3. Set the Ultra96 boot mode switch SW2 to SD Card boot mode as shown below.Figure 4 – Ultra96 Switch LocationPage 108 Connect to Webserver1. Press and release the power button (SW3). The Green Power On LED (DS9), RedINIT_B LED (DS7) and the Green User LEDs should illuminate. After a few seconds, INIT_B LED will turn off and the Green DONE LED (DS6) will illuminate. At 15 seconds, the Blue Bluetooth Enable LED (DS1) will illuminate. At 30 seconds, the Yellow Wireless LAN Enable LED (DS8) will illuminate.2. After about 40 seconds, a new Wi-Fi SSID will be discoverable, named“Ultra96_<MAC_ID>” which is unique for each board. Connect the Wi-Fi on your PC to this SSID.Page 11Figure 6 – Connect to Ultra96 Webserver3. Now that we are connected to the Ultra96, we should open up the webserver. Open aninternet browser window and navigate to the following address : http://192.168.2.14. You will be directed to the webserver’s home page for Ultra96. Here you will be able toview example projects, custom contents and various tutorials for Ultra96.Page 129 Ultra96 GPIO LEDs Example Project1. Next we want to access the Ultra96 GPIO LEDs example project. From the Ultra96 homepage select Ultra96 GPIO LEDs example projectFigure 7 – Ultra96 GPIO LEDs2. All LEDs will be at an unknown state to begin with. Select the drop down menus andbegin changing the status of the GPIO LEDs. You will notice that the four LEDs (located in between the two USB connectors J8/J9) update in real time.3. Scroll to the bottom of the webpage and you will see a definition table for various LEDselection options.4. Something of interest may be setting LEDs 0 and LEDs 1 to phy0tx and phy0rxrespectively.5. Now as you navigate throughout this webserver you will notice the Wi-Fi transmitting andreceiving LEDs flickering as you are sending and receiving data from the Ultra96.Page 1310 OpenAMP Matrix Multiplication1. Select Example Projects up at the top of the page. You will see a list of projects alongwith descriptions of each.2. Select OpenAMP Matrix Multiplication which is the second in the list.Figure 8 – OpenAMP Matrix Multiplication3. Read through the description which goes over what is going to happen in the OpenAMPMatrix Multiplication Design and then select Run Project4. In the Output section you will see the two input matrices and then the matrix multiplicationresults.11 Additional Example Projects1. Return back to the Example Projects page by selecting the Example Project tab at thetop.2. As you can see there are seven additional example projects available to you. Feel freeto explore them. However some require additional hardware such as the Grove Starter Kit to complete.Page 1412 Custom Content Tutorial1. Now select the Tutorial tab at the top of the page. You will be directed to aTutorials/Guides pageFigure 9 – Ultra96 Tutorials/Guides2. This sections goes into how to get started with the out of box microSD card image wehave been exploring up to this point. As of now we have explored the Run Example Projects section.3. Let’s take a look at the Custom Content tutorial. Select Custom Content.4. This Tutorial goes over the three different ways custom content can be added to this outof box image. The three different ways being1) Uploading custom files2) Making custom webpages3) Making custom projects5. To access these options select the Custom Content tab at the top of the webpage.Page 1513 Smart Tutorial1. Now return back to the Ultra96 Tutorials page. This time select Smart from the tutoriallist2. This tutorial goes into explaining how to use the Smart Package Manager (smart) toupdate/install packages.3. This tutorial also provides an example that you can follow along with that will showcasea use case of how to write a simple “Hello World” application, compile it, create a RPMpackage with CMake, install/remove it with smart, and then run it.14 Using Ultra96 Tutorial1. Return back to the Tutorials page and now select the Using Ultra96 tutorial2. This tutorial goes over the various ways you can interact with the Ultra96. As of now wehave only done this using the Webapp.3. We will not be exploring accessing your Ultra96 over miniDP or UART since by defaultyou would need additional hardware to access it through these two peripherals.4. Read through the SSH section, it states we can access the Ultra96 terminal usingTeraTerm or a PuTTY terminal application.5. Since we have already downloaded and installed TeraTerm at the beginning of this guidelet’s access the Ultra96’s Linux terminal over SSH using TeraTermPage 1615 Access Ultra96 Linux Terminal over SSH1. Verify that your PC is still connected to the Ultra96 Websever by checking your wirelessnetwork.2. Open TeraTerm and then select File New connection… as seen in the image below.Figure 10 – TeraTerm New ConnectionPage 17Page 183. A new TeraTerm: New connection window will open. We now want to connect to Ultra96over SSH, select TCP/IP and then configure your Terminal settings the same as the below figure.Figure 11 – SSH Terminal Settings4. Select OK5. You will then be prompted to enter SSH Authentication information. In our case it islooking for the Linux terminal ’s user name and passphrase which are root and root .6. Please type in root for the User name and then type in root for the Passphrase as well.Then select OK .Figure 12 –SSH Authentication7. You now have access to the Ultra96 Terminal!Figure 13 – Ultra96 Terminal16 INA226 Current Sensor1. Now that we have access to the Linux Terminal let’s try and read from the INA226 CurrentSensor on our board.2. Type in your console i2cdetect –y –r 1Figure 14 – I2Cdetect3. As you can see some devices are coming back as unavailable under I2C detect, thismeans they may already be monitored by some other driver within the system. That is the case for the INA226 Current Sensor on Ultra964. It turns out there is a Linux sysfs drive for INAxxx devices that is already built into thekernel:Page 19https:///pub/scm/linux/kernel/git/torvalds/linux.git/tree/Documentation/hwmon/ina2xx5. Based on this it turns out that you can actually just read the system current from theINA226 device by using the sensor command.6. In your terminal type sensorsFigure 15 – Reading INA226 Device7. As you can see the current, voltage, and temperature measurements are reported back.8. This is one of the lesser known but highly useful Linux subsystems.17 Power Off1. When you are done experimenting with your Ultra96 and wish to power off the board,press and release the Power button (SW3) located on the top side of your Ultra96 next to the barrel jack.2. You will notice your board does not power down immediately. It will take roughly 10-20seconds for your board to completely power down. The reason behind this is it is adhering to the various power down sequencing requirements.3. Please note, if you do not let your Ultra96 power off as per the power down sequencingrequirements (such as unplugging the barrel jack), your SD Card may get corrupted or damaged.4. To power off the Ultra96 you can also press and hold Sw3 for 10 seconds to force apower off. This is useful for when the soft power-off appears to no work.Page 2018 Getting Help and Support18.1 Avnet SupportThe Ultra96 is a versatile development kit that allows evaluation of the Zynq MPSoC, which can help you adopt Zynq into your next design. All technical support is offered through website support forums. Ultra96 users are encouraged to participate in the forums and offer help to others when possible./forums/zed-english-forumTo access the most current collateral for Ultra96 please visit the community support page at: /content/support –Hardware/Vivado Support–Software SupportOnce on the support page:To access the latest Ultra96 documentation, click on the Documentation link:To access the latest reference designs for Ultra96, click on the following link:To access the Ultra96 technical forums, click on the following link:Page 21To view online training and videos, click on the following link:18.2 Xilinx SupportFor questions regarding products within the Product Entitlement Account, visit the Contact Support site for Xilinx:https:///support/service-portal/contact-support.htmlFor technical support including the installation and use of the product license file, contact Xilinx Online Technical Support at /support. The following assistance resources are also available on the website:∙Software, IP and documentation updates∙Access to technical support web tools∙Searchable answer database with over 4,000 solutions∙User forumsPage 2219 Installing and Licensing Xilinx Software19.1 Install Vivado Design Suite, Design EditionThe Zynq device on the Ultra96 is supported in Vivado Design Suite, Design Edition. Version 2018.1 or later is required to use the pre-installed board definition file.You must license your Vivado Design Suite, Design Edition with the license that came with your Ultra96. To obtain your free license, visit the following website and insert the voucher code from the certificate included in your kit:/getlicense1. Log in2. Fill out information at Product Licensing - Name and Address Verification, then clickNext3. Select your Account4. Enter your voucher code here, then click Redeem Now.Page 235. At the confirmation screen, click Yes.Figure 16 – Voucher Confirmation6. Under Certificate Based Licenses, find OEM Zynq ZU3 Ultra96 Vivado Design EditionVoucher pack and check the box. Now click Generate Node-Locked License.Figure 17 – Generate Node-LockedPage 247. Create or select your Host ID. Click Next.Figure 18 – Select Host InformationPage 258. Review the license request, then click Next again.If a full seat of Vivado System or Design Edition has already been installed, then no further software will be needed. Please check online for any updates at:/support/download/index.htmFor detailed instructions on installing and licensing the Xilinx tools, please refer to the latest version of Vivado Design Suite User Guide Release Notes, Installation, and Licensing (UG973).Page 2620 Certification DisclaimerBoth CE and FCC certifications are necessary for system level products in those countries governed by these regulatory bodies.Because Avnet boards are intended for evaluation kits only and destined for professionals (you) to be used solely at research and development facilities for such purposes, they are considered exempt from the EU product directives and normally are not tested for CE or FCC compliance.If you choose to use your board to transmit using an antenna, it is your responsibility to make sure that you are in compliance with all laws for the country, frequency, and power levels in which the device is used. Additionally, some countries regulate reception in certain frequency bands. Again, it is the responsibility of the user to maintain compliance with all local laws and regulations.This board should be used in a controlled lab environment by professional developers for prototype and development purposes only. The board included in the kit is not intended for production use unless additional end product testing and certification is performed.21 Safety WarningsThis product shall only be connected to an external power supply that is 96boards compliant.Only compatible plug-in modules shall be connected to Ultra96. The connection of incompatible devices may affect compliance or result in damage to the unit and void the warranty.This product shall be operated in a well-ventilated environment. If a case is used, it shall have adequate ventilation.22 RF CertificationThe frequency range is 2.4 to 2.4835GHz.The max power complies with 802.11b, which is 17dBm (typ).More information on RF certification for the TI WiLink8 module is available here:/index.php/WL18xxMOD_Regulatory_Product_Certification#Countri es_Accepting_FCC.2FIC.2FCE.2FMIC_ReportsPage 27。

I-9 User Guide Online I-9 & E-VerifyProcessUpdated June 2023Table of ContentsOnline I-9 & E-Verify Process 2 I-9 Compliance 3 Section 1 – Employee Information 4 Accessing the System 11 New Hire Center 13 Section 2 – Employer Review 16 Photo Matching 22 Terminations 33 Special Circumstances 33Online I-9 and E-Verify ProcessAbout Electronic I-9s and E-Verify•Implemented to automate the process of documenting that each new employee is authorized to work in the United States•Complies with mandate from the Governor of Virginia to process all new hires and rehires through E-Verify•E-Verify allows employers to automatically determine eligibility of their employees to work in the United States•Online I-9 Management system is hosted by external vendor•Electronic I-9s are stored in a central database•Eliminates the need to complete a paper I-9 and submit to HRWhat is an I-9?• A form used to document verification of identity and employment eligibility of all employees (both citizen and non-citizen) hired to work in the United States after November 6, 1986•Required to comply with the Federal Immigration Reform and Control Act•Regulated by the U.S. Citizenship and Immigration Services (USCIS) division of Department of Homeland Securities (DHS)Some Penalties for Non-Compliance•Employers who violate the law may be subject to:o Civil fineso Criminal penalties (when there is a pattern or practice of violations)o Debarment from government contractso A court order requiring the payment of back pay to the individualdiscriminated againsto A court order requiring the employer to hire the individual discriminated against•More information is available at: /i-9-central/penaltiesI-9 ComplianceIs an I-9 Required?•Open Banner form PZII9HS for the employee•Does the employee have an E-Verify case number?o If NO, continue with I-9 processo If YES, open Banner form PWIEMPV•Review job start/end dates/last paid date•If there is a break in service or break in pay for more than one year, a new I-9 must be completed•For non-residents, the employment authorization documents could have changed - review carefully•Contact HR with questions if an I-9 is neededPWIEMPVTIPS: You can find the Last Paid Date on page PWIEMPVSection 1: Employee Information•Section 1 should be completed and signed by employee on or before the first day of work•Employee will receive two emails from **********************. One will have the link to the New Hire Center and the other will have the password to login. The password is only valid for the original login.*Please note, wage employees must have a job in Banner before they will be sent to the New Hire Center and receive these email*•Once logged in, employee will need to complete all forms in the New Hire Center before completing section 1 of the I9.Section 1:TIPS:•All fields are required EXCEPT:o Other Nameso Apt. Numbero Email Addresso Telephone Number•If the employee does not have a Middle Name, enter N/A•Foreign nationals without a Social Security number- check the “SSN Applied For”button below the Social Security number fieldTIPS:•Employee attests to citizenship•If number 4, An alien authorized to work until, is selected the new hire should indicate the “authorized to work until date” on the i9. The date should be listed on their form I-20, DS2019, or another form of work authorization.•If someone other than employee prepares section 1 on behalf of employee, thePreparer and/or Translator Certification must be completed•Click Continue to save•Review the data foraccuracy•Scroll to bottom of page•Employee signs the form by checking the attestation box•Employee’s initials must correspond to the name asit was keyed (not casesensitive)•If the employee hasmultiple first namesand/or last names, onlyenter the first, first nameinitial and the first, lastname initial•Click ContinueTIPS:•Print the receipt code page if section 2 will be completed by a remote completer. The remote completer will need the receipt number to pull up the I9.•New Hire will receive an email confirmation once Section 1 has been completed •Scroll to bottom of page to review acceptable documents to present for completingSection 2•Click continue to finish section 1TIPS:•List A document to prove identity and work authorization OR List B document to prove identity AND List C document to prove work authorization• A full list of acceptable documents can be found at https:///i-9-central/form-i-9-acceptable-documents•All documents must be original. Only exception is certified copy of birth certificate •All documents must be unexpired by the first day of work. For Foreign Nationals, Transfer Pending documents may not be used•Must present a document with a photo•Reminder – employee must present original documentation within three business days of starting workGetting access the I9 SystemFor employees needing access to the I9 system for processing purposes, departments need to complete the following steps:•Employer access only – for I9 access, complete the following steps:•Online Banner HR access request form on (https:///vt/prod/vtirm.irm_forms_main.entry) •Login and select Add/Change Administrative System Access•Enter employee’s ID and select Request additional access•Select Human Resources and check the Online I-9 option•Submit electronic form•Print copy for signature approval•Must be signed by employee AND dean, director, or department head•Send a signed copy to the HR Apps Team through the HR Dropbox (The dropbox link is located on )Completing Section 2 of the I9This section focuses on how to search for employees and complete section 2 of the I-9•Click on Login to New Hire CenterConsent to Information Release•Each time an I9 processor logs in, the Consent to Information Release screen will appear. Verify the VT Username and ID number, then click the SharebuttonNew Hire Center Welcome Screen•Click on Search Employee to verify all forms have been completed and Section 2 is ready to be completed•Enter First and Last Name, then press View•Verify Status says Document Complete - Waiting on Section 2 of I9•Click on the NameClick Complete I9•Verify the start date is the first day the employee began working. If the date listed is not the first day of physical work, please update this date.•Enter the VT ID. Do not include dashes•Visa type is not applicable to US Citizen•Select the document(s) presented by employee•Select documents from valid list of options provided in drop down list. The list provided will be based on the citizenship status indicated in Section 1•If employee is terminated before completing I-9, choose that option and continue•Click Continue to save•Examine documents and record verification information•Complete all fields provided•Click Continue to saveTIPS:•Fields may vary depending on documents presented•Click on Sample Document link to view valid examples of selected document type •Do not include dashes in Document number•If there is no Document number, include several zeros• Carefully review all information entered • Check the box stating you have read and agree with certification statement • Click Continue to saveE-Verify Status•Unique case number is assigned to I-9•I-9 verified against SSA and DHS databases•Receive initial status response within seconds•How to proceed depends on E-Verify status. One of the following messages will appear:o Employment authorized▪Employment authorized - with additional verification optional▪Employment authorized - with additional verification requested automaticallyo Photo matching requiredo Current I-9 is not eligible for verificationo SSA or DHS tentative non-confirmation; this status will be handled by the Central HR I9 Coordinators•Temporary initial responses, requiring more time or more steps include: o Initial verification not processed▪Review/Edit employee data (may indicate minor error/typo) o DHS verification in processo SSA or DHS continuanceo DHS referral to SSAo SSA/DHS case incomplete•I-9 wassuccessfullyadded•Next actiondepends onE-Verifyresponse•Always click“View CaseDetails” totakeappropriateaction•E-Verify has assigned a Case Number•Status at bottom of page shows Employment Authorized (If anything other than Employment Authorized or Manual Review is showing, please contact *********) •Case Resolved should be displayed at bottom of page•Logout or click Back to Compliance Center and proceed with another I-9Photo Matching•Required when employee presents any of the following eligibility documents: o U.S. Passport or Cardo I-551 Permanent Resident Card (green card)o I-766 Employment Authorization Document (EAD)•E-Verify requires I-9 administrators to match the photo provided with the one on file with the United States Citizenship and Immigration Services (USCIS)• A securely scanned copy of the photo document must be attached to the electronic I-9 as supporting documentation.•DO NOT ATTACH OTHER DOCUMENTS.Attaching Photos•Securely scan the image•Save the file with a name you will recognize•Attach the scanned image to the electronic I-9•Open the attached document to confirm legibility•Delete the file or encrypt it if retainedo Do not send any scanned documents to HRSECTION 2 – Uploading DocumentsTIPS:• Use List A to select US Passport or US Passport card, Permanent Resident Card, or Employment Authorization Document (EAD).• Attach both the front and back of the card. This can be attached as two separate documents• Click Continue to saveTIPS:• Examine the employee’s document(s) and record verification data • Enter Expiration Date (check box if there is not one)• Click Continue to saveTIPS:• Get started by uploading the image file• Select the Attach File link – Do not click on Upload I9. This will overwrite the currentI9 document in the fileTIPS:• Select document from list of valid options• Scroll to the bottom of the pageTIPS:• Select document from list of valid options• Be sure to use image files in one of the supported formats • Use the Choose File button to select from your computer • Click UploadTIPS:• An image of the attachment appears• Select Correct if this document does not have any errors • Select Incorrect if there are errors presentTIPS:• Notice theUploadStatus nowshows acheck mark• Press theFinishedbuttonTIPS:• E-Verify hascaught upand displaysthe PhotoMatchingstatus• Click viewcase detailsor scroll tothe bottom ofthe pageTIPS:• Verifylegibilityand closethe windowTIPS:• Click thePhotoMatchingbutton toproceed• Compare the photo shown to the photo on the ID cardSelect Yes:• If the photo on the document matches the photo on file• If there is no photograph in the database• Click Continue to proceedSelect No:• If the photo on the ID does not match the database• E-Verify response will be a Tentative Non-Confirmation• Notify *********• Click Continue to proceedSelect No Photo Displayed:• If not photo shows, click the No Photo Displayed button and click ContinueTIPS:• E-Verify has assigned a Case Number • Scroll to the bottom of the page• Make sure the case is closed• I-9 circumstances that may warrant terminationo Employee does not present documentation to complete Section 2 within three business days of the first day of worko Employee refuses to furnish a Social Security Number for E-Verify purposeso Employee elects not to contest a negative E-Verify finding• Complete Section 2 using the option at bottom of the Review and Verification page indicating that employee has terminatedSpecial Circumstances• SSN Applied For:o E-Verify requires employee’s social security number (SSN) on Section 1 in order to for the I9 to be Authorizedo Select the SSN Applied For option in the Employee Information and Verification section for someone who does not yet have a SSN. The I9 will bein a holding status until the SSN is providedo Employee MUST apply for an SSN and provide it to Payroll. Payroll will update the number in the I9 system and will submit to E-verify at that time• Receipts:o Employer may be required to accept a receipt in lieu of the List A, B, or C documento When receipt is presented, check the “Receipt” box next to the type of identification document on Section 2; a copy of the receipt should beattached to the I9Acceptable receipts an employee can present for identification• For Non-residents with a SSN - Always use the Non-everify location at beginning of semester!o Foreign nationals must be updated in the Federal SEVIS database before being processed in E-Verifyo If this is not done, submission to E-Verify needs to be delayed▪If individual’s “Applied for SSN” submission is automatically delayed▪If individual has an SSN, department must manually delay submission using the “non-E-Verify” locationo Complete Section 2 by entering the special non-E-Verify location, “000001”in the Location fieldo HR will follow up with the E-Verify process and updating the location data Directanyquestionsto:**********************。


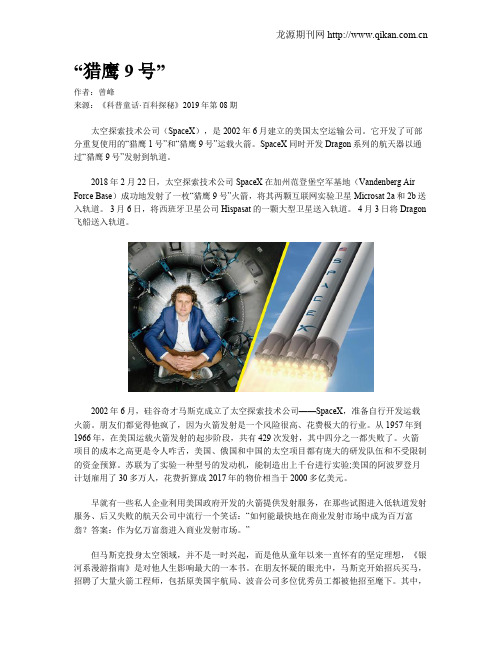
“猎鹰9号”作者:曾峰来源:《科普童话·百科探秘》2019年第08期太空探索技术公司(SpaceX),是2002年6月建立的美国太空运输公司。
它开发了可部分重复使用的“猎鹰1号”和“猎鹰9号”运载火箭。
SpaceX同时开发Dragon系列的航天器以通过“猎鹰9号”发射到轨道。
2018年2月22日,太空探索技术公司SpaceX在加州范登堡空军基地(Vandenberg Air Force Base)成功地发射了一枚“猎鹰9号”火箭,将其两颗互联网实验卫星Microsat 2a和2b送入轨道。
3月6日,将西班牙卫星公司Hispasat的一颗大型卫星送入轨道。
4月3日将Dragon 飞船送入轨道。
2002年6月,硅谷奇才马斯克成立了太空探索技术公司——SpaceX,准备自行开发运载火箭。
朋友们都觉得他疯了,因为火箭发射是一个风险很高、花费极大的行业。
从1957年到1966年,在美国运载火箭发射的起步阶段,共有429次发射,其中四分之一都失败了。
火箭项目的成本之高更是令人咋舌,美国、俄国和中国的太空项目都有庞大的研发队伍和不受限制的资金预算。
苏联为了实验一种型号的发动机,能制造出上千台进行实验;美国的阿波罗登月计划雇用了30多万人,花费折算成2017年的物价相当于2000多亿美元。
早就有一些私人企业利用美国政府开发的火箭提供发射服务,在那些试图进入低轨道发射服务、后又失败的航天公司中流行一个笑话:“如何能最快地在商业发射市场中成为百万富翁?答案:作为亿万富翁进入商业发射市场。
”但马斯克投身太空领域,并不是一时兴起,而是他从童年以来一直怀有的坚定理想,《银河系漫游指南》是对他人生影响最大的一本书。
在朋友怀疑的眼光中,马斯克开始招兵买马,招聘了大量火箭工程师,包括原美国宇航局、波音公司多位优秀员工都被他招至麾下。
其中,汤姆·穆勒原本是给美国宇航局一家供应商担任火箭引擎开发工作的工程师。
科学思维看可重复使用火箭:猎鹰9号打通并不仅仅是火箭领域#寻找真知派##科学思维看百态#出品:太空伊卡洛斯美国太空探索技术公司(SpaceX)利用“猎鹰”-9V1.1运载火箭多次在卡纳维拉尔角成功发射“龙”式货运飞船,“猎鹰”-9V1.1运载火箭在外观上与此前的“猎鹰”-9版本存在不同之处,最为典型的就是增加的可收放的着陆支架,起飞时着陆支架贴着火箭第一级发动机外壁上,进入降落持续后开始展开。
根据“猎鹰”-9V1.1的标准降落程序,第一级发动机“隼”-1D液氧煤油发动机关机后开始级间分离,在此后的3分钟左右时间内重新启动发动机,第一次启动“隼”-1D后溅落的第一级发动机开始减速,关键目的在于初始段引导到向位于卡纳维拉尔角以东数百公里半径内的海面,当第二次重启后将控制第一级发动机的滚转速率,使其停止滚转并控制好溅落姿态,使箭体与海面保持相对垂直。
图注:“猎鹰”-9V1.1运载火箭使用了全新的可收放着陆支架图注:“蚱蜢”火箭验证第一级发动机垂直降落可重复使用运载火箭需要有优异的发动机“猎鹰”-9V1.1运载火箭在本次发射任务表现出较好的状态,尤其是着陆支架在起飞过程中并没有影响火箭的姿态,在第一级返回溅落过程中“隼”-1D发动机的稳定性极佳,实现了两次重启,同时还完成了对第一级下落姿态的控制。
“猎鹰”-9V1.1比此前的基础型号长度更长,而且有效载荷能力也有较大的提升,但任务模式与此前是一致的,都是为国际空间站运送货物,发射工位也都在位于佛罗里达州的卡纳维拉尔角基地,“猎鹰”-9V1.1的第一级为“隼”-1D发动机,其动力构成与太空探索技术公司测试的“蚱蜢”火箭一样,但与标准型的“猎鹰”-9有区别,后者使用了“隼”-1C发动机。
“隼”-1D发动机的垂直返回技术已经在“蚱蜢”火箭上进行了测试。
2012年9月,SpaceX公司在得克萨斯州的试验场进行了“蚱蜢”火箭的首次试飞,高度达到1.8米,悬空时间为3秒左右,验证了火箭垂直起降达的可能性,首秀表演非常成功。
《卫星与网络》2020年09月020+ 宋强Falcon9系列任务手册全解读Copyright ©博看网. All Rights Reserved.Satellite & Network021从2010年6月4日到计划于11月5日(UTC)发射的第三代GPS导航定位的第四颗卫星,在10年5个月的时间里,Falcon 9系列将完成100次发射的壮举。
这里的Falcon 9系列包含了三发Falcon Heavy,但不包括2016年9月1日在发射台爆炸的那一枚。
之所以这么归类,是因为Falcon 9火箭,L E O能力从最早9900k g 的v1.0,到10450kg的v1.1,再到22800kg 的v1.2,能力提高了1倍有余,既然把它们都称为Falcon 9,那为什么不能将Falcon Heavy纳进来统一称为Falcon 9系列呢?(参见表1)100发,不仅是一个具有符号意义的数字,更是一个代表型号成熟的标志。
SpaceX成为业界关注的焦点久矣,也一直是航天业者的讨论热点,为什么一直讨论SpaceX呢?一方面是其确实出色,另一方面是因为其相对开放透明的对外策略:每次发射前有press kit,有视频直播,有各路大V在社交媒体上的表现等等。
本文要关注的就是这个press kit,直译过来是新闻资料袋,实际上就是个对外发布的任务手册,包含有空间任务的一些基本情况。
业界总在讨论Falcon 9火箭产品开发快速迭代、不断改进,这个小册子里应该或多或少都会有所体现,本文搜集了官方发布的SpaceX入轨发射的所有任务手册(截止到DM-2/Crew Dragon发射,共计86+3份)。
一、任务手册里包含了什么任务手册并不是SpaceX独有的,很多国外火箭一些可以公开的任务都有press kit,国内的也有,只是不在网上对外发布。
(参见图1)在早期,SpaceX的任务手册内容很丰满,有火箭、载荷、发射场、大工程背景、科学项目、公司、领军人物等各种信息的介绍,笔者关注的图1 Soyuz和Falcon9任务手册封面表1 Falcon 9系列一览Copyright ©博看网. All Rights Reserved.火箭这一部分,有详细的射前准备流程、飞行时序、发动机性能等信息,随着Falcon 9火箭的不断成熟,press kit的内容也在不断缩水,许多重复的内容都省略了,甚至在DM-2/Crew Dragon之后就停止了发布。
快讯猎鹰-9火箭发射“双小行星重定向测试”任务快报UTC时间2021年11月24日06时21分(北京时间11月24日14时21分),“双小行星重定向测试”(DART)探测器搭乘猎鹰-9火箭从范登堡空军基地发射成功。
这是2021年全球实施的第119次发射任务,是美国火箭的第44次发射任务。
“双小行星重定向测试”任务发射航天器概况本次任务共发射2个航天器,分别是“双小行星重定向测试”(DART)和“意大利小行星成像轻型立方体卫星”(LICIACube)。
(1)“双小行星重定向测试”探测器“双小行星重定向测试”(DART)是一项由行星防御驱动的技术试验任务,首次试验用于改变小行星运行轨道的动能撞击技术,旨在为防止小行星撞击地球奠定技术基础。
DART任务由NASA行星防御协调办公室(PDCO)和科学任务部的行星科学部门负责,具体由NASA马歇尔航天飞行中心的太阳系探索计划(Solar System Exploration Program)管理,由约翰霍普金斯大学应用物理实验室(APL)领导研制,NASA下属的喷气推进实验室(JPL)、戈达德航天飞行中心(GSFC)、约翰逊航天中心(JSC)、格伦研究中心(GRC)、兰利研究中心(LaRC)等为任务提供了支持,美国多所院校及天文台也参与了任务研制与观测。
此外,DART任务还携带了意大利航天局提供的立方体卫星LICIACube。
DART任务是一项行星防御试验任务,撞击近地双小行星系统——“迪蒂莫斯”(Didymos)中较小的天体Dimorphos,试验用于改变小行星运动轨道的动能撞击技术。
DART任务可揭示动能撞击过程中喷射物反冲动量的影响,帮助改进动能撞击影响的模型,降低预期撞击影响的不确定性,从而有助于未来的任务设计。
DART任务旨在测试动能撞击对于小行星动力学的影响,以及对小行星撞击后响应的观测。
DART的任务目标可以归结为:1)演示验证对Dimorphos 的动能撞击;2)改变Dimorphos环绕Didymos的轨道周期;3)利用地基望远镜观测撞击前后Dimorphos轨道周期的变化;4)测量撞击和由此产生的喷射物对于Dimorphos的影响。
猎鹰9号:SpaceX公司的成名之作2015年12月,猎鹰9号火箭进行了她的第20次发射。
当火箭把轨道通信公司(ORBCOMM)的11颗卫星推向太空后,猎鹰9号火箭的第一级在卡纳维拉尔角空军基地成功着陆,终于实现了SpaceX公司渴望已久的可回收火箭的初步验证。
猎鹰9-1.1全推力型火箭全长70米,直径3.66米,起飞推力6806千牛,起飞重量541吨。
猎鹰9号火箭的设计思路很明确:大量通用器件的应用缩短了研发周期和运营成本。
猎鹰9号是两级火箭。
第一级和第二级都采用默林1D发动机。
第一级采用9台默林1D发动机,第二级为1台加大喷管扩张比的默林1D真空型发动机。
也就是说,整枚火箭的主发动机用的是一个型号。
这种发动机通用的设计理念极大地简化了火箭对发动机系统的需求。
作为后起之秀的SpaceX公司来说,采用了在阿丽亚娜系列、东风-长征系列得到过验证的发动机通用理念的做法是很明智的。
猎鹰9-1.1火箭的第一级采用9台默林1D发动机。
默林采用燃气发生器循环,使用RP-1煤油和液氧作为推进剂。
该发动机是美国在进入21世纪后,从头开始研制的少有的火箭发动机之一(其实能够排的上号的就两个,第一要数洛克达因RS-68液氢液氧发动机,第二就是默林1D发动机了)。
默林发动机使用了早期在阿波罗计划里的登陆舱发动机上所使用的喉栓式喷嘴。
推进剂通过一个涡轮泵输出,进入燃烧室。
同时,涡轮泵也提供高压液体驱动液压控制器,之后进入低压燃料入口。
这样排除了对独立的液压动力系统的依赖,这意味着不会出现由于液压耗尽而失去对推力方向的控制。
涡轮泵的第三个用处是提供侧向推力来控制火箭自旋。
第1次发射:2010年6月4日;第2次发射:2010年12月8日;第3次发射:2012年5月22日;第4次发射:2012年10月8日;第5次发射:2013年3月1日;第6次发射:SpaceX公司的猎鹰9-1.1型运载火箭2013年9月29日在范登堡空军基地进行了首次发射,把加拿大航天局的“级联小卫星与电离层极区探测器”(CASSIOPE)空间天气观测卫星和搭载的5颗小卫星送入低地轨道。