RC空调操作手册
- 格式:pdf
- 大小:599.69 KB
- 文档页数:12

<区分> <种类> <名称> <规格番号> REV.0技术资料RCW 吸收式制冷机控制盘使用说明书YCR019C-H032RCW吸收式制冷机控制盘使用说明书发行烟台荏原空调设备有限公司烟台荏原空调设备有限公司目录1前言 (4)1-1关于操作使用 (4)1-2安全注意事项 (4)1-3使用注意事项 (5)1-4其它注意事项 (6)1-5关于检查保养 (6)2 概要 (7)2-1功能 (7)3 触摸屏 (8)3-1 外观及键盘操作部分 (8)3-2 画面构成 (9)3-3 画面解说 (10)3-3-1画面切换 (10)3-3-2功能键 (11)3-3-3输入设定值 (12)3-3-4项目切换 (13)3-3-5状态显示灯 (14)3-4流程画面 (15)3-5机组状态画面 (16)3-6数据显示画面 (17)3-6-1数据显示一 (17)3-3-2数据显示二 (18)3-7系统曲线画面 (19)3-7-1操作 (19)3-7-2曲线画面 (20)3-8故障显示画面 (21)3-8-1故障发生画面 (21)3-8-2预置报警显示画面 (23)3-8-3故障履历画面 (24)3-9设定输入一画面 (25)3-9-1温度设定画面 (26)3-9-2 时间设定画面 (27)3-9-3冷却水温度控制 (28)3-9-4运转切换操作 (29)3-9-5功能选择画面 (30)3-9-6定时开关机 (31)☆本书的标记说明本书按以下规则做成『』:表示显示画面的大项目。
《》:表示显示画面的小项目及显示灯。
【】:表示显示画面上的切换/选择键开关。
前言值此之际,非常感谢使用烟台荏原的RCW 吸收式制冷机。
本说明书主要对RCW 控制盘的部分显示内容、操作说明及安全方面的必要事项进行说明。
关于操作使用为了让用户能够安心使用,本公司认真谨慎的制作了RCW 控制盘。
使用过程中如果操作失误,可能会引起意想不到的故障或事故,所以使用之前请务必认真阅读本使用说明书,以便正确使用,延长吸收式制冷机的使用寿命。
![RC系列变频器说明书-中文版[1]](https://uimg.taocdn.com/397e121514791711cc79176a.webp)

RCK CH402 温度控制器使用说明书感谢您购买本系列温控器,请事先详细阅读此“使用说明书”,本说明书中的资料如改动恕不通知,敬请谅解。
本温控器的制造经过严格地品质管理,如遇有不正常的状态或显示,请即刻与北京四通股份公司工控部或您的供应商联络。
第1章准备篇 1.型号定义┄┄┄┄┄┄┄┄┄┄┄┄┄┄┄┄┄1-12.安装┄┄┄┄┄┄┄┄┄┄┄┄┄┄┄┄┄1-22.1外形尺寸2.2安装方法3.接线3.1端子构成3.2接线注意事项4.规格4.1输入4.2设定4.3显示4.4输出第2章功能篇 1.控制1.1PID控制1.2加热、冷却控制1.3正动作、逆动作1.4自动演算(AT)功能1.5自主校正(ST)功能1.6设定数据锁(LCK)功能2.报警2.1温度报警2.2加热器断线报警(HBA)2.3控制环断线报警(LBA)3.输入异常时的动作第3章操作篇 1.设定前状态2 S V设定模式3.参数设定模式4工程师参数设定模式第4篇通讯篇(仅限CD系列表)第5篇其它第1篇准备篇1.型号定义请参照下列代码表确认产品是否与您指定的型号一致。
CD/CH □01/02□□□-□□*□□-□□①②③④⑤⑥⑦⑧⑨⑩①规格尺寸详见第1篇2.1节②控制类型F:PID动作及自动演算(逆动作)D:PID动作及自动演算(正动作)W:加热/冷却PID动作及自动演算(水冷)*1A:加热/冷却PID动作及自动演算(风冷)*1③输入类型:见输入范围表④范围代码:见输入范围表⑤第一控制输出(OUT1)(加热侧)M:继电器接点输出8:电流输出(DC4~20mA)V:电压脉冲输出G:闸流控制管驱动用触发器输出T:闸流控制管输出⑥第二控制输出(OUT2)(制冷侧)*2无记号:当控制动作是F或D时M:继电器接点输出T:闸流控制管输出V:电压脉冲输出8:电流输出(DC4~20mA)⑦第一报警(ALM1),⑧第二报警(ALM2)*2N;未设报警J:下限输入值报警A:上限偏差报警K:附待机上限输入值报警B:下限偏差报警L:附待机下限输入值报警C:上、下限偏差报警P:加热器断线报警(CTL-6)*3 D:范围内报警S:加热器断线报警(CTL-12)*3 E:附待机上限偏差报警R:控制环断线报警*4F:附待机下限偏差报警V:上限设定值报警G;附待机上下限偏差报警W:下限设定值报警H:上限输入值报警⑨通信功能(仅限CD系列)N:无通信功能5:RS-485(双线系统)⑩防水/防尘功能N:无防水/防尘功能1:有防水/防尘功能注:*1W或A型无自主校正功能*2第二控制输出(OUT2)﹑第二报警(ALM2)为选项*3不能被定为第一报警(ALM1)*4控制环断线报警只能在第一报警和第二报警中选择其一2.安装2.1外形尺寸2.2安装方法⑴按照盘面开孔尺寸在盘面上打出用来安装仪器的矩形孔。

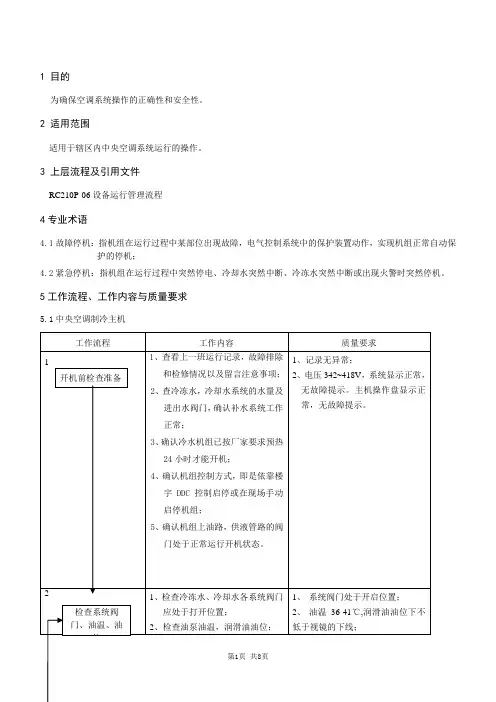
1 目的
为确保空调系统操作的正确性和安全性。
2 适用范围
适用于辖区内中央空调系统运行的操作。
3 上层流程及引用文件
RC210P-06设备运行管理流程
4专业术语
4.1故障停机:指机组在运行过程中某部位出现故障,电气控制系统中的保护装置动作,实现机组正常自动保
护的停机;
4.2紧急停机:指机组在运行过程中突然停电、冷却水突然中断、冷冻水突然中断或出现火警时突然停机。
5工作流程、工作内容与质量要求
5.1中央空调制冷主机
5.2.冷水机组运行参数(表1)
5.3停机操作程序与紧急停机
5.4正常停机程序为正常启动程序的逆过程,见下图:离心式制冷机组正常停机操作顺序示意图。
5.5制冷设备的紧急停机和事故停机的操作(表2)
6相关记录
6.1《值班记录表》
6.2《中央空调(配套设备)运行记录表》6.3《中央空调(主机)运行记录表》
7文档历史History of Document。

[F1] [F2] 开关屏幕更改为 ③⇒④⇒⑤ 屏幕更改为 ①⇒⑧⇒⑤主子线控器版本:程序 ID :请设定为主机或子机。
主子如果在 10 分钟内未建立通信,红色 LED 将闪烁。
⑤TOP 画面菜单风向冷房16:14(周一)F1:高能力运转F2:节能运转定时器设定停止中。
设定温度③室内机检索打开室内机检索中④室内机信息采集打开室内机信息获取中。
距离完成约需 1230 秒钟。
已设定主/子时屏幕更改为 ⑧⇒⑤。
屏幕更改为 ⑦。
如果超过 15 秒没有按屏幕,选择 (继续),显示屏更改为 的屏幕。
⑧初始化设定打开线控器初始设定中。
⑥设定继续确认是否保持上电前的设定?是否屏幕更改为 ①⇒②。
屏幕更改为 ⑥。
初始化之后,返回默认状态。
屏幕更改为 ①⇒②。
屏幕更改为 ⑥。
初始化之后,返回默认状态。
⑦初始化确认是否初始化全部线控器设定?是否通过 ▲ ▼ 按钮选择日期并按 设定 按钮。
显示所选屏幕。
显示所选屏幕。
可以在冷房停止时运转。
当室温低到开始冷房试运转时,通过将设定温度降低至 5°C,运转 30 分钟。
排水泵可以单独运转。
⑧冷房试运转冷房试运转返回开始点击开始后,以冷房模式设定 5°C ,试运转 30 分钟。
经过 30 分钟及变更 TOP 画面上的运转/停止、运转模式、设定温度的设定,则试运转结束。
排水泵试运转返回运转停止请选择设定。
安装日登录年月日返回设定请设定年月日。
安装设定安装日登录售后信息输入试运转风管机静压修正自动地址变更下一页返回请选择设定。
安装设定主室内机地址设定室内机后备运转功能红外线传感器设定面板升降操作上一页返回请选择设定。
使用最多 13 个字符登记联络人的电话号码,然后按 设定 按钮。
⑥登记联络人电话联络人电话返回设定删除请输入联络人电话并按“设定”。
输入售后信息。
售后信息输入联络人联络人电话返回请选择设定。
使用最多 26 个单字节字符登记联络人的姓名,然后按 设定 按钮。

rck rz01空调遥控说明使用方法:制冷模式Refrigeration mode1、按“模式”键,转换为雪花符号。
直接制冷。
和温度键配合使用。
自动模式Automatic mode2、按“模式”键,转换为三角尖符号。
一般是昼夜温差较大的情况下使用,空调根据室内温度自动调节。
温度高就制冷,温度低,就制热。
比较方便。
注意这个状态下是设置不了温度键的。
右边温度键为空白。
除湿模式Desiccant mode3、按“模式”键,转换为水滴符号。
代表室内湿热的话可以抽湿。
而且工作不连续,只抽湿。
时值盛夏,雨后和闷热的天气,空气中湿度大。
此时开启“除湿”模式,既能除湿,又能保持室内适宜的温度。
送风模式Air supply mode4、按“模式”键,转换为风扇符号。
空调风扇工作,主要一般在室内一晚上没通风后第二天给室内通风换气。
制热模式Heating mode5、打开空调开关,当前显示的是太阳模式,代表室内制热。
一般在冬天使用得多。
注:遥控器处于关机/待机状态下,同时按“模式”、“-”键(温度减键)可进行摄氏度(℃)和华氏度(℉)的转换。
注:如图,此时同时按“模式”、“-”键(温度减键)即可切回摄氏度(℃)。
强劲按键:仅在制冷和制热模式下按此键设定强劲开(显示“强劲风”字样)或关(不显示“强劲风”字样)。
不建议长时间使用强劲按键。
在选择了睡眠功能的情况下均屏蔽强劲功能,此时强劲按键只作为进入睡眠3的设定和查询的确认键使用。
具体操作方法见“睡眠按键”的操作说明。
灯光按键:按此键,可控制空调显示器上灯光开与关。
注:对于不适应夜间灯光而影响睡眠的用户,可使用遥控器灯光键,选择面板显示灯开启或关闭状态静音按键:按此键可设定静音开(显示“静音”字样)或关(不显示“静音”字样)。
注:通电后默认为静音关。
干燥辅热按键:在制冷和除湿模式下,按此键设定干燥开(显示“干燥”字样)或关(不显示“干燥”字样)。
在制冷和除湿模式下干燥关机内风机会低风挡运行12分钟左右,目的是吹干蒸发器上门水分防止霉变,此时做好客人投诉不会关机的解释工作。
rc-86x1线控说明书
1.使用时请保持空气流通。
2.请勿让风直接吹向壁炉或取暖装置上。
3.请勿爬在空调器.上面或在上面放置物件。
4.请勿在室内机组上悬挂物体。
5.请勿在空调器上放置花瓶或其他盛水的容器。
6.请勿直接让空调器暴露于有水的环境下。
7.请勿湿手来操作空调器。
8.请勿使用尖锐物体触碰开关。
9.长时间不使用本机时要把电源关掉。
10.在清洁空调器或更换空气过滤网时,请关闭断路器。
11.连接阀门在加热时会变得很烫,请小心处理。
12.检查安装支架确认有没有损坏。
13.请勿让动物或植物处于出风路径。
14.过了漫长的冬天后,在重新启动本机之前,必须接通电源开关最少12小时。
15.请勿饮用空调器所排出的水。
16.请勿在存有食物、植物或动物、精密仪器或艺术品的环境下使用。
17.请勿向热交换器铝片施压力。
18.必须装.上空气过滤网才进行操作。
请勿阻塞或遮盖进气格栅和排气口。
请确保室内机组或室外机组与其他电器用品之间的距离至少-米。
请避免在壁炉或其他取暖装置附近安装空调器。
安装室内机组和室外机组时,请避免让孩童接近。
请勿在空调器附近使用可燃性气体。

DC10RC / DC12RCBW / DC15RCBW Reverse Cycle Portable Air Conditioner with DehumidifierINSTRUCTION MANUALPLEASE READ THE INSTRUCTION MANUAL CAREFULLY BEFORE USING THE UNIT.CONTENTSANDPRECAUTIONS 1 WARNINGS3 STRUCTURE4 OPERATIONMAINTENANCE 12 ANDCLEANINGCODES 13 ERROR14 TROUBLESHOOTINGDATA 15 REFERENCETECHNICAL16 WARRANTYIMPORTANT INFORMATIONCarefully read this instruction manual before you install or useyour portable air conditioner. Please retain this manual for product warranty and for future reference.CAUTION• Make sure the inlet and outlet vents are never blocked.• Ensure the appliance is on a stable, even surface when operating to avoid water leakage.• Do not operate this unit in an explosive or corrosive atmosphere.• When switched to cooling, only operate this unit in ambient temperatures between 17°C and 43°C. For heating, only operate this unit in ambient temperatures between 5°C and 23°C.• Clean the air filter frequently to ensure efficient operation.• To prevent compressor damage when the unit has been operating and is turned off, please wait at least 3.5 minutes before restarting.• This unit needs to be plugged into a 220-240V ~ 50Hz AC, 10 Amp power outlet.• Do not use any extension cords with this unit.• This unit is for indoor operation only.• Open the adjustable air vent and extend the exhaust pipe (and drain pipe, if fitted) to the closest window before using.• After starting the unit, the fan will run first and the cooling display light will be flash for 3 minutes until then compressor starts working.• Only professional technicians, manufacturers or service agents can replace a damaged power cord.• When the batteries no longer work, they must be removed from the remote control and disposed of safely.• This appliance is not intended for use by persons (including children) with reduced physical, sensory or mental capabilities, or lack ofexperience and knowledge, unless they have been given supervision or instruction concerning use of the appliance by a person responsible for their safety.• Children should be supervised to ensure that they do not play with the appliance.• The appliance can only be connected to power source less than0.219Ω.• Clear the water before move the unit.IMPORTANTThe air conditioner must always be stored and transported upright. In case of doubt we suggest you wait at least 24 hours before operation. (Please keep the unit upright at all times) PACKAGE CONTENTS• Portable air conditioner• Remote control• Batteries for remote control• Extendable window kit• Water tray1. Controls2. Remote receiver3. Adjustable air vent4. Window kit adaptor5. Exhaust tube6. Upper drain plug7. Cool air inlet8. Cool air filter9. Hot air inlet10. Hot air filter11. Lower drain plugSTRUCTURENote: Make sure drain plugs (6 and 11) are fitted before use.BEFORE FIRST USE• Please read these instructions carefully before use and keep them for future reference.• Check your local main voltage whether it is the same as stated on the appliance.• Before using for the first time, remove any protective films or stickers from the appliance and ensure the control knob is in the “OFF” position. • Make sure drain plugs (5 & 9) are fitted before use.CONTROLS & DISPLAYICON DESCRIPTION(1) POWER - Press the POWER button to turn the unit “ON” or “OFF”.The portable air conditioner is fitted with a compressor delay protection circuit. This protects the unit from possible damage due to rapid starting and stopping of its compressor. Compressor operation begins 3 minutes after the unit is switched on or the mode is switched from dehumidify to air conditioning.(2) FUNCTION Press this button to select cooling, heating or dehumidification. When the heating or dehumidification functions are used the upper drain plug (6) must be removed and a drain hose must be attached.(3) TEMP+ In cooling function, this button raises the set temperature by 1°C each time it is pressed to a maximum of 30°C. In heating function, this button raises the set temperature by 1°C each time it is pressed to a maximum of 25°C.(4) TEMP- In cooling function, this button lowers the set temperature by 1°C each time it is pressed, to a minimum of 17°C. In heating function, this button lowers the set temperature by 1°C each time it is pressed to a minimum of 15°C.The time taken to reach the desired set temperature will depend on the environment and the size of the space in which the unit is operating in. For example, if the ambient temperature is too hot or the room is too large, the rate at which the temperature descends will be slower and the cooling may be less effective.(5) DISPLAY The display indicates the current, the set temperature or the timer setting. When the timer or temperature is adjusted, the new setting is shown then the display returns to the current set temperature.The display is also used to show error codes should a fault occur, see ERROR CODES.(6) SPEED Press SPEED to select LOW, MEDIUM, HIGH or AUTO fan speed. If AUTO fan speed is selected, the unit operates at maximum capacity and high fan speed while the room temperature is more than 2°C from the set temperature. When the room temperature is within 2°C ofthe set temperature, the unit operates at medium capacity and fan speed. Once the room temperature equals the set temperature, the unit will operate at minimum capacity and low fan speed to efficiently maintain the desired temperature. When HIGH, MEDIUM or LOW speed is selected, the unit operates at maximum capacity until the set temperature is reached. The fan operates at the selected speed.Note: When the unit is in heating mode, only HIGH, LOW fan speed can be selected.(7) TIMER ON/OFF button for the programmable timer.The timer can be used to turn the unit on automatically after a set time delay is complete.1. With the unit OFF, press the “TIMER” button to set the desired timedelay before the unit is to start.2. Choose the function desired (cooling, heating or dehumidification.)3. Once the set time delay is complete, the unit will turn on automatically.4. If you press the “POWER” button before the time delay is complete, thedelay will be cancelled and the unit will turn on immediately.The timer can be used to turn the unit off automatically after a set time period is complete.1. With the unit ON, press the “TIMER” button to set the desired time forthe unit to remain on.2. Once the set time period is complete, the unit will turn off automatically.3. If you press the “POWER” button before the time delay is complete, thedelay will be cancelled and the unit will turn off immediately.(8) SLEEP Press the SLEEP button to select the sleep comfort mode. When the unit is cooling and sleep mode is selected, the unit will raisethe set temperature 1°C each hour to a maximum of 2°C over two hours. When the unit is heating and sleep mode is selected, the unit will lowerthe set temperature 1°C each hour to a maximum of 2°C over two hours. These temperatures will be maintained for the balance of the time setand help maximize sleep comfort.When setting the “sleep comfort” mode, please ensure that you set the number of hours required by using the TIMER function. The hours setwill be shown on the display by pressing either the TEMP+ or TEMP buttons.REMOTE CONTROLINSTALLATIONUnpacking the unit:Remove the exhaust tube from its storage underthe rear air outlet. Replace the rear air outlet.Install the exhaust tube by rotating it clockwise ontothe rear air outlet. Please ensure it is fully insertedbefore use.Locating the unit:Install the portable air conditioner in a flat locationwith adequate space to ensure the air inlets andoutlets will not be blocked.Keep a minimum clearance of 50cm from walls andother objects. Locate the unit to allow the exhaustpipe and drain hose to reach a suitable window, asshown.Avoid sharp bends or kinks in the exhaust pipe. The optional adjustable window slider is included to ensure the exhaust pipe is held in place (in the window) and prevents expelled hot air re-entering the room.The appliance should not be used in damp areas such as a laundry or bathroom.Do not place the unit where it will be in direct sunlight as it may overheat and turn off.ADJUSTABLE WINDOW SLIDER KITThe adjustable window slider kit is installed as shown below:HEATING & DEHUMIDIFICATIONWhen the heating or dehumidification functionsare used the upper drain plug (6) must beremoved and a drain hose* must be attached.*Drain hose is not supplied.HEATINGWhen using the heating function move the rear air outlet with the exhaust tube to the front of the unit as below:NOTE: The outlet exhaust must still be attached to the window when using the heating function. Return the outlet and tube to the rear of the unit for cooling or dehumidification.WATER DRAIN (Error Code E4)When the air conditioner is used, excess water condensation may be produced that cannot be removed via the exhaust hose. This water is captured by an internal container. When this container is full, the unitwill stop working and display the E4 error code. When the error code is displayed the water collected must be manually drained.1. Switch off and unplug the unit.2. Move the unit to a suitable place to drain the water. Consider placinga tray or suitable container under the outlet pipe to catch the drainedwater.3. Remove the lower drain plug (11), refer to parts illustration.4. Slightly tilt the unit to the rear to drain the water.5. Replace the drain plug. Ensure the drain plug is re-fitted to the drainoutlet before use.NOTE: Extend the exhaust to the window before the unit is restarted.CLEANING & MAINTENANCECLEANING THE FILTERSWARNING: Always unplug the unit before moving or before any cleaning.The air filters located on the rear of the unit can be removed simply by pulling the filter frame slightly out and then across to the side.CLEANING THE CABINETWipe with a damp cloth and polish with a soft cloth.CARE TIPS1. Only plug the unit into a suitable 220-240V~ 50Hz AC 10 AMP power supply.2. Hold the plug when unplugging the unit, never pull on the cord.3. Do not place the unit in direct sunlight. This can fade the plastic case.4. Do not operate the unit in a confined space.5. Do not place objects on top of the unit. This blocks the air outlet.6. Do not place the unit where the air inlets or outlets may be blocked by curtains or furniture.7. Keep the filters clean.ERROR CODESOVERHEAT PROTECTIONThis unit is fitted with an overheat prevention device. If the unit overheats it will automatically turn off. The unit can be restarted after 30 minutes.ERROR CODESError codes are shown on the display should a fault occur.E1: Indicates open circuit or short circuit in the room temperature sensor. E2: Indicates open circuit or short circuit in the pipe temperature sensor. E4: Indicates the internal water container is full. Refer to WATER DRAIN.If error code E4 persists, please contact an authorized service centre.NOTE: Never try to repair or dismantle the air conditioner yourself. Unauthorized repairs may result in the loss of warranty and can endanger the user and their property.TROUBLESHOOTINGProblem Cause SolutionThe air conditioner does not operate.No power supply. Connect to a functioningpower supply socket &switch on.Error code E4 is shown,indicating the internalwater container is full.Empty the internal watercontainer. (Refer to ‘waterdrain’ section)The start timer function isactive.Press the power buttonto deactivate the timerfunction.The air conditioner does not seem to operate efficiently.The air conditioner is indirect sunlight/Close the curtains.Windows or doors areopen.Close the windows anddoors.The filters are dirty.Clean the filters.The air inlets or outletsare blocked.Remove the blockage.The room temperature isbelow the set tempera-ture.Lower set temperature.The air conditioner is noisy.The air conditioner is notlevel.Place the air conditionerThe compressor does not work.The overheat protectionis activated.Wait 30 minutes until thetemperature has de-creased, then turn the airconditioner on again.Note: Compressor op-eration begins 3 minutesafter the unit is switchedon.The remote control does not function.The distance betweenthe remote control andthe air conditioner is toogreat.Move closer to the airconditioner. Aim theremote control directly atthe control panel.The batteries are flat.Replace the batteries.TECHNICAL & REFERENCE DATADISPOSAL• Do not dispose of electrical appliances as unsorted municipal waste.Use separate collection facilities.• Contact your local government for information regarding the collectionsystems available.• If electrical appliances are disposed of in landfills or dumps, hazardoussubstances can leak into the ground water, polluting the food chain and damaging health and well-being.MAINTENANCEIf the unit fails to operate efficiently, is broken or other problems arise, unplug and do not operate. Ask for advice by calling your local after sales service agent or the Customer Care Centre on 1300 556 816 (AU) / 0800 666 2824 (NZ).SPECIFICATIONSWARRANTYThe warranty period is 24 months from the date of purchase. For service advice, please contact the Customer Care Centre on 1300 556 816 (AU) / ***********(NZ).Glen Dimplex Australia Pty Ltd Glen Dimplex New Zealand Ltd 1340 Ferntree Gully Road, 38 Harris Road, East Tamaki, Scoresby 3179, Victoria Auckland 2013ZealandAustralia NewPh: 1300 556 816 Ph: ***********。
关于RC空调(30KW)485卡的安装和设置1打开前门后如下图所示:
拆掉下边那块遮挡板.
只有左右两个螺丝.
拆掉后如下图:
会看见两块控制板.
在左手边(即第一块控制板)控制板的右上角位置会看见一个白色的9针的排针.如下图:
拿到485卡后,485卡插排凸起部分的朝向要和排针的缺口方向一致(即朝右,485接线柱的方向朝右).然后拆入即可.
安装完成后,设置面板
默认状态如下:
面板上有8个按键,从左至右:12345678
按一下:5
会出来一个设置界面,如下图:
然后按6,选择8:通信,按8,回车键,会出来另一个界面,如下图:
然后按回车键选中,按上下键修改各项设置即可.。
ICE系列无刷电子调速器RC(遥控器)设置操作指引特点:- 六个可调整进角或自动进角调整- 可调节锂/镍氢电池- 可调刹车.硬度和速度与软启动成正比。
- 可以通过RC设置编程使油门杆范围利用最大化- 可以在8KHz-16KHz 之间每次1KHZ调整PWM- 高频率对应低感应马达,- 频率越低开关损耗越少。
- 具有惯性滑行。
可以通过程序卡II来禁用或激活惯性滑行。
- 惯性滑行明显减少了部分负荷范围内的损失,不过会在极少数情况下导致出现问题。
有关速度控制方面,从部分负荷到全负荷会有一个粗略的过渡,从而避免了在全功率下接入调速模式。
RC设置:RC设置常规菜单蜂鸣音序列:摇杆在全油门时持续的单音蜂鸣表示是编程模式。
遥杆在空档位时一组逐渐减弱的蜂鸣音表示确认接收到讯号;接下来的其他蜂鸣音说明已识别到电池或电池类型;之后一组逐渐增强的蜂鸣音表示ESC已经准备好了!电调可以工作了请小心!正确的设置对于锂电池来说至关重要,因此,ESC每次通电时均会有声音发出。
Lipo设置(Lipo自动模式2-6(14)Cell)2声相同的蜂鸣音 => 2S Lipo 声音是3声相同的蜂鸣音 => 3S Lipo 声音是等等……为了成功识别3个甚至更多节数的电池芯,电池组应该总是处于充满电的状态!否则,如果遇到数量多的电池,可能会漏一个电芯,从而过晚导致低电压保护。
也可通过选用程序卡II设置电池单节数量。
6 节以上的电池,蜂鸣音就会变成两声高音两声低音的模式。
暗示这么多的蜂鸣音是不切实际的。
这么多的电芯无论如何不应用在自动模式上。
建议用程序卡设置电芯数量。
当每个电芯电压达到3.1V时,低压保护即被启动。
这是保守数值,然而它将可以延长锂电池寿命!因此,确认电池电芯数量非常重要,以免出现错误的低电压保护。
固定的电压下限只能通过编程卡II来进行设置,您也可以通过编程卡II对锂铁聚合物电池进行固定的电压下限设置。
镍镉/镍氢电池∙两声蜂鸣音高/低 => 镍氢模式低电压保护限制在约等于:0.65乘以每节的开路电压因此,如果起飞前是1.3V的开路电压,那么电压下限为0.91V/cell.一般来说,为了确保低压侦测的可靠度,飞行前应连接充满电的电池。
RC空调操作说明一、安装准备:1.在使用空调之前,请确保您已经购买了RC空调,并确认所有附件和配件是否完整。
2.确保空调安装位置足够稳固,并且有足够的空间供空调运转和维修。
二、安装空调:1.将室内机安装在离地面2米以上的位置,确保室内机与墙壁保持一定距离,以便于空气流通和维修。
2.将室外机安装在通风良好的位置,避免阳光直射和雨水侵入。
3.连接室内机和室外机的管道,并严格按照说明书连接各个部件。
4.接通电源,并确保电源电压和频率与空调要求相符。
5.打开主机面板,按照说明书对室内机进行初次操作和设置。
三、空调操作:1.打开电源:按下遥控器上的电源按钮或在室内机面板上的电源开关,使空调进入待机状态。
此时,室内机上的指示灯应亮起。
2.调节温度:使用遥控器或室内机面板上的温度调节按钮,将温度调至您所需的设定温度,空调将自动调节室内温度。
3.模式选择:-制冷模式:按下遥控器上的制冷模式按钮或在室内机面板上选择制冷模式图标,空调将开始制冷,并根据设定温度自动调节风速和制冷功率。
-制热模式:按下遥控器上的制热模式按钮或在室内机面板上选择制热模式图标,空调将开始制热,并根据设定温度自动调节风速和制热功率。
-送风模式:按下遥控器上的送风模式按钮或在室内机面板上选择送风模式图标,空调将仅提供室内通风,不进行制冷或制热。
-自动模式:按下遥控器上的自动模式按钮或在室内机面板上选择自动模式图标,空调将根据室内温度自动选择制冷或制热模式,并调节风速和功率。
4.风速选择:使用遥控器或室内机面板上的风速调节按钮,可以选择不同的风速档位,以改变空调送风的风速和舒适度。
5.定时功能:按下遥控器上的定时功能按钮,可设置空调的开启或关闭时间,方便您提前预约空调工作时间。
6.睡眠功能:按下遥控器上的睡眠功能按钮,空调将根据设定的睡眠温度和时间逐渐调整室内温度,提供更舒适的睡眠环境。
7.清洁与保养:定期清洁空调滤网和内外机外壳,以确保空调的运行效果和使用寿命。
InRowRC精密空调用户操作指南路径:主菜单>On/Standby>按ENTER键,改变状态到On。
空调会根据此前的设置信息运行。
停机路径:主菜单>On/Standby按ENTER键,把选项改为Standby,即机组会进入待机状态。
查看报警路径:主菜单>ViewAlarm在到屏幕可以到查看报警的序号,紧急程度,和基本描述。
按下箭头其他报警内容。
查看/更改设置点路径:主菜单>SetGroupSetpoint设置点是指客户期望达到的机柜前端,进入服务器的气流的温度。
所有的设定值需要在以下范围内:Cool:18.0–25.0°CSupplyAir:17.0–23.0°CFanSpeed:any可以看注:如果需要更改设置点,需要输入密码。
默认密码为apc(小写)。
查看运行状态路径:主菜单>ViewUnitStatu在此屏幕下可以看到如下信息:OpMode:显示设备的运行状态,有on,tandby和idle三种模式。
注:Idle说明设备有报警发生并没有解除。
CoolOutput:显示设备实际输出的制冷量。
CoolDemand:显示为达到设置点的温度所需要设备输出的制冷量。
SupplyAir:显示设备送风温度。
ReturnAir:显示设备回风温度。
RackInlet:显示机柜进风温度。
PowerSource:显示电源供电的路径。
注:InRowRC为双路电源供电。
分别为powerourceA和powerourceB.可以分别接入市电和UPS。
FluidIn:冷冻水供水水温。
注:标准范围是7-8C.供水温度过高,在同样的水流量下,会导致设备制冷量下降。
FluidOut:冷冻水出口水温。
FluidFlow:冷冻水流量。
FluidVlvPo:阀门开启度。
AirFlow:送风量。
FanSpeed:风扇转速。
单位为%。