521自动门说明书
- 格式:pdf
- 大小:929.42 KB
- 文档页数:14
泉州市捷盾电子科技有限公司奥力斯自动门使用说明书 OLIS R 平移门驱动装置 Automatic door beam device 使用说明书 Instruction 2012-7 客户服务电话:400-6622-863泉州市捷盾电子科技有限公司 Automatic Door 奥力斯自动门使用说明书有关安全的注意事项用户务必遵守的内容和种类以下图示和说明警告注意处理失误时,会产生令使用者死亡或负重伤的可能。
处理失误时,会产生令使用者受到伤害或发生物质上损失的可能性。
此图表示必须进行的“强制性”内容。
此图表示不得进行的“ 禁止”内容。
警告施工和调整请务必按照施工说明进行。
施工和调整中如有不慎,会造成火灾、触电、坠落等事故。
施工作业时请勿让通行者通过自动门或靠近作业现场。
如工具或部件不慎坠落,会造成人员伤害。
请勿改造零部件。
会造成火灾、触电、坠落等事故。
请勿使用规定电压、频率以外的电源。
会造成火灾、触电等事故。
请设置、调整传感器、使门的开口部位充分进入检测范围,不出现死角。
如检测范围过小或留死角,会使通行者被门冲撞或夹击,造成伤害。
请务必设置安全光线,确保门扇行走部位的检测范围。
否则会使通行者被门扇冲撞、夹击,造成伤害。
15 C M以上15 C M以上 15 C M以上 15 C M以上门扇传感器检测范围小于通行者的大小传感器检测范围 12 C M以上传感器检测范围 12 C M以上 12 C M以上传感器检测范围 12 C M以上表示门扇行走部位的检测范围门扇万一上述检测范围无法确保,为保证通行者通过检测范围,请务必通过放置盆栽植物等方法限制通行,并向业主说明情况。
如有不慎,会使通行者被门扇冲撞、夹击,造成伤害。
1 客户服务电话:400-6622-863泉州市捷盾电子科技有限公司奥力斯自动门使用说明书使用说明书注意请勿将门使用于潮湿、有振动、有腐蚀气体产生的场所。
会造成火灾、触电、坠落等事故。
doormx自动门控制器说明书1、安装:应当由专业人员按照说明书的要求正确进行安装。
电源线和电机动力线应选用线径不小于1.5mm2铜芯护套电缆,其它控制线应选用导线截面不小于0.5mm2的铜芯电缆。
电源火线应接于控制器的L端,零线应接于控制器的N端。
机内保险应使用Ф5×20mm/6A的快速熔断器,严禁将机内保险作直接短路使用。
电动门的门头电机应接于机内的P1端子排。
报警器应接于机内的P4端子排。
其他基本控制线应接于机内P2端子排。
安装接线时应参照产品所附的接线图正确连接。
尤其要注意,不得将低压控制线接于高压端子上或将高压控制线接于低压端子上。
控制器的接线安装除本产品规定的事项外,其他事项应遵守电气安全操作规程的有关规定。
控制器的安装位置根据用户的具体情况选择适当位置悬挂于五磁场干扰的墙体上。
安装高度距地面不应小于1.2m。
引出的电缆应沿墙体固定牢固。
通电前应对全部安装工作进行全面检查,确认无误之后方可送电试机。
探头安装于室外适当高度,角度可以调整。
2、操作:门体开关手动控制:接通电源后,控制器数显窗口中间应显示“-”,此时为控制器的待机状态。
控制器面板上的四个按键分别是“关门”、“停止”、“开门”、“报警”。
按下“开门”或“关门”键时,显窗口应分别显示“H”或“E”。
此时门机拖动门体运动,控制器此时并有低频讯响声发出。
门体在运动时,当限位开关起作用或自动延时动作,门体自动停止运动,此时低频讯响声自动停止发声。
由开门到关门,或有关们到开门转换时,必须按动停止键方可进行转换。
门体开关遥控控制:遥控器的“A”键对应手动开关的“开门”,“B”键对应手动开关的“停止”,“C”键对应手动开关的“关门”,“D”键对应手动开关的“报警”功能。
使用时,按下遥控器相应的功能键约1――0.5S时门体将按照既定功能运动或停止,其操作过程同手动控制。
遥控器的控制距离与现场的电磁场强弱、遥控发射器的电池电压、气候的变化等因素有一定影响,这是正常现象,使用拉杆天线可适当增加控制距离。

灵锐系列操作手册通用版用户指导手册目录功能说明>前言>产品结构说明>产品功能说明>O LED显示说明>按键设定说明>语音响声含义说明数据下载更新说明>下载与更新GPS状态>GPS主要规格说明>无法取得卫星信号因素>GPS异常警示状态目前警方制式系统与产品保修>目前警方制式系统>重要原厂保证需知>产品保修凭证>打假维权声明前言亲爱的用户您好:首先非常感谢您使用我公司系列产品,除恭喜您挑选到好的产品外,也为您正确的选购有完善保固及有服务质量的产品,而替您庆幸不已,汽车雷达侦测器在全球各地虽行之有年,然而全球各地之汽车雷达业者良莠不齐,营销花招百出,广告夸大不实,已令广大消费者眼花缭乱无从选择,再加上各家公司对于商品本质之感度及侦搜范围,大多无专业仪器进行测试,而造成即使于市场知名度很高的商品,仍免有不堪使用之劣质商品充斥其中贩卖,造成消费者人人只能自求多福,同样是雷达侦测器,为何我们就是比人家好?因为我们一直很用心,希望带给您行车更安全!本公司自成立以来,无论商品的质量保固,都做到每一位顾客有口皆碑外,诚实不夸大,诚实标价不欺骗,落实于每一位销售环节中,贵为市场之清流,堪称业界之表率,更领先全国销售同业,引进百万专业仪表检查仪器,严格把关,使得公司所营销之商品,有大幅度超越一般市销商品的质量与性能,进而使您购买到最优良的商品。
最后除再次感谢您的肯定与惠顾,也同时希望您能主动对本公司未尽周全之处指教,亦在此呼吁驾驶人安全第一,生命无价,又我们能期待所有使用者,都能详细技术手册,所谓知己知彼,对警方测速设备执勤原理及程序多一分了解,就多了一份安全与胜算,期盼每位驾驶员都能快快乐乐出门,平平安安回家。
祝:万事如意,事事顺心!>产品结构说明(此图只用于按键说明,图片可能与您机器略有差异,仅供参考。
)>产品功能说明锌合金散热功能:专利的锌合金外观除了提供完美的客户质感外,还保证了整机优良的散热能力,增强了机内电子元器件的使用寿命。
1FAAC S.p.A.Via Benini, 140069 Zola Predosa (BO) - ITALIATel.: 051/61724 - Fax: 051/758518www.faac.it732143 Rev.A.EC DECLARATION OF CONFORMITY FOR MACHINES ....................................................................................p. 2 WARNINGS FOR THE INSTALLER .......................................................................................................................p. 2 1.DESCRIPTION AND TECHNICAL SPECIFICATIONS ....................................................................................p. 31.1.DIMENSIONS ................................................................................................................................p. 32.ELECTRIC DEVICES (standard system) ....................................................................................................p. 33.INSTALLING THE AUTOMATED SYSTEM ......................................................................................................p. 43.1.PRELIMINARY CHECKS ................................................................................................................p. 43.2.INSTALLATION DIMENSIONS ........................................................................................................p. 43.2.1.GENERAL RULES FOR DETERMINING THE INSTALLATION DIMENSIONS ............................p. 43.3.INSTALLATION OF THE OPERATORS .............................................................................................p. 44.START-UP ....................................................................................................................................................p. 64.1.ADJUSTING THE ANTI-CRUSHING SYSTEM ..................................................................................p. 65.FINAL OPERATIONS ...................................................................................................................................p. 76.AUTOMATED SYSTEM TEST .........................................................................................................................p. 77.MANUAL OPERATION ...............................................................................................................................p. 78.RESTORING NORMAL OPERATION MODE ................................................................................................p. 79.MAINTENANCE ..........................................................................................................................................p. 710.REPAIRS .....................................................................................................................................................p. 711.TROUBLE SHOOTING .................................................................................................................................p. 821)ATTENTION! To ensure the safety of people, it is important that you readall the following instructions. Incorrect installation or incorrect use of the product could cause serious harm to people.2)Carefully read the instructions before beginning to install the product.3)Do not leave packing materials (plastic, polystyrene, etc.) within reachof children as such materials are potential sources of danger.4)Store these instructions for future reference.5)This product was designed and built strictly for the use indicated in thisdocumentation. Any other use, not expressly indicated here, could compromise the good condition/operation of the product and/or be a source of danger.6)FAAC declines all liability caused by improper use or use other than thatfor which the automated system was intended.7)Do not install the equipment in an explosive atmosphere: the presenceof inflammable gas or fumes is a serious danger to safety.8)The mechanical parts must conform to the provisions of Standards EN12604 and EN 12605.For non-EU countries, to obtain an adequate level of safety, the Standards mentioned above must be observed, in addition to national legal regulations.9)FAAC is not responsible for failure to observe Good Technique in theconstruction of the closing elements to be motorised, or for any deformation that may occur during use.10)The installation must conform to Standards EN 12453 and EN 12445.For non-EU countries, to obtain an adequate level of safety, the Standards mentioned above must be observed, in addition to national legal regulations.11)Before attempting any job on the system, cut out electrical power .12)The mains power supply of the automated system must be fitted with anall-pole switch with contact opening distance of 3mm or greater. Use of a 6A thermal breaker with all-pole circuit break is recommended.13)Make sure that a differential switch with threshold of 0.03 A is fittedupstream of the system.14)Make sure that the earthing system is perfectly constructed, andconnect metal parts of the means of the closure to it.15)The safety devices (EN 12978 standard) protect any danger areasagainst mechanical movement Risks , such as crushing, dragging,and shearing.16)Use of at least one indicator-light (e.g. FAACLIGHT ) is recommendedfor every system, as well as a warning sign adequately secured to the frame structure, in addition to the devices mentioned at point “15”.17)FAAC declines all liability as concerns safety and efficient operationof the automated system, if system components not produced by FAAC are used.18)For maintenance, strictly use original parts by FAAC.19)Do not in any way modify the components of the automated system.20)The installer shall supply all information concerning manual operationof the system in case of an emergency, and shall hand over to the user the warnings handbook supplied with the product.21)Do not allow children or adults to stay near the product while it isoperating.22)Keep remote controls or other pulse generators away from children,to prevent the automated system from being activated involuntarily.23)Transit through the leaves is allowed only when the gate is fully open.24)The user must not attempt any kind of repair or direct action whateverand contact qualified personnel only.25)Maintenance: check at least every 6 months the efficiency of thesystem, particularly the efficiency of the safety devices (including,where foreseen, the operator thrust force) and of the release devices.26)Anything not expressly specified in these instructions is not permitted.WARNINGS FOR THE INSTALLERGENERAL SAFETY OBLIGATIONSEC DECLARATION OF CONFORMITY FOR MACHINES(DIRECTIVE 98/37/EC)Manufacturer:FAAC S.p.A.Address:Via Benini, 1 - 40069 Zola Predosa BOLOGNA - ITALY Declares that:402 mod. operator,•is built to be integrated into a machine or to be assembled with other machinery to create a machine under the provisions of Directive 98/37/EC;•conforms to the essential safety requirements of the following EEC directives:73/23/EEC and subsequent amendment 93/68/EEC.89/336/EEC and subsequent amendment 92/31/EEC and 93/68/EECand also declares that it is prohibited to put into service the machinery until the machine in which it will be integrated or of which it will become a component has been identified and declared as conforming to the conditions of Directive 98/37/EC.Bologna, 01 January 2005The Managing DirectorA. Bassi3These instructions apply to the following models:402 CBC - 402 SBSThe FAAC 402 automated system for swing leaf gates consists of an enbloc composed of an electric pump and a hydraulic piston which transmits drive to the leaf.The model with a hydraulic locking does not require installation of electric locks, as it guarantees mechanical locking of the leaf when the motor is not operating.The model without a hydraulic locking, requires the installation of electric locks to ensure the leaf is mechanically locked.The 402 automated systems were designed and built to automate swing leaf gates. Do not use for any other purpose.Tab. 1: Technical specifications of “402 Operator”MODEL402 CBC402 SBSPower supply voltage 230 Vac(+6%-10%) 50 (6o) Hz Rod extension speed 1.3 cm/s 1 cm/s Pump flow rate1 l/min 0.75 l/min Traction and thrust force 0-500 daN0-690 daNOperating ambient temperature -40°C - +55°CAbsorbed power 220 W Absorbed current 1 A Motor rotation speed 1400 rpm Motor winding temperature 120°C Weight 6.5 kg Type of oil FAAC HP OILProtection class IP 55Single leaf max length 1,80 m3,00 mUse frequency55 (cycles/hour)4To ensure a correctly operating automated system, the structure of the existing gate or gate to be built must satisfy the following requirements:•Max length of leaves according to the dimensions of Table 1 on page 3.• A strong and rigid leaf structure.•Smooth, uniform leaves movement, without any irregular friction during the entire travel;•Existing hinges in good condition.•Travel limit mechanical stops must be provided.We advise you to carry out the metalwork jobs before installing the automated system.The condition of the structure directly influences the reliability and safety of the automated system.Table A : Recommended dimensions for standard operatorsc = The effective rod stroke is shorter than the maximum stroke, inorder to prevent the rod from reaching its stop point internally, during the opening and closing stages.(*) Rod effective stroke (**) maximum dimension1)Fasten the rear attachment on the pilaster, following the indications in Table A . Modify, if necessary, the length of the supplied attachment.Attention : To avoid compromising good operator functionality, we recommend you to respect the indicated dimensions.• For iron pilasters, accurately weld the rear attachment (ref.ባ, Fig. 6) directly on the pilaster.• For masonry pilasters, select one of the following solutions:A)appropriately lay a walling-in plate and then accurately weld the rear attachment.B)secure, with screws and expansion plugs, the rear attachment plate (ref. a, Fig.6) to the pilaster and then accurately weld the rear attachment to theplate as shown in Fig. 6.If the dimensions indicated in table A or B cannot be executed,the following must be considered in order to determine different measurements:-to obtain 90° opening of the leaf: a + b = c.-to obtain over 90° opening of the leaf: a + b < c.-lower a and b dimensions will result in higher speeds . We advise you to observe the current legal regulations;-limit the difference of the a and b dimensions to within 40 mm :higher differences will considerably vary speed during the opening and closing motion;-for reasons of operator dimensions, the minimum Z dimension is 50 mm (Fig. 4);-if the pilaster dimensions or the position of the hinge (dimension d ) do not make it possible to contain dimension a to the required size, a niche must be made in the pilaster as shown in Opening angle 90°110°a (mm)120100b (mm)120100c(*)(mm)240240d(**)(mm)705056-Lastly, remove the key and restore the power supply to the system.For any repairs, contact FAAC’s authorised Repair Centres.78The following table will help you identify and solve some particular conditions.CONDITIONGate not moving.Gate moving slowly.Gate moving jogwise.The operator is losing oil from the breather screw.The leaves stop at slow-down.Gate speed not constant.A B CD E FSUGGESTION-Check if mains power is supplied.-Make sure that the operator is not unlocked. (chapter 8.).-Check the adjustment of the anti-crushing system (paragraph 4.1).-Check oil level inside the tank. (chapter 9 - Fig. 16).-Check the connection and operation of the thrust capacitor.-Check the efficiency of the electronic control unit.-Check the adjustment of the anti-crushing system (paragraph 4.1).-Make sure that you have removed the breather screw (chapter 5).-Run some complete gate opening and closing cycles, in order to release any air inside the piston.-An initial, minimum oil leak is normal. A larger leak may occur if the operator is not fitted in a perfectly horizontal plane. If the oil leak does not stop soon, weadvise you to visit an authorised repair centre.-Check the adjustment of the anti-crushing system (paragraph 4.1).-Incorrect installation dimensions (paragraph 3.2).Notes919M A I N T E N A N C E R E G I S T E R.o N e t a D b o j f o n o i t p i r c s e D se r u t a n g i S 1_______________________________________________________________________________________________________________________________________na i c i n h c e T re m o t s u C 2_______________________________________________________________________________________________________________________________________na i c i n h c e T re m o t s u C 3_______________________________________________________________________________________________________________________________________na i c i n h c e T re m o t s u C 4_______________________________________________________________________________________________________________________________________na i c i n h c e T re m o t s u C 5_______________________________________________________________________________________________________________________________________na i c i n h c e T re m o t s u C 6_______________________________________________________________________________________________________________________________________na i c i n h c e T re m o t s u C 7_______________________________________________________________________________________________________________________________________na i c i n h c e T re m o t s u C 8_______________________________________________________________________________________________________________________________________na i c i n h c e T re m o t s u C 9_______________________________________________________________________________________________________________________________________na i c i n h c e T re m o t s u C 01_______________________________________________________________________________________________________________________________________na i c i n h c e T re m o t s u C I n s t a l l a t i o n t e c h n i c i a n ________________________________________________C u s t o m e r ___________________________________________________________________T y p e of s y s t e m ________________________________________________________S e r i a l n u m b e r _________________________________________________________I n s t a l l a t i o n d a t e ______________________A c t i v a t i o n ________________________S y s t e m c o n f ig u r a t i o nT R A P L E D O M RE B M U N L A I R E S e r o t a u t t A 402C A A F 1e c i v e d y t e f a S 2e c i v e d y t ef a S 1s l l e c o t o h p f o r i a P 2s l l e c o t o h p f o r i a P 1e c i v e d l o r t n o C 2e c i v e d l o r t n o C lo r t n o c o i d a R pm a l g n i h s a l F ec i v ed re h t O ec i v ed re h t O I n d i c a t i o n of r e s i d u a l r i s k s a n d o f f o r e s e e a b l e i m p r o p e r u s e_________________________________________________________________________________________________________________________________________________________________________________________________________________________________________________________________________________________________________________________________________________________________________________________________________________________________________________________________________________________________________________________________________________________________________________________________________________________________________________________________________________________________________________________________________________________________________________________________________________________________________________________________________________________________________________________________________________________________Read the instructions carefully before using the product and store them for future useIf correctly installed and used, the 402 automated system ensures a high degree of safety.Some simple rules on behaviour can prevent accidental trouble:-Do not pass between the leaves when they are moving. Waitfor the leaves to open fully before passing through them.-Do not, on any account stay in between the leaves.-Do not stand near the automated system, and do not allowchildren, persons or things to do so, especially when it is operating.-Keep remote controls or other pulse generators away fromchildren, to prevent the automated system from being activated involuntarily.-Do not allow children to play with the automated system.-Do not willingly obstruct leaves movement.-Prevent any branches or shrubs from interfering with leavesmovement.-Keep indicator-lights efficient and easy to see.-Do not attempt to activate the leaves by hand unless you havereleased them.-In the event of malfunctions, release the leaves to allow accessand wait for qualified technical personnel to do the necessary work.-When you have set manual operation mode, cut power to thesystem before restoring normal operation.-Do not in any way modify the components of the automatedsystem.-Do not attempt any kind of repair of direct action whateverand contact qualified personnel only.-At least every six months: arrange a check by qualifiedpersonnel of the automated system, safety devices and earth connection.These instructions apply to the following models:402 CBC - 402 SBS.The FAAC 402 automated system for swing leaf gates consists of a hydraulic enbloc composed of an electric pump and a hydraulic piston which transmits drive to the leaf.The models with a hydraulic locking do not require installation of an electric lock, as they guarantee mechanical locking of the leaf when the motor is not operating.The other models, without a hydraulic locking always require one or more electric locks to ensure the leaf is mechanically locked.Leaves of up to 3 mt can be automated depending on the selected model.The functioning of the operators is controlled by an electronic control unit, housed in an enclosure with adequate degree of protection against atmosphere agents.The leaves are normally closed.When the electronic control unit receives an opening command from the radio control or any other pulse generator, it activates the hydraulic appliance which rotates the leaves until they reach the opening position to allow access.If automatic mode was set, the leaves close automatically after selected pause time has elapsed.If the semi-automatic mode was set, a second pulse must be sent to close the leaf again.A stop pulse (if supplied) always stops movement.For details on the behaviour of the automated system in different function logics, consult the installer.Automated systems include safety devices (photocells) that prevent the leaves from moving when there is an obstacle in the area they protect.The 402 automated system is supplied standard with a hydraulic anti-crush protection safety device (BY-PASS) which limits the torque transmitted to the leaves.The warning-light indicates the current leaf movement.If the gate has to be moved manually due to a power cut or fault of the automated system, use the release device as follows:-Insert the triangular key on the release screw located in the lower part of the flange (Fig.1).-Turn the release key anti-clockwise for about two turns.-Open or close the leaf manually.To prevent an involuntary pulse from activating the operator during the manoeuvre, cut power to the system before re-locking the operator.-To re-lock the operator, turn the key clockwise until it stops (Fig.1).-Release the operator from the front and rear attachments.732143 - Rev. A。
ARMOIRE DE COMMANDEPOUR MOTORÉDUCTEURS EN 120 V OU 230 VZF1N110 / ZF1NMANUEL D'INSTALLATIONFR FrançaisFA00679-FRP a g e 2- M a n u e l F A 00679-F R -v e r s . 1 - 12/2017 - © C A M E S .p .A . - L e c o n t e n u d e c e m a n u e l e s t s u s c e p t i b l e d e s u b i r d e s m o d i f i c a t i o n s à t o u t m o m e n t e t s a n s a u c u n p r éa v i s .Armoire de commande pour portails battants à deux vantaux. Les fonctions peuvent être confi gurées au moyen des commutateurs DIP et réglées à l'aide des trimmers.Toutes les connexions sont protégées par des fusibles rapides.Utilisation prévueL’armoire de commande ZF1N110 / ZF1N a été conçue pour la commande des motoréducteurs CAME pour portails battants à usage résidentiel ou collectif.Toute installation et toute utilisation autres que celles qui sont indiquées dans ce manuel sont interdites.Données techniquesCe symbole indique des parties à lire attentivement. Ce symbole indique des parties concernant la sécurité.Ce symbole indique ce qui doit être communiqué à l'utilisateur.INSTRUCTIONS IMPORTANTES DE SÉCURITÉ POUR L'INSTALLATIONATTENTION. UNE INSTALLATION INCORRECTE PEUT PROVOQUER DE GRAVES DOMMAGES, SUIVRE TOUTES LES INSTRUCTIONSD'INSTALLATIONLE PRÉSENT MANUEL N'EST DESTINÉ QU'À DES INSTALLATEURS PROFESSIONNELS OU À DES PERSONNES COMPÉTENTESP a g e 3 - M a n u e l F A 00679-F R - v e r s . 1 - 12/2017 - © C A M E S .p .A . - L e c o n t e n u d e c e m a n u e l e s t s u s c e p t i b l e d e s u b i r d e s m o d i f i c a t i o n s à t o u t m o m e n t e t s a n s a u c u n p r éa v i s .Attention ! Avant d'intervenir sur l'armoire de commande, mettre hors tension et déconnecter les éventuelles batteries.Contrôles préliminairesAvant d'installer l'armoire de commande, il faut :• s'assurer que la zone de fi xation est à l'abri de tout choc, que les surfaces de fi xation sont bien solides et que la fi xation est réalisée au moyen d'éléments appropriés (vis, chevilles, etc.) à la surface ;• prévoir sur le réseau d'alimentation, conformément aux règles d'installation, un dispositif de déconnexion omnipolaire spécifi que pour le sectionnement total en cas de surtension catégorie III ;• s'assurer que les éventuelles connexions à l'intérieur du boîtier (réalisées pour la continuité du circuit de protection) sont bien dotées d'une isolation supplémentaire par rapport aux autres parties conductrices internes ;• prévoir des tuyaux et des conduites pour le passage des câbles électriques afi n de les protéger contre la détérioration mécanique ;Page4-ManuelFA679-FR-vers.1-12/217-©CAMES.p.A.-Lecontenudecemanuelestsusceptibledesubirdesmodificationsàtoutmomentetsansaucunpréavis. Types de câbles et épaisseurs minimumOutils et matérielS'assurer de disposer de tous les instruments et de tout le matériel nécessaire pour eff ectuer l'installation en toute sécurité et conformément aux normes en vigueur. La figure illustre quelques exemples d'outils utiles àl'installateur.P a g e 5 - M a n u e l F A 00679-F R - v e r s . 1 - 12/2017 - © C A M E S .p .A . - L e c o n t e n u d e c e m a n u e l e s t s u s c e p t i b l e d e s u b i r d e s m o d i f i c a t i o n s à t o u t m o m e n t e t s a n s a u c u n p r éa v i s .AlimentationFixation de l'armoire de commandeFixer la base de l’armoire dans une zone protégée à l'aide de vis et de chevilles ❶. Il est conseillé d'utiliser des vis à tête cylindrique (6 x 70 mm).Percer les trous préforés (18 et 20 mm) sous la base de l'armoire ❷. Avoir soin de ne pas endommager la carte électronique.Introduire les passe-câbles avec gaines annelées pour le passage des câbles électriques ❸.120 V ou 230 VAC - 50/60 HzSortie alimentation accessoires 24 VAC - max. 20 WKRONOATIFASTFERNIKRONOATIFASTFERNI4321P a g e 6 - M a n u e l F A 00679-F R - v e r s . 1 - 12/2017 - © C A M E S .p .A . - L e c o n t e n u d e c e m a n u e l e s t s u s c e p t i b l e d e s u b i r d e s m o d i f i c a t i o n s à t o u t m o m e n t e t s a n s a u c u n p r éa v i s .Limiteur de couple moteurPour varier le couple moteur, déplacer la cosse indiquée sur une des 4 positions : 1 min. - 4 max.Motoréducteur (M1) 120 VAC* ou 230 VAC, retardé à l’ouverture.Motoréducteur (M2) 120 VAC* ou 230 VAC, retardé à la fermeture.Connexion des motoréducteursP a g e 7 - M a n u e l F A 00679-F R - v e r s . 1 - 12/2017 - © C A M E S .p .A . - L e c o n t e n u d e c e m a n u e l e s t s u s c e p t i b l e d e s u b i r d e s m o d i f i c a t i o n s à t o u t m o m e n t e t s a n s a u c u n p r éa v i s .Sortie signalisation portail ouvert (Portée contact : 24 V - 3 W max.).Signale la position du portail ouvert. S'éteint lorsque le portail est fermé.Sortie connexion clignotant.(Portée contact : 120 V ou 230 VAC - 25 W max.).Dispositifs de signalisationConnexion serrure de verrouillage électrique 12 V - Puissance max. : 15 WSerrure de verrouillage électriqueFonction OUVERTURE-FERMETURE-INVERSION (pas-à-pas) depuis un dispositif de commande (contact NO). Il est également possible, avec DIP 2 sur ON, d’activer la commande OUVERTURE-ARRÊT-FERMETURE-ARRÊT (séquentielle).Bouton d'ARRÊT (contact NF). Permet l'arrêt du portail avec désactivation de la fermeture automatique. Pour reprendre le mouvement, appuyer sur le bouton de commande ou sur un autre dispositif de commande.S'il n'est pas utilisé, court-circuiter le contact.Dispositifs de commandeRXTXDEL TA-SDIRDEL TATX 2102TX C NC++-NO C NC DEL TA-S DIRDEL TARXTX RXTXP a g e 8 - M a n u e l F A 00679-F R - v e r s . 1 - 12/2017 - © C A M E S .p .A . - L e c o n t e n u d e c e m a n u e l e s t s u s c e p t i b l e d e s u b i r d e s m o d i f i c a t i o n s à t o u t m o m e n t e t s a n s a u c u n p r éa v i s .Connexion des dispositifs de sécurité (test sécurité)La carte contrôle l'effi cacité des dispositifs de sécurité (ex. : photocellules) à chaque commande d'ouverture ou de fermeture.Les anomalies, quelles qu'elles soient, désactivent les commandes.Pour ce type de connexion, activer la fonction avec DIP 3 sur ON.Dispositifs de sécuritéPhotocellulesEntrée pour dispositifs de sécurité type photocellules.Réouverture durant la fermeture. Durant la phase de fermeture du portail, l'ouverture du contact provoque l'inversion du mouvement jusqu'à ouverture totale du portail ;Si les photocellules ne sont pas utilisées, court-circuiter le contact 2-C1.P a g e 9 - M a n u e l F A 00679-F R - v e r s . 1 - 12/2017 - © C A M E S .p .A . - L e c o n t e n u d e c e m a n u e l e s t s u s c e p t i b l e d e s u b i r d e s m o d i f i c a t i o n s à t o u t m o m e n t e t s a n s a u c u n p r éa v i s .P a g e 10 - M a n u e l F A 00679-F R - v e r s . 1 - 12/2017 - © C A M E S .p .A . - L e c o n t e n u d e c e m a n u e l e s t s u s c e p t i b l e d e s u b i r d e s m o d i f i c a t i o n s à t o u t m o m e n t e t s a n s a u c u n p r éa v i s .P a g e 11CAME S.p.A.Via Martiri Della Libertà, 1531030 Dosson di Casier - Treviso - Italytel. (+39) 0422 4940 - fax. (+39) 0422 4941M a n u e l F A 00679-F R - v e r s . 1 - 12/2017 - © C A M E S .p .A . - L e c o n t e n u d e c e m a n u e l e s t s u s c e p t i b l e d e s u b i r d e s m o d i f i c a t i o n s à t o u t m o m e n t e t s a n s a u c u n p r éa v i s .CAME SPA déclare que ce produit est conforme aux directives de référence en vigueur au moment de sa production.Avant d’eff ectuer ces opérations, il est toujours recommandé de vérifi er les normes spécifi ques en vigueur sur le lieu d’installation. Les composants de l’emballage (carton, plastiques, etc.) sont assimilables aux déchets urbains solides et peuvent être éliminés sans aucune diffi culté, en procédant tout simplement à la collecte diff érenciée pour le recyclage.D’autres composants (cartes électroniques, piles des émetteurs, etc.) peuvent par contre contenir des substances polluantes. Il faut donc les désinstaller et les remettre aux entreprises autorisées à les récupérer et à les éliminer.NE PAS JETER DANS LA NATURE !Fixation du couvercleAu terme des branchements électriques et de la mise en fonction, mettre le couvercle et le fi xer à l'aide des vis fournies.。
0 目录0 目录-------------------------------------------------------11 简介-------------------------------------------------------12 技术描述---------------------------------------------------53操作特性--------------------------------------------------164维护保养--------------------------------------------------205简单故障排除----------------------------------------------21附录------------------------------------------------------251 简介1.1 安全操作1.2 前言1.3 版权1.4 使用须知1.5 专业名词缩写1.6 选装部件1.1 安全操作美必盛自动门的设计、检验和生产是依据严格的国际标准进行的。
进行每年一次的常规维护时应确保操作程序正确(在经常使用的情况下)。
所有的工作必须由美必盛公司或美必盛公司认可的经销商来完成。
在进行操作之前必须先阅读操作手册。
警告:尽量避免接触转动部分。
如果对操作手册有任何疑问,请与宁波美必盛公司联系。
美必盛自动门地址:联系电话:网址:1.2 前言操作手册是专门为自动门的用户提供的,它向你提供如下信息:门的操作门的结构门的维护1.3 版权本操作手册是由公司提供和认可的。
它只提供给自动门的所有者和公司认可的代理商。
公司保留一切权力。
本操作手册信息的所有权归美必盛公司。
在没有得到美必盛公司的书面认可之前,将本操作手册的信息或其中的一部分泄漏给第三者是不允许的。
美必盛公司保留改进产品而不另行通知的权力。
密码感应卡独立式门锁简介版本:V1.0密码加Mifare卡办公室、家用智能安全门锁是IC一卡通系统组成部分之一,其使用的Mifare 卡可以用在其他一卡通设备上。
本门锁系统功能强大,使用灵活方便,可实现一卡多门、一门多卡的开门方式,并可将门锁设置成常开状态,房门假锁(门没有锁好)时,门锁会自动报警提示。
密码、开门卡全部由用户自己删除和配制,最大限度地减少安全漏洞。
本系统采用Mifare卡,是一种普及型感应卡(如小区停车场等)。
本门锁适用于现代化办公室、写字楼,高级小区公寓、别墅等。
Mifare卡密码办公室、家用门锁系统有以下两种开门模式:独立式:单独使用Mifare卡或密码可以开门。
组合式:Mifare卡和密码同时使用才可以开门。
注:1.本系统的门锁出厂初始化后的管理密码为12345678,开门模式为独立式。
1.1.从独立式切换到组合式操作如下:输入8位管理密码按钥匙键,再按6键蜂鸣器长鸣6声,蓝灯闪烁,再按钥匙键确认,蜂鸣器“嘀”长响一声,切换成功。
若退出则按*号键;1.2.从组合式切换到独立式操作如下:输入8位管理密码按钥匙键,再按5键蜂鸣器长鸣5声,蓝灯闪烁,再按钥匙键确认,蜂鸣器“嘀”长响一声,切换成功。
若退出则按*号键;2.在组合模式下,若先读卡(或先输入密码后按钥匙键)则“嘀、嘀”两声指示灯蓝灯闪烁,然后在10秒内输入开门密码按钥匙键(或读卡)蓝灯亮开门⑴管理卡功能:设置和删除有效开门卡;可以开门。
⑵开门卡功能:开门及设置通道锁⑶机械匙功能:紧急开门、配管理卡。
注:输密码前先擦摸一下按键面板,等背光蓝灯亮起后再输。
一、设置管理卡、删除管理卡1.1 空卡时,刷第一张卡,蜂鸣器短鸣一声再长鸣一声,此卡即为管理卡。
1.2 用机械匙开门开5次,绿灯慢闪烁,进入配管理卡状态(开锁状态是指锁芯的斜舌和大方舌都缩入锁体内),此时读卡即为管理卡,成功蜂鸣器“嘀”短响一声再“嘀”长响一声,同时注销原来的管理卡。

开门机使用说明(小控制板)-CAL-FENGHAI.-(YICAI)-Company One1自动开门机使用说明书标准技术参数◇机箱材料:国产标准45钢◇传动臂角度:180度◇开门方向:单向◇工作电压: AC220 ±10% V/50 ±10% HZ◇驱动电机:24V 直流有刷电机◇输入接口:干接点信号◇开、关门时间: 1-9秒(可调)◇◇上电后进入通行状态所需时间: 3秒◇◇工作环境:室内、室外(阴棚)◇◇温度:-10℃—— 50℃相对湿度:≤90%,不凝露一、安装说明1、设备的安装:开门机中预埋铺设RVV4X0.75mm2信号线及2X1.5mm2控制线。
并将控制线接至控制室。
用四个膨胀螺丝按下图底座安装尺寸将开门机固定。
设备安装尺寸图2、设备接线安装1)输入接口:OPEN、GND为干接点短路信号;2)接线排的连接:按接线排的标识接好电源和开闸信号;G N D O P E N G N D 磁力锁—磁力锁++12V 21 4 3 6 5控制箱内接线端 电机内光电限位板及接线插座 图3注明:1、提供的开闸信号接法:干接点信号:GND 为公共端,OPEN 和GND 短接就分别开信号;2、将磁力锁的正极(+12V )和负极(GND ),分别接入控制箱内。
3、检查接线是否与接线图一致,检查所有插头是否有松动;检查设备是否接地可靠;确认无误后可上电调试。
3、 注意事项:未经许可,设备上请勿添加外围设备且确保设备接地可靠,保证设备工作的安全可靠;二、设备参数设置操作说明一、通用描述1.显示屏是指主控板上的从左到右显示的2位LED;2.三个按键从左到右依次为INC键,DEC键,SET键,SET键用于进入和退出功能设定;INC键用于对需要设定的参数进行加1;DEC键用于对需要设定的参数进行减1,或退出菜单(显示01时按DEC键退出菜单);当要进入某项功能号时按SET键,此时显示屏显示2位当前功能号参数并闪烁,表示可以用INC键(+),DSC键(—)对此功能号参数进行修改,修改完成后按SET键退出此项参数设置。
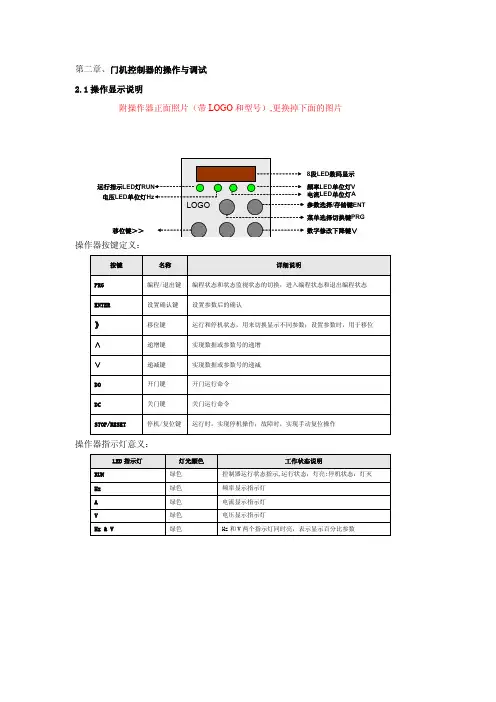
第二章、门机控制器的操作与调试2.1操作显示说明附操作器正面照片(带LOGO和型号),更换掉下面的图片操作器指示灯意义:2.1.1参数操作显示YS-K01门机控制器的操作显示需使用选配件YS-P01操作器。
操作器的显示状态有以下几种状态(根据软件表现更改内容)1.停机状态显示停机状态显示的参数有:输出端子状态、门位置、开门速度、输入端子状态、母线电压,通过》键实现各种状态参数的循环显示选择。
插入实物照片2.运行状态显示运行状态显示的参数有:输出端子状态、门位置、开关门速度设定、当前运行速度、输出电压、输出电流、输出力矩、母线电压、输入端子状态,通过》键实现各种状态参数的循环显示选择。
插入实物照片3.参数编辑状态以设定参数P1.01为230V为例说明:首先按下PRG键,操作器显示-P0-,该菜单为一级菜单显示,然后按∧键显示-P1-,然后按ENTER键进入P1组内部参数组;然后按∧键显示P1.01,按ENTER键进入该功能码,该功能码显示值为220,通过按∧键将值修改为230,按ENTER键确认修改,修改完后功能码组显示P1.02,按PRG键退回一级菜单显示-P1-,按PRG键退回停机或运行监视状态。
插入实物照片4.故障状态显示当控制器处于故障状态时,操作器显示故障码,当故障排除后,按下STOP/RESET键复位故障,操作器恢复到停机状态显示。
故障显示内容参见附录2故障诊断与对策插入实物照片2.1.2 参数上传和下载批处理YS-K01门机控制器为适应电梯行业调试和维护高效率的需求,设计有控制曲线参数存储和批处理功能。
对于相同门宽、相同型号的门机,可以用同样的曲线参数实现门的开关控制,把经验曲线参数从调试效果良好的门机控制器上传到操作器,再从操作器下载到相同门宽、相同型号的门机使用的门机控制器,就可以实现良好的开关门控制。
例如:1号门和2号门宽度相同,门机械配置型号相同,1号门运行曲线调试好后,把控制器A 的曲线参数上传到操作器的相应位置,并编好组号,从操作器对应组号位置把曲线经验参数下载到控制器B ,控制器B 就可以实现对2号门的良好开关门控制。
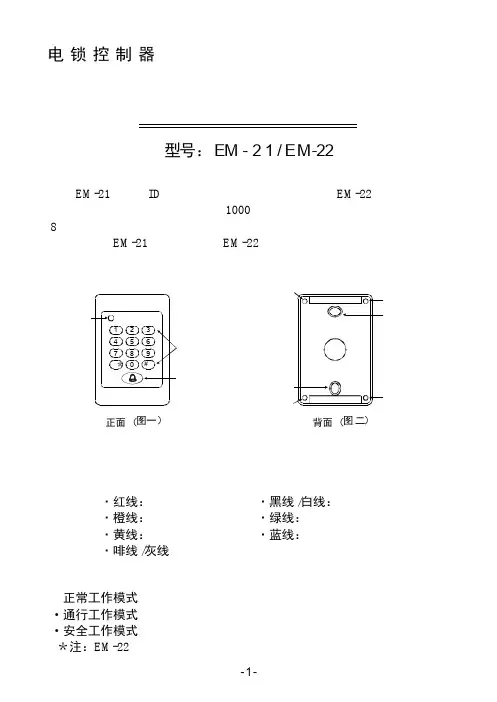
简介EM-21ID EM-2210008EM-21EM-22是使用非接触卡与密码的电锁控制器;是使用密码操作的电锁控制器。
两者都能容纳位用户同时使用,用户密码最高可达位数字。
下面是的使用说明,无卡片操作部分。
安装说明三种工作模式·先选择适合位置,按照接线说明连接,再用镙钉固定好控制器,最后盖上面盖即可。
接线说明如下:——刷卡开门——刷卡开门或输入密码开门——先刷主卡再输入密码或先刷主卡再刷副卡才开门在通行工作模式才有效——输入密码开门·红线:·黑线白线:·橙线:·绿线:·黄线:·蓝线:啡线灰线电源正极电源负极电锁出门开关门铃开关门铃开关:备用//·正常工作模式通行工作模式安全工作模式*注:··EM-22外观说明正面(图一)背面(图二)外壳镙丝孔定位镙丝孔定位镙丝孔外壳镙丝孔外壳镙丝孔外壳镙丝孔电锁控制器型号:EM -21/EM-22使用手册1*22*21VIP 2099921a 2b 1c 13a 2b 1423VIP 1209992功能管理模式登记VIP用户1登记卡片用户2)在工作模式下,按“”秒,输入管理密码,按“”确认。
)在功能模式下,VIP)进入功能模式,输入“”并按“”确认,进入登记用户功能。
)输入用户编号(在至之间选择),并按“”确认,指示灯亮“绿色”并嘟声,表示所选用户编号为空,可以刷主卡登记。
指示灯亮“红色”并嘟声,表示所选用户编号已被占用或超出范围,需重新选择。
)刷主卡,指示灯亮“绿色”并嘟声,登记成功。
)刷主卡,指示灯亮“红色”并嘟声,登记失败。
)刷主卡,指示灯亮“橙色”并长嘟声,重复登记,操作无效。
)登记主卡后,指示灯闪烁加快,输入密码并按“”确认;或刷副卡登记。
)指示灯亮“绿色”并嘟声,登记成功。
)指示灯亮“红色”并嘟声,登记失败。
)重复、项继续登记用户。
)进入功能模式,输入“”并按“”确认,进入登记卡片用户功能。
3、接线3-1 控制器接线P4所有输出均为继电器触点输出。
DC:24V,2A;AC:220V/110V 1A P5外接开门到位输入开关(双稳态磁开关),要求开关动作时触点闭合。
4.操作4-2 基本操作※注:设定参数时必须先断开开关门输入信号,否则按P键将不起作用。
如果间断性地按△或▽键,数值将一步一步地改变,如果长时间地按下这些键,数值将快速地改变。
如果出现不慎将参数错误设定,通过将参数F017设定为1,并按P 键,可以将所有参数都复位到出厂设定值。
※注:参数F022—F032由厂方设定,一般情况下用户勿须现场设定。
6.调试说明6-1 两个关键词的解释1)脱机运行状态:脱开电梯主控制器、脱开层门装置,门机单独运行的状态。
2)外接开门到位开关:在门机底板上安装一双稳态磁开关、开关动作触点闭合,门机控制器得到开门到位信号,开门到位时通。
6-2、门机控制器调试的具体步骤1)按照顺序安装门机完毕,调整好门机高度和位置、轿门扇、门刀;让门机处于脱机运行状态,保证轿门无阻碍开门到位和关门到位。
2)检查门机控制器的输入电源:AC220V±15%;如电源电压不在AC220V±15%范围内,切勿上电,否则会损坏门机控制器。
3)确认输入电源电压正常,打开门机控制器电源开关。
初上电,门机控制器显示已存出厂门宽度脉冲数,以自学习速度向开门方向运行,直到外接开门到位开关闭合向门机控制器输入开门到位信号,同时操作面板上外接到位开关指示灯DSIN亮,表示门机已开门到位。
只有门机控制器接收到外接开门到位开关动作闭合信号,控制器才响应端子指令和面板操作;如没有开门到位信号输入,只显示当前脉冲数,不响应来自端子或操作面板的开关门指令,门机一直处于低速开门状态。
有下列情况之一有可能造成没有开门到位信号输入:①插件P5松动或插件P5到磁开关连线故障。
插紧插件或正确连线。
②磁钢同磁开关位置不匹配,不能让磁开关动作,调整磁开关位置,使开门到位时磁开关动作闭合。
Important warranty, user informationand service record for your automatic doorAutomatic sliding door operating & maintenance manualFor power-operated doors to EN 16005AUTOMATIC SLIDING DOOR LOG BOOKContentsService and maintenanceService and maintenance Warranty statement Door system dataReport for initial inspection User guideFirst entry last exit procedure (if fitted)Daily ChecksRegular inspection and maintenance Inspection reports23456-7 891011-15Why the necessity?All doors, whether manual or automatic, are complex components subject to punishing wear and tear. Therefore to ensure that they continue to functionproperly, regular service and maintenance is imperative.Regular door maintenance helps prevent accidents, reduces breakdowns and the accompanying inconvenience, and prolongs the life of the door operator.There are also legal implications regarding the servicing of all door types which must be adhered to, to ensure the safety of users at all times. All safety requirements for power operated doors are stipulated in EN 16005:2012 Power operated pedestrian doorsets -Safety in use. All dormakaba service engineers are trained to comply with this standard through the Automatic Door Suppliers Association (ADSA) examination of competency.dormakaba provides a tailored, local resource for the servicing and maintenance of all brands of:• automatic swing• sliding and revolving doors • manual doors • fire doors• access control systems • industrial doors • roller shutters • gates & barriersFor more information visit AUTOMATIC SLIDING DOOR LOG BOOKWarranty statementService and maintenancePlease note the legal implications regarding the installation and servicing of automatic doors which must be adhered to, so as to ensure the safety of users at all times as stipulated in EN 16005:2012 Power operated pedestrian doorsets – Safety in use.Product registrationAny decision to register your product does not affect your statutory rights under the UK Sale of Goods Act 1979.If you would like to register your product with dormakaba please visit Alternatively, you can contact the dormakaba UK Service Hotline on:0800 212 380************************LimitationsThis warranty does not apply to defects resulting from Customer actions, such as mishandling, improper installation, operation outside of design limits, misapplication, attempted repair, or unauthorized modification.Any additional warranty provided by the selling agent does not imply or transfer any additional obligation to dormakaba regarding this product.dormakaba standard terms and conditions will apply at all times and are available on request.dormakaba are not liable for the consequences of any third party claim on its products, which are sold in the knowledge that installation is carried out by competent staff and maintained in accordance with current safety standards.Thank you for purchasing a dormakaba product which has been designed and manufactured to provide many year’s problem-free operation.All products sold by Dorma UK Ltd are warranted against defect in materials and workmanship for a period of 12 months from the date of purchase on a return to factory basis.If you believe this product has a defect or has failed during normal use within the warranty period, please contact the authorised agent from whom you bought the product and who will make arrangements for its return.Alternatively, if your product was installed bydormakaba please contact us directly as detailed below to discuss the return of the unit, with the product serial number. dormakaba standard terms and conditions will apply at all times and are available on request.AUTOMATIC SLIDING DOOR LOG BOOKDoor system dataTo be completed by a qualified technician at installation Manufacturer: DORMA UK Ltd, Wilbury Way, Hitchin, SG4 0AB Type of operator/door: Sliding DoorTo be completed by a qualified technician at installationProduct name: ES200 / BST / CS80 MAGNEO / Other (please state below):(delete as applicable)..........................................................................................................................................................................Sales Order No.: ..................................................................................................................................................................................Asset No.: .............................................................................................................................................................................................Year of mission date: ..............................................................................................................................................................................Installed by: DORMA UK Ltd / Other (please state company)Doorset location / reference: ............................................................................................................................................................Additional information:................................................................................................................................................................................................................................................................................................................................................................................................................................................................................................................................................................................................................................................................................................................................................................................................................................................................................................................................................................................................................................................................................................................................................................................................................................................................................................................................................................................................................................................................................................................................................................................................................................................................................................................................In order that an automatic door operator may comply with the requirements of EN16005:2012 a risk assessment should be carried out prior to installation which assesses the risk to users. It is the responsibility of the installer to ensure that a door system is compliant.AUTOMATIC SLIDING DOOR LOG BOOKReport for initial inspectionTo be completed by a qualified technician at installationThe following list of components and functions to be inspected is only a reference and shall help the inspector during inspection. From case to case, the inspection can be more or less comprehensive. In principle, the inspector has to perform a visual inspection and functional tests to check the system for completeness. In addition, the system status and the efficiency of the components and the respective safety equipment require inspection. Please consider the separate inspection instructions supplied with the individual door types.3.1 General•Functionality of door system •Proper mounting •Connections/Power supply •Guide rails and base sections •Force transmission/Incremental encoder •Bearings•Glazing, Cover•Coating, Corrosion protection•All documentation complete3.2 Check safety equipment accordingto risk assessment to EN 16005 •Finger protection (crushing, shearing and drawing in)•Safety sensors/Sensor monitoring •Reversing/Stop equipment •Safety screen•Safety contact strips (SCS) •Force limitation•Emergency pushbuttons• Safety sensors• Fire alarm connection• Batteries 3.3 Control elements •Pushbuttons/switches •Contact mats•Radio controls/Remote controls •Card readers•Motion detectors3.4 Function•Friction clutch•NC contact (limit switch) •NO contact (limit switch) •Locking device, Deactivation •Deactivation of safety equipment •Emergency manual operation •Emergency Opening/Rubber cord/ Auxiliary drive3.5 Check door system for properfunctioning in all operation modes •OFF•AUTOMATIC •PERMANENT OPEN •PARTIAL OPEN•EXIT ONLY•LOCKING DEVICESUser guide123Program switch settings:AUTOMATIC SLIDING DOOR LOG BOOKThe unit is switched off. In the case of units with theoptional locking mechanism, the door is electro-mechanically locked.Door may be opened using first entry - last exit switches if fitted.If a person or object comes within range of the radar detectors, the door opens to full opening width and closes at the end of the preset hold-open time.The external sensor is deactivated, the door may only be used from the inside (e.g. one way function on close of business).If a person or object comes within range of the internal sensor, presence sensors or light barriers, the dooropens to its full opening width and closes the end of the preset hold-open time.The operator can be programmed to lock or unlock in the ‘EXIT ONLY’ position by a dormakaba Service engi-neer.Old Program SwitchNew Program Switch.........4PARTIAL OPENING5PERMANENTLY OPENAUTOMATIC SLIDING DOOR LOG BOOKIf a person or object comes within range of thedetectors or presence sensor, the door opens to the preset partial opening width and closes at the end of the preset hold-open time.The opening width of the door can be adjusted individually. To do this:Close the door using the OFF switch settingSet the program switch to PERMANENTLY OPENThe door opens at low (check) speedAs soon as the door reaches the desiredpartial opening width, set the program switch to PARTIAL OPENINGThe door stops and the control unit stores the desired positionThe door commences a closing cycleThe door opens in check speed to its full opening width and remains in the position until another function is selected.In the event of power failureIf the program switch is in the AUTOMATIC position, the door will fail openIf the program switch is in the OFF position, the door will remain closed To open the door, turn the program switch to AUTOMATIC. After a short delay the door will open at reduce speed and remain open until power is restored or the program switch is turned to Off.Alternatively, if FIRST ENTRY - LAST EXIT is fitted, operate button once or key once to open the door. To close the door, operate either button or key once.This sequence can be carried out as required until power is restored.First entry last exit procedure (if fitted)The purpose of this system is to allow an opening of the door when the Program Switch is in the OFF position and the sensors are not operable.This means that people should not open or close the door MANUALLY which could result in a major failure of the operator and potentially damage components.There will be a GREEN BUTTON near to the door on the inside of the building.To EXIT the building:1. Turn the program switch to the OFF position and letthe door close (stand away from the door to ensure the sensor does not detect you).2. Set the building alarm (if you have one)3. Operate the GREEN BUTTON to open the door4. Exit and allow the door to close (stand away fromthe door to ensure the sensor does not detect you), then lock the door in the centre with the key when closed.To ENTER the building:There will be a KEY SWITCH or other access control near to the door on the outside of the building1. Unlock the door, before using the KEY SWITCH2. Operate the key switch on the outside of thebuilding, this will open the door3. Enter the building (stand away from the door toensure the sensor does not detect you), the door will then close behind you4. Turn off the building alarm (if you have one)5. Put the program switch into the required position,or leave it in the OFF position6. If required to admit staff members before openinghours, simply press the GREEN BUTTON. The doorwill open then re-close.AUTOMATIC SLIDING DOOR LOG BOOKDaily checks - facility operatorA safety check should be performed daily by the facility operator on each automatic door.ActivationWalk toward the door at a normal pace. The door should start opening before you reach a minimum of 1000mm from the door. If the door is an escape route,a minimum of 1500mm applies in the direction of escape.Repeat for the other side if the door has two-way operation.SafetyNote: In order to test the safety sensors we recommend using an approved test object measuring 200mm x 300mm x 700mm high to test the door safety as detailed in EN16005.Activate the door to open, place the test object in the threshold, move away from the threshold and verify that the door stays open.Remove the test object from threshold area, after a short time delay the door should close.For sensors covering the area of door travel, place the test object directly beneath the sensor. When activated, the door should open at reduced speed.Low Energy Sliding Doors (CS80 Magneo only)•May not be fitted with safety devices as described above•Often have manual activation devices •Travel at lower speeds with lower force•In the opening direction will stop when obstructed and continue after the obstruction is removed •In the closing direction will reverse open when obstructedGeneral Observations•Check the door area does not present tripping or slipping hazards•Check all door panels for broken/cracked glass•Check all doors have correct warning and information signs displayed•Check the position and security of screens & barriers •Check operation of manual or remote activation, or emergency stop button if fitted•Check for distractions and obstructions in the vicinity of the doors•Check all equipment and cabling is securely fixed If you have questions about any of the above items, please contact dormakaba UK Service. Safety devices for all doors should be checked by an ADSA qualified technician at least once a year.If you have a problem you cannot correct, turn off the door and call your local dormakaba on 0800 212 3800.AUTOMATIC SLIDING DOOR LOG BOOKADSA Occupier Safety CheckVideosRegular inspection and maintenanceTo be undertaken by a qualified technician.The following list describes what has to be done during the maintenance of dormakaba door systems. Always consider the mounting and operation instructions during maintenance.Please observe the requirements for fire doors, emergency exits and escape routes during inspection, if applicable. The current state of technology has to be taken into consideration when assessing the door system with regard to safety-related questions.Note down any safety-relevant error/deficit in the log book and on the performance sheet. The inspector must note down the scope, results and date of the inspections and the facility operator has to keep these documents for at least one year.ES/CS complete door systems (sliding doors)1. Clean and check the track section, retension/repair/replace as required2. Check toothed belt and retension/replace asrequired3. Check escape route function of escape routesystems (check rubber cord and retension/replace as required)4. Check door suspension and adjust/repair/replace as required5. Check floor guide and adjust/repair/replace asrequired6. Check all fixing components and retension asrequired7. Check all settings and readjust as required8. Check all safety equipment and adjust/repair/replace as required9. Check and reaadjust all safety clearances asrequired (finger protection, crushing and shearing edges, drawing-in)10. Check all control elements and adjust/repair/r eplace as required11. Check wear parts such as toothed belt, motor,pulley and locking device once a year and replace as required (see complete wear part list)12. Write down inspection and maintenance report the log bookPlease note we recommend that sliding doorswhich are emergency exits or escape routes are inspected twice a year13. Replace rechargeable battery packs approximatelyevery two yearsAUTOMATIC SLIDING DOOR LOG BOOKInspection reportsThe facilities operator should ensure that this log book is available for the qualified technician on his arrival at site.If it is not available then it is the responsibility of the facilities operator to record the visit.AUTOMATIC SLIDING DOOR LOG BOOK112021-10AUTOMATIC SLIDING DOOR LOG BOOK122021-10AUTOMATIC SLIDING DOOR LOG BOOK132021-10AUTOMATIC SLIDING DOOR LOG BOOK142021-10AUTOMATIC SLIDING DOOR LOG BOOK152021-10CENTRAL LOCATIONSdormakabaDORMA UK LtdWilbury WayHitchin, HertsSG4 0ABSERVICE BRANCHES SCOTLANDUnit 1, Almond Road, Middlefield Industrial Estate, FalkirkFK2 9HQIRELANDPO Box 1050MaynoothCo. KildareNORTH WESTUnit 10, Meadow Business Park Meadow Lane, BoltonBL2 6PT dormakabaKaba LtdLower Moor WayTiverton, DevonEX16 6SSLONDON NORTH & SOUTHWilbury WayHitchinHertfordshireSG4 0ABMIDLANDSNORTH EASTSOUTH WESTLower Moor WayTivertonDevonEX16 6SSUnit 32 Crowther RoadCrowther Industrial EstateWashingtonTyne & WearNE38 0ADThe CourtyardJohn Harper StreetWillenhallWest MidlandsWV13 1REE:************************。
冷雨自动门控制器说明书摘要:1.控制器概述2.控制器功能3.安装与接线4.使用方法5.维护与故障排除6.注意事项正文:【控制器概述】冷雨自动门控制器是一款高性能的自动门控制设备,采用先进的微电脑控制技术,适用于各种类型的自动门。
本控制器具有自动识别、智能调节、稳定可靠等特点,可广泛应用于商业、住宅、办公等场所。
【控制器功能】1.自动感应功能:当有人或物体靠近时,自动门会自动开启,人/物体离开后自动关闭。
2.手动控制功能:可以通过遥控器、开关按钮等方式手动控制自动门的开关。
3.温度控制功能:根据环境温度自动调节自动门的工作模式,节能环保。
4.障碍检测功能:当检测到门扇下方有障碍物时,自动门会自动停止运行,防止意外发生。
5.防夹功能:当检测到有人或物体被夹在门扇之间时,自动门会立即停止运行,确保安全。
【安装与接线】1.安装前请确保电源电压与设备额定电压相符。
2.将控制器安装在便于操作和观察的位置,如墙壁或立柱上。
3.根据自动门的安装位置和大小,正确接线。
一般包括电源线、门禁线、安全传感器线等。
4.接线完毕后,请检查线路是否牢固,避免松动导致故障。
【使用方法】1.打开电源,控制器开始工作。
2.按下遥控器按钮,观察自动门是否正常开启和关闭。
3.测试手动控制功能,确保开关按钮可以正常控制自动门。
4.在使用过程中,如遇到异常情况,请及时关闭电源,联系售后服务人员进行处理。
【维护与故障排除】1.定期检查控制器线路,确保接线牢固,无松动现象。
2.保持控制器周围环境干燥,避免潮湿、高温等恶劣环境。
3.如遇故障,请先关闭电源,然后根据故障现象进行排查。
如无法解决,请联系售后服务人员。
【注意事项】1.在安装和使用过程中,请遵守相关安全规定,确保人身安全。
2.请勿在控制器上堆放物品,以免影响散热和正常工作。
3.请勿自行拆卸或维修控制器,以免造成安全事故。
机电工程学院课程设计说明书设计题目:自动门控制系统设计学生姓名:***学号: ************专业班级:机制F0908指导教师:***2011年12 月08 日内容摘要在当今社会自动门的应用也越来越广泛。
它现在为许多宾馆、超市、百货大楼等现代建筑所使用,不仅可以美化出入口环境,而且具有节能、防尘、隔音等功能,同时也是建筑物智能化的重要指标。
本课程设计的自动门控制系统是利用PLC为核心来控制实现的,其电路结构简单,程序运行可靠性高。
PLC程序用梯形图语言设计完成,并采用模拟仿真软件测试PLC控制系统。
本设计方案可靠性高在设计必要设计要求上又做了一定的功能加强,比如增加手动开关门功能,和禁止开关门功能使该自动门系统更加强大。
关键字:PLC;控制;自动门目录第1章引言 (1)第2章 PLC概述 (2)2.1系统设计方案 (2)2.2控制系统流程图 ............................................................. 错误!未定义书签。
2.3自动门配置及组成原理 ................................................. 错误!未定义书签。
2.4 PLC接线图 ..................................................................... 错误!未定义书签。
2.4 程序梯形图 .................................................................... 错误!未定义书签。
第3章自动门介绍 ................................................................ 错误!未定义书签。
第4章总体方案设计............................................................ 错误!未定义书签。
设置开门模式*4X #其中X 表示系统开门的模式。
0 –只能刷卡开门;1 -2 -卡加密码(读卡并需输入密码后开门)。
例如*4 1 #表示系统开门模式为刷卡或者按密码都可以开门。
设置开门延时*6X X #其中X X 表示将开门所要延时的秒数,例如*60 5 #则表示开门延时时间设置为5秒。
系统最低开门延时设置为1秒,最高开门延时设置为99秒,用户可在1秒与99秒的开门延时范围内任意设置。
系统初始化操作(第一步是恢复系统初始密码,其次才是数据清空)持续按住初始化按钮5秒钟,蜂鸣器每秒鸣叫一声,5声之后将长鸣一声短鸣三声,如果此时松开铵键,控制器将恢复系统初始密码等,开门延时恢复为5秒,开门模式为“卡或密码”,系统编程密码与开门密码恢复为888888;如果再持续按住约3秒直到控制器发出第二次长鸣一声短鸣三声,此时所有数据清空。
注:本操作不是在编程状态下完成,是通过对门禁内的初始化按钮操作完成。
技术参数卡片数据存储容量:500张编程与开门密码:(1 - 8位)感应距离:80MM ~150MM 工作湿度:10% ~95%工作温度-20℃~65℃用户使用方法:1、只能刷卡开门:正常工作状态刷一张有效卡即可开门2、卡或密码开门: 刷一张有效卡或者输入开门密码后按#确认开门3、卡加密码开门: 在刷完卡后10 秒钟内输入正确的密码再按#即可开门,刷卡后绿灯开始闪烁,等待输入密码。
注:使用密码开门时,用户输入正确密码后按一下#键即可开门L151多功能单机门禁增强版操作使用说明书简介多功能单机门禁是为电动门锁及安全防范系统而设计,支持感应卡开门、密码开门、感应卡加密码开门等三种开门方式,用户可以随意选择自己喜欢的开门方式。
编程设置直接在密码键盘上进行,操作方便,使用简单,安全可靠。
而且具备超强的抗干扰能力和自我诊断自我保护功能,以确保系统安全有效地正常运作。
卡片设置方式支持刷卡设置、按卡号设置;支持外接韦根26标准读头(可以实现进出刷卡开门、分体控制、更加安全),同时支持室内出门按钮控制电锁的开启,本系统可以存储500张开门卡片信息,所有存储信息不会因电源断电而丢失,同时支持门铃输出,功能强大,安装简便,是应用于办公室、家庭、机房及公共场所的理想门禁装置。