Alfresco使用教程
- 格式:doc
- 大小:429.00 KB
- 文档页数:12

下面是Alfresco的安装向导。
============================在Linux 上安装============================所有这些指导假定使用LINUX终端命令行。
如果您不是用管理员登陆的话,也许需要在命令前加前缀'sudo'。
安装Alfresco Tomcat捆绑包-------------------------------访问/downloads- 下载"alfresco-community-tomcat-2.0.0.tar.gz "- 在opt目录下执行mkdir alfresco命令建立一个名为'alfresco'的目录-在'alfresco'的目录下执行tar –xzf alfresco命令解压alfresco-tomcat-alfresco-community-tomcat-2.0.0.tar.gz。
设置路径---------编辑'alfresco.sh' 文件并检查Tomcat安装位置的参数设置:- 如果是JBoss 捆绑包,这个路径会是:'/opt/alfresco/tomcat'===========================启动Alfresco服务器===========================确保MySQL 服务器正在运行,然后访问'/opt/alfresco' 目录- 运行'alfresco.sh start'- 您现在可以尝试通过如下地址访问ALfresco:http://localhost:8080/alfresco这个服务器配置可一个用户和密码都是‘admin’的管理员。
测试安装,你也许希望查看指南,可以从如下地址获得:/downloads或者通过Web Client 从company space 获得===========================关闭Alfresco服务器===========================访问'/opt/alfresco' 目录并运行'alfresco.sh stop'。
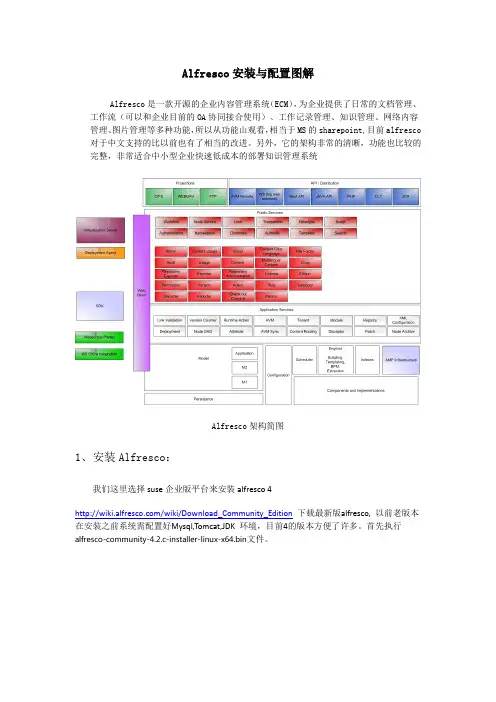
Alfresco安装与配置图解Alfresco是一款开源的企业内容管理系统(ECM),为企业提供了日常的文档管理、工作流(可以和企业目前的OA协同接合使用)、工作记录管理、知识管理、网络内容管理、图片管理等多种功能,所以从功能山观看,相当于MS的sharepoint,目前alfresco 对于中文支持的比以前也有了相当的改进。
另外,它的架构非常的清晰,功能也比较的完整,非常适合中小型企业快速低成本的部署知识管理系统Alfresco架构简图1、安装Alfresco:我们这里选择suse企业版平台来安装alfresco 4/wiki/Download_Community_Edition下载最新版alfresco, 以前老版本在安装之前系统需配置好Mysql,Tomcat,JDK 环境,目前4的版本方便了许多。
首先执行alfresco-community-4.2.c-installer-linux-x64.bin文件。
开始使用,打开浏览器访问:http://localhost:8080/alfresco可以看到alfresco的主页,使用admin用户及前面设定的密码能够正常登陆/opt/alfresco-4.0.a/manager-linux-x64.run在启动tomcat时候出现"tomcat could not be started"我们需要输入下面命令#rm /opt/alfresco-4.0.a/tomcat/temp/catalina.pid2、汉化配置/projects/zh-package/下载相应版本的汉化包unzip language_Pack.zipchmod +x install_language_pack.sh./ install_language_pack.shVim/opt/alfresco/tomcat/webapps/alfresco/WEB-INF/classes/alfresco/web-client-config.xml添加登陆页面的中文语言选项,然后找到<languages> 节点,再添加一行:<language locale="zh_CN">Chinese (Simplified)</language> 最后保存退出。
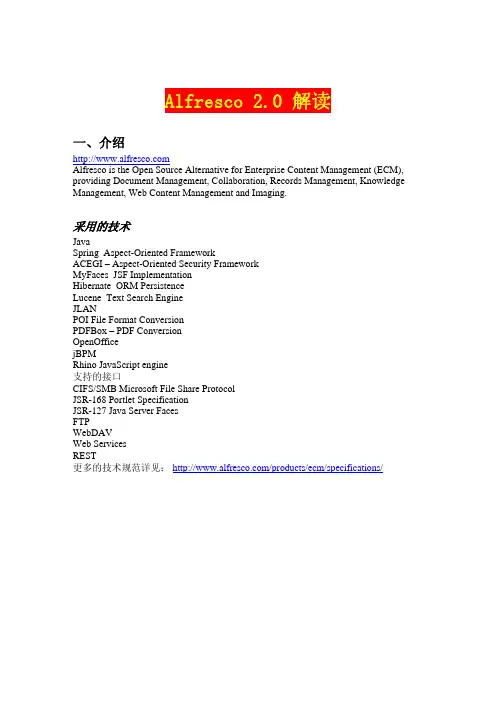
Alfresco 2.0 解读一、介绍Alfresco is the Open Source Alternative for Enterprise Content Management (ECM), providing Document Management, Collaboration, Records Management, Knowledge Management, Web Content Management and Imaging.采用的技术JavaSpring Aspect-Oriented FrameworkACEGI – Aspect-Oriented Security FrameworkMyFaces JSF ImplementationHibernate ORM PersistenceLucene Text Search EngineJLANPOI File Format ConversionPDFBox – PDF ConversionOpenOfficejBPMRhino JavaScript engine支持的接口CIFS/SMB Microsoft File Share ProtocolJSR-168 Portlet SpecificationJSR-127 Java Server FacesFTPWebDAVWeb ServicesREST更多的技术规范详见:/products/ecm/specifications/二、配置解读1、从web.xml开始入手其它的略过,在 web.xml 中可以看到加载了如下 Spring 配置文件<context-param><param-name>contextConfigLocation</param-name><param-value>classpath:alfresco/web-client-application-context.xmlclasspath:web-services-application-context.xmlclasspath:alfresco/web-api-application-context.xmlclasspath:alfresco/application-context.xml</param-value><description>Spring config file locations</description></context-param>web client 层alfresco/web-client-application-context.xml打开它可以看到它引入了所有的alfresco/web-client*.xml & alfresco/extension/web-client*.xml & jar:*!/META-INF/web-client*.xmlweb api 层alfresco/web-api-application-context.xml打开它可以看到它引入了alfresco/web-api-config.xml & alfresco/extension/web-api-config-custom.xmlweb service 层web-services-application-context.xml刚开始找这个文件时,居然没有找到,怪事!not exist???why?于是后来才发现这个文件是在 remote-api.jar 包里,晕,不是很好的做法啊。
AlphaControls的使用方法主要包括以下步骤:
1. 打开你的Delphi设计窗体,将AlphaTools组件页的第一个组件(TsskinManager)放到设计窗体上。
2. 设置TsskinManager的属性一:SkinDirectory,将其路径设置为AlphaControls安装目录下的Skins(安装时可能有多个Skin文件夹,如Skins、Skins1等,可以把这些文件夹内的文件统一放在Skins 文件夹下)。
3. 设置TsskinManager的属性二:InternalSkins,在此属性弹出的对话框中选择需要的皮肤(有预览效果),可以添加多个皮肤。
4. 如果想制作出更换皮肤的功能,可以通过对SkinName属性的赋值来实现。
如果此属性不设置,也可以看到皮肤效果,但在别人的电脑上就不一定了,此属性的功能就是把皮肤文件编译进Delphi最后的可执行文件(.exe)中,所以此属性还是必须设置的。
使用AlphaControls的过程中遇到任何问题,建议咨询专业人士。
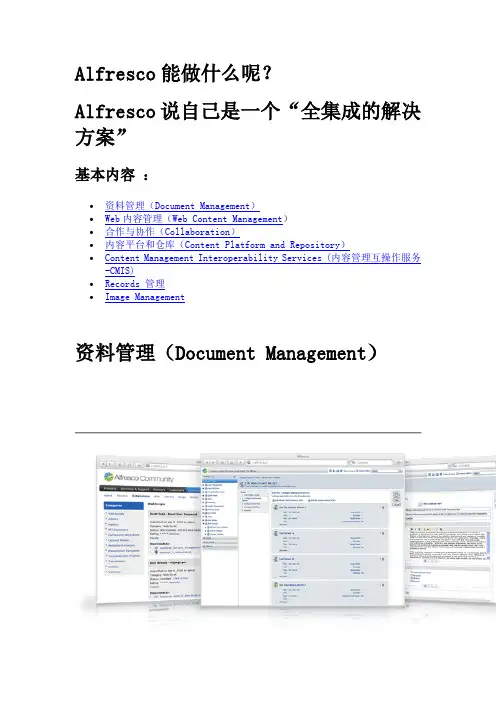
Alfresco能做什么呢?Alfresco说自己是一个“全集成的解决方案”基本内容:•资料管理(Document Management)•Web内容管理(Web Content Management)•合作与协作(Collaboration)•内容平台和仓库(Content Platform and Repository)•Content Management Interoperability Services (内容管理互操作服务-CMIS)•Records 管理•Image Management资料管理(Document Management)一些很贵的也很复杂的企业资料管理系统(ECM)已经不少了。
不过人们往往更习惯使用那些每天都用的简单的熟悉的工具Alfresco 资料管理(Document Management)在对内容的接受,共享和存储方面,可以更好的让用户使用自己常用的工具容易的建立自己的内容应用,包括检索和版本化管理等重要功能。
共享驱动器(Shared drive)Alfresco的资料库和一个共享在网络上的驱动器一样。
你可以保留使用任何你知道的或者喜欢的编辑工具来编辑资料。
从Microsoft Office 到Open Office, Dreamweaver 或者 AutoCAD,而不用安装其他的程序或者需要重新学习。
无论是自己还是公司需要的功能都可以满足,包括存储,版本化管理,共享,检索和审计。
对MS Office的集成(Integration with Microsoft Office)Alfresco集成了MS Office 和 Open Office。
所以你可以一如既往的使用你自己的office环境,在不需要再学习的情况下,你和你的公司就可以得到存储,版本化管理,共享,检索和很简单的就集成了工作流的审计功能。
为资料应用建立各种规则(Rules for content applications)Alfresco把简单共享的驱动器放到一个虚拟的文件系统中,在这里,你用简单的向导就可以创建一个你需要的资料管理应用。
Package‘alfr’October12,2022Type PackageTitle Connectivity to'Alfresco'Content Management RepositoriesVersion1.2.1Author Roy Wetherall<********************>Maintainer Roy Wetherall<********************>Description Allows you to connect to an'Alfresco'content management repository and interact with its contents using simple and intuitive functions.You will be able to establish a connec-tion session to the'Alfresco'repository,read and upload content and manage folder hierarchies.For more details on the'Alfresco'con-tent management repositorysee<https:///ecm-software/document-management>.Depends R(>=3.5.0)License GPL-3|file LICENSEURL https:///rwetherall/alfr,https://rwetherall.github.io/alfr/BugReports https:///rwetherall/alfr/issuesEncoding UTF-8LazyData trueRoxygenNote6.1.1Imports httr,jsonlite,magrittr,stringrSuggests devtools,httptest,roxygen2,testthat,knitr,rmarkdown,covr,remotes,spelling,fsVignetteBuilder knitrSystemRequirements Alfresco Content Repository(Community orEnterprise)Language en-USNeedsCompilation noRepository CRANDate/Publication2019-07-1904:30:04UTC12alfr R topics documented:alfr (2)alf_node (3)alf_node.delete (4)alf_node.new (5)alf_session (7)alf_session.invalidate (8)alf_session.is_valid (9)Index10 alfr alfr:A package for connecting with AlfrescoDescriptionThe alfr package provides a way to connect to Alfresco and interact with the contents of the repository.Session•alf_session-connection session to an Alfresco repository•alf_session.is_valid-determine whether the session connection to an Alfresco repository is still valid•alf_session.invalidate-invalidates a session so it can no longer use used to connect to an Alfresco repositoryNodes•alf_node-get the details of a folder or content node•alf_node.new-creates a new folder or content node•alf_node.delete-deletes a folder or content nodeAuthor(s)Roy Wetherall<********************>alf_node3 alf_node Get Alfresco nodeDescriptionGets the details of an Alfresco repository node matching node_id or,if provided,the node at relative_path relative to node_id.Usagealf_node(session,node_id="-root-",relative_path=NULL)Argumentssession valid Alfresco repository sessionnode_id node id,defaults to-root-relative_path relative path from node_id to required node,defaults to NULLValueNode detailsExamples#try to establish a connection to the alfresco content repositorymy_session<-tryCatch(alf_session("http://localhost:8080","admin","admin"),error=function(e)NULL)if(!is.null(my_session)){#create documentmy_new_document<-alf_node.new(my_session,node_id="-root-",list(name="example.txt",nodeType="cm:content",relativePath="example"))#upload contentmy_new_document$content$update(system.file("extdata","sample.txt",package="alfr"))#get details of document nodemy_document<-alf_node(my_session,relative_path="example/example.txt")#output the name of the documentprint(my_document$name)4alf_node.delete #output the details of documents contentprint(my_document$content$mime_type)print(my_document$content$mime_type_name)print(my_document$content$size)print(my_document$content$encoding)#read document contentmy_content_file<-file(my_document$content$as.file(),"r")my_content<-readLines(my_content_file)close(my_content_file)print(my_content)#upload new contentmy_updated_document<-my_document$content$update(system.file("extdata","modified_sample.txt",package="alfr"))#print updated content sizeprint(my_updated_document$content$size)#delete documentalf_node.delete(my_session,my_document$id)}alf_node.delete Deletes an Alfresco nodeDescriptionDeletes an Alfresco node identified by node_id.If the node is a folder then all the delete recurses through the primary children.Usagealf_node.delete(session,node_id,permanent=FALSE)Argumentssession valid Alfresco repository sessionnode_id node id to deletepermanent indicates whether the node is permanently deleted or places in the trashcan where where it can be recovered from.FALSE by default.Examples#try to establish a connection to the alfresco content repositorymy_session<-tryCatch(alf_session("http://localhost:8080","admin","admin"),error=function(e)NULL)if(!is.null(my_session)){#create documentmy_new_document<-alf_node.new(my_session,node_id="-root-",list(name="example.txt",nodeType="cm:content",relativePath="example"))#upload contentmy_new_document$content$update(system.file("extdata","sample.txt",package="alfr"))#get details of document nodemy_document<-alf_node(my_session,relative_path="example/example.txt") #output the name of the documentprint(my_document$name)#output the details of documents contentprint(my_document$content$mime_type)print(my_document$content$mime_type_name)print(my_document$content$size)print(my_document$content$encoding)#read document contentmy_content_file<-file(my_document$content$as.file(),"r")my_content<-readLines(my_content_file)close(my_content_file)print(my_content)#upload new contentmy_updated_document<-my_document$content$update(system.file("extdata","modified_sample.txt",package="alfr"))#print updated content sizeprint(my_updated_document$content$size)#delete documentalf_node.delete(my_session,my_document$id)}alf_node.new Create a new Alfresco nodeDescriptionCreates a new Alfresco repository node as a child of node_id.Usagealf_node.new(session,node_id,node_details)Argumentssession valid Alfresco repository sessionnode_id node idnode_details details of new nodeValuenode detailsExamples#try to establish a connection to the alfresco content repositorymy_session<-tryCatch(alf_session("http://localhost:8080","admin","admin"),error=function(e)NULL)if(!is.null(my_session)){#create documentmy_new_document<-alf_node.new(my_session,node_id="-root-",list(name="example.txt",nodeType="cm:content",relativePath="example"))#upload contentmy_new_document$content$update(system.file("extdata","sample.txt",package="alfr"))#get details of document nodemy_document<-alf_node(my_session,relative_path="example/example.txt") #output the name of the documentprint(my_document$name)#output the details of documents contentprint(my_document$content$mime_type)print(my_document$content$mime_type_name)print(my_document$content$size)print(my_document$content$encoding)#read document contentmy_content_file<-file(my_document$content$as.file(),"r")my_content<-readLines(my_content_file)close(my_content_file)print(my_content)alf_session7 #upload new contentmy_updated_document<-my_document$content$update(system.file("extdata","modified_sample.txt",package="alfr"))#print updated content sizeprint(my_updated_document$content$size)#delete documentalf_node.delete(my_session,my_document$id)}alf_session Get connection session to Alfresco content repositoryDescriptionValidates authentication details with Alfresco content repository,returning ticket,server details and endpoints if successful.Usagealf_session(server,username,password)Argumentsserver Alfresco server URLusername user namepassword passwordValueConnection session to Alfresco repositoryExamples#try to establish a connection to the alfresco content repositorymy_session<-tryCatch(alf_session("http://localhost:8080","admin","admin"),error=function(e)NULL)if(!is.null(my_session)){#output session informationprint(paste("Session:[ticket=",my_session$ticket,",server=",my_session$server,"]",sep=""))#verify that the session is validif(alf_session.is_valid(my_session))print("Session verified as valid.")#invalidate the session so that it can no longer be usedalf_session.invalidate(my_session)}alf_session.invalidateInvalidates a session.DescriptionInvalidates a valid session so it can no longer be used to connect to an Alfresco repository.Usagealf_session.invalidate(session)Argumentssession sessionValueTRUE if session has been successfully invalidated,FALSE if session was already invalid.Examples#try to establish a connection to the alfresco content repositorymy_session<-tryCatch(alf_session("http://localhost:8080","admin","admin"),error=function(e)NULL)if(!is.null(my_session)){#output session informationprint(paste("Session:[ticket=",my_session$ticket,",server=",my_session$server,"]",sep="")) #verify that the session is validif(alf_session.is_valid(my_session))print("Session verified as valid.")#invalidate the session so that it can no longer be usedalf_session.invalidate(my_session)}alf_session.is_valid Determine whether a session is valid.DescriptionDetermines whether a given session is still valid or not.Usagealf_session.is_valid(session)Argumentssession sessionValueTRUE if the session is valid,FALSE otherwiseExamples#try to establish a connection to the alfresco content repositorymy_session<-tryCatch(alf_session("http://localhost:8080","admin","admin"),error=function(e)NULL)if(!is.null(my_session)){#output session informationprint(paste("Session:[ticket=",my_session$ticket,",server=",my_session$server,"]",sep="")) #verify that the session is validif(alf_session.is_valid(my_session))print("Session verified as valid.") #invalidate the session so that it can no longer be usedalf_session.invalidate(my_session)}Indexalf_node,2,3alf_node.delete,2,4alf_node.new,2,5alf_session,2,7alf_session.invalidate,2,8alf_session.is_valid,2,9alfr,2alfr-package(alfr),210。
alfresco知识库管理系统用户使用手册目录【名词解释】 21、alfresco知识库管理系统 22、站点 23、文档 34、知识 35、内容 36、标记 3【其它说明】 41、查找内容的3个主要方法 4一、管理系统登陆 41、系统登录 42、界面简介 5二、个人档案管理 61、编辑个人档案 62、更改密码 7三、站点使用说明 81、访问站点 82、”站点“界面简介 83、”文档库“功能说明 94、”维基“功能说明 10四、存储库使用说明 12五、搜索使用说明 131、快速搜索 132、条件搜索 133、关键词组合搜索 14【名词解释】1、alfresco知识库管理系统Alfresco是一款开源的企业内容管理系统,可以为企业提供文档和知识管理的版本控制、移动访问、协同工作等多种功能。
Alfresco支持全文检索,用户使用简单,Alfresco是目前应用最广泛的开源企业知识管理系统,先后有超过500万次的下载,7.4万个社区成员。
我们的财务共享中心知识库管理系统,就是用该软件搭建的。
2、站点站点是存放企业内容的基础。
我们把站点视为仓库,内容视为物资,不同的物资存放在不同的仓库中,比如我们把粮食放在一个仓库中,把矿石放在另外一个仓库中。
站点的作用就是存放特定的内容,并限定访问的用户。
比如目前我们财务知识库的3个站点中,SSC知识库就是存放财务中心的内容,财务中心员工可以访问这些内容;其它2个站点存放的是地市州财务人员相关的内容。
3、文档包括数据库中的信息、企业的各种文档、报表、账单、网页、图片、传真,甚至多媒体音频、视频等等各种电子信息载体。
在我们的知识库系统中,”文档“具体指存放在站点下的”文档库“中的文件。
4、知识知识通常指通过学习、实践或探索所获得的认识、判断或技能。
在我们的知识库系统中,”知识“具体指存放在站点下的”维基“中的文件。
”知识“是基于文档提炼、总结的精华经验,可以通过查看”知识“文章来更快、更好地获取相关信息。
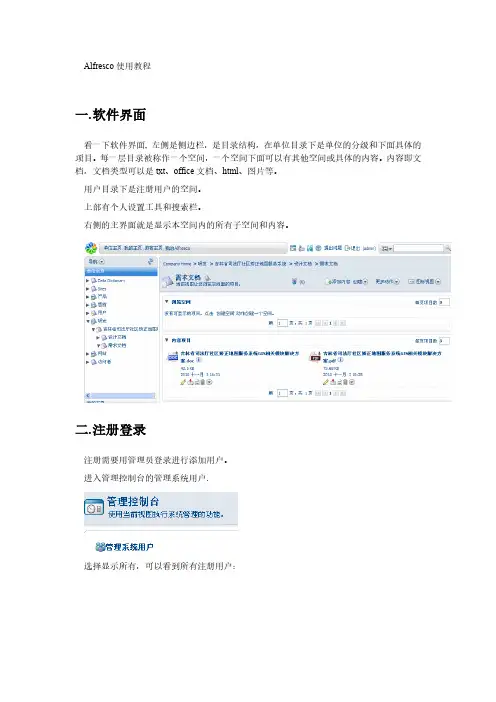
Alfresco使用教程一.软件界面看一下软件界面, 左侧是侧边栏,是目录结构,在单位目录下是单位的分级和下面具体的项目。
每一层目录被称作一个空间,一个空间下面可以有其他空间或具体的内容。
内容即文档,文档类型可以是txt、office文档、html、图片等。
用户目录下是注册用户的空间。
上部有个人设置工具和搜索栏。
右侧的主界面就是显示本空间内的所有子空间和内容。
二.注册登录注册需要用管理员登录进行添加用户。
进入管理控制台的管理系统用户.选择显示所有,可以看到所有注册用户:其中名称是显示名,用户名是登录名,主空间是用户空间,限额是自己空间的最大容量限制。
选择右上角的创建用户填入相应内容和限额,点右上角的下一步。
填入用户登录的用户名密码,空间名称,点击结束,一个用户就添加完毕了。
三.添加空间和内容1.添加空间如果此用户有在此空间下添加空间的权限,在创建里就会有这两项点击高级创建空间向导,选择从头开始。
选择文件夹空间在详细信息里输入空间名称,标题和描述,选择一个图标,点击结束。
一个空间就建立了。
如果直接点击创建空间,就会弹出上面的画面,默认建立的是文件夹空间。
如果新建的是论坛空间,在下面可以建立论坛论坛里可以新建主题和发表回复。
2.创建内容在线输入内容并保存。
四.添加内容注意,添加的所有内容会自动加入到版本管理里。
五.离线编辑文档1.在界面文档的按钮里选择“离线编辑”2.系统会弹出下载界面,并且自动弹出下载窗口。
把文档下载到本地。
3.在本地编辑文件并保存。
4.在工作界面,会看到此文件的工作副本文件,选择上传新版本。
5.然后选择结束编辑,Alfresco会自动把工作副本作为原文件的最新版本。
并且可以选择版本号。
这是编辑过的文件:6.如果想要查看版本,可以在详细信息的版本控制里查看:如果要恢复以前的版本,请下载相应的版本后选择右侧的更新,把此版本作为最新版本上传。
六.内容规则可以用内容规则对文档进行详细控制,这里不做介绍。
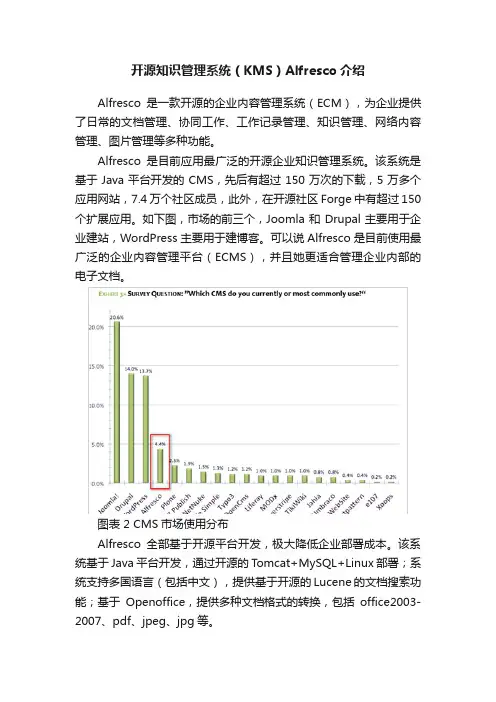
开源知识管理系统(KMS)Alfresco介绍Alfresco是一款开源的企业内容管理系统(ECM),为企业提供了日常的文档管理、协同工作、工作记录管理、知识管理、网络内容管理、图片管理等多种功能。
Alfresco是目前应用最广泛的开源企业知识管理系统。
该系统是基于Java平台开发的CMS,先后有超过150万次的下载,5万多个应用网站,7.4万个社区成员,此外,在开源社区Forge中有超过150个扩展应用。
如下图,市场的前三个,Joomla和Drupal主要用于企业建站,WordPress主要用于建博客。
可以说Alfresco是目前使用最广泛的企业内容管理平台(ECMS),并且她更适合管理企业内部的电子文档。
图表 2 CMS市场使用分布Alfresco全部基于开源平台开发,极大降低企业部署成本。
该系统基于Java平台开发,通过开源的T omcat+MySQL+Linux部署;系统支持多国语言(包括中文),提供基于开源的Lucene的文档搜索功能;基于Openoffice,提供多种文档格式的转换,包括office2003-2007、pdf、jpeg、jpg等。
Alfresco拥有良好的用户交互。
该系统基于目录树管理文档,提供全文检索,多国语言支持,用户使用简单,便于在企业中推广。
基于Alfresco平台企业可以构建多种知识管理应用。
Alfresco是一个企业级的系统,企业可以基于该系统构建多种应用,如企业文档数据库、企业知识管理门户、可扩展的内容数据库、公司的网站、市场信息沟通、基于需求的出版、工作记录管理、财务应用、研发平台用信息共享平台等。
图表 2 Alfresco系统平台架构图Alfresco提供了一套完整的权限管理体系。
Alfresco采用用户-组-资源-权限的分层次权限管理体系,让管理员可以方便的控制电子文档或文档空间的访问权限。
在实际应用本土化的过程中,Alfresco也存在一些局限性:(1)Alfresco的对最低权限的定义过于宽松。
alfresco流程设计
Alfresco的流程设计可以通过以下步骤完成:
1.定义流程:根据业务需求,定义所需的业务流程,可以使用Alfresco的流程设计工具进行可视化设计,也可以通过编写代码的方式实现。
2.创建任务节点:在流程中创建任务节点,并为每个任务节点分配相应的责任人或角色。
3.设置流转规则:根据流程的逻辑关系,设置流程的流转规则,包括前一个任务节点的结束条件、后一个任务节点的触发条件等。
4.配置表单:为每个任务节点配置相应的表单,表单的内容可以根据实际需求进行定制。
5.部署流程:将设计好的流程部署到Alfresco服务器上,并启动流程实例。
6.测试流程:通过模拟实际业务场景,测试流程是否符合预期,并对不符合预期的地方进行调整和优化。
7.发布流程:经过测试和验证后,将流程正式发布到生产环境中,供实际业务使用。
Alfresco支持LDAP验证这里说的活动目录指的是公司内的AD服务器。
希望能通过AD账户来访问Alfresco网站并设置相应的权限。
根据alfresco的官方做法,需要配置一个验证链。
首先用alfrescoNtlm来提供Ntlm验证功能;其次用passthru子系统把用户提供的用户名和密码转交给AD服务器进行验证;最后加上一个ldap-ad在alfresco和AD其同步账户。
创建子系统配置文件这里有三个子系统,分别是alfrescoNtlm,passthru和ldap-ad。
验证链首先要在alfresco-global.properties里声明验证链验证链的声明格式如下:authentication.chain=id1:type1,id2:type2......idn:typen所以需要加入以下验证链:authentication.chain=alfrescoNtlm1:alfrescoNtlm,passthru1: passthru,ldap1:ldap-ad验证链的第一个一定要声明alfrescoNtlm,后面两个一个用来验证的,一个是用来同步的,所以顺序没有关系。
配置文件新建以下三个目录tomcat/webapps/alfresco/WEB-INF/classes/alfresco/extension/subsystems/Authentication/afres coNtlm/alfrescoNtlm1tomcat/webapps/alfresco/WEB-INF/classes/alfresco/extension/subsystems/Authentication/pass thru/passthru1tomcat/webapps/alfresco/WEB-INF/classes/alfresco/extension/subsystems/Authentication/ldap -ad/ldap1再把相应验证子系统中的properties文件拷贝到目录里,tomcat/webapps/alfresco/WEB-INF/classes/alfresco/extension/subsystems/Authentication# ls -R.:alfrescoNtlm ldap-ad passthru./alfrescoNtlm:alfrescoNtlm1./alfrescoNtlm/alfrescoNtlm1:alfresco-authentication.properties ntlm-filter.properties./ldap-ad:ldap1./ldap-ad/ldap1:ldap-ad-authentication.properties./passthru:passthru1./passthru/passthru1:ntlm-filter.properties passthru-authentication-context.propertiesalfrescoNtlmntlm-filter.propertiesntlm.authentication.sso.enabled=falsentlm.authentication.mapUnknownUserToGuest=falsentlm.authentication.browser.ticketLogons=truealfresco-authentication.propertiesalfresco.authentication.allowGuestLogin=falsealfresco.authentication.authenticateCIFS=falsepassthruntlm-filter.propertiestlm.authentication.sso.enabled=false^Mntlm.authentication.mapUnknownUserToGuest=false^Mntlm.authentication.browser.ticketLogons=truepassthru-authentication-context.propertieseLocalServer=falsepassthru.authentication.domain= passthru.authentication.servers=192.168.1.5passthru.authentication.guestAccess=falsepassthru.authentication.defaultAdministratorUserNames=2023 #Timeout value when opening a session to an authentication server, in milliseconds passthru.authentication.connectTimeout=5000 #Offline server check interval in seconds passthru.authentication.offlineCheckInterval=300passthru.authentication.protocolOrder=NetBIOS,TCPIP passthru.authentication.authenticateCIFS=truepassthru.authentication.authenticateFTP=trueldap-adldap-ad-authentication.properties# This flag enables use of this LDAP subsystem for authentication. It may be# that this subsytem should only be used for synchronization, in which case# this flag should be set to false.ldap.authentication.active=false## This properties file brings together the common options for LDAP authentication rather than editing the bean definitions #ldap.authentication.allowGuestLogin=false#How to map the user id entered by the user to taht passed through to LDAP# In Active Directory, this can either be the user principal name (UPN) or DN.# UPNs are in the form @domain and are held in the userPrincipalName attribute of a usererNameFormat=%**************# The LDAP context factory to useldap.authentication.java.naming.factory.initial=com.sun.jndi. ldap.LdapCtxFactory# The URL to connect to the LDAP serverldap.authentication.java.naming.provider.url=ldap://192.168 .1.5:389# The authentication mechanism to use for password validationldap.authentication.java.naming.security.authentication=sim ple# Escape commas entered by the user at bind time# Useful when using simple authentication and the CN is part of the DN and contains commasldap.authentication.escapeCommasInBind=false# Escape commas entered by the user when setting the authenticated user# Useful when using simple authentication and the CN is part of the DN and contains commas, and the escaped \, is # pulled in as part of an LDAP sync# If this option is set to true it will break the default home folder provider as space names can not contain ldap.authentication.escapeCommasInUid=false# Comma separated list of user names who should beconsidered administrators by defaultldap.authentication.defaultAdministratorUserNames=admin istrator# This flag enables use of this LDAP subsystem for user and group# synchronization. It may be that this subsytem should only be used for# authentication, in which case this flag should be set to false.ldap.synchronization.active=true# The authentication mechanism to use for synchronization ldap.synchronization.java.naming.security.authentication=si mple# The default principal to bind with (only used for LDAP sync). This should be a UPN or DNldap.synchronization.java.naming.security.principal=adminis *******************# The password for the default principal (only used for LDAP sync)ldap.synchronization.java.naming.security.credentials=pass word# If positive, this property indicates that RFC 2696 paged results should be# used to split query results into batches of the specified size. This# overcomes any size limits imposed by the LDAP server.ldap.synchronization.queryBatchSize=1000# If positive, this property indicates that range retrieval should be used to fetch# multi-valued attributes (such as member) in batches of the specified size.# Overcomes any size limits imposed by Active Directory.ldap.synchronization.attributeBatchSize=1000# The query to select all objects that represent the groups to import.ldap.synchronization.groupQuery=(objectclass\=group)# The query to select objects that represent the groups to import that have changed since a certain time.ldap.synchronization.groupDifferentialQuery=(&(objectclas s\=group)(!(modifyTimestamp<\={0})))# The query to select all objects that represent the users to import.ldap.synchronization.personQuery=(&(objectclass\=user)(u serAccountControl\:1.2.840.113556.1.4.803\:\=512))# The query to select objects that represent the users to import that have changed since a certain time.ldap.synchronization.personDifferentialQuery=(&(objectclas s\=user)(userAccountControl\:1.2.840.113556.1.4.803\:\=512)(!(modif yTimestamp<\={0})))# The group search base restricts the LDAP group query to a sub section of tree on the LDAP server.ldap.synchronization.groupSearchBase=DC\=Domain,DC\=l ocal# The user search base restricts the LDAP user query to a sub section of tree on the LDAP server.erSearchBase=DC\=Domain,DC\=lo cal# The name of the operational attribute recording the last update time for a group or user.ldap.synchronization.modifyTimestampAttributeName=modifyTimestamp# The timestamp format. Unfortunately, this varies between directory servers.ldap.synchronization.timestampFormat=yyyyMMddHHmms s'.0Z'# The attribute name on people objects found in LDAP to use as the uid in AlfrescoerIdAttributeName=sAMAccountNa me# The attribute on person objects in LDAP to map to the first name property in AlfrescoerFirstNameAttributeName=givenN ame# The attribute on person objects in LDAP to map to the last name property in AlfrescoerLastNameAttributeName=sn# The attribute on person objects in LDAP to map to the email property in AlfrescoerEmailAttributeName=mail# The attribute on person objects in LDAP to map to the organizational id property in AlfrescoerOrganizationalIdAttributeName=c ompany# The default home folder provider to use for people created via LDAP importldap.synchronization.defaultHomeFolderProvider=userHom esHomeFolderProvider# The attribute on LDAP group objects to map to the authority name property in Alfrescoldap.synchronization.groupIdAttributeName=cn# The attribute on LDAP group objects to map to the authority display name property in Alfrescoldap.synchronization.groupDisplayNameAttributeName=dis playName# The group type in LDAPldap.synchronization.groupType=group# The person type in LDAPldap.synchronization.personType=user# The attribute in LDAP on group objects that defines the DN for its membersldap.synchronization.groupMemberAttributeName=membe r# If true progress estimation is enabled. When enabled, the user query has to be run twice in order to count entries.ldap.synchronization.enableProgressEstimation=true注意事项•所有的配置更改后都必须重启服务•ldap-ad中的验证功能必须关闭,否则和passthru冲突•AD的UPN是%**************。
此文档以Alfresco Community Edition 4.2.f + MySQL 5.5.38为例以图解的方式向您说明了如何安装Alfresco。
一、环境介绍✧Windows 7 旗舰版64位操作系统✧alfresco-community-4.2.f-installer-win-x64.exe✧mysql-5.5.38-winx64.exe✧Navicat_for_MySQL_10.1.7.exe二、Alfresco安装1、下载Alfresco安装程序,这里我们选择下载的是alfresco-community-4.2.f-installer-win-x64.exe安装程序;☞下载地址为:/projects/alfresco/files/2、点击如下图所示的Alfresco安装程序;3、在下图所示的引导安装界面中选择安装语言,这里我们选择“Simplified Chinese- 简体中文”,然后点击“OK”按钮,进入到下一步:4、在下图所示的引导安装界面中点击“前进 >”按钮,进入到下一步:5、在下图所示的引导安装界面中选择“高级”,然后点击“前进 >”按钮进入到下一步:6、在下图所示的引导安装界面中取消选中PostgreSQL选项,然后点击“前进 >”按钮,进入到下一步:7、在下图所示的引导安装界面中将C:\Alfresco改为C:\AlfrescoCE4.2.f,然后点击“前进 >”按钮进入到下一步:8、在下图所示的引导安装界面中依次输入以下内容,然后点击“前进 >”按钮进入到下一步:JDBC URL:jdbc:mysql://localhost:3306/alfrescoce4.2.f?useUnicode=yes& characterEncoding=UTF-8JDBC驱动程序:org.gjt.mm.mysql.Driver数据库名称:alfrescoce4.2.f用户名:root密码:root验证:root9、在下图所示的引导安装界面中点击“前进 >”按钮进入到下一步:10、在下图所示的引导安装界面中点击“前进 >”按钮进入到下一步:11、在下图所示的引导安装界面中点击“前进 >”按钮进入到下一步:12、在下图所示的引导安装界面中输入“管理密码”和“确认密码”,例如123456,然后点击“前进 >”按钮进入到下一步:13、在下图所示的引导安装界面中点击“前进 >”按钮进入到下一步:14、在下图所示的引导安装界面中点击“前进 >”按钮进入到下一步:15、在下图所示引导安装界面中点击“前进 >”按钮进入到下一步:16、在下图所示的引导安装界面中点击“前进 >”按钮进入到下一步:17、最后静静地等待Alfresco安装完成:18、但也不要忘了将MySQL JDBC Driver拷贝到C:\Alfrescoce4.2.f\tomcat\lib目录下。
ALFRESCO概述概览ECMKit内容管理之道ALFRESCO 概述/概览Posted on 三月 11, 2011 by liangAlfresco系统从很多方面来说和ECM系统十分相似。
(参见图1-1)在核心部分是一个内容库,她用来持久化内容,元数据,关联关系和全文索引,该内容库的运行由一个服务器所支持。
Alfresco拥有一套编程接口能支持多种编程语言和协议,开发人员可以基于该接口开发定制化的应用和解决方案。
Alfresco现成的应用程序能提供标准的解决方案,例如文档管理,记录管理和Web内容管理。
然而,因为和其他ECM系统相比,Alfresco相对比较年轻,因此它更容易使用现代架构。
Alfresco系统完全基于Java,因此只要能运行Java企业版的系统都能运行Alfresco。
它的核心是Spring平台,这使得Alfresco能模块化各种功能如版本控制,安全和规则。
Alfresco能自由的使用脚本以便简化新增功能以及接口的开发。
架构中的该部分被称作Web Scripts它即用于数据层服务也能用于展现层服务。
Alfresco尽可能保持架构的轻量级以便下载和安装,还能方便地利用新的打包和部署选项,如云计算平台。
内容应用服务器和内容库Alfresco系统的核心是内容应用服务器(Content Application Server),它管理和维护这内容库。
内容库可以和数据库做类比,除了它维护的不仅仅是结构化数据。
内容的二进制流保存在内容库中,相关的全文搜索索引由Lucene的索引维护。
实际的二进制流的内容是以文件形式由内容库管理,虽然这些文件只能在系统内部使用,和你在实际使用中打开的文件并不一样。
内容库还维护着内容条目,分类和文件夹/文件结构间的关联关系。
文件夹/文件的结构维护在数据库中,和内部文件存储结构并不对应。
Lucene是Apache项目中的一个开源全文搜索引擎。
内容应用服务器主要负责管理,访问和更新内容库中的内容所涉及的业务逻辑。
Alfresco使用教程一.软件界面看一下软件界面, 左侧是侧边栏,是目录结构,在单位目录下是单位的分级和下面具体的项目。
每一层目录被称作一个空间,一个空间下面可以有其他空间或具体的内容。
内容即文档,文档类型可以是txt、office文档、html、图片等。
用户目录下是注册用户的空间。
上部有个人设置工具和搜索栏。
右侧的主界面就是显示本空间内的所有子空间和内容。
二.注册登录注册需要用管理员登录进行添加用户。
进入管理控制台的管理系统用户.选择显示所有,可以看到所有注册用户:其中名称是显示名,用户名是登录名,主空间是用户空间,限额是自己空间的最大容量限制。
选择右上角的创建用户填入相应内容和限额,点右上角的下一步。
填入用户登录的用户名密码,空间名称,点击结束,一个用户就添加完毕了。
三.添加空间和内容1.添加空间如果此用户有在此空间下添加空间的权限,在创建里就会有这两项点击高级创建空间向导,选择从头开始。
选择文件夹空间在详细信息里输入空间名称,标题和描述,选择一个图标,点击结束。
一个空间就建立了。
如果直接点击创建空间,就会弹出上面的画面,默认建立的是文件夹空间。
如果新建的是论坛空间,在下面可以建立论坛论坛里可以新建主题和发表回复。
2.创建内容在线输入内容并保存。
四.添加内容注意,添加的所有内容会自动加入到版本管理里。
五.离线编辑文档1.在界面文档的按钮里选择“离线编辑”2.系统会弹出下载界面,并且自动弹出下载窗口。
把文档下载到本地。
3.在本地编辑文件并保存。
4.在工作界面,会看到此文件的工作副本文件,选择上传新版本。
5.然后选择结束编辑,Alfresco会自动把工作副本作为原文件的最新版本。
并且可以选择版本号。
这是编辑过的文件:6.如果想要查看版本,可以在详细信息的版本控制里查看:如果要恢复以前的版本,请下载相应的版本后选择右侧的更新,把此版本作为最新版本上传。
六.内容规则可以用内容规则对文档进行详细控制,这里不做介绍。
命令A-ZSANtricity commandsNetAppJuly 28, 2023This PDF was generated from https:///zh-tw/e-series-cli/commands-a-z/activate-asynchronous-mirroring.html on July 28, 2023. Always check for the latest.目錄命令A-Z. . . . . . . . . . . . . . . . . . . . . . . . . . . . . . . . . . . . . . . . . . . . . . . . . . . . . . . . . . . . . . . . . . . . . . . . . . . . . . . . 1答. . . . . . . . . . . . . . . . . . . . . . . . . . . . . . . . . . . . . . . . . . . . . . . . . . . . . . . . . . . . . . . . . . . . . . . . . . . . . . . . . . . 1c. . . . . . . . . . . . . . . . . . . . . . . . . . . . . . . . . . . . . . . . . . . . . . . . . . . . . . . . . . . . . . . . . . . . . . . . . . . . . . . . . . . 18D. . . . . . . . . . . . . . . . . . . . . . . . . . . . . . . . . . . . . . . . . . . . . . . . . . . . . . . . . . . . . . . . . . . . . . . . . . . . . . . . . . 126e. . . . . . . . . . . . . . . . . . . . . . . . . . . . . . . . . . . . . . . . . . . . . . . . . . . . . . . . . . . . . . . . . . . . . . . . . . . . . . . . . . 177G. . . . . . . . . . . . . . . . . . . . . . . . . . . . . . . . . . . . . . . . . . . . . . . . . . . . . . . . . . . . . . . . . . . . . . . . . . . . . . . . . . 186我. . . . . . . . . . . . . . . . . . . . . . . . . . . . . . . . . . . . . . . . . . . . . . . . . . . . . . . . . . . . . . . . . . . . . . . . . . . . . . . . . 187 l. . . . . . . . . . . . . . . . . . . . . . . . . . . . . . . . . . . . . . . . . . . . . . . . . . . . . . . . . . . . . . . . . . . . . . . . . . . . . . . . . . . 189 R. . . . . . . . . . . . . . . . . . . . . . . . . . . . . . . . . . . . . . . . . . . . . . . . . . . . . . . . . . . . . . . . . . . . . . . . . . . . . . . . . . 191 S. . . . . . . . . . . . . . . . . . . . . . . . . . . . . . . . . . . . . . . . . . . . . . . . . . . . . . . . . . . . . . . . . . . . . . . . . . . . . . . . . . 243 V. . . . . . . . . . . . . . . . . . . . . . . . . . . . . . . . . . . . . . . . . . . . . . . . . . . . . . . . . . . . . . . . . . . . . . . . . . . . . . . . . . 620命令A-Z答啟動非同步鏡射「activate storageArray facture’命令會啟動「非同步鏡射」功能。
Alfresco 5安装---华东纪蕴数据中心目录安装CentOS 7安装wget下载Alfresco 5安装包(bin格式,使用wget下载) 查看并安装Alfresco依赖包设置CentOS 7主机名并添加到hosts卸载postfix安装并配置Alfresco安装CentOS 7●CentOS 7最小化安装,安装方法自己百度●安装完成,查看版本信息,然后yum update升级至最新版。
root@localhost ~]# cat /etc/RedHat-releaseCentOS Linux release 7.2.1511 (Core)[root@localhost ~]# uname -aLinux localhost.localdomain 3.10.0-327.el7.x86_64 #1 SMP Thu Nov 19 22:10:57 UTC 2015 x86_64 x86_64 x86_64 GNU/Linux●关闭SelinuxVi /etc/selinux/config将enforce改为disable保存退出,然后重启。
安装wget安装wgetyum install -y wget下载Alfresco安装包下载Alfresco安装包bin格式,根据这个网址选择需要安装包下载(使用wget下载待用)wget /a/al/alfresco/Alfresco%20201707%20Community/alfresco-community-installer-201707-linux-x64.bin查看并安装Alfresco依赖包yum -y install fontconfig libSM libICE libXrender libXext cups-libs设置CentOS 7主机名hostnamectl set-hostname localhostecho “127.0.0.1 localhost”>> /etc/hosts卸载postfixyum –y remove postfixchmod +x alfresco-community-installer-201707-linux-x64.bin ./alfresco-community-installer-201707-linux-x64.bin配置防火墙端口firewall-cmd --add-port=8080/tcp --permanent firewall-cmd --add-port=8443/tcp --permanent firewall-cmd --add-port=7070/tcp --permanent firewall-cmd --reload查看服务启动状态ss -atulpn访问网站http://IP地址:8080/share/page扩展功能设置屏蔽普通账户的站点创建权限1、进入目录/opt/alfresco-community/tomcat/shared/classes/alfresco/extension2、将custom-public-services-security-context.xml文件复制其中,重启服务器生效。
Alfresco源代码初步搭建Alfresco的源码初步构建Alfresco Lab 3.0 Stable 的Full Install + SDK还原在Eclipse web runtime + debug 这个还原方式是最纯净的还原方式,全部引用3.0 SDK Stable 版中的所有jar 和src 。
Web 目录全部是原版的Jar,Src 只是作为Web Jar 的一个参考。
(主要介绍Windows 下的源码还原)该还原的代码有以下特点:A) 可以在Web容器运行中时修改B) 修改后立即生效C) 可以在运行中DebugD) 修改源码不需要从新启动服务立即生效E) 纯净的SDK 还原F) 修改错误不影响容器的继续运行一、安装Tomcat插件安装和下载SDK(安装Alfresco-Labs-3Stable-Full-Setup.exe 在相应的目录中)安装后的Alfresco 目录结构如下解压缩tomcat/webapps/alfresco.war 压缩文件,内容目录结构如下二、启动和设置EclipseA.新建web工程alfrescoB.将上一张图中所有的目录拷贝至Eclipse 新建Web工程的WebContent 目录下。
C.为了重用Lib,所以我们点Windows –Preferences –Java - Build Path – User Libraries点击New ,设置名称为3rdLib , 然后点击Add Jars , 把目录选择至workspace/alfresco/WebContent/WEB-INF/lib 目录下除了含有alfresco 字样的包统统加进3rdLib 中.D.同上步,添加新的User Lib , alfresco . 选择lib 目录下所有含有alfresco 名称的jar添加Tomcat包的引用F.一般情况下我们直接拷贝整个Web Content 目录,那么Eclipse 会帮我们把WebContent/WEB-INF/lib 中的jar 自动添加至Web App Libraries,然后并设置引用,如果存在Web App Libraries 引用那么我们将它删除三、设置Tomcat插件在alfresco web 工程上点击properties->tomcat 然后按照下图的钩选其他若干工程导入类似,就不在这里举例,将需要的包加载进来即可!况且都在3rd中四、导入的最终结果。
Alfresco使用教程
一.软件界面
看一下软件界面, 左侧是侧边栏,是目录结构,在单位目录下是单位的分级和下面具体的项目。
每一层目录被称作一个空间,一个空间下面可以有其他空间或具体的内容。
内容即文档,文档类型可以是txt、office文档、html、图片等。
用户目录下是注册用户的空间。
上部有个人设置工具和搜索栏。
右侧的主界面就是显示本空间内的所有子空间和内容。
二.注册登录
注册需要用管理员登录进行添加用户。
进入管理控制台的管理系统用户.
选择显示所有,可以看到所有注册用户:
其中名称是显示名,用户名是登录名,主空间是用户空间,限额是自己空间的最大容量限制。
选择右上角的创建用户
填入相应内容和限额,点右上角的下一步。
填入用户登录的用户名密码,空间名称,点击结束,一个用户就添加完毕了。
三.添加空间和内容
1.添加空间
如果此用户有在此空间下添加空间的权限,在创建里就会有这两项
点击高级创建空间向导,选择从头开始。
选择文件夹空间
在详细信息里输入空间名称,标题和描述,选择一个图标,点击结束。
一个空间就建立了。
如果直接点击创建空间,就会弹出上面的画面,默认建立的是文件夹空间。
如果新建的是论坛空间,在下面可以建立论坛
论坛里可以新建主题和发表回复。
2.创建内容
在线输入内容并保存。
四.添加内容
注意,添加的所有内容会自动加入到版本管理里。
五.离线编辑文档
1.在界面文档的按钮里选择“离线编辑”
2.系统会弹出下载界面,并且自动弹出下载窗口。
把文档下载到本地。
3.在本地编辑文件并保存。
4.在工作界面,会看到此文件的工作副本文件,选择上传新版本。
5.然后选择结束编辑,Alfresco会自动把工作副本作为原文件的最新版本。
并且可以选择版本号。
这是编辑过的文件:
6.如果想要查看版本,可以在详细信息的版本控制里查看:
如果要恢复以前的版本,请下载相应的版本后选择右侧的更新,把此版本作为最新版本上传。
六.内容规则
可以用内容规则对文档进行详细控制,这里不做介绍。
七.使用Microsoft Office插件
1.安装alfresco-community-office2003-addins-3.3, 属性按默认值即可.
2.启动word,点击Alfresco插件,点击最下面的“Click here to Configure the Alfesco Server URLs”
填入相应信息后点Save Settings
保存后登录,可以看到有以下几个标签
分别是我的Alfresco、浏览空间和文档、搜索Alfresco、文档详细信息、我的任务和文档标
签。
3.上传文档
打开一篇要上传的文档。
在“浏览空间和文档”里选择要上传的空间(此用户需要有此空间的添加文档权限),点击Save To Alfresco
可以看到文档已经上传到空间
此时文档是锁定的,因为此文档正在被编辑。
当你关闭此文档保存时文档会作为最新版本被保存在服务器上。
4.查看文档
在浏览空间和文档里,点击你需要编辑的文档,此文档会自动打开。
可以查看此文档。
5.比较文档版本
在“文档详细信息里”,点击“V ersion History”,会显示此文档的版本信息,点击某一个版本的“Compare with current”,会打开一个新的word文档,显示此版本与当前文档的差别。
可以进行比较合并操作,结束后保存为一个文件,然后用更新操作更新到服务器上作为为最新版本。
6.在线编辑文档
点击需要编辑的文档“check out”按钮,进入编辑模式。
此时会为此文档建立工作副本。
并且原文件会被锁定。
当编辑完此文档后不必保存,直接点击工作副本的“check in”,文档会自动作为最新版本保存在服务器上。
(工作副本会被自动删除)
7.把文档插入到当前文档中
点击按钮就可以把此文档的内容插入到当前文档中。
8.一些错误的处理
由于软件本身是web界面,所以会遇到一些脚本错误,此时选择确定。
如果界面变成白屏,请点击右键,选择“返回”即可。
如果遇到出错,会出现原文件和工作副本同时存在的情况。
一般工作副本比较新,可以打开工作副本,另存为本地的一个文件,然后删除工作副本。
在“我的Alfresco”里选Launch
Alfresco,进入web界面,找到这个文件点更新,把本地的最新版本上传上去。
如果无法打开Version History标签,可以先切换到“搜索Alfresco”然后再切换回来就可以了。
无法check out文件的原因是此目录下存在同名的有(工作副本)后缀的文件,如果需要此文件的内容,请按上面加黑的方法操作。
否则直接删除工作副本就可以check out原文件了。
9.其他功能
其他还包括搜索文档、添加标签、工作任务、工作流、转换成PDF等功能,请大家自行阅读在线文档:
/help/34/community/msaddin/。