
NUAIKO独家CCNA实验手册
- 格式:pdf
- 大小:698.13 KB
- 文档页数:55

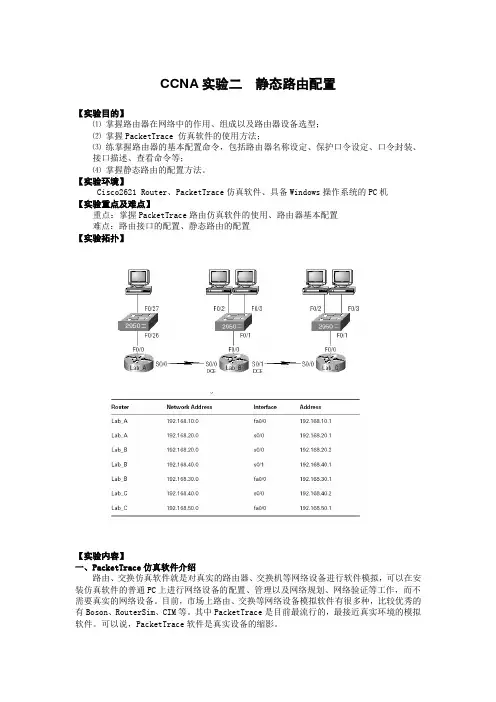
CCNA 实验二 静态路由配置【实验目的】⑴ 掌握路由器在网络中的作用、组成以及路由器设备选型; ⑵ 掌握PacketTrace 仿真软件的使用方法;⑶ 练掌握路由器的基本配置命令,包括路由器名称设定、保护口令设定、口令封装、接口描述、查看命令等;⑷ 掌握静态路由的配置方法。
【实验环境】Cisco2621 Router 、PacketTrace 仿真软件、具备Windows 操作系统的PC 机 【实验重点及难点】重点:掌握PacketTrace 路由仿真软件的使用、路由器基本配置 难点:路由接口的配置、静态路由的配置 【实验拓扑】【实验内容】一、PacketTrace 仿真软件介绍路由、交换仿真软件就是对真实的路由器、交换机等网络设备进行软件模拟,可以在安装仿真软件的普通PC 上进行网络设备的配置、管理以及网络规划、网络验证等工作,而不需要真实的网络设备。
目前,市场上路由、交换等网络设备模拟软件有很多种,比较优秀的有Boson 、RouterSim 、CIM 等。
其中PacketTrace 是目前最流行的,最接近真实环境的模拟软件。
可以说,PacketTrace 软件是真实设备的缩影。
二、PacketTrace 使用打开PacketTrace软件,选择“Custom Made Devices”中的2621XM系列路由器。
再选择“Connections”连接线中的“Serial DCE”连接线,按照如图路由器的方式连接好路由器。
然后,按照图示连接好交换机和主机。
三、路由器配置1.路由器配置模式及其转换⑴用户模式(user mode) router>用户模式(user mode):该模式下只能查看路由器基本状态和普通命令,不能更改路由器配置。
此时路由器名字后跟一个“>”符号,表明是在用户模式下。
如:router>⑵特权模式(privileged mode) router#特权模式(privileged mode):该模式下可查看各种路由器信息及修改路由器配置。

实验22 公司网络规划实验要求:5个部门之间不能互相访问,但是都可以访问服务区和Internet。
服务区不能访问Internet。
Internet不能主动发起访问内部服务。
实验器材:路由器route(3620);交换机switch(2950),和6台pc等。
实验目的:了解vlan的划分;访问控制列表的设置;trunk 的封装;以及防火墙的设置等。
如图所示以下是具体的操作:vlan划分部分route: enconf tint e0/0.1encapsulation isl vlan 1ip add 192.168.1.1 255.255.255.0no shutint e0/0.2encapsulation isl vlan 2ip add 192.168.2.1 255.255.255.0no shutint e0/0.3encapsulation isl vlan 3ip add 192.168.3.1 255.255.255.0no shutint e0/0.4encapsulation isl vlan 4ip add 192.168.4.1 255.255.255.0no shutint e0/0.5encapsulation isl vlan 5ip add 192.168.5.1 255.255.255.0no shutint e0/0.6encapsulation isl vlan 6ip add 192.168.6.1 255.255.255.0no shutswitch:envlan databasevlan 2 name vlan2vlan 3 name vlan3vlan 4 name vlan4vlan 5 name vlan5vlan 6 name vlan6crl+zenconf tint fa0/2switchport access vlan 2 int fa0/3switchport access vlan 3 int fa0/4switchport access vlan 4 int fa0/5switchport access vlan 5 int fa0/6switchport access vlan 6 int fa0/7switchport mode trunkswitchport trunk encapsulation islpc1: 192.168.1.2 255.255.255.0pc2: 192.168.2.2 255.255.255.0pc3: 192.168.3.2 255.255.255.0pc4: 192.168.4.2 255.255.255.0pc5: 192.168.5.2 255.255.255.0pc6: 192.168.6.2 255.255.255.0设置访问控制列表部分;以及防火墙的设置:比较烦琐,我不修改他的设置了,重新在最下面为大家举一部分,其它的参照就可以了route:enconf taccess-list 101 deny tcp 192.168.1.2 0.0.0255 any establishedpermit tcp any any establishedaccess-list102 permit ip 192.168.1.2 0.0.0.255 192.168.2.1 0.0.4.255access-list103 permit ip 192.168.2.2 0.0.0.255deny ip192.168.2.2 0 0.0.255 192.168.3.2 0.0.4.255access-list 104 permit ip 192.168.3.2 0.0.0.255 192.168.1.2 0.0.0.255deny ip 192.168.3.2 0.0.0.255 192.168.4.2 0.0.3.255.deny ip 192.168.3.2 0.0.0.255 192.168.2.2 0.0.0.255acces-list 105 permit ip 192.168.4.2 0.0.0.255 192.168.1.2 0.0.0.255deny ip 192.168.4.2 0.0.0.255 192.168.5.2 0.0.2.255deny ip 192.168.4.2 0.0.0.255 192.168.2.2 0.0.2.255access-list 106 permit ip 192.168.5.2 0.0.0.255 192.168.1.2 0.0.0.255deny ip 192.168.5.2 0.0.0.255 192.168.2.1 0.0.3.255deny ip 192.168.5.2 0.0.0.255 192.168.6.2 0.0.0.255access-list 107 permit ip 192.168.6.2 0.0.0.255deny ip 192.168.6.2 0.0.0.255 192.168.2.2.1 0.0.4.255int e0/0.1ip access-group 101ip access-group 102 inint e0/0.2ip access-group 101ip access-group 103 inint e0/0.3ip access-group 101ip access-group 104 inint e0/0.4ip access-group 101ip access-group 105 inint e0/0.5int access-group 101int access-group 106 inint e0/0.6int access-group 101int access-group 107 inaccess-list 101 permit tcp 192.168.0.00.0.7.255 anyint e/0.1ip access-group 101 outaccess-list 102 deny tcp 192.168.3.0 0.0.0.255 anyaccess-list 102 deny tcp 192.168.4.0 0.0.0.255 anyaccess-list 102 deny tcp 192.168.5.0 0.0.0.255 anyaccess-list 102 deny tcp 192.168.6.0 0.0.0.255 anyaccess-list 102 permit tcp 192.168.1.0 0.0.0.255 anyaccess-list 102 permit tcp any any established int e0/0.2ip access-group 102 out。
CCNA实验大全一、CDP 的配置。
192.168.1.1 192.168.1.2 2 S1/1 1 S1/1 S1/0 172.16.1.1172.16.1.2S1/0 3要求:a、配置接口的信息。
b 、R1能ping通R2,R2能ping通R3;c、在R2 S1/0关闭cdp,使R1不能发现R2,但R3可以发现R2;d、 R2在全局的模式下关闭cdp,让所有的路由器间不能相互发现对方。
注:如果路由器之间连接帧中继,需要封装encapsulation frame-relay 步骤:1、配置基本信息Router(config)#hostname R1 R1(config)#no ip domain-lookup R1(config)#line con 0R1(config-line)#logging syn R1(config-line)#exec-timeout 0R1(config)#interface s1/1 R1(config-if)#no shutdownR1(config-if)#ip address 192.168.1.1 255.255.255.0 Router(config)#hostname R2 R2(config)#no ip domain-lookup R2(config)#line con 0R2(config-line)#logging syn R2(config-line)#exec-timeout 0R2(config)#interface s1/0 R2(config-if)#no shutdownR2(config-if)#ip address 192.168.1.2 255.255.255.0 R2(config-if)#exitRouter(config)#interface s1/1 R2(config-if)#no shutdownR2(config-if)#ip address 172.16.1.1 255.255.0.0Router(config)#hostname R3 R3(config)#no ip domain-lookup R3(config)#line con 0R3(config-line)#logging syn R3(config-line)#exec-timeout 0R3(config)#interface s1/0R3(config-if)#no shutdownR3(config-if)#ip address 172.16.1.2 255.255.0.0 2、R1能ping通R2,R2能ping通R3; r1#ping 192.168.1.2Type escape sequence to abort.Sending 5, 100-byte ICMP Echos to 192.168.1.2, timeout is 2 seconds: !!!!!Success rate is 100 percent (5/5), round-trip min/avg/max = 48/56/88 msR2#ping 172.16.1.2Type escape sequence to abort.Sending 5, 100-byte ICMP Echos to 172.16.1.1, timeout is 2 seconds: !!!!!Success rate is 100 percent (5/5), round-trip min/avg/max = 48/56/88 ms 3在R2 S1/0关闭cdp,使R1不能发现R2,但R3可以发现R2; r1#show cdp neighborsCapability Codes: R - Router, T - Trans Bridge, B - Source Route Bridge S - Switch, H - Host, I - IGMP, r - RepeaterDevice ID Local Intrfce Holdtme Capability Platform PortIDR2 Ser 1/1 147 R 7206VXR Ser1/0 在R2s1/0关闭cdp:(直关闭接口的CDP) R2(config)#interface s1/0R2(config-if)#no cdp enable 在R1查询cdp的邻居(60s): r1#show cdpneighborsCapability Codes: R - Router, T - Trans Bridge, B - Source Route Bridge S - Switch, H - Host, I - IGMP, r - RepeaterDevice ID Local Intrfce Holdtme Capability Platform PortID (没有邻居) 在R3查询cdp的邻居(60s): r3#show cdp neighborsCapability Codes: R - Router, T - Trans Bridge, B - Source Route Bridge S - Switch, H - Host, I - IGMP, r - RepeaterDevice ID Local Intrfce Holdtme Capability Platform PortIDR2 Ser 1/0 132 R 7206VXR Ser1/1 4、R2在全局的模式下关闭cdp,让所有的路由器间不能相互发现对方。
