
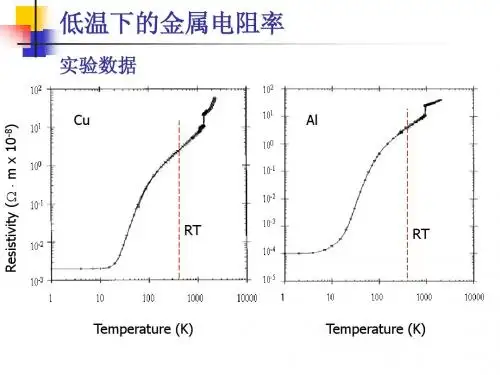
Interconnect_chapter 2_4_r
- 格式:ppt
- 大小:604.00 KB
- 文档页数:13
PCB Guidelines for DDR3Strict adherence to all documented DDR3 PCB guidelines is required for successful operation. For more information on PCB guidelines, see the UltraScale Architecture PCB Design and Pin Planning User Guide (UG583) [Ref11].PCB Guidelines for DDR4Strict adherence to all documented DDR4 PCB guidelines is required for successful operation. For more information on PCB guidelines, see the UltraScale Architecture PCB Design and Pin Planning User Guide (UG583) [Ref11].Pin and Bank RulesDDR3 Pin Rulesbitstream is split into two stages. Specifically, IP cores built by the Memory IP or Memory Interface Generator (MIG) must not use bank 65 I/O. This ensures that IP can remain completely within stage 2, and avoid complications with its embedded I/O and demanding timing constraints.The rules are for single and multi-rank memory interfaces.•Address/control means cs_n, ras_n, cas_n, we_n, ba, ck, cke, a, parity (valid for RDIMMs only), and odt. Multi-rank systems have one cs_n, cke, odt, and one ck pair per rank.•Pins in a byte lane are numbered N0 to N12.•Byte lanes in a bank are designed by T0, T1, T2, or T3. Nibbles within a byte lane are distinguished by a “U” or “L” designator added to the byte lane designator (T0, T1, T2, or T3). Thus they are T0L, T0U, T1L, T1U, T2L, T2U, T3L, and T3U.Note:There are two PLLs per bank and a controller uses one PLL in every bank that is being used by the interface.1.dqs, dq, and dm location.a.Designs using x8 or x16 components – dqs must be located on a dedicated byteclock pair in the upper nibble designated with “U” (N6 and N7). dq associated witha dqs must be in same byte lane on any of the other pins except pins N1 and N12.b.Designs using x4 components – dqs must be located on the dedicated dqs pair inthe nibble (N0 and N1 in the lower nibble, N6 and N7 in the upper nibble). dq’sassociated with a dqs must be in the same nibble on any of the other pins except pin N12 (upper nibble).c.dm (if used) must be located on pin N0 in the byte lane with the corresponding dqs.When dm is disabled, pin N0 can be used for dq and pin N0 must not be used foraddress/control signal. Pin N0 must not be used for Address/Control when dm is not used (exception reset# pin).Note:dm is not supported with x4 devices.d.dm, if not used, must be pulled low on the PCB. Typical values used for this are equalto the DQ trace impedance such as 40 or 50Ω. Consult with the memory vendor for their specific recommendation. Unpredictable failures occur if this is not pulled low appropriately.2.The x4 components must be used in pairs. Odd numbers of x4 components are notpermitted. Both the upper and lower nibbles of a data byte must be occupied by a x4 dq/dqs group.3.Byte lanes with a dqs are considered to be data byte lanes. Pins N1 and N12 can be usedfor address/control in a data byte lane. If the data byte is in the same bank as the remaining address/control pins, see step #4.4.Address/control can be on any of the 13 pins in the address/control byte lanes. Address/control must be contained within the same bank.5.For dual slot configurations of RDIMMs and UDIMMs: cs, odt, cke, and ck port widthsare doubled. For exact mapping of the signals, see the DIMM Configurations.6.One vrp pin per bank is used and DCI is required for the interfaces. A vrp pin isrequired in I/O banks containing inputs as well as in output only banks. It is required in output only banks because address/control signals use SSTL15_DCI/SSTL135_DCI to enable usage of controlled output impedance. DCI cascade is allowed. When DCIcascade is selected, vrp pin can be used as a normal I/O. All rules for the DCI in the UltraScale™ Architecture SelectIO™ Resources User Guide (UG571) [Ref7] must befollowed.7.ck pair(s) must be on any PN pair(s) in the Address/Control byte lanes.8.reset_n can be on any pin as long as general interconnect timing is met and I/Ostandard must be SSTL15. Reset to DRAM should be pulled down so it is held low duringpower up. When dm is disabled, the reset pin can be allocated to N0th pin of data byte lane or any other free pin of that byte lane as long as other rules are not violated.9.Banks can be shared between two controllers.a.Each byte lane is dedicated to a specific controller (except for reset_n).b.Byte lanes from one controller cannot be placed inside the other. For example, withcontrollers A and B, “AABB” is allowed, while “ABAB” is not.10.All I/O banks used by the memory interface must be in the same column.11.All I/O banks used by the memory interface must be in the same SLR of the column forthe SSI technology devices.12.Maximum height of interface is five contiguous banks. The maximum supportedinterface is 80-bit wide.Maximum component limit is nine and this restriction is valid for components only and not for DIMMs.13.Bank skipping is not allowed.14.Input clock for the MMCM in the interface must come from a GCIO pair in the I/Ocolumn used for the memory interface. Information on the clock input specifications can be found in the AC and DC Switching Characteristics data sheets (LVDS inputrequirements and MMCM requirements should be considered). For more information, see Clocking, page87.15.There are dedicated V REF pins (not included in the rules above). Either internal orexternal V REF is permitted. If an external V REF is not used, the V REF pins must be pulled to ground by a resistor value specified in the UltraScale™ Architecture SelectIO™Resources User Guide (UG571) [Ref7]. These pins must be connected appropriately for the standard in use.16.The interface must be contained within the same I/O bank type (High Range or HighPerformance). Mixing bank types is not permitted with the exceptions of the reset_n in step 7 and the input clock mentioned in step 12.17.The par pin is required for DDR3 RDIMMs. For more information on parity errors, seethe Address Parity, page34.18.The system reset pin (sys_rst_n) must not be allocated to Pins N0 and N6 if the byteis used for the memory I/Os.。

Allegro® Constraint Manager User Guide1Welcome to Constraint ManagerTopics in this chapter includeThe Allegro® Constraint Manager Information Set on page 12What is Allegro® Constraint Manager?on page 13Accessing Constraint Manager on page 17Domains, Workbooks, Worksheets, and Cells on page 21Constraint Manager’s User Interface Controls on page 33Enhancements Done in 16.3The Allegro® Constraint Manager Information SetThe Allegro® Constraint Manager information set consists of online books accessible from Cadence Help in both HTML and PDF formats. All documentation is accessible from Constraint Manager’s help menu.Refer to . . .for this level of informationAllegro®Constraint Manager User Guide (this book) This book is for users who want to know how to use Constraint Manager in the design flow. This book complements the information in the Allegro® Constraint Manager Reference.Allegro® Constraint Manager Reference This book contains descriptions and procedures for all commands, organized by menu-sequence. Information about worksheet cells is also included.If you click help in a dialog box or if you highlight a menu command and press F1, the appropriate command description from this book appears.This book complements the information in the Allegro® Constraint Manager User Guide.Allegro® Platform Constraints Reference This book contains information describing the constraints architecture, and it includes reference information for each constraint.Allegro® Platform System Connectivity Manager This book contains information describing the hierarchical,User Guide lower-levelconstraints usedin theConstraintManager-enabled, high-speed flow.What is Allegro® Constraint Manager?Allegro® Constraint Manager is a cross-platform, workbook- and worksheet-based application used to manage constraints across all tools in the Cadence PCB and IC Package design flow.Constraint Manager lets you define, view, and validate constraints at each step in the design flow, from design capture (in Allegro® Design Entry HDL or System Connectivity Manager) to floorplanning (in Allegro® PCB SI L, XL, and GXL to design realization (in Allegro®PCB L, XL, GXL, and OrCAD PCB Editor). You can also use Constraint Manager with SigXplorer to explore circuit topologies and derive electrical constraint sets which can include custom constraints, custom measurements, and custom stimulus.Note: Figure 1-2 depicts Constraint Manager worksheets as launched from PCB Editor, OrCAD PCB Editor, or APD. The worksheet hierarchy is different for Constraint Manager when launched in exploration mode, from Allegro Design Entry HDL, or from System Connectivity Manager.Figure 1-1 The Constraint Manager User InterfaceConstraint Manager uses familiar user interface controls. See Table 1-2on page 33 for more information.In Constraint Manager, you work with objects and constraint sets, which capture your design requirements.Constraint Manager organizes constraints and Constraint Sets into the Physical, Spacing, Same Net Spacing, and Electrical domains. You then assign the appropriate constraint set to objects in your design, changing references (or re-defining the currently assigned constraint set) as your design requirements change. A constraint set can be referenced by any number of objects in your design.For more information on design objects and the object hierarchy, see Chapter 2, “Working with Constraint Objects.”For more information on how to define constraint sets and how to assign them to objects in your design, see Chapter 3, “Working With Reusable Constraint Objects — CSets.”Constraint Manager affords you the following features and benefits:Table 1-1 Constraint Manager FeaturesFeature BenefitObject Grouping You can organize objects into easily-managed units, such as a Class, Bus, Differential Pair, or Match Group to make it easier to apply constraints to member objects.Conceptual Definition You can define constraints in a Constraint Set and later apply those constraints to net-related objects.Redefinable Constraints Rather than changing individual net-related constraints one-by-one, you can redefine a constraint set and all objects that reference that constraint set get updated all at once.Cross-Probing You can run Constraint Manager with companion tools such as Allegro Design Entry HDL, Allegro SI, or Allegro Package Design and select a net in ConstraintManager and see the associated object update dynamically in the schematic, floorplanner, or layout, respectively. Conversely, Constraint Manager updates its values when they are modified in a companion tool.When you cross probe cells that contain constraint violations, the respective DRC marker (bowtie) becomes highlighted in the design entry- or PCB-Editor, or in APD.Topology Exploration You can access SigXplorer from Constraint Manager to schedule pins and derive generic or net-specific constraints, which may include customconstraints,custommeasurements,and customstimulus. Theresultingtopologytemplate datacan be importedinto ConstraintManager as anElectrical CSet. Design Reuse You can groupconstraints thatsatisfy aspecific designrequirementinto anconstraint set,which can bereferencedwithin theactive design orexported forreuse in asubsequentdesign.Cloning Constraints In addition to importing constraint sets or creating them from scratch, you can copy it, modify its parameters, and save it under a new name.Analysis ConstraintManagerperforms designrule checks, andsimulations asnecessary, toanalyze thedesign.Analysis resultsarecommunicatedby DRC markers, results populated in worksheet cells, simulation waveforms, and reports. Analysis results (actuals) can be compared to defined constraints to derive margins.System-level Constraints Constraint Manager can capture board-to-board interconnect constraints.Persistent Storage Constraint Manager maintains constraint information in either the board or the schematic database.Net, Component, and Pin Properties The Properties workbooks let you add and edit certain properties for nets, components, or pins.Customizable User Interface You can create a custom workbook and worksheets that suit your work habits.Accessing Constraint ManagerYou access Constraint Manager in Exploration mode through the Windows Start menu or by entering consmgr in a Unix or Linux shell.Constraint Manager can also be invoked from a host tool as follows:From this tool Choose this menu commandAllegro PCB Editor, Allegro Package Design, or Allegro SI Setup – Constraints – Electrical Physical Spacing Constraint ManagerAllegro Design Entry HDL Tools – Constraints – EditSystem Connectivity Manager Design – Edit ConstraintsYou can also click the Constraint Manager icon in the host tool’s toolbar.Constraint Manager maintains constraint information in the board database when used with Allegro PCB or SI, in the package database when used with Allegro Package Design, or in the schematic database when used with Allegro Design Entry HDL.The appearance of the Worksheet Selector, worksheets, andcommands differ depending on whether Constraint Manager islaunched in Exploration mode, invoked from a front-end application,or a backend-application. For example, By Layer view of Physicaland Spacing cells is not available in Constraint Manager, whenlaunched from OrCAD PCB Editor or Allegro PCB Editor,Performance L option.The name of the tool from which you launch Constraint Manager appears in the banner atop the Constraint Manager user interface. For example:Constraint Manager (Connected to Allegro Design Entry HDL)See Chapter 6, “Using Constraint Manager with Other Tools Across the Allegro Platform”for using Constraint Manager with other Cadence tools.Constraint Manager launched from Allegro PCB Series L, Performance L,and OrCAD PCB EditorThis manual covers all functionality available in Constraint Manager when invoked from Allegro® PCB Series GXL and XL. When invoked from an Allegro® PCB Series L, Performance L, or OrCAD PCB Editor, Constraint Manager launches with these limitations:Scripting Scripting islimited to thecommands andconstraints thatare supported inAllegro® PCBSeries L orOrCAD PCBEditor.Match Groups You can define Match Groups only in net-level worksheets; you cannot define match groups at the Constraint Set-level.Pin Pairs You can definepin pairs only innet-levelworksheets; youcannot define pinpairs at the at theConstraint Set-levelSignal Integrity Signal integrity analysis is not supported. The Signal Integrity workbook has been removed.Timing Timing analysis isnot supported.The Timingworkbook hasbeen removed.Custom measurements Custom measurementsand custom stimulus and custom stimulus are not supported. The Custom Measurements tab (Analyze – Analysis Modes) has been removed; only the DRC Modes tab remains. The Custom Measurements workbook is not visible.Crosstalk DRC Crosstalk analysisis not supported.The max xtalkand max peak xtalk design rule checks have beenremoved from theAnalysis Modesdialog box.Topology Templates Topology import and export are not supported. As such, the Tools menu has also been removed prohibiting access to topology exploration tools including SigXplorer and SigWave.Analysis Simulation-basedanalysis is notsupported. Onlydesign rulechecks can beperformed.Xnet Creation You create anXnet (extendednet) through asignal model.using a Series XLor GXL PCBEditor or high tier legacy PCB Editor. PCBPerformanceSeries LIn the Electrical domain, custom measurements, pin delay, and Z-axis delay are not supported. You also cannot control same net crosstalk and parallelism checks.By Layer view of Physical and Spacing cells is not supported.Ratsnest Bundle worksheets are not supported.Microvias are not supported.PCB Series L In theElectricaldomain,custommeasurements,pin delay, andZ-axis delayare notsupported.You alsocannot controlsame netcrosstalk andparallelismchecks.For thePhysical- and Spacing-domains, regions, pin pairs, Xnets, differential pairs, buses, and by-layer worksheets are not supported.Ratsnest Bundle worksheets are not supported.Microvias are not supported.OrCAD PCBEditor By Layer view of Physical and Spacing cells is not available.Ratsnest Bundle worksheets are not supported.Microvias are not supported.When you select an object in Constraint Manager and right-click, a context pop-up menu appears. Keep in mind that this guide depicts all available options. If you launched Constraint Manager from Allegro® PCB Series L Editor (Performance), orOrCAD PCB Editor, some options will be removed or dimmed to inhibit functionality. Constraint Manager launched from Allegro® Physical ViewerPCB collaboration tools lack constraint management access, yet companies with co-design partners may require design constraint information as specified by contract or agreement. Use Constraint Manager in conjunction with Allegro® Physical Viewer as a back-end validation tool that lets design partners view electrical constraint information and analysis results and communicate it without requiring interpretation or conversion if an Allegro flow is used.When invoked from the Allegro® Physical Viewer Setup menu, read-only mode Constraint Manager launches with a limited functionality set. You can view the constraint information that a .brd file contains. All constraints appear in native delay values (for example, not a length only Performance mode). You cannot modify or export these constraints as certain menu functionality is disabled: right mouse buttons will not allow you to create, modify, ordelete objects. Print and View menu options are available.Read-only mode Constraint Manager includes all worksheets. However, SigWave or simulation actuals data are unavailable. Actual and Margin information is available for the constraints based on the design’s current state.Although Allegro® Physical Viewer does not let you change DRC modes, as they are inherited from the board, you can run DRC from Allegro to display actual data in Constraint Manager, which changes the database; then save it in Allegro® Physical Viewer. Domains, Workbooks, Worksheets, and CellsThe Constraint Manager workspace (see Figure 1-2, and Figure 1-3on page 23) contains the following components.The:Menus for command accessTool Bars for quick command accessSelector Bar for switching among domains and DRC and Properties WorkbooksW orksheet Selector for selecting the appropriate worksheetType column for identifying the type of object in the Objects columnW orksheets for capturing, editing, and validating constraintsS tatus Bar for feedback on object selection and constraint processingDRC Status indicator for checking the state of design rule checkingFigure 1-2 The Constraint Manager workspaceNote: When you select an object in Constraint Manager and right-click, you can also access commands from a context-sensitive, pop-up menu.The Status Bar provides key information about cell contents, the state ofobjects, error conditions, and conditions and processes in your design.When in doubt, consult the status bar.The Worksheet SelectorUse the W orksheet Selector to access the appropriate worksheet that you want to work in. Selector Bars let you access individual constraint worksheets, properties worksheets, and DRC worksheets, which you access by clicking on a Selector Bar. You can also undock and reposition the W orksheet Selector.Figure 1-3 Worksheet SelectorGrab the border of the W orksheet Selector and reposition it to get a fullview of workbook and worksheet selector nodes (as shown).Domain Selector BarsConstraint Manager organizes constraints, and constraint sets, by domain: Electrical, Physical, Spacing, and Same Net Spacing. You access each domain by clicking on the appropriate Selector Bar, which is located at the bottom of the W orksheet Selector (see Figure 1-3).Figure 1-4 Worksheet HierarchyIn the Constraint Set Folders for all domains, you define generic rules and you create generic object groupings. You can later assign these rules to the appropriate net-related objects in your design.In the Net folders for all domains, you can create net-specific object groupings, and you can define certain net properties. In the Electrical domain, you can also create a constraint set based on the characteristics of a net object.In the Physical, Spacing and Same Net Spacing constraint folders, worksheets based on layer, or by all layers, contain Nets, Classes, and Regions.By Layer view of Physical and Spacing cells is not available inConstraint Manager, when launched from OrCAD PCB Editor orAllegro PCB Editor, Performance L option.Properties Selector BarUse the Properties selector bar to manage net, component, and pin properties.The Net folder provides you with a quick glance of electrical and general properties. Some cells in these worksheets cannot be edited.The Component folder provides component coordinates, based on placement information, source data for third-party thermal analysis tools, and part definitions. Also included are electrical, thermal, and pin fabrication data. Some cells in these worksheets cannot be edited.System Connectivity Manager also provides component worksheetswhere you can define and edit these properties.See the Allegro Platform Properties Reference for more information on component properties.DRC Selector BarUse the DRC selector bar to view and waive design rule violations on objects inPCB Editor or APD. See the Objects – Waive command in the Constraint Manager Reference for more information.WorkbooksOnce you expand a parent Object Type folder, workbooks organize objects by design discipline. For example, the Electrical domain contains the Signal Integrity, Timing, Routing, and Custom Measurements workbooks. Also in the Electrical domain, the All Constraints workbook in the Electrical CSet folder consolidates constraints from all worksheets to give you a global view. Subordinate to the All Constraints workbook is the User Defined folder, which contains constraints that you have defined in SigXplorer. Note: The worksheet hierarchy is different if you launch Constraint Manager in exploration mode, or from Allegro® Design Entry HDL or Allegro® System Architect.When you select a workbook, all worksheets that belong to that workbook appear in a shared worksheet window. You can use the W orksheet Selector to select a worksheet or you can select a worksheet by clicking on the appropriate tab in the shared workbook window. You may have to scroll horizontally to locate the desired worksheet tab.Note: When you launch Constraint Manager from a physical layout editor, the cells that are in view are populated first. As you scroll other cells into view, the layout tool updates hidden cells as they become visible in Constraint Manager.The Analyze – Analysis Modes command controls DRC checks. Also, refer to the DRC State Bar, located at the bottom of Constraint Manager, adjacent to the Status Bar, tolearn the state of DRC updatesdetermine if DRCs are up-to-date for all enabled checksFigure 1-5 Workbooks and WorksheetsIn Figure 1-5, notice how the Net object type folder is expanded to show Timing as the active workbook. The Timing workbook contains the Switch/Settle Delays and Setup/Hold worksheets. Notice how the worksheets in the W orksheet Selector correspond to theworksheet tabs in the active workbook. Also notice that the active workbook and the active worksheet within the active workbook are emphasized with color in the workbook selector. Note: If any workbook has only one worksheet, Constraint Manager updates the W orksheet Selector to contain only the worksheet (under the Object Type folder).For information on objects and the object hierarchy, see Chapter 2, “Working with Constraint Objects.” For information on how to define CSets and how to assign them to objects in your design, see Chapter 3, “Working With Reusable Constraint Objects — CSets.”Physical and Spacing Workbook ViewsUnlike Electrical worksheets, Physical , Spacing, and Same Net Spacing CSet worksheets include layers, which correspond to the cross-section view of your design. Furthermore, you can view these layers collectively (All Layers ) or individually (By Layer ). You can also view them at the CSet-level or at the Net-level. See “All Layers / By Layer CSet Views” on page 28. and “All Layers Net View” on page 29.By Layer view of Physical and Spacing cells is not available inConstraint Manager, when launched from OrCAD PCB Editor orAllegro PCB Editor, Performance L option.Working in the CSet object folder lets you work in the abstract, defining CSets that will later be applied to net objects. The All Layers view shows CSets in collapsed form and layers associated with a CSet in expanded form. The By Layer view (in the CSet folder) shows layers in collapsed form and CSets associated with each layer in expanded form.Note: The CSet view does not have a Referenced CSet column.Figure 1-6 All Layers / By Layer CSet ViewsFigure 1-7 All Layers Net ViewWorking in the Net object folder lets you define CSets based on existing CSets or based on constraints already on Net objects. The All Layers view shows Container Net objects in collapsed form and Net objects in expanded form.Note: The Net, Net Class-Class (in the Spacing domain) and Region object types have a Referenced CSet column but do not have a By Layer viewSame Net Spacing DRC ModesAs with other domains, you enable design rule checks for all layers through the Analysis Modes dialog box. However, in the Same Net Spacing domain, you can control design rule checks by layer.You define a Same Net Spacing CSet in the CSet folder, and later assigning that CSet to a constraint object. In this way, you can enable or disable the CSet, effectively providing you with a granular level of control of setting constraint modes by layer. You do this by choosing TRUE or FALSE in the Enable DRC By-Layer column in the Options worksheet (see Figure 1-8).Note: A by-layer constraint check is a slave to the mode for that constraint as set in the Analysis Modes dialog box (choose Analyze – Analysis Modes). That is, if the individualDRC is not enabled in the Same Net Spacing Modes tab, Constraint Manager ignores the state of the Enable DRC By-Layer column.Figure 1-8 Layer-based DRC ModesCellsCells hold data, results, or calculations. Constraint Manager uses different colors or shades of color in cells depending on the state of your design and on the scope of the data in the cell.Indicates avalueinheritedfrom ahigher-levelobject, suchas a CSet.Indicates aPass state —A valueindicatingthat the cellfalls withinthe setconstraintlimit.Indicates aPass state —A valueindicatingthat all childcells of the parent object fall within the set constraint limit.Indicates a directly set value in a cell. Also called an override.Indicates a value that cannot be computed. The reason appears when you hover your mouse over a yellow cell and observe the message displayed in the status line, located at the lower-left corner of Constraint Manager. You may have not have . . .enabled the DRC mode for the cell completely placed the object completely routed the object correctly set up simulationparameters Note: You can set certain constraints, such as differential pairs, in more than one domain. Constraint Manager indicates a constraint edit in one domain by coloring the cell of the same constraint in the opposite domain yellow.Indicates a Fail state — A value indicating that the cell violates the set constraint limit. Constraint Manager rolls up worst-case Margins to higher-level objects.Indicates a Fail state –— A value indicating that any child cell of the parent object violates theset constraintlimit.Indicates acell which isnot applicableto the object.These cellsnever containvalues.Indicates acell that youcannot edit.Indicates acellcontaining aformula (thered bar to theright of thecell).Indicates acell that isbookmarked.To guide you in entering data into a cell, right-click in the cell and chooseChange from the pop-up menu.Constraint Manager’s User Interface ControlsConstraint Manager employs the same conventional window and worksheet controls that are used in Microsoft Windows Explorer® and Microsoft Excel®. Constraint Manager also supports the Microsoft Intellimouse® and wheel mouse.Table 1-2 User Interface ControlsTask Feature UsageCommand Access Pull-down Menus Click the pull-down menu atthe top ofConstraintManager toaccesscommands. Icons Click an icon toexecute aIf you brieflyhover thecursor above anicon, a tool tipdisplays in thestatus bar(located at thelower-leftcorner ofConstraintManager)describing theicon’s function. Keyboard Shortcuts Press Controland press:p (to print)z (to undo)c (to cut)v (to paste)f (to find)d (to delete)Also, you canaccess manycommands bypressing Altalong with theunderlinedcharacter, andyou can assignyour ownshortcuts (seethe Tools –CustomizeShortcut Keyscommand intheConstraintManagerReference).Right-Click (context sensitive)Depending on the object selected, you can right-click to quickly access aact on that object.Window and Worksheet Sizing and Placement Drag and Drop You can dragto repositionthe ConstraintManagerwindow, andindividualworksheets, onyour desktop. Sizing Borders You can resizethe ConstraintManagerwindow or anindividualworksheet openwithinConstraintManager bydragging theborder. Maximize/Minimize You canminimize anopen worksheetto an icon oryou canmaximize it tofocus only onthat worksheet. Dismiss You can clickthe dismiss [X]button (locatedat the top right-corner of theworksheet) toclose aworksheet.Constraint datais not lost whenyou dismiss aworksheet.Worksheet Viewing Window Select You can clickand drag on anopen worksheetto reposition it.You can useObject Expand/Collapse the worksheet selector to work at any object level in the hierarchy (from the system level to the pin pair level) by expanding [+] and collapsing [-] the object tree-structure. You can also choose Objects – Expand and Objects – Collapse from the pull-down menus to achieve the same effect.Cascade You can viewall openworksheetsarranged one-behind-the-other bycascading(Window –Cascade).ConstraintManager ordersWorksheets sothat each isselectable witha click of themouse. Theactive windowis placed in theforeground andis identifiableby an active(selected)border.Tile You can viewall openworksheetssimultaneouslyby tiling(Window –Tile). Eachopen worksheetis automaticallysized toaccommodatethe size of theConstraintManagerwindow.New Window You canduplicate thecontent of theactiveworksheet in anew window.This lets you tofocus yourview ondifferentobjects in thesameworksheet.Worksheet Tab Select When you expand a constraint discipline (signal integrity, timing, routing) from the worksheet selector, all objects within that discipline appear in a worksheet window. You then click a related tab to activate the desired worksheet.You may haveto scrollhorizontallyuntil thedesiredworksheet tabis visible.Synchronize Rows When youmodify rows ofthe worksheetin focus (forexample,scrolling downor expanding abus),ConstraintManagerpromotes thesamemodification toall worksheetsthat havesynchronizationenabled.Accelerator KeysConstraint Manager provides function keys and modified function keys that provide quick access to common functions.Function KeysViewCntrl+F6OptionsRename F2Print Cntrl+pAnalysisCntrl+F9ModesAnalysisShift+F9SettingsAnalyze F9Find Cntrl+fFind Next F3FindShift F3 PreviousOpen a newCntrl+n window onthe activeworksheetCntrl+Tab Move to thenext openworksheetShift+Cntrl+Tab Move to thepreviousopenworksheetNextF6worksheettabPreviousShift+F6 worksheettabCntrl+F4 Close theactiveworksheetSelect aShift+Click contiguousrange ofcellsCntrl+Click Select anon-contiguousrange ofcellsAlt+ or Num+ Expandobject rowsCollapseAlt- or Num- object rowsCut Cntrl+x orShift+Del Copy Cntrl+c orCntrl+Ins Paste Cntrl+v orShift+Ins Delete anD elobject orcell content。
Mellanox OFED for Linux Installation GuideRev 1.5.1Mellanox Technologies350 Oakmead Parkway, Suite 100Sunnyvale, CA 94085U.S.A.Tel: (408) 970-3400Fax: (408) 970-3403Mellanox Technologies, Ltd.PO Box 586 Hermon Building Yokneam 20692Israel Tel: +972-4-909-7200Fax: +972-4-959-3245© Copyright 2010. Mellanox Technologies, Inc. All Rights Reserved.Mellanox®, BridgeX®, ConnectX®, InfiniBlast®, InfiniBridge®, InfiniHost®, InfiniPCI®, InfiniRISC®, InfiniScale®, andVirtual Protocol Interconnect are registered trademarks of Mellanox Technologies, Ltd.CORE-Direct , FabricIT, and PhyX are trademarks of Mellanox Technologies, Ltd.All other marks and names mentioned herein may be trademarks of their respective companies.Document Number: 2914Rev 1.5.1Mellanox Technologies 2NOTE:THIS HARDWARE, SOFTWARE OR TEST SUITE PRODUCT (“PRODUCT(S)”) AND ITS RELATED DOCUMENTATION ARE PRO-VIDED BY MELLANOX TECHNOLOGIES “AS-IS” WITH ALL FAULTS OF ANY KIND AND SOLELY FOR THE PURPOSE OF AIDING THE CUSTOMER IN TESTING APPLICATIONS THAT USE THE PRODUCTS IN DESIGNATED SOLUTIONS. THE CUS-TOMER'S MANUFACTURING TEST ENVIRONMENT HAS NOT MET THE STANDARDS SET BY MELLANOX TECHNOLOGIES TO FULLY QUALIFY THE PRODUCTO(S) AND/OR THE SYSTEM USING IT. THEREFORE, MELLANOX TECHNOLOGIES CAN-NOT AND DOES NOT GUARANTEE OR WARRANT THAT THE PRODUCTS WILL OPERATE WITH THE HIGHEST QUALITY . ANY EXPRESS OR IMPLIED WARRANTIES, INCLUDING , BUT NOT LIMITED TO, THE IMPLIED WARRANTIES OF MER-CHANTABILITY , FITNESS FOR A PARTICULAR PURPOSE AND NONINFRINGEMENT ARE DISCLAIMED. IN NO EVENT SHALL MELLANOX BE LIABLE TO CUSTOMER OR ANY THIRD PARTIES FOR ANY DIRECT, INDIRECT, SPECIAL, EXEM-PLARY , OR CONSEQUENTIAL DAMAGES OF ANY KIND (INCLUDING , BUT NOT LIMITED TO, PAYMENT FOR PROCURE-MENT OF SUBSTITUTE GOODS OR SERVICES; LOSS OF USE, DATA, OR PROFITS; OR BUSINESS INTERRUPTION) HOWEVER CAUSED AND ON ANY THEORY OF LIABILITY , WHETHER IN CONTRACT, STRICT LIABILITY , OR TORT(INCLUDING NEGLIGENCE OR OTHERWISE) ARISING IN ANY WAY FROM THE USE OF THE PRODUCT(S) AND RELATED DOCUMENTATION EVEN IF ADVISED OF THE POSSIBILITY OF SUCH DAMAGE.Mellanox OFED for Linux User’s Manual Rev 1.5.1 InstallationThis chapter describes how to install and test the Mellanox OFED for Linux package on a singlehost machine with Mellanox InfiniBand and/or Ethernet adapter hardware installed. The chapterincludes the following sections:•“Hardware and Software Requirements” (page 3)•“Downloading Mellanox OFED” (page 4)•“Installing Mellanox OFED” (page 4)•“Uninstalling Mellanox OFED” (page 15)Hardware and Software RequirementsHardware RequirementsPlatforms• A server platform with an adapter card based on one of the following Mellanox Technologies’InfiniBand HCA devices:-MT25408 ConnectX®-2 (VPI, IB, EN, FCoE) (firmware: fw-ConnectX2)-MT25408 ConnectX® (VPI, IB, EN, FCoE) (firmware: fw-25408)-MT25208 InfiniHost® III Ex (firmware: fw-25218 for Mem-Free cards, and fw-25208 for cards withmemory)-MT25204 InfiniHost® III Lx (firmware: fw-25204)-MT23108 InfiniHost® (firmware: fw-23108)Note For the list of supported architecture platforms, please refer to the Mellanox OFEDRelease Notes file.Required Disk Space for Installation•400MBSoftware RequirementsOperating System•Linux operating systemNote For the list of supported operating system distributions and kernels, please refer to the Mellanox OFED Release Notes file.Installer Privileges•The installation requires administrator privileges on the target machineMellanox Technologies3Rev 1.5.1Mellanox Technologies 4Downloading Mellanox OFEDStep 1.Verify that the system has a Mellanox network adapter (HCA/NIC) installed by ensuringthat you can see ConnectX or InfiniHost entries in the display.The following example shows a system with an installed Mellanox HCA:host1# lspci -v | grep Mellanox02:00.0 InfiniBand: Mellanox Technologies MT25418 [ConnectX IB DDR, PCIe 2.0 2.5GT/s] (reva0)Step 2.Download the ISO image to your host.The image’s name has the format MLNX_OFED_LINUX-<ver>-<OS label>.iso. You candownload it from > Products > IB SW/Drivers.Step e the md5sum utility to confirm the file integrity of your ISO image. Run the followingcommand and compare the result to the value provided on the download page.host1$ md5sum MLNX_OFED_LINUX-<ver>-<OS label>.isoInstalling Mellanox OFEDThe installation script, mlnxofedinstall , performs the following:•Discovers the currently installed kernel•Uninstalls any software stacks that are part of the standard operating system distribution oranother vendor's commercial stack•Installs the MLNX_OFED_LINUX binary RPMs (if they are available for the current kernel)•Identifies the currently installed InfiniBand and Ethernet network adapters and automatically 1upgrades the firmwarePre-installation Notes•The installation script removes all previously installed Mellanox OFED packages and re-installsfrom scratch. You will be prompted to acknowledge the deletion of the old packages.Note Pre-existing configuration files will be saved with the extension “.conf.saverpm”.•If you need to install Mellanox OFED on an entire (homogeneous) cluster, a common strategy isto mount the ISO image on one of the cluster nodes and then copy it to a shared file system suchas NFS. To install on all the cluster nodes, use cluster-aware tools (such as pdsh).•If your kernel version does not match with any of the offered pre-built RPMs, you can add yourkernel version by using the “mlnx_add_kernel_support.sh ” script located under the docs/directory.Usage:mlnx_add_kernel_support.sh -i|--iso <mlnx iso>[-t|--tmpdir <local work dir>][-v|--verbose]1.The firmware will not be updated if you run the install script with the ‘--without-fw-update’ option.Mellanox OFED for Linux User’s Manual Rev 1.5.1 ExampleThe following command will create a MLNX_OFED_LINUX ISO image for RedHat 5.4 underthe/tmp directory.MLNX_OFED_LINUX-1.5.1-rhel5.4/docs/mlnx_add_kernel_support.sh -i/mnt/MLNX_OFED_LINUX-1.5.1-rhel5.4.isoAll Mellanox, OEM, OFED, or Distribution IB packages will be removed.Do you want to continue?[y/N]:yRemoving OFED RPMs...Running mkisofs...Created /tmp/MLNX_OFED_LINUX-1.5.1-rhel5.4.isoInstallation ScriptMellanox OFED includes an installation script called mlnxofedinstall. Its usage is describedbelow. You will use it during the installation procedure described in Section , “Installation Proce-dure,” on page 6.Usage./mlnxofedinstall [OPTIONS]Note If no options are provided to the script, then all available RPMs are installed.Options-c|--config <packages config_file>Example of the configuration file can be found under docs -n|--net <network config file>Example of the network configuration file can be foundunder docs-p|--print-available Print available packages for the current platform and cre-ate a corresponding ofed.conf file. The installation scriptexits after creating ofed.conf.--with-fc Install FCoE support — Available on RHEL5.2 ONLY--with-32bit Install 32-bit libraries (default). This is relevant forx86_64 and ppc64 platforms.--without-32bit Skip 32-bit libraries installation--without-ib-bonding Skip ib-bonding RPM installation--without-depcheck Skip Distro's libraries check--without-fw-update Skip firmware update--force-fw-update Force firmware update--force Force installation (without querying the user)--all Install all kernel modules, libibverbs, libibumad, librd-macm, mft, mstflint, diagnostic tools, OpenSM, ib-bonding,MVAPICH, Open MPI, MPI tests, MPI selector, perftest, sdp-netstat and libsdp srptools, rds-tools, static and dynamiclibrariesMellanox Technologies5Rev 1.5.1Mellanox Technologies6--hpc Install all kernel modules, libibverbs, libibumad, librd-macm, mft, mstflint, diagnostic tools, OpenSM , ib-bonding,MVAPICH, Open MPI, MPI tests, MPI selector, dynamic librar-ies--basic Install all kernel modules, libibverbs, libibumad, mft,mstflint, dynamic libraries--msmInstall all kernel modules, libibverbs, libibumad, mft,mstflint, diagnostic tools, OpenSM , ib-bonding, dynamiclibrariesNOTE: With --msm flag, the OpenSM daemon is configured torun upon boot.-v|-vv|-vvvSet verbosity level -q Set quiet - no messages will be printed mlnxofedinstall Return CodesTable 1 lists the mlnxofedinstall script return codes and their meanings.Installation ProcedureStep 1.Login to the installation machine as root.Step 2.Mount the ISO image on your machine host1# mount -o ro,loop MLNX_OFED_LINUX-<ver>-<OS label>.iso /mntNote After mounting the ISO image, /mnt will be a Read Only folder.Step 3.Run the installation scripthost1# /mnt/mlnxofedinstallThis program will install the MLNX_OFED_LINUX package on your machine.Note that all other Mellanox, OEM, OFED, or Distribution IB packages will be removed.Do you want to continue?[y/N]:yUninstalling the previous version of OFEDTable 1 - mlnxofedinstall Return CodesReturn CodeMeaning 0The Installation ended successfully 1The installation failed 2No firmware was found for the adapter device 3Failed to start the mst driverMellanox OFED for Linux User’s Manual Rev 1.5.1 Starting MLNX_OFED_LINUX-1.5.1-rc6 installation ...Installing kernel-ib RPMPreparing... ########################################### [100%]1:kernel-ib ########################################### [100%]Installing kernel-ib-devel RPMPreparing... ########################################### [100%]1:kernel-ib-devel ########################################### [100%]Installing mft RPMPreparing... ########################################### [100%]1:mft ########################################### [100%]Installing mpi-selector RPMPreparing... ########################################### [100%]1:mpi-selector ########################################### [100%]Install user level RPMs:Preparing... ########################################### [100%]1:libibumad ########################################### [100%]Preparing... ########################################### [100%]1:libibumad ########################################### [100%]Preparing... ########################################### [100%]1:libibmad ########################################### [100%]Preparing... ########################################### [100%]1:libibmad ########################################### [100%]Preparing... ########################################### [100%]1:libibumad-devel ########################################### [100%]Preparing... ########################################### [100%]1:libibumad-devel ########################################### [100%]Preparing... ########################################### [100%]1:libibmad-devel ########################################### [100%]Preparing... ########################################### [100%]1:libibmad-devel ########################################### [100%]Preparing... ########################################### [100%]1:ofed-scripts ########################################### [100%]Preparing... ########################################### [100%]1:libibverbs ########################################### [100%]Preparing... ########################################### [100%]1:libibverbs ########################################### [100%]Preparing... ########################################### [100%]1:libibverbs-devel ########################################### [100%]Preparing... ########################################### [100%]1:libibverbs-devel ########################################### [100%]Preparing... ########################################### [100%]1:libibverbs-devel-static########################################### [100%]Preparing... ########################################### [100%]1:libibverbs-devel-static########################################### [100%]Preparing... ########################################### [100%]1:libibverbs-utils ########################################### [100%]Preparing... ########################################### [100%]1:libmthca ########################################### [100%]Mellanox Technologies7Rev 1.5.1Mellanox Technologies8Preparing... ########################################### [100%]1:libmthca ########################################### [100%]Preparing... ########################################### [100%]1:libmthca-devel-static ########################################### [100%]Preparing... ########################################### [100%]1:libmthca-devel-static ########################################### [100%]Preparing... ########################################### [100%]1:libmlx4 ########################################### [100%]Preparing... ########################################### [100%]1:libmlx4 ########################################### [100%]Preparing... ########################################### [100%]1:libmlx4-devel ########################################### [100%]Preparing... ########################################### [100%]1:libmlx4-devel ########################################### [100%]Preparing... ########################################### [100%]1:libibcm ########################################### [100%]Preparing... ########################################### [100%]1:libibcm ########################################### [100%]Preparing... ########################################### [100%]1:libibcm-devel ########################################### [100%]Preparing... ########################################### [100%]1:libibcm-devel ########################################### [100%]Preparing... ########################################### [100%]1:libibumad-static ########################################### [100%]Preparing... ########################################### [100%]1:libibumad-static ########################################### [100%]Preparing... ########################################### [100%]1:libibmad-static ########################################### [100%]Preparing... ########################################### [100%]1:libibmad-static ########################################### [100%]Preparing... ########################################### [100%]1:ibsim ########################################### [100%]Preparing... ########################################### [100%]1:librdmacm ########################################### [100%]Preparing... ########################################### [100%]1:librdmacm ########################################### [100%]Preparing... ########################################### [100%]1:librdmacm-utils ########################################### [100%]Preparing... ########################################### [100%]1:librdmacm-devel ########################################### [100%]Preparing... ########################################### [100%]1:librdmacm-devel ########################################### [100%]Preparing... ########################################### [100%]1:libsdp ########################################### [100%]Preparing... ########################################### [100%]1:libsdp ########################################### [100%]Preparing... ########################################### [100%]1:libsdp-devel ########################################### [100%]Preparing... ########################################### [100%]1:libsdp-devel ########################################### [100%]Mellanox OFED for Linux User’s Manual Rev 1.5.1Preparing... ########################################### [100%]1:opensm-libs ########################################### [100%]Preparing... ########################################### [100%]1:opensm-libs ########################################### [100%]Preparing... ########################################### [100%]1:opensm ########################################### [100%]opensmd 0:off 1:off 2:off 3:off 4:off 5:off 6:offPreparing... ########################################### [100%]1:opensm-devel ########################################### [100%]Preparing... ########################################### [100%]1:opensm-devel ########################################### [100%]Preparing... ########################################### [100%]1:opensm-static ########################################### [100%]Preparing... ########################################### [100%]1:opensm-static ########################################### [100%]Preparing... ########################################### [100%]1:compat-dapl ########################################### [100%]Preparing... ########################################### [100%]1:compat-dapl ########################################### [100%]Preparing... ########################################### [100%]1:compat-dapl-devel ########################################### [100%]Preparing... ########################################### [100%]1:compat-dapl-devel ########################################### [100%]Preparing... ########################################### [100%]1:dapl ########################################### [100%]Preparing... ########################################### [100%]1:dapl ########################################### [100%]Preparing... ########################################### [100%]1:dapl-devel ########################################### [100%]Preparing... ########################################### [100%]1:dapl-devel ########################################### [100%]Preparing... ########################################### [100%]1:dapl-devel-static ########################################### [100%]Preparing... ########################################### [100%]1:dapl-devel-static ########################################### [100%]Preparing... ########################################### [100%]1:dapl-utils ########################################### [100%]Preparing... ########################################### [100%]1:perftest ########################################### [100%]Preparing... ########################################### [100%]1:mstflint ########################################### [100%]Preparing... ########################################### [100%]1:sdpnetstat ########################################### [100%]Preparing... ########################################### [100%]1:srptools ########################################### [100%]Preparing... ########################################### [100%]1:rds-tools ########################################### [100%]Preparing... ########################################### [100%]1:rnfs-utils ########################################### [100%]Preparing... ########################################### [100%]Mellanox Technologies9Rev 1.5.1Mellanox Technologies 10 1:ibutils ########################################### [100%]Preparing... ########################################### [100%]1:ibutils2 ########################################### [100%]Preparing... ########################################### [100%]1:ibdump ########################################### [100%]Preparing... ########################################### [100%]1:infiniband-diags ########################################### [100%]Preparing... ########################################### [100%]1:qperf ########################################### [100%]Preparing... ########################################### [100%]1:mlnxofed-docs ########################################### [100%]Preparing... ########################################### [100%]1:mvapich_gcc ########################################### [100%]Preparing... ########################################### [100%]1:mvapich_pgi ########################################### [100%]Preparing... ########################################### [100%]1:mvapich_intel ########################################### [100%]Preparing... ########################################### [100%]1:openmpi_gcc ########################################### [100%]Preparing... ########################################### [100%]1:openmpi_pgi ########################################### [100%]Preparing... ########################################### [100%]1:openmpi_intel ########################################### [100%]Preparing... ########################################### [100%]1:mpitests_mvapich_gcc ########################################### [100%]Preparing... ########################################### [100%]1:mpitests_mvapich_pgi ########################################### [100%]Preparing... ########################################### [100%]1:mpitests_mvapich_intel ########################################### [100%]Preparing... ########################################### [100%]1:mpitests_openmpi_gcc ########################################### [100%]Preparing... ########################################### [100%]1:mpitests_openmpi_pgi ########################################### [100%]Preparing... ########################################### [100%]1:mpitests_openmpi_intel ########################################### [100%]Device (15b3:634a):02:00.0 InfiniBand: Mellanox Technologies MT25418 [ConnectX IB DDR, PCIe 2.0 2.5GT/s] (rev a0)Link Width: 8xLink Speed: 2.5Gb/sInstallation finished successfully.Programming HCA firmware for /dev/mst/mt25418_pci_cr0 deviceRunning: mlxburn -d /dev/mst/mt25418_pci_cr0 -fw /tmp/MLNX_OFED_LINUX-1.5.1/MLNX_OFED_LINUX-1.5.1-sles11/firmware/fw-25408/2_7_000/fw-25408-rel.mlx -dev_type 25408 -no-I- Querying device ...-I- Using auto detected configuration file: /tmp/MLNX_OFED_LINUX-1.5.1/MLNX_OFED_LINUX-1.5.1-sles11/firmware/fw-25408/2_7_000/MHGH28-XTC_A4-A7.ini (PSID = MT_04A0140005)-I- Generating image ...Current FW version on flash: 2.6.0New FW version: 2.7.0Burning FW image without signatures - OKRestoring signature - OK-I- Image burn completed successfully.Please reboot your system for the changes to take effect.warning: /etc/infiniband/openib.conf saved as /etc/infiniband/openib.conf.rpmsaveNote In case your machine has the latest firmware, no firmware update will occur and the installation script will print at the end of installation a message similar to the following:...Installation finished successfully.The firmware version 2.7.000 is up to date.Note: To force firmware update use '--force-fw-update' flag.Note In case your machine has an unsupported network adapter device, no firmware update will occur and the error message below will be printed. Please contact your hardwarevendor for help on firmware updates.Error message:-I- Querying device ...-E- Can't auto detect fw configuration file: ...Step 4.In case the installation script performed firmware updates to your network adapter hard-ware, it will ask you to reboot your machine.Step 5.The script adds the following lines to /etc/security/limits.conf for the userspace components such as MPI:* soft memlock unlimited* hard memlock unlimitedThese settings unlimit the amount of memory that can be pinned by a user space application.If desired, tune the value unlimited to a specific amount of RAM.Step 6.For your machine to be part of the InfiniBand/VPI fabric, a Subnet Manager must be run-ning on one of the fabric nodes. At this point, Mellanox OFED for Linux has alreadyinstalled the OpenSM Subnet Manager on your machine. For details on starting OpenSM,see Chapter 12, “OpenSM – Subnet Manager”.Step 7.(InfiniBand only) Run the hca_self_test.ofed utility to verify whether or not the InfiniBand link is up. The utility also checks for and displays additional information suchas•HCA firmware version•Kernel architecture•Driver version•Number of active HCA ports along with their states•Node GUIDNote For more details on hca_self_test.ofed, see the file hca_self_test.readme under docs/.host1# /usr/bin/hca_self_test.ofed---- Performing InfiniBand HCA Self Test ----Number of HCAs Detected (1)PCI Device Check ....................... PASSKernel Arch ............................ x86_64Host Driver Version .................... MLNX_OFED_LINUX-1.5.1 (OFED-1.5.1-mlnx9) 1.5.1-2.6.9_89.ELlargesmpHost Driver RPM Check .................. PASSHCA Firmware on HCA #0 ................. 2.7.000HCA Firmware Check on HCA #0 ........... PASSHost Driver Initialization ............. PASSNumber of HCA Ports Active 0Port State of Port #0 on HCA #0 ........ INITPort State of Port #0 on HCA #0 ........ DOWNError Counter Check on HCA #0 .......... PASSKernel Syslog Check .................... PASSNode GUID on HCA #0 .................... 00:02:c9:03:00:00:10:e0------------------ DONE ---------------------Note After the installer completes, information about the Mellanox OFED installation such as prefix, kernel version, and installation parameters can be retrieved by running the com-mand /etc/infiniband/info.Installation ResultsSoftware•The OFED and MFT packages are installed under the /usr directory.•The kernel modules are installed under:-InfiniBand subsystem:/lib/modules/`uname -r`/updates/kernel/drivers/infiniband/-mlx4 driver:Under /lib/modules/`uname -r`/updates/kernel/drivers/net/mlx4you will find mlx4_core.ko, mlx4_en.ko, mlx4_ib.ko (and mlx4_fc ifyou ran the installation script with --with-fc)-RDS:/lib/modules/`uname -r`/updates/kernel/net/rds/rds.ko-Bonding module:/lib/modules/`uname -r`/updates/kernel/drivers/net/bonding/bonding.ko •The package kernel-ib-devel include files are placed under /usr/src/ofa_kernel/include/. These include files should be used when building kernel modules that use the stack. (Note that the include files, if needed, are “backported” to your kernel.)•The raw package (un-backported) source files are placed under/usr/src/ofa_kernel-<ver>•The script openibd is installed under /etc/init.d/. This script can be used to load and unload the software stack.•The script connectx_port_config is installed under /sbin. This script can be used to con-figure the ports of ConnectX network adapter cards to Ethernet and/or InfiniBand. For details on this script, please see Section 3.1, “Port Type Management”.•The directory /etc/infiniband is created with the files info and openib.conf and con-nectx.conf. The info script can be used to retrieve Mellanox OFED installation information. The openib.conf file contains the list of modules that are loaded when the openibd script is used. The connectx.conf file saves the ConnectX adapter card’s ports configuration to Ether-net and/or InfiniBand. This file is used at driver start/restart (/etc/init.d/openibd start) .•The file 90-ib.rules is installed under /etc/udev/rules.d/•If OpenSM is installed, the daemon opensmd is installed under /etc/init.d/ and opensm.conf is installed under /etc.•If IPoIB configuration files are included, ifcfg-ib<n> files will be installed under:-/etc/sysconfig/network-scripts/ on a RedHat machine-/etc/sysconfig/network/ on a SuSE machine•The installation process unlimits the amount of memory that can be pinned by a user space application. See Step 5.•Man pages will be installed under /usr/share/man/Firmware•The firmware of existing network adapter devices will be updated if the following two condi-tions are fullfilled:1. You run the installation script in default mode; that is, without the option‘--without-fw-update’.2. The firmware version of the adapter device is older than the firmware version includedwiththe Mellanox OFED ISO imageNote If an adapter’s Flash was originially programmed with an Expansion ROM image, the automatic firmware update will also burn an Expansion ROM image.•In case your machine has an unsupported network adapter device, no firmware update will occur and the error message below will be printed. Please contact your hardware vendor for help on firmware updates.Error message:。
![[实践]PCI时序图](https://imgs-1438308264.cos.ap-hongkong.myqcloud.com/465b456f30b765ce0508763231126edb6f1a7631.webp)
1)PCI LOCAL BUS SPEC V2.2主讲人:关永聪2)内容简介3)Chapter 1 introduction1.1PCI总线概述.PCI全称peripheral component interconnect special interest group,简称PCISIG.标准的PCI系统架构4)1.2 PCI 总线的特性及优点1.高性能:33M时钟,32位数据总线,数据传输率可达132M/S.2.线性突发传输.PCI总线支持线性突发传输,可确保总线不断满载数据.3.极少的存取延迟,可大副减低外设取得总线控制权的时间.4.采用总线主控和同步操作.5.不受处理器的限制.6.适合各种机型.7.预留了发展空间.5)Chapter 2 signal definition对于只作为目标的设备,PCI需要至少47条信号线;若只作为主设备,则需49条信号线.6)2.1信号类型定义IN:输入,是一标准的只作输入的信号.OUT:输出,是一标准的输出驱动信号.T/S:表示一双向的三态输入输出信号.S/T/S:表示一持续的低电平有效的三态信号.O/D:表示漏极开路,允许多个设备以线或的型式共同驱动和分享.S/T/S:表示一持续的低电平有效的三态信号.O/D:表示漏极开路,允许多个设备以线或的型式共同驱动和分享.7)2.2 信号引脚定义2.2.1系统引脚CLOCK(IN):PCI的信号,除RST,INTA#,INTB#,INTC#,INTD#外,都在CLOCK的上升沿有效或采样.RESET#(IN):用来使PCI专用的特性寄存器和序列发生器相关的信号恢复规定的初始状态.2.2.2地址与数据引脚AD[31::00](T/S):是地址数据多路复用的输入输出信号.在FRAME#有效时,为地址期;在IRDY#.TRDY#同时有效时是数据期.C/BE[3::0](T/S):总线命令与字节使能.PAR[T/S]:奇偶校验.2.2.3接口控制引脚.FRAME#(S/T/S):帧开始信号.IRDY#(S/T/S):主设备准备好.TRDY#(S/T/S):从设备准备好.STOP#(S/T/S):停止传送数据.LOCK#(S/T/S):锁定信号.8)IDSEL(IN):初始化设备选择信号.DEVSEL#(S/T/S):设备选择信号.2.2.4仲裁引脚.REQ#(T/S):总线占用请求.GNT#(T/S):总线占用允许.2.2.5错误报告引脚.PERR#(S/T/S):奇偶校验错误报告.SERR#(O/D):系统错误报告.2.2.5中断引脚.INTA# INTB# INTC# INTD#(O/D):请求一个中断,后三个只能用于多功能设备.2.2.6其它可选信号引脚.9)PRSNT[1::2]#(IN):PCI SLOT 中是否有卡.CLOCKUN#(IN,O/D,S/T/S):只用在PCI MOBILE 中,在CONNECTOR中没定义.M66EN(IN):PCI总线频率为66M.PME#(O/D):电源管理事件.3.3V aux(IN):3.3V辅助电源输入.2.2.7 64位扩展引脚(可选).A/D[63::32](T/S)C/BE[7::4](T/S)REQ64#(S/T/S):64位传送请求.ACK64#(S/T/S):64位传送应答.10)PAR64(T/S):高32位奇偶校验.JTAG/Boundary Scan Pins (可选)TCLK(IN):在检查存取操作时检查时钟.TDI(IN):在检查存取操作时检查输入.TDO(OUT):在检查存取操作时检查输出.TMS(IN):在检查存取操作时控制控制器的状态.TRST#(IN):在检查存取操作时初始化控制器.2.2.9 System Management Bus接口引脚.(可选)SMBCLK(O/D):System Management Bus时钟.SMBDAT(O/D):System Management Bus数据.11)Chapter 3 bus operation3.1总线命令.3.1.1总线命令定义.C/BE[3::0]#Command Type0000 中断应答0001 特殊周期0010 I/O读0011 I/O写0100 保留0101 保留0110 存储器读0111 存储器写1000 保留1001 保留12)C/BE[3::0]#Command Type1010配置读1011配置写1100存储器多行读1101双地址周期1110存储器行读1111存储器写并无效13)3.2 PCI总线协议3.2 PCI总线协议.3.2.1 PCI总线的传输控制.三个重要的传输控制信号:FRAME#:由主设备驱动,指明一个数据传输的开始和结束.IRDY#:由主设备驱动,允许插入等待时间.TRDY#:又从设备驱动,允许插入等待时间.PCI总线的传输一般应遵循下面的管理规则:一.FRAME#和IRDY#定义了总线的忙/闲状态,当其中之一有效时,总线忙, 两个都无效时,总线闲.二.一旦FRAME#被置无效,在同一传输周期里不能再设置.三.除非设置了IRDY#,一般情况下不能置FRAME#无效.四.一旦主设备设置了IRDY#,直到当前数据传送结束之前,主设备不能置FRAME#和IRDY#无效.14) 3.2 PCI的编址PCI定义了三个地址空间,内存地址空间,I/O地址空间,配置地址空间.3.2.1内存地址空间:在存储器访问中,所有目标设备都要访问A/D[1::0],A/D[1::0]有下面的定义:00突发传输顺序为线性增长方式10 为CACHE行切换方式X0 保留3.2.2 I/O地址空间:在具体访问中,每当一个从设备被地址译码选中后,便要检查C/BE[3::0]#是否与A/D[1::0]相符,如果两者矛盾,则从设备不传送任何数据,而是以一个“目标终止”操作来结束访问.A/D[1::0]与C/BE[3::0]#的对应关系如下表:15)16)3.2.3配置地址空间在配置的地址空间中,要用A/D[7::0]将访问落实到一个DWORD地址.当一个设备收到配置命令,当IDSEL 有效,且A/D[1::0]=00,则该设备被选为访问的目标.否则,不参与当前的对话.17) 3.3 总在线的数据传输过程一些说明:本节所给的时序图主要表示总线以32位方式执行有关工作时,信号的相应关系.3.3.1总在线的读操作.读操作的基本时序图如下:18) 基本读操作时序图19) 3.3.2基本写操作时序20) 3.3.3传输的终止3.3.3.1由主设备提出的终止.一.数据已传输完.二.超时.21)22)3.3.3.2由从设备提出的终止一.retry.二.disconnect.23)24)25)由从设备发出的终止的特点一.STOP#发出后,就必须维持其有效状态直到FRAME#撤销为止.二.STOP#发出后,FRAME#应尽快撤销,FRAME#撤销后,STOP#也必须在接下来的时钟周期撤销.三.在STOP#有效期间,DEVSEL#也必须有效.四.从设备可以决定是否在STOP#发出后还进行一次数据传输.五.从设备不能在STOP#撤销后再传送数据.六.STOP#发出后的数据传输不能多于一次.七.若主设备要继续完成由从设备终止的传输,它必须在撤销REQ#后两个时钟周期后立刻重新置REQ#有效.26)3.4总线的仲裁仲裁是通过REQ#,GNT#两根信号线来实现的.3.4.1仲裁协议.仲裁的原则:一.若设置了GNT#无效而FRAME#有效时,当前的数据传输是合法的,继续传送下去.二.当总线非空闲时,一个设备的GNT#有效和另一个的GNT#无效之间必须有一个延期时钟,以免在A/D和奇偶校验之间发生时序竞争.三.FRAME#无效时,仲裁器可在任何时刻置REQ#,GNT#无效.若总线占用者在置REQ#,GNT#有效后,在处于空闲状态16个PCI CLOCK后,仍未传送数据,仲裁器可以打破这个状态.27)基本仲裁时序图28)3.4.2仲裁的停靠29) Chap 4 electrical specification30)4.2联接器PCI定义了两种扩展板的联接器,一种是基于5V环境的,一种是基于3.3V环境的.这两种连接器有防呆设计.31)4.3扩展板的技术指标32)Exercises1.PCI信号有哪几种类型,定义如何?2.PCI总线命令的定义.3.PCI总线传输的管理规则.4.基本读操作和基本写操作的时序图有何差异.5.由主设备提出的两种传输终止方式,数据传输完和超时有何区别.6.总线仲裁有何原则.KEY:1.page 6.2. page 11.3.page 13.4. page 18,19.5.page20,21.6.page 26.33)34)ReferencesPCILocalBusSpecification Revision 2.2。