
UG二次开发之Open和NXOpen
- 格式:pdf
- 大小:73.91 KB
- 文档页数:4

第1章二次开发应用初步UG/NX是当今世界上最先进和高度集成的、面向制造行业的CAD/CAE/CAM软件系统,可用于产品的整个开发过程,包括产品概念设计、建模、分析和加工。
UG/NX以其强大的设计和加工功能而著称,可以支持目前市场上销售的不同厂家的所有工作站及微机平台,广泛应用于通用机械、模具、汽车及航空航天领域,被很多世界著名公司选定为企业计算机辅助设计、分析、制造的标准。
从20世纪60年代起UG就一直代表着工程制造业CAD/CAM软件产品的最高水平。
20世纪90年代,UG进入中国市场,受到广大CAD/CAM用户的欢迎。
UG在中国的用户已超过1000多家,装机量达到350 多套。
这是因为UG是一个集成化、全面、一体的软件,它包括设计、加工、分析和最流行的产品数据管理(PDM),给企业提供了一个全面的解决方案。
1.1 CAD软件的二次开发随着CAD应用领域的不断扩大和应用水平的不断提高,用户需求与CAD系统规模之间的矛盾日益增加,没有一个CAD系统能够完全满足用户的各种需求。
作为商品化的CAD软件产品,是否拥有一个开放的体系结构,是衡量该软件的优劣性、适用性和生命力的重要标志,而是否拥有一个开发简便、运行高效的二次开发平台又是开放式体系结构的核心和关键。
目前,主流的CAD软件都具有用户定制功能并提供二次开发工具。
通过CAD软件的二次开发工具可以把商品化、通用化的CAD系统用户化、本地化、即以CAD系统为基础平台,在软件开发商所提供的开发环境与编程接口基础之上,根据自身的技术需要研制开发符合相关标准和适合企业实际应用的用户化、专业化、知识化、集成化软件,以进一步提高产品研发的效率。
在通用CAD基础上融入专业知识构建专用CAD系统是当前深化CAD应用的潮流。
把用户的设计思想转化为特定的新功能需要以下基本要素,这些基本要素构成了CAD软件二次开发平台的基本结构:(1)通用CAD软件——管理层。
通用CAD软件是整个开发的基础,是二次开发应用程序的宿主。

UG帮助⽂档NXOPENC#C#(UG)Create and display a dialogPrivate dialog As nxopen.uistyler.Dialogdialog = UI.GetUI().Styler.CreateStylerDialog("Sample.dlg")显⽰对话框dialog.Show()Alternatively, the UI Styler uses the following instead of the show function you open the dialog from the menu:或者,UI/Styler⽤以下代码实现从菜单打开的对话框的显⽰功能。
Dim isTopDialog As BooleanisTopDialog = falsedialog.RegisterWithUIMenu(isTopDialog)How styler items are declared:Private changeDialog As NXOpen.UIStyler.DialogItemPrivate changeStr0 As NXOpen.UIStyler.StringItemPrivate changeReal6 As NXOpen.UIStyler.RealItemHow styler items are initialized:(初始化)changeDialog = theDialog.GetStylerItem("UF_STYLER_DIALOG_INDEX",NXOpen.UIStyler.Dialog.ItemType.DialogItem)changeStr0=theDialog.GetStylerItem("STR_0",NXOpen.UIStyler.Dialog.ItemType.St ringItem)changeReal6=theDialog.GetStylerItem("REAL_6",NXOpen.UIStyler.Dialog.ItemType .RealItem)Register dialog box item callback functionsIn order to register these callbacks, NX provides an API “Add##Handler”, wh ere ## is replaced with “Activate”, “Construct”,“Apply” as shown in following examples. For more information on callbacks of all the dialog items, see the callback section in Dialog Item Reference.When you exit a Styler dialog box normally, the destructor callback is executed at last. Selecting Cancel or OK will invoke Cancel or OK callback first, followed by the destructor callback.Event Handler representation(事件处理程序代表)In case of .NET (VB/C#) APIs, registration is done through Delegates, and represented as:namespace NXOpen.UIStyler{public class StringItem: UIStyler.StylerItem{public delegate int Activate(UIStyler.StylerEvent eventObject);public unsafe voidAddActivateEvent(UIStyler.PushButton.Activate activateevent)();}}In your C# application, the registration will look like this:changeDialog.AddConstructHandler(AddressOf constructor_cb, False)changeDialog.AddOkayHandler(AddressOf ok_cb, False)changeDialog.AddApplyHandler(AddressOf apply_cb, False)changeStr0.AddActivateHandler(AddressOf bend_radius_cb, False)changeReal6.AddActivateHandler(AddressOf tolerance_cb, False)Get and set dialog item attributesThe NX Open API provides get and set methods for the relevant attributes of each dialog item. You can set and get the visibility for a PushButton using the following code. Once you get the dialog item, you can set the property of the item anywhere in your program. Here “thePushButton0” is an object of PushButton dialog item.C#/*Getting visibility attribute*/Boolean isVisible = thePushButton0.Visibility;/*Setting visibility attribute*/thePushButton0.Visibility = true;Launch a dialog from the event callback of another dialogWhile registering a callback, you must determine whether this event can launch another dialog box, depending upon the value of the toggle for “Creates Dialog” on the resource editor. The last argument in every callback registering function indicates this. It is done by setting this argument to “TRUE” or “FALSE”.C#changeAction0 =(NXOpen.UIStyler.PushButton)theDialog.GetStylerItem("ACTION_0",Dialog.ItemType.PushButton);changeAction0.AddActivateHandler(new NXOpen.UIStyler.PushButton.Activate(action_0_act_cb), true);changeAction1 =(NXOpen.UIStyler.PushButton)theDialog.GetStylerItem("ACTION_1",Dialog.ItemType.PushButton);changeAction1.AddActivateHandler(new NXOpen.UIStyler.PushButton.Activate(action_1_act_cb), false);Run a VB application as a journal script1. Choose Tools→Journal→Play. The Journal Manager dialog box opens.2. Click Browse to navigate to the location of the VB file.3. Click Run.Run a VB application using DLL1. Open Microsoft Visual Studio .Net.2. Create a new project:o Choose File→New→Project.o Select Visual Basic Projects, Console Application and type the name with which you want to save the project (for example, test).o Click OK.3. In the Solution Explorer, select the AssemblyInfo.vb file from the project, right-clickand choose Delete from the shortcut menu. A dialog appears warning you that the file will be permanently removed. Click OK.4. In the Solution Explorer, select theModule1.vb file from the project, right-click andchoose Delete from the shortcut menu. A dialog appears warning you that the file will be permanently removed. Click OK. 5. Add references for the following files:o NXOpen.dllo NXOpenUI.dllo NXOpen.Utilities.dllo NXOpen.UF.dllIn the Solution Explorer, right-click References under the project. Choose AddReference→Browse→%UGII_ROOT_DIR%\out\managed. Press the CTRL key and select the dlls.6. In the Solution Explorer, highlight the project name, right-click and choose AddExisting Item. Navigate to the location of the .vb file and add it.7. Choose Project Menu→Properties. If you see "Module1" in Startup Projec t, pushdown list, select Startup Project as the new Module name displayed in the list. Click OK.8. Choose Build Menu→Build Solution, or Ctrl + Shift + B, or go to Solution Explorer,select the project name, right-click and select Build. This creates the required dll.9. To run the VB examples, do the following:o Choose File→Execute→NX Open. The Execute User Function dialog box opens.o Navigate to the location of the .dll file. It will be in the \bin directory under the directory named for the VB project.o Select the .dll file and click OK.SelectionSelection class contains methods that update the selection structure associated with the active dialog box. Some method declarations for class Selection are:namespace NXOpen{class Selectionvoid SetSelectionMask(NXOpen::SelectionHandle * select /** Selection handle */,NXOpen::Selection::SelectionAction action /** Mask action */,const std::vector & mask_array /** Mask triples */);public: void SetSelectionCallbacks(NXOpen::SelectionHandle * select /** Selection handle */,const NXOpen::Selection::FilterCallback& filterproc /** Filter callback for additional user specificfiltering. */,const NXOpen::Selection::SelectionCallback& selcb /** Selection callback for application specificprocessing. */);C#To get the selection handleDim selectH As SelectionHandle = changeDialog.GetSelectionHandle()Create selection mask arrayDim selectionMask_array(0) As NXOpen.Selection.MaskTripleWith selectionMask_array(0).Type = NXOpen.UF.UFConstants.UF_solid_type.Subtype = NXOpen.UF.UFConstants.UF_solid_edge_subtype.SolidBodySubtype = NXOpen.UF.UFConstants.UF_UI_SEL_FEATURE_ANY_EDGE End WithSet the selection maskUI.GetUI().SelectionManager.SetSelectionMask(selectH,NXOpen.Selection.SelectionAction.ClearAndEnableSpecific, selectionMask_array)Set selection proceduresUI.GetUI().SelectionManager.SetSelectionCallbacks(selectH, AddressOf filter_cb, AddressOf sel_cb)Define the filter_cb and sel_cb procedures as follows in order to register this in set selection procedure in the above step. Public Function filter_cb(ByVal selectedObject As NXObject, ByValselectionMask_array As NXOpen.Selection.MaskTriple, ByValselectHandle As SelectionHandle)As IntegerTry// write your code hereCatch ex As NXException' ---- Enter your exception handling code here -----MsgBox(ex.Message)End TryEnd FunctionPublic Function sel_cb(ByVal selectedObjects As NXObject(), ByVal deselectedObjects() As NXObject, ByVal selectHandle AsSelectionHandle)As IntegerTry// write your code hereCatch ex As NXException' ---- Enter your exception handling code here -----MsgBox(ex.Message)End Trysel_cb = NXOpen.UIStyler.DialogState.ContinueDialog End FunctionDialog box layoutIntroductionAttachment class is used to set the attachment of the dialog item, for example left item, right item, top item, and so on and also the relative positioning of the item (for example, center, left, right, bottom, top). The following sections explain the corresponding NX Open APIs that manipulate the dialog item’s attachment (layout) structure.Set an attachment to dialog ItemFollowing set of APIs are used to set the attachment for a particular dialog box itemC# Attachment attach = changeAction0.InitializeAttachment();attach.SetCenter(false);attach.SetAttachTypeTop(Attachment.AttachType.Dialog);attach.SetTopDialogItem("INT_1");attach.SetTopOffset(0);attach.SetAttachTypeRight(Attachment.AttachType.Dialog);attach.SetRightDialogItem("UF_STYLER_DIALOG_INDEX");attach.SetRightOffset(50);attach.SetAttachTypeLeft(Attachment.AttachType.Dialog);attach.SetLeftDialogItem("UF_STYLER_DIALOG_INDEX");attach.SetLeftOffset(50);changeAction0.SetAttachment(attach);。
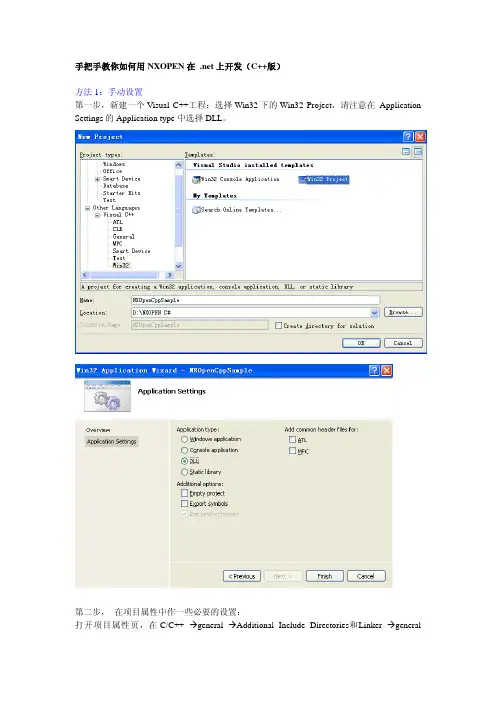
手把手教你如何用NXOPEN在 .net上开发(C++版)方法1:手动设置第一步,新建一个Visual C++工程:选择Win32下的Win32 Project,请注意在 Application Settings的Application type中选择DLL。
第二步,在项目属性中作一些必要的设置:打开项目属性页,在 C/C++ Ægeneral ÆAdditional Include Directories和Linker ÆgeneralÆAdditional Library Directories下都添加UG安装目录下的ugopen文件夹路径,因为该目录下的NXOPEN子目录中有NXOPEN的需要的头文件。
在LinkerÆinputÆAdditional Dependencies中,添加需要的库文件,即libufun.lib,libnxopencpp.lib,libugopenint.lib及libnxopenuicpp.lib。
第三步,添加必要的头文件以及使用名字空间。
(注:同方法2第三步,请参照下面)第四步,打开cpp文件,添加UG的入口函数 ufsta()/ufusr()和函数ufusr_ask_unload()。
添加自己的代码,编译生成dll文件。
(注:同参照方法2)方法2:无需手动设置第一步,将UgOpen_v19.awx 拷贝到VS2005的 IDE文件夹下,路径如下所示:D:\Program Files\Microsoft Visual Studio 8\Common7\IDE第二步,新建一个Visual C++工程:在左侧Project types中选择Visual C++,可以看到有NX6 Open Wizard选项了。
选择NX6 Open Wizard新建一个Visual C++工程。
在Application Settings中按默认选项,即dll和C++。

UG⼆次开发实体转装配零件并将实体属性填写到装配零件中(C#)1 ///<summary>2///实体转化为装配3///</summary>4///<param name="prtfull">全路径</param>5///<param name="bodys">实体</param>6///<param name="SaveBool">是否保存零件</param>7///<returns>返回prtTag </returns>8public void CreatObjPartToAssembly(string prtfull, Body bodys, bool SaveBool, ref Tag prtTag)9 {10 NXOpen.FileNew fileNew1;11 fileNew1 = base.theSession.Parts.FileNew();12 fileNew1.TemplateFileName = "model-plain-1-mm-template.prt";13 eBlankTemplate = false;14 fileNew1.ApplicationName = "ModelTemplate";15 fileNew1.Units = limeters;16 fileNew1.RelationType = "";17 esMasterModel = "No";18 fileNew1.TemplateType = NXOpen.FileNewTemplateType.Item;19 fileNew1.ItemType = "";20 fileNew1.Specialization = "";21 fileNew1.SetCanCreateAltrep(false);22 fileNew1.NewFileName = prtfull;23 fileNew1.MasterFileName = "";24 fileNew1.MakeDisplayedPart = false;25 NXOpen.Assemblies.CreateNewComponentBuilder createNewComponentBuilder1;26 createNewComponentBuilder1 = workPart.AssemblyManager.CreateNewComponentBuilder();27 createNewComponentBuilder1.ReferenceSet = ponentReferenceSetType.Other;28 createNewComponentBuilder1.ReferenceSetName = "PART";29 createNewComponentBuilder1.OriginalObjectsDeleted = false;30string name = Path.GetFileNameWithoutExtension(prtfull);31 createNewComponentBuilder1.NewComponentName = name.ToUpper();32bool added1;33 added1 = createNewComponentBuilder1.ObjectForNewComponent.Add(bodys);34 createNewComponentBuilder1.NewFile = fileNew1;35 NXOpen.NXObject nXObject1;36 nXObject1 = mit();37 Tag occTag = nXObject1.Tag;38 Tag InstanceTag = theUfSession.Assem.AskInstOfPartOcc(occTag);39 prtTag = theUfSession.Assem.AskChildOfInstance(InstanceTag);40 NXOpen.BasePart bpart = (NXOpen.BasePart)NXObjectManager.Get(prtTag);41if (SaveBool)42 {43 bpart.Save(BasePart.SaveComponents.True, BasePart.CloseAfterSave.False);44 }45 NXObject.AttributeInformation[] allAttrs = bodys.GetUserAttributes();46foreach (NXObject.AttributeInformation attrinfo in allAttrs)47 {48 bpart.SetUserAttribute(attrinfo, Update.Option.Now);49 }50 createNewComponentBuilder1.Destroy();51 }。