Router and switch 配置命令
- 格式:doc
- 大小:185.50 KB
- 文档页数:11
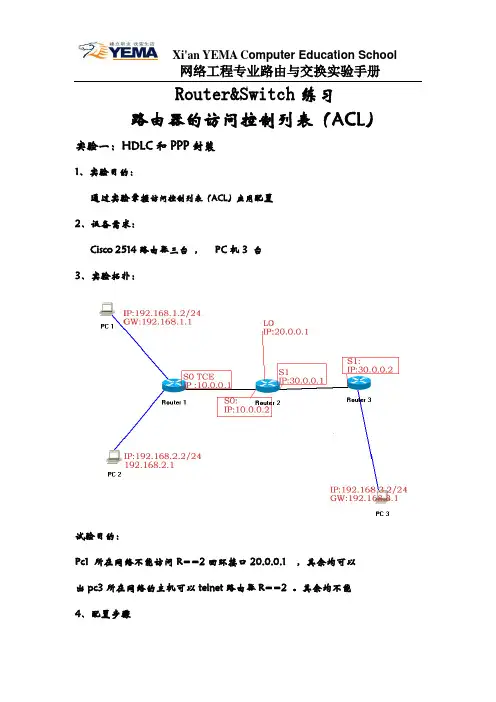
Router&Switch练习路由器的访问控制列表(ACL)实验一:HDLC和PPP封装1、实验目的:通过实验掌握访问控制列表(ACL)应用配置2、设备需求:Cisco 2514路由器三台,PC机3 台3、实验拓扑:试验目的:Pc1 所在网络不能访问R==2回环接口20.0.0.1 ,其余均可以出pc3所在网络的主机可以telnet路由器R==2 。
其余均不能4、配置步骤配置router1Router>Router>enableRouter#CON TRouter(config)#hostname r==1r==1(config)#interface serial 0r==1(config-if)#ip address 10.0.0.1 255.0.0.0r==1(config-if)#clock rate 9600r==1(config-if)#no shutdownr==1(config-if)#EXITr==1(config)#interface ethernet 0r==1(config-if)#ip address 192.168.1.1 255.255.255.0 r==1(config-if)#no shutdownr==1(config-if)#EXITr==1(config)#interface ethernet 1r==1(config-if)#ip address 192.168.2.1 255.255.255.0 r==1(config-if)#no shutdownr==1(config-if)#EXITr==1(config)#router eigrp 1r==1(config-router)#network 192.168.1.0r==1(config-router)#network 192.168.2.0r==1(config-router)#network 10.0.0.0r==1(config-router)#EXITr==1(config)#end配置router2Router>enableRouter#CON TRouter(config)#hostname r==2r==2(config)#interface serial 0r==2(config-if)#ip address 10.0.0.2 255.0.0.0 r==2(config-if)#no shutdownr==2(config-if)#EXITr==2(config)#interface loopback 0r==2(config-if)#ip address 20.0.0.1 255.0.0.0 r==2(config-if)#no shutdownr==2(config-if)#EXITr==2(config)#interface serial 1r==2(config-if)#ip address 30.0.0.1 255.0.0.0 r==2(config-if)#clock rate 64000r==2(config-if)#no shutdownr==2(config-if)#EXITr==2(config)#ROUr==2(config)#router eigrp 1r==2(config-router)#network 10.0.0.0r==2(config-router)#network 20.0.0.0r==2(config-router)#network 30.0.0.0r==2(config-router)#EXITr==2(config)#line vty 0 4r==2(config-line)#password yemar==2(config-line)#loginr==2(config)#access-list 1 deny 192.168.1.0 0.0.0.255r==2(config)#access-list 1 permit anyr==2(config)#interface serial 0r==2(config-if)#ip ar==2(config-if)#ip access-group 1 inr==2(config-if)#exitr==2(config)#access-list 2 permit 192.168.3.0 0.0.0.255 r==2(config)#line vty 0 4r==2(config-line)#access-class 2 inRouter3配置Router>enableRouter#CON TRouter(config)#hostname r==3r==3(config)#interface serial 1r==3(config-if)#ip address 30.0.0.2 255.0.0.0r==3(config-if)#no shutdownr==3(config-if)#EXITr==3(config)#interface ethernet 0r==3(config-if)#ip address 192.168.3.1 255.255.255.0r==3(config-if)#no shutdownr==3(config-if)#EXITr==3(config)#router eigrp 1r==3(config-router)#network 30.0.0.0r==3(config-router)#network 192.168.3.0r==3(config-router)#EXITr==3(config)#END5.分别各两台pc设IP与网关(略)6.根据实验目的测试(略)Pc1 所在网络不能访问R==2回环接口20.0.0.1 ,其余均可以出pc3所在网络的主机可以telnet路由器R==2 。
1、switch>:用户模式——能查看版本信息2、在用户模式下输入enable会进特权模式——它能保存、修改、删除这一系列的配置switch>enable→switch#:特权模式,下面有一些命令就在此命令下完成:①、删除vlan的文件配置:delete flash:vlan.dat②、删除vlan中的配置文件:erase startup-config③、查看vlan配置文件是否被删除及vlan的是否创建:show vlan④、重新启动交换机:reload⑤、查看当前交换机的配置:show running-config⑥、保存对交换机所配置的内容,即是保存在Nvram:copy running-configstartup-config⑦、检查Nvram的内容:show startup-config⑧、检查虚拟接口 vlan的特征:show interface vlan 1⑨、查看接口IP的属性:show ip interface vlan 1⑩、查看cisco的信息:show version⑪、查看交换机所用快速以太网接口的默认属性:show interface fastethernet 0/18⑫、查看闪存目录中的内容:show flash 或dir flash3、在特权模式下输入configure terninal后会进入全局模式,一切的配置必须在此模式中进行配置Switch#configure terninal→switchp(config)#:全局模式①、配置路由器设备的名字:switch(config)#hostname + 交换机的名字②、配置进入特权模式的密码,即使能密码:switch(config)#enable password +密码③、配置非明文密码:switch(config)#enable secret + 密码4、为交换机配置console口①、进入现成配置模式,即进入console口:switch(config)# line console 0②、设置密码(重新启动时需要此密码):switch(config-line)#password + 密码③、允许登录:switch(config-line)#login5、配置远程登录的密码:①、首先要配置使能密码②、允许让几个人登录:switch(config)#line vty 0 4(即允许五个登录)③、设置密码:switch(config-line)#password + 密码④、允许远程登录:switchp(config-line)#login6、在全局模式下的有关命令①对所有密码进行加密:switch(config)#service password-encryption②、不解析错误的命令:switch(config)#no ip domain-lookup7、创建vlan(2—1001,注vlan 1既不可以创建,也不可以删除)①、创建vlan :vlan + 要创建vlan的值②、给vlan取名:switch(config-vlan)#name + 名字(此步可以不要)③、把PC与交换机相连的端口添加到相应的vlan中:a、Switch(config)#interface + 端口b、Switch(config-if)#switchport access vlan + 相应vlan的值④、需要传递多个vlan信息就要打中继口,即trunka、switch(config)#interface + 交换机另一端口b、switch(config-if)#switchport mode trunk8、传统vlan 的通信(1)、router的配置①、为接口配置IP地址(该IP是相应vlan的PC网关)②、激活端口:no shutdown(2)、switch的配置①、创建vlan,将PC端口划入相应vlan②、将switch与router相连的端口划入相应的vlan(3) 、PC的配置:就是给PC配置IP,注PC的默认网关与router的IP相同,网关相同9、单臂路由实现vlan的通信(1)router配置①、添加子接口:interface f0/0.1(此处有多少个vlan就添加多少个子接口)②、将子接口封装到相应的vlan:encapsulation dot + 相应vlan的值③、将子接口配置IP:ip add +ip地址 + 子网掩码④、激活物理接口:no shutdown(2)、switch的配置①、创建 vlan,交PC的端口划入到相应vlan②、与router相连的端口打trunk(3)、配置PC的IP9、三层交换(1)、配置三层交换①、启用三层交换:(config)#ip routing②、创建vlan:(config)# vlan + 要创建vlan的值③、把相应的vlan配置IPa、指定一个vlan:(config)#interface vlan + vlan相应的值c、配置IP:(config-if)#ip add + ip + 子网掩码(2)、配置switch①、每个交换机创建vlan②、把端口划分到相应的vlan中③、打中继口(trunk)Show命令1、show version 这个命令可以查看IOS版本号,已启动时间,Flash中的IOS 的文件名,router里面共有什么端口,寄存器的值等等。
Router and switch 配置命令精华压缩版72010-03-22 18:1115.在基于IOS的交换机上调整根路径成本:switch(config-if)# spanning-tree [vlan vlan-list] cost cost在基于CLI的交换机上调整根路径成本:switch(enable) set spantree portcost moudle/port costswitch(enable) set spantree portvlancost moudle/port [cost cost][vlan-list] 16.在基于IOS的交换机上调整端口ID:switch(config-if)# spanning-tree[vlan vlan-list]port-priority port-priority 在基于CLI的交换机上调整端口ID:switch(enable) set spantree portpri {mldule/port}priorityswitch(enable) set spantree portvlanpri {module/port}priority [vlans]17. 在基于IOS的交换机上修改STP时钟:switch(config)# spanning-tree [vlan vlan-list] hello-time secondsswitch(config)# spanning-tree [vlan vlan-list] forward-time secondsswitch(config)# spanning-tree [vlan vlan-list] max-age seconds在基于CLI的交换机上修改STP时钟:switch(enable) set spantree hello interval[vlan]switch(enable) set spantree fwddelay delay [vlan]switch(enable) set spantree maxage agingtiame[vlan]18. 在基于IOS的交换机端口上启用或禁用Port Fast 特征:switch(config-if)#spanning-tree portfast在基于CLI的交换机端口上启用或禁用Port Fast 特征:switch(enable) set spantree portfast {module/port}{enable|disable}19. 在基于IOS的交换机端口上启用或禁用UplinkFast 特征:switch(config)# spanning-tree uplinkfast [max-update-rate pkts-per-second]在基于CLI的交换机端口上启用或禁用UplinkFast 特征:switch(enable) set spantree uplinkfast {enable|disable}[rate update-rate] [all-protocols off|on]20. 为了将交换机配置成一个集群的命令交换机,首先要给管理接口分配一个IP地址,然后使用下列命令: switch(config)# cluster enablecluster-name cv21. 为了从一条中继链路上删除VLAN,可使用下列命令:switch(enable) clear trunk module/port vlan-range22. 用show vtp domain 显示管理域的VTP参数.23. 用show vtp statistics显示管理域的VTP参数.24. 在Catalyst交换机上定义TrBRF的命令如下:switch(enable) set vlan vlan-name [name name] type trbrf bridge bridge-num[stp {ieee|ibm}]25. 在Catalyst交换机上定义TrCRF的命令如下:switch (enable) set vlan vlan-num [name name] type trcrf{ring hex-ring-num|decring decimal-ring-num} parent vlan-num26. 在创建好TrBRF VLAN之后,就可以给它分配交换机端口.对于以太网交换,可以采用如下命令给VLAN分配端口:switch(enable) set vlan vlan-num mod-num/port-num27. 命令show spantree显示一个交换机端口的STP状态.28. 配置一个ELAN的LES和BUS,可以使用下列命令:ATM (config)# interface atm number.subint multiointATM(config-subif)# lane serber-bus ethernet elan-name29. 配置LECS:ATM(config)# lane database database-nameATM(lane-config-databade)# name elan1-name server-atm-address les1-nsap-address ATM(lane-config-databade)# name elan2-name server-atm-address les2-nsap-address ATM(lane-config-databade)# name …。
Cisco路由与交换配置命令汇总一、Cisco2950交换机的基本配置:Switch> //用户模式Switch>enable //进入特权模式Switch# //特权模式Switch#configure terminal //进入全局模式Switch(config)# //全局模式Switch(config)#host C2950 //配置主机名C2950(config)#C2950(config)#enable password cisco //设置进入特权模式的普通口令C2950(config)#enable secret class //设置进入特权模式的加密口令C2950(config)#line console 0 //设置进入控制台0的口令C2950(config-line)#password S1C2950(config-line)#loginC2950(config-line)#exitC2950(config)#line vty 0 4 //设置远程登陆口令C2950(config-line)#password S2C2950(config-line)#loginC2950(config-line)#exitC2950(config)#二、交换机端口的设置C2950#config terminalC2950(config)#interface fa0/1 //进入接口fa0/1配置模式C2950(config-if)#description SalesPrinter //配置描述信息C2950(config-if)#duplex full //配置全双工C2950(config-if)#speed 100 //配置接口带宽C2950(config-if)#endC2950#show interface //查看验证接口配置C2950#show running-config //查看验证全部配置C2950#copy running startup //将运行配置复制到启动配置三、交换机的远程配置C2950(config)#interface vlan 1 //进入VLAN 1接口配置模式C2950(config-if)#ip address 192.168.1.10 255.255.255.0//配置交换机的管理IP地址C2950(config-if)#exitC2950(config)#C2950(config)#line vty 0 4 //配置交换机远程登录口令C2950(config-line)#password classC2950(config-line)#loginC2950(config-line)#exitC2950(config)#enable password cisco //设置进入特权模式的口令C2950(config)#在PC机命令行中利用Telnet来登录连接交换机,也可在登录一台交换机后,再利用Telnet命令,登录连接另一台交换机。
Switch命令大全!1.在基于IOS的交换机上设置主机名/系统名:switch(config)# hostname hostname在基于CLI的交换机上设置主机名/系统名:switch(enable) set system name name-string2.在基于IOS的交换机上设置登录口令:switch(config)# enable password level 1 password在基于CLI的交换机上设置登录口令:switch(enable) set passwordswitch(enable) set enalbepass3.在基于IOS的交换机上设置远程访问:switch(config)# interface vlan 1switch(config-if)# ip address ip-address netmaskswitch(config-if)# ip default-gateway ip-address在基于CLI的交换机上设置远程访问:switch(enable) set interface sc0 ip-address netmask broadcast-addressswitch(enable) set interface sc0 vlanswitch(enable) set ip route default gateway4.在基于IOS的交换机上启用和浏览CDP信息:switch(config-if)# cdp enableswitch(config-if)# no cdp enable为了查看Cisco邻接设备的CDP通告信息:switch# show cdp interface [type modle/port]switch# show cdp neighbors [type module/port] [detail]在基于CLI的交换机上启用和浏览CDP信息:switch(enable) set cdp {enable|disable} module/port为了查看Cisco邻接设备的CDP通告信息:switch(enable) show cdp neighbors[module/port] [vlan|duplex|capabilities|detail]5.基于IOS的交换机的端口描述:switch(config-if)# description description-string基于CLI的交换机的端口描述:switch(enable)set port name module/number description-string6.在基于IOS的交换机上设置端口速度:switch(config-if)# speed{10|100|auto}在基于CLI的交换机上设置端口速度:switch(enable) set port speed moudle/number {10|100|auto}switch(enable) set port speed moudle/number {4|16|auto}7.在基于IOS的交换机上设置以太网的链路模式:switch(config-if)# duplex {auto|full|half}在基于CLI的交换机上设置以太网的链路模式:switch(enable) set port duplex module/number {full|half}8.在基于IOS的交换机上配置静态VLAN:switch# vlan databaseswitch(vlan)# vlan vlan-num name vlaswitch(vlan)# exitswitch# configure teriminalswitch(config)# interface interface module/numberswitch(config-if)# switchport mode accessswitch(config-if)# switchport access vlan vlan-numswitch(config-if)# end在基于CLI的交换机上配置静态VLAN:switch(enable) set vlan vlan-num [name name]switch(enable) set vlan vlan-num mod-num/port-list9. 在基于IOS的交换机上配置VLAN中继线:switch(config)# interface interface mod/portswitch(config-if)# switchport mode trunkswitch(config-if)# switchport trunk encapsulation {isl|dotlq}switch(config-if)# switchport trunk allowed vlan remove vlan-listswitch(config-if)# switchport trunk allowed vlan add vlan-list在基于CLI的交换机上配置VLAN中继线:switch(enable) set trunk module/port [on|off|desirable|auto|nonegotiate] Vlan-range [isl|dotlq|dotl0|lane|negotiate]10.在基于IOS的交换机上配置VTP管理域:switch# vlan databaseswitch(vlan)# vtp domain domain-name在基于CLI的交换机上配置VTP管理域:switch(enable) set vtp [domain domain-name]11.在基于IOS的交换机上配置VTP 模式:switch# vlan databaseswitch(vlan)# vtp domain domain-nameswitch(vlan)# vtp {sever|cilent|transparent}switch(vlan)# vtp password password在基于CLI的交换机上配置VTP 模式:switch(enable) set vtp [domain domain-name][mode{ sever|cilent|transparent }][password password]12. 在基于IOS的交换机上配置VTP版本:switch# vlan databaseswitch(vlan)# vtp v2-mode在基于CLI的交换机上配置VTP版本:switch(enable) set vtp v2 enable13. 在基于IOS的交换机上启动VTP剪裁:switch# vlan databaseswitch(vlan)# vtp pruning在基于CL I 的交换机上启动VTP剪裁:switch(enable) set vtp pruning enable14.在基于IOS的交换机上配置以太信道:switch(config-if)# port group group-number [distribution {source|destination}] 在基于CLI的交换机上配置以太信道:switch(enable) set port channel moudle/port-range mode{on|off|desirable|auto}15.在基于IOS的交换机上调整根路径成本:switch(config-if)# spanning-tree [vlan vlan-list] cost cost在基于CLI的交换机上调整根路径成本:switch(enable) set spantree portcost moudle/port costswitch(enable) set spantree portvlancost moudle/port [cost cost][vlan-list]16.在基于IOS的交换机上调整端口ID:switch(config-if)# spanning-tree[vlan vlan-list]port-priority port-priority在基于CLI的交换机上调整端口ID:switch(enable) set spantree portpri {mldule/port}priorityswitch(enable) set spantree portvlanpri {module/port}priority [vlans]17. 在基于IOS的交换机上修改STP时钟:switch(config)# spanning-tree [vlan vlan-list] hello-time secondsswitch(config)# spanning-tree [vlan vlan-list] forward-time secondsswitch(config)# spanning-tree [vlan vlan-list] max-age seconds在基于CLI的交换机上修改STP时钟:switch(enable) set spantree hello interval[vlan]switch(enable) set spantree fwddelay delay [vlan]switch(enable) set spantree maxage agingtiame[vlan]18. 在基于IOS的交换机端口上启用或禁用Port Fast 特征:switch(config-if)#spanning-tree portfast在基于CLI的交换机端口上启用或禁用Port Fast 特征:switch(enable) set spantree portfast {module/port}{enable|disable}19. 在基于IOS的交换机端口上启用或禁用UplinkFast 特征:switch(config)# spanning-tree uplinkfast [max-update-rate pkts-per-second]在基于CLI的交换机端口上启用或禁用UplinkFast 特征:switch(enable) set spantree uplinkfast {enable|disable}[rate update-rate][all-protocols off|on]20. 为了将交换机配置成一个集群的命令交换机,首先要给管理接口分配一个IP地址,然后使用下列命令:switch(config)# cluster enable cluster-name21. 为了从一条中继链路上删除VLAN,可使用下列命令:switch(enable) clear trunk module/port vlan-range22. 用show vtp domain 显示管理域的VTP参数.23. 用show vtp statistics显示管理域的VTP参数.24. 在Catalyst交换机上定义TrBRF的命令如下:switch(enable) set vlan vlan-name [name name] type trbrf bridge bridge-num[stp {ieee|ibm}]25. 在Catalyst交换机上定义TrCRF的命令如下:switch (enable) set vlan vlan-num [name name] type trcrf{ring hex-ring-num|decring decimal-ring-num} parent vlan-num26. 在创建好TrBRF VLAN之后,就可以给它分配交换机端口.对于以太网交换,可以采用如下命令给VLAN分配端口:switch(enable) set vlan vlan-num mod-num/port-num27. 命令show spantree显示一个交换机端口的STP状态.28. 配置一个ELAN的LES和BUS,可以使用下列命令:ATM (config)# interface atm number.subint multiointATM(config-subif)# lane serber-bus ethernet elan-name29. 配置LECS:ATM(config)# lane database database-nameATM(lane-config-databade)# name elan1-name server-atm-address les1-nsap-address ATM(lane-config-databade)# name elan2-name server-atm-address les2-nsap-address ATM(lane-config-databade)# name …30. 创建完数据库后,必须在主接口上启动LECS.命令如下:ATM(config)# interface atm numberATM(config-if)# lane config database database-nameATM(config-if)# lane config auto-config-atm-address31. 将每个LEC配置到一个不同的ATM子接口上.命令如下:ATM(config)# interface atm number.subint multipointATM(config)# lane client ethernet vlan-num elan-num32. 用show lane server 显示LES的状态.33. 用show lane bus显示bus的状态.34. 用show lane database显示LECS数据库可内容.35. 用show lane client显示LEC的状态.36. 用show module显示已安装的模块列表.37. 用物理接口建立与VLAN的连接:router# configure terminalrouter(config)# interface media module/portrouter(config-if)# description description-stringrouter(config-if)# ip address ip-addr subnet-maskrouter(config-if)# no shutdown38. 用中继链路来建立与VLAN的连接:router(config)# interface module/port.subinterfacerouter(config-ig)# encapsulation[isl|dotlq] vlan-numberrouter(config-if)# ip address ip-address subnet-mask39. 用LANE 来建立与VLAN的连接:router(config)# interface atm module/portrouter(config-if)# no ip addressrouter(config-if)# atm pvc 1 0 5 qsaalrouter(config-if)# atm pvc 2 0 16 ilnirouter(config-if)# interface atm module/port.subinterface multipoint router(config-if)# ip address ip-address subnet-maskrouter(config-if)# lane client ethernet elan-numrouter(config-if)# interface atm module/port.subinterface multipoint router(config-if)# ip address ip-address subnet-namerouter(config-if)# lane client ethernet elan-namerouter(config-if)# …40. 为了在路由处理器上进行动态路由配置,可以用下列IOS命令来进行: router(config)# ip routingrouter(config)# router ip-routing-protocolrouter(config-router)# network ip-network-numberrouter(config-router)# network ip-network-number41. 配置默认路由:switch(enable) set ip route default gateway42. 为一个路由处理器分配VLANID,可在接口模式下使用下列命令:router(config)# interface interface numberrouter(config-if)# mls rp vlan-id vlan-id-num43. 在路由处理器启用MLSP:router(config)# mls rp ip44. 为了把一个外置的路由处理器接口和交换机安置在同一个VTP域中:router(config)# interface interface numberrouter(config-if)# mls rp vtp-domain domain-name45. 查看指定的VTP域的信息:router# show mls rp vtp-domain vtp domain name46. 要确定RSM或路由器上的管理接口,可以在接口模式下输入下列命令:router(config-if)#mls rp management-interface47. 要检验MLS-RP的配置情况:router# show mls rp48. 检验特定接口上的MLS配置:router# show mls rp interface interface number49. 为了在MLS-SE上设置流掩码而又不想在任一个路由处理器接口上设置访问列表:set mls flow [destination|destination-source|full]50. 为使MLS和输入访问列表可以兼容,可以在全局模式下使用下列命令:router(config)# mls rp ip input-acl51. 当某个交换机的第3层交换失效时,可在交换机的特权模式下输入下列命令:switch(enable) set mls enable52. 若想改变老化时间的值,可在特权模式下输入以下命令:switch(enable) set mls agingtime agingtime53. 设置快速老化:switch(enable) set mls agingtime fast fastagingtime pkt_threshold54. 确定那些MLS-RP和MLS-SE参与了MLS,可先显示交换机引用列表中的内容再确定:switch(enable) show mls include55. 显示MLS高速缓存记录:switch(enable) show mls entry56. 用命令show in arp显示ARP高速缓存区的内容。
交换机基本状态:switch: ROM状态,switch> 用户模式(输入enable进入特权配置模式)switch# 特权配置模式(输入config terminal进入全局配置)switch(config)# 全局配置模式(输入interface fastEthernet端口号进入接口模式) switch(config-if)# 接口状态交换机的特权配置模式Switch#show version 基本配置的查看switch#show vlan ;查看vlan配置信息switch#show interface ;查看端口信息switch#dir flash: ;查看闪存switch#show interfaces vlan 1 查看有关IP协议信息和相关命令的设置是否己生效switch#show running-config 查看当前配置清单switch#show interface fastEthernet0/1 查看指定端口的具体配置和统计信息switch#erase startup-config 将交换机恢复为出厂黙认状态switch#sho run interface fastEthernet0/17 查看关于0/17端口的配置信息switch#sho mac-address-table aging-time 设置MAC地址表超时时间switch#show mac-address-table 查看整个MAC地址表使用CDP协议switch#show cdp 显示了设备的CDP全局配置信息switch#show cdp interface f0/17 显示了fo/17接口的CDP配置信息switch#show cdp traffic 显示有关CDP包的统计信息(CDP conters信息)switch#show cdp neighbors 列出与本设备相邻的设备在switch#sshow cdp entry 后面键入“*”号即可显示所有入项的细节设置端口双工模式switch(config)#duplex ? { autu full half }全局配置模式switch>enable;进入特权模式switch#config terminal 进入全局配置模式switch(config)#hostname xxx;设置交换机的主机名switch(config)#enable password xx ;设置使能口令switch(config)#enable secret xxx ;设置使能密码设置交换机的管理IP地址:switch(config)#interface vlan 1 ;(进入vlan 1)switch(config-if)#ip address 192.168.1.1 255.255.255.0 (设置IP地址和子网掩码)switch(config-if)#no shut (开启端口)switch(config-if)#exit (退出)switch(config)#ip default-gatew.02.1.1.1 202.1.1.2 (设置所使用的域名服务哭地址) switch(config)#line console 0 ;进入控制台口switch(config-line)#line vty 0 4 ;进入虚拟终端switch(config-line)#login ;允许登录switch(config-line)#password xx ;设置登录口令xx创建与删除VLAN方法(选删除端口后删除VLAN)方法一(enable模式下创建vlan)switch#vlan database 进入vlan数据库模式switch(vlan)#vlan 2 name test20 新建vlan 2及vlan 名为test20switch(vlan)#end 退出即生效switch#show vlan brief 查看vlan配置switch#copy running-config startup config 保存配置删除VLAN方法switch#vlan database 进入vlanswitch(vlan)#no vlan 2 删vlan 2方法二(conf t模式下创建vlan)Switch#conf t 进入全局配置模式Swintch(config)#vlan 2 新建vlan号为2Swintch(config-vlan)#name test20 名字命名为test20(可选)Swintch(config-vlan)#end 退出switch#copy running-config startup config 保存配置删除VLAN方法Switch#conf t 进入全局配置模式Swintch(config)#no vlan 2 删除vlan2在VLAN中添加端口switch#conf t 进行全局配置模式switch(config)#interface fastEthernet0/1 ;进入端口0/1switch(config-if)#switchport mode access 定义二层接入端口switch(config-if)#switchport access vlan 2 把端口分配给vlan 2在VLAN中删除端口switch#conf t 进行全局配置模式switch(config)#interface fastEthernet0/1 ;进入端口1switch(config-if)#no switchport access vlan 10 将端口0/1从vlan10中删除switch(config-if)#end 退出switch#show vlan brief 查看vlan配置交换机端口上配置Trunk中继switch#conf t 进行全局配置模式switch(config)#interface fastEthernet0/1 ;进入端口1switch(config-if)#switchport mode access ;设置端口为接入模式switch(config-if)#switchport mode trunk ;设置端口为中继模式switch(config-if)#switchport mode dynamic auto 自动协商是否成为中继端口switch(config-if)#switchport mode dynamic desirable 设置接口为主动尝试转换中继链路switch(config-if)#switchport mode nonegotiate 将接口设定为永久中继模式,但禁止接口产生DTP帧,要建立部继链路,就必须手工将邻接接口配置为中继接口switch(config-if)#end 退出switch#show interfaces 0/1 switchport 显示有关switchport的配置从Trunk中添加、删除vlanswitch#conf t 进行全局配置模式switch(config)#int f0/1 ;进入端口1switch(config-if)#switchport mode trunk ;设置为中继switch(config-if)#switchport trunk allowed vlan 1,2 ;设置允许的vlan switch(config-if)#switchport trunk encap dot1q ;设置vlan 中继Switch#write 保存配置信息路由器支持的命令:路由器显示命令:router#show run ;显示配置信息router#show interface ;显示接口信息router#show ip route ;显示路由信息router#show cdp nei ;显示邻居信息router#reload ;重新起动路由器口令设置:router>enable ;进入特权模式router#config terminal ;进入全局配置模式router(config)#hostname ;设置交路由器的主机名router(config)#enable secret xxx ;设置特权加密口令router(config)#enable password xxb ;设置特权非密口令router(config)#line console 0 ;进入控制台口router(config-line)#line vty 0 4 ;进入虚拟终端router(config-line)#password xx ;设置登录口令xxrouter(config-line)#login ;要求口令验证router(config)#(Ctrl+z) ;返回特权模式router#exit ;返回命令路由器配置:router(config)#int s0/0 ;进入Serail接口router(config-if)#no shutdown ;激活当前接口router(config-if)#clock rate 64000 ;设置同步时钟router(config-if)#ip address ;设置IP地址router(config-if)#ip address second ;设置第二个IProuter(config-if)#int f0/0.1 ;进入子接口router(config-subif.1)#ip address ;设置子接口IProuter(config-subif.1)#encapsulation dot1q ;绑定vlan中继协议router(config)#config-register 0x2142 ;跳过配置文件router(config)#config-register 0x2102 ;正常使用配置文件router#reload ;重新引导路由器文件操作:router#copy running-config startup-config ;保存配置router#copy running-config tftp ;保存配置到tftprouter#copy startup-config tftp ;开机配置存到tftprouter#copy tftp flash: ;下传文件到flashrouter#copy tftp startup-config;下载配置文件ROM状态:Ctrl+Break ;进入ROM监控状态rommon>confreg 0x2142 ;跳过配置文件rommon>confreg 0x2102 ;恢复配置文件rommon>reset ;重新引导rommon>copy xmodem: flash: ;从console传输文件rommon>IP_ADDRESS=10.65.1.2 ;设置路由器IPrommon>IP_SUBNET_MASK=255.255.0.0 ;设置路由器掩码rommon>TFTP_SERVER=10.65.1.1 ;指定TFTP服务器IP rommon>TFTP_FILE=c2600.bin ;指定下载的文件rommon>tftpdnld ;从tftp下载rommon>dir flash: ;查看闪存内容rommon>boot ;引导IOS静态路由:ip route ;命令格式router(config)#ip route 2.0.0.0 255.0.0.0 1.1.1.2 ;静态路由举例router(config)#ip route 0.0.0.0 0.0.0.0 1.1.1.2 ;默认路由举例动态路由:router(config)#ip routing ;启动路由转发router(config)#router rip ;启动RIP路由协议。

1.在基于IOS的交换机上设置主机名/系统名: switch(config)# hostname hostname 在基于CLI的交换机上设置主机名/系统名: switch(enable) set system name name-string 2.在基于IOS的交换机上设置登录⼝令: switch(config)# enable password level 1 password 在基于CLI的交换机上设置登录⼝令: switch(enable) set password switch(enable) set enalbepass 3.在基于IOS的交换机上设置远程访问: switch(config)# interface vlan 1 switch(config-if)# ip address ip-address netmask switch(config-if)# ip default-gateway ip-address 在基于CLI的交换机上设置远程访问: switch(enable) set interface sc0 ip-address netmask broadcast-address switch(enable) set interface sc0 vlan switch(enable) set ip route default gateway 4.在基于IOS的交换机上启⽤和浏览CDP信息: switch(config-if)# cdp enable switch(config-if)# no cdp enable 为了查看Cisco邻接设备的CDP通告信息: switch# show cdp interface [type modle/port] switch# show cdp neighbors [type module/port] [detail] 在基于CLI的交换机上启⽤和浏览CDP信息: switch(enable) set cdp {enable disable} module/port 为了查看Cisco邻接设备的CDP通告信息: switch(enable) show cdp neighbors[module/port] [vlan duplex capabilities detail]。
Router和Switch的最基本配置Router基本配置:Router> \\路由器的启动时所进入的用户模式Router>enable \\键入该命令以进入特许模式Router# \\此显示模式表示已经进入了特许模式Router#configure terminal \\键入该命令以进入全局配置模式Router(config)# \\显示模式表示已经进入全局配置模式Router(config)#hostname SNXL01 \\名称改为“SNXL01”配置控制台密码SNXL01(config)#line console 0 file://0.0.0.0/表示第0 con 口SNXL01(config_line)#loginSNXL01(config_line)#password cisco配置控制台其他参数SNXL01(config)#line console 0SNXL01(config_line)#exec-timeout 0 0 \\配置console口超时时间SNXL01(config_line)#logging synchronous \\配置显示同步R1(config)# line vty 0 4 file://0-4/个telnet 用户线程可同时登陆R1(config-line)# exec-timeout 5 2配置欢迎信息SNXL01(config)#banner motd # (回车)输入一段欢迎信息并以“#”结束。
(回车)配置路由器密码SNXL01(config)#enable password cisco \\为路由器设置使能口令为ciscoSNXL01(config)#enable secret ciscolab \\为路由器设置使能密码为ciscolab配置路由器端口IP地址SNXL01(config)#interface fastethernet 0/0SNXL01(config-if)#ip add 192.168.1.1 255.255.255.0 SNXL01(config-if)#no shutdownSNXL01(config-if)#exitSNXL01(config)#exit配置路由器f0/0端口描述信息SNXL01(config)interface fastethernet 0/0SNXL01(config-if)#description “要描述的信息”进入路由器的串口配置模式SNXL01 (config)#interface serial 0/0SNXL01 (config_if)#设置串口的时钟频率SNXL01 (config)#interface serial 0/0SNXL01 (config_if)#clock rate 64000设置串口的带宽SNXL01 (config)#interface serial 0/0SNXL01 (config_if)#bandwidth 64配置静态路由SNXL01(config) #ip route 目标网络目标网络子网掩码下一跳地址配置缺省路由SNXL01(config) #ip route 0.0.0.0 0.0.0.0 下一跳地址SNXL01#copy running-config startup-config \\将配置信息存盘(存入NVRAM)SNXL01#show running-config \\查看当前的配置信息(RAM中的信息)SNXL01#show startup-config \\查看已存盘的信息(NVRAM中的信息)SNXL01#show ip route \\查看路由表信息SNXL01#show cdp neighbors \\查看此路由器还连有哪些cisco的设备SNXL01#erase startup-config \\将路由器恢复到出厂配置SNXL01#reload \\重新启动路由器路由器密码恢复1开机按住Ctrl+Break2执行confreg 0x21423执行reset4执行copy startup-config running-config 将路由器配置拷贝到running-config中5在全局配置模式下修改密码,并执行config-register 0x21026 copy running-config startup-config 保存信息7 reload 重新启动路由器Switch基本配置:Switch> \\交换机的启动时所进入的用户模式Switch>enable \\键入该命令以进入特许模式Switch# \\此显示模式表示已经进入了特许模式Switch#configure terminal \\键入该命令以进入全局配置模式Switch(config)# \\此显示模式表示已经进入了全局配置模式Switch(config)#hostname SNXL01 \\键入该命令把交换机的名称改为“SNXL01”SNXL01(config)#enable password cisco \\为交换机设置使能口令为ciscoSNXL01(config)#enable secret cisco \\为交换机设置使能密码为ciscoSNXL01(config)#interface FastEthernet 0/10 \\进入交换机的快速以太网端口f0/10SNXL01(config-if)#description link to Server A \\配置f0/10的描述信息,描述此端口和服务器Server A相连SNXL01(config-if)#duplex full \\配置f0/10端口为全双工SNXL01(config-if)#speed 10 \\配置f0/10端口速率为10Mb/sSNXL01(config-if)#exit \\退出端口模式到全局配置模式SNXL01(config)#exit \\退出全局模式到特许模式SNXL01#copy running-config startup-config \\将配置信息存盘(存入NVRAM)SNXL01#show version \\查看交换机的版本信息SNXL01#show running-config \\查看当前的配置信息(RAM中的信息)SNXL01#show startup-config \\查看已存盘的信息(NVRAM中的信息)SNXL01#show mac-address-table \\查看交换机的MAC地址表内容SNXL01#show cdp neighbors \\查看此交换机还连有哪些cisco的设备SNXL01#erase startup-config \\将交换机恢复到出厂配置SNXL01#reload \\重新启动交换机Cisco Catalyst2950交换机的密码恢复1.关机2.按住“MODE”键开机3.等到超级终端显示已开机,松开“MODE”键4.执行flash_init命令,可以查看flash的内容,dir flash:5.把flash里的“config.text”文件改名字为“config.old”rename flash:config.text flash:config.old6.执行boot启动交换机7.把flash里的“config.old”文件改名字为“config.text” rename flash:config. old flash:config. text8.把“config.text”考入系统的“running-config”copy flash:config.text running-config9.修改密码并且存盘保存信息。
思科交换机路由基本配置命令常用命令1.配置接口:interface {interface_type} {interface_number}2.配置IP地址:ip address {IP_address} {subnet_mask}3.配置默认网关:ip default-gateway {default_gateway_IP}4.开启接口:no shutdown5.配置路由协议:router {routing_protocol}6.配置路由器ID:router-id {router_ID}7.配置路由信息:network {network_address} {subnet_mask}8.配置静态路由:ip route {destination_network} {subnet_mask}{next-hop_IP}9.配置动态路由:router {routing_protocol} {network_address}10.保存配置:copy running-config startup-config注意:上述命令仅作为参考,具体配置应根据实际环境和设备型号进行调整。
下面是一些基本的 Cisco 交换机路由配置命令:1.配置 hostname: hostname <name>2.配置 IP 地址: interface <interface> 后进入接口模式,再输入 ipaddress <ip address> <subnet mask>3.配置默认路由: ip route 0.0.0.0 0.0.0.0 <next hop IP>4.启用路由协议: router <protocol> (例如: router rip)5.配置路由连接: network <network address> (例如: network192.168.1.0)6.查看路由表: show ip routeCisco 交换机路由配置步骤1.进入配置模式:configure terminal2.配置 IP 地址和子网掩码:interface [interface-name] ; ip address[ip-address] [subnet-mask]3.配置默认路由:ip route 0.0.0.0 0.0.0.0 [next-hop-IP-address]4.启用路由协议:router [protocol-name] (如:router ospf)5.配置路由协议参数: [protocol-name] [process-id] (如:ospf 1)6.配置路由连接:network [network-address] [wildcard-mask] area[area-id] (如:network 192.168.1.0 0.0.0.255 area 0)7.保存配置:copy running-config startup-config8.退出配置模式:exit。
交换机和路由器的配置命令(网络搭建用)交换机的基本配置switch(config)#en 进入特权模式switch(config)#conf t 进入全局配置模式switch(config)#interface f0/1 进入交换机的f0/1端口switch(config)#exit 退回上一级switch(config)#end 直接退回特权模式switch(config)#hostname jiaohuanji 改名字switch(config)#banner motd & 配置每日提示信息&为终止符switch(config)# interface f0/3进入3端口switch(config)#speed 10 配置端口的速率为10mswitch(config)#duplex half《half为半双工full为全双工》这里就是配置端口为半双工switch(config)#no shutdonwn 开启该端口vlan的设置switch(config)#vlan 10 创建vlan 10switch(config)#name test10 给vlan改名字switch(config)#interface f0/3 进入3端口switch(config)#switchport access valn10 将3端口加入vlan10中switch(config)#interface f0/24 进入24端口switch(config)#switchport mode trunk 将24端口设为公共端口聚合端口的设置switch(config)#interface aggregateport 1 创建聚合端口1switch(config)#swithport mode trunk 将聚合端口设置为公共模式switch(config)#interface range fastethernet f0/1-2 进入端口1和2 (rang为可以同时加入多个端口)switch(config)#port-group 1 配置端口1和2属于AG1快速生成树设置switch(config)#interface range f0/2-3 进入2和3的端口switch(config)#switchport mode trunk 把它们设置为公共端口switch(config)#spanning-tree 开启生成树switch(config)#spanning-tree rstp 开启快速生成树路由器的基本配置路由器的基本配置和交换机的差不多router#conf t进入全局模式router(config)#interface f0/1 进入1端口router(config)#hostname *** 为路由器改名字router(config)#interface f0/1 进入1端口router(config)#ip address 192.168.1.2 255.255.255.0 为端口配置ip地址router(config)#no shutdown 开启1端口三层交换机的基本配置switch(config)#ip routing 开启三层交换机的路由功能switch(config)#interface f0/5 进入5端口switch(config)#no switchport 开启端口的三层路由功能switch(config)#ip address 192.168.1.5 255.255.255.0 给端口配置ip地址switch(config)#no shutdown 开启端口switch(config)#vlan 20 创建vlan 20switch(config)#interface f0/5 进入端口5switch(config)#switchport access vlan 20 把端口5加入vlan20 中switch(config)#interface f0/23 进入端口23switch(config)#switchport mode trunk 把端口23设置为公共端口路由协议router(config)#interface f0/1 进入端口1router(config)#ip address 192.168.1.2 255.255.255.0 为端口设置ip地址router(config)#clock rate 6400 为端口设置时钟频率router(config)#no shutdown 开启该端口router(config)#ip route 192.168.1.0 (此ip为要到达的ip地址)255.255.255.0 192.168.2.1(此ip为经过的ip地址)为路由器设置静态路由RIP 路由协议switch配置rip协议switch(config)#router rip 开启rip协议进程switch(config-router)#network 192.168.1.0(此ip为你配置的三层交换机的ip)switch(config-router)#network 192.168.2.0(此ip为你配置的三层交换机的下一跳ip)router1配置rip协议router(config)#router riprouter(config-router)#network 192.168.2.0(此ip为连接三层交换机的端口的ip)router(config-router)#network 192.168.3.0 (此ip为连接三层交换机的端口的ip的下一跳ip)router2的配置和router1的配置一样只是ip改改即可ospf单区域设置switch配置rip协议switch(config)#router ospf开启ospf协议进程switch(config-router)#network 192.168.1.0此ip为你配置的三层交换机的ip)0.0.0.255(这里使用的是反码)area 0switch(config-router)#network 192.168.2.0(此ip为你配置的三层交换机的下一跳ip)0.0.0.255 area 0router1配置ospf协议router(config)#router ospfrouter(config-router)#network 192.168.2.0(此ip为连接三层交换机的端口的ip)0.0.0.255 area 0router(config-router)#network 192.168.3.0 (此ip为连接三层交换机的端口的ip的下一跳ip)0.0.0.255 area 0router2的配置和router1的配置一样只是ip改改即可交换机的端口安全switch(config)#interface range f01/23 进入1到23端口switch(config-if)#switchport port-security 开启交换机的端口安全功能switch(config-if)#switchport port-security maximum 1 配置最大连接数为1(可以不是1)switch(config-if)#switchport port-security vilolation shutdown 安全违例的处理方式是关掉(shutdown是关闭)配置交换机端口的mac和ip的地址绑定switch(config)#interface f0/3进入3端口switch(config-if)#switchport port-security 开启端口安全功能switch(config-if)#switchport port-security mac-address 0006.1bde.13d4(mac地址在电脑中是两个一组。
用户登陆任务管理1.R1# show sessions在R1上查看我本地发起的连接2.R2 # show users在R2上查看连接的情况:3.R1#同时接下<Ctrl+Shift+6>,然后全部放开,再按下x//以上是挂起R1上对R2的连接。
这时能回到R1上来,如果再接二次回车就能再回到R2上4.要断开这个连接一种是在发起连接的一方,也就是R1打下面命令:R1# disconnect 还可以在被连接的一方,也就是R2上打下面的命令:R2# clear line vty 05.show mac-addess-table 例:show int f0/1 清除:clear int 查看MAC地址列表(MAC地址列表的老化时间为120m)Mac address:交换机获取的MAC地址Type:获取MAC地址的类型Ports:MAC地址对应的交换机的接口编号6.配置接口的双工模式及速率Switch(config-if)# duplex (full half auto)≯duplex:配置双工模式的关键字≯full:全双工≯half:半双工≯auto:自动协商7.指定接口的通讯速率Switch(config-if)#speed (10 100 100 auto)Show int f0/24 查看交换机接口的默认双工模式及速率8.windows 操作主机ARP命令的使用Arp -a 查看ARP缓存表 Arp -d 清除ARP缓存Arp –d (加IP)删除特定的条目ARP对MAC地址和IP地址进行绑定 arp -s ip-address mac-ipress (例:arp –s 10.0.0.200 00-1a-64-a1-52-f0)9.cisco 设备ARP命令Show arp 显示ARP缓存表 clear arp-cache 清除缓存表Arp ip-address mac-address arpa〔interface-typeinterface-number〕绑定ARP条目例:arp 1.1.1.1 0011.1111.1111 arpa fastEthernet 0/2210.配置静态路由和浮动静态路由Router(config)# ip route network mask {address |interface} [distance]例:Router(config)# ip route 192.168.1.0 255.255.255.0 192.168.10.2≯network:目地的网络地址≯mask:子网掩码≯address:到达目的网络经过的下一跳路由器的接口地址≯interface:到达目地网络的本地接口≯distance:管理距离,取值范围1~255.11.Show ip int bri 查看路由器,交换机上的所有接口信息12.Router(config)#Default int f0/0 使用default命令恢复接口默认配置13. Router#traceroute 3.3.3.3 source 192.168.20.1路由中的traceroute命令与window系统中的tracert命令用法相似14.配置console口密码Router(config)# line console 0Router(config-line)#password ciscoRourer(config-line)#login配置特权模式密码Rourer(config)#enable password cisco或者 #enable secret cisco(当两个密码都配置后,将只有secret的密码生效)15.加密明文密码Router(config)#service password-encryption16.查看VLAN信息Switch#show vlan brief查看某个VLAN的信息Switch#show vlan id vlan-id。
Router and switch 配置命令精华压缩版112010-03-22 21:5370. 在路由器接口上用命令ip multicast ttl-threshold ttl-value设定TTL 阀值:dallasr1>(config-if)# ip multicast ttl-threshold ttl-value71. 用show ip pim neighbor显示PIM邻居表。
72. 显示组播通信路由表中的各条记录:dallasr1>show ip mroute[group-name|group-address][scoure][summary][count][active kbps]73. 要记录一个路由器接受和发送的全部IP组播包:dallasr1> #debug ip mpacket [detail] [access-list][group]74. 要在CISCO路由器上配置CGMP:dallasr1>(config-if)# ip cgmp75.配置一个组播路由器,使之加入某一个特定的组播组:dallasr1>(config-if)# ip igmp join-group group-address76. 关闭 CGMP:dallasr1>(config-if)# no ip cgmp77. 启动交换机上的CGMP:dallasr1>(enable) set cgmp enable78. 核实Catalyst交换机上CGMP的配置情况:catalystla1>(enable) show configset prompt catalystla1>set interface sc0 192.168.1.1 255.255.255.0set cgmp enable79. CGMP离开的设置:Dallas_SW(enable) set cgmp leave--------------------------------------------------------------------------------80. 在Cisco设备上修改控制端口密码:R1(config)# line console 0R1(config-line)# loginR1(config-line)# password LisbonR1(config)# enable password LilbaoR1(config)# login localR1(config)# username student password cisco81. 在Cisco设备上设置控制台及vty端口的会话超时:R1(config)# line console 0R1(config-line)# exec-timeout 5 10R1(config)# line vty 0 4R1(config-line)# exec-timeout 5 282. 在Cisco设备上设定特权级:R1(config)# privilege configure level 3 usernameR1(config)# privilege configure level 3 copy run startR1(config)# privilege configure level 3 pingR1(config)# privilege configure level 3 show runR1(config)# enable secret level 3 cisco83. 使用命令privilege 可定义在该特权级下使用的命令:router(config)# privilege mode level level command84. 设定用户特权级:router(config)# enable secret level 3 dallasrouter(config)# enable secret san-franrouter(config)# username student password cisco--------------------------------------------------------------------------------85. 标志设置与显示:R1(config)# banner motd ‘unauthorized access will be prosecuted!’86. 设置vty访问:R1(config)# access-list 1 permit 192.168.2.5R1(config)# line vty 0 4R1(config)# access-class 1 in87. 配置HTTP访问:Router3(config)# access-list 1 permit 192.168.10.7Router3(config)# ip http severRouter3(config)# ip http access-class 1Router3(config)# ip http authentication localRouter3(config)# username student password cisco88. 要启用HTTP访问,请键入以下命令:switch(config)# ip http sever89. 在基于set命令的交换机上用setCL1启动和核实端口安全:switch(enable) set port security mod_num/port_num…enable ma c addressswitch(enable) show port mod_num/port_num在基于CiscoIOS命令的交换机上启动和核实端口安全:switch(config-if)# port secure [mac-mac-count maximum-MAC-count]switch# show mac-address-table security [type module/port]--------------------------------------------------------------------------------90. 用命令access-list在标准通信量过滤表中创建一条记录:Router(config)# access-list access-list-number {permit|deny} source-address [source-address]91. 用命令access-list在扩展通信量过滤表中创建一条记录:Router(config)# access-list access-list-number{permit|deny{protocol|protocol-keyword}}{sourcesource-wildcard|any}{destinationdestination-wildcard|any}[protocol-specific options][log]92. 对于带内路由更新,配置路由更新的最基本的命令格式是:R1(config-router)#distribute-list access-list-number|name in [type number]93. 对于带外路由更新,配置路由更新的最基本的命令格式是:R1(config-router)#distribute-list access-list-number|name out [interface-name] routing-process| autonomous-system-number94. set snmp命令选项:set snmp community{read-only|ready-write|read-write-all}[community_string]95. set snmp trap 命令格式如下:set snmp trap {enable|disable}[all|moudle|classis|bridge|repeater|auth|vtp|ippermit|vmps|config|entity|stpx]set snmp trap rvcr_addr rcvr_community96. 启用SNMP chassis 陷阱:Console>(enable) set snmp trap enable chassis97. 启用所有SNMP chassis 陷阱:Console>(enable) set snmp trap enable98. 禁用SNMP chassis 陷阱:Console>(enable) set snmp trap disable chassis99. 给SNMP陷阱接收表加一条记录:Console>(enable) set snmp trap 192.122.173.42 public 100. show snmp 输出结果。
VLAN划分Switch>enableSwitch#conf tSwitch(config)#vlan 10Switch(config-vlan)#exitSwitch(config)#vlan 20Switch(config-vlan)#exitSwitch(config)#interface range fastEthernet 0/1-10 Switch(config-if-range)#switchport access vlan 10 Switch(config-if-range)#exitSwitch(config)#interface range fastEthernet 0/11-20 Switch(config-if-range)#switchport access vlan 20 Switch(config-if-range)#exitSwitch(config)#interface fastEthernet 0/24Switch(config-if)#switchport mode trunkSwitch(config-if)#exit三层交换机配置Switch>enableSwitch#conf tSwitch(config)#vlan 10Switch(config-vlan)#exitSwitch(config)#vlan 20Switch(config-vlan)#exitSwitch(config)#vlan 30Switch(config-vlan)#exitSwitch(config)#vlan 40Switch(config-vlan)#exitSwitch(config)#interface fastEthernet 0/2Switch(config-if)#switchport mode trunkSwitch(config-if)#exitSwitch(config)#interface fastEthernet 0/3Switch(config-if)#switchport mode trunkSwitch(config-if)#exitSwitch(config)#ip routingSwitch(config)#interface vlan 10Switch(config-if)#ip address 192.168.1.1 255.255.255.0Switch(config-if)#no shutdownSwitch(config-if)#exitSwitch(config)#interface vlan 20Switch(config-if)#ip address 192.168.2.1 255.255.255.0 Switch(config-if)#no shutdownSwitch(config-if)#exitSwitch(config)#interface vlan 30Switch(config-if)#ip address 192.168.3.1 255.255.255.0 Switch(config-if)#no shutdownSwitch(config-if)#exitSwitch(config)#interface vlan 40Switch(config-if)#ip address 192.168.4.1 255.255.255.0 Switch(config-if)#no shutdownSwitch(config-if)#exitSwitch(config)#interface fastEthernet 0/1Switch(config-if)#no switchportSwitch(config-if)#ip address 192.168.0.2255.255.255.0 Switch(config-if)#no shutdownSwitch(config-if)#exitSwitch(config)#ip route 200.1.1.0 255.255.255.0 192.168.0.1 Switch(config)#ip route 222.1.1.0 255.255.255.0 192.168.0.1route1Router>enableRouter#conf tRouter(config)#hostname R1R1(config)#enable password 1234R1(config)#interface fastEthernet 0/0R1(config-if)#ip address 192.168.0.1 255.255.255.0R1(config-if)#no shutdownR1(config-if)#exitR1(config)#interface serial 1/0R1(config-if)#ip address 222.1.1.1 255.255.255.0R1(config-if)#no shutdownR1(config-if)#exitR1(config)#ip route 192.168.1.0 255.255.255.0 192.168.0.2 R1(config)#ip route 192.168.2.0 255.255.255.0 192.168.0.2 R1(config)#ip route 192.168.3.0 255.255.255.0 192.168.0.2 R1(config)#ip route 192.168.4.0 255.255.255.0 192.168.0.2 R1(config)#ip route 200.1.1.0 255.255.255.0 222.1.1.2route2Router>enableRouter#conf tRouter(config)#interface serial 1/0Router(config-if)#ip address 222.1.1.2 255.255.255.0 Router(config-if)#clock rate 64000Router(config-if)#no shutdownRouter(config-if)#exitRouter(config)#interface fastEthernet 0/0Router(config-if)#ip address 200.1.1.1 255.255.255.0 Router(config-if)#no shutdownRouter(config-if)#exitRouter(config)#ip route 0.0.0.0 0.0.0.0 222.1.1.1 HTTP服务器访问<br>201510513103<br>CaoJieACL访问控制列表Router>enableRouter#conf tRouter(config)#access-list 1 deny 192.168.4.0 0.0.0.255 Router(config)#accRouter(config)#access-list 1 perRouter(config)#access-list 1 permit anyRouter(config)#interRouter(config)#interface faRouter(config)#interface fastEthernet 0/0Router(config-if)#ip accRouter(config-if)#ip access-group 1 outRouter(config-if)#exitNAT网络地址动态转换Router>enableRouter#conf tRouter(config)#access-list 1 permit 192.168.0.0 0.0.255.255Router(config)#ip nat pool caojie 222.1.1.3 222.1.1.16 netmask 255.255.255.0 Router(config)#ip nat inside source list 1 pool caojieRouter(config)#interface serial 1/0Router(config-if)#ip nat outsidesRouter(config-if)#ip nat outsideRouter(config-if)#exitRouter(config)#interface f0/0Router(config-if)#ip nat insideRouter(config-if)#exitS1的Telnet远程登录(参考)Switch(config)#interface vlan 10Switch(config-if)#ip address 192.168.1.234 255.255.255.0Switch(config-if)#no shutdownSwitch(config-if)#exitSwitch(config)#enable password 1234Switch(config)#line vty 0 4Switch(config-line)#password ****Switch(config-line)#loginSwitch(config-line)#exitCommandPrompt(命令行)PC>ping 192.168.1.234PC>telnet 192.168.1.234。
一、交换机的基本配置1. 配置enable口令、密码和主机名Switch> (用户执行模式提示符)Switch>enable (进入特权模式)Switch# (特权模式提示符)Switch#config terminal (进入配置模式)Switch(config)#enable password cisco (设置enable password为cisco) Switch(config)#enable secret cisco1 (设置enable secret为sisco1) Switch(config)#hostname C2950 (设置主机名为C2950)C2950(config)#end (退回到特权模式)C2950#2. 配置交换机IP地址、默认网关、域名和域名服务器C2950(config)#ip address 192.168.1.1 255.255.255.0 (设置交换机IP)C2950(config)#ip default-gateway 192.168.1.254 (设置默认网关)C2950(config)#ip domain-name (设置域名)C2950(config)#ip name-server 200.0.0.1 (设置域名服务器)C2950(config)#end3. 配置交换机的端口属性C2950(config )#interface fastethernet0/1 (进入接口0/1的配置模式)C2950(config-if)#speed ? (查看speed命令的子命令)C2950(config-if)#speed 100 (设置该端口速率为100Mbps)C2950(config-if)#duplex ? (查看duplex命令的子命令)C2950(config-if)#duplex full (设置该端口为全双工)C2950(config-if)#description TO_PC1 (设置该端口描述为TO_PC1)C2950(config-if)#^Z (返回到特权模式,同end)C2950#show interface fastethernet0/1 (查看端口0/1的配置结果)C2950#show interface fastethernet0/1 status (查看端口0/1的状态) 4. 配置和查看MAC地址表C2950(config)#mac-address-table ? (查看mac-address-table的子命令)C2950(config)#mac-address-table aging-time 100 (设置超时时间为100s)C2950(config)#mac-address-table permanent 0000.0c01.bbcc f0/3 (加入永久地址) C2950(config)#mac-address-table restricted static 0000.0c02.bbcc f0/3 f0/7(加入静态地址)C2950(config)#endC2950#show mac-address-table (查看整个MAC地址表)C2950#clear mac-address-table restricted static (清除限制性地址)二、配置和管理VLAN1. VLAN基础知识VLAN技术:把物理上直接相连的网络从逻辑上划分为多个子网。
router> 用户模式1:进入特权模式enablerouter > enablerouter #2:进入全局配置模式configure terminalrouter > enablerouter # configure terminalrouter (conf)#3:交换机命名hostname routera 以routerA为例router > enablerouter # configure terminalrouter(conf)# hostname routerAroutera (conf)#4:配置使能口令enable password cisco 以cisco为例router > enablerouter # configure terminalrouter(conf)# hostname routerArouterA (conf)# enable password cisco5:配置使能密码enable secret ciscolab 以cicsolab为例router > enablerouter # configure terminalrouter(conf)# hostname routerArouterA (conf)# enable secret ciscolab6:进入路由器某一端口interface fastehernet 0/17 以17端口为例router > enablerouter # configure terminalrouter(conf)# hostname routerArouterA (conf)# interface fastehernet 0/17routerA (conf-if)#进入路由器的某一子端口interface fastethernet 0/17.1 以17端口的1子端口为例router > enablerouter # configure terminalrouter(conf)# hostname routerArouterA (conf)# interface fastehernet 0/17.17:设置端口ip地址信息router > enablerouter # configure terminalrouter(conf)# hostname routerArouterA(conf)# interface fastehernet 0/17 以17端口为例routerA (conf-if)# ip address 192.168.1.1 255.255.255.0 配置交换机端口ip和子网掩码routerA (conf-if)# no shut 是配置处于运行中routerA (conf-if)# exit8:查看命令showrouter > enablerouter # show version 察看系统中的所有版本信息show interface vlan 1 查看交换机有关ip 协议的配置信息show running-configure 查看交换机当前起作用的配置信息show interface fastethernet 0/1 察看交换机1接口具体配置和统计信息show mac-address-table 查看mac地址表show mac-address-table aging-time 查看mac地址表自动老化时间show controllers serial + 编号查看串口类型show ip router 查看路由器的路由表9:cdp相关命令router > enablerouter # show cdp 查看设备的cdp全局配置信息show cdp interface fastethernet 0/17 查看17端口的cdp配置信息show cdp traffic 查看有关cdp包的统计信息show cdp nerghbors 列出与设备相连的cisco设备10:csico2600的密码恢复重新启动路由器,在启动过程中按下win+break键,使路由器进入rom monitor在提示符下输入命令修改配置寄存器的值,然后重新启动路由器remmon1> confreg 0x2142remmon2> reset重新启动路由器后进入setup模式,选择“no”,退回到exec模式,此时路由器原有的配置仍然保存在startup-config中,为使路由器恢复密码后配置不变把startup-config 中配置保存到running-config中,然后重新设置enable密码,并把配置寄存器改回0x2102:router> enablerouter# copy startup-config running-configrouter# configure terminalrouter(conf)# enable password ciscorouter(conf)# onfig-register 0x2102保存当前配置到startup-config , 重新启动路由器。
Router and switch 配置命令精华压缩版1、进入SETUP模式Router#setup2、时间设置router#clock set hh:mm:ss date moth year3、 router>show historyRouter>terminal history size lines4、 router#show version5、 router#show running-config6、 router#show starup-config7、 router(config)#hostname name 主机命名8、 router(config)#banner motd # message # 开机时的固定显示信息9、 router(config)#enable password password 特权模式明文密码10、 router(config)#no enable password11、 router(config)#enable secret password 特权模式加密密码12、 router(config)#no enable secret13、 router(config)#service password-encryption特权模式把明文密码加密密码,但没enable secret安全可以反解14、 router(config)#line console控制台密码15、 router(config-line)#login16、 router(config-line)#password password17、 router(config-line)#exec-timeout mm ss 禁止控制台会话自动退出18、 router(config-line)#logging synchronous重显被打乱的控制台输入router(config)#no ip domain-lookup 禁止域名解析19、 router(config)#line vty 0 4虚拟终端密码20、 router(config-line)#login21、 router(config-line)#password password22、 router(config)#interface type number(slot/port)端口设置23、 router(config-if)#ip address ip summast24、 router(config-if)#clock rate 64000(时钟频率单位为bps,只在DCE端设置)25、 router(config-if)#bandwith 64(带宽设置,单位为KB)26、 router(config-if)#no shutdown(shutdown)27、 router(config-if )#media-type type(10base) 为以太网端口选择适当的介质类型28、 router(config-if )#ctrl+z保存退出到特权模式29、 router#30、 router>用户模式enable进入router#特权模式config terminal进入router(config)#全局配置模式31、Interface Router(config-if)#端口设置Subinterface Router(config-subif)# 子端口设置Controller Router(config-controller)# 控制口设置Line Router(config-line)# 虚拟口设置Router Router(config-router)# 路由设置IPX router Router(config-ipx-router)#IPX路由设置32、 router#show interface33、 router#show interface Ethernet 034、 router#show interface serial 035、 router#show running-config36、 router#show starup-config37、 router#show flash38、 router#show controller39、 router#show controller interface type40、 router#show running-configrouter#copy running-config starup-config router#copy running-config tftprouter#copy starup-config tftprouter#copy flash tftprouter#copy tftp star-configrouter#copy tftp flash端口状态Serial1 is up, line protocol is up正常工作Serial1 is up, line protocol is down连接问题Serial1 is down, line protocol is down端口问题Serial1 is administratively down, line protocol is down人为关闭配置寄存器的值1、关闭路由器的电源重新启动按住ctrl+break键入进2、>3、>o/r 0×2142(跳过nvarm启动恢复密码)4、>I5、当系统提示是否进入setup模式时,按N6、 router>7、 router>enable8、 router#9、进入修改后(包括密码、寄存器的值:0×2100为rom monitor 启动、0×2101为setup模式启动、0×2102为10、 router#copy running-config starup-config11、 router#reload12、也可以在router#setup进入setup模式静态路由协议设置router(config)#ip route network submask(要到达的网络号掩码)ip address(下一跳或出口ip地址)router(config)#ip route 0.0.0.0 s0(出口端口或下一跳IP地址)rip设置router(config)#router riprouter(config-router)#network network-numberrouter#show ip protocol查看RIP信息router#show ip route 查看路由表router#debug ip rip查看RIP更新信息router(config-router)#passive-interface e0(阻止发出作息) router(config-router)#ip rip receive version 1 2接收1、2RIP 版本信息igrp设置router(config)#router igrp as numberrouter(config-router)#network network numberrouter#show ip route 查看路由表router#debug ip igrp events 查看IGRP路由更新大概信息router#debug ip igrp transaction 查看IGRP路由更新详细信息Router(config-router)#variance multiplier 控制 IGRP load balancingRouter(config-router)#traffic-share {balanced | min}控制load-balanced traffic 的分布eigrp设置router(config)#router eigrp as numberrouter(config-router)#network network numberrouter(config)#no auto-summry 关闭自动汇总router(config)# auto-summry 打开自动汇总(默认是打开的)router#show ip route eigrp 显示当前的路由表里的EIGRP条目router#show ip protocol 显示活动的路由协议进程的参数和当前的状态router#show ip eigrp neighbors 显示被EIGRP发现的邻居router#show ip eigrp traffic 显示发出和收到的IP EIGRP 包的数量router#show ip eigrp topology 显示IP EIGRP的拓扑表Router#debug ip eigrpospf设置1. Router(config)#router ospf process-idRouter(config-router)#network address(可以是网络号也可以是Ip地址 mask(通配掩码)area area-idRouter(config-if)# ip ospf priority numbe 配置OSPF的优先级Router#show ip protocols 验证OSPF的配置Router#show ip route 显示路由器学到的所有路由Router#show ip ospf interface type number 显示 area-ID 和邻接信息Router#show ip ospf neighbor 基于每接口显示OSPF邻居信息Router#debug ip ospf eventsRouter#debug ip ospf packet2. Router(config)# interface loopback number(lookback回路配置)Router(config-if)# ip address ip-address subnet-mask Router(config-if)# ip ospf cost cost-numbe 修改OSPF 的Cost 数值Router(config-if)# ip ospf authentication-key key 配置明文口令Router(config-if)# ip ospf messge-digest-key keyid md5 key 配置MD5口令(keyid和key必须配对一致,两邻居才可以通信)Router(config-route)# area area-id authentication [message-digest]message-digest为可选项,使用后路由器只传送口令消息的摘要(或散列)配置OSPF区域的验证:3. Router(config-if)# ip ospf hello-interval seconds 配置hello间隔:Router(config-if)# ip ospf dead-interval seconds配置down机判断间隔访问列表1.标准访问列表(standard access lists):只使用源IP地址来做过滤决定Router(config)#access-list 10 deny 172.16.40.0 0.0.0.255 Router(config)#access-list 10 permit anyRouter(config)#int e1Router(config-if)#ip access-group 10 out使用IP标准ACL来控制VTY线路的访问.Router(config)#access-list 50 permit 172.16.10.3Router(config)#line vty 0 4Router(config-line)#access-class 50 in删除IP标准ACLRouter(config-line)#no ip access-class 50 inRouter(config)#no access-list 502.扩展访问列表(extended access lists):它比较源IP地址和目标IP地址,层3的协议字段,层4端口号来做过滤决定Router(config)#access-list 110 deny tcp any host 172.16.30.5 eq 21Router(config)#access-list 110 deny tcp any host 172.16.30.5 eq 23Router(config)#access-list 110 permit ip any anyRouter(config)#int e1Router(config-if)#ip access-group 110 out3.虚拟通道访问router(config)#access-list 12 permit 192.89.55.0 0.0.0.255 router(config)#line vty 0 4outer(config-line)#access-class 12 in3.show ip interface:只显示IP访问列表信息4.show ip interface:显示所有接口的信息和配置的ACL信息5.show ip interface [接口号]:显示具体某个接口的信息和配置的ACL信息6.show running-config:显示DRAM信息和ACL信息,以及接口对ACL 的应用信息.交换机配置交换机上设置登陆口令Switch(config)# enable password level level password Switch(config)# no enable password level level password 设置hostname1900/2900(config)#hostname hostname设置IP Address1900(config)#ip address {ip address} {mask}1900(config)#ip address 10.5.5.11 255.255.255.02950(config#interface vlan 12950(config-if)#ip address {ip_address} {mask}2950(config)#interface vlan 12950(config-if)#ip address 10.5.5.11 255.255.255.0设置默认网关default gateway1900/2950(config)#ip default-gateway {ip address}1900/2950(config)#ip default-gateway 172.20.137.1查看交换机的IP地址1900#show ipIP address: 10.5.5.11Subnet mask: 255.255.255.0Default gateway: 10.5.5.3Management VLAN: 12950#show interface vlan 1Vlan1 is up, line protocol is upHardware is Cat5k Virtual Ethernet, address is 0010.f6a9.98 00 (bia 0010.f6a9.9800)Internet address is 172.16.80.79/24Broadcast address is 255.255.255.255设置双工选项1900(config)#interface e0/11900(config-if)#duplex {auto | full |full-flow-control | ha lf}2950(config)#interface fe0/12950(config-if)#duplex {auto | full | half}设置端口速度:switch(config-if)# speed {10|100|auto}查勘双工选项Switch#show interfaces fastethernet0/3查看MAC地址表1900/2950#show mac-address-table配置永久MAC地址1900(config)#mac-address-table permanent {mac-address type module/port}1900(config)#mac-address-table permanent 2222.2222.2222 eth ernet 0/31900#show mac-address-table2950(config)#mac-address-table static mac_addr {vlan vlan_i d} [interface int1 [int2 ... int15]]配置受限静态MAC地址1900(config)#mac-address-table restricted static {mac-addre ss type module/port src-if-list}1900(config)#mac-address-table restricted static 1111.1111. 1111 e0/4 e0/11900#show mac-address-table2950(config)#mac-address-table secure mac-addr interface [v lan vlan-id]2950(config)#mac-address-table secure 0003.3333.3333 fa 0/1 vlan 12950#show mac-address-table配置端口安全性1900(config-if)#port secure max-mac-count count1900(config)#interface e0/41900(config-if)#port secure1900(config-if)#port secure max-mac-count 11900(config)#address-violation {suspend | disable | ignore 1900# show mac-address-table security2950(config-if)#port security max-mac-count count2950(config)#interface fa0/12950(config-if)#port security2950(config-if)#port security max-mac-count 102950(config-if)#port security action {shutdown | trap} 2950#show mac-address-table secure2950#show port-security管理配置文件1900#copy nvram tftp://host/dst_file1900#copy tftp://host/src_file nvram1950#copy nvram tftp://10.1.1.1/wgswd.cfg2950#copy startup-config tftp://host/dst_file清除 NVRAM1900#delete nvram2950#erase startup-configvlan配置1900 VLAN建立1900下,使用vlan [vlan#] name [name] [vlan#]命令, 如下:>en#config t(config)#hostname 19001900(config)#vlan 2 name sales1900(config)#vlan 3 name marketing1900(config)#vlan 4 name mis1900(config)#exit端口分配1900(config)#int e0/21900(config-if)#vlan-membership static 2 1900(config)#int e0/41900(config-if)#vlan-membership static 3 1900(config)#int e0/51900(config-if)#vlan-membership static 4 1900(config-if)#exit1900(config)#exitVLAN验证1900#sh vlan2900 VLAN建立在2950下创建VLAN,在特权模式下使用vlan database命令2950#vlan database2950(vlan)#vlan 2 name MarketingVLAN 2 modified:Name: Marketing2950(vlan)#vlan 3 name AccountingVLAN 3 added:Name: Accounting2950(vlan)#applyAPPLY complete2950(vlan)#Ctrl+C2950#端口分配2950下的端口配置,使用switchport access vlan [vlan#]命令, 2950(config-if)#int f0/22950(config-if)#switchport access vlan 22950(config-if)#int f0/32950(config-if)#switchport access vlan 32950(config-if)#int f0/42950(config-if)#switchport access vlan 42950(config-if)#exit2950(config)#exit验证配置信息,如下:2950#sh vlan或2950#sh vlan brieftrunk配置1900 trunk配置1900(config)#int f0/261900(config-if)#trunk on2950下在接口配置模式,使用switchport命令,如下:2950(config)#int f0/122950(config-if)#switchport mode trunk2950(config-if)# switchport trunk encapsulation {isl|dot1q} 2950(config-if)#^Z将某VLAN从中继中删除2950(config-if)# switchport trunk allowed vlan remove vlan-list添加某个VLAN到中继线路2950(config-if)# switchport trunk allowed vlan add vlan-lis tConfiguring Inter-VLAN Routing给连接1900的trunk端口配置,使用encapsulation isl [vlan#]命令,如下:2600Router(config)#int f0/0.12600Router(config-subif)#encapsulation isl [vlan#] 2600Router(config-subif)#ip add ip add submask给连接2950的这样配置,如下:2600Router(config)#int f0/0.12600Router(config-subif)#encapsulation dot1q [vlan#] 2600Router(config-subif)#ip add ip add submaskVTP配置1900(config)#vtp server1900(config)#vtp domain noco1900(config)#vtp password noko在特权模式下使用show vtp命令验证,如下:1900#sh vtpVTP version: 1Configuration revision: 0Maximum VLANs supported locally: 1005Number of existing VLANs: 5VTP domain name: nocoVTP password: nokoVTP operating mode: Server2950如下:2950(config)#vtp mode server2950(config)#vtp domain noco验证信息,如下:2950#sh vtp ?counters VTP statisticsstatus VTP domain status2950#sh vtp statusNAT配置配置静态转换Router(config)#ip nat inside source static local-ip global-ipRouter(config-if)#ip nat insideRouter(config-if)#ip nat outside配置动态地址转换Router(config)#ip nat pool name start-ip end-ip {netmask ne tmask | prefix-length prefix-length}Router(config)#access-list access-list-number permit source [source-wildcard]Router(config)#ip nat inside source listaccess-list-number pool name配置OverloadingRouter(config)#access-list access-list-number permit source source-wildcardRouter(config)#ip nat inside source listaccess-list-number interface interface overload清除NAT Translation TableRouter#clear ip nat translation * 清除所有的动态地址转换条目Router#clear ip nat translation inside global-iplocal-ip [outside local-ip global-ip] 清除一个简单的动态地址转换条目(内、外)Router#clear ip nat translation outsidelocal-ip global-ip清除一个简单的动态地址转换(外)Router#clear ip nat translation protocol inside global-ip global-port local-ip local-port [outside local-iplocal-port global-ip global-port] 清除一个扩展动态地址转换条目Show命令输出信息Router#show ip nat translations1.在基于IOS的交换机上设置主机名/系统名:switch(config)# hostname hostname在基于CLI的交换机上设置主机名/系统名:switch(enable) set system name name-string2.在基于IOS的交换机上设置登录口令:switch(config)# enable password level 1 password在基于CLI的交换机上设置登录口令:switch(enable) set passwordswitch(enable) set enalbepass3.在基于IOS的交换机上设置远程访问:switch(config)# interface vlan 1switch(config-if)# ip address ip-address netmaskswitch(config-if)# ip default-gateway ip-address在基于CLI的交换机上设置远程访问:switch(enable) set interface sc0 ip-address netmask broadca st-addressswitch(enable) set interface sc0 vlanswitch(enable) set ip route default gateway4.在基于IOS的交换机上启用和浏览CDP信息:switch(config-if)# cdp enableswitch(config-if)# no cdp enable为了查看Cisco邻接设备的CDP通告信息:switch# show cdp interface [type modle/port]switch# show cdp neighbors [type module/port] [detail]在基于CLI的交换机上启用和浏览CDP信息:switch(enable) set cdp {enable|disable} module/port为了查看Cisco邻接设备的CDP通告信息:switch(enable) show cdp neighbors[module/port] [vlan|duplex |capabilities|detail]5.基于IOS的交换机的端口描述:switch(config-if)# de脚本ion de脚本ion-string基于CLI的交换机的端口描述:switch(enable)set port name module/number de脚本ion-string 6.在基于IOS的交换机上设置端口速度:switch(config-if)# speed{10|100|auto}在基于CLI的交换机上设置端口速度:switch(enable) set port speed moudle/number {10|100|auto} switch(enable) set port speed moudle/number {4|16|auto} 7.在基于IOS的交换机上设置以太网的链路模式:switch(config-if)# duplex {auto|full|half}在基于CLI的交换机上设置以太网的链路模式:switch(enable) set port duplex module/number {full|half} 8.在基于IOS的交换机上配置静态VLAN:switch# vlan databaseswitch(vlan)# vlan vlan-num name vlaswitch(vlan)# exitswitch# configure teriminalswitch(config)# interface interface module/numberswitch(config-if)# switchport mode accessswitch(config-if)# switchport access vlan vlan-numswitch(config-if)# end在基于CLI的交换机上配置静态VLAN:switch(enable) set vlan vlan-num [name name]switch(enable) set vlan vlan-num mod-num/port-list9. 在基于IOS的交换机上配置VLAN中继线:switch(config)# interface interface mod/portswitch(config-if)# switchport mode trunkswitch(config-if)# switchport trunk encapsulation {isl|dotl q}switch(config-if)# switchport trunk allowed vlan remove vla n-listswitch(config-if)# switchport trunk allowed vlan add vlan-l ist在基于CLI的交换机上配置VLAN中继线:switch(enable) set trunk module/port [on|off|desirable|auto |nonegotiate]Vlan-range [isl|dotlq|dotl0|lane|negotiate]10.在基于IOS的交换机上配置VTP管理域:switch# vlan databaseswitch(vlan)# vtp domain domain-name在基于CLI的交换机上配置VTP管理域:switch(enable) set vtp [domain domain-name]11.在基于IOS的交换机上配置VTP 模式:switch# vlan databaseswitch(vlan)# vtp domain domain-nameswitch(vlan)# vtp {sever|cilent|transparent}switch(vlan)# vtp password password在基于CLI的交换机上配置VTP 模式:switch(enable) set vtp [domain domain-name] [mode{ sever|ci lent|transparent }][password password]12. 在基于IOS的交换机上配置VTP版本:switch# vlan databaseswitch(vlan)# vtp v2-mode在基于CLI的交换机上配置VTP版本:switch(enable) set vtp v2 enable13. 在基于IOS的交换机上启动VTP剪裁:switch# vlan databaseswitch(vlan)# vtp pruning在基于CL I 的交换机上启动VTP剪裁:switch(enable) set vtp pruning enable14.在基于IOS的交换机上配置以太信道:switch(config-if)# port group group-number [distribution {s ource|destination}]在基于CLI的交换机上配置以太信道:switch(enable) set port channel moudle/port-range mode{on|o ff|desirable|auto}15.在基于IOS的交换机上调整根路径成本:switch(config-if)# spanning-tree [vlan vlan-list] cost cost 在基于CLI的交换机上调整根路径成本:switch(enable) set spantree portcost moudle/port cost switch(enable) set spantree portvlancost moudle/port [cost cost][vlan-list]16.在基于IOS的交换机上调整端口ID:switch(config-if)# spanning-tree[vlan vlan-list]port-priori ty port-priority在基于CLI的交换机上调整端口ID:switch(enable) set spantree portpri {mldule/port}priority switch(enable) set spantree portvlanpri {module/port}priori ty [vlans]17. 在基于IOS的交换机上修改STP时钟:switch(config)# spanning-tree [vlan vlan-list] hello-time s econdsswitch(config)# spanning-tree [vlan vlan-list] forward-time secondsswitch(config)# spanning-tree [vlan vlan-list] max-age seco nds在基于CLI的交换机上修改STP时钟:switch(enable) set spantree hello interval[vlan]switch(enable) set spantree fwddelay delay [vlan]switch(enable) set spantree maxage agingtiame[vlan]18. 在基于IOS的交换机端口上启用或禁用Port Fast 特征: switch(config-if)#spanning-tree portfast在基于CLI的交换机端口上启用或禁用Port Fast 特征:switch(enable) set spantree portfast {module/port}{enable|d isable}19. 在基于IOS的交换机端口上启用或禁用UplinkFast 特征: switch(config)# spanning-tree uplinkfast [max-update-rate p kts-per-second]在基于CLI的交换机端口上启用或禁用UplinkFast 特征:switch(enable) set spantree uplinkfast {enable|disable}[rat e update-rate] [all-protocols off|on]20. 为了将交换机配置成一个集群的命令交换机,首先要给管理接口分配一个IP地址,然后使用下列命令: switch(config)# cluster enable cluster-name cv21. 为了从一条中继链路上删除VLAN,可使用下列命令:switch(enable) clear trunk module/port vlan-range22. 用show vtp domain 显示管理域的VTP参数.23. 用show vtp statistics显示管理域的VTP参数.24. 在Catalyst交换机上定义TrBRF的命令如下:switch(enable) set vlan vlan-name [name name] type trbrf br idge bridge-num[stp {ieee|ibm}]25. 在Catalyst交换机上定义TrCRF的命令如下:switch (enable) set vlan vlan-num [name name] type trcrf {ring hex-ring-num|decring decimal-ring-num} parent vlan-nu m26. 在创建好TrBRF VLAN之后,就可以给它分配交换机端口.对于以太网交换,可以采用如下命令给VLAN分配端口:switch(enable) set vlan vlan-num mod-num/port-num27. 命令show spantree显示一个交换机端口的STP状态.28. 配置一个ELAN的LES和BUS,可以使用下列命令:ATM (config)# interface atm number.subint multiointATM(config-subif)# lane serber-bus ethernet elan-name29. 配置LECS:ATM(config)# lane database database-nameATM(lane-config-databade)# name elan1-name server-atm-addre ss les1-nsap-addressATM(lane-config-databade)# name elan2-name server-atm-addre ss les2-nsap-addressATM(lane-config-databade)# name …30. 创建完数据库后,必须在主接口上启动LECS.命令如下:ATM(config)# interface atm numberATM(config-if)# lane config database database-name ATM(config-if)# lane config auto-config-atm-address 31. 将每个LEC配置到一个不同的ATM子接口上.命令如下: ATM(config)# interface atm number.subint multipoint ATM(config)# lane client ethernet vlan-num elan-num32. 用show lane server 显示LES的状态.33. 用show lane bus显示bus的状态.34. 用show lane database显示LECS数据库可内容.35. 用show lane client显示LEC的状态.36. 用show module显示已安装的模块列表.37. 用物理接口建立与VLAN的连接:router# configure terminalrouter(config)# interface media module/portrouter(config-if)# de脚本ion de脚本ion-string router(config-if)# ip address ip-addr subnet-maskrouter(config-if)# no shutdown38. 用中继链路来建立与VLAN的连接:router(config)# interface module/port.subinterfacerouter(config-ig)# encapsulation[isl|dotlq] vlan-number router(config-if)# ip address ip-address subnet-mask39. 用LANE 来建立与VLAN的连接:router(config)# interface atm module/portrouter(config-if)# no ip addressrouter(config-if)# atm pvc 1 0 5 qsaalrouter(config-if)# atm pvc 2 0 16 ilnirouter(config-if)# interface atm module/port.subinterface m ultipointrouter(config-if)# ip address ip-address subnet-maskrouter(config-if)# lane client ethernet elan-numrouter(config-if)# interface atm module/port.subinterface m ultipointrouter(config-if)# ip address ip-address subnet-namerouter(config-if)# lane client ethernet elan-namerouter(config-if)# …40. 为了在路由处理器上进行动态路由配置,可以用下列IOS命令来进行:router(config)# ip routingrouter(config)# router ip-routing-protocolrouter(config-router)# network ip-network-numberrouter(config-router)# network ip-network-number (FengNet. Com)41. 配置默认路由:switch(enable) set ip route default gateway42. 为一个路由处理器分配VLANID,可在接口模式下使用下列命令: router(config)# interface interface numberrouter(config-if)# mls rp vlan-id vlan-id-num43. 在路由处理器启用MLSP:router(config)# mls rp ip44. 为了把一个外置的路由处理器接口和交换机安置在同一个VTP 域中:router(config)# interface interface numberrouter(config-if)# mls rp vtp-domain domain-name45. 查看指定的VTP域的信息:router# show mls rp vtp-domain vtp domain name46. 要确定RSM或路由器上的管理接口,可以在接口模式下输入下列命令:router(config-if)#mls rp management-interface47. 要检验MLS-RP的配置情况:router# show mls rp48. 检验特定接口上的MLS配置:router# show mls rp interface interface number49. 为了在MLS-SE上设置流掩码而又不想在任一个路由处理器接口上设置访问列表:set mls flow [destination|destination-source|full]50. 为使MLS和输入访问列表可以兼容,可以在全局模式下使用下列命令:router(config)# mls rp ip input-acl51. 当某个交换机的第3层交换失效时,可在交换机的特权模式下输入下列命令:switch(enable) set mls enable52. 若想改变老化时间的值,可在特权模式下输入以下命令:switch(enable) set mls agingtime agingtime53. 设置快速老化:switch(enable) set mls agingtime fast fastagingtime pkt_thr eshold54. 确定那些MLS-RP和MLS-SE参与了MLS,可先显示交换机引用列表中的内容再确定:switch(enable) show mls include55. 显示MLS高速缓存记录:switch(enable) show mls entry56. 用命令show in arp显示ARP高速缓存区的内容。
VLAN间的路由:基于锐捷S3550三层交换机1.1 实验目的掌握基于三层交换机进行VLAN间路由的配置方法。
1.2 实验环境1.3 实验的内容和要求(1)设置端口为T ag模式(2)同一VLAN里的计算机系统能跨交换机相互通信.(3)不同VLAN里的计算机系统也可以相互通信.1.4 实验说明第一步:在交换机SwitchA(S3550)上创建VLAN 10,并将0/5端口划分到VLAN 10中SwitchA # config !进入全局配置模式SwitchA (config)# vlan 10 !创建VLAN 10SwitchA(config-vlan) # name sylSwitchA(config-vlan) # exitSwitchA(config) # interface fastethernet 0/5SwitchA(config-if) # switchport access vlan 10SwitchA(config-if) # exit第二步:在交换机SwitchA(S3550)上创建Vlan 20,并将0/15端口划分到Vlan 20中SwitchA(config) # vlan 20SwitchA(config-vlan) # name bglSwitchA(config-vlan) # exitSwitchA(config) # interface fastethernet 0/15SwitchA(config-if) # switchport access vlan 20SwitchA(config-if) # exit第三步:把交换机SwitchA与SwitchB相连端口(假设为0/24)定义为tag vlan模式SwitchA(config)# interface fastethernet 0/24 !进入接口配置模式SwitchA(config-if)# switchport mode trunk !将fastethernet 0/24端口设为tag vl an模式验证测试:验证fastethernet 0/24端口已被设置为tag vlan模式SwitchA# show interface fastethernet 0/24 switchportInterface Switchport Mode Access Native Protected Vlan lists--------------------------------------------------------------------------------------Fa0/24 Enabled T runk 1 1 Disabled All第四步:在交换机SwitchB(S2126G-down)上创建Vlan10,并将0/5端口划分到Vlan10中(参照步骤一)第五步:把交换机SwitchB与SwitchA相连端口(假设为0/24)定义为tag vlan模式(参照步骤三)第六步:验证PC1与PC3能互相通信,但PC2与PC3不能互相通信第七步:创建网关,使三层交换机SwitchA (S3550)各VLAN间通信SwitchA(config)# interface vlan 10 !创建虚拟接口vlan 10SwitchA(config-if)# ip address 192.168.10.254 255.255.255.0!配置虚拟接口vlan 10的地址为192.168.10.254 SwitchA(config-if)# no shutdown !开启端口SwitchA(config-if)# exitSwitchA(config)# int vlan 20 !创建虚拟接口vlan 20SwitchA(config-if)# ip address 192.168.20.254 255.255.255.0!配置虚拟接口vlan 20的地址为192.168.20.254SwitchA(config-if)# no shutdown !开启端口验证测试:查看三层交换机SwitchA(S3550)路由接口的状态switchA# show ip interface !查看IP接口的状态Interface : VL10Description : Vlan 10OperStatus : UPManagementS tatus : EnabledPrimary Internet address: 192.168.10.254/24Broadcast address : 255.255.255.255PhysAddress : 00d0.f8ff.8ab5Interface : VL20Description : Vlan 20OperStatus : UPManagementS tatus : EnabledPrimary Internet address: 192.168.20.254/24Broadcast address : 255.255.255.255PhysAddress : 00d0.f8ff.8ab6第八步:为PC1,PC2,PC3添加网关测试结果:不同Vlan内的主机可以相互ping通注意事项:1. 两台交换机之间相连的端口应该设置为tag vlan模式。
2. 必需设置PC机的网关。
参考配置:SwitchA# show running-config !显示交换机SwitchA的全部配置Building configuration…Current configuration : 349 bytes!V ersion 1.0!Hostname SwitchAInterface FastEthernet 0/5Switchport access vlan 10!Interface FastEthernet 0/15Switchport access vlan 20!Interface FastEthernet 0/24Switchport mode trunk!Interface Vlan 10Ip address 192.168.10.254 255.255.255.0!Interface Vlan 20Ip address 192.168.20.254 255.255.255.0!EndSwitchB# show running-config !显示交换机SwitchB的全部配置Building configuration…Current configuration : 284 bytes!V ersion 1.0!Hostname SwitchBVlan 10name syl!Interface FastEthernet 0/5Switchport access vlan 10!Interface FastEthernet 0/24Switchport mode trunk!EndRouter and switch 配置命令更新时间:2009-05-31 作者:编辑整理来源: 点击:325 推荐挑错收藏打印关闭1、进入SETUP模式Router#setup2、时间设置router#clock set hh:mm:ss date moth year3、 router>show historyRouter>terminal history size lines4、 router#show version5、 router#show running-config6、 router#show starup-config7、 router(config)#hostname name 主机命名8、 router(config)#banner motd # message # 开机时的固定显示信息9、 router(config)#enable password password 特权模式明文密码10、 router(config)#no enable password11、 router(config)#enable secret password 特权模式加密密码12、 router(config)#no enable secret13、 router(config)#service password-encryption特权模式把明文密码加密密码,但没enable secret安全可以反解14、 router(config)#line console控制台密码15、 router(config-line)#login16、 router(config-line)#password password17、 router(config-line)#exec-timeout mm ss 禁止控制台会话自动退出18、 router(config-line)#logging synchronous重显被打乱的控制台输入router(config)#no ip domain-lookup 禁止域名解析19、 router(config)#line vty 0 4虚拟终端密码20、 router(config-line)#login21、 router(config-line)#password password22、 router(config)#interface type number(slot/port)端口设置23、 router(config-if)#ip address ip summast24、 router(config-if)#clock rate 64000(时钟频率单位为bps,只在DCE 端设置)25、 router(config-if)#bandwith 64(带宽设置,单位为KB)26、 router(config-if)#no shutdown(shutdown)27、 router(config-if )#media-type type(10base) 为以太网端口选择适当的介质类型28、 router(config-if )#ctrl+z保存退出到特权模式29、 router#30、 router>用户模式enable进入router#特权模式config terminal进入router(config)#全局配置模式31、Interface Router(config-if)#端口设置Subinterface Router(config-subif)# 子端口设置Controller Router(config-controller)# 控制口设置Line Router(config-line)# 虚拟口设置Router Router(config-router)# 路由设置IPX router Router(config-ipx-router)#IPX路由设置32、 router#show interface33、 router#show interface Ethernet 034、 router#show interface serial 035、 router#show running-config36、 router#show starup-config37、 router#show flash38、 router#show controller39、 router#show controller interface type40、 router#show running-configrouter#copy running-config starup-configrouter#copy running-config tftprouter#copy starup-config tftprouter#copy flash tftprouter#copy tftp star-configrouter#copy tftp flash端口状态Serial1 is up, line protocol is up正常工作Serial1 is up, line protocol is down连接问题Serial1 is down, line protocol is down端口问题Serial1 is administratively down, line protocol is down人为关闭配置寄存器的值1、关闭路由器的电源重新启动按住ctrl+break键入进2、>3、>o/r 0x2142(跳过nvarm启动恢复密码)4、>I5、当系统提示是否进入setup模式时,按N6、 router>7、 router>enable8、 router#9、进入修改后(包括密码、寄存器的值:0x2100为rom monitor启动、0x2101为setup模式启动、0x2102为10、 router#copy running-config starup-config11、 router#reload12、也可以在router#setup进入setup模式静态路由协议设置router(config)#ip route network submask(要到达的网络号掩码)ipaddress(下一跳或出口ip地址)router(config)#ip route 0.0.0.0 s0(出口端口或下一跳IP地址)rip设置router(config)#router riprouter(config-router)#network network-numberrouter#show ip protocol查看RIP信息router#show ip route 查看路由表router#debug ip rip查看RIP更新信息router(config-router)#passive-interface e0(阻止发出作息)router(config-router)#ip rip receive version 1 2接收1、2RIP版本信息igrp设置router(config)#router igrp as numberrouter(config-router)#network network numberrouter#show ip route 查看路由表router#debug ip igrp events 查看IGRP路由更新大概信息router#debug ip igrp transaction 查看IGRP路由更新详细信息Router(config-router)#variance multiplier 控制 IGRP load balancingRouter(config-router)#traffic-share {balanced | min}控制load-balanced traffic 的分布eigrp设置router(config)#router eigrp as numberrouter(config-router)#network network numberrouter(config)#no auto-summry 关闭自动汇总router(config)# auto-summry 打开自动汇总(默认是打开的)router#show ip route eigrp 显示当前的路由表里的EIGRP条目router#show ip protocol 显示活动的路由协议进程的参数和当前的状态router#show ip eigrp neighbors 显示被EIGRP发现的邻居router#show ip eigrp traffic 显示发出和收到的IP EIGRP 包的数量router#show ip eigrp topology 显示IP EIGRP的拓扑表Router#debug ip eigrpospf设置1. Router(config)#router ospf process-idRouter(config-router)#network address(可以是网络号也可以是Ip地址 mask (通配掩码)area area-idRouter(config-if)# ip ospf priority numbe 配置OSPF的优先级Router#show ip protocols 验证OSPF的配置Router#show ip route 显示路由器学到的所有路由Router#show ip ospf interface type number 显示 area-ID 和邻接信息Router#show ip ospf neighbor 基于每接口显示OSPF邻居信息Router#debug ip ospf eventsRouter#debug ip ospf packet2. Router(config)# interface loopback number(lookback回路配置)Router(config-if)# ip address ip-address subnet-maskRouter(config-if)# ip ospf cost cost-numbe 修改OSPF 的Cost数值Router(config-if)# ip ospf authentication-key key 配置明文口令Router(config-if)# ip ospf messge-digest-key keyid md5 key 配置MD5口令(keyid和key必须配对一致,两邻居才可以通信)Router(config-route)# area area-id authentication [message-digest]message-digest为可选项,使用后路由器只传送口令消息的摘要(或散列)配置OSPF区域的验证:3. Router(config-if)# ip ospf hello-interval seconds 配置hello间隔:Router(config-if)# ip ospf dead-interval seconds配置down机判断间隔访问列表1.标准访问列表(standard access lists):只使用源IP地址来做过滤决定Router(config)#access-list 10 deny 172.16.40.0 0.0.0.255 Router(config)#access-list 10 permit anyRouter(config)#int e1Router(config-if)#ip access-group 10 out使用IP标准ACL来控制VTY线路的访问.Router(config)#access-list 50 permit 172.16.10.3Router(config)#line vty 0 4Router(config-line)#access-class 50 in删除IP标准ACLRouter(config-line)#no ip access-class 50 inRouter(config)#no access-list 502.扩展访问列表(extended access lists):它比较源IP地址和目标IP地址,层3的协议字段,层4端口号来做过滤决定Router(config)#access-list 110 deny tcp any host 172.16.30.5 eq 21 Router(config)#access-list 110 deny tcp any host 172.16.30.5 eq 23 Router(config)#access-list 110 permit ip any anyRouter(config)#int e1Router(config-if)#ip access-group 110 out。