ZKZD-500U三边封制袋机
- 格式:doc
- 大小:103.50 KB
- 文档页数:8
三边封袋包机操作规程
三边封袋机操作规程如下:
1. 将包装卷材整齐地展放在工作台上,装上封切刀片,调节机架,使其处于水平位置。
2. 开启封切机,检查其工作性能,调整纵封器、横封器、计数器、电眼的工作状态。
3. 确认机器正常运行后,再安装包装袋。
4. 将包装袋装入纵封器与横封器之间,关闭纵封器并启动横封器,当包装袋从所有封口材料中通过并封口后,关闭横封器。
5. 根据包装袋的大小规格更换纵封器和横封器上的纸管。
6. 在操作过程中要注意控制封口线张力及输送带的速度,以免出现包装袋粘连或破损。
7. 关机时,应先停横封器,再停纵封器和输送带,同时清除工作台和机器周围的遗留物。
此外,还有需要注意的事项:
1. 操作过程中应确保安全,禁止在机器运转时手伸进行操作。
2. 在操作时不要频繁调整设备,避免出现安全事故。
3. 操作过程中要保持设备清洁,定期进行保养。
以上信息仅供参考,如果还有疑问,建议咨询专业人士意见。
三边封包装机设备工艺原理随着现代工业生产技术的不断发展,各行业对于包装机械的要求也越来越高。
三边封包装机作为一种新型的包装机械,具有高速、高效、低损耗、节能等特点,因此越来越受到企业的青睐。
本文将从三边封包装机的定义及分类、设备工艺原理、应用范围与市场前景等方面进行系统阐述。
一、三边封包装机的定义与分类三边封包装机是一种将产品送入包装膜内,将包装膜的三个边缘通过封合形成一定规格包装袋,并完成切断、计量、打码等作业的包装机。
三边封包装机通常以包装材料的张力控制为主,通过电子控制系统,实现送膜、包裹、封口、计数、计量、打码、制袋、切断等功能,适用于包装各种形状的固体、液体、半固体和粉末物料。
根据不同的包装材料和产品要求,三边封包装机还可以分为水平三边封包机和立式三边封包机。
水平三边封包机主要用于包装小型产品和食品,如方糖、巧克力、饼干等。
而立式三边封包机则适用于包装更大型、较重、多形状的产品和食品,如面包、大蛋糕、糖果等。
二、三边封包装机的设备工艺原理三边封包装机是一种高速、精度高、稳定性好的包装机械。
其工作原理是通过先将包装膜卷放在滚筒上,经过张力控制系统,调整包装膜的张力后输入工作区轮廓,然后将待包装物品通过工作区的输送机进入包装膜内。
接着,在封合单元中,利用双面热封来完成包装袋三边的封合,切断成定长,最后完成制袋、计量、打码等操作。
具体的设备工艺流程为:•包装膜的切断:首先,将较宽的包装膜从上面下来,经过张力控制后,通过电脑系统计算出多少长度(即多少个袋子),然后通过切刀进行切断。
•封边加热:利用封口器件,对包装膜的横向双层进行加热、压合,形成一个永远不会破裂的袋子的封口。
•产品放袋:产品通过输送带进入制袋机场,后通过一些机构送入相应的袋中。
•成袋输出:成袋的物品通过出料带出口,经过机构的定量计量后,输出到包装下部。
三、三边封包装机的应用范围与市场前景三边封包装机具有包装快速、封口牢靠、平整美观等特点,不仅可以应用于食品、医药、化妆品等行业,同样也适用于咖啡、茶叶、硬纸板等轻工重工业。

KZJ-500型水泥电动抗折机操作规程1. 前言KZJ-500型水泥电动抗折机是一种用于测定混凝土、水泥、砖、陶瓷等材料抗折强度的试验仪器。
为了保证试验的准确性、安全性和高效性,制定本操作规程。
2. 设备说明KZJ-500型水泥电动抗折机主要由下部支撑架、上部加荷机构、负荷预应力调节机构以及负荷计与打印机组成。
3. 操作步骤3.1 准备工作1.将KZJ-500型水泥电动抗折机放置在平整、牢固的地面上,底部4个调节螺钉要与地面水平。
2.检查每个调节螺钉是否已经调整到位,机器底部丝杆应该在底座的空心槽内。
3.将负荷计正确连接至机器的上端,确保负荷计的机械承载范围符合要求。
4.将打印机接触的纸张调整到与打印头平行,并按照箭头方向安装到打印机上。
5.将负荷计调平,并用调整手柄进行进行矫正。
3.2 试验操作1.按下主机电源开关,负荷计上电并处于待机状态。
2.按下负荷预应力调节机构(PRELOAD ADJUSTMENT)开关,同时使被试件放在加荷点上。
3.启动调节旋钮加荷(LOADING)直至设定荷载值。
4.根据要求记录各负荷示数,可以每次按下空白键打印一次。
5.荷载测试完成后,按下加荷机构回程按钮,将压头抬升到原来的高度位置。
6.关机前,按下主机电源开关关闭电源,按下打印机开关将打印机关闭。
4. 注意事项1.操作人员应熟悉KZJ-500型水泥电动抗折机的操作方法并遵守本规程。
2.试验过程中,禁止非工作人员靠近机器。
3.试验时,负荷不要超出负荷计的测量范围,以免损坏设备。
4.试验过程中出现异常情况应立即停机检查。
5.做好消毒、清洗等工作,保持设备干净卫生,做到定期维护和保养,延长使用寿命。
5. 维护保养1.使用后要及时清理设备,清理断口、压头等部位,避免沉积杂质。
2.定期对设备进行维护,包括紧固螺钉、润滑加油以及设备清理等工作。
3.如长期不使用设备,应该做好防护措施,整机应该用保护罩覆盖,避免灰尘对机器的影响。
塑料制品厂三边封制袋机制袋操作规程1.机器操作前的准备工作1.1清理工作台和机器,确保机器无灰尘和杂质。
1.2检查刀片的磨损情况,如有磨损应及时更换。
1.3检查机器的加热器和温度控制器,确保正常工作。
1.4准备好塑料薄膜和所需的辅助材料。
2.调整机器参数2.1根据所用薄膜的材质和厚度,调整机器的温度。
2.2调整机器的速度,根据需要调整制袋的速度。
2.3根据制袋的需要,调整机器的切刀和计米器。
3.进行制袋操作3.1将塑料薄膜放入滚筒,并通过滚筒将薄膜送入机器。
3.2根据所需制袋的尺寸,将薄膜进行折叠,使之进入三边封制袋机的导向传输装置。
3.3通过三边封制袋机的导向传输装置,将薄膜送入三边封切机的加热器。
3.4通过加热器对薄膜进行热封,形成制袋的三边封口。
3.5经过三边封切机的刀片切割,形成制袋的底部。
3.6经过计米器的计量,确定制袋的长度。
3.7薄膜进入制袋的定位台,通过定位台的导向装置,将薄膜平整并精确定位。
3.8通过定位台的传输装置,将薄膜送入制袋的上边封切机的加热器。
3.9通过加热器对薄膜进行热封,形成制袋的上边封口。
3.10经过上边封切机的刀片切割,形成制袋的上边。
3.11将制袋的产品从机器上取下,并进行质量检查。
3.12如有需要,对制袋产品进行打孔、压花、印刷等后续加工。
4.操作注意事项4.1操作人员应戴好劳动防护用品,如手套、口罩、工作服等。
4.2在操作过程中,要注意机器的运行状态,如出现异常应及时停机检修。
4.3操作人员要熟悉机器的结构和工作原理,遵守操作规程,确保安全生产。
4.4使用的薄膜应符合相关标准要求,不得使用质量不合格的薄膜。
4.5定期对机器进行保养和维修,确保机器的正常运行和使用寿命。
5.操作记录和质量控制5.1在每次操作结束后,要及时记录制袋的数量和质量情况。
5.2操作记录应包括制袋机的机号、操作人员、操作时间、生产数量等信息。
5.3对制袋产品进行质量检查,检查项目包括尺寸、封合强度、印刷质量等。

三边封包装机结构原理三边封包装机是一种用于包装各种产品的机器,满足不同包装尺寸的要求。
封口部分采用三边封口方式,确保包装袋密封性能好且美观。
机器结构三边封包装机主要由机架、送料系统、封口系统、电器控制系统和PLC等部件组成。
机架机架是三边封包装机的骨架部分,支撑整个机器的重量。
它由角铁、钢管等金属材料组成,能够承受各种外力和负荷,保证机器平稳运行。
送料系统送料系统是将袋状包装材料输送到封口系统的主要部分。
它由输送带、张力辊组成,通过电机驱动实现平稳的送料。
封口系统封口系统是三边封包装机的核心部分,它由热封刀、压合辊、温控系统等组成。
当袋状包装材料进入封口系统,热封刀通过加热使袋状包装材料熔化,压合辊压制袋口以达到密封的效果。
温控系统则控制热封刀的温度,确保封口的质量。
电器控制系统电器控制系统主要由控制箱、人机界面、传感器和执行器等部分组成。
人机界面提供了人机交互的界面,通过操作控制箱的按钮可以控制机器的启动、停止、速度等动作。
传感器可以检测机器工作状态,保证机器的正常运行。
执行器则负责执行各种动作。
PLCPLC是三边封包装机中重要的控制零部件,提供了可编程的逻辑功能。
它通过提供逻辑操作,使机器运行更加智能化和精确化。
工作原理三边封包装机的工作原理是先通过送料系统将袋状包装材料输送到封口系统,封口系统中的热封刀将袋口熔化,压合辊压制袋口,温控系统确保封口的质量。
同时电器控制系统根据PLC提供的逻辑操作,实现机器的启动、停止、速度等动作。
三边封包装机在加工过程中由于热封刀加热导致的高温和压合辊的高频振动,使得整个包装加工过程具有一定的噪声和能量消耗。
结语三边封包装机是现代包装行业的重要机器之一,它通过简单的结构设计和精确的控制系统来实现高效、精准的包装加工。
在未来,随着科技的进步和市场需求的变化,三边封包装机将会发展出更为智能化、节能环保的新型产品。
休闲裤贴袋机Chino Pocket Setter (MB1002D-1-S7300A-305P)使用说明书Instruction Manual常州智谷机电科技有限公司CHANGZHOU WISDOM &VALLEY ELECTRICAL TECHNOLOGY CO.,LTD在使用本设备之前请先阅读本使用说明书Please read the operation manual of the touch screen interface before using the device 请将本使用说明书放在便于查阅的地方保管Please keep this operation manual of touch screen interface in convenient placeforreference2020.03版本信息/Version感谢购买IMB工业用缝纫机。
在使用此机器之前,请仔细阅读以下的说明,这样可以更好地帮到您了解此机器的相关操作。
这些说明是根据现行的条例明确阐述了正确的工作方法。
Thank you for purchasing this industrial sewing machine from IMBBefore using this automatic unit,please read the following instructions,which will help you tounderstand how the machine operates.These instructions illustrate the correct working methods to comply with current regulations.在没有得到IMB授权许可的前提下,此说明书的任何部分是不可以被复制或者转录的。
说明书的内容可能被修改,而不需预先通知。
No part of this manual may be copied or transcribed without requesting prior authorization from IMBThe contents of this manual may be subject to change without advance notification.我们将欣然接受各位提出的改进此说明书的任何建议和指示We are happy to receive suggestions and/or indications on ways we could improve this manual.本机介绍说明分为三部分,具体请参照《MB1002D休闲裤贴袋机-使用说明书》、《MB1002D休闲裤贴袋机-零件手册》、《MB1002D休闲裤贴袋机-触摸屏界面操作说明》。
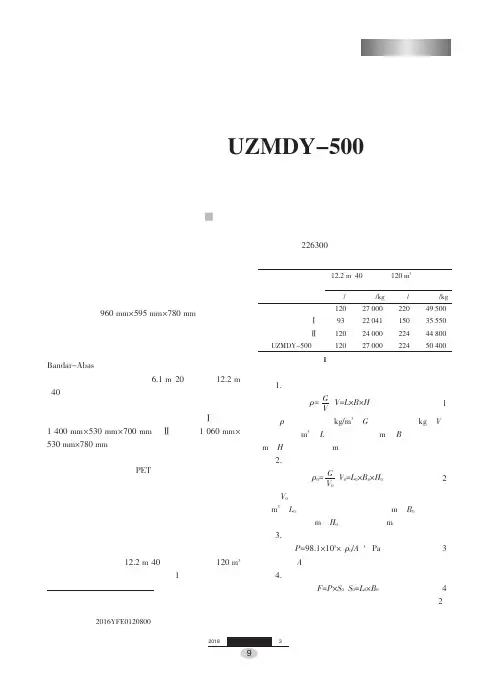
苏联时期,乌兹别克仅局限于在联盟范围内将棉纤维及棉绒通过其独有的铁路机车运输到位于俄罗斯、乌克兰及白俄罗斯的纺织厂内,当时情况下,乌兹别克棉包包型960mm×595mm×780mm在经济效益上是最合适的。
但自乌兹别克独立以来,其棉纤维和棉绒运输方向发生了本质的变化,现主要出口到东南亚、中国、孟加拉国、印度尼西亚等国家,此时通过伊朗Bandar-Abas港口的海路运输产生了巨大作用,乌兹别克棉包将在该港口被装入6.1m(20英尺)或12.2m (40英尺)的海运集装箱内运往出口国家,为此在国际棉包包型标准的基础上研究出适应当前国际运输车辆及集装箱的新包型是非常必要的。
Ⅰ号包型1400mm×530mm×700mm和Ⅱ号包型1060mm×530mm×780mm是两种通用的国际棉包包型。
众所周知,现有尺寸和密度的乌兹别克棉包具有很大的膨胀力,铁丝、PET带等捆扎材料经常出现崩裂的问题,给棉包装载和运输造成了很大的困扰,解决棉包捆扎问题迫在眉睫。
采用国际棉包包型将有助于减少作用在棉包捆扎带上的拉力,缓解捆扎材料崩裂的问题。
一、根据集装箱和火车车厢棉包装载量进行分析各类包型分别在12.2m(40英尺)集装箱和120m3的标准列车车厢内的装载量,见表1。
包型乌兹别克标准包型国际标准包型Ⅰ国际标准包型ⅡUZMDY-50012.2m(40英尺)集装箱装载量数量/包12093120120重量/kg27000220412400027000120m3标准列车车厢半载量数量/包220150224224重量/kg49500355504480050400表1各类包型的装载量(一)棉纤维压缩的相关参数1.棉包密度。
ρ=;V=L×B×HVG(1)式中:ρ为棉包密度(kg/m3);G为棉包总重(kg);V为棉包体积(m3);L为棉包长度(m);B为棉包宽度(m);H为棉包高度(m)。
三边封制袋机工作原理
三边封制袋机是一种用于制造三边封封口的塑料袋的机器。
其工作原理主要包括以下几个步骤:
1. 塑料薄膜供给:通过一个供料装置,将塑料薄膜从卷筒上拉伸并传送到机器的工作区域。
2. 上压辊挤压:在工作区域的塑料薄膜上方,设有一对上下压辊。
上辊通过下压,将塑料薄膜牢固固定在工作区域并保持平整。
3. 切割:通过一个切割装置,对塑料薄膜进行定长切割。
切割装置通常包括一对上下切割刀,刀刃在塑料薄膜下方,将其切割成所需的袋子长度。
4. 侧封:在塑料薄膜两侧,设有一对侧封装置。
侧封装置通过热封的方式,将塑料薄膜两侧快速封合,形成袋子的两个侧缝。
5. 底封:在切割后的塑料薄膜的一端,设有一对底封装置。
底封装置通过热封的方式,将塑料薄膜快速封合,形成袋子的底缝。
6. 袋子收集:完成底封后,机器会自动将制作好的袋子送出,由操作人员收集和包装。
通过以上步骤的连续操作,三边封制袋机可以高效地制造出大
量的三边封袋子。
这种机器广泛应用于食品、医药、化妆品等行业,能够提高生产效率和产品质量。
三边封制袋机厂家:为您介绍三边封制袋机的原理和清洗操作流程三边封制袋机是一种常用的包装机械,主要用于制作各种封口袋、塑料袋等包装物,广泛应用于食品、医药、化妆品等行业。
在使用过程中,了解三边封制袋机的原理和清洗操作流程对于提高生产效率和生产质量都非常重要。
原理三边封制袋机主要由送料机构、封口机构和收料机构等组成。
其中,送料机构会将塑料膜送入封口机构进行封合,在完成封合后,通过收料机构将成品送出。
具体来说,下面是三边封制袋机的工作原理:1.塑料薄膜通过送料机构送入定位器。
2.定位器将塑料膜拉长,并定位在封口机构上。
3.封口机构对塑料膜进行加热,通过压膜条将薄膜上下两边封口侧密封。
4.完成剪断,形成封口袋。
5.袋子向前运动,经收料架送出。
清洗操作流程三边封制袋机是一种需要进行定期维护的机器。
在使用过程中,如果发现机器有残留物或者出现油污等现象,需要及时进行清洗,以确保机器的正常运行。
下面是三边封制袋机的清洗操作流程:1.关闭电源,拔掉电源插头。
2.拆下传动链条和导轨,用擦布清洗。
不要用水直接清洁,以防水渗入导轨内部。
3.拆除主机侧盖,用刷子和擦布清洗机器内部。
注意不要涂刷到电机处。
4.使用吸尘器将机器上表面的灰尘、杂物等清除。
5.清理机器过程中,不要使用腐蚀性强的溶剂,以免对机器造成损坏。
6.完成清理后,将零件归置好,重新装入主机内部,并关闭主机侧盖。
维护保养三边封制袋机还需要注意以下几点:1.在使用过程中,必须按照操作说明书进行操作。
2.机器应定期进行清洗和保养。
3.机器维修和清洗需要由专人进行,非专业人员请勿擅自拆卸和修理。
4.废气排放口应定期清理和检查,以确保出料口畅通。
结束语三边封制袋机是一种常用的包装机械,掌握其工作原理和清洗操作流程对于提高生产效率和保证产品质量至关重要。
需要定期进行机器清洗和保养,以确保机器的正常运转和稳定性。

PXZDJ Series屏显三边封制袋机控制器用户手册杭州日升电气设备有限公司Sunrise Electric地址:杭州市富强路48号电话:0571—88185343,88186075网址:Email:risesun@目录:1.总介2.使用说明3.注意事项4.常见问题解答5.附录一:错误码说明6.附录二:接线端子说明7.附录三:机箱接线端子说明§总介本文档内容为杭州日升电气设备有限公司屏显三边封制袋机电脑控制器之使用说明与注意事项。
操作者应在详细阅读本手册后方可进行操作,在使用中如遇任何问题,可先参考注意事项和常见问题解答。
本说明中的温控和张力两个页面是对配有温控和张力配件的说明。
标准配置中不含此两选配件,用户可以根据实际需要选配这两个配件。
§使用说明●制袋/Working图一人机界面——制袋a制袋界面为主要工作界面,开机后左下角显示‘联机中/Connecting…’字样,联机正常后则显示‘Ready’字样,不正常显示相应的错误代码。
▲ 上方的6项为制袋状态监控,在实际运行的时候将显示当前状态下面的运行参数,其中数字会有两种颜色显示。
黄色数字为最近改变量,湖蓝色数字为最近未改变量。
▲ 中间的12项为制袋参数设置,通过键盘输入。
其中上方的9项选中时有蓝色边框闪烁,如图二所示。
但此时尚未进入选项框的设置状态。
再次按下‘设置’键,则可以对该选项进行设置,该选项框底色变成绿色,如图三所示。
下方的三个灰色选项框的在键盘上有相应的直接按键一一对应,按下相应的键之后则会在两个选项之间切换(关于按键的详细操作说明可参看后面的键盘界面说明)。
图二人机界面——制袋b图三人机界面——制袋c▲ 下方的柱状条是温控指示界面,此界面只有带温控的机型才有,如果没有温控的界面如图四所示。
其中蓝色柱状条为预设温度,绿色柱状条为实际温度,并且在其之上有数值显示。
其中黑色的数字才会有柱状条,表明该路温度控制打开,灰色的数字则没有柱状条,表明该路温度控制关闭。
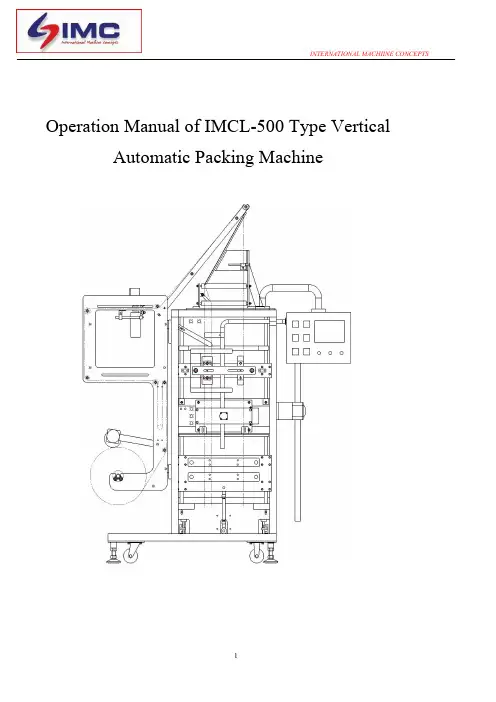
Operation Manual of IMCL-500 Type Vertical Automatic Packing MachineI. Technical parametersIMCL-500 Vertical-bag automatic liquid packaging machine adopts pneumatic drive, PLC control and touch screen man-machine interface, can automatically complete the whole packaging process, including bag making, capping, filling and measuring, sealing and cutting, date printing and finished product output. During the packaging process, the photoelectric calibration device will be used to ensure the integrity of the pattern of packaging bags.This machine has reasonable structure design, beautiful model, reliable working, accurate measurement, and easy to operation, adjustment and maintenance. It is applicable to the packaging of various non-carbonic beverages, fruit juice, wine (alcohol content is less than 60°), edible oil, vinegar, sauce and drinking water, and viscous materials, such as jams, spices and detergents having certain liquidity.The technical parameters of this machine are as follows:Production capacity: 15~30bags/minAir consumption: 0.4m3/min (0.8MPa)Packaging capacity: 150~1200ml (need to replace the fittings)Power supply voltage: AC220±10%V 50HzMeasuring accuracy: ±1.5%Whole machine power: maximum 4.0kw, normal work 2.0kwFilm width: 400~650(mm)Machine weight: 650kgWorking pressure: 0.65MPaAppearance size: 1950!1200!2500(mm)Film thickness: 0.10~0.14(mm)Structure introduction of vertical-bag automatic liquid packaging machine1. 传送带—Conveyer belt2. 横封切断机构—Horizontal sealing shutdown mechanism3. 膜牵引机构—Film traction mechanism4. 纵封机构—Vertical sealing mechanism5. 操作箱—Operating box6. 纵封高度调节机构—Vertical sealing height adjusting mechanism7. 袋折叠机构—Bag folding mechanism8. 电器箱—Electric appliance box9. 供料机构—Product feeding mechanism10. 供膜机构—Film supplying mechanism11. 打孔机—Hole-punching machine12. 下料管—Discharge pipeFigure 1 Structure diagram of packaging machineII. Performance introduction and adjustment methods of each part1. Composition of the whole machineThe machine consists of one main unit (packaging machine) and one belt conveyer (see the above Figure 1).2. Introduction and adjustment of the main mechanism ofpackaging machineNote: if the operations or adjustments mentioned below relate to the dangerous places, they only can be carried out after stopping the machine and pressing the emergency stop button.2.1 Conveyer beltThe conveyer belt of this machine is driven by the independent motor andreducer, and its startup and shutdown are controlled by the button of“conveyer belt” on the touch screen.1. Drive motor2. Drive roller3. Belt4. Driven roller5. Driven shaft6. Tension adjusting screw7. Operating slide8. Rear support9. Height adjusting nut10. Front supportFigure 2 Conveyer beltAs shown in Figure 2, rotate two tension adjusting screws 6 of the rear end, can adjust the tightness of the belt to balance the tension on both sides of belt; rotate the height adjusting nut 9, can change the height of the rear end of conveyer belt, and adjust to the appropriate height (under the normal working condition, the distance from belt to packaging bags is 20-30mm), then lock two nuts.2.2 Horizontal sealing shutdown mechanismThe mechanism consists of heat sealing, cold pressing part, shutdown part and servo lifting part. During the packaging process, it will complete the sealing, smashing, cutting-off and film tracking on both sides of packaging bags. The structure composition is shown in Figure 3.1. Servo motor2. Cold pressing cylinder3. Horizontal sealing cylinder4. Litter5. Horizontal sealing back6. Horizontal sealing head7. Pressure adjusting screw8. Shutdown cylinder9. Cold pressing head10. Blade11. Cold pressing back12. Pressure adjusting nut13. Lifting crank14. Lifting connecting rod15. Connecting rod nutFigure 3 Horizontal sealing shutdown mechanisms2.2.1 If the seal doesn’t fit due to the unbalance pressure of horizontal sealinghead, it can adjust the pressure of head ends and middle part through five pressure adjusting screws 7, make them balance, and then lock the nuts after the completion of adjustment. The five screws will not change the sealing head pressure, but can distribute the force of the cylinder on the whole sealing head uniformly.2.2.2 If the width of both seal sides of packaging bags is different significantly, itcan change the height of horizontal sealing back 5 and horizontal sealing head 6, until no significant difference of width on both seal sides.Horizontal sealing back 5 and horizontal sealing head 6 shall be aligned with each other during the adjustment process.2.2.3 Adjust the pressure adjusting nut 12, can make the balance of cold sealingpressure.2.2.4 Blade 10 is the part need to be replaced appropriately according to theservice condition, and the replacement method is shown below: put inner hexagonal wrench in the slot hole at the right lower end of cold sealing pressure head (facing machine), loosen the screws of two clamp blades, remove the blade, plug the new blade into the original position and then lock the screw. The angle between the cutter edge and the plane of sealing head shall be between 135° to 160°, and the knifepoint is revealed 2-3 mm above the plane.2.2.5 Usually check whether the nut on both ends of lifting connecting rod 14 isloose, and timely fasten.2.3 Vertical sealing mechanismVertical sealing mechanism consists of bag top opening sealing part and bag bottom sealing part, as shown in Figure 4.1. Vertical sealing cylinder2. Fastening handle3. Bag bottom sealing back4. Bag bottom sealing head5. Bag opening sealing back6. Bag opening sealing head7. Pressure adjusting screwFigure 4 Vertical sealing mechanism2.3.1 Loosen the fastening handle 2, can move the corresponding sealing back orsealing head to the right and left sides, and realize the changes for arc height of bag bottom or width of upper seal.2.3.2 Adjust four pressure adjusting screws 7 to balance the sealing head pressureof bag bottom.2.4 Vertical sealing height adjusting mechanism (Figure 5)1. Vertical sealing height adjusting hand wheel2. Fastening hand wheel3. Vertical sealing adjusting screw4. Vertical sealing link blockFigure 5 Vertical sealing height adjusting mechanismTwo vertical sealing height adjusting hand wheels 1 can adjust the height of vertical sealing mechanism to align with the sealing position of bag bottom. Loosen the fastening hand wheel 2, rotate the vertical sealing adjusting hand wheel 1, and then lock the fastening hand wheel 2 after completing the adjustment.2.5 Bag folding shaping mechanism (Figure 6)1. Set square2. Film guiding roller3. Bag bottom folding supportFigure 6 Bag folding shaping mechanismThe positions of set square 1 and four film guiding rollers 2 have been adjusted before leaving the factory, without adjustment in the work. Bag bottom folding support 3 plays a role of assisting bag shaping, and can change the folding depth of bag bottom to some extent; loosen the fastening screw, and can rotate up and down, to make it fold to the appropriate depth, but do not rise too tight, otherwise it is easy to scratch the packaging film.2.6 Product feeding mechanismThe machine adopts the quantitative product feeding device composed by pneumatic piston measuring cylinder and double one-way valve, with adjustable packaging capacity and high measuring accuracy. As shown in Figure 71. Feed pipe2. Discharge pipe3. One-way valve4. Product feeding cylinder barrel5. Piston6. Product feeding cylinder7. Measuring adjusting nut8. Locking nutFigure 7 Product feeding mechanism2.6.1 After each cleaning or dismantling, install two one-way valves 3 with theacting force of internal valve plate downward.2.6.2 When installing the product feeding cylinder barrel 4 and piston 5, you shallmake them be concentric as much as possible, and do not rub each other in movement, to avoid the damage.2.6.3 The adjustment of measuring size: rotate the measuring adjusting nut 7inward, and make L in Figure 8 become shorter, can reduce the measuringcapacity; on the contrary, it can increase the measuring capacity, after the adjustment is completed, install the locking nut 8 and interlock with the measuring adjusting nut 7, to avoid loosening and affecting the measurement.2.6.4 Where excessive measuring accuracy arise, check whether all pipeconnectors are locked, or examine whether one-way valve 3 and piston 5 are worn; if the seal ring of piston 5 is worn badly, it may cause the leakage of piston rear-end.2.7 Film supplying mechanism:use the complete suspension type structure, and consist of film supplying mechanism frame, hole-punching machine, code printer, film supplying motor, film roller, proximity switch (film supplying detection), optical fiber and amplifier (cursor detection), and film automatic rectification device, etc.(see Figure 8).1. Film loading shaft2. Film supplying motor3. Thermal ribbon code printer4. Cursor detection5. Hole-punching machine6. Rectification detection7. Automatic rectification mechanism8. Film storage swing leverFigure 8 Film supplying mechanism2.7.1 Film loading shaft 1 is used to carry the film roll, adjust two catch wheels to theright and left sides when loading the film roll for the first time, make the film roll in the middle position (can measure the distance between both film roll ends and film mounting side panels with the ruler, to make equal), match the screws on the left side catch wheel with the top slot on the film loading shaft 1 and tighten, and have no need of moving the left side catch wheel when you load the film roll every time; after the left side catch wheel is fixed, use force in tightening the right side catch wheel.2.7.2 Film supplying motor 2 is controlled by proximity switch, when the packagingfilm is towed (including automatic operation, point feeding and manually drawing packaging film), and the swing lever 8 rises to the position of top proximity switch, film supplying motor 2 starts to operate and supply the film, and the fixed time of motor rotation is set by the program; when the swing lever8 goes down to the proximity switch at the bottom, indicating that this roll ofpackaging film is used up, the packaging machine will automatically shut down, then you need to replace the new packaging film roll.2.7.3 Thermal ribbon code printer 3, cursor detection 4 and hole-punching machine aremoved all round.2.7.4 Cursor detection 4 is composed of optical fiber head, fiber amplifier andauxiliary parts, and the distance between the end face of optical fiber head and baffle board is 3mm ~ 5mm; when the optical fiber head is fixed on the mounting plate, the tightening force of fixing nut (m6) shall not be too large, and the maximum tightening torque is 10kgf-cm; when the end face of optical fiber head is contaminated, clean it with lens wiping paper, and avoid scratching the end face of optical fiber head. When adjusting the cursor detection 4 forwards and backwards, use hole-punching machine 5 to cooperate with the adjustment, and make the front and rear positions of the holes on the packaging film are located at the pattern cutting of two packaging bags, i.e., the cutting line of thefinished bags; while adjust the cursor detection 4 to the right and left sides, make the center of red light-spot is located in the middle of the length direction of cursor block to be detected.2.7.5 The centre distance between two punches of hole-punching machine 5 has beenadjusted according to the size of the user’s packaging bags before leaving the factory; if the punch cannot conduct punching, the complete set needs to be replaced, and the original centre distance shall be assured during the replacement.The purpose of adjusting the right and left directions of hole-punching machine5 is to punch two holes in the center of the width direction of packaging film byusing the ruler for measurement, and those experienced people can adjust it according to the situation of the finished bags; the purpose of adjusting the front and rear directions of hole-punching machine 5 is to divide the hole into two in the final cutting; when adjusting the hole-punching machine 5, do not change the front and rear relative positions of cursor detection 4 and hole-punching machine 5; the cursor detection 4 is installed on the motherboard of hole-punching machine, so it shall be integrally moved to the front and rear sides.2.7.6 Rectification detection 6 is also composed of optical fiber head, fiber amplifierand auxiliary parts; it is used to detect the edge of packaging film, and to control the motor counter-rotating of automatic rectification mechanism 7, only need to be adjusted according to the actual situation.2.7.7 “Turning on”, “turning off” and sensitivity of fiber amplifier can be adjustedaccording to the fiber amplifier’s instructions that came with the machine.3. Electronic control system3.1 Composition of electronic control system!PLCThe machine adopts CPU224 type PLC produced by Siemens Company to control the main unit (packaging machine) completely, and has the features ofaccurate control and high reliability; PLC can complete the action control of packaging machine, automatic supply and automatic rectification of packaging film, and automatic shutdown without film.!Touch screenThe machine adopts industrial man-machine interface, having a clear and simple picture; can enter all pictures to set the parameters of packaging machine and adjust its performance; easily open and close each function, and separately debug each action through the function buttons of “debugging picture”.!Temperature controller (control meter)The temperature controller chosen by this machine has the characteristics of high accuracy, reliable and durable performance, can control the temperature of each heater accurately, and change conveniently.3.2 Electronic control system distribution!Operating box: hang in front of the main unit, can move and consist of touch screen and power supply switch, connect to device box by using cables and terminal jacks, and easy to operate.!Device box (behind the main unit): install PLC, switch power supply, leakage protector, relay, electromagnetic air control valve and other components.III. Operation and utilization1. Working conditions1.1 Ambient temperature:+15~+401.2 Packaging material temperature:Refer to the relevant part of User Information on IMCL-500Vertical-bag Capping Automatic Liquid Packaging Machine.2. Operating instructions of electronic control system2.1 Instructions for operating panel of main control boxThe operating panel of main control box consists of touch screen,temperature control meter, and “emergency stop” button, “start/stop”button and “product feeding switch” button (see Figure 9).盖封头温度1 ——Cap sealing head temperature 1盖封头温度2 ——Cap sealing head temperature 2左纵封头温度——Left vertical sealing head temperature右纵封头温度——Right vertical sealing head temperature横封底温度——Horizontal sealing back temperature横封头温度——Horizontal sealing head temperature触摸屏——Touch screen启/停——Start/stop急停——Emergency stop供料——Product feedingFigure 9 Operating panel of main control box2.1.1 Operating picture of touch screen"This is the selection picture of main menu operating language, as shown in Figure 10.(1) Selecting “Chinese” will enter the Chinese operating picture.(2) Selecting “English” will enter the English operating picture.Figure 10"Entering the English running picture, as shown in Figure 11.Figure 11English running picture can show the packaging speed, accumulated packaging quantity and “clear” button, and opening and closing of heating, conveyer belt, rectification, alarm and code printing function. You can enter directly into other pictures from this picture.Entering the picture of “parameter setting”, as shown in Figure 12.Figure 12“Parameter setting” picture can set the coordinated parameters of various actions, to determine whether the packaging machine can be operated normally. The following describes the meaning of the parameters in the parameter picture: Horizontal sealing time delay: delay the horizontal sealing action for a few seconds after the film drawing is completed. Horizontal sealing time: action time of horizontal sealing. Drop off delay: start to control motor dropping after seeing the upper limit photo electricity for a few seconds. Rise and drop frequency: the rise and drop speed of film drawing servo motor. Cut delay: start to control cut action after seeing the upper limit photo electricity for a few seconds. Cut time: action time of cutting. Product feeding delay: start to feed after seeing the upper limit photo electricity for a few seconds. Product feeding time: action time of product feeding. Vertical sealing reset: press the stop button for a few seconds and then return the vertical sealing to the original position. Returning: return to the running picture.Note:1. Non-professional operators are forbidden to change the parameters of this picture freely.2. The parameter value of “parameter picture” in the packaging machine shall backup in the form of pictures or texts, to avoid the loss of parameters if the machine electricity is off for a long time.• Entering the manual picture can operate and test single action of thepackaging machine (as shown in Figure 13).Figure 13Note: when operating this picture, you cannot press two buttons ormore buttons at the same time, to avoid the mechanism collision ofpackaging machine and the damage to the machine parts.•Enter “alarm picture”, as shown in Figure 14Figure 14(1) The paperless alarm of packaging machine: when the packaging film is usedup, the alarm picture will pop up and shut down automatically, the lightwill flash, prompting there is no packaging film, and the user must stop the machine for replacing the film.(2) Photoelectric alarm: in the track state, if the cursor has not be detected threetimes in succession, the alarm picture will pop up and shut down automatically,the light will flash, prompting the user needs to check the photoelectric position or the location of packaging film, and can press “alarm reset” to release the alarm after determining the failure reason.(3) Returning: return to the running picture3. Operation specification and method3.1 Installation of the packing machine3.1.1 Check the following items after unpacking!Check the parts according to the Appendix 6 Packing List of the manual, and check whether the documents are complete or not.!Check whether the packing machine is damaged or damaged affecting the usage in the transportation process or not.3.1.2 Installation work!According to Figure1, the installation of all parts of the packing machine should be aligned, and fasten the connecting bolts. Adjust the bearing screw to make 4 casters of the host rack away from the ground, and make the packing machine in the steady state.!Pipelines connecting with all gas pipes and circuits.!After finding out AC220V, 50HZ, connect the power line of the packing machine to the power of the grounding device well and reliably.!Connect the gas source and the pressure regulator connector of the packing machine.3.2 Power on ready3.2.1 The operator must understand and master this manual, and be familiar withthe performance, operation and adjustment method.3.2.2 Before power on, check the positions of all agencies are correct, themovement mechanisms are flexible and the ,fasteners and the connectors are loosened or not, and remove and clean the foreign bodies, oil, dust and so on.3.2.3 Install the packaging film in the middle of the film roll, and complete thetransmembrane work by the Appendix 5 Transmembrane schematic diagram.3.2.4 The adjustment method of the pneumatic two linkage pieces (refer toFigure 15): Lift the pressure regulator knob 1 of the two linkage pieces,and rotate the knob to close counter-clockwise. After starting the aircompressor to 0.7MPa, open the air supply valve, rotate the pressureregulator knob 1 on the two linkage pieces clockwise, and press the knobuntil the pointer of the air pressure meter 3 to the position of 0.65MPa.Note: Press the water drain valve to release the water and drain the sewage.Figure 153.2.5 Replace the character printing the production date or lot number of the thermalcoder, install the needed production date or lot number, and check whether the print colored tape is run out or not (the installation of the characters and replacement of the colored tape refer to the manual of the thermal coder).3.2.6 Check the inside cover of the electromagnetic vibration feeder reservoir cover isfill or not, if it is not enough, supplement it.3.3 Power on trial operation3.3.1 Rotate the power switch clockwise, so that the host connects the power, at thistime, the packing machine is in the standby mode.3.3.2 Parameters setting(1)Setting of each end head, back cover temperatureSet the value of all temperature control meter in the operating box, and implement the approximate setting according to the features of the packing materials by the debugging or previous experiences. This temperature control meter has the memory function, after setting the value once, do not need to set the value in the next time, and implement the minor adjustment according to the actual situations.(2)Thermal coding temperature settingThe thermal coding temperature should be set by rotating the temperature control knob on the thermal coder according to the actual situation.(3)Parameters settingThe parameters have been set before delivery or debugging by the after-sale personnel, if the data is not lost, do not need to set it.3.3.3 Adjustment of the cursor detection sensitivity. Adjust it according to thesupplied fiber amplifier manual, and the after-sale personnel shall explain itby sound.3.3.4 Packaging empty bag test and inspection.3.3.4.1 Operate on the touch screen Operating Screen, and open the “heating” button,“correction” button, “coding” button and “conveyor belt” button. Start the aircompressor until the pressure reaches 0.7Mpa, open the intake valve androtate the reducing pressure valve to 0.65Mpa. When all sealing machinesreach the set temperature (need about 15min~20min), implement the emptypackaging bag test (note: if need single test for the packaging machine,operate it on the touch screen Manual Screen).3.3.4.2 Press the “Start/Stop” button on the operation box, and the packagingmachine enters the working state.Implement the following inspections for the empty bags:!Check the sealing quality of the empty bag by tearing method, and observe whether the sealing is firmly or not.!Check the integrity of the empty bag. Observe whether the cutting position is appropriate, the bag shape is intact or not. If it is not appropriate, adjust it.!Check whether the printed production date or lot number is clear or not, if it is not clear, increase the heating time of the print head.After the empty packaging bag passing the inspection, start the machine.3.4 Start for working3.4.1 Press the “feeding” button on the operation box.3.4.2 Press the “Start/stop” button on the operation box for trial packaging, andcheck the packaging quality, sealing quality and measurement accuracy ofthe finished bags. If the packaging capacity, sealing quality, measurementaccuracy do not meet the requirements, adjust it by pressing “Start/Stop”button on the operation box again.3.4.3 After normal operating, sample the sealing quality, measurement accuracy,patterns of the finished bags, integrity of the bag shape, the clarity of theprinted production date or lot number, if find the problems, stop themachine for adjustment.3.5 Stop the machine to complete the work3.5.1 Press the “Start/Stop” button on the operation box, the packing machineshall stop working.3.5.2 Turn off the “heating” button, “correction” button, “coding” button and“conveyor belt” button on the Operating Screen.3.5.3 Cut off the power by the power switch of the counterclockwise rotationdevices box.3.5.4 Tune the barometer of the pneumatic two linkage pieces to zero, and closethe air supply valve. Turn off the power supply switch of the air compressor,and the compressor shall stop to work.3.5.5 Clean all parts, remove the debris, and clean the feeding system.4. Notes4.1 Before use the packing machine, connect the ground wire strictly, empty thewater in the compressor tank, water and dust in the micro frog separator, at the same time, press the pneumatic two linkage pieces water drain valve (Figure 15) to drain the water.4.2 When the packing machine is working normally, prohibit putting the handsor hard object into the longitudinal and horizontal cutting bodies, and prohibit using the hands and other goods to contact the film roll to prevent damaging the equipments and causing the danger.4.3 The longitudinal and horizontal sealing silicon rubber strip is prohibitedscratching by the sharp object to prevent damaging the rubber tape and affecting the sealing quality, replace the PTFE tape on the silicon rubber tape regularly to ensure the sealing quality of the finished packing bags and reduce the damage rate.4.4 The packaging film should not have the dust, oil, water and other substances.When the film is run out, stop the machine and install the new film in time, bond the front-end and end of the upper rolling film by the adhesive tape, and pay attention to integrity of the packaging film pattern to improve the utilization of the membrane.4.5 When the packing machine is working, pay attention that when the adhesiveposition in the packing film moves to the photoelectric switch and punching device, turn off the touch screen Automatic Operating screen “feeding”button to stop feeding after replacing the new film, recover the feeding and enter the normal operating state until the adhesive position passed the horizontal sealing cutting bodies.4.6 When the packing machine is working, the finished bag should fall into theconveyor by the gravity naturally, do not use the hands or other goods to contact it to prevent leakage and adhesion. Remove the finished bag after falling 2~3S natural cooling, do not press and impact to avoid leakage.4.7 The quality of the packaging film has the great influence on the sealingquality, and users should understand the quality requirements of the film of the manufacturer in selection (such as heat sealing, thermal bonding strength, penetration resistance, composite strength, thickness requirements, etc). The packaging film with the poor quality (such as uneven thickness, low composite strength, poor thermal sealing performance, etc) should be feedback to the film manufacturer and request to treat it properly.4.8 As the electromagnetic vibration management feeder is working in thevibration condition, pay attention to check the fasteners of all parts, if the parts are loosened, fasten them. And pay attention to inspection the board spring, if it has the cracks, replace it by the same group.4.9 When the power voltage exceeds 240V or lower than 198V transiently, thepacking machine may produce the abnormal phenomena as result of the instable voltage (automatic power off, missing actions, disordered display, etc.). At this time, turn off the power switch immediately, check the power quality, if necessary, and install the voltage stabilizer device. The time interval from each stop to the next start should not be less than 10S.4.10 Before daily work, clean the movement friction surface of the horizontalsealing cutting bodies and punching devices, remove the dirt on the surface, and fill the appropriate lubrication oil on the sliding axis of the horizontal sealing cutting bodies. All sliding and rotating parts should be filled the lubrication regularly.4.11 Adjust the air source pressure each time, rotate the pneumatic two linkagepieces regulator knob to the closed position, and allow to open the pressure regulator knob to the working pressure 0.65Mpa of the packing machine until the pressure of the air compressor tank is more than or equal to0.7Mpa.4.12 Use the soft cloth to wipe the dirt on the molding surface and guide rollersurface, and clean the oil and liquid mark on the film roll.4.13 When the room temperature is lower than +100C, do not start the machinefor working to prevent damaging the cylinder and resulting in the malfunctions, if the cylinder is leaked, repair or replace it in time.4.14 When the machine is shutdown for a long time, start the machine every 30days, the starting pressure is 0.7Mpa, after two working loops, turn the pressure to 0.65Mpa, and stop the machine after working for 10min.。
操作手册SUPER WRAPPER M-5000G S E R I E S1 注意事项在充分了解本机器性能,并在正确操作下,本机器可以安全、高效、高质量的顺利完成所指定的包装任务。
但是如果不正确使用本机器,则可能会导致故障或事故的发生。
在操作、测试、维修本机时必须注意以下几点:〈操作〉①在开机前和试机期间,操作人员必须听取设备的介绍、指导、直至完全熟悉该机为止;同时,操作人员必须仔细阅读本手册,完全掌握全部操作方法及各个注意事项。
②在更换操作者时,新操作者必须听取原操作人员的指导,直至掌握全部操作方法及各个注意事项为止。
③当操作人员因饮酒或过度疲劳而不能保持清醒时,严禁进行操作、调校或维修的工作,否则,容易导致故障或发生事故。
〈清洁、维修、检查〉①为了确保机器能够安全可靠的正常运转,请按照“第七章”的规定进行定期清洁、保养、维修和检查。
②在对机器维修前,为了确保安全,必须先把主开关扳至“OFF”,中断压缩空气的供应,打开空气管道(如果在机器上装配有),排净压缩空气,然后才可以开始进行。
③若有一人以上的操作者或维修人员同时在场时,更要保持小心,尤其在需要开机时,注意保持动作的相互协调和联系。
④在对电器设备的保养、检修期间,必须注意高压电源。
该工作必须由取得电工资质并通晓本机器电气设备的人员操作。
〈其它注意事项〉①为创造一个安全、良好的工作环境,机器周围的物品应摆放整齐,便于操作。
②严禁将安全外罩除去,以免发生危险。
③在机器没有外罩时,不能操作机器。
严禁在打开具有互连装置的外罩后,撤销连锁系统,对机器进行任何开机操作,否则很可能发生意外。
2 包装机整体示意图2.1 上供膜型包装机示意图3 安装及调试3.1 安装机器请不要在下列地点安装机器:(1)非水平位置▲解释——应以产品传送平面为参照,使该机器水平安装。
为了实现水平安装,需要将包装机放置在一个水平基础上,在所指平面(即产品传送平面)上装一个水平仪,调节机器的水平。
自动上袋阀口袋包装机是一种高度自动化的包装设备,它结合了自动上袋、计量、填充、封口等多个功能于一体,广泛应用于食品、化工、建材、医药等多个行业。
以下是对自动上袋阀口袋包装机的详细介绍:一、工作原理自动上袋阀口袋包装机的工作原理大致如下:自动上袋:通过机械臂或吸盘等装置,自动将空置的阀口袋放置在包装机的指定位置。
计量与填充:利用高精度的称重传感器和测量装置,对需要包装的物料进行精确计量,并通过特定的给料装置将物料填充至阀口袋中。
封口:当物料达到预设的填充量后,包装机会自动对阀口袋进行封口处理,确保物料的密封性和保存质量。
二、主要特点高效自动化:整个包装过程无需人工干预,大大提高了生产效率。
精确计量:采用高精度的称重传感器和测量装置,确保每次包装的物料量准确无误。
多种功能:除了基本的上袋、计量、填充、封口功能外,部分机型还具备自动打码、自动堆叠等附加功能。
易于操作与维护:设备设计人性化,操作界面简单易懂,同时易于进行日常维护和保养。
三、技术参数自动上袋阀口袋包装机的技术参数可能因不同型号和品牌而有所差异,但一般包括以下内容:包装速度:通常以每分钟或每小时能完成的包装数量来衡量。
称量范围:指设备能够准确计量的物料重量范围。
称量精度:表示设备计量物料时的准确程度。
电源与功率:设备的电源要求和额定功率。
适用物料:指设备能够包装的具体物料类型,如粉末、颗粒、流体等。
四、应用场景自动上袋阀口袋包装机广泛应用于以下场景:食品工业:用于包装面粉、糖、盐、奶粉等粉末状食品。
化工行业:适用于包装化工产品,如化肥、农药、颜料等。
建材行业:用于包装水泥、沙子、石灰粉等建筑材料。
医药行业:用于包装各种医药粉末或颗粒。
五、选购建议在选购自动上袋阀口袋包装机时,建议考虑以下因素:生产需求:根据自身的生产规模和包装需求选择合适的机型。
物料特性:考虑物料的流动性、密度等特性对设备选型的影响。
品牌与售后:选择知名品牌和具有良好售后服务的供应商,以确保设备的质量和后续维护。
ZKZD-500U型多功能复合膜
高速全自动制袋机
技
术
说
明
温州正昆印刷机械有限公司
本机特点:
本机采用双伺服加第三牵引机构,使放料及高架上材料以恒速被第三牵引电机向前连续牵引,保证了放料的平稳性及放料张力的稳定性,自动上料机构自动上料,减少了劳动强度。
整机结构合理加工装配精良,外形美观。
运行速度恰当噪音低稳定性好。
是一台目前国内性能结构最优的设备。
1技术参数:
机器功能:三边封。
主要电器配置:主要电气配置牵引双伺服电机,配台湾产工控计算机触
摸屏,主驱动为交流电机配台安变频器。
温控16路放
卷恒张力。
适合基材:BOPP. COPP. PETPVC尼龙等塑料复合膜多层共挤薄膜,镀铝复合薄膜,纯铝箔复合薄膜。
机械最高节拍:150次/分
最高放料线速度:≤36米/分(视材料而定)
制袋尺寸:长度400毫米,超过此长度采用倍送实现,(最大6倍送)最大宽度500毫米。
料卷最大尺寸:∮600*1050毫米(直径*幅宽)
定位精度:≤±0.5毫米
热封刀数量:纵封采用4组上下加热,上下冷却;横封采用3组上下加热,2组上下冷却。
温度电热块数量:16块
温度设定范围:0~300℃
整机功率:40KW(实际使用刚通电开机时功率一般在30KW左右,
保温时一般功率在20KW左右)
外行尺寸:9000*2000*1870毫米(长*宽*高)
整机净重:约4500公斤
颜色:银灰色罩壳,黑色机身
控制系统型号:SSF-IV型复合膜高速制袋机控制系统。
二、设备配置及相关参数
1、放料装置
a) 结构型式,b) 图式水平工位(由磁粉制动器、气缸、摆辊、变频
器、电机、牵引辊传感器及控制系统组成)。
c) 放料轴,d) 气涨轴加气动锁紧装置。
1放料张力
b)控制机理:由电脑控制、粉制动器、变频器与交流电机传感器与
旋转编码器。
气缸对摆辊组成的复合型恒张力系统。
c)调节驱动:PID调节PWM驱动。
d)检测方式:传感器与旋转编码器综合检测。
2对边
结构:可调胶辊中心,双向旋转式调整结构。
形式:手动调节(调节手轮)。
4、上下对花
结构:双支棍筒上下调整。
形式:手动调节(调节手柄)
5、纵封装置
结构:组合式桥梁结构
驱动:主电机驱动动力杆
传动:偏心机构联杆垂直运动
数量:4组
长度:热刀800mm 冷刀400mm
6、横封装置
结构:大梁垫决式烫压合结构
驱动:主电机驱动动力杆
传动:偏心机构联杆垂直运动
数量:加热3组,冷却2组
长度:540mm
7、薄膜牵引
结构:气动式胶辊压合摩檫式
驱动:中惯量数字式交流伺服系统(日本进口1.5KW,1KW各1只、2000r/m,松下伺服电机)
传动:M型同步带轮传动,速比1:2.4
控制形式:电脑集中控制
检测方式:光电传感器结合接近开关综合控制
8、中间张力
结构:气压或浮动张力辊结构
控制形式:电脑集中控制,动态运动补偿
检测方式:无触点接近开关
浮辊张力调整范围:0~0.6Mpa,气压中间牵引电机补偿范围
1~10mm(电脑设定,自动补偿)
9、主传动装置
结构:由柄摇杆推拉式四连杆结构
驱动:3.7KW变频器驱动3KW三相异步电机
传动:主传动电机带1:13减速机
控制形式:电脑集中控制
运动方式:主电机运动带动框架上下垂直运动
10、自动定位装置
方式:(1)、电脑自动定长控制方式精度:≤0.5mm (2)、反射式光电传感器跟踪检测精度:≤0.5mm 光电搜索范围:0~10 mm(范围大小电脑可设定,自动搜索)
修正补偿范围:±1~±5mm
定位修正方式:光电及伺服电机编码器反馈电脑控制
11、温度控制装置
检测方式:热电偶检测K型
控制方式:电脑集中控制,固态继电器驱动PID调节
温度设定范围:0-300度
测温点:电加热块中段
12、切刀
结构:上切刀+调整装置+固定下切刀
形式:导杆直线轴承气动顶拉剪切式
传动:借用偏心轴动力
调整:水平移动,拉动手柄可调节裁切角度13、收边料机
结构:卧式往复丝杆收料结构
驱动:交流电机驱动
控制:传感器
14、冲孔装置
结构:弓型座气动式冲模
控制形式:电脑集中控制
驱动:电子开关驱动电磁阀(DC24V)
冲孔座:导轨式支撑弓型座手动水平微调结构调整量:±12mm
气缸:气动控制
模具:凌孔或圆孔
数量:2组
15、倍送装置
结构:气动垫块异步隔式
控制形式:电脑集中控制
驱动:电子开关驱动电磁阀(DC24V直流)动作方式:七组横封异步动作
倍送次数:从2~6倍送(电脑内可以设置)16、自动输送装置
结构:O型水平工位
驱动:固态继电器驱动,齿轮减速单相电机
传动:斜齿轮传动
输送距离及输送数量:电脑内自由设定
控制形式:电脑集中控制
三、配套设施(用户自行解决)
电源:三相380V±10%50HZ
带零线,地线(R.S.T.F)
容量:≥75KW
气源:35升/分(0.6Mpa)
冷却水:15升/分
四、选配装置(不含在报价内)
1增加冲孔
多于基本配置的4组冲孔,要声明,价格另计
2异型封刀
根据用户要求特制
五、包装方式:简易防潮包装
六、运输方式及运费
七、机器价格(不含选配装置)
八、其他条款详见合同正本
九、主要关键件清单:
注意:本机和其它厂家结构不同之处:
1、采用三牵引机构,使放卷及开卷部份连续匀速向前牵引,从而保
证放料张力恒定,中间分切口整齐,对边对花稳定。
2、自动上料装置可使大卷上料变得轻松简单。
1、Delivery: Within 25days after the confirmation of order(订单确认后25天)
2、Payments: 30% Deposit in advance , 70% balance paid before
shipment(30%订金,余款验机后付清)
3、Package: In wooden case without fumigation(木箱包装)
4、After sale service : One year Guarantee (保修一年)
1) The Seller will send an engineer to Buyer's country to
commission the machine staying there about 7 days.(卖方负责在7天内免费安装调试机器)
2) The Buyer should pay for the charges covering round-trip
tickets, transportation fees, accommodations, and any other
charges happened during the stay in Buyer’s country. I f over
7 days, the Buyer should pay USD 30.00 for the engineer one
day(买方负责技术员的往返机票、食宿、交通费用等支出。
如果调试时间超出7天买方需额外支付50美金每天)。