优异的传输带来优质的声音表现Kubala-Sosna Temptation USB线
- 格式:pdf
- 大小:2.12 MB
- 文档页数:3
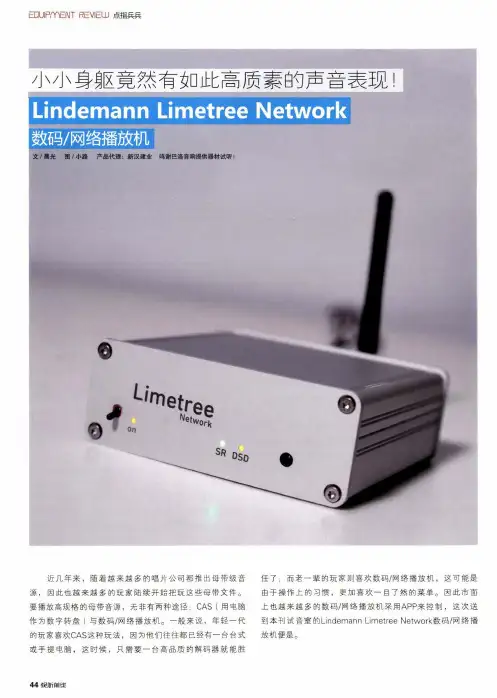
EDUIPmENT REVIEUJ 点指兵兵文/展光 图/小路 产品代理:新汉建业 鸣谢巴洛音响提供器材试听!近几年来,随着越来越多的唱片公司都推出母带级音 源,因此也越来越多的玩家陆续开始把玩这些母带文件。
要播放高规格的母带音源,无非有两种途径:CAS (用电脑作为数字转盘)与数码/网络播放机。
一般来说,年轻一代 的玩家喜欢CAS 这种玩法,因为他们往往都已经有一台台式 或手提电脑,这时候,只需要一台高品质的解码器就能胜任了;而老一辈的玩家则喜欢数码/网络播放机,这可能是由于操作上的习惯,更加喜欢一目了然的菜单。
因此市面 上也越来越多的数码/网络播放机采用APP 来控制,这次送到本刊试音室的Lindemann Limetree Network 数码/网络播 放机便是。
44彳師前崖银禧之年的Lindemann要介绍这款Limetree Network数码/网络播放机,就不得不介绍Lindemann的历史,因为现时的SACD的标准,也少不了Lindemann的身影。
Lindemann,可能老一辈的发烧友都对其相当熟悉,Lindemann Audiotechnik由Norbert Lindemann在1993年创立,第一款推出市场的AMP1合并功放以价廉物美著称。
随后,1997年的AMP4合并功放、以及全球首部采用升频技术的CD唱盘CD1,让Lindemann在高级音响市场奠定了不可动摇的地位。
与此同时,Lindemann也是德国第一个全面研制SACD的音响厂商,首部SACD唱盘D680在2002年初推出,两年后推出的820更被誉为全世界声音最好的SACD机之其中采用独家研发升频线路HiDRA使得SACD音质大幅度提升,许多发烧友是通过SACD0昌盘进而认识Lindemann这家公司。
2002年秋季推出B60和B90两对喇叭,接着在2005年推出了新设计的830前级和双单声道后级850,使其成为德国少数具备全线研发生产能力的音响厂商。
综合类1最强大而全面的软音源Hypersonic2简单易用的GM音色插件Hyper Canvas3超级四大件----Edirol HQ—QTSuper Quartet4张CD盘的超级音色库Plugsound Box5Cakewakl Studio Instrments的经典四大件SI—Bass Gitar SI-Drum Kit SI-Electric piano SI—String Section 6“巨人”的声音—————Colossus7软音源中的坦克装甲车-—-—SampleTank28酷似Hypersonic的LUXONIX Purity9小巧实用的韩国ravity合成器套件10国产的免费综合软音源Digital Sampling Arts Falcon2常规管弦乐音色类1最实用的管弦乐音源Edirol HQ Orchestral2制作管弦乐的最佳选择Symphonic Orchestrat系列超级巨无霸----白金版(Platinum Editon)个人工作室的最佳选择—--黄金版(Gold Edion)小巧实用的银版—--(Silver Edion)3古典华丽的Miroslav Phiharmonik4电脑里的合唱团-——-Symphonic Choirs打击乐1强大无比的流行鼓王---—-Fxpansio BFD2超级鼓手Addictive Drums3虚拟的鼓手-Steinberg Groove Agent24电子打击乐的首选———Drums Overkill5富有异乡风情的打击乐Wixoo Latigo 和Darbuka第1章带你走进软音源的时代 11.1 电脑音乐的两个时代-—硬件时代和软件时代 11。
2 软音源插件的基础知识概述 41.2.1 软音源和传统硬音源相比,有哪些优点? 51。
2。
2 使用软音源来制作音乐,需要什么样的电脑配置? 71。
2.3 专业音频卡的选择 101。

蓝牙拨号器---纽曼BT08全键盘蓝牙耳机测评蓝牙拨号器纽曼BT08全键盘蓝牙耳机测评蓝牙拨号器行业主导厂商纽曼普安又推出一款iPhonehome家族的新成员——BT08,新品BT08是一款全新设计理念产品,拥有简洁美观的外形,体积小巧,按键面呈微凸弧面,体现细微曲线美,透明显示符号及字符,水晶质感与金属色泽巧妙搭配彰显魔幻效果。
仅从外观就能看出这是一款精心打造的工艺品。
纽曼BT08 蓝牙拨号器虽然被称为工艺品,但iPhonehome BT08不但具有超大(1000)容量通讯录、最近通话记录、拔打电话、重拔等全方位语音通讯所需功能,而且更要说明的是在小巧的机身内还配备了280毫安时的电池。
并在语音通讯上又产生突破——支持耳机线控功能。
这算不算是iPhonehome BT08的仅有的特点呢,下面我们就一起来看看这个产品的细节吧~iPhonehome BT08测评之产品定位品味BT08一定要从他的精美造型说起,其精美的外观是介乎于电子产品和饰品之间的一款产品,其实BT08的诞生还是令我们比较意外的,毕竟在人们的心目中深圳的电子产品最著名的就是山寨二字。
而精美的产品不但要有创意的设计,更加现实的是产品成本的增加。
在蓝牙拨号器、深圳这样的字眼面前的确BT08这样的产品确实给人们带来了惊艳~实际体验如何呢,接下来我们继续观察吧。
Shen Longbao look in the eyes, for a chance to kill him. ShenLongbao behind smart to keep gendarmes, picked up a brick reservoir in cotton vest, walked into a small alley corner, seeing four weeks nobody will step up and pulled out bricks Asahi on military police knocked down. Unsuspecting Japanese military police was flaccid paralysis. Shen Longbao picked the Japanese military police gun in cotton vest, leave精致的产品来了,谁来使用呢,在这里我们采访了纽曼普安负责人李斌,他说,下一阶段,大屏将是手机的一个趋势。

OVERVIEW:This product is a far more advanced version of our original Seek Wah and Seek Wah II. Basically the Super Seek Wahis sort of a combination of a tremolo pedal and a wah wah pedal. If you’re familiar with seventies synths, it’s exactly like an analog sequencer controlling a mellow band pass filter. New features include: tap tempo, MIDI tempo control, glis-sando, expression pedal control over tempo and glissando, adjustable number of stages from 1 to 16, automatic tempo slowing or speeding (delta), savable/loadable presets and more!GETTING STARTED:Important Note: In order to accommodate all of the Super Seek Wah’s features, there are some instances where a knob may control more than one parameter. This is indicat-ed on controls that have a slash in their label. For example: the 16 mini step knobs can be set to control either the “wah” for that individual step, or “groove” for that individual step. A mini toggle switch labeled “groove/wah” assigns the function of those 16 mini knobs. Another couple examples of this type of multi-function are the “tap div/delta” and “steps/preset” knobs. These are not your father’s knobs! They are rotary encoders, kind of a cross between a knob and a switch. They can turn like regular knobs, they can be pushed down and turned, they can be pushed down and held, and they can be pushed and released. The parameter to the left of the slash is controlled by turning the knob nor-mally. The parameter to the right of the slash is controlled by pushing down the knob and turning it while depressed. We’ll cover all of that specifically later.If you’ve used a Ringtone before you’ll see the familiar Step/ Seq /Rnd mini toggle switch on the upper left. Seq and Rnd are modes where the pedal’s brain moves you from step to step, either sequentially or randomly. Step mode al-lows you to advance from step to step manually by tapping on the “tap/hold” button.SPEED CONTROL:There are four different ways to control tempo. The “speed” knob, the “tap/hold button”, MIDI clock input (from a computer or other MIDI device), and the expression pedal input (a 1/4” standard TRS synth-type expression pedal). You’ll see quickly that adjusting the speed control overrides the previous tap tempo setting, tapping then overrides the previous speed control setting, and MIDI overrides all. TYPE: Vexter Series [V] | MODEL: SUPER SEEK WAH™SPEED KNOB:Set as you like.TAP TEMPO:Tap Tempo has become a fairly common way to manually enter tempos into time based pedals like delays, tremolos, etc. The Super Seek Wah powers up in Tap Tempo mode. Tap Tempo captures and uses the time between your last 2 taps as a foundational pulse. From there, you turn the “tap div/delta” knob normally (without pushing) to select how many steps the sequencer travels in between tap pulses. The chart below lays out your options in multiples.STEP MULTIPLIER:MIDI CONTROLLED TEMPO:The Super Seek Wah may be clocked by any device that outputs MIDI clock information. It considers only the clock portion of MIDI data. MIDI clock will take priority over the speed knob, tap tempo, and expression pedal controls. If the MIDI clock is stopped at any time, the sequencing will freeze until you tap in a new tempo, turn the speed control, or MIDI clocking resumes. The “tap div” control applies to MIDI clock similarly to tapped tempos. But now your op-tions are the note values listed below.STEP NOTE:NUMBER OF STEPS:The “steps/preset” knob allows you to choose how many total steps are in your sequence. Turn the knob without pushing to select how many steps before the sequence starts over. You can select any number from 1 to 16. ADJUSTING THE WAH SEQUENCE:Adjusting the individual sequence controls (there are 16of them) will change the wah sounds when the “groove/ wah” mini toggle switch on the right hand side of the pedal switch is set on “wah”.Congratulations!You’re the proud owner of the Z.Vex Effects Vexter Super Seek Wah!™1 2 3 4 5 6 7 8²/ 1 2 3 4 6 8 16³Page 1 of 4ADJUSTING THE GROOVE () SEQUENCE: If you wish, you can individually change the rate at which each step moves to the next, causing less of a sudden step and more of a glide to the next step in the sequence. Set the “groove/wah” switch to “groove” to access this feature. ADJUSTING THE GLISSANDO GLOBALLY:There’s a knob on the upper right labeled “gliss” which globally adjusts all glissando rates between steps to the same value. It’s labeled differently from the “groove” switch to remind you that it adjusts all of them at once, so it’s not quite as “groovy.” ADJUST THIS ONE FIRST. If youadjust the individual groove settings and then try to adjust the global glissando setting, it will erase all of the groove settings and every step will follow the global glissando con-trol alone. You can, of course, go back and set your groove settings, but remember this to save yourself time and ag-groovation… set the glissando first, then get groovy, baby. Just to try to help you understand these controls, here is a not-so-brief summary. If you never adjust the gliss knob or set the switch on the right to groove and twist any of the16 sequence knobs, your steps will all be hard and quick, jumping from one to the next very quickly like, well, steps. You can smooth out the movement between steps with the gliss knob, and they’ll all smoothly move the same from step to step, getting more smeary as you turn it up. Or, you can switch the small toggle on the right to groove and individu-ally adjust how much glissando is applied to each step, causing some steps to be sudden and others to glide. Or, you can do both… adjust the whole bunch of them glob-ally with the gliss knob and then set the groove switch and groove on using the 16 small knobs, but please do it inthat order, and do not go back and adjust the gliss knob or you’ll have to start grooving all over again. Got it? Probably not. Just go screw around with it and something good will happen.DELTA CONTROL:We came up with this mode where the tempo can speed up and slow down, and the rate at which that happens we call DELTA.To activate DELTA mode, push and release both the “tapdiv/delta” and “steps/preset” knobs at the same time. Each push moves the mode led next to the “tap/hold” button. Stop when you get to delta.When the “tap div/delta” knob is held down and turned, it adjusts the delta rate. This controls the rate of change when the pedal is speeding up or slowing down. Selecting the little arrow pointing left on the mini toggle switch causes the tempo to decelerate when you step on the “tap/hold” but-ton. When you release that button, the speed snaps back to the original tempo. Fun, huh? If you choose the little arrow pointing right then press and hold the “tap/hold” button, it speeds up until you let go of the “tap/hold” button. Then it again snaps back to the original tempo. Want even more fun? Put that little switch in the middle between the arrows. Now, when you hold down the “tap/ hold” button it’ll alternately slow down and stay there (when you release the button), then speed back up and stay there (after the next hold and release) and so on, alternating faster to slower. This middle position of Delta behaves a little differently when the pedal is being clocked by a MIDI device. It will alternately speed up and slow down as before, but instead of remaining at the tempo when released, it will snap back to the MIDI clock. Remember, the rate at which this all takes place is controlled by the “tap div/delta” knob… just hold down and turn the “tap div/delta” knob to adjust it to one of the sixteen different rates. HOLD:When the “tap div/delta” and “steps/preset” knobs are pushed simultaneously for a moment, you can change the function of the “tap/hold” switch and select HOLD mode.In this mode, the sequencing stops when you push and hold the “tap/hold” switch, and continues when you let go. This feature works with MIDI clocking and all other tempo choices.GO TO 1:This is another function of the “tap/hold” button. Whenever you want the sequence to go directly to 1 and collect $200, tap the “tap/hold” switch ONCE. You have to be in TAP TEMPO mode (to get there, push and release both the “tap div/delta” and “steps/preset” knobs to cycle through the modes). Important Note: this is a really cool trick, butif you tap too close together you will wind up entering a new tempo. Using this feature with MIDI is really fun, and you don’t have to worry about tapping too often. You can interrupt your sequence at any time, and jump back to the beginning. This allows you change the sensation of your sequence by moving the apparent start point. You can also stutter the beginning of your sequence to complicate the pattern.EXPRESSION PEDAL INPUT:You can control either tempo or global glissando settings with an external expression pedal. Simply plug an expres-sion pedal into the input on the back of the Super Seek Wah with a ¼” TRS cable. Set the expression pedal mini toggle switch to either “gliss” or “speed”. That assigns control of the selected parameter to the expression pedal, and simultaneously disables the corresponding knob on the pedal. When using the Super Seek Wah without an external expression pedal, put the expression selector switch in the OFF position. And there’s one more secret thing you cando with the expression pedal. If you have the expression set to control “speed” but you also have the Step/Seq/Rnd toggle in “Step” you’d think nothing would happen, right? Wrong! In this setting you can glide forward and backward through the stages dependent on the position of the expres-sion pedal.I N D I V I D U A L G L I S S A N D OPage 2 of 4EXTERNAL TAP IN/OUT:There’s one more ¼” jack on the back that lets you slave your other Super Seekers(as well as most other pedals with a ¼” tap tempo in/out jack) together, or use an external momentary switch to tap in tempo remotely. When Super Seekers are connected to each other’s tap in/out jack, tap-ping on any one of them will cause all of them to jump to that tapped tempo.SAVING PRESETS:If you come up with a favorite program and you want to be able to recall it later, there are 8 “slots” in which a com-plete setup can be stored. To prepare for storage, push the “steps/preset” knob down and turn it to one of the 8 slots (one led in the first 8 steps will indicate which slot you’ve selected). Next, get your programming all done, adjusting your individual settings and fine-tuning the pedal until you’re happy. When you’re ready to save your settings, hold down the “steps/preset” knob and then push and hold down the “tap/hold” button until you see a couple of LEDs flicker next to that button. Your program is saved and will remain in memory even if the battery is removed from the pedal. What exactly gets saved? Glissando and groovy settings, last tempo settings, your last chosen mode (HOLD, DELTA, TAP),your chosen number of stages, tap/midi division, and DELTA setting. The DELTA toggle position and STP/SEQ/RNDtoggle position are also saved. The expression toggle position and GROOVE/WAH toggle position are not saved. RECALLING PRESETS:To access a saved preset, push down and turn the “steps/ preset” knob until you get to the slot you wish to recall. Re-lease, and voila! You’ve recalled your preset. You might have to reset the expression toggle position and GROOVE/WAH toggle, those settings are not saved.HOW TO SAVE A SETUP WHEN YOU’RE NOT IN THE SLOT WHERE YOU WANT TO SAVE IT:That was a mouthful. When you’re fooling around with the Super Seek Wah and come up with a really cool setup that you want to save, you may suddenly realize that you aren’t parked in the slot where you want to save it. In fact, you may be parked in a slot that you really don’t want to write over. What to do? Very simple, really, but be careful. Pick a slot that you (probably) don’t care about, or may be empty. Push in the “steps/preset” knob and rotate it to the slot that you want to over write. DON’T RELEASE IT! Now push down the “tap/hold” switch and wait until you see the happy blinky LEDs illuminate next to it. You’ve just saved your set-tings in the selected slot.If you accidentally release the “steps/preset” knob before you push and hold the “tap/hold” switch, you’ll wind up loading whatever preset was chosen (if there was one stored there), and lose the settings you were trying to save. Also, if you chose a slot that you thought contained nothing important and it was actually a really wonderful setup that you never ever ever wanted to lose, you just lost it. DON’T DO THAT! There are 8 program slots for you to fill with your creative genius. We left ourselves a little extra room in the Super Seek Wah’s brain for code updates. Just in case we think of something really fun to add later. Although activat-ing more features may eventually require pushing all buttons at once, while rubbing your nose on the back of the unit. INTERNAL CONTROLS:Inside the pedal you’ll find a trim pot for changing the global Q setting (frequency sweep from top to bottom) of the wah. The pot is set here at the shop for maximum range. POWERING YOUR PEDAL:We highly recommend that you use a high-quality 9VDC power supply with your Super Seek Wah with at least100mA capability. It should have a center-negative BOSS-type barrel connector. The pedal can operate using a 9V battery but do not expect much battery life… this thingis a power hog because of all of the LEDs and the micro controller.WARRANTY:As with all Z.Vex Effects, we will be very happy to help you out and fix up any damaged or defective Z.Vex product. To extend your Vexter’s warranty from 1 year to 2, please fill out the enclosed warranty card and mail it to us, or contact **********************************.Feelfreetocontact ********************/************************* questions.Enjoy!WE’VE INCLUDED A PHOTO OF THE SUPER SEEK TREM™ON THE REVERSE OF THIS PAGE FOR YOUR CONVENIENCE!Page 3 of 4P |*************|****************Last Updated: December 2013Page 4 of 4。

漫步者原子豆编解码【最新版】目录1.漫步者原子豆编解码器介绍2.编解码器的原理与特点3.应用范围与实际效果4.总结正文漫步者原子豆编解码器是一款性能出色的音频处理设备,适用于音乐制作、影视后期制作等领域。
它能够实现音频信号的高质量编解码,提供高品质的音频体验。
编解码器的原理是通过对音频信号进行数字信号处理,将模拟音频信号转换成数字信号,以便于存储和传输。
在播放时,再将数字信号转换回模拟信号。
这种处理方式能够有效地降低音频信号在传输过程中的损耗,保证音频质量。
漫步者原子豆编解码器采用了先进的数字信号处理技术,确保了音频信号的高保真度。
漫步者原子豆编解码器具有如下特点:1.高采样率:编解码器支持高达 32 位的采样率,使得音频信号的细节表现更加丰富,提高了音频质量。
2.高比特深度:比特深度是指音频信号的数字量化精度,漫步者原子豆编解码器支持高达 24 位的比特深度,使得音频信号的表现更加细腻,降低了数字失真。
3.多种格式支持:编解码器支持多种音频格式,包括 MP3、WAV、FLAC 等,满足用户不同的需求。
4.便捷的操作:漫步者原子豆编解码器采用一体化的设计,用户只需连接音频设备即可使用,无需复杂的设置。
漫步者原子豆编解码器在音乐制作、影视后期制作等领域有广泛的应用。
在音乐制作中,编解码器能够提供高品质的音频信号,使得音乐作品的表现更加细腻丰富。
在影视后期制作中,编解码器能够确保音频信号的高质量,提升观众的观影体验。
总的来说,漫步者原子豆编解码器是一款性能出色的音频处理设备,能够实现音频信号的高质量编解码,提供高品质的音频体验。
纽 曼 之 音 B90 系 列用 户 手 册 VM 961您 好:感谢您选用本公司生产的MP3数码播放器!为了使您尽快轻松自如地操作您的MP3数码播放器,我们随机配备了内容详尽的用户手册,您可以获取有关产品介绍、使用方法等方面的知识。
使用您的MP3播放器之前,请仔细阅读我们随机提供的所有资料,以便您能更好地使用该产品。
在编写本手册时我们非常认真和严谨,希望能给您提供完备可靠的信息,然而难免有错误和疏漏之处,请您给予谅解并由衷地欢迎您批评和指正。
如果您在使用该产品的过程中发现什么问题,请及时拨打我们的服务热线,感谢您的支持和合作! 本公司对于因软件、硬件的误操作、产品维修、电池更换或其它意外情况所引起的个人数据资料的丢失和损坏不负任何责任,也不对由此而造成的其它间接损失负责,请随时备份您的数据资料到您的台式(笔记本)计算机上。
同时我们无法控制用户对本手册可能造成的误解,因此,本公司将不对在使用本手册过程中可能出现的意外损失负责,并不对因使用该产品而引起的第三方索赔负责。
本手册中的信息如有变更,恕不另行通知。
本手册信息受到版权保护,其任何部分未经本公司事先书面许可,不准以任何方式影印和复制。
● 产品及产品颜色款式请以购买的实物为准。
● 本公司保留对本手册、保修卡及其相关资料的最终解释权。
注意事项★如果长时间不使用本播放器,请务必将电池取出放置以防止电池因过量消耗引起腐蚀或漏液而导致播放器损坏。
★不要在特别热、冷、多尘或潮湿的环境中使用播放器。
★使用时不要让播放器摔落、或与硬物摩擦撞击,否则可能会导致播放器表面磨花、电池脱落或其它硬件损坏。
★不要私自拆卸、修理和改造。
★在下列情况下请进行充电:☆如在正常操作中播放器电池图标为24按:外观及按键说明5基本操作一、开机/关机(1)在关机状态下短按一下开机键即可进入开机画面。
(2)在开机状态下长按播放键数秒钟,就可以把播放器关闭了。
二、连接到PC在计算机开机状态下将MP3播放器直接插入计算机的USB接口就可以进行USB数据传输。

Module Audio Music Hub说明书一门三杰 打造蓝牙传输新体验 Module Audio魔族音响最近一次过推出了两款“画中音”系列的Hi-Fi音乐播放设备,包括Minibar和Music Hub两款产品。
Minibar的中文名叫做魔音棒,而Music Hub则被称为音乐中心。
此外还有一款专供以上两款产品组合使用的超低音产品,这款“脉动之音”系列的Sonic boom低音炮有2英寸和3英寸两个型号。
由魔族音响推出的这3款产品,主要针对那些喜爱通过智能手机、平板电脑或者笔记本电脑听歌的影音玩家,通过简单的蓝牙搜索、配对、传输即可实现高品质的音乐播放,并且免除了连接线的烦恼。
Music Hub音乐中心 可能许多朋友和笔者一样,第一次看到Music Hub的时候会感觉它的外形与一台收音机十分相似,突然间让人联想到抬着收音机在路上摇曳的街舞青年。
而Music Hub音乐中心的设计思路就是从音乐分享出发,希望用户可以通过它与身边的朋友和家人分享自己喜爱的音乐,并且可以在任何地方、任何时间进行数字音乐的播放。
Music Hub音乐中心的箱体颜色主要由黑色组成,正面和背面的金属网罩为灰色,两者的搭配低调而沉稳。
箱体上设计了360度可旋转式手提支架,可通过这个支架任意调整听音角度,让Music Hub音箱的摆放随意而不受拘束。
Music Hub整个音箱的喇叭单元部分占据了音箱整体的80%,左右两边各有两个模组,每个模组包括1个超薄花瓣形喇叭和1个被动辐射器,其采用了左右单声道双模组对称式设计结构,也就是说前后双向扩声,可有效消除箱体振动。
Music Hub独特的前后双面发声设计令声音的覆盖面更加广阔,提供给听者更大的聆听自由度。
透过金属网罩可以隐约看到里面的银色花瓣形喇叭单元,正面的两个喇叭单元位于上方,而背面的两个喇叭单元位于下方。
Music Hub的操作面板位于音箱的顶部,上面设有一排共6个按键,从左至右分别是开关机按键、AUX按键、蓝牙按键、静音按键、音量减少按键和音量增加按键,并且对应前面板的指示灯。
Razer Surround gives gamers the best virtual 7.1 channel surround sound experience with any stereo headphones.Current generation virtual surround technologies are often inaccurate given that every individual has a unique response to simulated sound stages – as such, virtual surround sound is often regarded as inferior to discrete surround sound set ups.Using state-of-the-art technology, the surround sound algorithms powering Razer Surround creates an unbelievably accurate surround sound environment and allows gamers to calibrate positional sound to match their own unique preferences. This level of calibration allows Razer Surround to provide an incredible level of precision in-game, allowing gamers to have the unfair advantage.The bullet that just whistled past you or the high-rev engine of the Formula 1 car coming up from the rear just got real with Razer Surround. Immerse yourself in the ultimate sound experience made justfor you and your games.TABLE OF CONTENTS1. SYSTEM REQUIREMENTS (2)2. INSTALLATION (2)3. ACCOUNT MANAGEMENT (3)4. USING RAZER SURROUND (8)5. LEGALESE (18)1. SYSTEM REQUIREMENTSSYSTEM REQUIREMENTS∙Windows® 8 / Windows® 7∙Internet connection∙At least 200MB of free hard disk spaceDisclaimer: All features listed in this Master Guide are subject to change based on the current software version.2. INSTALLATIONINSTALLING RAZER SURROUNDRazer Surround is an audio configurator that is installed onto your PC for use with your headphones, headsets and even earphones. Razer Surround’s user interface is accessed via the Razer Synapse 2.0 client.Step 1. Download the Razer Synapse 2.0 installer from /synapse2/.Step 2. Run the installer and follow the on-screen instructions.Step 3. Download the latest version of the Razer Surround installer from /surround.Step 4. Launch the downloaded installer.Step 5. Wait for the installation to complete.UNINSTALLING RAZER SURROUNDIf you have a previously installed version of Razer Surround or if you wish to completely uninstall the program,Step 1.Navigate to your Control Panel and select Programs > Uninstall a program. Step 2.Right-click on the Razer Surround entry in the list and select Uninstall.Step 3.Follow the onscreen instructions to complete the uninstallation.Step 4.Restart your computer when prompted.3. ACCOUNT MANAGEMENTCREATING AN ACCOUNTRazer Surround works on the Razer Synapse 2.0 client. Hence, please register for a Razer Synapse 2.0 account as follows:Step unch Razer Synapse 2.0 from the Start menu.Step 2.Click CREATE ACCOUNT at the bottom of the client.Step 3.Enter a valid Email address.Step 4.Enter your Password. Re-enter the Password for confirmation.Step 5.Click the links to read the Subscription Agreement and Privacy Policy. Check the I have agreed to the Subscription Agreement and Privacy Policy box ifyou agree to be bound by the terms stated.Step 6.Click CREATE ACCOUNT.Step 7.Check your email inbox for an account verification email from Razer.Step 8.Verify your Razer Synapse 2.0 account by clicking on the link in the email. Step 9.Return to the Razer Synapse 2.0 client and login using your registered account.ACCESSING RAZER SURROUND’s USER INTERFACEStep unch Razer Synapse 2.0.Step 2.Enter your account’s Email address and Password.Step 3.Check the Stay logged in box ONLY IF you wish to automatically login to Razer Synapse 2.0 using this account each time you launch the client.Step 4.Click LOGIN.Step 5.All Razer Synapse 2.0 supported devices connected to your computer will be detected and listed on the bottom left area of the client. Click the RazerSurround icon to access the Razer Surround user interface.GOING OFFLINEInternet connection is required to log into Razer Synapse 2.0. Once you are logged in, you can choose to activate Offline Mode. Most functionalities aside from software update of your Razer Surround software works in offline mode.Go offl ine by clicking your account name on the top right corner and select “Go Offline”.SIGNING OUTSign out from Razer Synapse 2.0 by clicking your account name on the top right corner and select “Change User”. To completely close Razer Synapse 2.0, right-click the Razer Synapse 2.0 icon on your system tray and select “Close Razer Synapse 2.0”.Note: Audio adjustments made on your audio device via Razer Surround will only be active while Razer Synapse 2.0 is on.RETRIEVING YOUR PASSWORDIf you have forgotten your account password,Step 1.Click Forgot Password? on the login interface of the client. Your web browser will launch and direct you to Razer’s Password Reset Request page:Step 2.Enter your registered account EMAIL and type the image verification code shown. Then click SUBMIT.Step 3.Check your email inbox for a verification email from Razer. Click the link in the email.Step 4.Your web browser will navigate to the password reset page as shown in the figure below. Enter your NEW PASSWORD and retype it to confirm. Thenclick SUBMIT.A success screen will be displayed. You can now login to Razer Synapse 2.0 using this new password.CHANGING YOUR PASSWORDFor security purposes, you are recommended to change your account password regularly. To change your account password through the Razer Synapse 2.0 client, Step unch the client and login to Razer Synapse 2.0.Step 2.From the client, click your display name to bring up a list of menu options.Select CHANGE PASSWORD.Step 3.In the next screen, enter your current Password, and the New Password. Re-enter the new password then click OK to confirm the change.4. USING RAZER SURROUNDNote: Each audio device and headset/headphone calibrated via Razer Surround forms a unique pair of settings that will be saved in your Razer Synapse 2.0 online cloud. This setting will be retrieved each time the same pairing of devices is selected in the Razer Surround SETTINGS tab. CALIBRATING YOUR AUDIO DEVICE USING THE CALIBRATION WIZARDA 5 step calibration wizard helps you set up your audio device for virtual 7.1 surround sound playback. If you are setting up your audio device for the first time, we recommend using this wizard for a step by step guide on the calibration process.Click START to launch the wizard.Step 1 of 5In step 1, Razer Surround detects all audio sources that are connected to and recognized by your computer and lists them in the box. Choose the audio device that you wish to configure. Click Test to ensure that the correct device has been selected.Click Next to continue to the next step.Step 2 of 5If you are configuring for a Razer headphone, select your headphone model from the dropdown list.Click Next to continue.Step 3 of 5This step introduces the calibration process. Read the instructions carefully and ensure that you are in a quiet environment in order to hear the audio prompts properly.In this figure, the mannequin represents your position. The green arrows on each segment represent the target direction of the audio playback for that particular segment. Each orange line represents the last saved calibration settings configured on Razer Surround.Click Calibrate Now once you are ready to begin the calibration.Position yourself according to the point of reference indicated by the mannequin. The calibration process is divided into a series of segments. An audio prompt will be played for each segment.For the first segment, the sound should be perceived as coming from the direction marked by the green target arrow, roughly North-East of your point of reference. Your aim is to move the sound you hear such that you perceive it to be coming from this target direction. To achieve this,1.Listen carefully to the audio prompt2.The sound you hear will change direction as you move the mouse scroll wheel orthe up/down arrow keys.3.Continue changing the direction of the sound until you perceive it to come fromthe North-East position or as close to the green target arrow as possible. Note: The orange line indicates the relative change to the previously saved alignment setting. It does not affect your current calibration, as it serves merely as a change indicator.Click Next to continue to the next segment. Repeat the above, using the green target arrow for each segment as the target direction and continue until you complete the circle.Once all segments are calibrated, click Next to go to the next step.Click Experience Surround Sound to test your personalized sound environment. To tweak a particular section, simply click it to play its audio prompt and adjust the settings as desired. To reset the entire configuration, click Reset All. Otherwise, click Finish to confirm the settings.A confirmation screen will be displayed. Click OK to save and exit the wizard.CALIBRATING YOUR AUDIO DEVICE USING MANUAL SETTINGSIf your audio device has already been set up previously for virtual 7.1 surround sound playback but you wish to tweak a few settings, you can choose to use the SETTINGS tab instead.Ensure that the Enable Virtual Audio Device checkbox is selected. You can then edit the settings including :∙Selecting an audio source∙Selecting a Razer headphone (if you are using one)∙Enabling the Auto select USB headphone when available option. This allows Razer Surround to automatically use the USB driver for your headphone if available.∙Aligning the sound direction to the target direction for each audio segment. Click Test to test your new configuration or click Demo to view a demonstration on how audio calibration can be performed.CONFIGURING AUDIO ENHANCEMENTSThe Audio Tab lets you control various options related to the audio you hear from your headphones.Using the various sliders, you can:∙Enable stereo enhancement for audio playback∙Adjust the overall volume of your headset∙Improve the bass output of your headset∙Normalize the loudness of audio played to avoid sudden and unpleasant increase in volume from effects such as explosions∙Enable voice clarity adjustments to improve the quality of incoming voice conversations. Voice Clarity adjustments includes both clarity (Presence Level) and volume (Volume Level) of incoming voice conversationsCUSTOMIZING EQUALIZER SETTINGSThe EQ Tab lets you filter various audio frequencies, controlling the overall tone of your audio output.A list of preset equalizer settings can be selected from the drop down menu, giving you easy access to various commonly used audio tones. You can also manually adjust each audio frequency using the sliders.5. LEGALESECOPYRIGHT AND INTELLECTUAL PROPERTY INFORMATIONCopyright © 2013 Razer Inc. All rights reserved. Razer, For Gamers By Gamers, and the triple-headed snake logo are trademarks or registered trademarks of Razer Inc. and/or affiliated companies in the United States or other countries. Windows and the Windows logo are trademarks of the Microsoft group of companies. All other trademarks are the property of their respective owners.Razer Inc. (“Razer”) may have copyright, trademarks, trade secrets, patents, patent applications, or other intellectual property rights (whether registered or unregistered) concerning the product in this Master Guide. Furnishing of this Master Guide does not give you a license to any such copyright, trademark, patent or other intellectual property right. Razer Surround (the “Product”) may differ from pictures whether on packaging or otherwise. Razer assumes no responsibility for such differences or for any errors that may appear. Information contained herein is subject to change without notice.。

Xonar D-KARAX(K歌之王)声卡麦霸应用指南宝师傅、游飘Xonar D-KARAX声卡作为华硕定位于网络K歌的主打产品,采用C-Media CMI8786音频处理器,拥有7.1声道输出,支持96KHz/24bit,信噪比高达106dB,失真度>0.0013%,支持无延迟实时播放、录音。
此外,Xonar D-KARAX声卡还支持华硕独有的Hyper Grounding 技术,使用多层PCB将数字信号的供电与模拟信号的供电隔离,降低模拟信号和数字信号之间的串扰,对回放和录音品质都会有帮助。
对于这款声卡,最耀眼的是卡上集成的Cirrus Logic CS47028C DSP芯片,具备极低的麦克风延迟,不仅可以提供硬件混响、压缩“EQ”,还有“HP LP”滤波(就是大家常说的“低切”、“高切”,在对于麦克风调节时,有着很好的作用,特别是对于低于80Hz以下的噪音,因为这个频段,人声几乎是没有的,所以对于MIC输入上,我们可以认为这个频段以下就是噪音)。
安装好驱动后,打开驱动界面,如下图:我们从上图可以看到声卡控制界面。
这里是一个简化版面,详细的调节和参数都隐藏着,稍后介绍。
这里,我们可以看到一个频谱分析仪,显示的是当前播放声音的一个频谱。
中间是当前的模式显示,有预设模式、EQ模式、和当前的输出模式及音量条。
右边是音量控制旋钮、音频平衡调节、静音控制。
而其他高级设置需要点击面板右下角那个三角形标志的按钮,就会弹出高级设置界面了。
这里才是控制界面的精华所在,也是体现这款带有硬件DSP音频芯片强大的地方。
这里我们可以看到调节分为两大类:音乐(MUSIC)和卡拉OK(Karaoke) 模式。
首先,我们先来说说音乐部分:一、MUSIC面板1、主设定系统音源这里是你的音箱声道选择,最多支持7.1的系统如果是耳机,推荐用 2声道模式。
采样率这里最大的采样率支持96KHz,普通音乐和用于K歌的话,推荐使用44.1KHz (因为鉴于各种音乐K歌平台的采样均为44.1KHz,这样兼容性是最好的)。
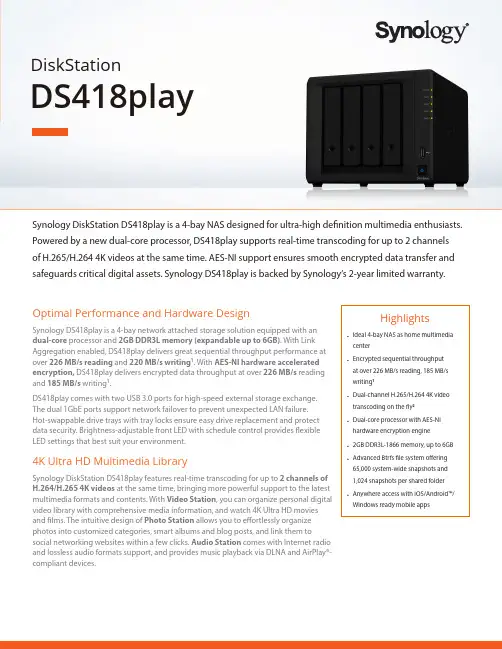
Synology DiskStation DS418play is a 4-bay NAS designed for ultra-high definition multimedia enthusiasts. Powered by a new dual-core processor, DS418play supports real-time transcoding for up to 2 channels of H.265/H.264 4K videos at the same time. AES-NI support ensures smooth encrypted data transfer and safeguards critical digital assets. Synology DS418play is backed by Synology’s 2-year limited warranty.DiskStationDS418playHighlights• Ideal 4-bay NAS as home multimedia center• Encrypted sequential throughput at over 226 MB/s reading, 185 MB/s writing 1• Dual-channel H.265/H.264 4K video transcoding on the fly 2• Dual-core processor with AES-NI hardware encryption engine • 2GB DDR3L-1866 memory, up to 6GB • Advanced Btrfs file system offering 65,000 system-wide snapshots and 1,024 snapshots per shared folder • Anywhere access with iOS/Android™/Windows ready mobile appsOptimal Performance and Hardware DesignSynology DS418play is a 4-bay network attached storage solution equipped with an dual-core processor and 2GB DDR3L memory (expandable up to 6GB). With Link Aggregation enabled, DS418play delivers great sequential throughput performance at over 226 MB/s reading and 220 MB/s writing 1. With AES-NI hardware accelerated encryption, DS418play delivers encrypted data throughput at over 226 MB/s reading and 185 MB/s writing 1.DS418play comes with two USB 3.0 ports for high-speed external storage exchange. The dual 1GbE ports support network failover to prevent unexpected LAN failure. Hot-swappable drive trays with tray locks ensure easy drive replacement and protect data security. Brightness-adjustable front LED with schedule control provides flexible LED settings that best suit your environment.4K Ultra HD Multimedia LibrarySynology DiskStation DS418play features real-time transcoding for up to 2 channels of H.264/H.265 4K videos at the same time, bringing more powerful support to the latest multimedia formats and contents. With Video Station , you can organize personal digital video library with comprehensive media information, and watch 4K Ultra HD movies and films. The intuitive design of Photo Station allows you to effortlessly organize photos into customized categories, smart albums and blog posts, and link them tosocial networking websites within a few clicks. Audio Station comes with Internet radio and lossless audio formats support, and provides music playback via DLNA and AirPlay®-compliant devices.Anywhere/Anytime AvailabilitySynology provides various mobile applications allowing you to enjoy your multimedia library even when on the go. Available on iOS, Android™, and Windows Phone® platforms, DS photo, DS audio, DS video, and DS file enable access to your Synology NAS through Photo Station, Audio Station, Video Station, and File Station. What’s more, you can use DS get to remotely manage and monitor download tasks onDownload Station.QuickConnect allows you to connect via a simple customizable address so that you can instantly access media and work files on any Windows/Mac/Linux computer, laptop, or mobile device.Btrfs: Next Generation Storage EfficiencyDS418play introduces the Btrfs file system, bringing the most advanced storage technologies to meet the management needs of modern businesses:• Built-in data integrity check detects data and file system corruption with data and meta-data checksums and improve the overall stability.• Flexible Shared Folder/User Quota System provides comprehensive quota control over all user accounts and shared folders.• Advanced snapshot technology with customizable backup schedule allows up to 1,024 copies of shared folder backups in a minimum 5-minute interval withoutoccupying huge storage capacity and system resources.• File or folder level data restoration brings huge conveniences and saves time forusers who wish to restore only a specific file or folder.• File self-healing: Btrfs file system can auto-detect corrupted files with mirroredmetadata, and recover broken data using the supported RAID volumes, which include RAID1, 5, 6, and 10.Effective Sync & Backup SolutionDS418play can serve as a centralized backup destination, making it easy to create your own private cloud. Cloud Sync keeps your Dropbox, Google Drive, Microsoft OneDrive, Baidu, and Box storages in sync with DS418play at home. Cloud Station Suite allows you to sync files among multiple devices, including Windows PC, Mac, Linux, and Android/iOS tablets and phones, effortlessly keeping everything up-to-date.With block-level incremental backup and cross-version deduplication, Synology Hyper Backup provides multi-version backup with optimized storage utilization and allows back up to multiple destinations–local shared folders, external hard drives, network shared folders, rsync servers, and public cloud services.Energy Efficient and Easy ManagementSynology DS418play is designed and developed with energy efficiency in mind.DS418play consumes only 29.01 W in regular operation. Wake on LAN/WAN and scheduled power on/off can further reduce power consumption and operational cost. With HDD hibernation, hard drives can enter the energy-saving mode automatically when the system has been idle for a specified period of time.4K Ultra HD Multimedia Bank Real-time H.264/H.265 4K video transcoding provides hassle-free high quality video playback among various devices.Anytime AvailabilityAccess your DiskStation anywhere usingSynology mobile apps.Hardware OverviewTechnical SpecificationsHardwareCPUIntel Celeron J3355 dual-core 2GHz, burst up to 2.5GHz Hardware encryption engine Yes (AES-NI)Hardware transcoding engine • Supported codecs: H.264 (AVC), H.265 (HEVC), MPEG-2, VC-1• Maximum resolution: 4K (4096 x 2160)• Maximum frames per second (FPS): 30Memory2 GB DDR3L SO-DIMM (expandable up to 6 GB)Compatible drive type 4 x 3.5" or 2.5" SATA SSD/HDD (drives not included)External port 2 x USB 3.0 port Size (HxWxD)166 x 199 x 223 mm Weight 2.23 kg LAN2 x 1GbE (RJ-45)Wake on LAN/WAN Yes Scheduled power on/off YesSystem fan2 (92 x 92 x 25 mm)AC input power voltage 100V to 240V AC Power frequency 50/60Hz, single phase Operating temperature 5°C to 40°C (40°F to 104°F)Storage temperature -20°C to 60°C (-5°F to 140°F)Relative humidity5% to 95% RH Maximum operating altitude5,000 m (16,400 ft)1Status indicator2Drive status indicator 3Drive tray lock 4USB 3.0 port 5Power button and indicator 6Drive tray 71GbE RJ-45 port 8Reset button9USB 3.0 port10Power port11Fan12Kensington Security Slot6General DSM specificationNetworking protocol SMB, AFP, NFS, FTP, WebDAV, CalDAV, iSCSI, Telnet, SSH, SNMP, VPN (PPTP, OpenVPN ™ , L2TP)File system • Internal: Btrfs, ext4• External: Btrfs, ext4, ext3, FAT, NTFS, HFS+, exFAT3Supported RAID type Synology Hybrid RAID (SHR), Basic, JBOD, RAID 0, RAID 1, RAID 5, RAID 6, RAID 10Storage management • Maximum internal volumes: 256• Maximum iSCSI targets: 32• Maximum iSCSI LUNs: 256• iSCSI LUN clone/snapshot supportFile sharing capability • Maximum local user accounts: 2,048• Maximum local groups: 256• Maximum shared folders: 256• Maximum concurrent SMB/NFS/AFP/FTP connections: 200Privilege Windows Access Control List (ACL), application privilegeDirectory service Windows® AD integration: Domain users login via SMB/NFS/AFP/FTP/File Station, LDAP integrationSecurity Firewall, encrypted shared folder, SMB encryption, FTP over SSL/TLS, SFTP, rsync over SSH, login auto block, Let's Encrypt support, HTTPS (Customizable cipher suite)Supported client Windows 7 and 10, Mac OS X® 10.11 onwardsSupported browser Chrome®, Firefox®, Internet Explorer® 10 onwards, Safari® 10 onwards; Safari (iOS 10 onwards), Chrome (Android™ 6.0 onwards)Interface Language English, Deutsch, Français, Italiano, Español, Dansk, Norsk, Svensk, Nederlands, Русский, Polski, Magyar, Português do Brasil, Português Europeu, Türkçe, Český,Packages and ApplicationsFile Station Virtual drive, remote folder, Windows ACL editor, compressing/extracting archived files, bandwidth control for specific users or groups, creating sharing links, transfer logsFTP Server Bandwidth control for TCP connections, custom FTP passive port range, anonymous FTP, FTP SSL/TLS, and SFTP protocol, boot over the network with TFTP and PXE support, transfer logsUniversal Search Offer global search into applications and filesHyper Backup Support local backup, network backup, and backup data to public clouds Active Backup for Server Centralize data backup for Windows and Linux servers without client installationBackup tools DSM configuration backup, macOS Time Machine support, Cloud Station Backup Shared folder sync - maximum tasks: 4Cloud Station Suite Sync data between multiple platforms by installing the client utilities on Windows, Mac, Linux, Android and iOS devices, while retaining up to 32 historical versions of filesMaximum concurrent file transfers: 200Cloud Sync One or two-way synchronization with public cloud storage providers including Amazon Drive, Amazon S3-compatible storage, Baidu cloud, Box, Dropbox, Google Cloud Storage, Google Drive, hubiC, MegaDisk, Microsoft OneDrive, OpenStack Swift-compatible storage, WebDAV servers, Yandex DiskSurveillance Station Maximum IP cameras: 25 (total of 750 FPS at 720p, H.264) (includes two free camera licenses; additional cameras require the purchasing of additional licenses)Snapshot Replication • Maximum replications: 64• Maximum shared folder snapshots: 1,024• Maximum system snapshots: 65,536Active Directory Server A flexible and cost-effective domain controller solutionVPN Server Maximum connections: 20, supported VPN protocols: PPTP, OpenVPN™, L2TP/IPSecMailPlus Server Secure, reliable, and private mail solution with high-availability, load balancing, security and filtering design (Includes 5 free email account licenses; additional accounts require the purchasing of additional licenses)MailPlus Intuitive webmail interface for MailPlus Server, customizable mail labels, filters, and user interfaceCollaboration tools • Chat maximum users: 1,000• Office maximum users: 200, maximum simultaneous editing users: 60• Calendar: support CalDAV and access via mobile devicesNote Station Rich-text note organization and versioning, encryption, sharing, media embedding and attachmentsStorage Analyzer Volume and quota usage, total size of files, volume usage and trends based on past usage, size of shared folders, largest/most/least frequently modified filesAntivirus Essential Full system scan, scheduled scan, white list customization, virus definition auto updateDownload Station Supported download protocols: BT, HTTP, FTP, NZB, eMule, Thunder, FlashGet, QQDL Maximum concurrent download tasks: 80Web Station Virtual host (up to 30 websites), PHP/MariaDB®, 3rd-party applications supportSYNOLOGY INC.Synology is dedicated to taking full advantage of the latest technologies to bring businesses and home users reliable and affordable ways to centralize data storage, simplify data backup, share and sync files across different platforms, and access data on-the-go. Synology aims to deliver products with forward-thinking features and the best in class customer services.Copyright © 2017, Synology Inc. All rights reserved. Synology, the Synology logo are trademarks or registered trademarks of Synology Inc. Other product and company names mentioned herein may be trademarks of their respective companies. Synology may make changes to specification and product descriptions at anytime, without notice.DS418play-2017-ENU-REV002Headqu artersSynology Inc. 3F-3, No. 106, Chang An W. Rd., Taipei, Taiwan Tel: +886 2 2552 1814 Fax: +886 2 2552 1824ChinaSynology Shanghai 200070, Room 516, No. 638 Hengfeng Rd., Zhabei Dist. Shanghai, ChinaUnited KingdomSynology UK Ltd.Unit C, Denbigh WestBusiness Park, Third AvenueBletchley, Milton KeynesMK1 1DH, UKTel: +44 1908 366380GermanySynology GmbHGrafenberger Allee125 40237 DüsseldorfDeutschlandTel: +49 211 9666 9666North & South AmericaSynology America Corp.3535 Factoria Blvd SE #200Bellevue, WA 98006, USATel: +1 425 818 1587FranceSynology France SARL39 rue Louis Blanc, 92400Courbevoie, FranceTel: +33 147 176288Other packages Video Station, Photo Station, Audio Station, DNS Server, RADIUS Server, iTunes® Server, Log Center, additional 3rd-party packages are available on Package CenteriOS/Android™ applications DS audio, DS cam, DS cloud, DS file, DS finder, DS get, DS note, DS photo, DS video, MailPlus Windows Phone® applications DS audio, DS file, DS finder, DS get, DS photo, DS videoEnvironment and PackagingEnvironment safety RoHS compliantPackage content • DS418play main unit x 1• Quick Installation Guide x 1• Accessory pack x 1• AC power adapter x 1• RJ-45 LAN cable x 2Optional accessories • D3NS1866L-4G• VisualStation VS360HD, VS960HD • Surveillance Device License Pack • MailPlus License PackWarranty 2 years*Model specifications are subject to change without notice. Please refer to for the latest information.1. Performance figures may vary depending on environment, usage, and configuration.2. DS418play can transcode 4K video to 1080p or lower. The maximum number of concurrent video transcoding channels supported may vary depending on the video codec,resolution, bitrate and FPS.3. exFAT Access is purchased separately in Package Center.。
低延时,高音质特征命名
低延时、高音质是音频传输中非常重要的特征,可以用以下命名来描述:
1. 快传高保真(Fast Transmission High Fidelity,FTHF):强调音频传输速度快,同时保持高保真度。
2. 实时高清音质(Real-time High Definition Sound Quality,RHDSQ):突出音频传输的实时性和高清晰度。
3. 无延迟高品质(No Latency High Quality,NLHQ):强调音频传输没有延迟,并且具有高品质的音质。
4. 迅捷高保真(Swift High Fidelity,SHF):强调音频传输迅捷快速,同时保持高保真的音质。
5. 极速高清音质(Ultra-fast High Definition Sound Quality,UFHDSQ):突出音频传输速度极快,同时具有高清晰度的音质。
第二章、音频处理技术声音是多媒体信息的一个重要组成部分。
也是表达思想和情感的一种必不可少的媒体,随着多媒体信息处理技术的发展,音频处理技术得到了广泛的应用。
如:视频图像的配音、配乐;静态图像的解说、背景音乐;可视电话、电视会议中的话音;游戏中的音响效果:虚拟现实中的声音模拟;电子读物的有声输出等。
声音的合理使用可以使多媒体系统变得更加丰富多彩。
一、声音信号的形式和特征任何声音都是物体振动产生的现象,物体受到敲打或激发就能产生振动,通过一定介质(如空气、水等)传播形成的连续波,在物理学中称为声波。
这种波就像在平静的池塘中投入石子,涟漪从中心向四面扩散,当它到达人的耳膜是,耳膜就会感觉到这种压力的变化,或者感觉到振动,这就是声音。
声波有各种不同的强度和频率,许多声波混合在一起可能构成交响乐,也可能是一片噪音。
在物理上,声音可以用一条连续的曲线来表示,它是随时间连续变化的模拟量。
声波信号有两个重要的参数:频率和幅度。
声波幅度大小体现声音的强弱,声音的频率体现音调的高低。
信号的幅度是从信号的基线到当前波峰的距离。
幅度决定了信号音量的强弱程度。
幅度越大,声音越强。
对音频信号.它的强度用分贝(dB)表示。
分贝的幅度就是音量。
一个声源每秒钟可产生成百上千个波峰,把每秒钟波峰所发生的数目称之为信号的频率,用赫兹(HZ比)或千赫兹(kHZ)表示。
例如一个声波信号在一秒钟内有5000个波峰,则可将它的频率表示为5000hz或5khz。
人们在日常说话时的语音信号频率范围在300hz—3000hz之间,人所能辨别的频率范围在20hz—20khz之间,频率小于20hz的信号成为次声波(subsonic),频率高于20khz的称为超声波。
音箱和耳机的频响范围所谓频响范围,指的是频率响应范围。
在音箱、耳机等音频回放设备中一般会有标注20Hz-20KHz类似这样的一个数字范围的指标,此即是指该设备可以回放的有效频率范围。
当然,与之相对应的是,人耳理论上可听到的声波范围也是20Hz-20KHz。
Personal Hi-End Theater品味私人影音1能令人喜欢上的影院之声M ission LX M K II多声道系列+ M-5122A超低音I文/家祺图/小路产品代理:IAG先歌国际影音英国M ission在2016年推出L X系列,很快便在欧洲热销,获得国外许多媒体好评和奖项。
而以‘'音乐做主,技 术为辅(M usic is the M aster,Technology is the Slave > ”为口号的M ission并未停滞不前,而是一直在寻找改良产品的机会,LX系列当时已经是十分受欢迎的入门级高性价比影院系列,而M ission在融合中端Q X系列和旗舰级Z X系列的特点后,在4年之后推出了L X M K II系列,将性价比提升到更高境界。
>扩展阵容改良的方面,L X M K I丨不仅有声学方面的提升,还扩展 了L X M K II的扬声器款式,让它们可以适用于更多家居场57Personal Hi-End Theater品味私人影音合。
包括_款新的落地箱、一款新的中置箱、以及一款全 新的3D 环绕箱,可以作为挂墙环绕或者放置在落地箱上方 作为反射式全景声音箱用;这使得LX M K II 系列的阵容扩展 到9款型号(3书架、3落地、2中置、1环绕),可以完全只 用LX M KII 系列的音箱就能够构建D TS:X (需要高位环绕) 和杜比全景声(需要反射音箱)的影院(超低音除外), 全套影院声音表现更统一。
>性能提升M ission 的经典IDG (反向驱动设计)将高音单元设计 在低音/中音单元下方,利用高频镜像原理,让高音通过镜 像后,再与中音和低音有效地同步结合,使得三频时间上 实现精确同步,能够同时到达听者位置。
这样也可以省去 在后期的分频电路中再设计时间校准延迟电路,从而提高 扬声器的瞬态性能。
>全新外观本次测试的LX M KII 产品包括LX -5 M KII 落地箱、LX -LX M K II 由M ission 的首席声学设计师Peter Com eau 负 责开发,期间花费了数百小时的聆听测试。
Cakewalk SONAR 7官方中文手册美国Cakewalk公司 原著云天音乐网 饶磊 编译云天音乐网()版权所有 抄袭必究本文档所涉及的信息如有更改,孰不另行通知,Twelve Tone Systems公司不承担相应的义务。
此文档所描述的软件仅授权给已经合法取得许可证的用户使用。
软件只能在协议条款规定的范围内使用和复制。
除非协议特别允许,任何媒体复制该软件均属非法。
在没有得到Twelve Tone Systems 公司书面许可的任何情况下,本文件不得以任何形式、任何理由(电子的或机械的)进行复制或传播,包括复印和录制。
Copyright © 2007 Twelve Tone Systems, Inc. 版权所有。
ACID是Sony公司的注册商标。
Cakewalk是Twelve Tone Systems公司的注册商标。
SONAR和Cakewalk标志是Twelve Tone Systems公司的注册商标。
其它的公司和产品名称均是其拥有者的商标。
在互联网上访问Cakewalk英文站:。
在互联网上访问Cakewalk中文站:。
在互联网上访问云天音乐网:。
SONAR 7 官方中文手册0.目录0. 目录 (3)1. 编者的话 (6)2. 中文SONAR系列图书 (7)3. 前言 (9)4. SONAR 7 介绍 (11)7 新特性概览 (12)4.1. SONAR7 的系统需求 (13)4.2. SONAR4.3. SONAR7 新特性详解 (13)7 的峰值限制器-Boost 11 (17)4.4. SONAR7 包含的虚拟乐器 (17)4.5. SONAR4.6. SONAR7 的母带后期处理插件 (19)7Producer Edition(制作人版)和Studio Edition(工作室版)功能比较 (21)4.7. SONAR4.8. 选择SONAR 7的20个理由 (21)5. 安装 (28)6. 指南 (38)6.1. 指南1——基础 (39)6.1.1. 打开工程 (39)6.1.2. 回放准备 (39)6.1.3. 播放工程 (42)6.1.4. 自动重新开始工程 (44)6.1.5. 更改速度 (46)6.1.6. 静音和独奏 (47)6.1.7. 更改音轨乐器 (48)6.1.8. 在MIDI键盘上演奏音乐 (49)6.2. 指南2——录制MIDI (51)6.2.1. 创建新工程 (51)6.2.2. 录制MIDI音轨 (51)6.2.3. 保存 (54)6.2.4. 循环录制 (54)6.2.5. 插入录制 (56)6.3. 指南3——录制数字音频 (58)6.3.1. 设置采样率 (58)6.3.2. 设置音频驱动器的精度和录制精度 (58)6.3.3. 新建一个工程 (59)云天音乐网()版权所有 抄袭必究6.3.4. 设置音频轨 (59)6.3.5. 检查输入电平 (59)6.3.6. 录制数字音频 (60)6.3.7. 聆听录制结果 (60)6.3.8. 录制另外一个动机 (61)6.3.9. 输入监听 (61)6.3.10. 循环和插入录制 (62)6.3.11. 多通道录制 (62)6.4. 指南4——编辑MIDI (63)6.4.1. 移调 (63)6.4.2. 用托放的方法复制事件条 (63)6.4.3. 在钢琴卷帘视图里编辑音符 (64)6.4.4. 滑动编辑 (65)6.4.5. 绘制MIDI包络线 (66)6.4.6. 把MIDI转换成音频 (67)6.5. 指南5——编辑数字音频 (69)6.5.1. 打开工程 (69)6.5.2. 导入音频文件 (69)6.5.3. 移动以及循环事件条 (70)6.5.4. 对事件条进行滑动编辑 (70)6.5.5. 自动交叠淡变 (71)6.5.6. 合并音轨 (71)6.6. 指南6——使用智能事件条 (72)6.6.1. 添加智能事件条到工程里 (72)6.6.2. 循环智能事件条 (73)6.6.3. 更改智能事件条的音高 (75)6.6.4. 更该工程的速度 (76)6.6.5. 创建你自己的智能事件条 (76)6.7. 指南7——混音 (80)6.7.1. 添加实时的音频效果 (80)6.7.2. 对单独的效果设置自动控制 (80)6.7.3. 编组控制 (81)6.7.4. 对混音自动控制 (81)6.7.5. 导出MP3文件 (82)6.8. 指南8——使用软件合成器 (84)6.8.1. 把Cakewalk TTS-1插入到工程里 (84)6.8.2. 通过软件合成器播放MIDI音轨 (85)6.8.3. 将软件合成器音轨转换成音频 (85)6.9. 指南9——鼓映射 (87)SONAR 7 官方中文手册6.9.1. 创建一个新工程 (87)6.9.2. 创建鼓映射 (87)6.9.3. 创建一条鼓音轨 (87)6.9.4. 映射鼓音符到不同的输出端口上 (88)6.10. 指南10——Cyclone软件合成器 (91)6.10.1. Cyclone概述 (91)6.10.2. 添加文件到节奏垫 (91)6.10.3. 设置节奏垫的音量和相位 (92)6.10.4. 演奏Cyclone (92)6.10.5. 在循环编辑器里编辑循环 (93)7. 版权说明 (95)云天音乐网()版权所有 抄袭必究1.编者的话云天音乐网()是专门从事电脑音乐研究和教学的专业网站,自从2000年开办以来一直得到广大电脑音乐爱好者的喜爱。
小机身大能量SONANCE S10SUB-1超低音文/田野图/小路鸣谢影音大师提供器材试听!Personal Hi-End Theater品味私人影音41Personal Hi-End Theater 品味私人影音■ S 10SUB -1箱体为封闭式设计,采用一个10英寸超长冲程聚丙嫌振膜单元,配以橡胶悬边缓冲笔者开始接触家庭影院器材的时候,曾有朋友向我咨 询中等面积的听音环境,但是家居杂物较多,不想用太多 地方放置器材,想要一款既小型,低频又不错的超低音。
这可难倒了我,毕竟大尺寸单元更容易做到优质的低频, 我当时认识的器材并不多,一时想不到有什么品牌的小型 又强力的超低音。
最后朋友还是妥协选择了常规尺寸的大 方块型超低音,但我也从此对小体积的影院产品特别留 意。
S 0NANCE 的S 10SU B -1吸引了我的注意力:它会不会 就是我所期待的超低音呢?超低音(subw oofer ),又叫低音炮,是家庭影院器材 中的关键组成部分之一。
通常家庭影院会设置一个低频分 频点,将分频点以下的频段交由超低音负责。
一来很多影 院音箱体积并不大,本身低频表现并不出色,超低音可以 弥补这些音箱低频中较为单薄的部分,让整体声音变得更 饱满;二来很多影院音箱本身便设计了较高的低频下限 (如100Hz 甚至更高),频率再往下的区域便需要超低音去 填补。
人耳对80Hz 以下的低频感觉迟钝,但对80Hz 往上的频率则逐渐敏感了,如果超低音低频质量不佳,就会影响 到整套系统的音质,那不仅仅是音效够不够澎湃的问题 了;但反之,优秀的超低音又能对影院音质带来很好的加 成效果。
所以说,只要’‘炮”够好,那么影院效果就已经 圆满了一半。
►经验丰富的品牌说回到S 0N AN CE ,这个美国品牌创立于1983年,一 直致力于将声音和建筑设计完美融合,在定制安装领域有 着很高的地位。
全球第一款(商用)嵌入式扬声器和第一 款嵌入式超低音都由S 0NANCE 推出。
艾肯iCON MOBILE-6声卡开箱评测说到iCON,一般业内人士都不会陌生,这是一家专注于专业音频设备的品牌,产品以声卡、MIDI控制键盘、DAW控制器等硬件设备为主。
由于其稳定的品质和平易近人的价格而异军突起,成为了目前专业音频设备市场中具有竞争力的品牌。
我们本次的评测对象就是iCON旗下的外置声卡设备MOBILE-6,这是一款专门为网络K歌及专业录音爱好者量身打造的顶尖专业级双栖声卡,其设计理念源于音平商城多年来针对网络K歌与专业录音爱好者对声卡的需求与选择进行采集分析而积累的丰富经验,并与在音频卡领域具有卓越成就的iCON品牌耗时一年精心研发而成的。
iCON MOBILE-6网络K歌录音声卡的各种创新体验及高品质在技术性能上毫上不妥协地独占了双栖领域的市场最高点,我们有理由相信:“技术加经验,可以成就大牌之作”。
图1 MOBILE-6的包装盒正反面图案图1是艾肯iCON MOBILE-6网络K歌录音声卡的包装盒,体积不大,但是非常有分量,拿在手里你绝想象不到这是一块外置声卡。
包装盒背面的图案沿袭了艾肯iCON一贯风格,印有该硬件设备的英文操作说明。
遗憾的是由于野蛮快递的原因,包装盒正面有些许褶皱。
打开盒子,清点随机配件:USB数据线一条(该数据线的质量超赞,由于两端都配有磁环,可以最大限度降低外界干扰,保证音频卡的稳定性)、电源适配器一个、随机光盘一张(含中文使用手册及设备驱动)、安装指导手册等。
如图2所示图2 官方标配随机配件里包含的三包凭证、仿伪查询卡以及产品合格证引起了我的注意,这足以说明艾肯iCON的品牌意识和重视质量等细节表现。
如图3所示图3 iCON的品质保证终于能够一睹艾肯iCON MOBILE-6网络K歌录音声卡的真容。
拿在手里才发现,实际手感非常沉,并且从任何一个角度估量,都能感觉到设备内部非常充实,即使在不拆机的情况下,也能想象得到其品质如何。
如图4所示图4 MOBILE-6俯视图首先,用料非常实在,其操作面板采用厚实的铝合金材料,从外观上就给人以稳重结实富有质感的良好印象。
优异的传输带来优质的声音表现
Kubala-Sosna Temptation USB线
文/司徒图/小路产品代理:骏韵音响零售价:¥5250元
不容忽视的USB线
线材对于音响系统的影响,我是深信不疑的,这种改变,既有正面的也有负面的。
在线材接入系统之前,或许这一切都是无法预测的,而最明显的改变莫过于信号线和喇叭线这些模拟线材。
随着数码音频的飞速发展,特别是网络播放器、CAS等开始流行起来之后,越来越多的发烧线材厂家推出了USB线、网线等产品。
很多发烧友认为,电源线、喇叭线、信号线才是影响声音的重要环节。
对于USB线,大多都认为只要解码器有隔离、支持异步传输模式,优秀的线和其它一般的USB线的分别不会太明显。
我以前也是这样认为的,但是最近试
17
EDUIPmENT REVIEUJ 点指兵兵
过数条优秀的USB 线之后,这个观念便彻底改变了。
事实 上,如果说USB 线是一条纯数码线并不准确,因为它除了 包含一对以异步式运作的数码讯号外,还有一组5V 直流电
线和地线,所以USB 线其实是电源线和数码线的混合体, 有要求的玩家应该慎选一条适合的线材,以免在这个环节
成为整个系统的短板。
Kubala-Sosna 美国金威---制线专家
这次送到本刊试音室的是来自美国Kubala-Sosna 金威 的 Temptation USB 线。
美 国金威 Kubala-Sosna 由 Joe
Kubala 与Howard Sosna 共同创立于2003年,品牌名称也是
取自两位创办人的姓氏结合而成。
Joe Kubala 与Howard
Sosna 自小就认识,Howard Sosna 在少年时期就对无线电
技术非常热爱。
某次,Howard Sosna 找到了Joe Kubala 聊
起线材,然后他们就开始一起研发线材。
他们将制作好的 线材送去实验室进行测试,发现他们制作的线材,在传送 仪器后产生的方波,相比其他线材有着更少的铃震,这也 促使他们将这些优秀的线材制作成产品,让发烧友用上之
后能听到更为真实的声音。
从2003年成立至今,他们与研发团队不断研发及生产
各种优质的高端线材,深受广大音响发烧友所爱戴。
每年 于世界各个大小规模的展会中,Kubala-Sosna 也多次成为
众多参展商所选用的线材之一,包括YG Acoustics 、
emmLabs 、MBL 、Avalon 、Wilson Audio 、Gryphon 、Jeff
Rowland 、Audionet 、Esoteric 、Clear Audio s dCS 、Audio Research 等著名的品牌也跟Kubala-Sosna 合作,可见
Kubala-Sosna 在行内的地位之高。
Kubala Sosna 的线材共有9个级别,分别为
Realizations Elation 、 Sensation 、 Emotion 、 Expression 、
Temptation 、Fascination,这7个级别都属于厂方的高级系
列 RevolutionZ 线材,更经济的Anticipation 和Imagination 是
纯音响和家庭影院系统都能兼顾的产品。
Kubala-Sosna 所 有级别都提供了信号线、喇叭线、电源线供用家选择,而
一些系列还有提供USB 线。
本文的主角Temptation USB 线
属于Kubala-Sosna 中价位的产品。
独门的专利技术
Temptation USB 线同样用上了Kubala-Sosna 的独门专
利----OptimiZ Architecture 技术。
这项技术是基于不同导
线材质有不同的电容、电阻、电感而研发出来的。
导线阻
抗的最基本因素在于电容、电阻、电感的结合,很多线材 在电容、电阻、电感这三种特性上得不到协调,所以或多
或少都会偏向高频或低频,夸张了某些频段而又削弱了另 一些频段,令声音表现得不够中性自然。
Kubala-Sosna 的
OptimiZ Architecture 技术能把电容、电阻、电感这三种特
性取得一个最佳的平衡位置,使得全频表现得平直连贯,
不会做出偏差。
因此厂方在设计线材时会将不同物料的导 体从线芯直径、线芯数目、分隔度、绝缘体、屏蔽层、以
及硬度等进行对比,并且在多套系统上进行试听,从而获
得最佳的比例。
采用了OptimiZ Architecture 技术的Temptation USB 线
拥有更低的电阻,自然拥有极佳的传导性。
在绝缘层方
面,Temptation USB 线披覆多层屏蔽保护,能够有效隔绝
各种有害电磁波的干扰。
从用料和制作上就可以感受到
Kubala-Sosna 的用心,完全是高档线材的水平。
USB 作为数据传输手段,是很少会出错的,也就是你
18祝Jiff
前崖
什么样子的数据传过去,收过来的是一模一样,问题只在 于传输可能时快时慢,而对于音频流这种与实时同步挂钩 的东西来说,USB 这个特点就是个致命伤,是极容易产生
Jitter 时基误差的。
当然,现在的技术已经可以在终端(也
就是解码器)上很好的解决同步的问题,但是更好的
USB 线,可以让USB 传输更流畅,让声音更加真实。
因
此,USB 线同样必须有足够的抗干扰能力,因此屏蔽层显 得很重要,它要保证数码信号在传输过程中不受污染。
实试感受
试听的时候搭配了锤龙的DA-10解码耳放一体机,笔 者拿一条价位相仿的USB 线做对比,很快就能感受到
Temptation USB 线所带来的声音差异:试听霍洛维兹的
《舒曼:童年情景》的现场录音WAV 文件,整体的层次感
与细节都有明显的变化,音乐背景宁静,声音干净而又通
透,钢琴琴声细腻温润,可以听到更丰富的细节,就连观 众席轻微的声响都能清晰听到,让整首曲目听来更加鲜活
生动。
接着试听陈慧娴早些年推出的发烧翻唱专辑《心爱》 发烧录音专辑WAV 文件,Temptation USB 线带来的中频表
现令笔者十分喜欢,特别是第一首的《还是觉得你最好》
纯人声伴奏,声音定位清晰准确,陈慧娴演绎得娇羞兼
备,人声甜美、通透且细节丰富,可以清楚听到张嘴换气
的细轻微细节,让笔者重新感受到CAS 的魅力。
现在做USB 线的线材厂商越来越多,使用更好的材料、更好的技术,让美国金威
Kubala-Sosna 的Temptation USB 线带来优秀的音质效果,进一步发掘USB 传输/解码
的潜力。
随着技术的发展,当初USB 仅是应用于电脑与解码器之间,而近年则是更多地 应用在网络/数码播放机与解码器之间的连接,因此想把玩网络/数码播放机和解码器的
消费者,更是不能缺少一条像Temptation USB 那么优秀的USB 线。
09
19。