SATA串口硬盘的设置
- 格式:doc
- 大小:25.00 KB
- 文档页数:2

明明白白用硬盘SATA主板BIOS设置方法简谈一、硬盘SATA主板BIOS设置方法1.首先,打开电脑,进入BIOS设置界面。
这是通过在开机时,按住电脑的其中一按键(如F2),进入BIOS的设置界面。
2.然后,在BIOS设置界面,找到“Storage Configuration”,它是一个选项菜单,通过此菜单,可以进行SATA硬盘的设置操作。
3.在“Storage Configuration”菜单中,我们可以找到“SATA Mode”选项,它分为3个选项:IDE,AHCI和RAID。
这3个模式会针对不同的安装环境进行设置,我们可以根据实际情况,将此设置为IDE,AHCI或RAID模式。
4.接着,在“Storage Configuration”菜单中,我们可以找到“Link Power Management”选项,这是一个可以用来设置SATA硬盘电源管理模式的选项。
它有两个选项:Disabled和Enabled。
Disabled代表关闭电源管理模式,Enabled代表开启电源管理模式。
5.最后,在“Storage Configuration”菜单中,还有一个可以设置SATA硬盘的转速的选项,它可以让我们调整SATA硬盘的读写速度。
如果硬盘的容量超过500GB,我们可以将此选项设置为6Gbps,以获得更快的读写速度。
二、安装SATA硬盘的常见问题1.首先,许多用户安装SATA硬盘时会遇到BIOS无法识别硬盘的问题,这是由于SATA硬盘与主板的兼容性问题引起的。
可以尝试更换其他品牌的硬盘,或者在主板上更新BIOS版本,来解决这个问题。
2.其次,还有一些用户会遇到安装SATA硬盘后。

在BIOS中设置SATA串口进到BIOS后,选择Main下的IDE Configuration Menu,在Onboard IDE Operate Mode下面可以选择两种IDE操作模式:兼容模式和增强模式(Compatible Mode和Enhanced Mode)。
可能BIOS版本不一样,没有这项,但是你仔细点看,就不会错过的。
bios怎么检测硬盘具体步骤:1.开机在出现ThinkPad 图标后按F1键,进入BIOS设置;2.将光标移动到HDD diagnostic program,按回车键;3.出现下面两个选择:Main hard disk driveUltrabay hard disk drive4.选择Main hard disk drive,按回车键;5.此时进入一个DOS窗口,标题为Hard disk drive diagnostics program,在这个程序里面,可以看到硬盘的型号,例如HTS541060G9SA00,同时可以看到测试的状态和进度,测试进度是从0%一直到100% 。
在测试完毕后,可以看到测试结果。
6.此时,按ESC键,可以终止测试程序,再按一次回车键,则可以返回到BIOS 菜单;7.选择Ultrabay hard disk drive,可以对Ultrabay 硬盘做检测,测试方法一样;如果Ultrabay中没有硬盘,会出现如下报错:Hard disk drive diagnostics Warning:Ultrabay hard disk drive is not found.Please check Ultrabay hard disk driver.点击OK后,会返回检测界面;BIOS里面带的这个诊断程序,可以对硬盘进行读验证和速度测试,一般来说,每测试1GB的容量大概需要1分钟。
附加信息:这个测试是完全基于BIOS的测试,即使硬盘上没有操作系统,也可是使用上述方法做测试。

SATA硬盘跳线设置图解
SATA硬盘跳线设置图解
SATA硬盘跳线设置是一个很容易忽略的环节,因此一定要好好看下SATA硬盘上的跳线设置说明,最新的SATAⅡ硬盘多数不用再设置跳线了,而早一些硬盘的很多默认跳线在SATA 150上,限制了SATA 300规格的发挥。
关于有些SATA硬盘要把盖帽才能支持SATA2的问题,有些人说要拔掉才能支持,有些就说不用拔。
现在就以我的WD SE16 2500KS 说明一下。
我的买回来根本就不用拔,而且连跳线用的盖帽都没有,直接插上去装好驱动就可以了。
这里是我的硬盘表面的图文说明:
硬盘标签上一般有关于跳线的详尽说明
硬盘上的跳线,使用跳线帽短接成立
SATAⅡ被识别为SATA硬盘,不支持NCQ
设备管理器中的相关信息
大家一看就明白,因什么有些说要拔掉的原因才能支持SATA2。
有些就不用拔。
目前SATA硬盘跳线设置图解。

如何在不加载驱动的情况下在SATA硬盘上安装操作系统常规使用SATA硬盘标准的安装操作系统步骤是,在用光盘启动系统后,按F6,通过软盘加载该主板厂商提供的南桥驱动程序来识别SATA硬盘。
下面介绍一种方法,在不加载SATA驱动的情况下,让SATA模拟成传统PATA硬盘来顺利安装系统,在装好系统后再把PATA硬盘变成SAT A硬盘。
1. 按F2进入BIOS设置,Advanced | Internal Device Configuration ,将”Serial ATA Controller”设置为Enabled,并将其子选项ACHI Configuration设置为”Disabled”。
2. 使用Product Recovery CD启动系统,并进行安装。
此时,SAT A硬盘会被认为普通的PATA 硬盘。
安装操作会顺利结束,中途无须提供SATA驱动程序。
3. 进入新安装好的操作系统,将该主板专用的SATA驱动放在本地硬盘中,启动设备管理器,找到IDE A TA/ATPI controller并展开,查看Intel(R)82801FBMUltra ATA Storage Controller –2653分支的属性,单击”Update Drive”按钮。
4. 在Hardware Update Wizard中,选择”Install from a list or specific location”,”Don’t search.I will choose the driver to install.”在”Select the device driver you want to install for this hardware”窗口的列表中勾选”Show compatible hardware”,并选择”Intel(R) 82801 FBM Ultra ATA Storage Controller -2653”,然后单击”Hard Disk”按钮,在弹出的查找SATA驱动窗口中,单击”Browse”按钮,定位到之前存放SATA驱动程序的路径,选择”iaAHCI.inf ”文件并打开,在后面的窗口中选择”Intel (R) 82801 FBM SATA AHCI Controller”并单击确定,在之后出现的警告对话框中选择”Yes”按钮。
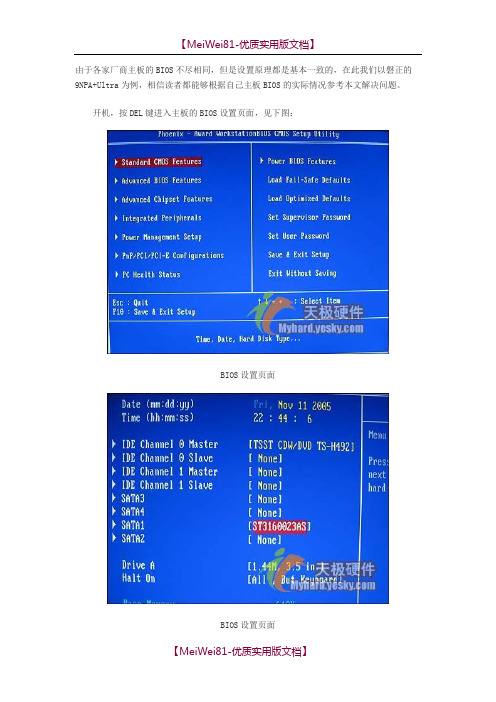
由于各家厂商主板的BIOS不尽相同,但是设置原理都是基本一致的,在此我们以磐正的9NPA+Ultra为例,相信读者都能够根据自己主板BIOS的实际情况参考本文解决问题。
开机,按DEL键进入主板的BIOS设置页面,见下图:BIOS设置页面BIOS设置页面首先,我们进行硬盘的相关设置。
选择IntegratedPeripherals进入,这一项中包含有硬盘的相关设置选项,其中有SATA Mode、SecondaryMasterUDMA、SecondarySlaveUDMA、SATA1/2、SATA3/4、RAIDEnable等几个选项。
BIOS设置BIOS设置在每个选项中,均有Enabled和Disabled两个选项可供选择,这里我们只要将“SATA1/2”、“SATA3/4”设置为[Enabled],以激活SATA,其它的选项保持不变。
BIOS设置页面另外,如果你的机器机只安装了一块硬盘,不需要组建RAID,那么你把“RAIDEnable”选项设置为[Disabled],也就是关闭这项功能。
反之,如果你需要组RAID模式,则需要设置成[Enabled],以便打开项功能。
另外DelayForHDD(Secs)选项中提供了0,1两种模式供大家选择。
完成硬盘的设置后,我们还要对系统的启动顺利进行一下简单的设置。
按ESC键,退出硬盘设置项,选择AduancedBIOSFeatures项进入基本的BIOS设置选项,在这一项中,我们可以看到FirstBootDevice、SecondBootDevice、ThirdBootDevice三个设置项,每项中又包括Removable、HardDisk、CDROM三个可选项,其中第一个为系统自动寻找可启动磁盘、第二、三项为硬盘启动和光驱启动。
那么我们将FirstBootDevice设置为HardDisk,系统便会默认将硬盘做为第一启动盘。
设置启动项另外,在使用SATA硬盘时,如果你的机器中没有安装软驱,我们还要将软驱这一项给关闭。
硬盘路线的设置串口是点对点传输,没有主从盘一说,只分SATA1和SATA2SATA有I和II两种,I为150M,II为300M。
该跳线是把硬盘接口速率降为I的标准。
有些主板不支持SATA II的。
IDE硬盘跳线:硬盘跳线分三种设置:master(主盘)、slave(从盘)、cable select(根据在数据线上的位置决定主从)。
一个IDE接口最多可以接两个IDE设备,这就是说,一般的PC你要想接的硬盘数最多也只能是4个;一个IDE接口能够通过一根数据线同时挂上两个硬盘,这就有了跳线问题,为了区分这两个硬盘,必须要给他们做上“标记”,我们能够直接操作的那就是跳线;一般在硬盘体上面都有说明,跳线要如何设置才能够让系统正常启动;如果是系统硬盘的话当然要把它设置成Master模式,即把它当作主硬盘,一般也把它接到第一个IDE接口上,当然接到第二个IDE 接口上也不会出现什么严重问题,只是可能每次系统会弹出选择框要你选择从哪个盘启动;所以这个习惯上一般是先把第一个IDE接口的位置占满之后再挂到第二个IDE接口上,另外一个习惯就是光驱一般接到第二个IDE接口上。
所以现在我们假设第一个IDE接口上已经接了一个跳线设为Master模式的硬盘,你现在还想在这个接口上通过同一根数据线再接一个硬盘的话,那么你必须要把这个后来挂上去的硬盘的跳线设为Slave模式,即从盘模式。
如果你把两个都设为Master的话,系统肯定不能启动!那么第二个IDE接口你也要挂两个硬盘的话,不管其中一个硬盘是不是系统盘,你都要把他们的主从分开,依照上面的设置行事;另外还有一点就是,现在的主板一般都有主从硬盘自动选择功能(98年以前的主板可能没有这种功能),所以你只要把你所要挂到机器上所有的硬盘的跳线设置为cable select(根据在数据线上的位置决定主从)就可以了!关于硬盘跳线如何手动具体设置,一般的硬盘体上都有配图参考说明。
SATA硬盘跳线:两块ST盘,无主从之分,直接把跳线都拔掉即可,如果是不同牌子的盘且要接在同一条数据线上的话,主从跳法在硬盘标上能找到,数据线那边是这样的"远主近从" 。
1Guide to SATA Hard DisksInstallation and RAID Configuration1.Guide to SATA Hard Disks Installation (2)1.1Serial ATA (SATA) Hard Disks Installation (2)2.Guide to RAID Configurations (3)2.1Introduction of RAID (3)2.2RAID Configuration Precautions (5)2.3Installing Windows ® 7 / 7 64-bit / Vista TM /Vista TM 64-bit / XP / XP 64-bit With RAID Functions 62.4Setting the BIOS RAID Items (11)2.5Configuring the Intel RAID BIOS (11)2.6Deleting RAID Volume..........................................1521.Guide to SATA Hard Disks Installation1.1Serial ATA (SATA) Hard Disks InstallationIntel X79 chipset supports Serial ATA (SATA) hard disks with RAID functions, including RAID 0, RAID 1, RAID 10, RAID 5, and IntelRapid Storage. Please read the RAID configurations in this guide carefully according to the Intel southbridge chipset that yourmotherboard adopts. You may install SATA hard disks on thismotherboard for internal storage devices. For SATA installationguide, please refer to Serial ATA (SATA) Hard Disks Installation of “User Manual” in the support CD. This section will guide you how tocreate RAID on SATA ports.32.Guide to RAID Configurations2.1Introduction of RAIDThis motherboard adopts Intel southbridge chipset that integrates RAID controller supporting RAID 0 / RAID 1/ Intel Rapid Storage /RAID 10 / RAID 5 function with four independent Serial ATA(SATA) channels. This section will introduce the basic knowledge of RAID, and the guide to configure RAID 0 / RAID 1/ Intel Rapid Storage / RAID 10 / RAID 5 settings.RAIDThe term “RAID” stands for “Redundant Array of IndependentDisks”, which is a method combining two or more hard disk drives into one logical unit. For optimal performance, please installidentical drives of the same model and capacity when creating a RAID set.RAID 0 (Data Striping)RAID 0 is called data striping that optimizes two identical hard disk drives to read and write data in parallel, interleaved stacks. It will improve data access and storage since it will double the datatransfer rate of a single disk alone while the two hard disksperform the same work as a single drive but at a sustained data transfer rate.WARNING!!Although RAID 0 function can improve the access performance, itdoes not provide any fault tolerance. Hot-Plug any HDDs of theRAID 0 Disk will cause data damage or data loss.RAID 1 (Data Mirroring)RAID 1 is called data mirroring that copies and maintains anidentical image of data from one drive to a second drive. Itprovides data protection and increases fault tolerance to theentire system since the disk array management software willdirect all applications to the surviving drive as it contains acomplete copy of the data in the other drive if one drive fails.4Intel Rapid StorageThe Intel Rapid Storage technology supported allows you tocreate a RAID 0 and RAID 1 set using only two identical hard disk drives. The Intel Rapid Storage technology creates two partitions on each hard disk drive to create a virtual RAID 0 and RAID 1 sets.This technology also allows you to change the hard disk drivepartition size without losing any data.RAID 10RAID 10 is a striped configuration with RAID 1 segments whosesegments are RAID 1 arrays. This configuration has the samefault tolerance as RAID 1, and has the same overhead for fault-tolerance as mirroring alone. RAID 10 achieves high input / output rates by striping RAID 1 segments. In some instances, a RAID 10configuration can sustain multiple simultaneous drive failure. Aminimum of four hard disk drives is required for this setup.RAID 5RAID 5 stripes both data and parity information across three ormore hard disk drives. Among the advantages of RAID 5configuration include better HDD performance, fault tolerance,and higher storage capacity. The RAID 5 configuration is bestsuited for transaction processing, relational database applications,enterprise resource planning, and other business systems. Use aminimum of three identical hard disk drives for this setup.52.2RAID Configurations Precautions1.Please use two new drives if you are creating a RAID 0(striping) array for performance. It is recommended touse two SATA drives of the same size. If you use twodrives of different sizes, the smaller capacity hard diskwill be the base storage size for each drive. Forexample, if one hard disk has an 80GB storage capacityand the other hard disk has 60GB, the maximum storagecapacity for the 80GB-drive becomes 60GB, and thetotal storage capacity for this RAID 0 set is 120GB.2.You may use two new drives, or use an existing driveand a new drive to create a RAID 1 (mirroring) array fordata protection (the new drive must be of the same sizeor larger than the existing drive). If you use two drivesof different sizes, the smaller capacity hard disk will bethe base storage size. For example, if one hard disk hasan 80GB storage capacity and the other hard disk has60GB, the maximum storage capacity for the RAID 1 setis 60GB.3.Please verify the status of your hard disks before youset up your new RAID array.WARNING!!Please backup your data first before you create RAID functions.In the process you create RAID, the system will ask if you want to “Clear Disk Data” or not. It is recommended to select “Yes”, and then your futuredata building will operate under a clean environment.67If you want to use “Intel Rapid Storage” in Windows ® environment, pleaseinstall “SATAII drivers” from the Support CD again so that “Intel RapidStorage” will be installed to your system as well.After the installation of Windows ® XP / XP-64bit OS, if you want to manage RAID functions,you are allowed to use both “RAID Installation Guide” and “Intel Rapid Storage Information”for RAID configuration. Please refer to the document in the Support CD, “Guide to SATA Hard Disks Installation and RAID Configuration”, which is located in the folder at the following path: .. \ RAID Installation Guide and the document in the support CD, “Guide to Intel Rapid Storage”, which is located in the folder at the following path: .. \ Intel Rapid Storage Information2.3.2 Setting Up a “RAID Ready” SystemYou can also set up a “RAID Ready” system with a single SATA / SATAII /SATA3 hard disk. A “RAID Ready” system can be seamlessly upgraded to RAID 0, RAID 1 or RAID 5 at a later date by using RAID migration feature of Intel Rapid Storage. The following steps outline how to build an Intel “RAID Ready” system.1. Assemble the system and attach a single SATA / SATAII / SATA3 hard drive.2. Set up system BIOS as step 1 of page 6. When done, exit Setup.3. Make a SATA / SATAII / SATA3 driver diskette as step 2 of page 6. Begin Windows ® setup by booting from the installation CD.4. At the beginning of Windows ® setup, press F6 to install a third-party RAID driver. When prompted, insert the SATA / SATAII / SATA3 driver diskette containing the Intel ® RAID driver. After reading the floppy disk, the driver will be presented. Select the driver to install according to the mode you choose and the OS you install.5. Finish the Windows ® installation and install all necessary drivers.STEP 4: Install Windows ® XP / XP 64-bit OS on your system.After making a SATA / SATAII / SATA3 driver diskette and using“RAID Installation Guide” to set RAID configuration, you can start toinstall Windows ® XP / XP 64-bit on your system. At the beginning ofWindows setup, press F6 to install a third-party RAID driver. Whenprompted, insert the SATA / SATAII / SATA3 driver diskette containingthe Intel ® RAID driver. After reading the floppy disk, the driver will bepresented. Select the driver to install according to the mode youchoose and the OS you install.82.3.3 Migrating a “RAID Ready” System to RAID 0,RAID 1 or RAID 5If you have an existing “RAID Ready” system, then you can use thefollowing steps to perform a migration from a single non-RAIDconfiguration to a two drive RAID 0, RAID 1 configuration or threedrive RAID 5 configuration. To prepare for this, you will need anotherSATA / SATAII / SATA3 hard drive with a capacity equal to or greaterthan that currently being used as the source hard drive.1. Physically attach one additional SATA / SATAII / SATA3 hard drive to the SATAII / SATA3 port not being used. Note the serial number of the hard drive already in the system; you will use this to select it as the source hard drive when initiating the migration.2. Boot Windows ®, install the Intel(R) Rapid Storage Manager software, if not already installed, using the setup package obtained from a CD-ROM or from the Internet. This will install the necessary Intel Storage Utility and start menu links.3. Open the Intel Storage Utility from the Start Menu and select “Create RAID volume from Existing Hard Drive” from the Actions menu. This will activate the Create RAID volume from Existing Hard Drive Wizard. Click through the dialogs as prompted. It’s important to understand what will occur during the migration process because any data on the destination hard drive will be lost.4. Once the migration is complete, reboot the system. If you migrated to a RAID 0 volume, use Disk Management from within Windows ® in order to partition and format the empty space created when the two hard drive capacities are combined. You may also use third-party software to extend any existing partitions within the RAID volume.6. Install the Intel(R) Rapid Storage software via the CD-ROM included with your motherboard or after downloading it from the Internet. This will add the Intel(R) Rapid Storage Console which can be used to manage the RAID configuration.7. After setting up a “RAID Ready” system as the above steps, you can follow the procedures of the next section to migrate the system toRAID 0, RAID 1 or RAID 5.92.3.4 Installing Windows ® 7 / 7 64-bit / Vista TM / Vista TM64-bit With RAID FunctionsIf you want to install Windows ® 7 / 7 64-bit / Vista TM / Vista TM 64-bit on your SATA / SATAII / SATA3 HDDs with RAID functions, please follow below steps.STEP 1: Set up BIOS.A. Enter BIOS SETUP UTILITY Advanced screen Storage Configuration.B. Set “SATA Operation Mode” to [RAID].STEP 2: Use “RAID Installation Guide” to set RAIDconfiguration.Before you start to configure the RAID function, you need to check the installation guide in the Support CD for properconfiguration. Please refer to the document in the Support CD,“Guide to SATA Hard Disks Installation and RAID Configuration”,which is located in the folder at the following path:.. \ RAID Installation GuideSTEP 3: Install Windows ® 7 / 7 64-bit / Vista TM / Vista TM 64-bit OS on your system.After the installation of Windows ® 7 / 7 64-bit / VistaTM / Vista TM 64-bit OS, if you want tomanage RAID functions, you are allowed to use both “RAID Installation Guide” and “Intel Rapid Storage Information” for RAID configuration. Please refer to the document in the Support CD, “Guide to SATA Hard Disks Installation and RAID Configuration”, which is located in the folder at the following path: .. \ RAID Installation Guideand the document in the support CD, “Guide to Intel Rapid Storage”, which is located in the folder at the following path: .. \ Intel Rapid Storage Information10112.4Setting the BIOS RAID ItemsAfter installing the hard disk drives, please set the necessary RAID items in the BIOS before setting your RAID configuration. Boot your system, and press <F2> key to enter BIOS setup utility. Highlight Advanced and press <Enter>, then the main interface of BIOS setup utility will appear. Please set the option Configure SATA as to [RAID]. Save your change before you exit BIOS setup.2.5Configuring the Intel RAID BIOSReboot your computer. Wait until you see the RAID software prompting you to press <Ctrl+I>.Press <Ctrl+I>. Then, the Intel RAID Utility - Create RAID Volume window appears.Select the option Create RAID Volumeand press <Enter>.12Volume0In the Create Volume Menu, under Name item, please key-in a unique name with 1-16 letters for your RAID volume then press <Enter>.Use the up or down arrow keys to select your desired RAID Level .You may select RAID0 (Stripe), RAID1 (Mirror), RAID 5, RAID 10, or Matrix Storage for your RAID level. Press <Enter>, and then you can select Strip Size .Volume013Volume0If you selected RAID 0 (Stripe), use the up or down arrow keys to select the stripe size for your RAID 0 array then press <Enter>.The available values range from 8 KB to 128 KB. The default selection is 128 KB. The strip value should be chosen based on the planned drive usage.• 8 /16 KB - low disk usage• 64 KB - typical disk usage• 128 KB - performance disk usageAfter you set disk block size, press <Enter> to set disk Capacity .After setting up Capacity , please press <enter>.Volume014Volume0Press <Enter> under the Create Volume item. The utility prompts a confirmation message as below.Volume0Press <Y> to complete the setup of RAID.After the completion, you will see the detailed information about theRAID that you set up.152.6Deleting RAID VolumeIf you want to delete a RAID volume, please select the option Delete RAID Volume , press <Enter>, and thenfollow the instructions on the screen.Please note that you are only allowed to create one RAID partition at a time under BIOS RAID environment. If you want to create extra RAID partition, please use the RAID utility under Windows environment toconfigure RAID functions after you install OS.。
随着i865、i875、KT600等支持SA TA串口硬盘的主板的逐步普及,越来越多的人装机时选择了SA TA硬盘。
但是由于SA TA硬盘有别于并口PA TA硬盘,其安装设置部分会不同。
如果设置没搞清楚,在以后的使用中很可能出现问题,所以本文会从BIOS设置(重点部分,是后面几项的基础),分区,安装系统三个方面讲解SA TA硬盘的使用问题,其中还会说明一下SA TA硬盘与旧有并口硬盘共存的注意事项。
一、BIOS设置部分由于各家主板的BIOS不尽相同,但是设置原理都是基本一致的,在此只介绍几种比较典型的BIOS设置,相信读者都能够根据自己主板BIOS的实际情况参考本文解决问题。
1.南桥为ICH5/ICH5R的主板先以华硕的P4C800为例,这款主板芯片组为i865PE,南桥为ICH5/ICH5R。
进到BIOS 后,选择Main下的IDE Configuration Menu,在Onboard IDE Operate Mode下面可以选择两种IDE操作模式:兼容模式和增强模式(Compatible Mode和Enhanced Mode)。
其中兼容模式Compatible Mode,可以理解为把SA TA硬盘端口映射到并口IDE通道的相应端口,当你选择这种模式时在下面的IDE Port Settings中会有三个选项:Primary P-A TA+S-A TA:并行IDE硬盘占据IDE0+1的主通道(Primary IDE Channel),串行SA TA硬盘占据IDE2+3的从通道(Secondary IDE Channel)。
也就是说这时主板上的第二个并行IDE接口对应的端口不可用。
Secondary P-A TA+S-A TA:与上面正相反,此时主板第一个并行IDE接口(Primary P-A TA)上对应的端口不可用,因为给SA TA硬盘占用了。
P-A TA Ports Only:屏蔽了串行SA TA硬盘接口,只能使用并行接口设备。
随着i865、i875、KT600等支持SA TA串口硬盘的主板的逐步普及,越来越多的人装机时选择了SA TA硬盘。
但是由于SA TA硬盘有别于并口PA TA硬盘,其安装设置部分会不同。
如果设置没搞清楚,在以后的使用中很可能出现问题,所以本文会从BIOS设置(重点部分,是后面几项的基础),分区,安装系统三个方面讲解SA TA硬盘的使用问题,其中还会说明一下SA TA硬盘与旧有并口硬盘共存的注意事项。
一、BIOS设置部分
由于各家主板的BIOS不尽相同,但是设置原理都是基本一致的,在此只介绍几种比较典型的BIOS设置,相信读者都能够根据自己主板BIOS的实际情况参考本文解决问题。
1.南桥为ICH5/ICH5R的主板
先以华硕的P4C800为例,这款主板芯片组为i865PE,南桥为ICH5/ICH5R。
进到BIOS 后,选择Main下的IDE Configuration Menu,在Onboard IDE Operate Mode下面可以选择两种IDE操作模式:兼容模式和增强模式(Compatible Mode和Enhanced Mode)。
其中兼容模式Compatible Mode,可以理解为把SA TA硬盘端口映射到并口IDE通道的相应端口,当你选择这种模式时在下面的IDE Port Settings中会有三个选项:
Primary P-A TA+S-A TA:并行IDE硬盘占据IDE0+1的主通道(Primary IDE Channel),串行SA TA硬盘占据IDE2+3的从通道(Secondary IDE Channel)。
也就是说这时主板上的第二个并行IDE接口对应的端口不可用。
Secondary P-A TA+S-A TA:与上面正相反,此时主板第一个并行IDE接口(Primary P-A TA)上对应的端口不可用,因为给SA TA硬盘占用了。
P-A TA Ports Only:屏蔽了串行SA TA硬盘接口,只能使用并行接口设备。
注:前两种模式中,主板上的SA TA1接口自动对应IDE通道中的主盘位置,SA TA2接口自动对应IDE通道中的从盘位置。
当选择模式为增强模式Enhanced Mode时,其下的端口设置的字样变为Enhanced Mode Supports On,其中也有三个选项:
P-A TA+S-A TA:并行和串行硬盘并存模式,此时SA TA和PA TA通道都相互独立互不干扰,理论上4个P-A TA和2个S-A TA可同时接6个设备,实际上得根据不同主板而定,有的南桥芯片就只支持4个A TA设备。
此时SA TA1口硬盘对应Third IDE Master(第三IDE通道主盘),SA TA2口硬盘对应Fourth IDE Master(第四IDE通道主盘)。
S-A TA:串行硬盘增强模式,此时理论上支持4个串行硬盘,但还得看主板的支持情况(如果是ICH5R芯片组如P4P800,想组RAID模式,则必须要选择此项,并将Configure S-A TA as RAID项设为Y es,S-A TA BOOTROM项设为Enable,设置后BIOS自动检测的时候按“Ctrl+I”进行RAID设置)。
P-A TA:其实还是一种映射模式,SA TA硬盘占据的是第一个IDE通道,SA TA1口对应第一个通道的主盘,SA TA2口对应第一个通道的从盘。
当你使用的是Win98/Win NT/Win2000/MS-DOS等传统的操作系统时,由于它们只支持4个IDE设备,所以请选择兼容模式Compatible Mode,并根据你的实际硬盘数量和位置选择IDE Port Settings中的对应选项;当你使用的是WinXP/Win2003等新型的操作系统时,可以选择增强模式Enhanced Mode来支持更多的设备。
当然如果你安装Win98+Win XP双系统的话,也只好选择Compatible Mode了。
另外,有的主板BIOS有BUG,致使在单个SA TA 硬盘上安装Windows 98SE系统时不能正确安装SA TA硬盘(如:华擎P4VT8),只需要升级BIOS版本到最新版就可以解决了。
注:虽然SA TA硬盘本身并没有主从之分,但是如果使用了端口映射的模式,当你想要并行硬盘和串行硬盘共存时,还是得注意硬盘所占的位置不要冲突了,而且启动顺序也需要在BIOS中根据实际情况进行相应调整。
下面以GA-8KNXP Ultra为例,简要说一下技嘉主板的BIOS中SA TA的设置:
这款主板的芯片组是i875P,南桥为ICH5R,其SA TA部分的设置选项在Main主菜单下的Integrated Peripherals(整合周边设备)里,其设置功能详见下表(只列出了有关SA TA硬盘设置的部分):
2.南桥为VIA的VT8237的主板
相对于ICH5/ICH5R芯片组,VT8237的SA TA设置部分就简单得多了。
下面以硕泰克的SL-KT600系列为例,其SA TA部分的设置选项也是在Main主菜单下的Integrated Peripherals(整合周边设备)里:
Onboard PA TA IDE(主板内建并行IDE口设定)
此项设定允许用户配置主板内建并行IDE口功能。
Disabled:关闭主板的并行IDE口功能。
Enabled:允许使用并行IDE口功能(预设值)。
Onboard IDES operate mode(主板内建IDE优先设定)
PA TA is Pri IDE:PA TA口上的设备优先(预设值)。
SA TA is Pri IDE:SA TA口上的设备优先。
Onboard SA TA- IDE(主板内建SA TA口功能设定)
Disabled:关闭主板上SA TA口。
SA TA:主板上SA TA口当做一般的SA TA口使用。
RAID:主板上SA TA口上的硬盘可以建立磁盘阵列(预设值)。
这里你只需要根据实际情况调整一下串、并行口的优先级就可以正常使用SA TA硬盘了。
(通过上面的选项能看出,在这里S-A TA硬盘还是可以理解为映射到P-A TA端口上来识别的。
)
注:RAID的组建还需要在开机时按“Tab”键进入VIA科技RAID控制器的BIOS设置画面另行设置,请参见相关的说明手册。