Arduino-LiquidCrystal库函数的语法及其命令设置
- 格式:doc
- 大小:42.50 KB
- 文档页数:10

liquidcrystal_i2c 常用函数liquidcrystal_i2c 常用函数指的是在使用液晶显示屏模块时,常用的驱动函数集合。
该函数集合中包含了一系列可通过I2C总线通信与微控制器进行交互的操作指令。
本文将以liquidcrystal_i2c 常用函数为主题,通过一步一步的解释,带领读者了解这些常用函数的使用方法和功能。
1. 引言液晶显示屏模块广泛应用于各种电子设备中,例如数字仪表、计算器、手机等。
liquidcrystal_i2c 库是一种可以简化液晶显示屏驱动工作的库,它可以通过I2C总线与微控制器通信,简化了硬件接线和代码编写。
在使用这个库时,我们可以通过一些常用函数来实现液晶显示屏上文字的显示、光标的控制、显示屏的清除等功能。
2. 开始使用liquidcrystal_i2c在开始使用liquidcrystal_i2c 函数之前,我们需要确保已将该库添加到Arduino IDE 中并正确引用。
此外,我们还需要连接液晶显示屏模块与微控制器,并根据模块的引脚定义正确进行接线。
下面是一些常见的函数以及它们的使用方法和功能介绍。
3. 初始化显示屏初始化函数用于设置液晶显示屏的参数,包括行数、列数、字体大小等。
在使用liquidcrystal_i2c 函数之前,我们需要首先调用初始化函数。
以下是常用的初始化函数及其参数的说明:void LiquidCrystal_I2C::begin(uint8_t cols, uint8_t rows)初始化液晶显示屏参数:cols - 显示屏的列数rows - 显示屏的行数4. 清除显示屏清除函数可以将液晶显示屏上的内容全部清除,以便重新绘制新的内容。
以下是常用的清除函数及其说明:void LiquidCrystal_I2C::clear()清除液晶显示屏上的所有字符5. 光标控制光标控制函数用于设置光标的位置和显示状态。
以下是常用的光标控制函数及其说明:void LiquidCrystal_I2C::setCursor(uint8_t col, uint8_t row)设置光标的位置参数:col - 光标所在列的位置row - 光标所在行的位置void LiquidCrystal_I2C::noCursor()关闭光标显示void LiquidCrystal_I2C::cursor()开启光标显示6. 写入字符和字符串字符和字符串写入函数用于将字符或字符串写入液晶显示屏。

LCD+Keypad+Shield:我使用的LCD模块。
接口编号(括号内为对应接口编号):DB4(PI N4),DB5(PIN5),DB6(PIN6),DB7(PIN7),RS(PIN8),Enable(PIN9),背光控制(PIN10)LiquidCrystal库:这个库包含了你要让LCD工作的一切函数,Arduino+IDE自带。
你可以在这里找到相关信息,当然,下面一会提到一些。
1. LiquidCrystal()——定义你的LCD的接口:各个引脚连接的I/O口编号,格式为LiquidCrystal(rs,+enable,+d4,+d5,+d6,+d7)LiquidCrystal(rs,+rw,+enable,+d4,+d5,+d6,+d7)LiquidCrystal(rs,+enable,+d0,+d1,+d2,+d3,+d4,+d5,+d6,+d7)LiquidCrystal(rs,+rw,+enable,+d0,+d1,+d2,+d3,+d4,+d5,+d6,+d7)2. begin()——定义LCD的长宽(n列×n行),格式lcd.begin(cols,+rows)3. clear()——清空LCD,格式lcd.clear()4. home()——把光标移回左上角,即从头开始输出,格式lcd.home()5. setCursor()——移动光标到特定位置,格式lcd.setCursor(col,+row)6. write()——在屏幕上显示内容(必须是一个变量,如”Serial.read()”),格式lcd.write(data)7. print()——在屏幕上显示内容(字母、字符串,等等),格式lcd.print(data)lcd.print(data,+BASE)8. cursor()——显示光标(一条下划线),格式lcd.cursor()9. noCursor()——隐藏光标,格式lcd.noCursor()10. blink()——闪烁光标,格式lcd.blink()11. noBlink()——光标停止闪烁,格式lcd.noBlink()12. display()——(在使用noDisplay()函数关闭显示后)打开显示(并恢复原来内容),格式lcd.display()13. noDisplay()——关闭显示,但不会丢失原来显示的内容,格式为lcd.noDisplay()14. scrollDisplayLeft()——把显示的内容向左滚动一格,格式lcd.scrollDisplayLeft()15. scrollDisplayRight()——把显示的内容向右滚动一格,格式为lcd.scrollDisplayRight()16. autoscroll()——打开自动滚动,这使每个新的字符出现后,原有的字符都移动一格:如果字符一开始从左到右(默认),那么就往左移动一格,否则就向右移动,格式lcd.autoscroll()17. noAutoscroll()——关闭自动滚动,格式lcd.noAutoscroll()18. leftToRight()——从左往右显示,也就是说显示的字符会从左往右排列(默认),但屏幕上已经有的字符不受影响,格式lcd.leftToRight()19. rightToLeft()——从右往左显示,格式lcd.rightToLeft()20. createChar()——自造字符,最多5×8像素,编号0-7,字符的每个像素显示与否由数组里的数(0-不显示,1-显示)决定,格式lcd.createChar(num,+data),有点难理解,可以看一个例子。

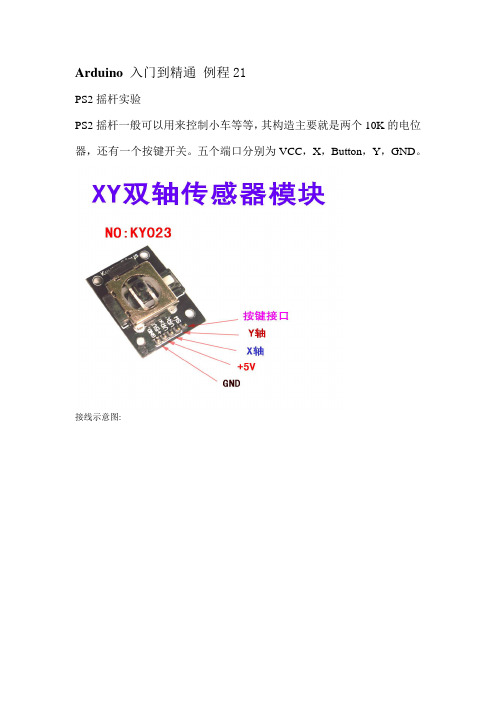
Arduino 入门到精通例程21PS2摇杆实验PS2摇杆一般可以用来控制小车等等,其构造主要就是两个10K的电位器,还有一个按键开关。
五个端口分别为VCC,X,Button,Y,GND。
接线示意图:程序代码1.#include <LiquidCrystal.h> //调用arduino自带的LiquidCrystal库2.3.LiquidCrystal lcd(12, 11, 10, 9, 8, 7);//设置接口4.5.int xpotPin = 0; //设置模拟口0为X的信号输入端口6.int ypotPin = 1; //设置模拟口1为Y的信号输入端口7.int bpotPin = 2; //设置模拟口2为Button的信号输入端口8.9.int xval=0; //设置变量10.int yval=0;11.int bval=0;12.13.void setup()14.{15.lcd.begin(16, 2); //初始化LCD16.delay(1000); //延时1000ms17.}18.19.void loop()20.{21.22.xval = analogRead(xpotPin); //xval变量为从0信号口读取到的数值23.yval = analogRead(ypotPin); //yval变量为从1信号口读取到的数值24.bval = analogRead(bpotPin); //bval变量为从2信号口读取到的数值25.lcd.clear(); //清屏26.lcd.setCursor(0, 0); //设置光标位置为第一行第一个位置27.lcd.print("X="); //使屏幕显示文字X=28.lcd.print(xval);29.lcd.setCursor(7, 0); //设置光标位置为第一行第八个位置30.lcd.print("Y="); //使屏幕显示文字Y=31.lcd.print(yval);32.33.if(bval<500)34.{35.lcd.setCursor(0, 1) ; //设置光标位置为第二行第一个位置36.lcd.print("Button ON"); //使屏幕显示文字ButtonON37.}38.else39.{40.lcd.setCursor(0, 1) ;41.lcd.print("Button OFF"); //使屏幕显示文字ButtonOFF42.}43.44.delay(100); //延时0.1秒,这里也就是刷新速度。

lcd显示屏库函数
LCD显示屏库函数是一些特定于LCD显示屏操作的函数库,用于控制和管理LCD显示屏的显示。
这些函数库提供了各种函数,例如初始化LCD显示屏、清除LCD显示屏、设置光标位置、在LCD显示屏上显示文本等。
一个常见的LCD显示屏库函数是LiquidCrystal库函数,适用于Arduino开发环境。
这个库提供了一套函数,用于控制与Arduino连接的LCD显示屏。
一些常用的函数包括:
- `LiquidCrystal(rs, enable, d4, d5, d6, d7)`:初始化LCD显示屏。
- `begin(cols, rows)`:设置LCD显示屏的列数和行数。
- `clear()`:清除LCD显示屏上的内容。
- `setCursor(col, row)`:设置光标位置。
- `print(text)`:在LCD显示屏上打印文本。
- `write(value)`:向LCD显示屏写入一个字符。
这些函数可以根据需要在程序中调用,以实现控制和操作LCD显示屏的功能。

arduino 双冒号用法-回复Arduino双冒号用法是指在编程中使用双冒号操作符(::)来操作Arduino 的库函数和成员函数。
双冒号操作符也被称为作用域操作符,它允许我们在特定的作用域内引用类、结构体、命名空间或枚举的成员。
在Arduino 编程中,双冒号操作符可以用于访问库函数和类的成员函数,以实现更灵活和复杂的功能。
本文将详细介绍Arduino双冒号用法,并提供一步一步的解释和示例。
1. 引入Arduino库首先,在Arduino程序中,我们需要引入适当的库以便使用所需的函数和类。
例如,如果我们想使用LiquidCrystal_I2C库中的函数,我们需要在代码中添加以下行:#include <LiquidCrystal_I2C.h>2. 创建对象在使用Arduino库中的函数或类之前,我们需要创建一个对象。
对象是该类的实例,它具有库函数或类的所有属性和方法。
要创建一个对象,我们可以使用类的构造函数。
通常,库提供了一个默认的构造函数,我们可以直接使用它来创建对象。
例如,对于LiquidCrystal_I2C库,我们可以使用以下代码创建一个名为lcd的对象:LiquidCrystal_I2C lcd(0x27, 16, 2);这行代码中的数字参数是根据具体硬件的地址和尺寸设置的。
在这个例子中,我们创建了一个具有地址0x27和尺寸16x2的lcd对象。
3. 使用双冒号操作符调用函数一旦我们创建了一个对象,我们就可以使用双冒号操作符调用该类的函数。
语法如下:对象名.函数名(参数);在Arduino中,对象名实际上是我们在创建对象时指定的变量名。
例如,如果我们想调用LiquidCrystal_I2C库中的print函数,在lcd对象上我们可以这样写:lcd.print("Hello World");在这个例子中,我们在lcd对象上调用了print函数,并向它传递了一个字符串作为参数。

;Arduino 语法手册函数部分摘自:函数部分数字 I/OpinMode()描述将指定的引脚配置成输出或输入。
详情请见digital pins。
语法pinMode(pin, mode)#参数pin:要设置模式的引脚mode:INPUT或OUTPUT返回无例子ledPin = 13语法…noTone(pin)参数pin: 所要停止产生声音的引脚返回无shiftOut()shiftOut())描述将一个数据的一个字节一位一位的移出。
从最高有效位(最左边)或最低有效位(最右边)开始。
依次向数据脚写入每一位,之后时钟脚被拉高或拉低,指示刚才的数据有效。
注意:如果你所连接的设备时钟类型为上升沿,你要确定在调用shiftOut()前时钟脚为低电平,如调用digitalWrite(clockPin, LOW)。
注意:这是一个软件实现;Arduino提供了一个硬件实现的SPI库,它速度更快但只在特定脚有效。
语法shiftOut(dataPin, clockPin, bitOrder, value)参数dataPin:输出每一位数据的引脚(int)clockPin:时钟脚,当dataPin有值时此引脚电平变化(int)bitOrder:输出位的顺序,最高位优先或最低位优先value: 要移位输出的数据(byte)^返回无shiftIn()描述将一个数据的一个字节一位一位的移入。
从最高有效位(最左边)或最低有效位(最右边)开始。
对于每个位,先拉高时钟电平,再从数据传输线中读取一位,再将时钟线拉低。
注意:这是一个软件实现;Arduino提供了一个硬件实现的SPI库,它速度更快但只在特定脚有效。
语法《shiftIn(dataPin,clockPin,bitOrder)参数dataPin:输出每一位数据的引脚(int)clockPin:时钟脚,当dataPin有值时此引脚电平变化(int)bitOrder:输出位的顺序,最高位优先或最低位优先返回读取的值(byte)pulseIn()描述《读取一个引脚的脉冲(HIGH或LOW)。
LCD1602库函数LCD1602 库函数This library allows an Arduino board to control LiquidCrystal displays (LCDs) based on the Hitachi HD44780 (or a compatible) chipset, which is found on most text-basedLCDs. The library works with in either 4- or 8-bit mode (i.e. using 4 or 8 data lines in addition to the rs, enable, and, optionally, the rw control lines).Function详细解释LiquidCrystal() LiquidCrystal类的构造函数,初始化LCDDescription描述Creates a variable of type LiquidCrystal. The display can be controlled using 4 or 8 data lines. If the former, omit the pin numbers for d0 to d3 and leave those lines unconnected. The RW pin can be tied to ground instead of connected to a pin on the Arduino; if so, omit it from this function's parameters.Syntax语法LiquidCrystal(rs, enable, d4, d5, d6, d7)LiquidCrystal(rs, rw, enable, d4, d5, d6, d7)LiquidCrystal(rs, enable, d0, d1, d2, d3, d4, d5, d6, d7)LiquidCrystal(rs, rw, enable, d0, d1, d2, d3, d4, d5, d6, d7)Parameters参数rs: the number of the Arduino pin that is connected to the RS pin on the LCD 数据/命令选择引脚rw: the number of the Arduino pin that is connected to the RW pin on the LCD (optional) 读写引脚enable: the number of the Arduino pin that is connected to the enable pin on the LCD 使能引脚d0, d1, d2, d3, d4, d5, d6, d7: the numbers of the Arduino pins that are connected to the corresponding data pins on the LCD. d0, d1, d2, and d3 are optional; if omitted, the LCD will be controlled using only the four data lines (d4, d5, d6, d7). 数据引脚,8个或4个Example⽰例#include <LiquidCrystal.h>LiquidCrystal lcd(12, 11, 10, 5, 4, 3, 2);void setup(){lcd.begin(16,1);lcd.print("hello, world!");}begin() 初始化LCD的界⾯,设置LCD尺⼨DescriptionInitializes the interface to the LCD screen, and specifies the dimensions (width and height) of the display. begin()needs to be called before any other LCD library commands.Syntaxlcd.begin(cols, rows)Parameterslcd: a variable of type LiquidCrystalcols: the number of columns that the display has 列数rows: the number of rows that the display has ⾏数clear() 清屏,光标在左上⾓DescriptionClears the LCD screen and positions the cursor in the upper-left corner.Syntaxlcd.clear()Parameterslcd: a variable of type LiquidCrystalhome() 光标复位,定位于左上⾓DescriptionPositions the cursor in the upper-left of the LCD. That is, use that location in outputting subsequent text to the display. To also clear the display, use the function instead.Syntaxlcd.home()Parameterslcd: a variable of type LiquidCrystalsetCursor() 设置光标位置DescriptionPosition the LCD cursor; that is, set the location at which subsequent text written to the LCD will be displayed.Syntaxlcd.setCursor(col, row)Parameterslcd: a variable of type LiquidCrystalcol: the column at which to position the cursor (with 0 being the first column)row: the row at which to position the cursor (with 0 being the first row)write() 写⼀个字符到LCDWrite a character to the LCD.Syntaxlcd.write(data)Parameterslcd: a variable of type LiquidCrystaldata: the character to write to the displayReturnsbytewrite() will return the number of bytes written, though reading that number is optionalExample#include <LiquidCrystal.h>LiquidCrystal lcd(12, 11, 10, 5, 4, 3, 2);void setup(){Serial.begin(9600);}void loop(){if (Serial.available()){lcd.write(Serial.read());}}print() ⽂本输出到LCDDescriptionPrints text to the LCD.Syntaxlcd.print(data)lcd.print(data, BASE) 输出格式可以是⼆进制,⼗进制,⼋进制,⼗六进制Parameterslcd: a variable of type LiquidCrystaldata: the data to print (char, byte, int, long, or string)BASE (optional): the base in which to print numbers: BIN for binary (base 2), DEC for decimal (base 10), OCT for octal (base 8), HEX for hexadecimal (base 16).Returnsbyteprint() will return the number of bytes written, though reading that number is optionalExample#include <LiquidCrystal.h>LiquidCrystal lcd(12, 11, 10, 5, 4, 3, 2);void setup(){cursor() 显⽰光标DescriptionDisplay the LCD cursor: an underscore (line) at the position to which the next character will be written.Syntaxlcd.cursor()Parameterslcd: a variable of type LiquidCrystalnoCursor() 隐藏光标DescriptionHides the LCD cursor.Syntaxlcd.noCursor()Parameterslcd: a variable of type LiquidCrystalblink() 光标闪烁DescriptionDisplay the blinking LCD cursor. If used in combination with the () function, the result will depend on the particular display. Syntaxlcd.blink()Parameterslcd: a variable of type LiquidCrystalnoBlink() 光标不闪烁DescriptionTurns off the blinking LCD cursor.Syntaxlcd.noBlink()Parameterslcd: a variable of type LiquidCrystaldisplay() 开启LCD显⽰功能,DescriptionParameterslcd: a variable of type LiquidCrystalnoDisplay() 关闭LCD显⽰功能,但之前的显⽰内容不丢失DescriptionTurns off the LCD display, without losing the text currently shown on it.Syntaxlcd.noDisplay()Parameterslcd: a variable of type LiquidCrystalscrollDisplayLeft() 向左滚屏,LCD显⽰的内容往左移⼀格DescriptionScrolls the contents of the display (text and cursor) one space to the left.Syntaxlcd.scrollDisplayLeft()Parameterslcd: a variable of type LiquidCrystalscrollDisplayRight() 向右滚屏,显⽰的内容往右移⼀格DescriptionScrolls the contents of the display (text and cursor) one space to the right.Syntaxlcd.scrollDisplayRight()Parameterslcd: a variable of type LiquidCrystalautoscroll() ⾃动滚屏,输⼊时光标在⼀个固定位置,字符⾃动移动DescriptionTurns on automatic scrolling of the LCD. This causes each character output to the display to push previous characters over by one space. If the current text direction is left-to-right (the default), the display scrolls to the left; if the current direction is right-to-left, the display scrolls to the right. This has the effect of outputting each new character to the same location on the LCD.Syntaxlcd.autoscroll()Parameterslcd: a variable of type LiquidCrystalTurns off automatic scrolling of the LCD.Syntaxlcd.noAutoscroll()Parameterslcd: a variable of type LiquidCrystalleftToRight() ⽂本显⽰时的移动⽅向是从左往右,默认⽅向DescriptionSet the direction for text written to the LCD to left-to-right, the default. This means that subsequent characters written to the display will go from left to right, but does not affect previously-output text.Syntaxlcd.leftToRight()Parameterslcd: a variable of type LiquidCrystalrightToLeft() ⽂本显⽰时的移动⽅向是从右往左DescriptionSet the direction for text written to the LCD to right-to-left (the default is left-to-right). This means that subsequent characters written to the display will go from right to left, but does not affect previously-output text.Syntaxlcd.rightToLeft()Parameterslcd: a variable of type LiquidCrystalcreateChar() 建⽴⼀个⾃定义的图形字符DescriptionCreate a custom character (glyph) for use on the LCD. Up to eight characters of 5x8 pixels are supported (numbered 0 to 7). The appearance of each custom character is specified by an array of eight bytes, one for each row. The five least significant bits of each byte determine the pixels in that row. To display a custom character on the screen, () its number.NB : When referencing custom character "0", if it is not in a variable, you need to cast it as a byte, otherwise the compiler throws an error. See the example below.Syntaxlcd.createChar(num, data)Parameterslcd: a variable of type LiquidCrystalnum: which character to create (0 to 7)data: the character's pixel dataLiquidCrystal lcd(12, 11, 5, 4, 3, 2); byte smiley[8] = //微笑图案{B11011,B00000,B01010,B00000,B00000,B10001,B10001,B01110,};void setup(){lcd.createChar(0, smiley);lcd.begin(16, 2);lcd.write(byte(0));}void loop() {}。
- 1 -高 新 技 术0 引言目前,在中学物理和医科院校医学物理的教学中,眼睛调节功能的教学演示基本是使用手动变焦的方法,该方法仿真度不高,受外界影响大,不易得到清晰的像[1]。
该文以Arduino 单片机为核心主控板,设计并制造了1款能自动模拟眼睛调节功能的演示器。
该演示器用自动变焦透镜来模拟晶状体,可以形象、精准地模拟和演示眼睛自动调节的功能,还可以达到自动矫正近视眼和远视眼的目的。
1 系统总体设计该眼睛调节演示器通过Arduino 系统、可变焦透镜、HC-SR04超声波传感器测距以及步进电机板块去模拟眼睛的自动化调焦过程。
单片机选用Arduino UNO,用Arduino IDE 编程控制整个系统,采用软硬件结合的方式全自动、精准地模拟眼球成像。
该系统的工作原理如下:所视物与可变焦透镜(用自制水透镜模拟,自制方法成熟且易实现)的距离为物距,视网膜与可变焦透镜的距离为像距,Arduino 调用超声波测出的物距u 、像距v 以及可变焦透镜当前前后表面的曲率半径r 01、r 02,并将结果显示在LCD 上。
首先,根据物距u 和像距v 调用程序计算“晶状体”的焦度,从而确定透镜前后曲面的曲率半径r 1、r 2;其次,用超声波(结合二倍焦距法)测出透镜当前r 01、r 02的值,与所需要的值r 1、r 2进行比较,程序计算出可变焦透镜需要抽注液体的量;最后,由Arduino 驱动电机推动螺杆,螺杆推动注射器通过管子给透镜抽注液体以达到所需要的r 1、r 2的值,进而满足所需要的屈光度,使“视网膜”上呈现出清晰的像[1]。
系统的工作原理如图1所示。
1.1 演示器主要模块的功能1.1.1 Arduino以Arduino 为核心,控制超声波传感器开展测距的工作,并对测量得到的数据进行计算和比较,再将比较的结果反馈给步进电机,使其驱动注射器对透镜里的液体进行抽注,从而达到自动调焦的目的。
1.1.2 可变焦透镜可变焦透镜在整个过程中模拟眼睛的晶状体,通过改变透镜内的液体来实现自动变焦,从而达到所需要的的屈光度。
Arduino-LiquidCrystal库函数的语法及其命令设置Arduino LiquidCrystal库函数的语法及其命令设置Function1 LiquidCrystal()2 begin()3 clear()4 home()5 setCursor()6 write()7 print()8 cursor()9 noCursor()10 blink()11 noBlink()12 display()13 noDisplay()14 scrollDisplayLeft()15 scrollDisplayRight()16 autoscroll()17 noAutoscroll()18 leftToRight()19 rightToLeft()20 createChar()1 LiquidCrystal()内容创建一个LiquidCrystal的实例(构造函数).可使用4线或8线方式作为数据线(请注意,还需要指令线).若采用四线方式,将d0-d3悬空不连接.RW引脚可接地而不用接在Arduino的某个引脚上;如果这样接,省略在函数中的rw参数.语法LiquidCrystal(rs, enable, d4, d5, d6, d7)LiquidCrystal(rs, rw, enable, d4, d5, d6, d7) LiquidCrystal(rs, enable, d0, d1, d2, d3, d4, d5, d6, d7) LiquidCrystal(rs, rw, enable, d0, d1, d2, d3, d4, d5, d6, d7) 参数设置rs: rs连接的Arduino的引脚编号rw: rw连接的Arduino的引脚编号enable:enable连接的Arduino的引脚编号d0, d1, d2, d3, d4, d5, d6, d7: 连接的Arduino的引脚编号例子#includeLiquidCrystal lcd(12, 11, 10, 5, 4, 3, 2);void setup(){lcd.print("hello, world!");}void loop() {}2 begin ()内容指定显示屏的尺寸(宽度和高度)。
1 LiquidCrystal()内容创建一个LiquidCrystal的实例(构造函数).可使用4线或8线方式作为数据线(请注意,还需要指令线).若采用四线方式,将d0-d3悬空不连接.RW引脚可接地而不用接在Arduino的某个引脚上;如果这样接,省略在函数中的rw参数.语法LiquidCrystal(rs, enable, d4, d5, d6, d7)LiquidCrystal(rs, rw, enable, d4, d5, d6, d7)LiquidCrystal(rs, enable, d0, d1, d2, d3, d4, d5, d6, d7)LiquidCrystal(rs, rw, enable, d0, d1, d2, d3, d4, d5, d6, d7)参数设置rs: rs连接的Arduino的引脚编号rw: rw连接的Arduino的引脚编号enable:enable连接的Arduino的引脚编号d0, d1, d2, d3, d4, d5, d6, d7: 连接的Arduino的引脚编号例子#include <LiquidCrystal.h>LiquidCrystal lcd(12, 11, 10, 5, 4, 3, 2);void setup(){lcd.print("hello, world!");}void loop() {}2 begin ()内容指定显示屏的尺寸(宽度和高度)。
语句lcd.begin(cols, rows)参数设置lcd: 液晶类型的名称变量cols: 显示器可以显示的列数(1602是16列)rows: 显示器可以显示的行数(1602是2行)3 clear ()简介清楚LCD屏幕上内容,并将光标置于左上角。
语法lcd.clear()参数LCD:LiquidCrystal类的对象4 home()内容将光标定位在屏幕左上角. 就是说,接下来的字符从屏幕左上角开始显示.如果同时要清楚屏幕上的内容,请使用clear()函数代替.语法lcd.home()参数设置lcd: a variable of type LiquidCrystal5 setCursor()简介将光标定位在特定的位置。
Arduino LiquidCrystal库函数的语法及其命令设置Function• 1 LiquidCrystal()• 2 begin()• 3 clear()• 4 home()• 5 setCursor()• 6 write()•7 print()•8 cursor()•9 noCursor()•10 blink()•11 noBlink()•12 display()•13 noDisplay()•14 scrollDisplayLeft()•15 scrollDisplayRight()•16 autoscroll()•17 noAutoscroll()•18 leftToRight()•19 rightToLeft()•20 createChar()1 LiquidCrystal()内容创建一个LiquidCrystal的实例(构造函数).可使用4线或8线方式作为数据线(请注意,还需要指令线).若采用四线方式,将d0-d3悬空不连接.RW引脚可接地而不用接在Arduino的某个引脚上;如果这样接,省略在函数中的rw参数.语法LiquidCrystal(rs, enable, d4, d5, d6, d7)LiquidCrystal(rs, rw, enable, d4, d5, d6, d7)LiquidCrystal(rs, enable, d0, d1, d2, d3, d4, d5, d6, d7)LiquidCrystal(rs, rw, enable, d0, d1, d2, d3, d4, d5, d6, d7)参数设置rs: rs连接的Arduino的引脚编号rw: rw连接的Arduino的引脚编号enable:enable连接的Arduino的引脚编号d0, d1, d2, d3, d4, d5, d6, d7: 连接的Arduino的引脚编号例子#include <LiquidCrystal.h>LiquidCrystal lcd(12, 11, 10, 5, 4, 3, 2);void setup(){lcd.print("hello, world!");}void loop() {}2 begin ()内容指定显示屏的尺寸(宽度和高度)。
语句lcd.begin(cols, rows)参数设置lcd: 液晶类型的名称变量cols: 显示器可以显示的列数(1602是16列)rows: 显示器可以显示的行数(1602是2行)3 clear ()简介清楚LCD屏幕上内容,并将光标置于左上角。
语法lcd.clear()参数LCD:LiquidCrystal类的对象4 home()内容将光标定位在屏幕左上角. 就是说,接下来的字符从屏幕左上角开始显示.如果同时要清楚屏幕上的内容,请使用clear()函数代替.语法lcd.home()参数设置lcd: a variable of type LiquidCrystal5 setCursor()简介将光标定位在特定的位置。
语法lcd.setCursor(col, row)参数LCD:一个LiquidCrystal类型的变量col: 你要显示光标的列 (从0开始计数)row: 你要显示光标的行 (从0开始计数)6 write()简介向LCD写一个字符。
语法lcd.write(data)lcd: 一个类型为LiquidCrystal的变量(LiquidCrystal是一个类)。
data: 你要显示的字符(仅限英文和数字和你自己定义的字符)。
返回值bytewrite() 将返回写入的字节数,虽然读这个数字是可选示例#include <LiquidCrystal.h>LiquidCrystal lcd(12, 11, 10, 5, 4, 3, 2);void setup(){Serial.begin(9600);}void loop(){if (Serial.available()) {lcd.write(Serial.read());}}7 print()内容将文本显示在LCD上.语法lcd.print(data)lcd.print(data, BASE)参数lcd: 液晶类型的名称变量data:要显示的数据,可以是char, byte, int, long或者string类型的BASE (optional): 数制(可选的),BIN,DEC,OCT,HEX分别将数字以二进制,十进制,八进制,十六进制方式显示出来.返回值这个返回值通常是用不到的示例#include <LiquidCrystal.h>LiquidCrystal lcd(12, 11, 10, 5, 4, 3, 2);void setup(){lcd.print("hello, world!");}void loop() {}8 cursor()内容显示光标.(光标所在的位置, 就是下一个字符将会被显示的位置) 语句lcd.cursor()参数设置lcd: 液晶类型的名称变量例子•cursor() and noCursor()9 noCursor()内容隐藏光标。
语法lcd.noCursor()参数lcd: 液晶类型的名称变量例子•cursor() and noCursor()10 blink()内容显示闪烁的光标。
如果和cursor()一起使用,最终结果将取决于您使用的LCD屏幕. 语法lcd.blink()参数设置lcd: 液晶类型的名称变量例子•blink() and noBlink()11 noBlink()内容关闭光标闪烁功能.语句lcd.noBlink()参数设置lcd: 液晶类型的名称变量例子12 display()内容调用noDisplay()隐藏LCD上显示内容后,调用本函数恢复显示.语法lcd.display()参数lcd: 液晶类型的名称变量例子•display() and noDisplay()•blink() and noBlink()13 noDisplay()内容关闭液晶显示,但原先显示的内容不会丢失. 可使用display()恢复显示. 语法lcd.noDisplay()参数lcd: 液晶类型的名称变量例子•display() and noDisplay()14 scrollDisplayLeft()简介使屏幕上内容(光标及文字)向左滚动一个字符。
语法lcd.scrollDisplayLeft()参数lcd: 一个LiquidCrystal类的对象例子•scrollDisplayLeft() and scrollDisplayRight()15 scrollDisplayRight()简介使屏幕上内容(光标及文字)向右滚动一个字符。
语法lcd.scrollDisplayRight()参数lcd: 一个LiquidCrystal类的对象例子•scrollDisplayLeft() and scrollDisplayRight()16 autoscroll()简介打开液晶显示屏的自动滚动,将会使得当一个字符输出到LCD时,令先前的文本移动一个位置.如果当前写入方向为由左到右(默认方向),文本向左滚动.反之,文本向右滚动.它的功能可以理解为,当输出单个字符时,会使得字符总是输出在LCD上的同一个位置.语法lcd.autoscroll()参数lcd: a variable of type LiquidCrystal17 noAutoscroll()简介关闭自动滚动功能。
(后输入的字符可能无法显示)语法lcd.noAutoscroll()参数LCD:LiquidCrystal类的对象18 leftToRight()内容默认的方向,将文本从左到右写入屏幕.这意味着,后续字符的显示将是从左向右的,但是这不会影响先前已经显示的字符.语法lcd.leftToRight()参数设置lcd: a variable of type LiquidCrystal19 rightToLeft()简介设置文本写入LCD的方向为从右向左(默认是从左向右)。
这意味着,后续字符将会由右至左写入,但不影响先前的文本的显示。
语法lcd.rightToLeft()参数lcd: 一个LiquidCrystal类的对象20 createChar()内容创建用户自定义的字符.共可创建8个用户自定义字符,编号从0到7.字符外观由一个8字节数组定义,每行占用一个字节.最低的5个有效位决定像素点所在的行.若要在屏幕显示自定义字符,请使用write()函数.(参数为字符的编号0-7)语法lcd.createChar(num, data)参数设置lcd: a variable of type LiquidCrystalnum: 所创建字符的编号(0-7)data: 字符的像素数据例子#include <LiquidCrystal.h>LiquidCrystal lcd(12, 11, 5, 4, 3, 2);byte smiley[8] = {B00000,B10001,B00000,B00000,B10001,B01110,B00000,};void setup() {lcd.createChar(0, smiley);lcd.begin(16, 2);lcd.write(0);}void loop() {}整理:付天国日期:2012-12-12。