101KD20NX中文资料
- 格式:pdf
- 大小:122.42 KB
- 文档页数:6
1000 900 800 700 600 500 400 300
V
200
Max. Clamping Voltage
100 90
80 70 60 50
40
30
10-6
10-5
10-4
10-3
10-2
10-1
100
A
561KD20 511KD20 471KD20 431KD20 391KD20 361KD20 331KD20 301KD20
360
681KD20N X
420
560
344
621KD20N X
385
505
328
561KD20N X
350
460
312
511KD20N X
320
418
296
471KD20N X
300
385
280
431KD20N X
275
350
264
6500
4000
391KD20N X
250
320
240
361KD20N X
4.1
151K
4.5
121K
4.1
101K
3.9
820K
3.8
680K
5.5
560K
5.0
470K
5.0
390K
4.7
330K
4.7
270K
4.7
220K
4.5
180L
4.5
T Thickness
D07
8.3 8.1 7.9 7.5 7.2 6.9 6.6 6.4 6.1 5.3 5.1 4.9 4.8 4.6 4.4 4.3 4.2 4.1 4.5 4.1 3.9 3.8 5.5 5.0 5.0 4.7 4.7 4.7 4.5 4.5
Electrical Characteristics @ 25OC Unless Otherwise Noted
Part Number
Maximum Allowable Voltage
ACrms
DC
Maximum Energy
10/1000us
Withstanding Surge Current
1 time
Specified Test Current:<0.05%/к • Varistor voltage temperature coefficient:
Vb at 25ć- Vb at 85ć x 1 x(100/ć)
Vb at 25ć
60
182KD20NX* thru
180LD20NX*
11 to 1000 Volts Varistor
17
22
10
220KD20N X
14
18
8
180LD20N X
10
14
7
*680K-180L Max. Clamping Voltage testing current 20A
Rated Wattage Varistor Voltage
V1mA (W)
(V) 1800(1620-1980) 1100(990-1210) 1000(900-1100)
680KD20 560KD20 470KD20 390KD20 330KD20
Max. Clamping Voltage
MCC TM
Micro Commercial Components
680KD20 560KD20 470KD20 390KD20 330KD20
10 9
6 5
10-6
10-5
10-4
910(819-1001) 820(738-902) 780(702-858) 750(675-825) 680(612-748) 620(558-682) 560(504-616) 510(459-561) 470(423-517) 430(387-473) 1 390(351-429) 360(324-396) 330(297-363) 300(270-330) 270(243-297) 240(216-264) 220(198-242) 200(185-225) 180(162-198) 150(135-165) 120(108-132) 100(90-110)
Note 2.
Part Code
D05
182K
112K
102K
911K
821K
781K
751K
7.9
681K
7.5
621K
7.2
561K
6.9
511K
6.6
471K
6.4
431K
6.1
391K
5.3
361K
5.1
331K
4.9
301K
4.8
271K
4.6
241K
4.4
221K
4.3
201K
4.2
181K
0.8 7.5 22 23 0.8 7.5
1 10 28 30 0.8 7.5
1 10
Revision: 2
1 of 6
2006/09/09
元器件交易网
182KD20NX thru 180LD20NX
MCC
TM
Micro Commercial Components
V-I Surge Life Time Ratings (820K to 182K)
10000
10000
3000 2000
1000
500 400 300 200 A 100
50 40 30 20
10
5 4 3 2
1
10 times 1 time 2 times
102 times
103 times 104 times 105 times 106 times
3000
2000 V
1000 700 600 500
MCC
TM
Micro Commercial Components
182KD20 152KD20 112KD20 102KD20 911KD20 821KD20 781KD20 751KD20 681KD20 621KD20
400
300
200 10-6
7.0 to 695.0 Joule
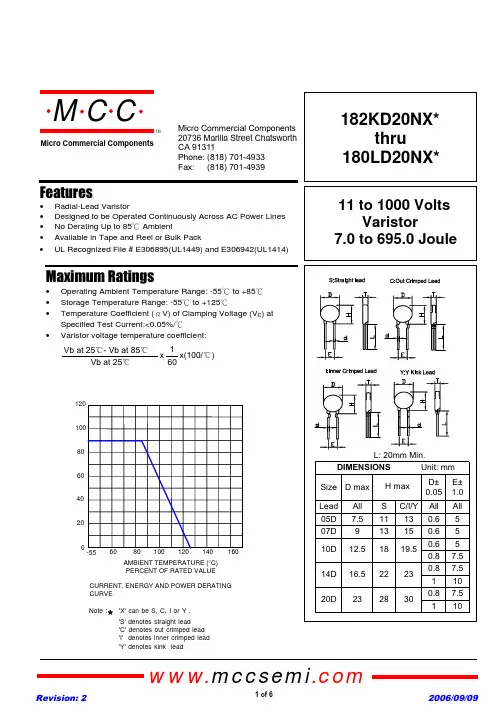
120
100
80
60 40 20
0 -55
60 80 100 120 140 160
AMBIENT TEMPERATURE (°C) PERCENT OF RATED VALUE
CURRENT, ENERGY AND POWER DERATING CURVE
* Note : 'X' can be S, C, I or Y . 'S' denotes straight lead 'C' denotes out crimped lead 'I' denotes inner crimped lead 'Y' denotes kink lead
Revision: 2
2 of 6
2006/09/09
元器件交易网 182KD20NX thru 180LD20NX
V-I Curve (330K to 680K)
400 300 200 100 70 60
30 V
20
Max. Leakage Current
L: 20mm Min.
DIMENSIONS
Unit: mm
Size D max
H max
D± E± 0.05 1.0
Lead All 05D 7.5 07D 9 10D 12.5
14D 16.5
20D 23
S C/I/Y All All 11 13 0.6 5 13 15 0.6 5
0.6 5 18 19.5
Features
• Radial-Lead Varistor • Designed to be Operated Continuously Across AC Power Lines • No Derating Up to 85к Ambient • Available in Tape and Reel or Bulk Pack • UL Recognized File # E306895(UL1449) and E306942(UL1414)
10-3
10-2
10-1
100
A
Test current waveform 10-6 to 10-3 A: Direct current 10-1 to 104 A: 8/20µs
101
102
103
104
105
V-I Curve (820K to 561K)
Max. 2000 Leakage Current
3000 2000
1000
500 400 300 200 A 100
50 40 30 20
10
5 4 3 2
1
1 time 2 times
10 times 102 times
103 times 104 times 105 times 106 times
20
100
1000
µs
Impulse Current – Amperes Impulse Width – Micro seconds
10000
20
100
1000
µs
Impulse Current – Amperes Impulse Width – Micro seconds
V
200
Max. Clamping Voltage
100 90
80 70 60 50
40
30
10-6
10-5
10-4
10-3
10-2
10-1
100
A
561KD20 511KD20 471KD20 431KD20 391KD20 361KD20 331KD20 301KD20
360
681KD20N X
420
560
344
621KD20N X
385
505
328
561KD20N X
350
460
312
511KD20N X
320
418
296
471KD20N X
300
385
280
431KD20N X
275
350
264
6500
4000
391KD20N X
250
320
240
361KD20N X
4.1
151K
4.5
121K
4.1
101K
3.9
820K
3.8
680K
5.5
560K
5.0
470K
5.0
390K
4.7
330K
4.7
270K
4.7
220K
4.5
180L
4.5
T Thickness
D07
8.3 8.1 7.9 7.5 7.2 6.9 6.6 6.4 6.1 5.3 5.1 4.9 4.8 4.6 4.4 4.3 4.2 4.1 4.5 4.1 3.9 3.8 5.5 5.0 5.0 4.7 4.7 4.7 4.5 4.5
Electrical Characteristics @ 25OC Unless Otherwise Noted
Part Number
Maximum Allowable Voltage
ACrms
DC
Maximum Energy
10/1000us
Withstanding Surge Current
1 time
Specified Test Current:<0.05%/к • Varistor voltage temperature coefficient:
Vb at 25ć- Vb at 85ć x 1 x(100/ć)
Vb at 25ć
60
182KD20NX* thru
180LD20NX*
11 to 1000 Volts Varistor
17
22
10
220KD20N X
14
18
8
180LD20N X
10
14
7
*680K-180L Max. Clamping Voltage testing current 20A
Rated Wattage Varistor Voltage
V1mA (W)
(V) 1800(1620-1980) 1100(990-1210) 1000(900-1100)
680KD20 560KD20 470KD20 390KD20 330KD20
Max. Clamping Voltage
MCC TM
Micro Commercial Components
680KD20 560KD20 470KD20 390KD20 330KD20
10 9
6 5
10-6
10-5
10-4
910(819-1001) 820(738-902) 780(702-858) 750(675-825) 680(612-748) 620(558-682) 560(504-616) 510(459-561) 470(423-517) 430(387-473) 1 390(351-429) 360(324-396) 330(297-363) 300(270-330) 270(243-297) 240(216-264) 220(198-242) 200(185-225) 180(162-198) 150(135-165) 120(108-132) 100(90-110)
Note 2.
Part Code
D05
182K
112K
102K
911K
821K
781K
751K
7.9
681K
7.5
621K
7.2
561K
6.9
511K
6.6
471K
6.4
431K
6.1
391K
5.3
361K
5.1
331K
4.9
301K
4.8
271K
4.6
241K
4.4
221K
4.3
201K
4.2
181K
0.8 7.5 22 23 0.8 7.5
1 10 28 30 0.8 7.5
1 10
Revision: 2
1 of 6
2006/09/09
元器件交易网
182KD20NX thru 180LD20NX
MCC
TM
Micro Commercial Components
V-I Surge Life Time Ratings (820K to 182K)
10000
10000
3000 2000
1000
500 400 300 200 A 100
50 40 30 20
10
5 4 3 2
1
10 times 1 time 2 times
102 times
103 times 104 times 105 times 106 times
3000
2000 V
1000 700 600 500
MCC
TM
Micro Commercial Components
182KD20 152KD20 112KD20 102KD20 911KD20 821KD20 781KD20 751KD20 681KD20 621KD20
400
300
200 10-6
7.0 to 695.0 Joule
120
100
80
60 40 20
0 -55
60 80 100 120 140 160
AMBIENT TEMPERATURE (°C) PERCENT OF RATED VALUE
CURRENT, ENERGY AND POWER DERATING CURVE
* Note : 'X' can be S, C, I or Y . 'S' denotes straight lead 'C' denotes out crimped lead 'I' denotes inner crimped lead 'Y' denotes kink lead
Revision: 2
2 of 6
2006/09/09
元器件交易网 182KD20NX thru 180LD20NX
V-I Curve (330K to 680K)
400 300 200 100 70 60
30 V
20
Max. Leakage Current
L: 20mm Min.
DIMENSIONS
Unit: mm
Size D max
H max
D± E± 0.05 1.0
Lead All 05D 7.5 07D 9 10D 12.5
14D 16.5
20D 23
S C/I/Y All All 11 13 0.6 5 13 15 0.6 5
0.6 5 18 19.5
Features
• Radial-Lead Varistor • Designed to be Operated Continuously Across AC Power Lines • No Derating Up to 85к Ambient • Available in Tape and Reel or Bulk Pack • UL Recognized File # E306895(UL1449) and E306942(UL1414)
10-3
10-2
10-1
100
A
Test current waveform 10-6 to 10-3 A: Direct current 10-1 to 104 A: 8/20µs
101
102
103
104
105
V-I Curve (820K to 561K)
Max. 2000 Leakage Current
3000 2000
1000
500 400 300 200 A 100
50 40 30 20
10
5 4 3 2
1
1 time 2 times
10 times 102 times
103 times 104 times 105 times 106 times
20
100
1000
µs
Impulse Current – Amperes Impulse Width – Micro seconds
10000
20
100
1000
µs
Impulse Current – Amperes Impulse Width – Micro seconds